RS Feva User manual

Rigging Manual V5

1. INTRODUCTION
2. RS FEVA TECHNICAL DATA
3. COMMISSIONING
3.1 Preparation
3.2 Unpacking
3.3 Rigging the Mast
3.4 Rigging the Jib
3.5 Rigging the mast for the Gennaker
3.6 Stepping the Mast
3.7 Rigging the Kicker
3.8 Rigging the Boom
3.9 The Daggerboard
3.10 The Rudder
3.11 Hoisting the Mainsail
3.12 Hoisting the Jib
3.13 Rigging the Gennaker
3.14 Completion
4. SAILING HINTS
4.1 Introduction
4.2 Launching
4.3 Leaving the Beach
4.4 Sailing Close-Hauled and Tacking
4.5 Sailing Downwind and Gybing
4.6 Using the Gennaker
5. MAINTENANCE
5.1 Boat Care
5.2 Foil Care
5.3 Spar Care
5.4 Sail Care
5.5 Fixtures & Fittings
6. WARRANTY
7. GLOSSARY
Contents
All terms highlighted in blue throughout the manual can be found in the Glossary of Terms.

1. Introduction
Congratulations on the purchase of your new RS Feva and thank you for choosing
racing in this truly excellent design.
manual has been compiled to help you to gain the maximum enjoyment from your
RS Feva, in a safe manner. It contains details of the craft, the equipment supplied
Please read this manual carefully and be sure that you understand its contents
before using your RS Feva.
boat, or if you are changing to a type of craft that you are not familiar with, for your
own safety and comfort, please ensure that you have adequate experience before
assuming command of the craft. If you are unsure, RS, your RS dealer, or your
national sailing federation – for example, the Royal Yachting Association – will be
able to advise you of a local sailing school, or a competent instructor.
RS Sailing highly recommends using RS supplied equipment for usage and storing
of your craft. Deviation from using RS supplied equipment, such as sails and
storage solutions, will require consultation with RS Sailing. Failure to do so may
Please keep this manual in a secure place and hand it over to the new owner
if you sell the boat.
For further information, spares, and accessories, please contact:
RS Sailing
Premier Way
Abbey Park
Romsey
Hants SO51 9DQ
Tel.: +44(0)1794 526760
Fax: +44(0)1794 278418
E-mail: www.info@rssailing.com
For details on your local RS dealer, please visit www.rssailing.com

Length Overall (LOA) 3.64m 12’0”
Beam 1.42m 4’8”
Hull Weight 68kg 136lb
Mainsail 5.5m257sq ft
3 Batten Mainsail 6.5m268sq ft
Jib 2.1m222sq ft
Gennaker 7.0m273sq ft
2. Technical Data
3. Commissioning
3.1 Preparation
Your RS Feva comes complete with all the components necessary to take the boat
sailing. In order to commission it, you will need the following tools:
• Pliers, or a shackle key
• PVC Electrician’s Tape
You may require other tools later, should you wish to make any setting or tuning
adjustments to the boat or the rig.
DO NOT use a knife or other sharp object to cut through packaging
containing parts – you may damage the contents!
Whilst your RS Feva has been carefully prepared, it is important that new owners
should check that shackles and knots are tight. This is especially important when
important to check such items regularly prior to sailing.

Having unpacked your RS Feva, you should check that you have all of the items
listed below before throwing away any of the packing, as there may be some small
items still wrapped.
3.2 - Unpacking
Boat Pack:
Foil Kit:
1
1
1
1
1
1
1
1
1
1
1
Hull
Lower mast
Top mast
Boom
Document bag
Owner’s manual
Dagger Blade
Rudder Blade
Rudder Stock
Tiller
Tiller Extension

Customer Fittings Pack:
Rope Pack:
1
1
1
3
1
1
Plastic Bobble
Nylon Spring
Hook
20mm block
Single Jam Block
and Becket
100mm Dacron
Patch.
1
1
1
1
1
1
1
Mainsheet
Main Halyard
Downhaul
Boom Strop
Jib Sheet
Jib Halyard
Jib Halyard Block

S Sail Pack:
XL Club Sail Pack:
XL Race Sail Pack
1
1
1
1
1
1
1
1
1
1
S Mainsail
XL Mainsail
XL Mainsail
Club Jib
Club Jib
XL Jib
Spinnaker
Spinnaker
Spinnaker
Race Pack
• Uncoil the main halyard
• Thread one end of the main halyard through
the bullseye at the top of the mast.
• Run both ends of the main halyard to the bottom
of the mast and tie in place (this prevents them
from disappearing back up the mast!).
If you have the Jib and/or Gennaker Pack, please refer to Section 3.4 Rigging
the Jib, and Section 3.11 Rigging the Gennaker before stepping the mast in
the boat.
To complete this section, you will need:
• The mast top section
• The mast lower section
• The main halyard
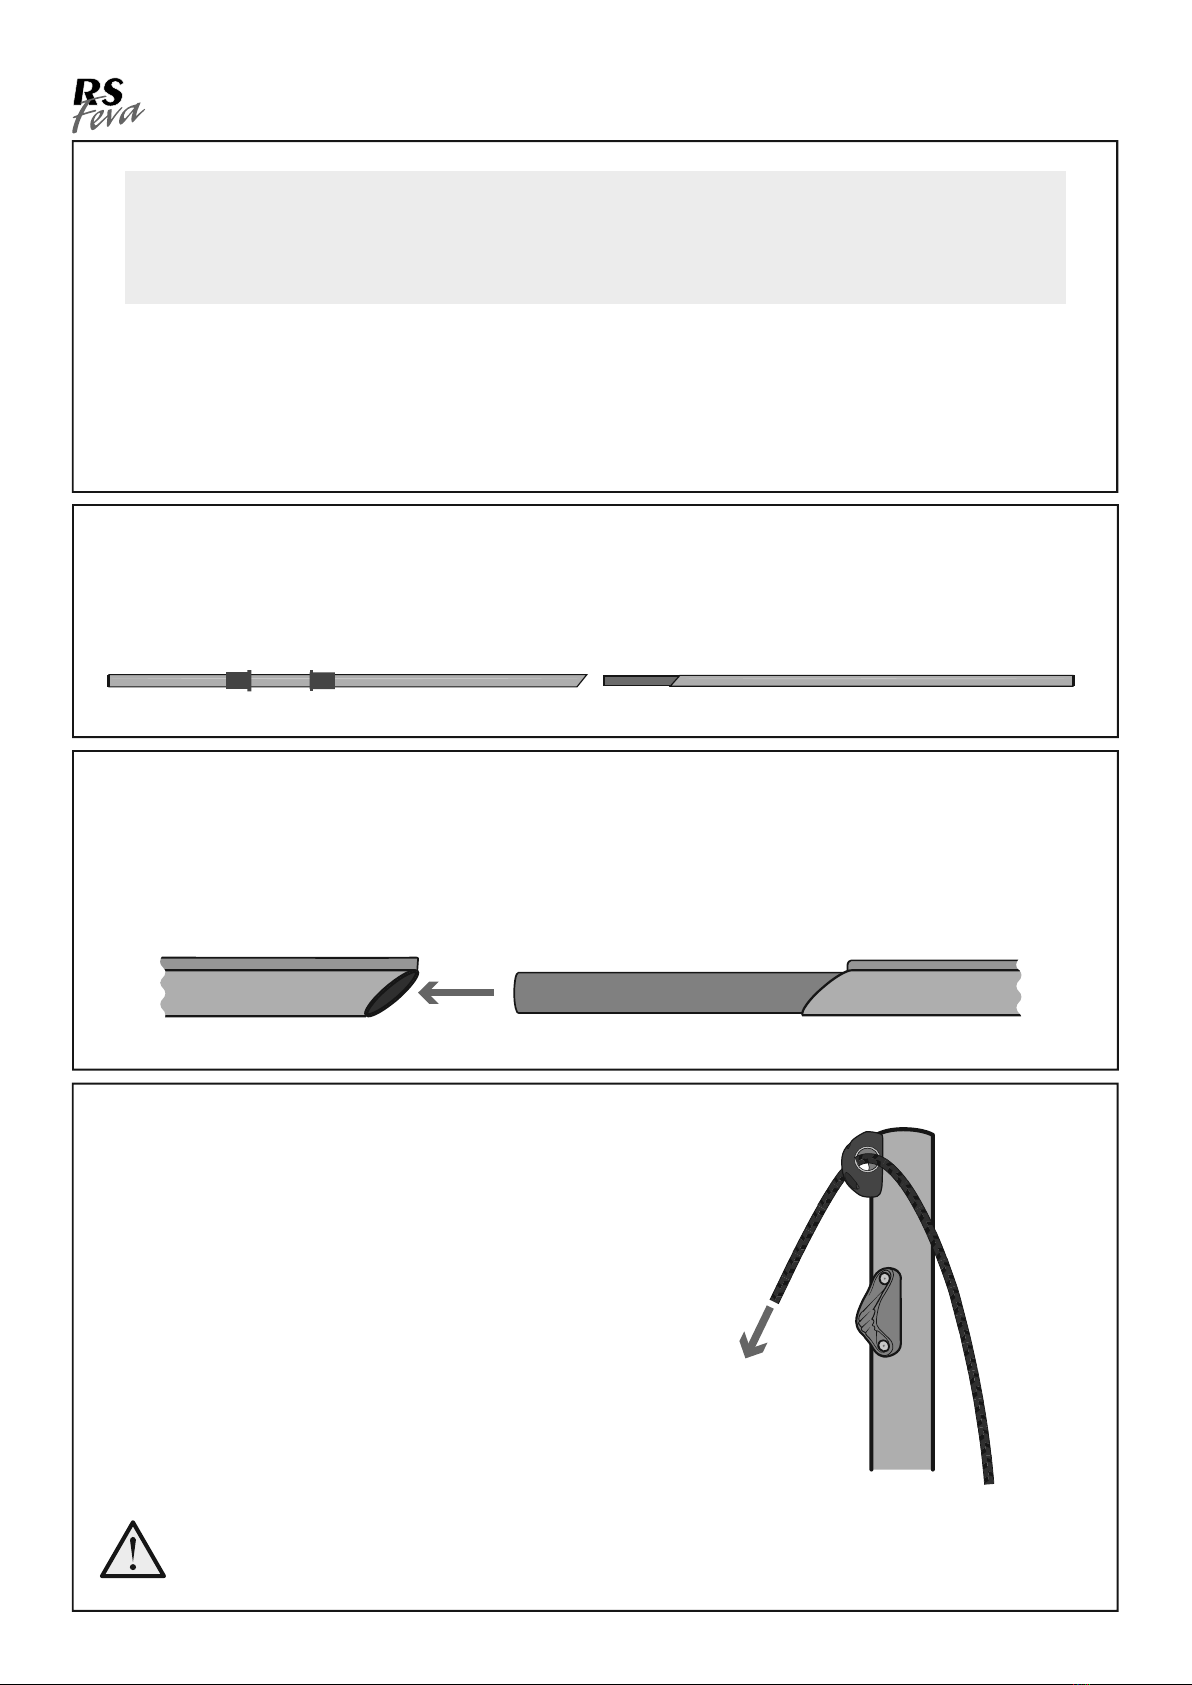
3.3 - Rigging the Mast
a)
b)
c)
• Place the mast top section and mast lower section on the ground, in line with
each other.
• Slide the inner sleeve of the mast top section into the end of the mast lower section.
• Push the two mast sections together. The angle of the join should ensure that the
mast track on the two sections aligns.
Please note, top and bottom mast sections are matched, they are not interchangeable
so if you have more than one boat you should consider marking the sections to identify
which go together.

d)
a)
3.3 - Rigging the Mast
3.4 - Stepping the Mast
REMEMBER
If you are rigging the Jib and Gennaker Packs, you need to read Sections 3.4 and
3.10 before stepping the mast
Now the mast is ready to be put up in the boat, or ‘stepped’.
BEFORE PICKING UP THE MAST, CHECK THAT YOU ARE NOT IN
THE VICINITY OF OVERHEAD POWER CABLES
The mast
pin has a locking nut on the bottom to prevent it from
falling out.
To close the mechanism:
1) Push the Pin through the gate from above.
2) Screw down the knurled nut until it is tight.
The Mast Gate Pin
• Remove the mast gate pin from the
hole and open the mast gate.

3.4 - Rigging the Jib
a)
b)
c)
To complete this section, you will need:
• 1 x Feva jib
• 2 x Feva shrouds
• 1 x shroud shackle
• 1 x jib halyard block
• 1 x jib halyard
• 1 x jib sheet
• 1 x jib halyard block tie
Before stepping the mast you will need to complete the following steps:
• Hook the eyelets at the end of the shrouds onto the shroud shackle.
• Attach the shroud shackle to the lower of
the two metal rings on the front face of the
mast.
• Tie knot #1 in one end of the jib halyard block tie.
Other manuals for Feva
2
Table of contents
Other RS Boat manuals


Popular Boat manuals by other brands


PURSUIT
PURSUIT OS 335 owner's manual

Boston Whaler
Boston Whaler CONQUEST 345 owner's manual

Jeanneau
Jeanneau SUN ODYSSEY 41 DS owner's manual

Meridian
Meridian 490 Pilothouse owner's manual

Advanced Elements
Advanced Elements AdvancedFrame Expedition AE1009 owner's manual

Robo Marine Indonesia
Robo Marine Indonesia GEOMAR user manual


