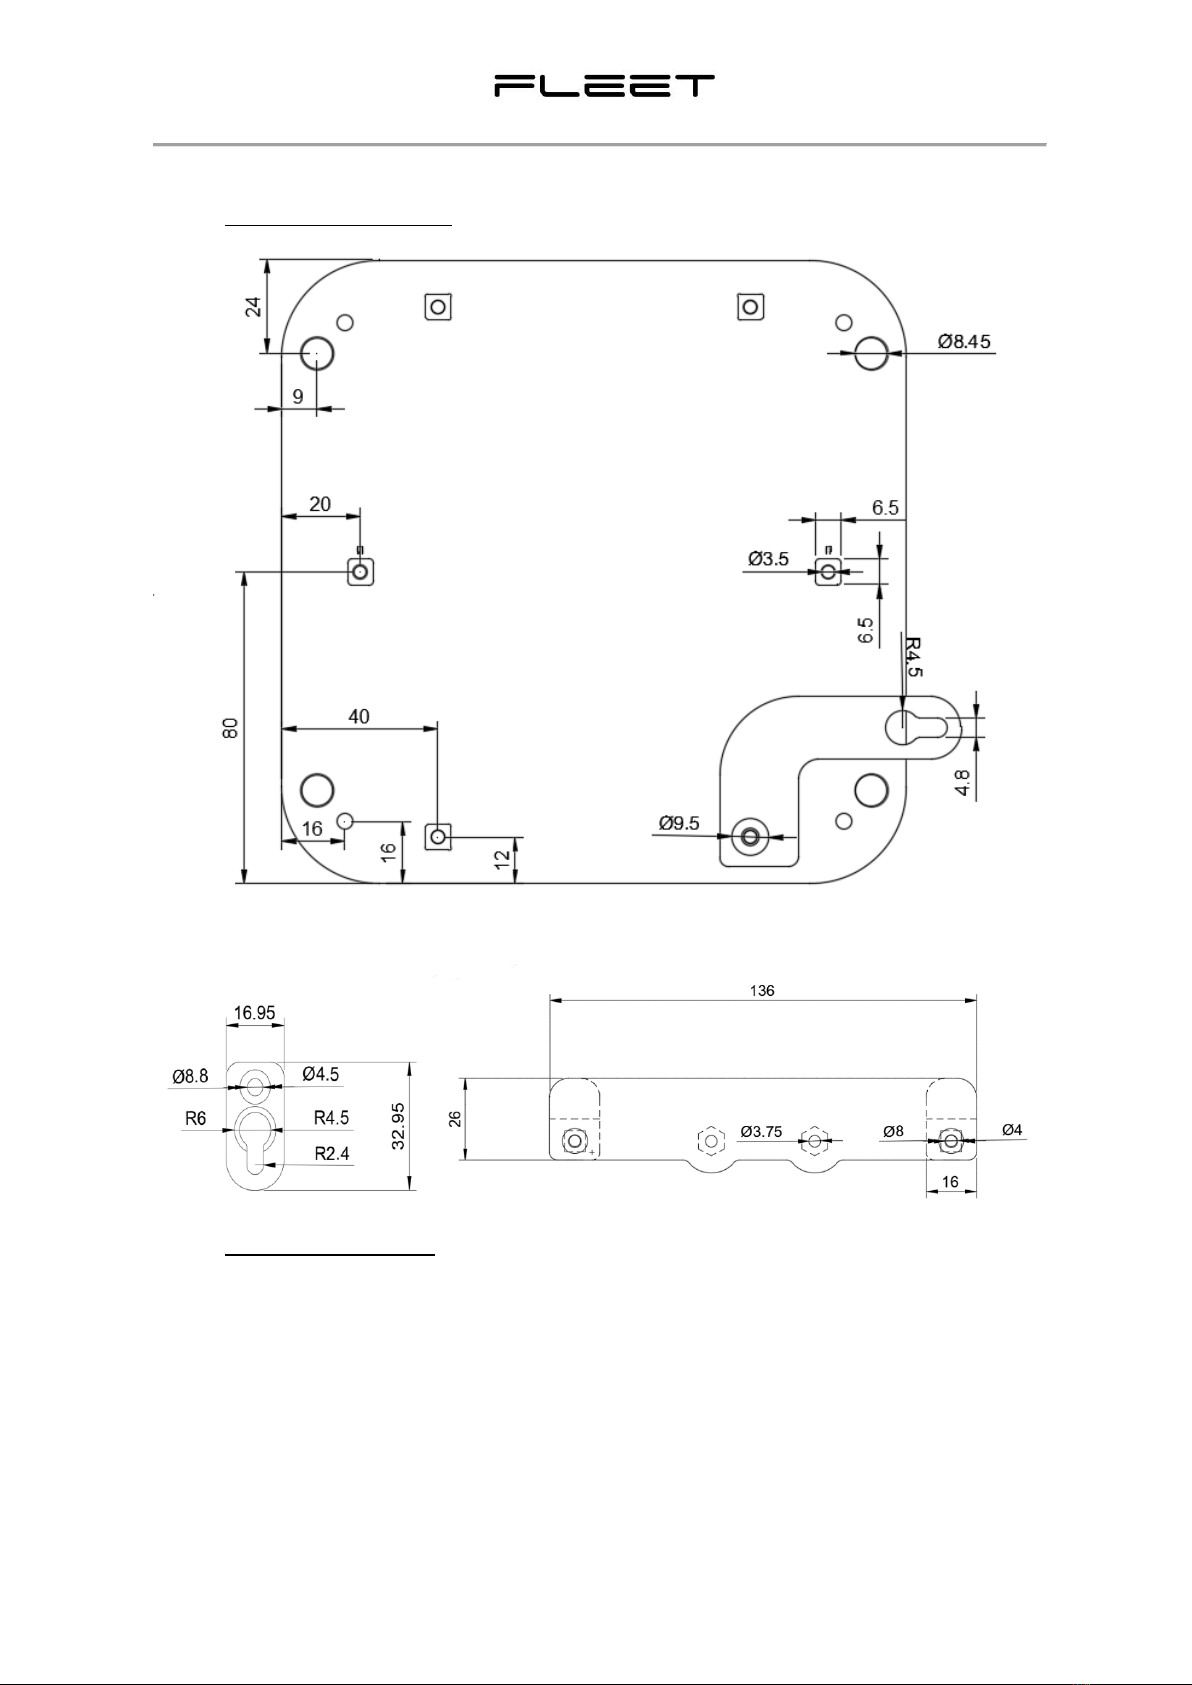
FLEET Gen 2 Portal FSPOR0201-2 User manual

Fleet Gen 2 Portal
User Manual
Title of Document
MAN-PTL-002
Revision
0.5 | 27/07/21 - DRAFT
Role
Name
Position
Prepared By :
Oscar Whalley
Mechanical Engineer
Approved By :
Kody Cook
Lead Systems Engineer

MAN-PTL-002 v0.4
1
CONTENTS
Contents 1
1Introduction 3
1.1 Hardware 3
1.2 Tech Specs 3
1.3 Variants 3
2Installation 4
2.1 Wiring up Your Portal 4
2.1.1 12V DC Power Jack 5
2.1.2 Serial Port 5
2.1.3 Ethernet Port 5
2.1.4 Satellite Port 1 5
2.1.5 Satellite Port 2 5
2.1.6 WiFi Antenna Port 6
2.1.7 LTE Antenna Port 6
2.1.8 GPS Antenna Port 6
2.1.9 Lora Antenna Port 1 & 2 6
2.2 Mechanical Mounting and Assembly 7
2.2.1 Portal Mounts Diagram 7
2.2.2 Mounting your Portal 7
2.2.3 Mounting your Antenna 8
2.2.4 Tips for Placement 8
2.2.4.1 Hazard Reduction 8
2.2.4.2 Improved Reception 8
3Configuration 9
3.1 Local Network Configuration 9
3.1.1 Method 1: Wi-Fi 9
3.1.2 Method 2: Wired Ethernet –Direct Connection 10
3.1.3 Method 3: Wired Ethernet –Local Network 11
3.2 Accessing the Portal Interface 11
3.3 Portal Configuration 12
3.3.1 Device Groups 12
3.3.2 Adding a Device Group 12
3.3.2.1 Creating Custom Codecs 13
3.3.3 Region Selection / Frequency Bands 14
3.3.4 LoRaWAN Version 14

MAN-PTL-002 v0.4
3
1INTRODUCTION
1.1 Hardware
The following is a complete list of the hardware required to set up the Fleet Portal.
1. 12V DC Wall Adapter
2. Ethernet Cable
3. WiFi/LTE/GPS antenna
4. Fleet Gen 2 Portal
5. Fleet Gen 1 Satellite Modem
6. Orbcomm Satellite modem
7. LoRa Antenna
NOTE: Depending on the version of your Portal, you may not require a satellite modem for operation.
1.2 Tech Specs
Operating Temperature
-20 –70°C
Input Voltage
12V DC
Average Power Consumption
5.5 W
Maximum Power Consumption
14.5 W
CPU
2x Arm Cortex™-A7
Disk
4 GB (DDR3)
RAM
512 MB
1.3 Variants
MODEL NUMBER
FLEET PART
NUMBER
LORA SINGLE
GATEWAY
LTE
NB-IOT
FSPOR0201-2
FA-POR-002-1-2
Yes
Yes
No
FSPOR0201-3
FA-POR-002-1-3
Yes
No
Yes
1
2
6
4
3
5
7

MAN-PTL-002 v0.4
4
2INSTALLATION
2.1 Wiring up Your Portal
;
NAME
DESCRIPTION
CONNECTOR
DETAILS
PWR
Power Input
5.5mm x 2.1mm DC Barrel Jack
12V
SERIAL
Serial
RJ11
RS232
LAN
Ethernet
RJ45
SAT1
Satellite Modem 1
8-pin M12 Circular connector
Fleet Modem
SAT2
Satellite Modem 2
8-pin M12 Circular connector
Orbcomm Modem
WIFI
WiFi
SMA
LTE
LTE/NB-IoT
SMA
GPS
GPS
SMA
LORA2
LoRa 2
SMA
LORA1
LoRa 1
SMA
(optional)

MAN-PTL-002 v0.4
5
2.1.1 12V DC Power Jack
The Portal is shipped with a 12V DC Wall Mount Adaptor for bench testing. To use this simply insert
one end of the power cable into the portal and the other into a socket.
Important: The DC Jack to the Portal is centre positive, meaning that positive voltage is supplied to
the core of the jack.
We recommend customers to use Certified Wall Mount Adaptors according to the proposed
countries (Canada, AS/NZS and America) for deployments where the wall-plug power is available.
If you need support to use alternative power source equipment for any other reason and are unsure
on how to check the polarity, contact Fleet for assistance.
2.1.2 Serial Port
The portal supports one serial port which uses an RJ11 connector and uses the RS232 interface. This
can be utilised to access the Serial Console or for connecting to and RS-232 MPPT charge controller
See Victron Energy’s VE.Direct interface and applicable devices:
https://www.victronenergy.com/solar-charge-controllers.
2.1.3 Ethernet Port
The Portal supports one RJ45 ethernet port. This can be used to connect directly to the portal via a
static IP at 192.168.5.1 or via DHCP when connected to a router. Internet provided via Ethernet can
also be used as a backhaul method when available.
Note : Crossover ethernet cables will not work with this ethernet port.
2.1.4 Satellite Port 1
The Portal comes with 2 Satellite Ports, both of which use an 8-pin M12 Circular connector. Satellite
Port 1 should be used with the Fleet Modem included. This can be achieved by connecting the Fleet
Modem to Satellite Port 1 using the included cable by inserting the cable end into the 8-pin M12
Circular connector and then hand-tightening it.
2.1.5 Satellite Port 2
The second Satellite Port supported by the Portal uses an 8-pin M12 Circular connector. Satellite Port
2 should be connected to the included Orbcomm Modem. In order to connect them, insert the cable
coming off of the Orbcomm modem into the 8-pin M12 Circular connector and hand-tighten it.

MAN-PTL-002 v0.4
6
2.1.6 WiFi Antenna Port
The included WiFi Antenna Port uses an SMA female connector which should be connected to the
WIFI/LTE/GPS Antenna. This can be done by using the cable with a green end marked “WIFI” coming
out of the Antenna into the WiFi Port. The male SMA connector on the end of the cable should be
inserted and then hand-tightened.
2.1.7 LTE Antenna Port
The Portal includes one LTE Antenna Port which uses an SMA female connector. In order to utilise
this connection, the LTE Antenna Port should be connected to the WIFI/LTE/GPS Antenna which is
done by connecting the cable with the purple end marked “LTE” into the LTE Port. In order to achieve
this, the male SMA Connector on the end of the cable should be inserted into the LTE Port and hand-
tightened.
2.1.8 GPS Antenna Port
The included GPS Antenna Port utilises an SMA female connector. For proper utilisation, this port
should be connected to the WIFI/LTE/GPS Antenna. This is done by connecting the cable coming out
of the WIFI/LTE/GPS Antenna with a blue end marked “GPS”. To do this, connect the male SMA
connector at the end of this cable into the GPS Antenna Port’s SMA female connector and hand-
tighten.
2.1.9 Lora Antenna Port 1 & 2
The Portal is provided with a LoRa antenna and cable with an SMA male connector. This connection
is essential for the operation of the Portal. Simply insert the male connector from the antenna into
the port and hand-tighten the connector.
N-Type connectors come with a twist-lock sleeve when connected to a mating part. To ensure the
longevity of the cables, ensure to only twist the sleeve in order to lock the connector, rather than
twisting the entire cable around.
Note: The LoRa transceiver can be damaged if operated without a connected antenna. Ensure that
the antenna is attached correctly to the Portal before powering it on.

MAN-PTL-002 v0.4
7
2.2 Mechanical Mounting and Assembly
2.2.1 Portal Mounts Diagram
2.2.2 Mounting your Portal
Your portal can be mounted in a number of different ways based on the specifications ordered:
●Standard wall mount feet can be utilised which use #8 Pan Head Screw.
●The M4 screw points on the back can be utilised to mount the Portal directly onto a surface
or custom bracket.
●L-brackets can be included in order to offset the specific place the Portal is mounted.
●A bracket which can be installed and attached to a standard Din Rail is also available.
If the portal is being placed outside, it will need to be contained in a suitable cabinet, the
requirements for this cabinet are:
●Circuit breaker

MAN-PTL-002 v0.4
8
●Uninterruptible Power Supply (Pre-certified)
●Battery
●IP67 rating
And if solar panels are being utilised, then an MPPT is recommended which can be attached to the
Serial Port using an RJ11 male connector.
Note: The Fleet Modem also utilises M4 screws and so the same kind of mounting methods mentioned
above for the Portal can also be used with the Fleet Modem.
Note:
i. The Portal must be mounted in a vertical position with the LoRa Antenna connector facing
the sky.
ii. Ensure at least 10 m of clearance from any tall structures within the Portal range (buildings,
scaffolds, etc.).
iii. Metal objects should not rest on the Portal as this will interfere with communications to the
satellite.
2.2.3 Mounting your Antenna
U-Bolts are recommended for the included LORA Antenna which should be attached on the collar at
the base of the Antenna so as to not interfere with the signal. The Antenna needs a fair amount of
clearance, so it should not be installed against a wall, and its proximity to electromagnetic signals
should be kept in mind as these can interfere with or even damage the Antenna. Multiple Antennas
should be kept at least 33cm from each other to avoid potential interference.
It is also important to note that while a variety of cable lengths may be utilised, a longer cable for use
with the Antenna may make the Antenna less effective.
2.2.4 Tips for Placement
There are a couple reasons why you may want to mount your Portal above ground or other out-of-
reach areas.
2.2.4.1 Hazard Reduction
In order to ensure effective operation of the Portal, position the Portal out of the way from the paths
of people and machinery. In addition, wild fauna have the potential to damage equipment if the
Portal resides too close to the ground. Birds also provide a hazard to exposed cables, so utilising mesh
sleeves as protection is generally advised.
2.2.4.2 Improved Reception
There are 5 antenna ports included on the Portal:

MAN-PTL-002 v0.4
9
●2 x LoRa
●WiFi
●GPS
●LTE
Where possible, it is recommended to use a low profile multiband antenna for WiFi, GPS and LTE.
This are omnidirectional and should be mounted as high as possible. The LoRa antenna/s are typically
selected based on the application.
3CONFIGURATION
3.1 Local Network Configuration
3.1.1 Method 1: Wi-Fi
The Portal provides a Wi-Fi hotspot that can be joined via any Wi-Fi enabled laptop or desktop
computer. To join this network:
1. Ensure that Wi-Fi is enabled on your laptop or desktop.
2. Check the available Wi-Fi connections for your device. Select the connection labelled
“FleetXXXXXXXX”, where “X” may be an alphanumeric value in the range “A-F” and “0-9”. The
Wi-Fi SSID for your Portal is included on the underside of the Portal.
Note: If the Portal is being powered for the first time, please allow a few minutes for it to
initialise before the Wi-Fi network becomes available.
3. Enter the Wi-Fi password Aabbccdd and click “Connect”.

MAN-PTL-002 v0.4
10
The Portal is now connected. The Portal can be accessed with the following IP address: 192.168.4.1
3.1.2 Method 2: Wired Ethernet –Direct Connection
The Portal can also be accessed using the Ethernet port. This is a less portable method of connecting
to the Portal, however, Wi-Fi can still be used on your device while you operate the Portal.
1. Connect one end of the provided Ethernet cable to the Portal RJ45 port, and the other to the
RJ45 port on your device.
2. Type Ethernet into the search box at the bottom of the screen and click the result “Change
Ethernet Settings”.
3. In the window that opens, click “Change adapter options”.
4. In the next window, right click your Ethernet connection and select “Properties”.
5. In the next window, double-click on Internet Protocol Version 4 (TCP/IPv4).
6. Enter the information shown in the image below into the respective fields.
1
7. Press OK and close all previously opened windows.
The Portal is now connected. The IP address to access the Portal over Ethernet is: 192.168.5.1

MAN-PTL-002 v0.4
11
3.1.3 Method 3: Wired Ethernet –Local Network
The Portal can also be assigned an IP address by connection to a router. This is useful if you require
remote access to the Portal that cannot be serviced via Wi-Fi or direct Ethernet connection.
1. Connect one end of the provided Ethernet cable to the Portal RJ45 port and the other to a
RJ45 port on your device.
The Portal is now connected, but it will be assigned a dynamic IP address by your router. Consult your
router operating manual to determine this address.
3.2 Accessing the Portal Interface
1. Open an Internet browser. It is recommended to use Google Chrome. In the URL address bar,
enter https://<IP Address>:8989,where <IP Address> is the full IP address that was
determined in Section 3.1.
2. A security warning will appear in the browser window. At the bottom of the page, click
“Advanced” and then click “Proceed to <IP Address> (unsafe)” at the bottom of the page.
3. A login screen will appear. Enter the following credentials and press “Login”:
Username: admin
Password: admin

MAN-PTL-002 v0.4
12
3.3 Portal Configuration
3.3.1 Device Groups
Device Groups are objects that separate the use cases of your LoRa network. For instance, one device
group may be soil monitoring and another might be water reservoir monitoring. Device groups
provide a way for the user to group common sensors together to make managing them easier.
Each device group contains scripts which are called codecs. One is called a decoder codec, which is
used to decode sensor information that arrives at the Portal. The other is called an encoder codec,
which encodes the information to be sent via the satellite backhaul.
Note: Each device group only supports one decoder and one encoder codec because device groups
are intended for use with only one type of sensor.
3.3.2 Adding a Device Group
1. From the home page, click on the “Devices” link on the left to list all currently configured
Device Groups. Click the “Add Group” button to add a new Device Group.

MAN-PTL-002 v0.4
13
2. Enter a name and description for the Device Group. Choose the MAC version required, and
whether the Device Group will use OTAA or ABP.
3. For the decoder and encoder codec, enter the appropriate Payload Encoder and Payload
Decoder.
4. Click "Save" at the bottom of the page.
3.3.2.1 Creating Custom Codecs
As mentioned above, one may change the codecs within an application for custom use. It is not
recommended to change encoding codecs without consulting Fleet first, as unsuitable changes made
here could make it impossible to retrieve your data after satellite backhaul.

MAN-PTL-002 v0.4
14
The Portal supports a variety of devices. More devices are constantly being added, and each of these
require a different codec.
If you need to use a device which is not presently supported, contact Fleet and we can provide
support in creating your own codec.
Note: Fleet does not bear responsibility for custom codecs created by the customer.
3.3.3 Region Selection / Frequency Bands
The user has the ability to switch their Portal’s frequency region to a different band if desired. Click
on the “Info” link in the left menu. From here the LoRaWAN region for the wanted packet forwarder
can be changed by pressing “Change”, selecting the wanted region, and pressing “Save”.
The relevant frequency band should be selected based on the region of operation. For example, if
the Portal is operated in the US, one of the US bands should be selected.
To ensure that the Portal can communicate with other LoRa devices, all devices on the network must
operate on the same frequency band.
At the time of writing, the Portal firmware is fully compatible with US, AU, AS and EU regions.
3.3.4 LoRaWAN Version
Different LoRaWAN devices operate with different LoRaWAN versions. Currently, the Portal supports
LoRaWAN versions 1.0.0, 1.0.1, 1.0.2, 1.0.3 and 1.1.0 . Fleet will provide support of future LoRaWAN
versions with software updates in the future.
If you are using devices with earlier LoRaWAN versions, ensure you assign them to a dedicated
application and pick the correct LoRaWAN version in the device group. If supplied by Fleet, the
dispatch sheet will show which LoRaWAN version the device are using. Independently sourced devces
will have this information contained within its data sheet.

MAN-PTL-002 v0.4
15
3.3.5 LoRaWAN Device Classes
LoRaWAN comes in three different device classes: A, B & C.
The Portal supports all three classes of device. The device group created on the portal must match
the classes supported by the device being used. Failure to do so will result in the device not being
able to receive downlinks from the Portal.
4OPERATION
Once familiarity with the basic configuration of the Portal is complete, it’s time to start building your
LoRa network.
4.1 Adding LoRa Devices
Devices need to be registered with your Portal for it to start receiving data. It’s recommended that
you add the LoRa devices and verify their operation before installation to save the need for remote
debugging.
Adding LoRa devices requires three pieces of information:
1. LoRaWAN version
Mentioned in Section 3.3.4: when adding devices, this LoRaWAN version will be associated
with a device group. Currently, the Portal supports versions 1.0.0, 1.0.1, 1.0.2, 1.0.3 and
1.1.0.
2. Device Electronic Unique Identifier (DevEUI)
A unique identifier required for each LoRa device. This is usually displayed on the exterior
of the device enclosure or inside the packaging.
3. Activation keys
The required keys differ depending on the LoRa MAC version and activation method your
device uses:

MAN-PTL-002 v0.4
16
OTAA
ABP
LORAMAC 1.0.X
●Application Key
●Device Address
●Network Session Key
●Application Session
Key
LORAMAC 1.1.0
●Network Key
●Application Key
●Device Address
●Network Session
Encryption Key
●Serving Network
Session Integrity Key
●Forwarding Network
Session Integrity Key
●Application Session
Key
If the nodes were provided by Fleet, these details will be included in the packaging. If purchased
independently, you will need to consult the user manual and data sheets of those nodes and
sensors. To add a LoRa Device to an application:
1. From the Groups page, click on the “>>” of the Device Group you would like to add the
device to.
2. Click the “Add Device”button on the right-hand-side.
3. Enter a name and description for your device. Ensure to keep a record of the exact use of
each device against its name, as this is what appears on the received data at the cloud.
Alternatively, create a device name descriptive enough for this purpose.
4. Enter the DevEUI in the appropriate box.

MAN-PTL-002 v0.4
17
5. Enter activation keys:
a. OTAA devices:
Enter activation keys in the appropriate boxes.
Note: the exact fields shown here will depend on the LoRaMAC version of your device group
b. ABP devices:
Enter the device address and activation keys in the appropriate boxes.
Note: the exact fields shown here will depend on the LoRaMAC version of your device group
6. Click “Save”.
It is highly recommended that you check that your device is communicating successfully before
deployment.

MAN-PTL-002 v0.4
18
4.2 Distributing your LoRaWAN Network
LoRa is a protocol that relies on the transmission of radio waves over long distances carrying small
amounts of data. Like any radio communication, LoRa is inhibited by physical obstructions, sheer
distance, and inclement weather to a certain extent.
LoRa is known to be able to successfully communicate up to 10 km when line-of-sight is not disrupted.
This should be kept in mind when distributing your sensors in the field and all care should be taken
to ensure that obstructions between your device and the Portal are limited.
Also, radio waves are effectively reflected by metal surfaces. Thus, do not place your devices in sealed
metal containers. If necessary, consider running an external antenna from inside the structure to the
outside to boost signal range.
4.3 Accessing your Data
Your data will be sent automatically over the backhaul network and will be available at
https://nebula.fleet.space.
5TROUBLESHOOTING

MAN-PTL-002 v0.4
19
FCC Notices
This device complies with Part 15 of the FCC Rules and with Innovation, Science and Economic
Development Canada’s licence-exempt RSS(s). Operation is subject to the following two conditions:
(1) This device may not cause interference; and
(2) This device must accept any interference, including interference that may cause
undesired operation of the device.”
This equipment has been tested and found to comply with the limits for a Class A digital device,
pursuant to Part 15 of the FCC Rules. These limits are designed to provide reasonable protection
against harmful interference when the equipment is operated in a commercial environment. This
equipment generates, uses and can radiate radio frequency energy and, if not installed and used in
accordance with the instruction manual, may cause harmful interference to radio communications.
Operation of this equipment in a residential area is likely to cause harmful interference in which case
the user will be required to correct the interference at his own expense.
CAUTION:
Any changes or modifications not expressively approved by the grantee could void the user's
authority to operate this equipment.This equipment complies with the FCC and ISED Canada
radiation exposure limits set forth for an uncontrolled environment. This equipment should be
installed and operated with a minimum distance of 20 cm between the radiator and all persons during
normal operation.
Cet équipement est conforme aux limites d'exposition aux rayonnements de la FCC et d'ISED Canada
établies pour un environnement non contrôlé. Cet équipement doit être installé et utilisé avec une
distance minimale de 20 cm entre le radiateur et toutes les personnes pendant le fonctionnement
normal.
CAN ICES-003 (A) / NMB-003 (A)
L’émetteur/récepteur exempt de licence contenu dans le présent appareil est conforme aux CNR
d’Innovation, Sciences et Développement économique Canada applicables aux appareils radio
exempts de licence. L’exploitation est autorisée aux deux conditions suivantes :
1. L’appareil ne doit pas produire de brouillage;
2. L’appareil doit accepter tout brouillage radioélectrique subi, même si le
brouillage est susceptible d’en compromettre le fonctionnement.
This manual suits for next models
1
Table of contents
Popular Gateway manuals by other brands

Shenzhen Allywll info & tech Co.
Shenzhen Allywll info & tech Co. EIA2000 user manual

TEMPERED
TEMPERED HIPswitch-75 Series quick start

urmet domus
urmet domus IPerVoice 1039 quick guide

Avaya
Avaya CMC1 installation guide

call4tel
call4tel NX-S/O 2 Series Quick user guide

Leuze electronic
Leuze electronic MA 204i Technical description