Fleetminder MDVR8AHD-4G User manual

MDVR8AHD-4G
Multi-Channel Driver Recorder
Installation and User Guide
www.fleetminder.com.au
8-CH AHD MDVR Brief User Manual
CONTENT
1.Specification 2.Accessories
3.MDVR Installation 4.I/O Alarm Sensor Wire
5.Control Bar Introduction 6.Playback Introduction
7.AVI Backup 8.2-CH Split Screen
9.Camera Mirror Function 10.Alarm &MD Alarm Setup
11.Record Setup 12.4G/WIFI Network Setup
13.Email Setup 14.User Management
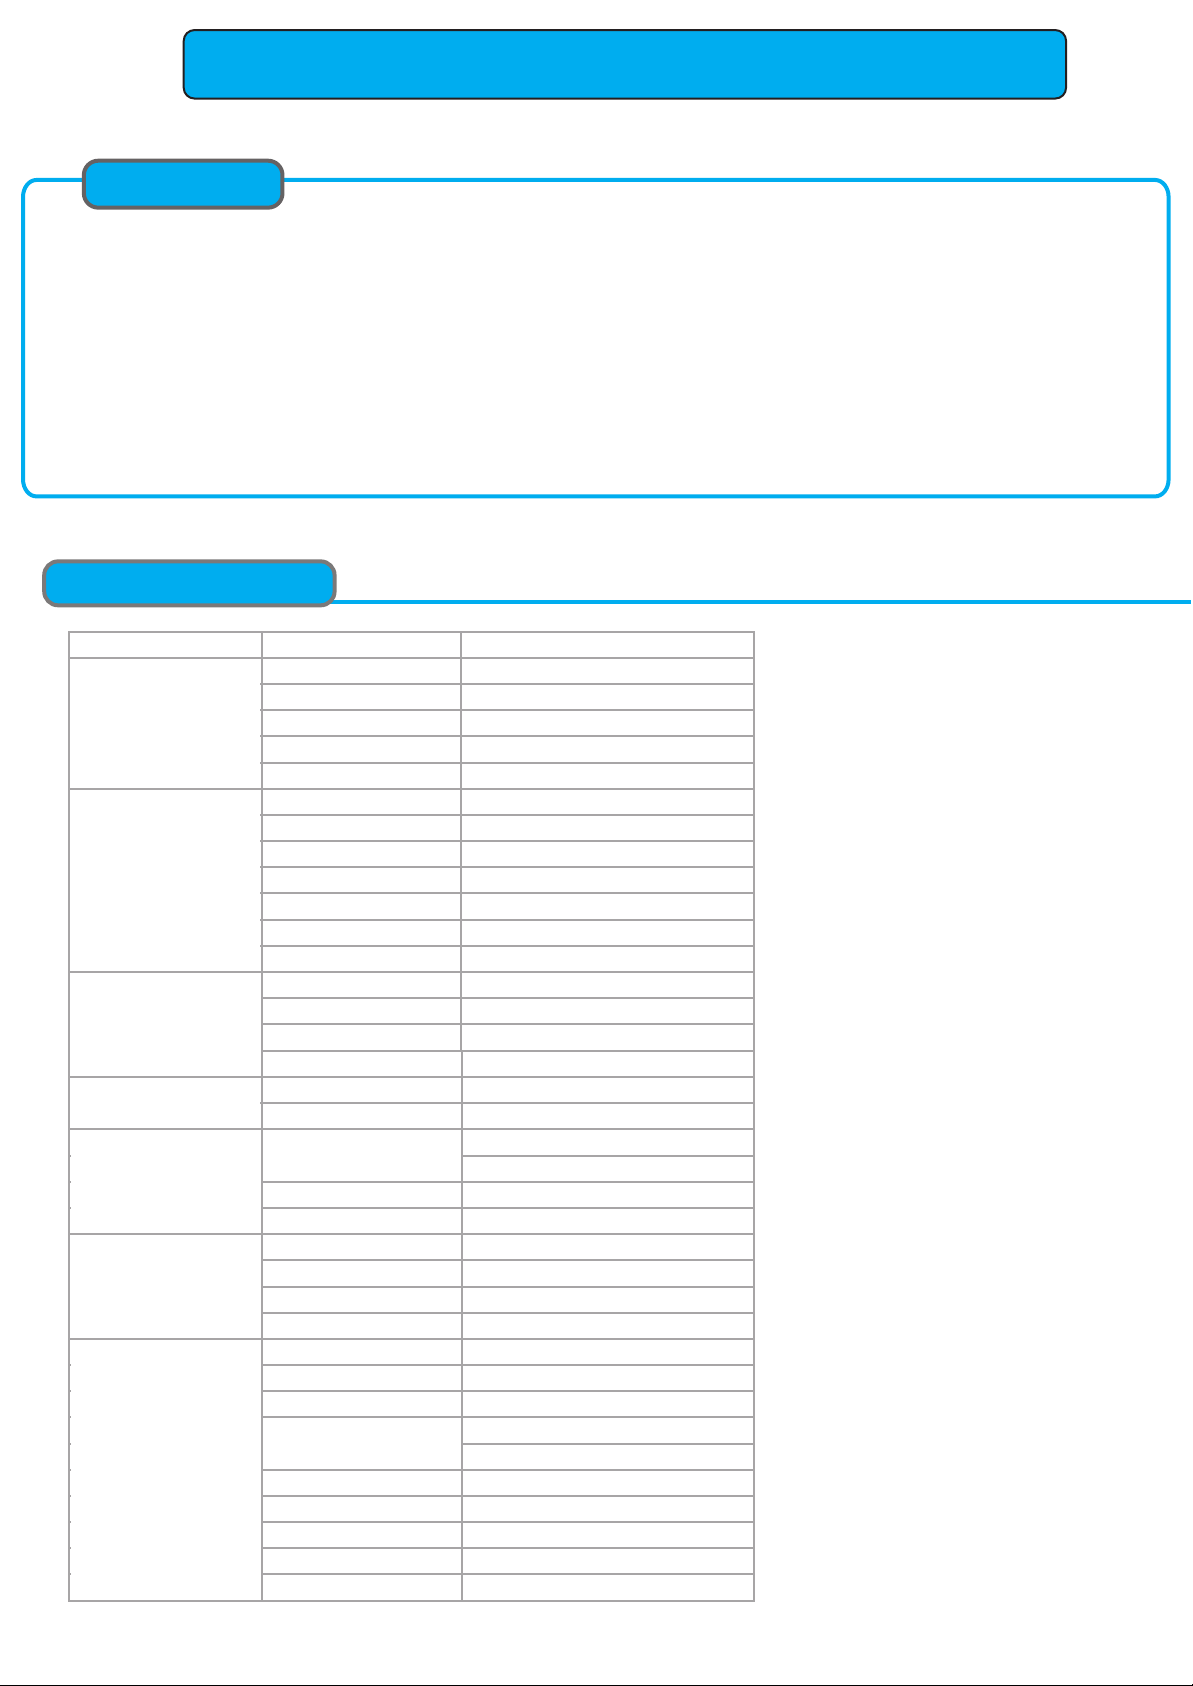
SPECIFICATION
SPECIFICTION
Items Parameter Performance
Chipset Hi3520DV300
System Linux
Language Chinese/English/Russia etc
Interface Visual GUI,Support Mouse
Account Management Admin/Sub-User management
Video Standard PAL/NTSC
Video Input 8-CH AHD Input
Resolution 1080N/720P
Video Ouput 1-CH CVBS + 1-CH VGA Output
Image Quality 0-7 levels adjustable (0 is the best)
Recording Mode Boot up/Manual/Schedule/Alarm Record
Motion detection Support
Audio Input 8-CH Audio input
Audio recording Audio & Video synchronized recording
Audio Compression G.726
Audio Output 1-CH Audio Output
Mode Playback by Time/File/Channel/Event
Playback Channel 4-CH Local Playback
I/O Alarm Input 4-CH
I/O Alarm Output 1-CH
GPS Optional
3G/4G Network 3G WCDMA/4G LTE Optional
WIFI Network Optional
RJ45 Enternet Network Standard
Pre-Recording 0-15s
Post-Recording 15s-300s
G-sensor Support
Storage Max 1x 2TB HDD + 2x 128GB SD Card
Voltage Input DC8-36V
Temperature -20℃- +70℃
Dimension 188mm*148mm*60mm
Weight 2.35KG
Local Upgrade by USB/SD card
Remote Upgrade by 3G/4G
System
Record
Audio
Playback
Interface
Function
Others
USB Port
Upgrade Mode
1-CH USB 2.0 For Mouse or Upgrade
Extendable 2-CH RS232 & 2-CH RS485
SPECIFICATION
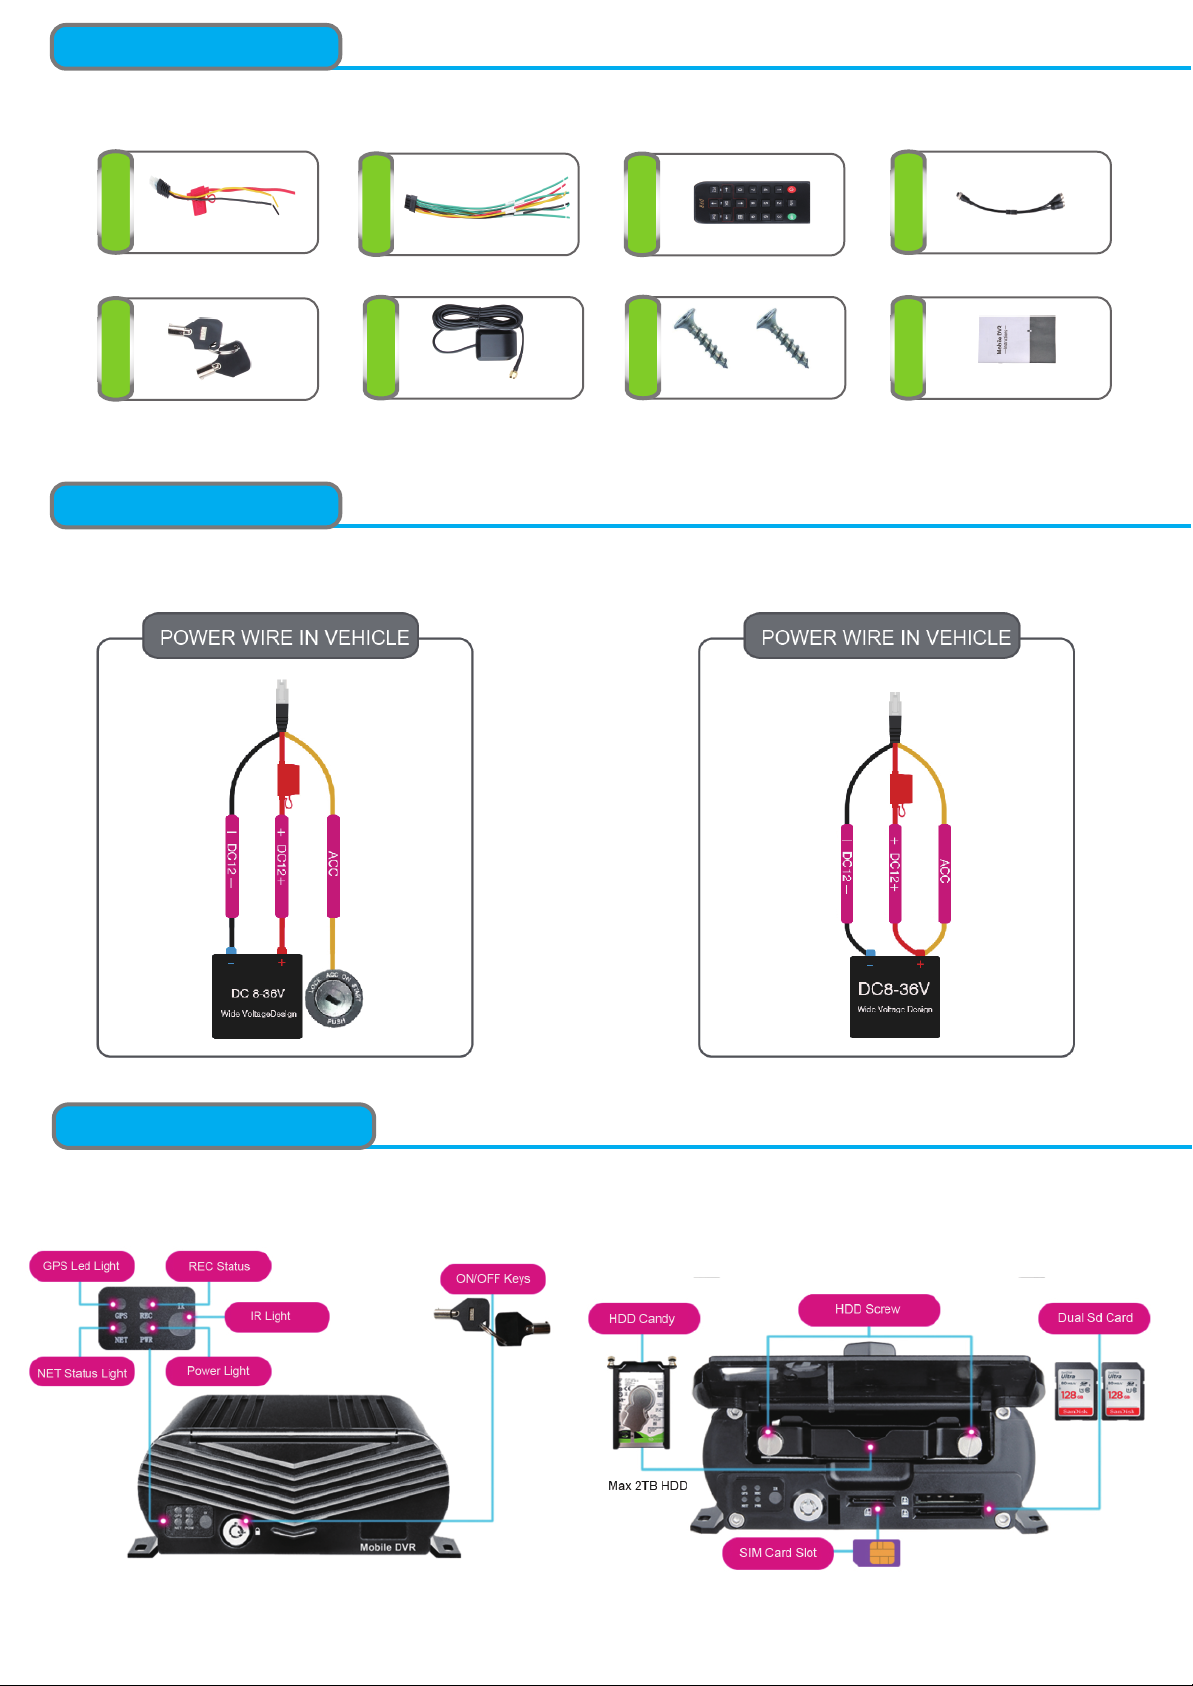
ACCESSORIES
123
567
Power Cable I/O Cable Remote Control
l
8
4
Video Input Cable
Mobile Keys GPS Antena HDD CANDY SCREWS User Manual
SPECIFICATION
Power Connection
SPECIFICATION
HDD MDVR INSTALLATION
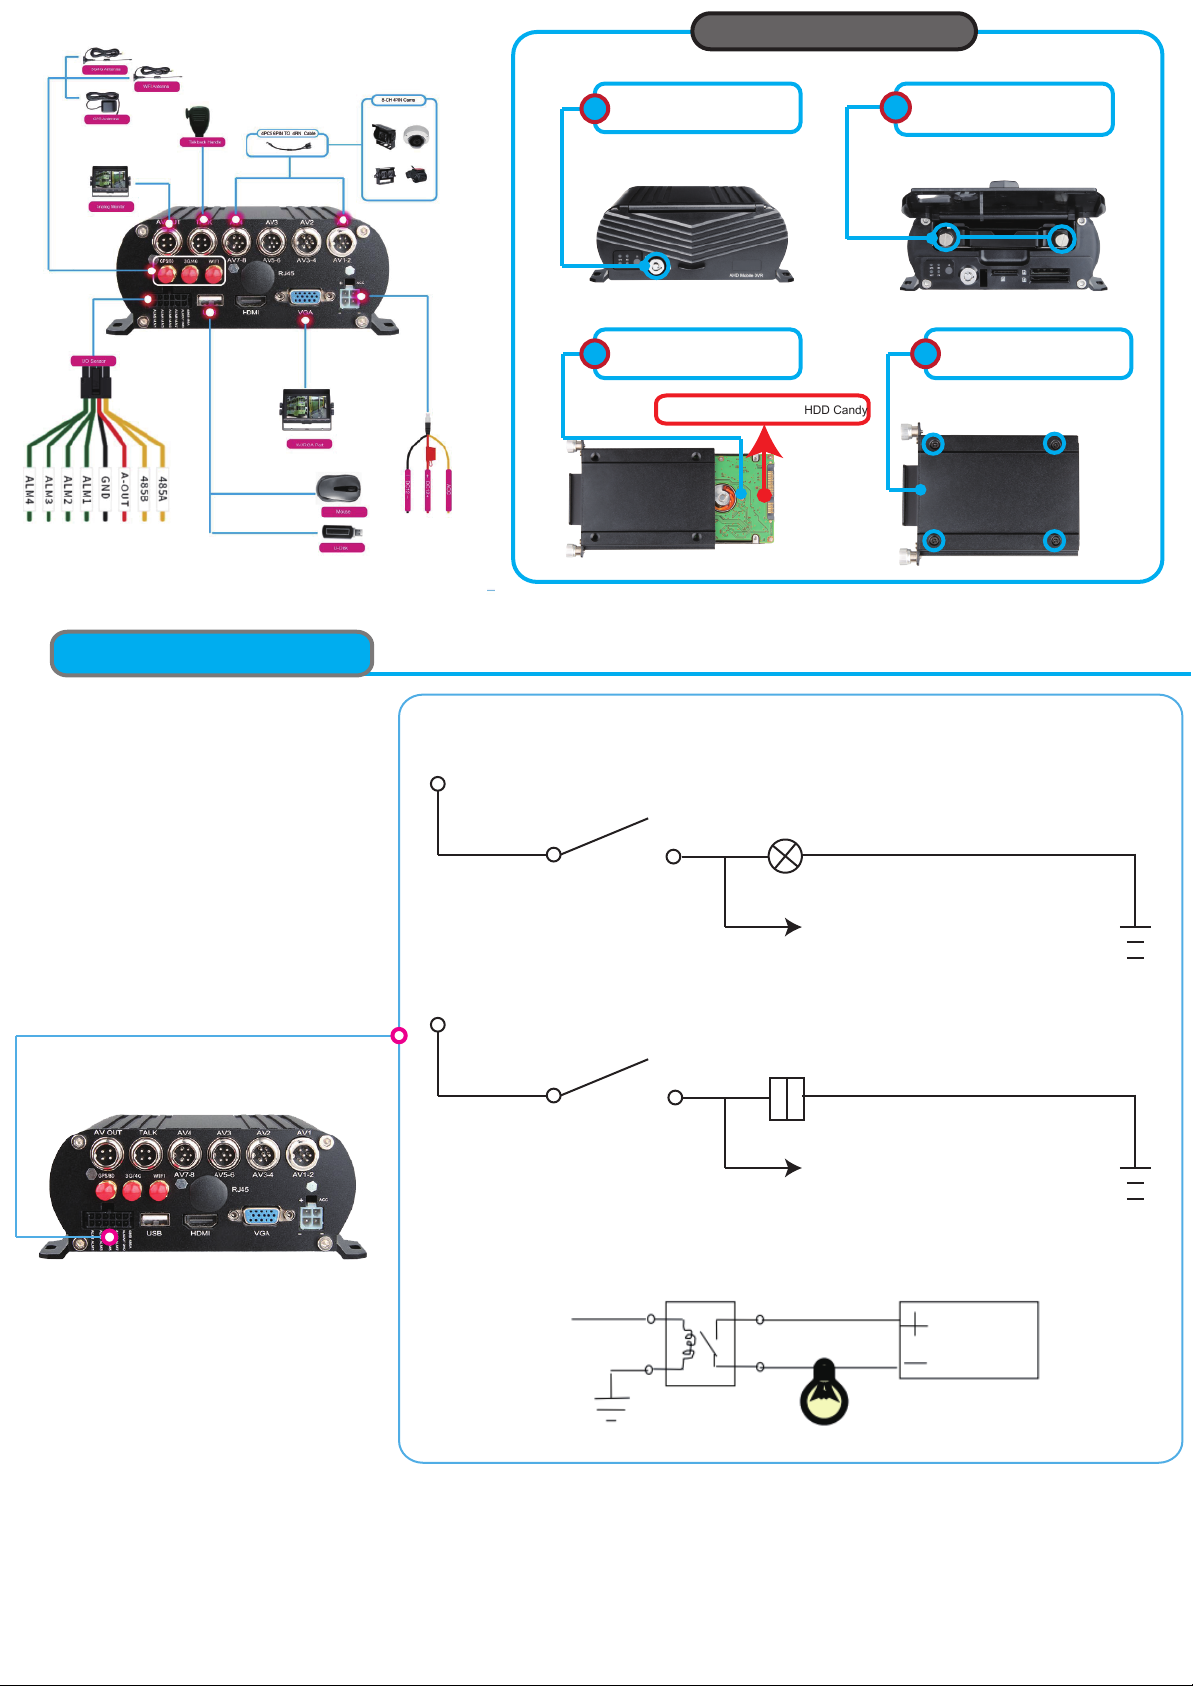
Open MDVR Shell by
MDVR Key
12Twist loose screws and take
out of the HDD Candy
Insert HDD Into HDD Candy
3
Lift it up to screw HDD with HDD Candy
Screws HDD and Insert
HDD into MDVR
4
HDD Candy Installation
SPECIFICATION
I/O Alarm Sensor Wire
01: I/O Input Wire with Turning light
Turning Light
Turning Control Stick
I/O Cable wire with the signal of
Turning Light/Turning Stick
02: I/O input Wire with Door Button
Door Open/Close
Door Button
I/O Cable wire with the signal of
Door Button
03: I/O Output Wire with Alarm Light etc
DC12/24V
DC12/24V
Alarm Output
DC12/24V
Noted: Please kindly refere to Alarm/Motion detection setup for Video Amplifying, Email for alarm trigger

SPECIFICATION
After Start MDVR,See MDVR UI like the Picture below
Full Screen
Multi-Screen
PTZ Control
CHs Scruise
Color Setup
Enlargement
Volume
ON/OFF REC
ENLARGEMENT
Click Enlarge button, and Drag Mouse to select a special area to auto enlarge.
>
Enlarge Button
SPECIFICATION
Step-01: Login MDVR Menu,User Name: admin, Password: Null (No Password)
PLAYBACK
CONTROL BAR
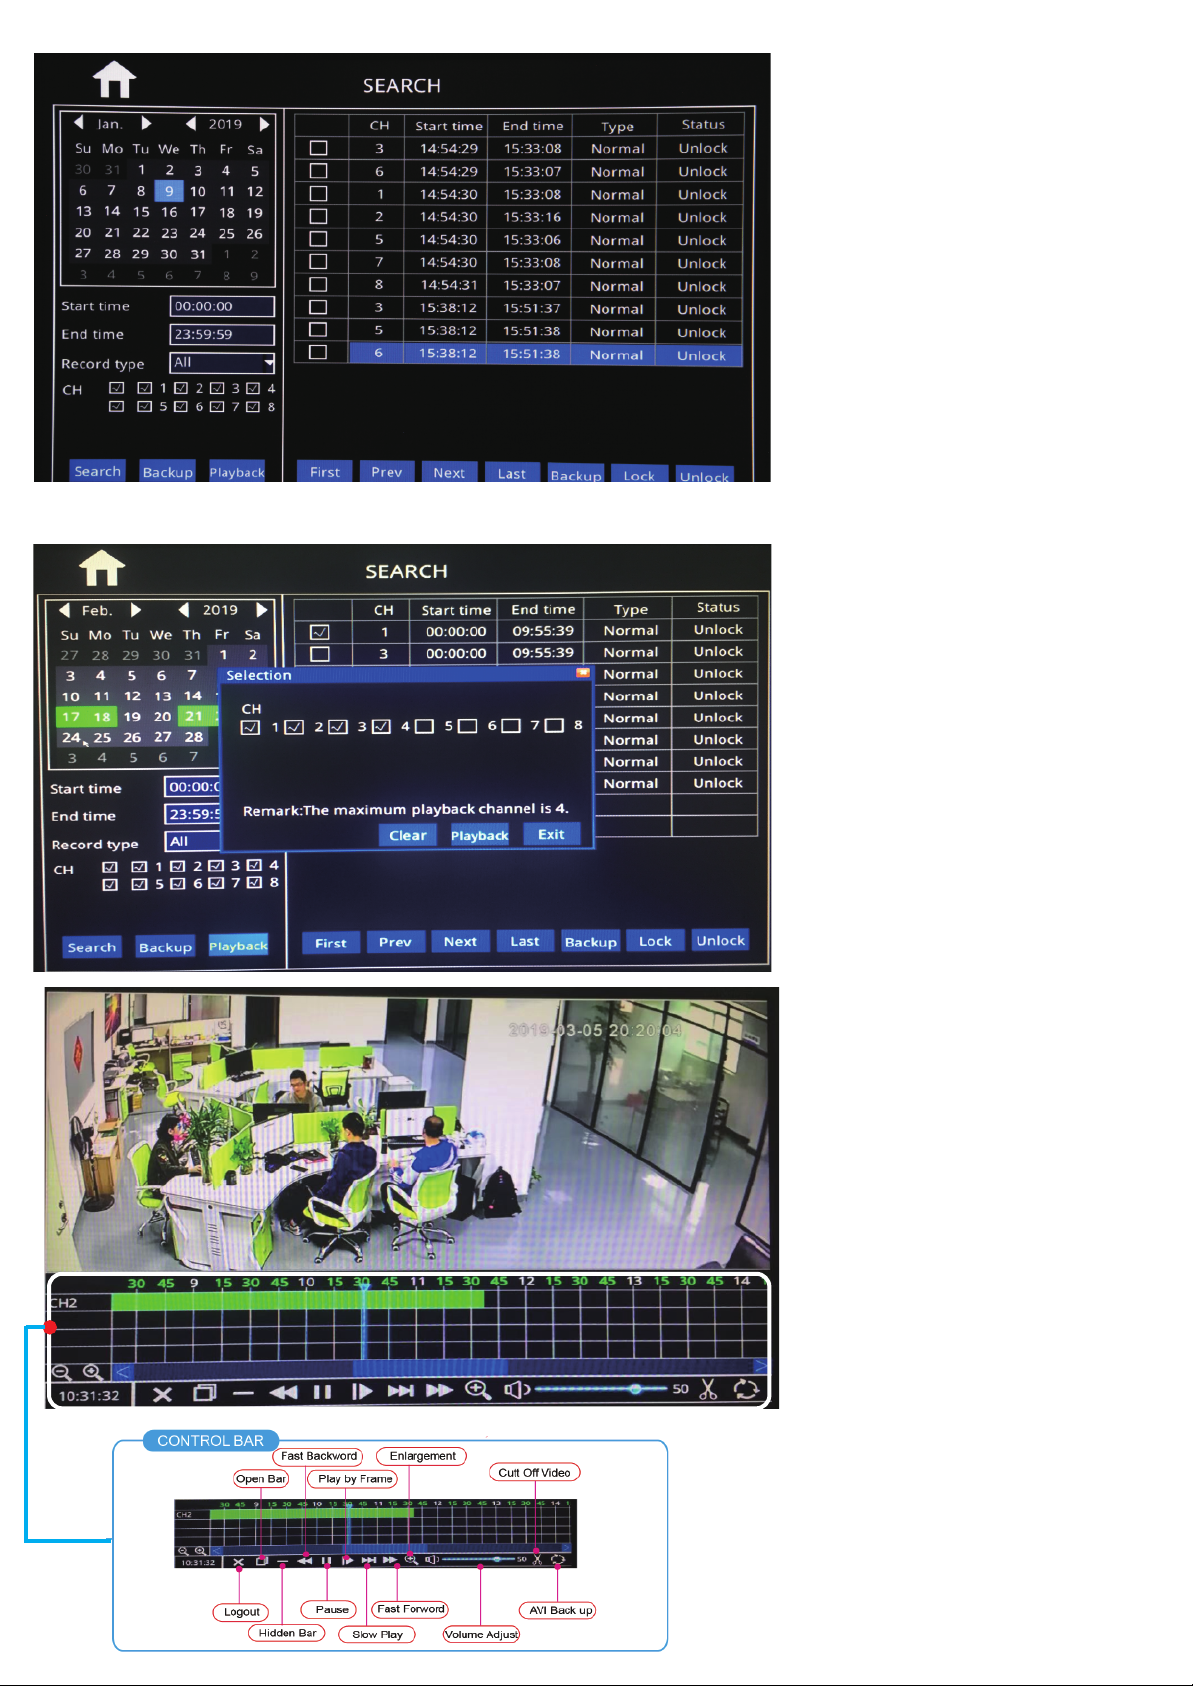
PLAYBACK
Step-02: Login “Search”=>Setup Playback time & CHs=> Search Out Video files, Like the Picture belows:
Step-03: Check Video File=> Click “Playback”=>Choose the Playback CHs (Max 4-CH)=> Click “Playback”
CONTROL BAR
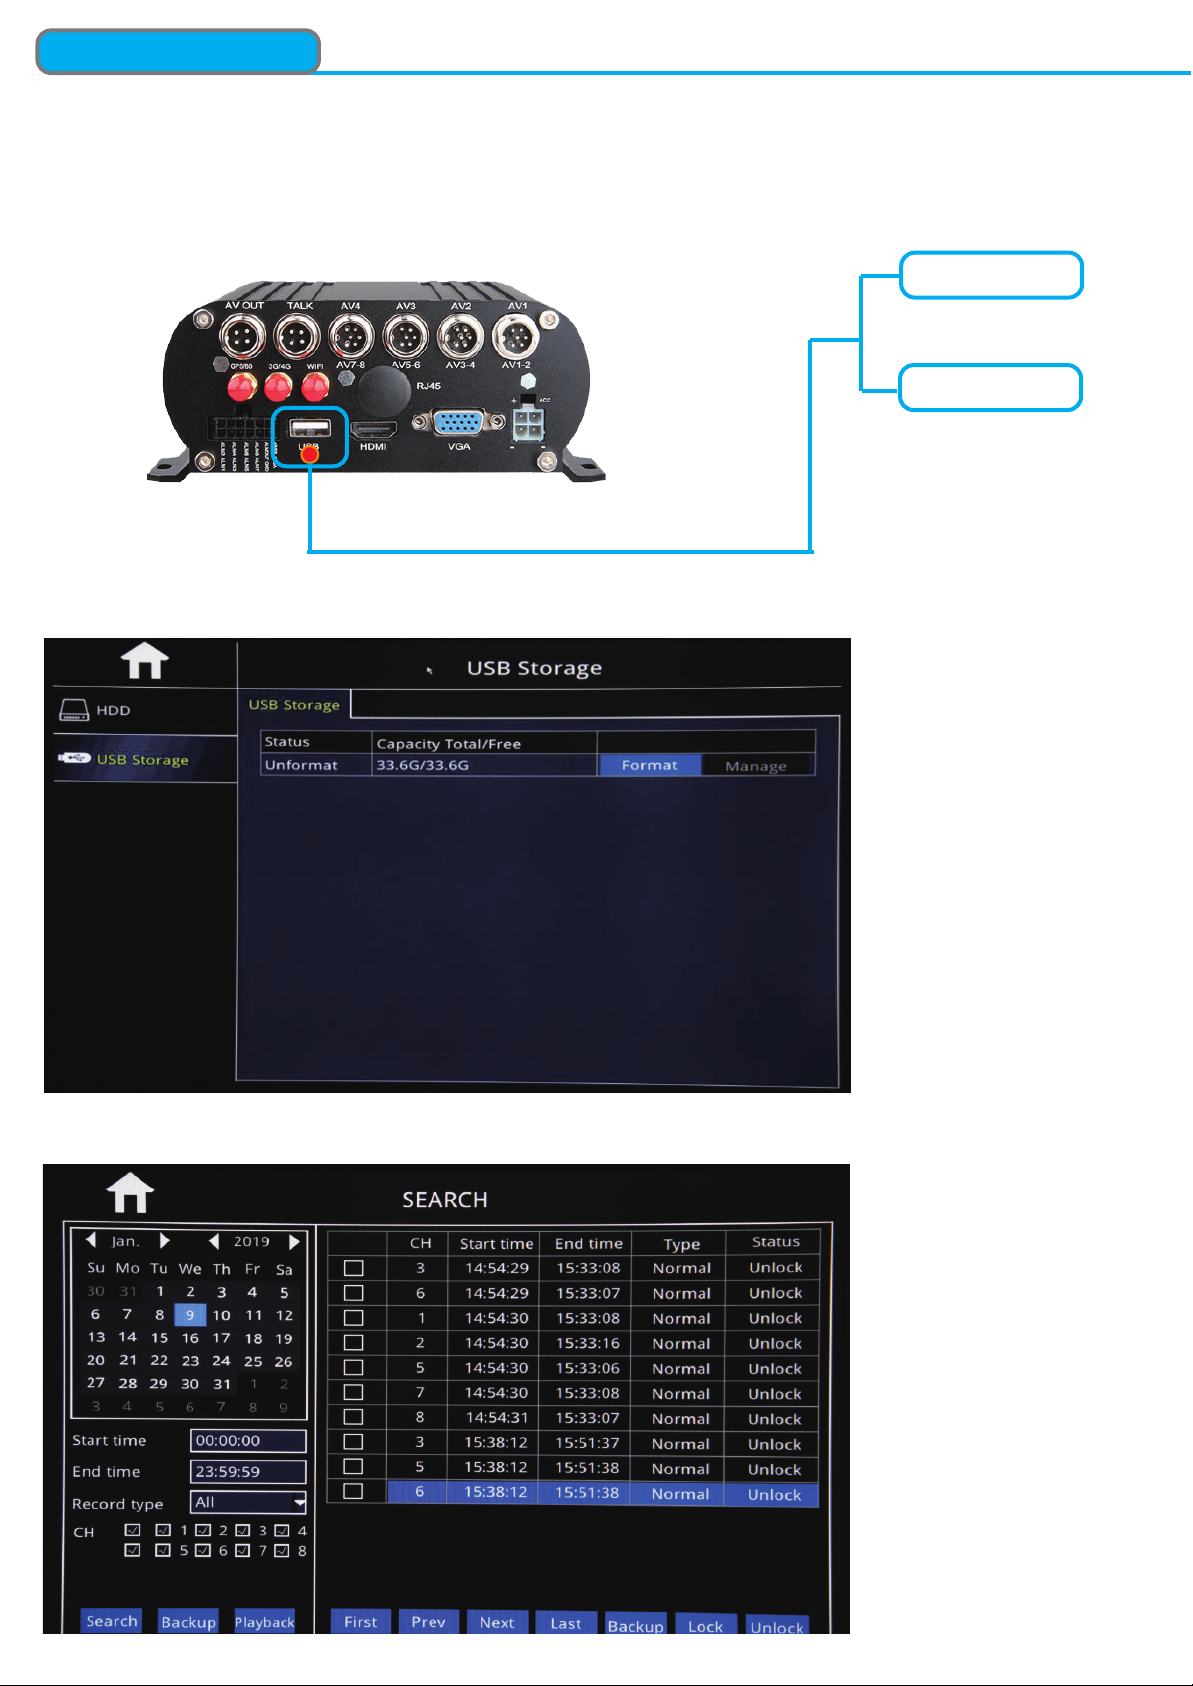
Step-01:Insert U-Disk or External HDD into MDVR Via USB Port
USB U-Disk
External Portable HDD
AVI BackUp
Step03:”Search”=>Search Out Recorded videos
Step-02:Come into “Disk”=>USB Storage=> Format

2-CH Split Screen Setup
Step-01: Login MDVR Main Menu,=>BASIC=>DISPLAY=>Main Output setup=> Apply
Main Output Mode
1x1: Single Display after Starting
2x2: 4-CH Split Display after Starting
1x2: 2-CH Split Display after Starting
2x1: 2-CH Split Display after Starting
Step-02: After setup above, Restart MDVR, The Video will be auto 2-CH Split Screen
After Setup Main Output Mode,The Display
will auto adjust and then you can setup the video
channels for 2-CH display at random.
For Example,CH1&CH3/ CH1&CH2 ect for 2-CH
Split Screen.
A. Default 2-CH Split Screen Setup Guide
Mirror Function
Noted: Mirror Function is mainly for Vehicle Cams installation for Left/Right Mirror, Up/Down Mirror
Step: Login in MDVR Menu=>Advance=>Channel=Analog Camera
NOTE
Mirror: Left/Right Mirror
Flip:Up/Down Mirror

Step-01: Login MDVR GUI=>”Basic”=>”Record”=>Mode: Scheduel
Always Mode
Schedule Mode
Motion Detection Setup
Step-02: Come into “Scheduel”=> Setup “Alarm” Time in Red
Step-03: Come into “Advance”=>”Alarm”=>”Motion”=> Check Motion CHs and Sensitivity (1=Highest)

Step-04: Click Area “Settings” to Setup Motion Detection Area
NOTE
MOTION AREA COLOR
NO-MOTION AREA COLOR
Step-05: Click Trigger“Settings” to Setup Alarm linkage function
Login MDVR Menu=>”Basic”=>”Date/Time”=>”DST” To Setup DST Time
DST Time Setup
1.Record: While alarm trigger,MDVR
will auto upload the video of the checked
channel to server
2. Snapshot: While Alarm trigger, MDVR
will auto upload snapshot of checked
channel to server
3.Send Email: While alarm trigger,MDVR
will auto send email to custmer
4.Aalrm Output: Enable alarm output,like
alarm light
5.Pop-Up Screen: While alarm trigger,
MDVR will auto amplify the video to be
full screen.
NOTE
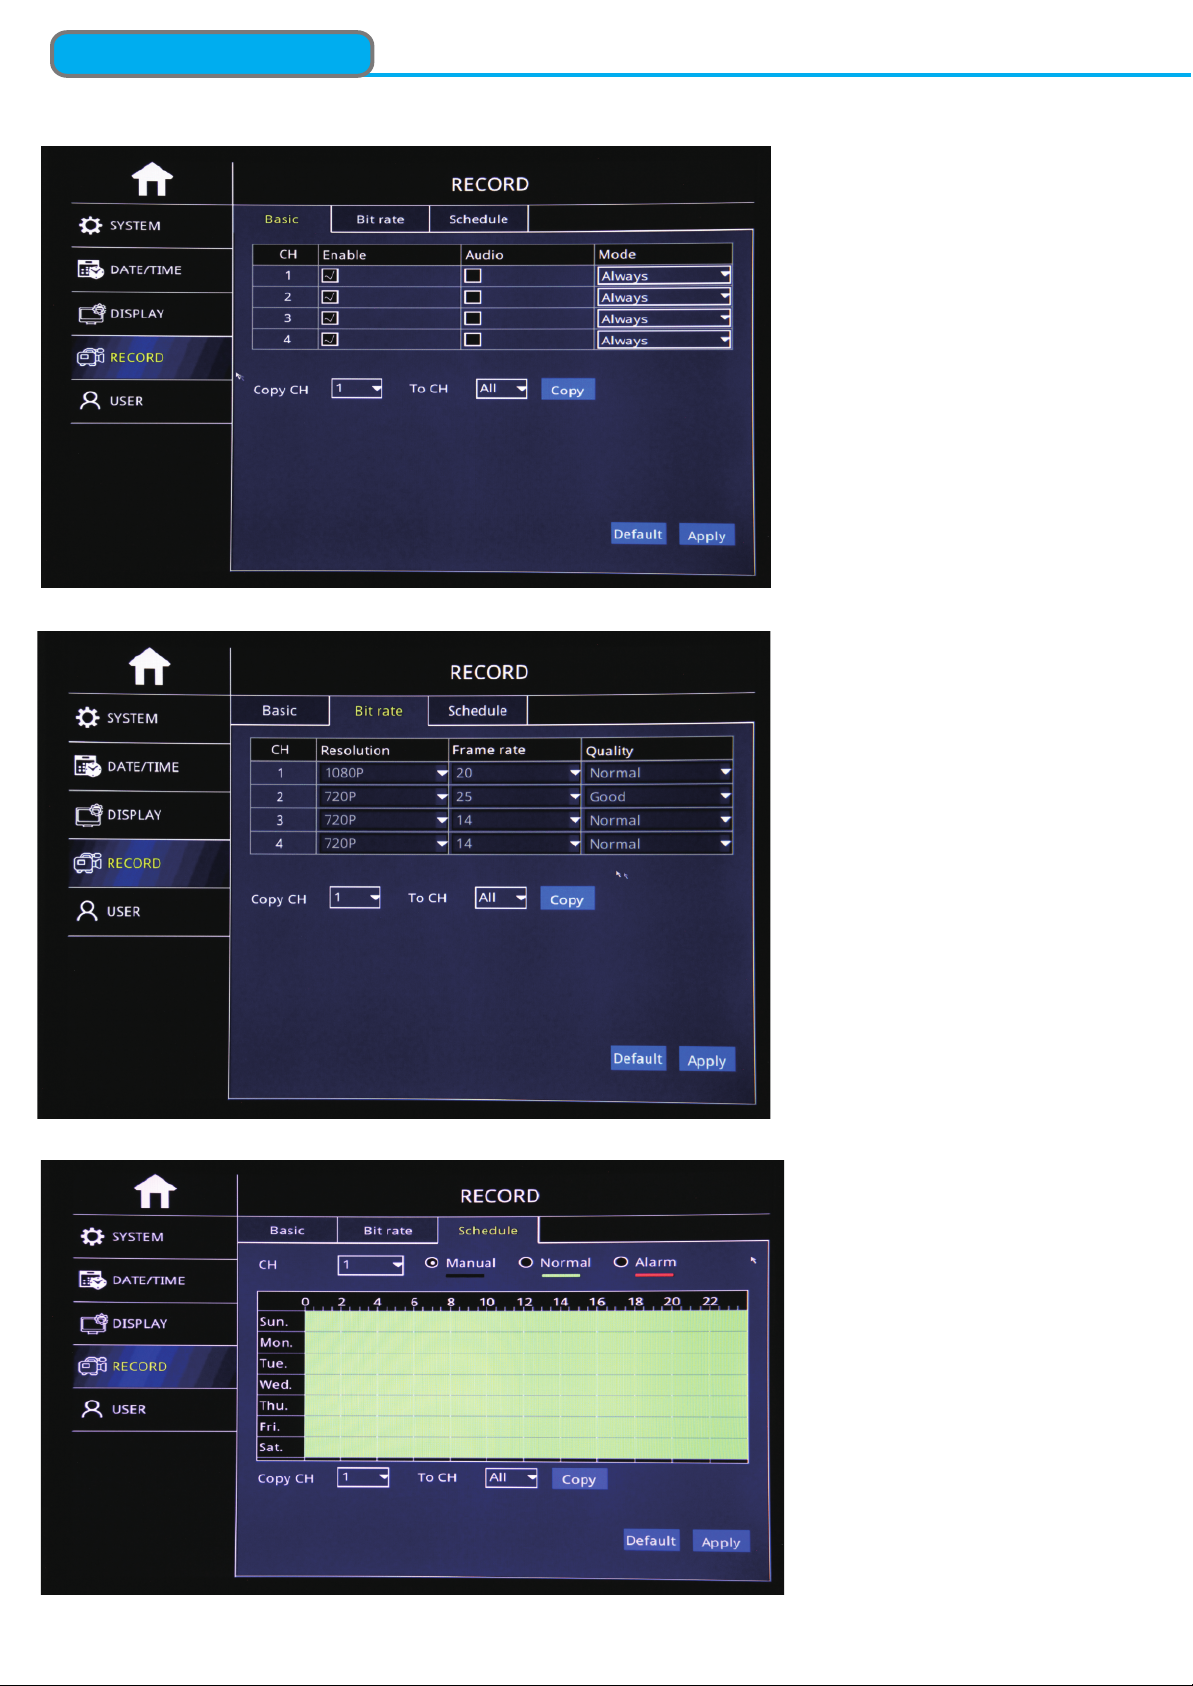
Step-01:Login MDVR Menu=>”Basic”=>”RECORD”=>”BASIC” To Settle Channels & Audio Setup
Step-02: Login “Bit Rate”=>Setup Record Stream
Step-03: Login “Schedule”=>Setup Alarm Record & Manual Record Mode
Record Setup

3G/4G&WIFI Setup
Step-02:After WIFI Setup=>”3G/4G”=>”Switch: Enable”=>”Mode:Manual”=> Input “APN”=> “Access Number:*99#”
Step-03: After Setup, “Net” Led On and Press “Info” Button to check network connection Status, If All success, the
device already connected with Server and can login CMSV6 to see the live video.
Step-01:Login MDVR Menu=>”ADVANCE”=>”NETWORK”=>”WIFI”=>”Enable” to auto search out WIFI SSID=>Click the
WIFI SSID=> Input Password=> Connect WIFI
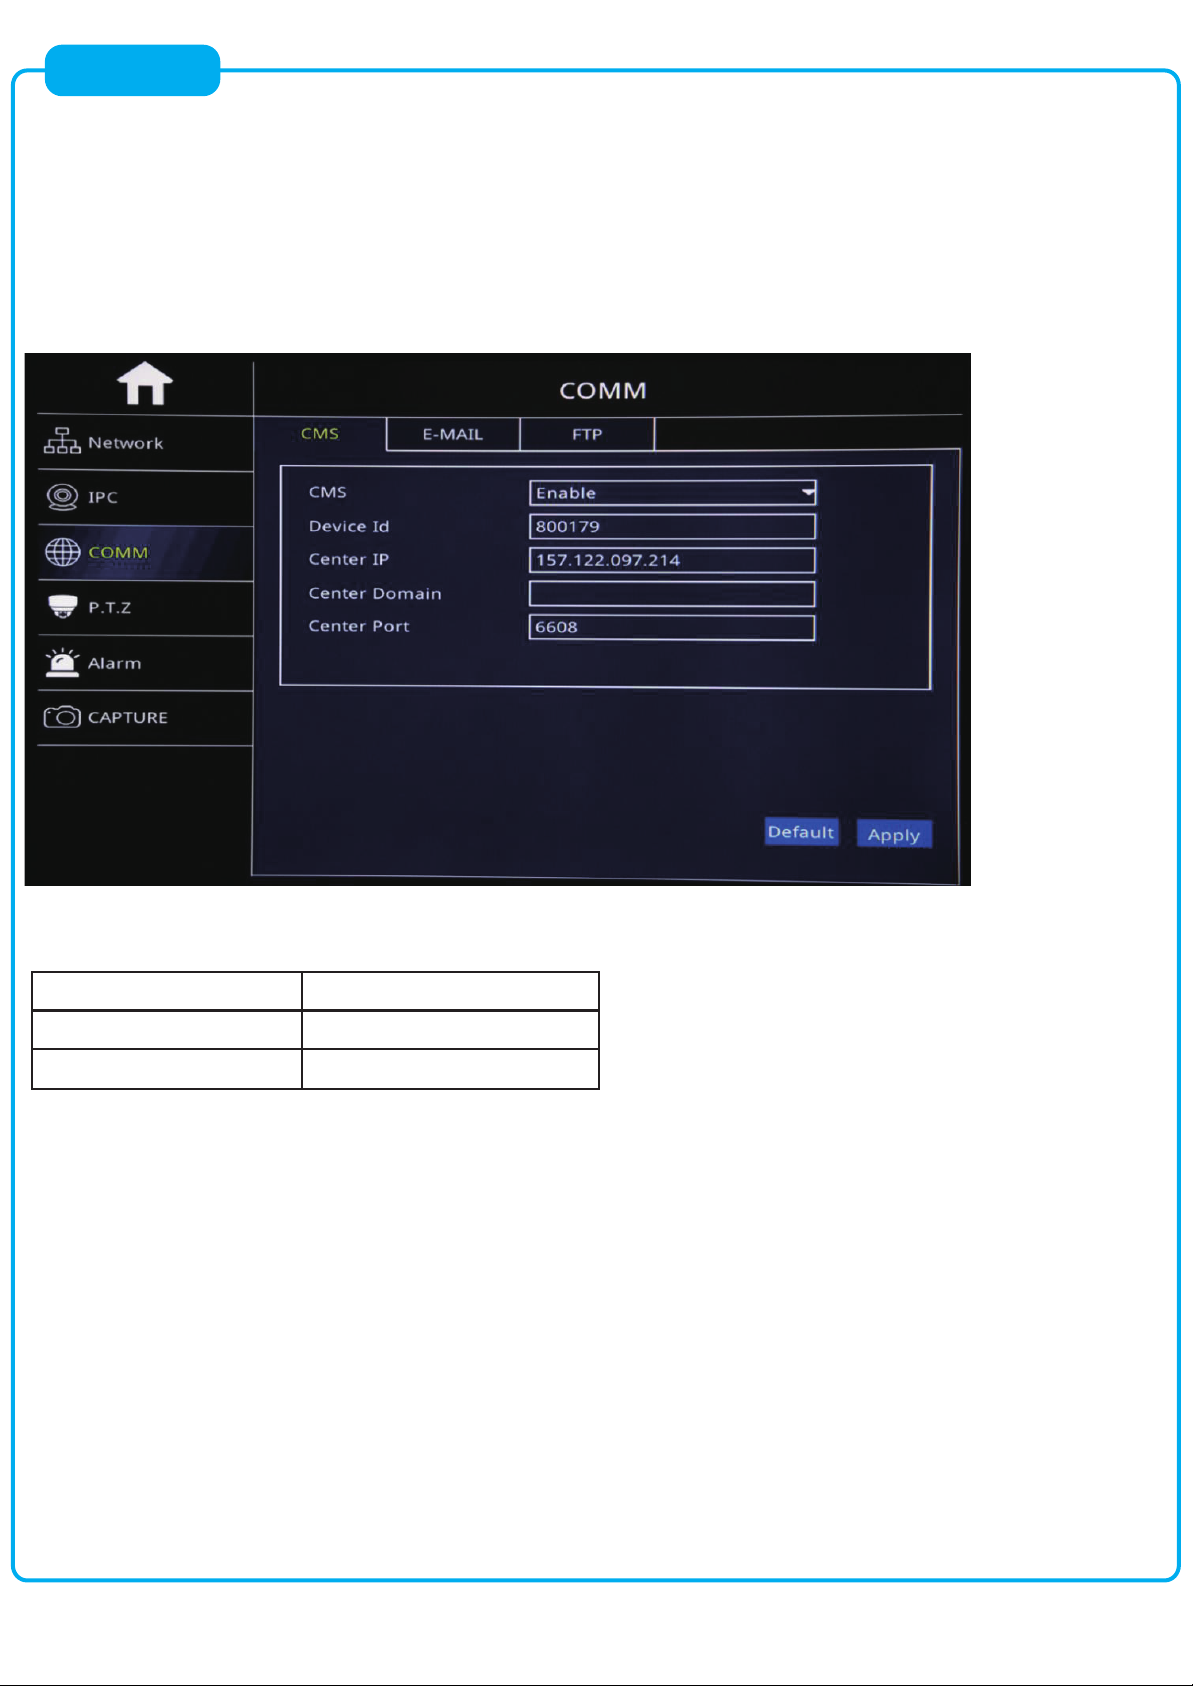
FAQ-01: HOW TO CHANGE SERVER IP
Re: Login MDVR Menu=>”ADVANCE”=>”COMM”=>”CMS” To Change Server IP,Device ID and Port
Noted:When clients build their own server,they need to change the server IP or Please keep it default
FAQ
FAQ-02: USA CARRIER APN LIST
4G Carrier APN
T-Mobile fast.t-mobile.com
AT&T nxtgenphone
FAQ-03: WHY NOT WORK AFTER 4G SETUP?
Reason-01: 4G Sim card no Service or Stop Work, Please kindly confirm it
Reason-02: Input APN Wrong, Please kindly check APN
Reason-03: 4G Antena do not wire with MDVR
Reason-04: Input Wrong Server IP and Port what if you changed, So please kindly check CMS Setup
What if still not solved, Please kindly email “ Step-03 info” Picture to our technical support team to check

Step-02:Login MDVR Menu=>”ADVANCE”=>”ALARM”=>”Motion/Sensor/Video Loss/ Other” Alarm Setup=>”Trigger”
=>Check “Email” Button.
Email Setup
Function Description: When Alarm Trigger, The MDVR will Auto Send Email to users
Step-01: Login MDVR Menu=>”ADVANCE”=>”COMM”=>”E-MAIL”=>”E-mail: Enable”=>Input Media Server(SMTP)
=> Port=> Connection Security: “None,SSL/TLS” Optional=> User Name: Sender’s Email address=> Password:
Sender’s Email Password=> To: User’s/Reciever’s Email Address=>CC:Copy Email’s Address
NOTE
After Setup the info, Please kindly click “Test” button to send a test alarm email to you
and verify all the setup well.

User Management
Step-01: Login Main Menu=> Basic=>User=>Add
Step-02: Come into “Edit user” GUI to setup user name, Password etc info and check “Authority”
NOTE
MDVR will default
Administrator account
without password,you can
click ‘admin” to come into
“admin” account to setup
psw and remember it
NOTE
Client can setup different
user account for different
drivers to allow them to
have different authority
Table of contents
Other Fleetminder Measuring Instrument manuals

Popular Measuring Instrument manuals by other brands


Keysight Technologies
Keysight Technologies N9340B Configuration guide

Pfeiffer Vacuum
Pfeiffer Vacuum QMG 422 operating instructions

Center
Center 342 instruction manual
Icon Process Controls
Icon Process Controls truflo UltraFlo 2000 Series operating manual

CTC Union
CTC Union MMX2000 Series product manual

ESD SYSTEMS
ESD SYSTEMS SPl-20686 Operation installation and maintenance


