Fleurelle LS1800 User manual

1
LS1800

2
Copyright Fleurelle
English 7
Italiano 12
Deutsch 18
Français 24
Nederlands 30
Español 36
Português 42
EÏÏËÓÈη 48
Dansk 55
Polski 60
Čeština 66
Magyar 72
Român 78
84
3
A
713 6
5
4
1
2
3
11
10
8
9
12
4
B
EF
DC
5 14 4
15
17
18
6
7
16
20
19
21
5
G
IJ
H2 H3
H1
12
22
24 3 2
23
6
10
29
K
OP
MN
L
25
26 27
28
7
Congratulations!
On purchasing the Fleurelle system which will assure
you of problem free leaf clearing.
LS1800 - Blower Vac
2-speed Vacuuming ✔Shredding ✔
2-speed Blowing ✔
Your product has many features designed for your
benefit, including:
•Powerful motor that blows air and will vacuum/
mulch.
•Unique 5 blade fan that will shred leaves into
small debris in a 10 to 1 ratio.
•2-speed switch for maximum convenience.
•Ergonomic design improves comfort and ease
of use.
•Large aperture vacuuming tube to maximise
the intake of leaves.
•35 litre easy empty collection bag.
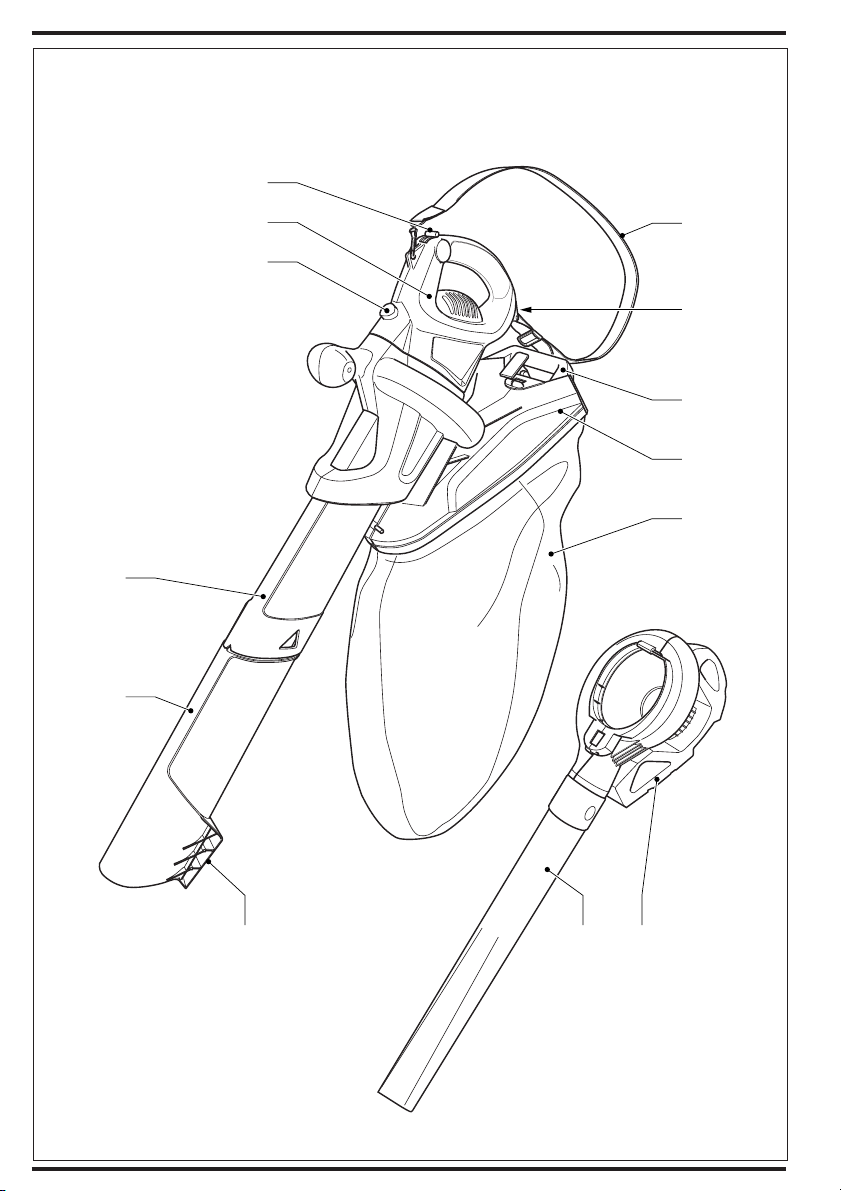
Description (Fig. A)
AFollowing is a list of parts that will be
mentioned in this user manual and are
shown in the diagrams:
1. Two-speed on/off switch
2. Powerhead
3. Release button
4. Vacuum tube - upper
5. Vacuum tube - lower
6. Blow clamshell
7. Blow tube
8. Bag top
9. Collection bag
10. Collection bag handle
11. Carrying strap
12. Cable restraint
13. Scraper
User manual
LS1800
Know your product
Read this manual carefully, observing all
recommended safety precautions before,
during and after using your product.
Maintain your product in good working order.
Familiarise yourself with the controls on
your product before attempting to operate
it, but above all, be sure you know how to
stop the product in an emergency.
Retain this manual and all other literature
supplied for future reference.
Safety instructions
Training
•Do not allow the unit to be used by
persons under the age of 16 or other
persons who have not read this user
manual. You are responsible if there is
an accident.
•Remember that the operator/user is
responsible for accidents or hazards
occurring to other people or their property.
6
m
360˚
•Do not allow children, animals or other
persons near your product when in use
- always keep them at least 6m (20ft)
away from the working area.
•Never carry your product by the cable
or jerk the cable. Keep the cable away
from heat sources, oils or sharp edges.
Check the condition of your cable
before use and do not use if damaged.
Preparation
•Do not operate your product barefoot
or in open sandals.
•To protect your feet and legs, always
wear stout shoes or boots and long
trousers - freshly cut grass is damp and
slippery. Rubber or man made footwear
will enhance your safety.
•Use protective equipment. Wear safety
spectacles or goggles whilst operating
your product in blow mode.
•To prevent dust irritation the wearing of
a suitable face mask is recommended.
•Use ear protection if the sound level
seems uncomfortable when using your
product.

8
Warning! Secure long hair so it is above
shoulder length. Keep loose clothing, ties,
tassels and hanging straps away from
openings and moving parts.
•The power supply cable should be
regularly inspected for signs of damage
or ageing, and only used if in good
condition.
•Always be sure your product is in a safe
operating condition and all parts are
secure before use.
•Do not operate the product if any parts
are defective or worn.
•Do not pick up burning materials such
as lit cigarette butts.
•Do not operate the blower/vacuum in a
gaseous or explosive atmosphere as
motors in these tools normally spark
and this may ignite fumes.
Operation
•Do not use in vacuum mode without
the vacuum tubes and collection bag in
place.
Always switch off your product, allow the
fan to stop and remove the plug from the
socket when:
•Changing from blower to vacuum.
•The supply cable has become
damaged or entangled.
•You leave your product unattended.
•Clearing a blockage.
•Checking, adjusting, cleaning or
working on your product.
•If the appliance starts to vibrate
abnormally.
•Do not place the inlet or outlet of the
vacuum near eyes or ears when operating.
Never blow debris in the direction of
bystanders.
•Do not use your product in the rain and
do not allow it to get wet. Avoid using
the product in wet conditions.
•Use your product only in daylight or
good artificial light.
•Do not cross gravel paths or roads
whilst your product is switched on
during blow/vac mode. Walk, never run.
•Do not place your unit down on gravel
whilst it is switched on.
•Always be sure of your footing,
particularly on slopes. Do not overreach
and keep your balance at all times.
•Do not pick up matter that may be
contaminated with flammable or
combustible liquids such as gasoline, or
use in areas where they might be present.
•Do not place any objects into the
openings. Never use if the openings are
blocked - keep free of hair, lint, dust and
anything that may reduce the airflow.
Warning! Always use your product in the
manner outlined in this manual. Your
product is designed to be used in an upright
mode and if it is used in any other way it
may result in injury. Never run your product
whilst lying on its side or upside down.
•Do not carry the appliance by the
cable.
•Always direct the cable to the rear away
from the appliance.
!
•If a cord becomes damaged during
use, disconnect the supply cord from
the mains immediately.
DO NOT TOUCH THE CORD BEFORE
DISCONNECTING THE SUPPLY.
Maintenance and storage
•Store your product in a dry place when
not in use, out of the reach of children.
•Do not use solvents or cleaning fluids to
clean your product - use a blunt
scraper to remove grass and dirt.
•Before use, carefully check the appliance
and mains cable for damage. Check for
misalignment and seizure of moving
parts, breakage of parts, damage to
guards and switches and any other
conditions that may affect its operation.
Ensure that the appliance will operate
properly and perform its intended
function. Do not use the appliance if
any part is damaged or defective. Do
not use the appliance if the switch does
not turn it on and off.
•Have any damaged or defective parts
repaired or replaced by an authorised
repair agent. Never attempt any repairs
yourself.
•If the supply cord is damaged, it must
be replaced by the manufacturer or its
service agent or a similarly qualified
person in order to avoid a hazard.
Replace damaged or unreadable labels.
•Check the Debris collector frequently
for wear or deterioration.
•Only use genuine replacement parts
and accessories.

9
ENGLISH
Double insulation
This tool is double insulated; therefore no
earth wire is required. Always check that
the power supply corresponds to the
voltage on the rating plate.
Guard against electric shock.
•Electric safety can be further improved by using
a high-sensitivity (30 mA / 30 mS) residual
current device (RCD).
•Your appliance is designed for use on AC
(mains) electrical supplies only. Do not attempt
to use it on any other supply.
Extension cables
When using the appliance outdoors, only use
extension cables intended for outdoor use.
Assembly prior to use (Fig. B & C)
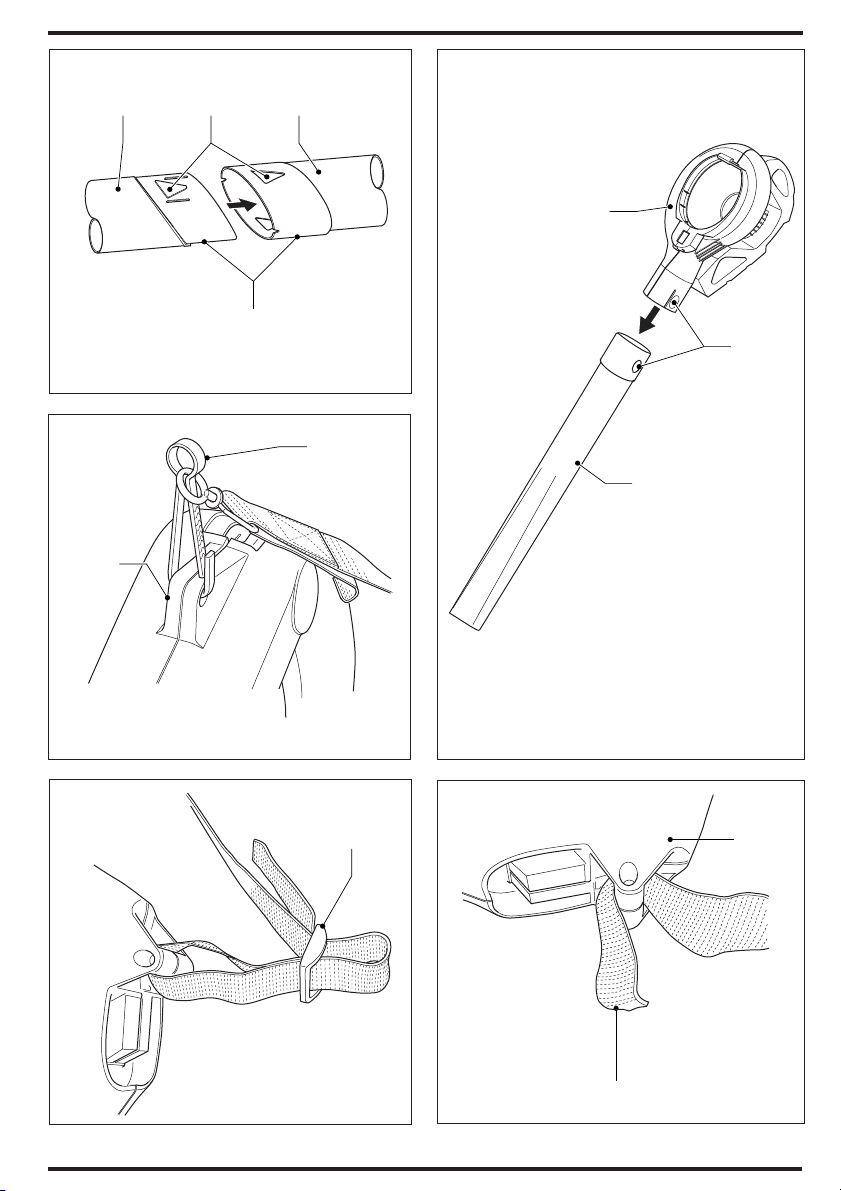
Vacuum tube assembly (Fig. B)
B•Vacuum tubes must be assembled
together before use.
•To ease assembly apply soapy water
solution to joint area.
•Align the notches (15) and the triangles
(14) on upper (4) and lower (5) tubes.
•Push the lower tube (5) firmly into the
upper tube (4), until the triangles click
into place. (Never operate apart).
•In the interests of safety, it is not
intended for the tubes to be separated
once assembled.
Blow tube assembly (Fig. C)
C•Blow tube must be assembled to the
blow clamshell before use.
•Align the circles (16) on the clamshell
(6) and the tube (7).
•Push the tube (7) firmly onto the
clamshell (6) until the circles click into
place.
•For storage the blow tube can be
detached from the blow clamshell by
depressing the circles on either side
and gently sliding off the tube.
Carrying strap assembly (Fig. D - G)
•Fit the carrying strap to the powerhead,
if required, and adjust to suit the user.
For your comfort, the shoulder strap is
designed to be fitted in two ways:
Single Point Attachment (Fig. D)
•Clip the hook (17) through the eyelet
(18) on the powerhead.
•Adjust the length of the loop with the
buckle.
Double point attachment
(Fig. D, E, F & G)
•Clip the hook (17) through the eyelet
(18) on the powerhead.
•Remove the loose end of the strap from
the buckle.
•Pass the loose end (19) under the boss
(20), and thread it back through the
buckle (21).
•Adjust the length of the loop with the
buckle (Fig. G).
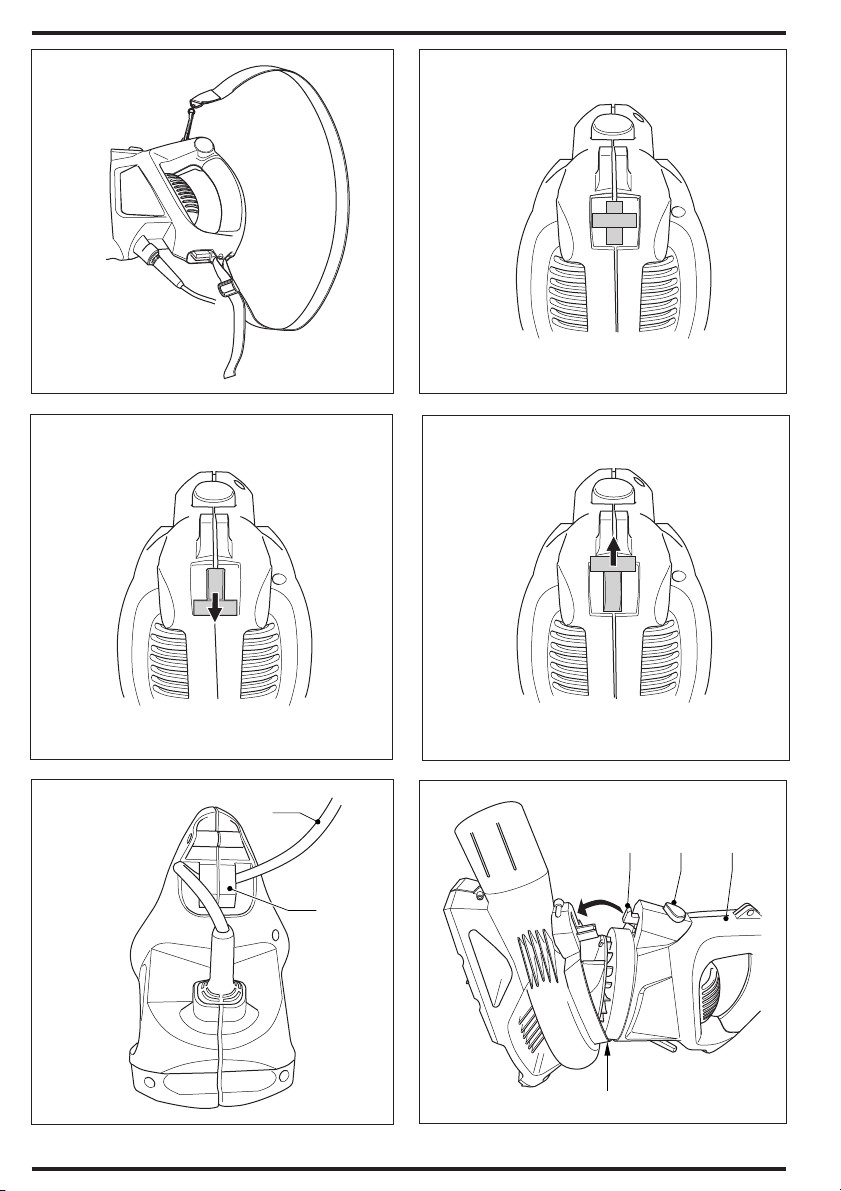
On/off switch (Fig. H1, H2, H3)
Warning! Use both hands to grip the
product firmly when switching on.
•For extra control, your blowvac is fitted
with a two speed switch located on the
handle of the powerhead.
•The switch has a central off. Position 0
(Fig. H1).
•To use in low speed, move the switch
fully to the rear. Position I (Fig. H2).
•To change to high speed push the
switch back to the off position and then
fully forward. Position II (Fig. H3).
Cable restraint (Fig. I)
I•A cable restraint is incorporated into the
rear of the powerhead.
•Loop the cable (22) through the cable
restraint (12).
Using your product (Fig. J)
When using as a blower or vacuum, always
wear safety glasses. If using in dusty
conditions, wear a filter mask as well.
Switch off your product, allow the fan to
stop and remove the plug from the socket
before carrying out any adjustment,
servicing or maintenance.
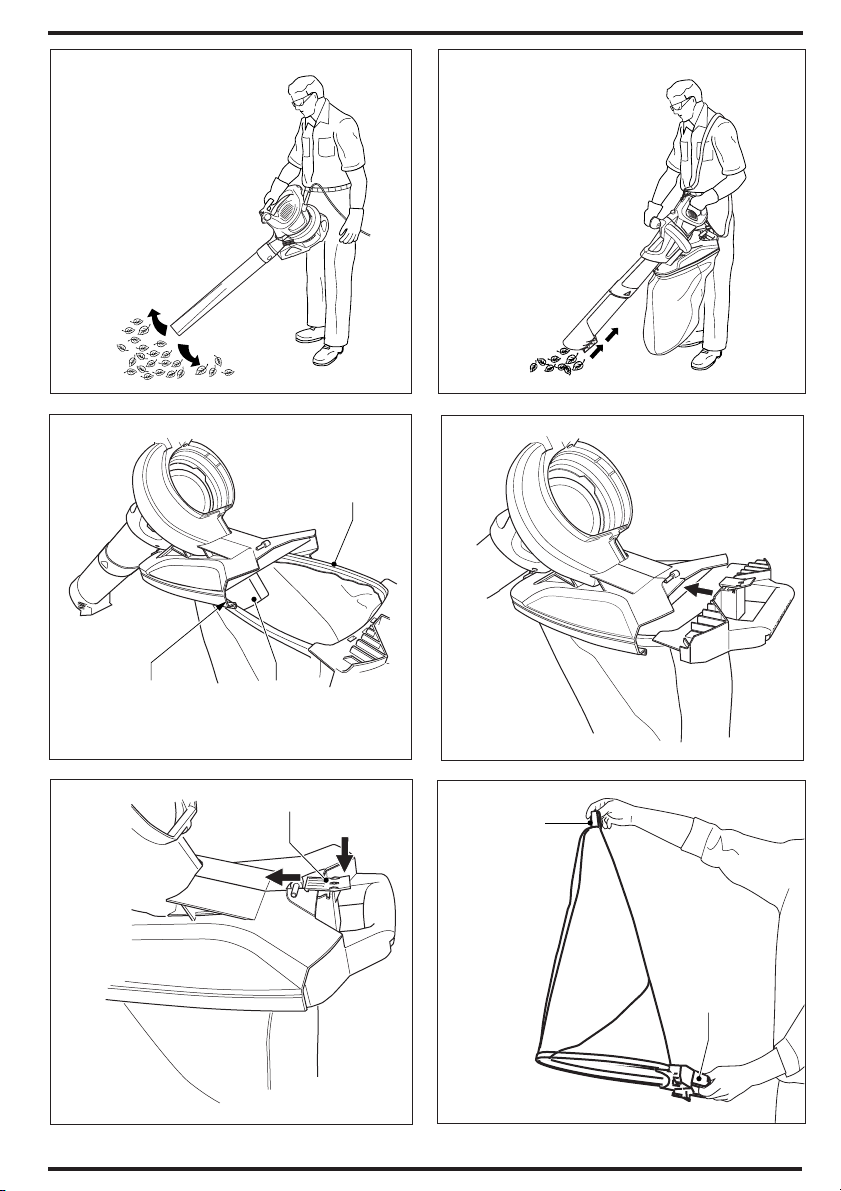
Blow mode
J•Attach the blow clamshell and tube
(6 & 7) to the powerhead (2) (Fig. J) by
locating the blower as indicated by
arrow 23, then pivot about this point
until the locking/release catch (24) is
fully engaged.

10
•Hold the blow tube approximately
180mm (7”) above the ground, switch
your product on and using a sweeping
motion from side to side, advance
slowly keeping the accumulated debris/
leaves in front of you (Fig. K).
•Once you have blown the debris/leaves
into a pile, you can convert to vacuum
mode to collect the debris.
Removing blow/vacuum tube (Fig. J)
J•To disconnect the blow clamshell or
vacuum tube from the powerhead,
depress the release button (3), ensuring
the tube does not fall to the ground.
•The release button will not depress if
the switch is in the “on” position.
Vacuum mode (Fig. L - P)
To fit the bag assembly to your product:
(Fig. M, N, O)
•For vacuuming/shredding, the
collection bag (9) must be fitted to the
bag holder (8).
•Fig. M: Locate the bag rim (25) into the
bag holder channel (26) ensuring that
the front of the bag is placed over the
vacuum outlet (27).
•Slide the bag fully into the channel and
depress the latch (28) to lock the
handle into the bag top (Fig. N & O).
•Position the tube slightly above the
debris/leaves. Switch your product on,
then using a sweeping motion the
debris/leaves will be sucked up the
tube, shredded and thrown into the
collection bag (Fig. L).
•For stubborn debris/leaves your
vacuum tube is incorporated with a
scraper (13). Use this scraper to loosen
the debris and continue to vacuum as
normal.
•As the bag fills the power of the suction
will decrease, switch off your product
and unplug from the mains power supply.
•To remove the bag, depress the latch
(28) to disengage from the bag holder
and slide the bag out.
•To empty, hold the plastic handle (10)
and grab the nylon handle (29) on the
underside of the bag. Turn the bag
upside down and shake out any debris
and leaves.
Fault finding
Failure to operate (1) Check the connection to the
power supply.
(2) Check the fuse in the plug, if
blown, replace (UK only).
(3) Check that the blow/vacuum
tube assembly is correctly fitted
to the powerhead.
(4) If the fuse continues to blow -
immediately disconnect from the
mains power supply and consult
your local Fleurelle authorised
repair agent.
Poor vacuum/ (1) Switch off - disconnect from
high pitched whine the mains power supply, debris
should fall clear of the tube.
(2) Remove and empty the
collection bag.
(3) Check that both the inlet and
exit ports on the vacuum tube
are clear.
(4) Remove any debris from the
fan area.
(5) If poor vacuuming continues -
immediately disconnect from the
mains power supply and consult
your local Fleurelle authorised
repair agent.
Poor shredding (1) Switch off - disconnect from
the mains power supply and
remove the collection bag.
(2) Remove the vacuum tube
and inspect the fan.
(3) Clean any debris from the fan
blades.
(4) If the fan is cracked or
damaged, do not use - consult
your local Fleurelle authorised
repair agent.
Cleaning your product
Keep your product dry.
Under no circumstances spray with water.
•Clean your product regularly.
•Remove any leaves stuck to the inside of the
vacuum tube.
•Plastic parts may be cleaned using a mild soap
and a cloth dampened with hot water.
Do not use any type of detergent, cleaner
or solvent which may contain chemicals
that could seriously damage the plastic.
•Self lubricating bearings are used in your
product, therefore lubrication is not required.

11
ENGLISH
Protecting the environment
If the product has reached the end of its
working life, dispose of it in an
environmentally friendly way.
Tips
•If your machine has stopped working, please
check first to see whether the cause may lie
outside the machine, e.g. through an
interruption to the electrical supply.
•Please ensure that you provide the following
documentation together with your defective
machine:
•Purchase receipt.
•Description of the defect (as precise a
description as possible will enable us to
make a speedy repair)
When making claims under the guarantee, informing
us of problems or requesting replacements parts,
please contact the shop where you purchased your
machine or our service point.
Technical data
(also see identification plate)
Power 1,800 W
Voltage 230 V/50 Hz
Current 8.2 A
Revolutions 16,000 min-1
Protection Double insulation
Guarantee
Dear Customer,
Congratulations on purchasing this Fleurelle product.
Like all Fleurelle products, it has been developed
on the basis of the latest technical knowledge and
produced using the most reliable and up-to-date
electrical and electronic components.
Before operating the machine, please take a few
minutes to read through the operating instructions.
Many thanks!
This machine has been produced and checked
using the most modern methods. The seller offers
a 24 month guarantee of defect-free materials and
error-free production, calculated from the date of
purchase, under the folowing conditions:
Within the guarantee period, all defects attributable
materials or production defects will be corrected
free of charge. Complaints should be made as
soon as the problem has been noticed.
The buyer is only entitled to claim a reduction of
the purchase price or the return of the purchase
money on the basis of the guarantee, within 6 months
from the day of purchase, if the purpose of the
machine stipulated by the manufactorer cannot be
finally achieved through repaires or exchange.
Claims under guarrantee are nullified by technical
interventions on the parts of the buyer or the third
parties. Damage that is caused by inappropriate
connection or installation, or by acts of God or
other external influences, does not fall under the
terms of the guarantee.
We reserve the right to decide whether to repair
defective parts, replace them, or exchange the
machine in the event of a complaint. Exchanged
parts become our property.
Compensation claims are excluded unless they are
based on gross negligence on the part of the
manufacturer.
No further claims can arise on the basis of this
guarantee. Claims under guarantee must be
supported by the buyer by production of his
purchase receipt.
EC Declaration of conformity
We hereby declare that the following electrical
tool:
LS1800
conforms to:
98/37/EC, 89/336/EEC, 73/23/EEC,
EN 55014, EN 55104, EN 60335,
2000/14/EC, Leaf blower/collector =11 m3/min,
Annex V
Level of sound pressure, measured according to
2000/14/EC:
LpA (sound pressure) dB(A) 92
LWA (acoustic power) dB(A) 105
LWA (guaranteed) dB(A) 107
Hand/arm weighted vibration value according to
EN ISO 5329: < 2.5 m/s2
Herbert Montebaur
Quality assurance
GPM, Schlüterstr. 3, D-40235 Düsseldorf

12
Congratulazioni
L’acquisto del sistema Fleurelle vi garantirà operazioni
di asportazione del fogliame senza problemi.
LS1800 - Blower Vac
Aspiratore a due velocità
✔
Trituratore
✔
Soffiatore a due velocità
✔
Questo modello è dotato di molte utili funzioni,
tra le quali:
•Potente motore in grado di soffiare aria e di
aspirare/triturare.
•Esclusiva ventola a 5 pale in grado di triturare le
foglie in piccoli frammenti con rapporto di
volume di 10 a 1.
•Interruttore a due velocità per il massimo
confort.
•Design ergonomico per grande comfort e
facilità di utilizzo.
•Tubo aspiratore con apertura disegnata in
modo da massimizzare l’asportazione di foglie.
•Sacchetto di raccolta da 35 litri facile da
svuotare.
Descrizione (Fig. A)
AVi elenchiamo di seguito una lista di
componenti che verranno nominati in
questo manuale e che sono illustrati nei
diagrammi:
1. Interruttore on / off a due velocità
2. Testa di alimentazione
3. Tasto di sgancio
4. Tubo di aspirazione - sezione superiore
5. Tubo di aspirazione - sezione inferiore
6. Impugnatura per soffiaggio
7. Tubo per soffiatore
8. Cima del sacchetto
9. Sacchetto di raccolta
10. Impugnatura del sacchetto di raccolta
11. Cinghia per trasporto
12. Fermacavo
13. Raschietto
Conoscete la vostra macchina
Leggete attentamente tutte le istruzioni
contenute in questo manuale prima,
durante e dopo aver utilizzato la macchina,
rispettando le norme di sicurezza e
seguendo le avvertenze per un suo
corretto mantenimento.
Prima di utilizzare l’utensile, prendete
confidenza con la posizione dei comandi
ed assicuratevi di essere in grado di
spegnere la macchina immediatamente in
caso di emergenza.
Tenete con cura il presente manuale per
qualsiasi futura necessità.
Norme di sicurezza
Addestramento
•Non consentite l’utilizzo della macchina
a persone di età inferiore a 16 anni o che
non abbiano letto il presente manuale.
Siete responsabili incaso di incidente.
•Ricordate che l’operatore/utilizzatore è
legalmente responsabile di eventuali
danni e ferimenti ad altre persone e alla
loro proprietà.
6
m
360˚
•Non lasciate avvicinare bambini o
animali o altre persone mentre state
usando la macchina - fateli sempre
stare ad almeno 6 metri di distanza
dalla zona di lavoro.
•Non trasportate mai la macchina
tenendola per il cavo elettrico.
Non tiratelo con troppa forza. Tenete il
cavo lontano da sorgenti di calore, olio,
bordi affilati. Controllate le condizioni
del cavo elettrico prima dell’utilizzo e
non usatelo se danneggiato.
Preparazione
•Non utilizzate la macchina a piedi scalzi
o con sandali aperti.
•Per proteggere i piedi e le gambe,
indossare sempre calzature o stivali e
pantaloni a gamba lunga; l’erba appena
tagliata è umida e scivolosa. Per motivi
di sicurezza sono da preferirsi le
calzature in gomma o fatte a mano.
•Utilizzate appositi strumenti protettivi.
Portate occhiali o maschera in plexiglas
durante il lavoro, nel modo “soffiatore”.
LS1800
Manuale d’istruzioni

13
•Per evitare irritazioni dovute alla
polvere, si suggerisce di indossare una
maschera di protezione.
•Utilizzate tappi per proteggere l’udito
se il livello del rumore durante l’utilizzo
vi sembra troppo alto.
Attenzione! Raccogliere i capelli lunghi al
di sopra delle spalle. Abiti ampi, cravatte,
fiocchi e cinghie pendenti vanno tenuti a
distanza dalle aperture e dalle parti in
movimento.
•Ispezionate regolarmente il cavo
elettrico per segni di usura o danno ed
usatelo solo se in buone condizioni.
•Assicuratevi sempre che la macchina
sia in buone condizioni operative e che
tutti i componenti siano saldamente
fissati prima dell’utilizzo.
•Non utilizzate la macchina con parti
usurate o danneggiate.
•Non aspirate materiale infuocato come
per esempio mozziconi di sigaretta.
•Non utilizzate la macchina in presenza
di atmosfera gassosa o esplosiva in
quanto il motore potrebbe produrre
scintille e causare esplosioni.
Utilizzo
•Non utilizzate la macchina come
aspiratore senza avere correttamente
posizionato il tubo aspiratore ed il
sacchetto raccoglitore.
Spegnere sempre il prodotto, attendere
che la ventola si fermi e disinserire la spina
dalla presa quando:
•Passate da soffiatore ad aspiratore.
•Il cavo elettrico si è danneggiato
o incastrato.
•Si lascia il prodotto incustodito.
•Dovete rimuovere un ostacolo.
•Dovete eseguire controlli,
regolazioni, pulizia e manutenzione
della macchina.
•Se l’attrezzo comincia a vibrare in
modo anomalo.
•Non portate vicino agli occhi e alle
orecchie le aperture dell’aspiratore
durante l’utilizzo. Non dirigere mai in
direzione dei presenti il getto d’aria per
soffiare via i detriti.
•Non utilizzate la macchina in caso di
pioggia e non fate che si inumidisca.
Se possibile evitate di usare la
macchina in condizioni di umidità.
•Lavorate solo con la luce del giorno o
disponendo di buona illuminazione
artificiale.
•Non attraversare sentieri di ghiaia o
strade quando la macchina è accesa e
funziona nel modo di soffiatura/
aspirazione. Procedere con andatura
lenta, non correre mai.
•Non adagiare l’utensile sul ghiaietto
mentre è acceso.
•Non attraversate viottoli sassosi o
strade asfaltate con l’utensile acceso.
Non sporgersi e mantenere sempre
l’equilibrio.
•Non aspirate materiale che potrebbe
essere contaminato da liquidi
infiammabili o combustibili come p.es.
benzina e non utilizzate la macchina in
luoghi dove potrebbero essere presenti.
•Non gettate alcun oggetto nelle aperture.
Non lavorate mai se le aperture sono
ostruite - tenetele pulite da capelli,
polvere, lana ed ogni altro corpo che
potrebbe ostruire il flusso d’aria.
Attenzione! Utilizzate sempre la macchina
secondo le presenti istruzioni. La macchina
è disegnata per un utilizzo verticale e
potrebbe causare ferimenti se usata in ogni
altra posizione. Non accendete mai la
macchina mentre si trova appoggiata di
lato o capovolta.
•Non trasportare l’apparecchio
afferrandolo per il cavo.
•Il cavo di alimentazione deve essere
mantenuto sul lato posteriore, lontano
dall’attrezzo.
!
•Se un cavo si danneggia durante l’uso,
disinserire immediatamente la spina
dell’apparecchio dalla presa di corrente.
NON TOCCARE IL CAVO PRIMA DI
SCOLLEGARE L’ALIMENTAZIONE.
Cura e manutenzione
•Tenete la macchina in luogo asciutto
e fuori dalla portata di bambini.
•Non utilizzate solventi o altri prodotti
chimici per la pulizia della macchina -
utilizzate una spatola per rimuovere
erba e terra impastate.
•Prima dell’uso, ispezionare
accuratamente l’utensile e il cavo di
alimentazione per rilevare eventuali
danni.
ITALIANO

14
Controllare se ci sono parti non allineate
o che si muovono, componenti rotti,
danni alle protezioni o agli interruttori e
qualsiasi altra condizione che possa
alterare il funzionamento della
macchina. Accertare che il prodotto
funzioni come previsto e che venga
impiegato per lo scopo per cui è stato
progettato. Non usare l’apparecchio se
ci sono elementi danneggiati o difettosi
e se non è possibile accenderlo e
spegnerlo mediante l’interruttore.
•Eventuali elementi difettosi o danneggiati
devono essere sostituiti o riparati da un
tecnico autorizzato. Non tentare mai di
effettuare delle riparazioni.
•Se il cavo di alimentazione è
danneggiato, per evitare situazioni
pericolose è necessario affidarne la
sostituzione al fabbricante, centro di
assistenza o comunque a personale
qualificato. Sostituire le etichette
danneggiate o illeggibili.
•Controllare spesso il raccoglitore di
detriti per rilevare segni di usura o
deterioramento.
•Usare esclusivamente pezzi di ricambio
e accessori originali.
.
Doppio isolamento
Il doppio isolamento di cui è provvisto
l’apparecchio rende superfluo il filo di terra.
Controllare sempre che la tensione di
alimentazione corrisponda a quella indicata
sulla targhetta.
Fare attenzione alle scosse elettriche.
•La sicurezza elettrica può essere ulteriormente
ampliata utilizzando un dispositivo a corrente
residua (RCD) ad alta sensibilità (30 mA / 30 mS).
•Questo utensile è predisposto esclusivamente
per l’alimentazione elettrica (di rete) CA.
Non tentare di usarlo con alimentazioni diverse.
Prolunghe
Quando l’attrezzo viene impiegato all’aperto,
usare unicamente le prolunghe per uso esterno.
Montaggio prima dell’uso (Fig. B & C)
Montaggio tubo aspirazione (Fig. B)
B•I tubi di aspirazione devono essere
montati insieme prima dell’utilizzo.
•Per facilitare il montaggio passare sulla
zona del giunto una soluzione di acqua
saponata.
•Allineare le tacche (15) e i triangoli (14)
sui tubi superiore (4) e inferiore (5).
•Installare la sezione inferiore (5) sopra la
sezione superiore del tubo (4), finché il
triangolo non scatta in posizione
(non utilizzarli mai separati).
•Per motivi di sicurezza il montaggio dei
tubi si intende permanente.
Assemblaggio del tubo soffiante (Fig. C)
C•Prima dell’uso, è necessario
assemblare il tubo di soffiaggio
fissandolo alla relativa impugnatura.
•Allineare i cerchi (16) sull’impugnatura
(6) e il tubo (7).
•Spingere con decisione il tubo (7)
sull’impugnatura (6) finché i cerchi non
scattano in posizione.
•Per conservare l’attrezzo, il tubo di
soffiaggio può essere staccato
dall’impugnatura premendo i cerchi su
ogni lato e facendo fuoriuscire il tubo
con delicatezza.
Montaggio tracolla (Fig. D - G)
•Se necessario fissate la tracolla al corpo
motore e regolatela come necessario.
Per maggiore comodità, la cinghia a
tracolla può essere indossata in due
modi:
Attacco a un punto (Fig. D)
•Attraverso l’occhiello (18), fissare il
gancio (17) alla testa di alimentazione
•Regolare la lunghezza della cinghia
mediante la fibbia.
Attacco a due punti (Fig. D, E, F & G)
•Attraverso l’occhiello (18), fissare il
gancio (17) alla testa di alimentazione
•Rimuovere dalla fibbia l’estremità libera
della cinghia.
•Far scorrere l’estremità libera (19) sotto
la borchia (20) e reinfilarla attraverso la
fibbia (21).
•Regolare la lunghezza della cinghia
mediante la fibbia (Fig. G).
Interruttore on/off (Fig. H1, H2, H3)
Attenzione! All’accensione, utilizzare
entrambe le mani per impugnare
saldamente il prodotto.
•Per maggiore controllo, il Blowvac è
provvisto di interruttore a due velocità,
ubicato sull’impugnatura della testa di
alimentazione.

15
•L’interruttore è spento in posizione
centrale. Posizione 0 (Fig. H1).
•Per usare la bassa velocità, spostare
l’interruttore completamente indietro.
Posizione I (Fig. H2).
•Per passare all’alta velocità, spingere
l’interruttore di nuovo in posizione off e
poi completamente in avanti.
Posizione II (Fig. H3).
Serracavo (Fig. I)
I•Un serracavo è incorporato nella parte
posteriore del corpo motore.
•Infilare il cavo (22) nel fermacavo (12).
Utilizzo della macchina (Fig. J)
Durante l’utilizzo come soffiatore o aspiratore
portate sempre occhiali protettivi. Portate
anche una mascherina filtro in presenza di
polvere.
Spegnere il prodotto, attendere che la
ventola si fermi ed estrarre la spina dalla
presa prima di eseguire qualsiasi intervento
di regolazione, assistenza o manutenzione.
Soffiatore
J•Fissare il tubo e l’impugnatura di
soffiaggio (6 & 7) alla testa di
alimentazione (2) (Fig. J), posizionando
il soffiatore come indicato dalla freccia
23; poi ruotare attorno a questo punto
finché il fermo di sgancio / aggancio
(24) non è perfettamente impegnato.
•Tenete il tubo a circa 15/20cm dal
terreno, accendete la macchina e con
un movimento alternato da destra a
sinistra avanzate lentamente
mantenendo di fronte a voi le foglie o i
detriti accumulati (Fig. K).
• Dopo aver formato una pila di foglie/
detriti, potete convertire l’utilizzo della
macchina in aspiratore per raccoglierli.
Rimozione del tubo di soffiatura/
aspirazione (Fig. J)
J•Per staccare dalla testa di alimentazione
l’impugnatura di soffiaggio o il tubo di
aspirazione, spingere il pulsante di
sgancio (3), facendo attenzione a non
fare cadere a terra il tubo.
•Il pulsante di sgancio non può essere
spinto se l’interruttore è in posizione “on”.
Aspiratore (Fig. L - P)
Per collegare il sacchetto raccoglitore
alla macchina (Fig. M, N, O):
•Per aspirare / triturare è necessario
installare il sacchetto di raccolta (9) nel
portasacchetto (8).
•Fig. M: Individuare il telaio del sacchetto
(25) nel canale del portasacchetto (26),
controllando che il lato anteriore del
sacchetto sia posizionato sopra la
presa di aspirazione (27).
•Fare scivolare il sacchetto
completamente nel canale e spingere il
fermo (28) per bloccare l’impugnatura
sul lato superiore del sacchetto
(Fig. N & O).
•Posizionare il tubo leggermente al di
sopra delle foglie/detriti. Accendere
l’apparecchio, quindi, con un
movimento circolare i detriti/foglie
verranno aspirati nel tubo, triturati e
gettati nel sacco raccoglifoglie (Fig. L).
•Per le foglie / i detriti più ostinati, il tubo
di aspirazione è munito di un raschietto
incorporato (13). Utilizzare il raschietto
per ammorbidire i detriti e continuare ad
aspirarli come d’abitudine.
•Mano a mano che il sacco si riempie,
la potenza di aspirazione diminuirà;
spegnere l’apparecchio e staccare la
spina dalla presa di corrente.
•Per estrarre il sacchetto, spingere il
fermo (28) per sganciarlo dal
portasacchetto e farlo scivolare fuori.
•Per svuotare il sacchetto, mantenere
l’impugnatura di plastica (10) e afferrare
l’impugnatura di nailon (29) sul lato
inferiore del sacchetto. Capovolgere il
sacchetto e svuotarlo, facendone
fuoriuscire detriti e foglie.
Ricerca di malfunzionamento
La macchina non (1) Controllate il collegamento
funziona alla presa elettrica.
(2) Controllate che il tubo sia
correttamente collegato al
corpo motore.
ITALIANO

16
Dichiarazione CE di conformità
Dichiariamo che l’elettroutensile:
LS1800
è stato sviluppato in conformità a:
98/37/CEE, 89/336/CEE, 73/23/CEE,
EN 55014, EN 55104, EN 60335,
2000/14/CEE, Sfiatatoio fogliame / collettore
=11 m3/min, Annex V
Livello di rumorosità, dati ricavati in base alla
norma 2000/14/CEE:
LpA (rumorosità) dB(A) 92
LWA (potenza sonora) dB(A) 105
LWA (garantito) dB(A) 107
Il valore medio quadratico ponderato
dell’accelerazione secondo EN ISO 5329:
< 2,5 m/s2
Herbert Montebaur
Quality assurance
GPM, Schlüterstr. 3, D-40235 Düsseldorf
(3) Se il fusibile continua a
bruciarsi – scollegare
immediatamente la spina
dalla rete di alimentazione
elettrica e consultare un
tecnico autorizzato Fleurelle
locale.
Scarsa aspirazione/ (1) Spegnete la macchina,
suono acuto staccate la spina dalla presa,
eventuali detriti potrebbero
cadere fuori dal tubo.
(2) Smontate e svuotate il
sacchetto raccoglitore.
(3) Controllate che l’entrata e
l’uscita del tubo siano libere da
detriti.
(4) Rimuovete eventuali detriti
dalla zona della ventola.
(5) Se la condizione di bassa
capacità di aspirazione
persiste – scollegare
immediatamente la spina
dalla rete di alimentazione
elettrica e consultare un
tecnico autorizzato Fleurelle
locale.
Scarsa triturazione (1) spegnete la macchina -
staccate la spina dalla presa
e smontate il sacchetto
raccoglitore.
(2) smontate il tubo e
controllate la ventola.
(3) rimuovete eventuali detriti
dalle pale della ventola.
(4) Se la ventola risulta
spezzata o danneggiata,
non utilizzare la macchina –
consultare un tecnico
autorizzato Fleurelle locale.
Pulizia della vostra macchina
Tenete sempre asciutta la macchina.
Non spruzzatela mai con acqua.
•Pulite regolarmente la vostra macchina.
•Rimuovete tutte le foglie che si attaccassero
all’interno del tubo.
•Le parti plastiche possono essere pulite
utilizzando un sapone neutro ed un panno
inumidito con acqua calda.
Non utilizzate mai alcun tipo di detergente,
solvente o altro prodotto che contenga
agenti chimici che potrebbero danneggiare
seriamente la plastica.
•La vostra macchine utilizza cuscinetti auto-
lubrificanti. Quindi non è necessaria alcuna
lubrificazione.
Protezione dell’ambiente
Se il prodotto ha raggiunto il termine della
propria durata operativa, provvedere a
smaltirlo in modo ecologicamente
compatibile.
Punte
• Se la macchina ha smesso di funzionare,
per prima cosa controllare che la causa del
problema non si trovi all’esterno della
macchina, ad es. per un’interruzione
dell’alimentazione elettrica.
• Si raccomanda di allegare la seguente
documentazione alla macchina difettosa:
• Ricevuta d’acquisto.
• Descrizione del difetto (una descrizione
quanto più precisa possibile ridurrà i tempi
necessari per le riparazioni)
Per effettuare reclami in garanzia, fornire informazioni
riguardo ad un problema o richiedere parti di
ricambio, consultare il rivenditore presso cui è stata
acquistata la macchina o il nostro punto di
assistenza.

17
Dati tecnici
(vedere anche la targhetta
identificativa)
Potenza 1.800 W
Tensione 230 V/50 Hz
Corrente 8,2 A
Num. giri 16.000 min-1
Protezione Doppio isolamento
Garanzia
Gentile Cliente,
Congratulazioni per l’acquisto di questo prodotto
Fleurelle. Come tutti i prodotti Fleurelle, anche
questo è stato sviluppato secondo le più avanzate
conoscenze tecniche e prodotto utilizzando i
componenti elettrici ed elettronici più affidabili ed
aggiornati.
Prima di utilizzare la macchina, si consiglia di
leggere con attenzione le istruzioni per l’uso.
Grazie!
Questa macchina è stata prodotta e controllata
applicando i metodi più aggiornati. Il rivenditore
offre una garanzia contro difetti nei materiali e nella
lavorazione per un periodo di 24 mesi a partire
dalla data dell’acquisto originale, soggetta alle
seguenti condizioni:
Entro il periodo di garanzia, qualsiasi difetto nei
materiali e nella lavorazione verrà eliminato
gratuitamente. I reclami devono essere inoltrati al
momento del primo insorgere del problema.
L’acquirente ha il diritto di richiedere
esclusivamente una riduzione del prezzo di
acquisto o il risarcimento del costo di acquisto sulla
base della presente garanzia, entro 6 mesi dal
giorno della data d’acquisto, qualora i fini di utilizzo
della macchina dichiarati dal fabbricante non
possano essere ottenuti tramite riparazioni o
sostituzione.
I reclami inoltrati entro il periodo di garanzia
verranno invalidati da interventi tecnici sui
componenti effettuati dall’acquirente o da terze
parti. Eventuali danni causati da collegamento o
installazione inappropriati, da eventi accidentali o
da altre influenze esterne non rientrano nei termini
della presente garanzia.
Nell’eventualità di un reclamo, il fabbricante si
riserva il diritto di decidere se riparare o sostituire i
componenti difettosi, oppure sostituire la macchina
completa. I componenti sostituiti diventano di
proprietà del fabbricante.
Le richieste di risarcimento sono escluse se non
dovute a grave negligenza da parte del fabbricante.
ITALIANO
Nessuna ulteriore richiesta può essere avanzata
sulla base della presente garanzia. I reclami in
garanzia devono essere avallati dall’acquirente
tramite presentazione della ricevuta d’acquisto.

18
Herzlichen Glückwunsch
Mit Ihrem Kauf des Fleurelle Systems haben sie ein
Produkt gekauft, welches Ihnen problemloses
Laubsaugen ermöglicht.
LS1800 - Blower Vac
Saugen mit zwei Geschwindigkeiten
✔
Häckseln
✔
Blasen mit zwei Geschwindigkeiten ✔
Die Laubsauger haben viele Eigenschaften, die für
eine einfache und gute Handhabung sorgen:
•Der kraftvolle Motor bläst die Luft und
saugt/häckselt.
•Die einzigartige 5-Blatt-Turbine häckselt das
Laub und verringert den Abfall auf 1/10 des
ursprünglichen Volumens.
•Bequem angeordneter Schalter für zwei
Geschwindigkeiten.
•Ergonomisches Design für bessere
Bedienerfreundlichkeit und Komfort.
•Der große Durchmesser des Saugrohres
garantiert ein Maximum an Saugleistung.
•Leicht zu leerender 35-Liter-Fangsack.
Beschreibung (Abb. A)
ANachstehend eine Liste derjenigen Teile,
die in dieser Bedienungsanleitung erwähnt
werden und in den Abbildungen gezeigt
werden:
1. Zweistufiger Ein-/Ausschalter
2. Antriebskopf
3. Entriegelungsknopf
4. Saugrohr - oben
5. Saugrohr - unten
6. Gebläse-Halbschale
7. Blasrohr
8. Oberseite des Fangsacks
9. Fangsack
10. Handgriff des Fangsacks
11. Tragegurt
12. Kabel-Zugentlastung
13. Schaber
Geräteinformation
Bitte lesen Sie diese Bedienungsanleitung
und beachten Sie alle empfohlenen
Sicherheitshinweise vor und während des
Arbeitens mit Ihrem Laubsauger. Halten Sie
Ihr Werkzeug immer in gutem Zustand.
Machen Sie sich mit den Funktionen Ihres
Black & Decker Laubsaugers vertraut und
versichern Sie sich, daß Sie das Gerät im
Notfall schnell stoppen können.
Bitte bewahren Sie diese
Bedienungsanleitung gut auf, damit Sie
auch zukünftig etwas nachlesen können.
Sicherheitshinweise
Bitte lesen Sie alle Hinweise, bevor Sie das Gerät
benutzen!
Hinweise
•Erlaubens Sie keinen Personen,
die diese Bedienungsanleitung nicht
gelesen haben oder noch unter 16
Jahren sind die Benutzung des Gerätes.
Im Falle eines Unfalles sind Sie
verantwortlich!
•Beachten Sie, daß der Bediener für
Unfälle oder Gefahren, die vom Gerät
auf andere Personen oder deren
Eigentum ausgehen, verantwortlich ist.
6
m
360˚
•Halten Sie andere Personen,
insbesondere Kinder oder Haustiere
von dem laufenden Gerät fern. Sie
selbst sind dafür verantwortlich, daß
kein Unfall geschieht - Halten Sie o.g.
Personen wenigstens 6 Meter von
Ihrem Arbeitsgebiet fern.
•Tragen Sie Ihr Gerät niemals am Kabel
und reißen Sie bitte nicht am Kabel.
Halten Sie das Kabel von scharfen
Kanten, heißen Oberflächen und Öl
fern. Überprüfen Sie den Zustand des
Kabels vor Gebrauch und benutzen Sie
es nicht, sofern es beschädigt ist.
Vorbereitung
•Bedienen Sie das Gerät nicht barfuß
oder in offenen Sandalen.
•Zum Schutz Ihrer Füße und Beine
tragen Sie stets festes Schuhwerk oder
Stiefel und lange Hosen - frisch
gemähter Rasen ist feucht und
rutschig. Gummistiefel bzw. festes
Schuhwerk erhöhen Ihre Sicherheit.
Bedienungsanleitung
LS1800

19
•Tragen Sie beim Arbeiten mit dem
Gebläse immer eine Schutzbrille oder
entsprechende Sicherheitsgläser.
•Um sich vor Staub zu schützen, wird
das Tragen eines angemessenen
Gesichtsschutzes empfohlen.
•Tragen Sie einen Lärmschutz, sobald
der Lärmpegel des Arbeitens
unangenehm wird.
Warnung: Langes Haar hochstecken,
damit es nicht länger als schulterlang ist.
Lose sitzende Kleidung, Krawatten, Quasten
und herabhängende Riemen von Öffnungen
und beweglichen Teilen fernhalten.
•Das Stromkabel sollte regelmäßig
auf Zeichen von Schäden oder
Verschleiß überprüft werden und nur in
gutem Zustand verwendet werden.
•Überzeugen Sie sich vor Arbeitsbeginn
immer vom einwandfreien Zustand
Ihres Gerätes.
•Arbeiten Sie nicht mit Ihrem
Laubsauger, wenn irgendwelche
Geräteteile defekt oder abgenutzt sind.
•Saugen Sie keine glimmenden Teile wie
beispielsweise Zigarettenkippen ein.
•Arbeiten Sie mit Ihrem Gerät niemals in
explosiver oder gasgefüllter Atmosphäre,
da bei Elektromotoren üblicherweise
beim Betrieb Funken entstehen
und JÁ¸urch Brände ausgelöst werden
können.
Bedienung
•Benutzen Sie Ihren Laubsauger nicht
als Sauggerät, ohne daß Sie vorher
das Saugrohr und den Laubfangsack
montiert haben.
Schalten Sie das Produkt stets aus, lassen
Sie den Lüfter zum Stillstand kommen und
ziehen Sie den Stecker aus der Steckdose,
falls:
•Sie das Gerät von der Blasfunktion
auf die Saugfunktion umbauen.
•Das Netzkabel beschädigt wurde
oder sich verwickelt hat.
•Wenn Sie das Gerät unbeaufsichtigt
zurücklassen.
•Sie das verstopfte Rohr reinigen
wollen.
•Sie das Gerät kontrollieren, säubern
oder an der Maschine arbeiten wollen.
•Wenn das Gerät beginnt, übermäßig
stark zu vibrieren.
•Bitte halten Sie Augen und Ohren fern
von der Ausblas- bzw. Ansaugöffnung.
Den Unrat niemals in die Richtung
blasen, in der sich Personen aufhalten.
•Benutzen Sie Ihren Laubsauger nicht
im Regen und achten Sie darauf,
daß er nicht naß wird. Verzichten Sie
auf Gebrauch des Laubsaugers in
nassem Gras.
•Benutzen Sie das Gerät nur bei
Tageslicht oder sehr hellen künstlichen
Lichtverhältnissen.
•Bei eingeschaltetem Gerät im Blas-/
Saugmodus keine Kieswege oder
Straßen überqueren. Laufen Sie
niemals, gehen Sie statt dessen.
•Legen Sie das Gerät niemals auf Kiesel,
solange es eingeschaltet ist.
•Achten Sie immer darauf, daß Sie
sicher stehen und nicht das
Gleichgewicht verlieren - vor allem
dann, wenn Sie an Hanglagen arbeiten.
Strecken Sie sich nicht zu weit nach
vorne, und halten Sie stets das
Gleichgewicht.
•Saugen Sie keine Materialien ein,
die mit einer entflammbaren Flüssigkeit
(Beispiel: Benzin) getränkt sind oder
mit einer solchen in Berührung geraten
sein könnten.
•Legen Sie keine losen Gegenstände in
die Öffnungen des Gerätes. Benutzen
Sie das Gerät nie, wenn die Öffnungen
durch solche Teile blockiert sind. Halten
Sie die Öffnungen frei von Haaren,
Fussein, Staub oder ähnlichem, was die
Saug- bzw. die Blasleistung Ihres
Gerätes reduzieren könnte.
Achtung! Halten Sie sich bei der
Benutzung Ihres Laubsauger immer an die
Hinweise der Bedienungsanleitung.
Ihr Laubsauger ist so konstruiert, daß er in
aufrechter Position benutzt werden kann -
der Gebrauch in jeder anderen Position
kann Verletzungen nach sich ziehen.
Schalten Sie das Gerät niemals an,
während es auf der Seite oder auf dem
Kopf liegt.
•Tragen Sie das Gerät nicht am Kabel.
•Führen Sie das Kabel immer nach
hinten - weg vom Gerät.
DEUTSCH

20
!
•Falls ein Kabel beim Gebrauch
beschädigt wird, trennen Sie das
Versorgungskabel sofort vom Netz.
BERÜHREN SIE DAS KABEL NICHT,
SOLANGE ES NOCH NICHT VOM
NETZ GETRENNT IST.
Pflege/lnstandhaltung
•Bewahren Sie Ihren Laubsauger
stets an einem trockenem Ort außerhalb
der Reichweite von Kindern auf.
•Benutzen Sie keine scharfen
Reinigungs- oder Lösungsmittel, da
diese die Plastikteile des Gerätes
angreifen könnten. Verwenden Sie zur
Reinigung lediglich ein feuchtes Tuch.
•Halten Sie die Rohre des Gerätes mit
einem stumpfen Kratzer sauber,
so ist die optimale Leistungsstärke
gewährleistet.
•Überprüfen Sie das Gerät und das
Netzkabel vor der Arbeit auf
Beschädigungen. Vergewissern Sie
sich, daß alle beweglichen Teile richtig
montiert sind und nicht klemmen, daß
keine Teile gebrochen sind, daß keine
Schutzvorrichtungen und Schalter
beschädigt sind, und prüfen Sie,
ob irgendwelche anderen Schäden den
einwandfreien Betrieb des Gerätes
beeinträchtigen könnten. Vergewissern
Sie sich, daß das Gerät ordnungsgemäß
funktioniert. Benutzen Sie das Gerät
nicht, wenn irgendein Teil defekt ist.
Verwenden Sie das Gerät nicht, wenn
der Ein-/Ausschalter nicht funktioniert.
•Lassen Sie defekte Teile immer von
einer unserer Kundendienstwerkstätten
reparieren oder austauschen.
Versuchen Sie nie, das Gerät selber zu
reparieren.
•Falls das Netzkabel beschädigt ist,
so ist es vom Hersteller oder einem
autorisierten Servicecenter
auszutauschen, um Gefahren
vorzubeugen. Beschädigte und
unleserliche Schilder sind zu erneuern.
•Überprüfen Sie den Fangsack
gelegentlich auf Verschleiß und Alterung.
•Verwenden Sie nur Original-Ersatzteile
und Zubehör.
Doppelisolierung
Dieses Gerät ist schutzisoliert, daher ist
keine Erdleitung erforderlich. Überprüfen
Sie stets, ob die Netzspannung der auf
dem Typenschild angegebenen Spannung
entspricht.
Schutz vor elektrischem Schlag.
•Die elektrische Sicherheit läßt sich durch
Verwendung eines Fehlerstrom-Schutzschalters
(FI-Schalter) (30 mA/30 ms) zusätzlich erhöhen.
•Ihr Gerät wurde ausschließlich für
Wechselstrombetrieb (Lichtnetz) ausgelegt.
Versuchen Sie nicht, das Gerät mit einer
anderen Stromversorgung zu betreiben.
Verlängerungskabel
Wenn Sie das Gerät im Freien verwenden,
verwenden Sie nur Verlängerungskabel,
die sich für den Einsatz im Freien eignen.
Montage des Gerätes (Abb. B & C)
Saugfunktion (Abb. B)
B•Die Saugrohre müssen vor Gebrauch
montiert werden.
•Zum einfacheren Zusammenbau tragen
Sie auf die Verbundflächen eine
Seifenwasserlösung auf.
•Die Kerben (15) und Dreiecke (14) am
oberen (4) und unteren (5) Rohr
ausrichten.
•Das untere Rohr (5) fest in das obere
Rohr (4) schieben, bis die Dreiecke in
ihrer Lage einrasten. (Niemals in nicht
zusammengesteckten Zustand
betreiben.)
•Im Interesse der Sicherheit sollten die
Rohre, nachdem sie zusammengesetzt
wurden, nicht auseinandergenommen
werden.
Montage des Gebläserohrs (Abb. C)
C•Das Blasrohr muß vor der Verwendung
an der Gebläse-Halbschale angebracht
werden.
•Die Kreise (16) an der Halbschale (6)
und dem Rohr (7) ausrichten.
•Das Rohr (7) fest auf die Halbschale (6)
schieben, bis die Kreise in ihrer Lage
einrasten.
•Zur Aufbewahrung kann das Blasrohr
von der Gebläse-Halbschale
abgenommen werden, indem die Kreise
auf jeder Seite gedrückt und das Rohr
sanft abgezogen wird.
Tragegurt (Abb. D - G)
•Befestigen Sie den Tragegurt am
Motorgehäuse Ihres Laubsaugers und
richten Sie ihn nach Ihrer Körpergröße aus.
Der Tragegurt dient Ihrem Komfort und
kann auf zweierlei Weise angeordnet
werden:
Table of contents
Languages:
Popular Blower manuals by other brands


Finn
Finn MBH6 Operator's manual

Little Wonder
Little Wonder Sho Owner's manual and safety instructions

Ryobi
Ryobi RBL3626 Original instructions

Husqvarna
Husqvarna BLOWER KIT 42'' Operator and parts manual

VITO GARDEN
VITO GARDEN 2T 27cc instruction manual

Worx
Worx Leaf Pro WA4054 Assembly manual & user guide


