FlexiForce RS200 Instruction Manual
RS200 manual GB 2009 www.flexiforce.com
1
manual GB
rev.0 Feb-09
RS200
Hardware system for
residential (garage)
overhead doors
Built-in height 200mm, springs in front
INSTALLATION / MAINTENANCE / USAGE
© All rights reserved. FlexiForce® 2009

RS200 manual GB 2009 www.flexiforce.com
2
manual GB
rev.0 Feb-09
ATTENTION! GENERAL WARNING!
To install, use and maintain this door system safely, a number of precautions
must be taken. For the safety of all concerned, pay heed to the warnings and
instructions given below! If in doubt, contact your supplier.
SPECIAL SAFETY WARNINGS OR REMARKS IN THIS MANUAL ARE INDICATED
WITH THIS SYMBOL. READ THESE WARNINGS CAREFULLY!
9This manual has been written for use by experienced fitters and as such is not suitable for
d.i.y. purposes or for use by trainee fitters.
9This manual describes the installation of the hardware set components, door sections
(panels) and refers to installation manuals of the electrical operator. Be sure to
supplement this manual if needed with instructions for any additional components not
described in this manual.
9Before starting, read this manual carefully!
9Certain components may be sharp or have jagged edges. As such you are advised to wear
safety gloves.
9All the components which have been supplied are designed for use with this specific
overhead door. Replacement or adding additional components may have an adverse effect
on the safety of, and the guarantee on, the door. Also the CE-approval which has been
granted to this door will be cancelled when components are changed or installation is not
done according to this manual! Installer is responsible for this.
9Ensure that there is sufficient light during installation. Remove obstacles and dirt. Make
sure that there is no one else present other than the fitters. Other people (children!) may
get in the way or endanger themselves during the installation.
GUARANTEE, CONDITIONS AND TERMS
The general terms and conditions of delivery and payment issued by the Metaalunie and designated as
METAALUNIE CONDITIONS are fully applicable to all our quotations, contracts and their
implementation. We expressly reject all other terms and conditions. On request we will send you a copy
of these terms and conditions free of charge. A copy may also be downloaded from our website
www.flexiforce.com.
FlexiForce strives to deliver 100 % in conformance with the order. In practice, in spite of all our controls,
this is not always possible. However we will rectify any errors as quickly as possible, in order to minimise
the inconvenience caused to you or the user. As such, it is important that you inform us as soon as possible
about any problem with the delivery (include the order number and week of production) and give us the
opportunity to offer a suitable solution.
FlexiForce will only reimburse third party costs if we have given explicit permission for this in advance. The
reimbursement is based on normal rates and travelling expenses over distances of 1 hour away at most.
For large-scale projects we strongly advise you to first install 1 door completely before installing the other
doors. In this way, any errors can be detected early on and rectified comparatively cheaply.
This manual does not confer any rights. Technical modifications may be made without written notice.
FlexiForce has endeavoured to design and put together this hardware set in conformance with the
applicable CE-norms. However, we recommend to check our configuration against any local national
specification.

RS200 manual GB 2009 www.flexiforce.com
3
manual GB
rev.0 Feb-09
FlexiForce has applied the mandated INITIAL TYPE TESTING for doors described in this manual, at the
SP-Institute in Sweden (as Notified Body Nr. 0402). The INITIAL TYPE TESTING REPORT that has been
rewarded, can be transferred to the door producing company. This is needed to complete your CE files
according to product standard EN13241-1. Contact FlexiForce for acquiring this report.
APPLICATION RANGE
FlexiForce has developed a new hardware system for garage overhead doors. The system includes the
following features:
•Suitable for single and double garages, Wmax = 5.000 mm, Hmax = 3.000 mm.
•For double doors, the horizontal track set can be reinforced with side plate RX560L/R
•Advised max door weight is 165 kg. Each spring break device is approved to 125kg.
•CE approved when selecting the proper FlexiForce components.
We wish you every success with the installation of this hardware set. If anything is unclear or should
you have queries, you should of course contact Flexi-Force B.V. or your supplier.
This set has to be completed with the assembled door sections. Panels brands and types according to
the list of approved panels.
NB! FlexiForce has introduced a new system for shaft installation, so called SUPERCLICK®.
There is a separate manual available for this system (attachment). In this manual, the
SuperClick® system is marked with this sign:
NB! FlexiForce recommends to apply our “light” hardware range for garage doors. In this manual
only “light” components are selected.
Attention! In this set, the fixing material required to install the track set to the building is not
included. It is the responsibility of the qualified door installer to make sure that the building
(stone, concrete, wood, etc.) is strong enough at the points of fixation to ensure a reliable
construction. The door installer has to select proper fixing materials.
RECOMMENDED ADDITIONAL MANUALS
RS200 manual GB 2009 www.flexiforce.com
4
manual GB
rev.0 Feb-09
IN THIS MANUAL:
-Attention, general warnings 2
-Guarantee, terms and conditions 2
-Applicationrange 3
-Recommended additional manuals 3
-Tools for correct and rapid assembly 5
-Applied fixation materials 5
-RS200 System overview 6
-Installing vertical track system 7
-Installing horizontal track system 8
-Shaft system installation 11
-Panel <> Hardware installation 14
-Cables & Torsion springs 17
-Finishingthedoor 19
-Optional: E-operation 23
-Panelassembly 24
-Troubleshooting 27
-Dismantling the overhead door 28
-Maintenance and replacement of parts 29

RS200 manual GB 2009 www.flexiforce.com
5
manual GB
rev.0 Feb-09
TOOLS FOR CORRECT AND RAPID ASSEMBLY
(Battery) drill with Bit 4,0 mm
Bit 4,5 mm
Bit 6,5 mm
Plug 10 mm
Plug13mm
Hexagonal key 4 mm
Socket screw spanner 8mm (in)
Ring /open ended spanner 10 mm
Ring /open ended spanner 13 mm
Ring /open ended spanner 15 mm
Ring /open ended spanner 17 mm
Socket wrench with ¼” square
Wrench
Gluing clamp
Cord
Water level (hose)
2 blocks of ca. 20 en 40mm in height
Measuring equipment
APPLIED FIXATION MATERIALS
The applicable fixation material is described in the drawings of this manuals. Below an overview
of the applied fasteners and optional alternatives.
1055BV, self-tapping screw Alternatives: 1055D, screw, 6,3x25mm, with drill-point
Max torque 10Nm, key 10 1053BV, screw 6,3x35mm
1053D, screw 6,3x35mm, with drill-point
1054-25, 1054-35, screw with socket hex cap, drill point
1054W-25, 1054W-35, screw with socket hex cap (RAL9010)
Optional: 1055CAP10, white (RAL9010) cover for screws (key 10)
1070B35, bolt M8x25 1006B, press bolt 1062B, bolt M6x16
1068M, nut M8 1062M, nut M6 1062M, nut M6
Max. torque 13Nm, key 13 Max. torque 9,1Nm, key 10 Max. torque 5,3Nm, key 10
1071BC, bolt M8x12, SuperClick® secure bolt NB! Fixation material for installing to wall and
Max. torque 10Nm, key 13 ceiling is not included in this manual!

RS200 manual GB 2009 www.flexiforce.com
6
manual GB
rev.0 Feb-09
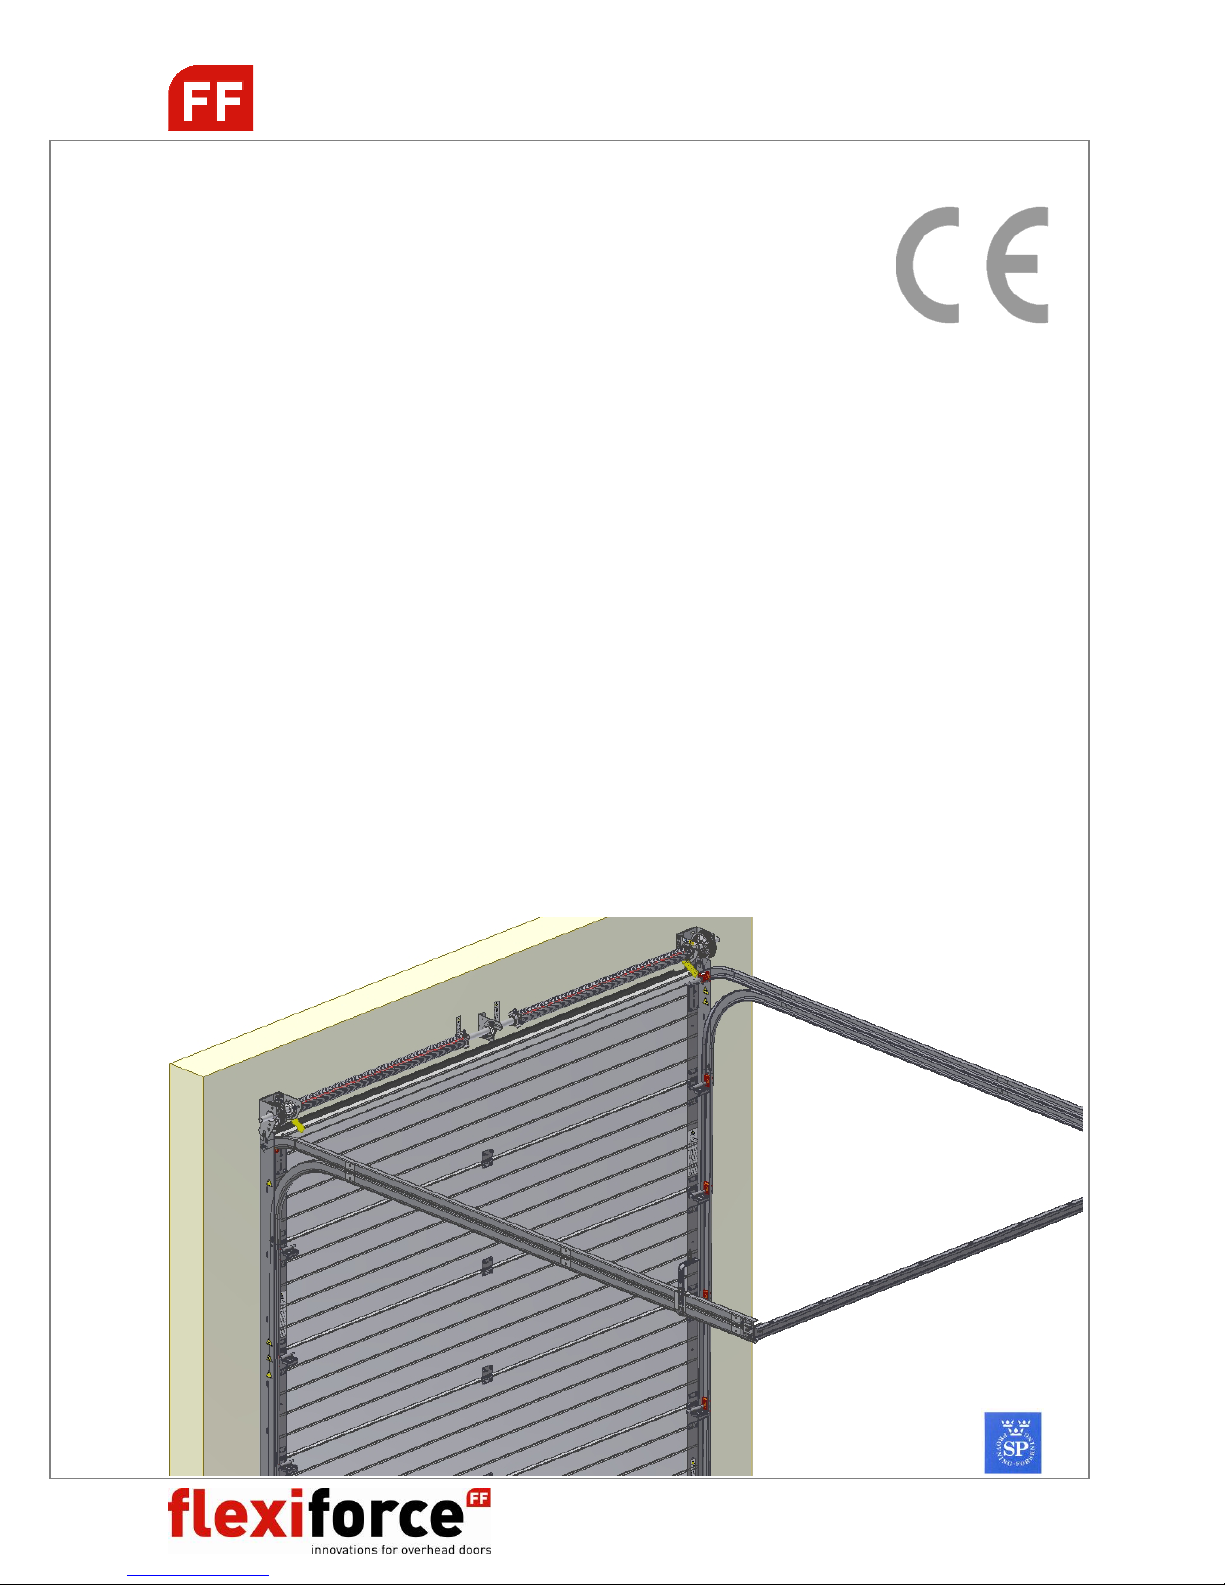
RS200 SYSTEM OVERVIEW
B = H – 175mm for manual operated doors
B = H – 0mm for e-operated doors
Shaft system
with torsion springs, spring break devices
drums, spring fittings, cables, etc.
RS200H10etc.
Horizontal double track set
Connection horizontal
tracks
RSV10etc
Vertical set with track, side seal and
vertical angle
Door panels, sections
With end caps, hinges, bottom
brackets, bottom astragal and seal,
top roller carriers, windows, etc.
RS200 : top view

RS200 manual GB 2009 www.flexiforce.com
7
manual GB
rev.0 Feb-09
INSTALLING VERTICAL TRACK SYSTEM

RS200 manual GB 2009 www.flexiforce.com
8
manual GB
rev.0 Feb-09
VERTICAL TRACK SET
HORIZONTAL TRACK SET
OPTIONAL: REINFORCEMENT HORIZONTAL TRACK SET
For heavy doors, the horizontal track could be optionally reinforced with plate RX560R/L.

RS200 manual GB 2009 www.flexiforce.com
9
manual GB
rev.0 Feb-09
INSTALLATION WALL CONSOLES
Traditional installation
SuperClick® installation

RS200 manual GB 2009 www.flexiforce.com
10
manual GB
rev.0 Feb-09
CONNECTION HORIZONTAL TRACKS (OPTIONAL)
L = days opening width + 134mm
SUSPENSION HORIZONTAL TRACK TO CEILING
CLICK!

RS200 manual GB 2009 www.flexiforce.com
11
manual GB
rev.0 Feb-09
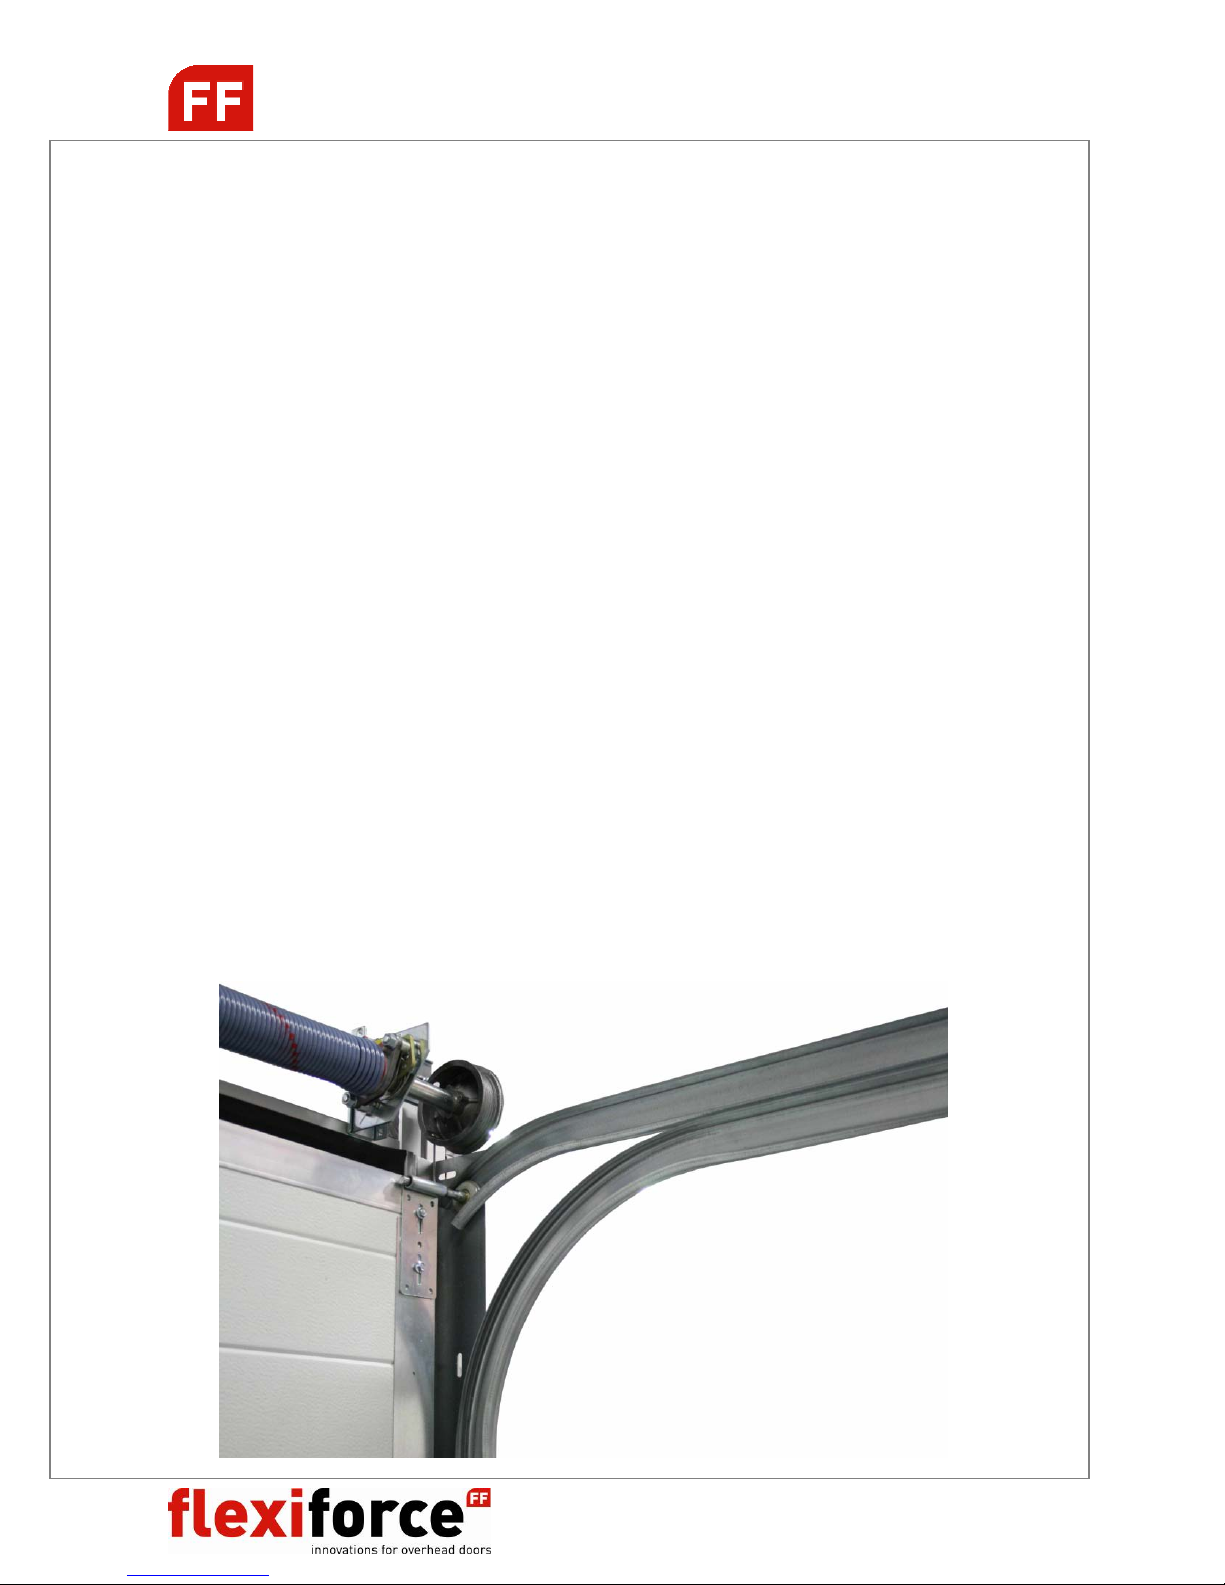
SHAFT SYSTEM INSTALLATION
DOOR W<3000mm
CENTRAL SHAFT SUSPENSION (3 ALTERNATIVES)
USA-MINI 312RM
312R
Central shaft suspension
Torsion springs
with spring fittings and spring break devices
Cable drums
No key-way: FF4X8, FF400-8(S), FF0402
Without key-way
tube shaft

RS200 manual GB 2009 www.flexiforce.com
12
manual GB
rev.0 Feb-09
SHAFT SYSTEM INSTALLATION
DOOR W>3000mm (double doors)
CENTRAL SHAFT SUSPENSION (W>3000mm)
Traditional installation SuperClick® installation
Torsion springs
with spring fittings and spring break devices
Cable drums
With key-way: FF-4-13, FF05NL12 etc.
Central shaft suspension
With coupler and 2 bearing plates
(310CL/CR or USA-MINI)
With key-way
tube key-wayed shaft
Max 23 Nm

RS200 manual GB 2009 www.flexiforce.com
13
manual GB
rev.0 Feb-09
FIXATION TO THE LINTEL
Traditional installation SuperClick® installation

RS200 manual GB 2009 www.flexiforce.com
14
manual GB
rev.0 Feb-09
PANEL <> HARDWARE INSTALLATION

RS200 manual GB 2009 www.flexiforce.com
15
manual GB
rev.0 Feb-09
Alternative hinges: 411-series

RS200 manual GB 2009 www.flexiforce.com
16
manual GB
rev.0 Feb-09
INSTALLATION TOP PANEL / TOP ROLLER CARRIER
Close the door and secure the door panel. Loosen the two self-tapping screws (1055BV) securing the
top roller holder (417S) so that it can be displaced with a slight tick. Press the top panel against the
side (upper) seal and slide the top roller holder as far as possible downwards and fix all screws.
(minimum play between door panel and seal). The bearing roller lies snugly in the rounding of the
bearing tracks.
Alternative top roller carrier: adjustable 419S-series

RS200 manual GB 2009 www.flexiforce.com
17
manual GB
rev.0 Feb-09
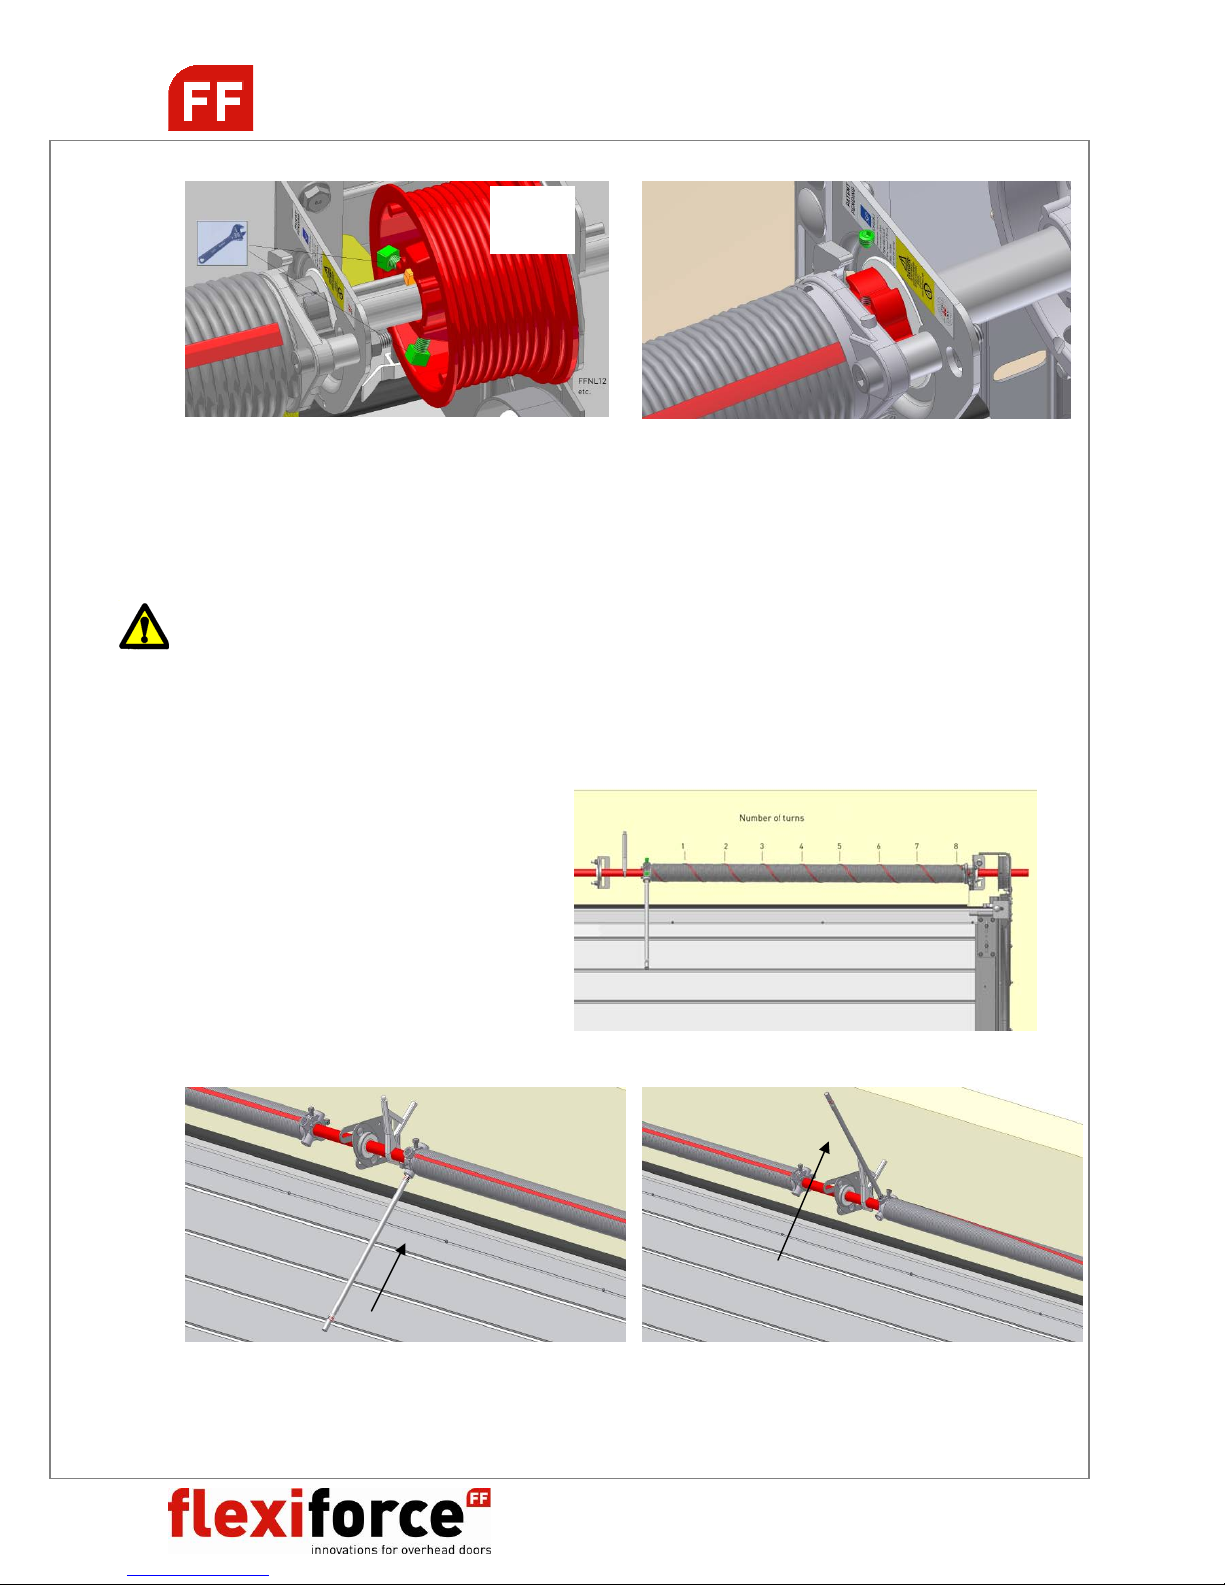
CABLES & TORSION SPRINGS
! Cable running behind the rollers to the cable drums
Without key-way: Fix shaft with clamp. Hook the cable connection in the drum.
Rotate the drum for winding the cable. Position drum on the shaft.
Max 10Nm
RS200 manual GB 2009 www.flexiforce.com
18
manual GB
rev.0 Feb-09
With key-way:
NB! See separate manual spring break device installation: 656Manual GB.pdf
TORSION SPRING TENSIONING
CAUTION!
Torsion springs are subject to considerable tension! Proceed at all times with extreme caution.
Installation, maintenance and repair should be carried out only by experienced and properly trained
overhead door fitters. Use correctly fitting and properly maintained tension levers (FlexiForce
code RES-TB).
Number of turns on the torsion springs:
Height (H) 4 panels 5 panels
2000mm 7.1 turns 6.8 turns
2125mm 7.6 turns 7.3 turns
2250mm 8.0 turns 7.7 turns
2375mm 8.4 turns 8.7 turns
2500mm 8.5 turns 9.2 turns
5 panels 6 panels
2750mm 9,4 turns 9,2 turns
3000mm 10,3 turns 10,0 turns
Insert the 1st tension lever completely into the slot. Turn the 1st tension lever a quarter turn such
that the spring is tensioned.
Max
23 Nm
RS200 manual GB 2009 www.flexiforce.com
19
manual GB
rev.0 Feb-09
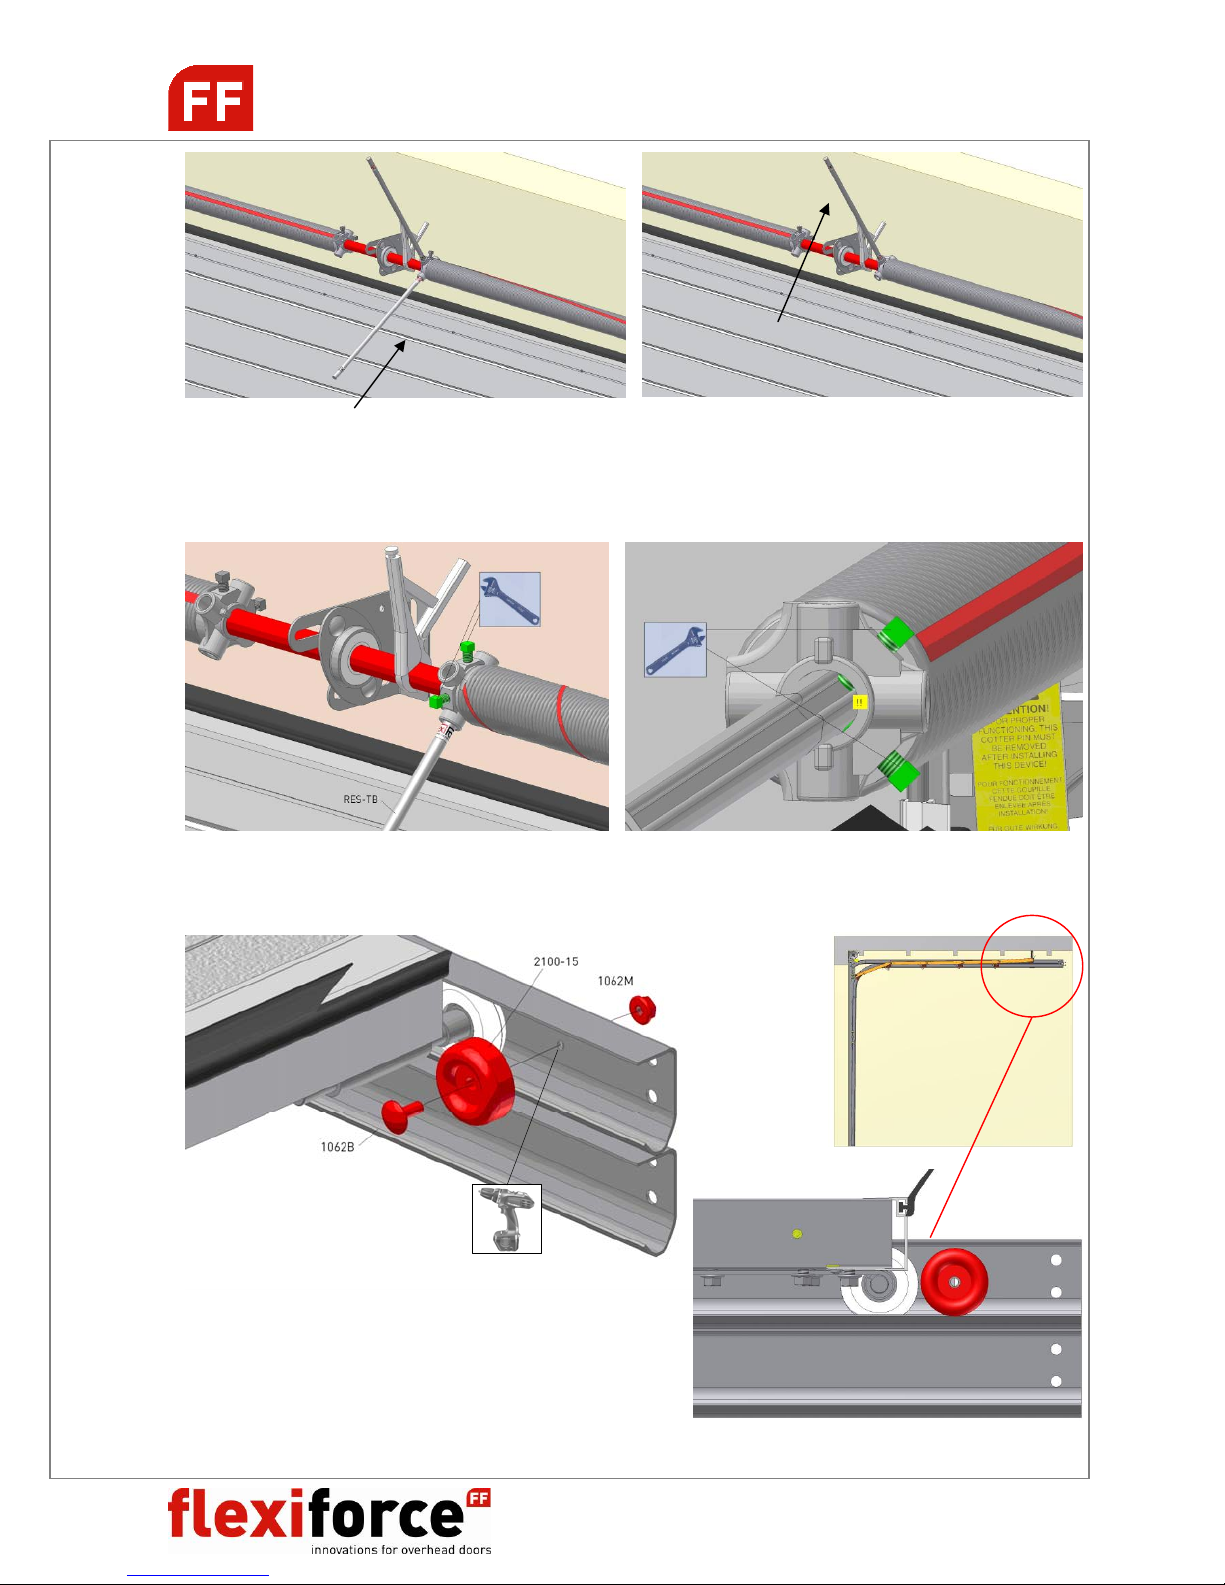
Insert the 2nd lever completely into the next slot. Take over the tension of the spring from the 1st tension
lever to the 2nd tension lever. Remove the 1st tension lever from the slot. Turn the 1st tension lever a
quarter turn such the spring is tensioned. Repeat until number of turns is achieved. Then fix the spring
plug to the shaft. Check the door balance and adjust the springs if necessary (equally both springs!)
FINISHING THE DOOR
Max 25 Nm
RS200 manual GB 2009 www.flexiforce.com
20
manual GB
rev.0 Feb-09
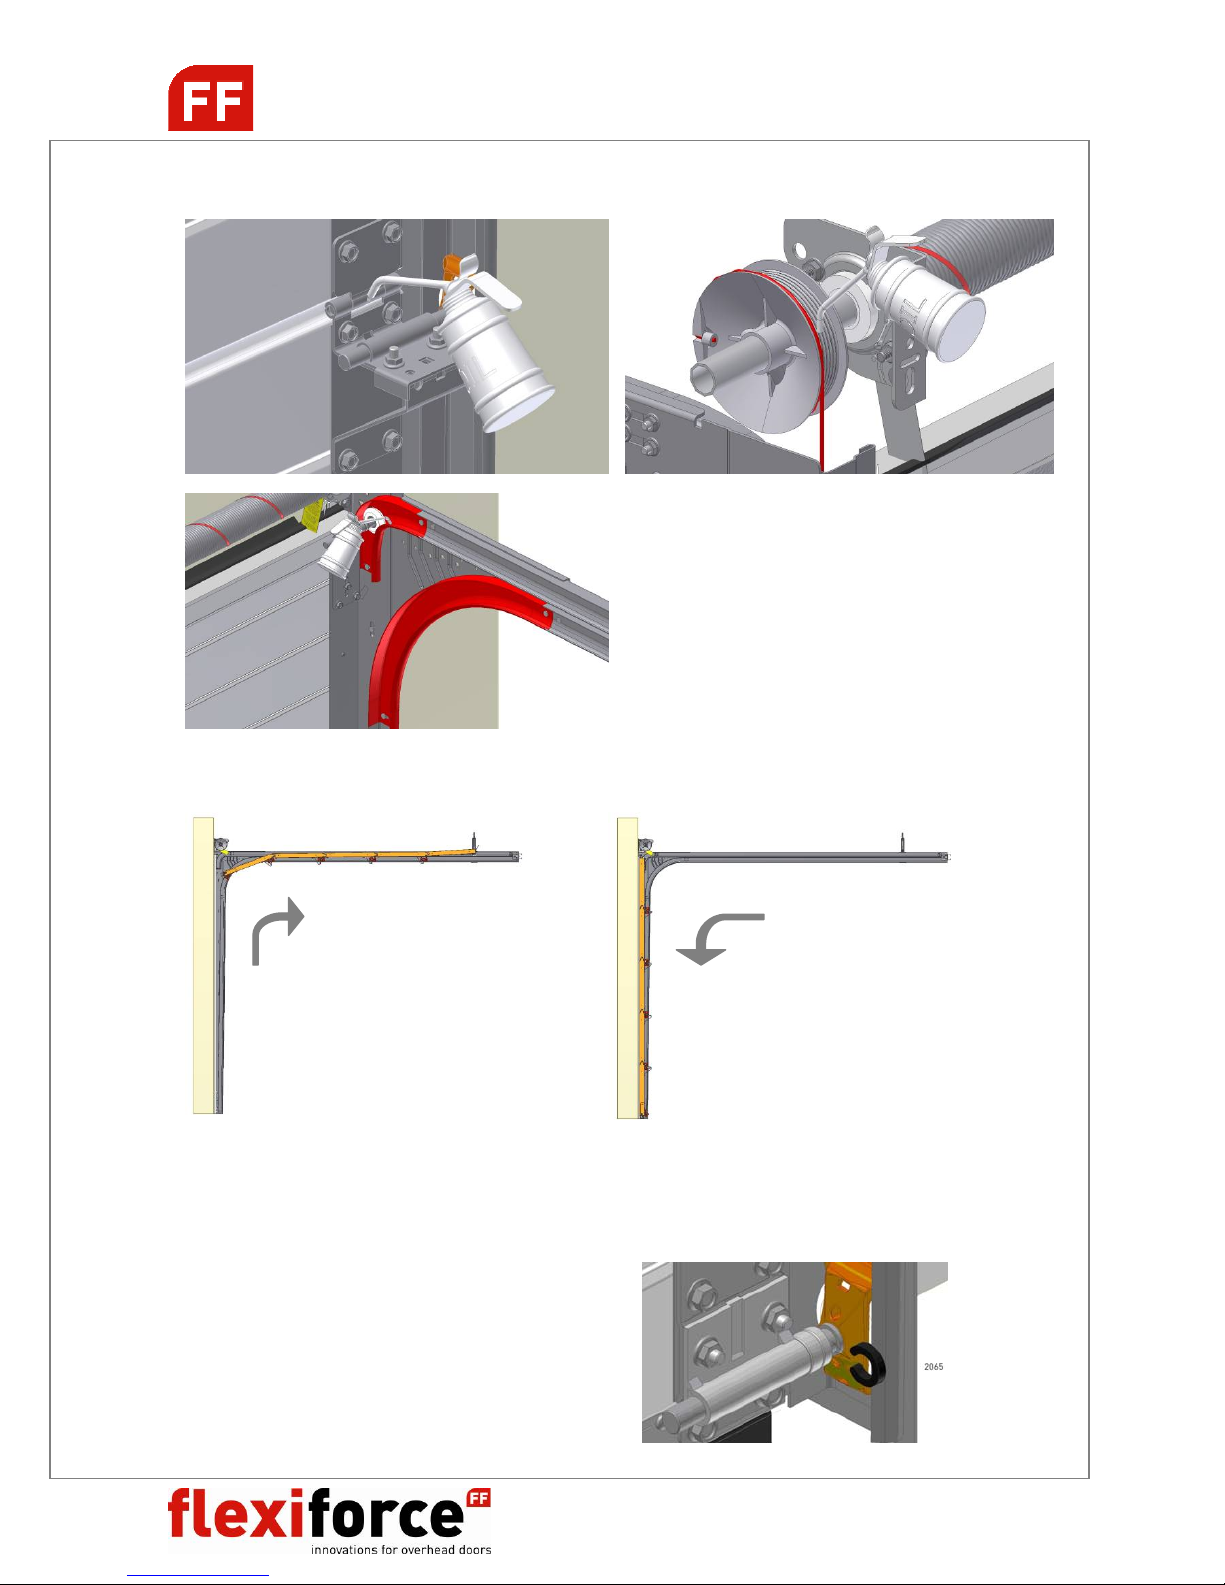
GREASING DOOR PARTS
RE-ADJUSTING THE DOOR
Open and close the door for checking all the settings.
When the door panel is not hanging completely horizontally in the lifting cables in (almost) closed
conditions there are several options for fine adjustment.
A. Loosen the securing bolts of the cable drum and the drum relative to the tube shaft.
B. When a coupling is employed this may be adjusted to ensure a better horizontal setting.
Horizontal movement of the door can be limited
(to max. 5mm) by installing 2065 distance rings on the
roller shafts.
Table of contents
Other FlexiForce Garage Door Opener manuals


Popular Garage Door Opener manuals by other brands

Chamberlain
Chamberlain 9601 owner's manual

GOGOGATE
GOGOGATE Garage Door Opener user manual

Gliderol
Gliderol Glidermatic GRD installation instructions

SAMT
SAMT RGD350 Installation instructions and user guide

Quantum
Quantum 3214 Owner installation and user manual

Chamberlain
Chamberlain POWER DRIVE PD420 owner's manual


