FLITE TEST STEM MILITARY TRANSPORT EP AIRPLANE User manual

FEATURES/SPECIFICATIONS:
Multi-Axis Gyro Stability System
Durable EPP Construction
Reliable 2.4GHz Control System
Efcient and Powerful Dual Motor Control
Wingspan: 390mm Length: 405mm Flying Weight: 50g
Battery: 3.7v 1S 300mAh 25C Lithium Polymer (included)
USB Battery Charger (included)
REQUIRES:
• (3) 1.5V AA size batteries for the transmitter.
• (1) Clear tape (Cellophane or packing tape)
IMPORTANT! Read the ENTIRE instruction guide to become familiar with the model before
operating. This guide contains instructions for safety, operation and maintenance. It is
essential to read and follow all the instructions and warnings, prior to assembly, setup or use,
in order to operate correctly and avoid damage or injury.
NOTICE: All instructions, warranties and other collateral documents are subject to change at
the sole discretion of Flite Test. For up-to-date information, visit: www.itetest.com
To view step-by-step video build instructions, tuning,
and ying tips go to: www.flitetest.com/ftfreighter
MILITARY TRANSPORT EP AIRPLANE
www.flitetest.com
2
!
• Very important! Never leave the charger and LiPo
battery unattended while charging!
• Do not charge a LiPo battery on a ammable
surface or near combustible materials.
• Never charge inside a vehicle or at a location that
could be damaged in the event of a LiPo re.
• Keep out of reach of children!
• Do not charge or use a battery that is deformed,
bent, crushed or has any type of visible damage.
• You must only use the included, factory-approved
charger with this LiPo battery.
• Disconnect the battery and unplug the charger if the
charge time exceeds 3 hours.
• Disconnect the battery and unplug the charger after
the charge is complete.
• Keep LiPo batteries out of reach of animals.
A punctured battery may cause a harm.
• Never disassemble or modify a battery, it’s wiring, or
puncture cells, as this may result in re.
• Do not allow the battery to short circuit by touching
exposed wires together.
• LiPo batteries must always be recycled or disposed
of properly.
This airplane requires use of a lithium polymer (LiPo) battery. Improper handling may
result in damage or injury. You are responsible for following all safety precautions as
outlined in the battery’s instruction manual and below:
LITHIUM BATTERY WARNINGS
Do not return your model to the store. Flite Test will
repair or replace factory defects for 90 days from the
date of purchase. This warranty specically does not
cover crash damage, misuse or abuse. To make a
warranty claim, please contact our product support
team at www.itetest.com. This warranty applies
only if the product is operated in compliance with the
instructions and warnings provided.
Flite Test assumes no liability except for the exclusive
remedy or repair of parts as specied above. Flite
Test shall not be liable for consequential, crash or
incidental damages.
WARRANTY
• Warning: Do not modify or alter this model.
• The vehicle is suitable for ages 14 and above.
• You must always disconnect and remove the battery
from the airplane when not in use.
• Do not operate near people or animals.
• Before each ight, examine all parts for damage.
If any damage is found, do not operate until the
damage has been repaired.
• Always remove the propellers when working on
the airplane.
• Important! Always unplug the battery from the
charger after charging is complete.
• Keep the airplane and battery away from direct
sunlight and/or heat sources.
• Always unplug and remove the battery after each
ight.
SAFETY PRECAUTIONS
DROP RISESIZELIGHTS
www.flitetest.com
3
TRANSMITTER SETUP
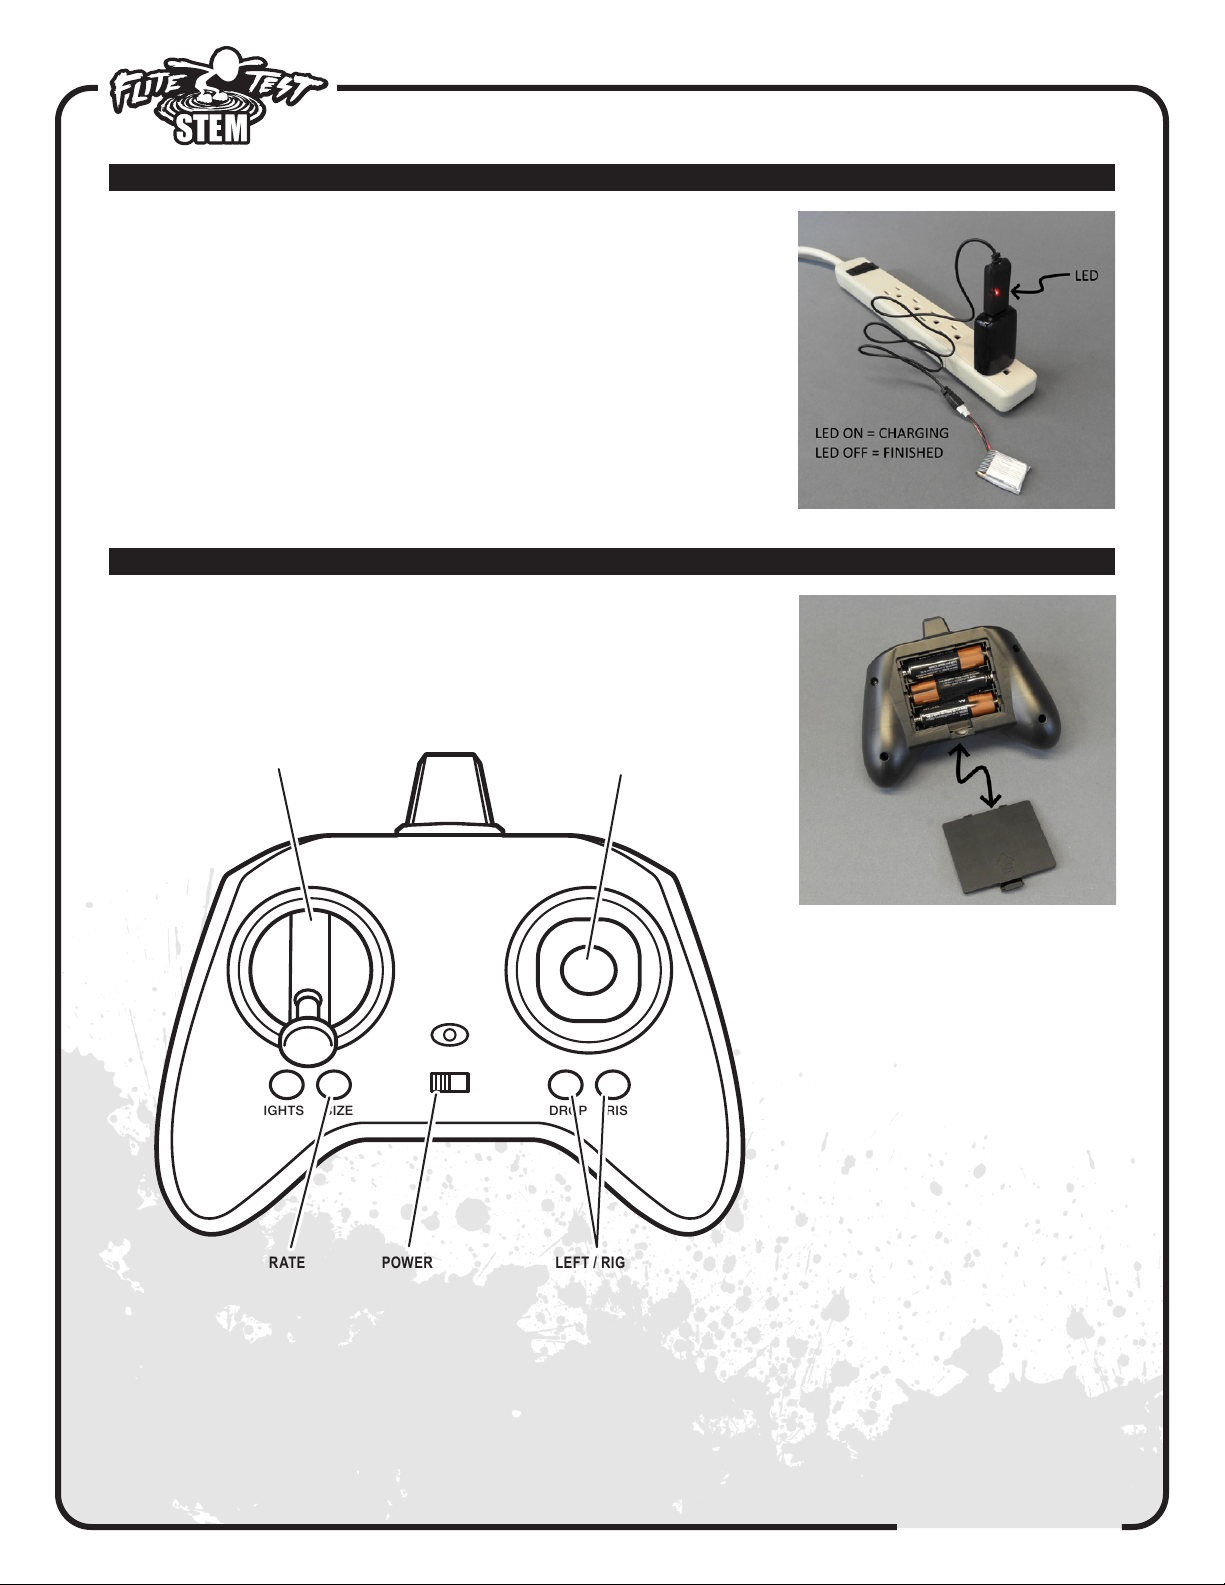
Fully charge the Lithium polymer (LiPo) battery before use.
1. Plug the charger into a 5v power adapter.
2. Plug the battery into the charger.
3. The LED will glow solid when charging.
4. When the LED goes out, charging is complete.
5. Unplug the battery from the charger.
6. Unplug the charger from the power adapter.
NEVER leave the battery unattended when charging.
ALWAYS disconnect the charger and battery when charging is complete.
Install three (3) 1.5v AA batteries into the transmitter battery compartment
located on the back. Make sure the polarity matches the (+/-) indicators.
Familiarize yourself with the transmitter controls.
CHARGING THE LITHIUM BATTERY
LEFT / RIGHT
LEFT / RIGHT
TRIM
POWER
ON / OFF
RATE
THROTTLE

www.flitetest.com
4
ASSEM BLY
Gluing:
Use the included glue to assemble the airplane.
• Remove the cap and pierce the seal. Attach the tapered glue nozzle to the bottle.
• Use sparingly! A thin lm of glue is all you will need.
• Always apply glue to the surface rst and then attach the part.
• Wipe up excess quickly using a paper towel as the glue will dry to the touch fast.
!Caution! The included glue is solvent based. Avoid breathing
the fumes, always work in a well-ventilated area and keep
away from children and pets.
PRO TIP: Read through each step completely and trial t parts before gluing.
1) Glue the engine rings to each of the engine pods.
3) Glue an engine brace on the top of wing to hold
the engine pod in place. Note: The four brace parts
are different. The one you will need will match the
angle of the wing and the indicated shape at each
location.
2) Glue one engine pod to the wing. 4) Repeat steps two and three for all engine pods.

www.flitetest.com
5
ASSEM BLY
6) Using the included glue, attach the motor to the
bottom of each wing.
5) The two motors are counter rotating and need to
be installed in the correct wing to work properly.
Match the Left motor (L) with the Left wing and the
Right (R) motor with the right wing.
9) Route the motor connectors through the opening
and pull through. Carefully set the wing in rmly in
place. Make sure the edges line up and that the
wing is fully seated into the fuselage. Do not get
glue on the motor wires.
8) Apply a thin layer of glue to the wing saddle of the
fuselage as shown. Glue should be used sparingly.
7) Route the wires along the bottom of the wing to the
center and secure with strips of clear tape.
10) Carefully glue the horizontal stabilizer to the top of
the Vertical stabilizer. Hold in place to ensure the
parts line up well and are perpendicular with each
other.

www.flitetest.com
6
ASSEM BLY
11) The altitude above sea level of your location will
inuence how your plane will y. Therefore, you
may need to adjust the angle of the tail as you
glue it in place. We recommend that you test t
the tail into the fuselage, making sure it is fully
seated. Then pull just the back up so that the
front stays in. This will increase the elevator angle
for more lift in higher altitude areas. Adjustment
recommendations are as follows:
• 0 to 1600ft (0 to 500M) leave fully seated
to 1mm
• 1600 to 3280ft (500 to 1000M) pull out 1 to
1.5mm
• 3280ft to 8200ft (1000 to 2500M) pull out 1.5
to 3.0mm
• Above 8200ft (2500M) pull out 3.5mm
• Note: After you y, you can ne tune this
adjustment by bending the back edge of the
elevator surface up or down slightly.
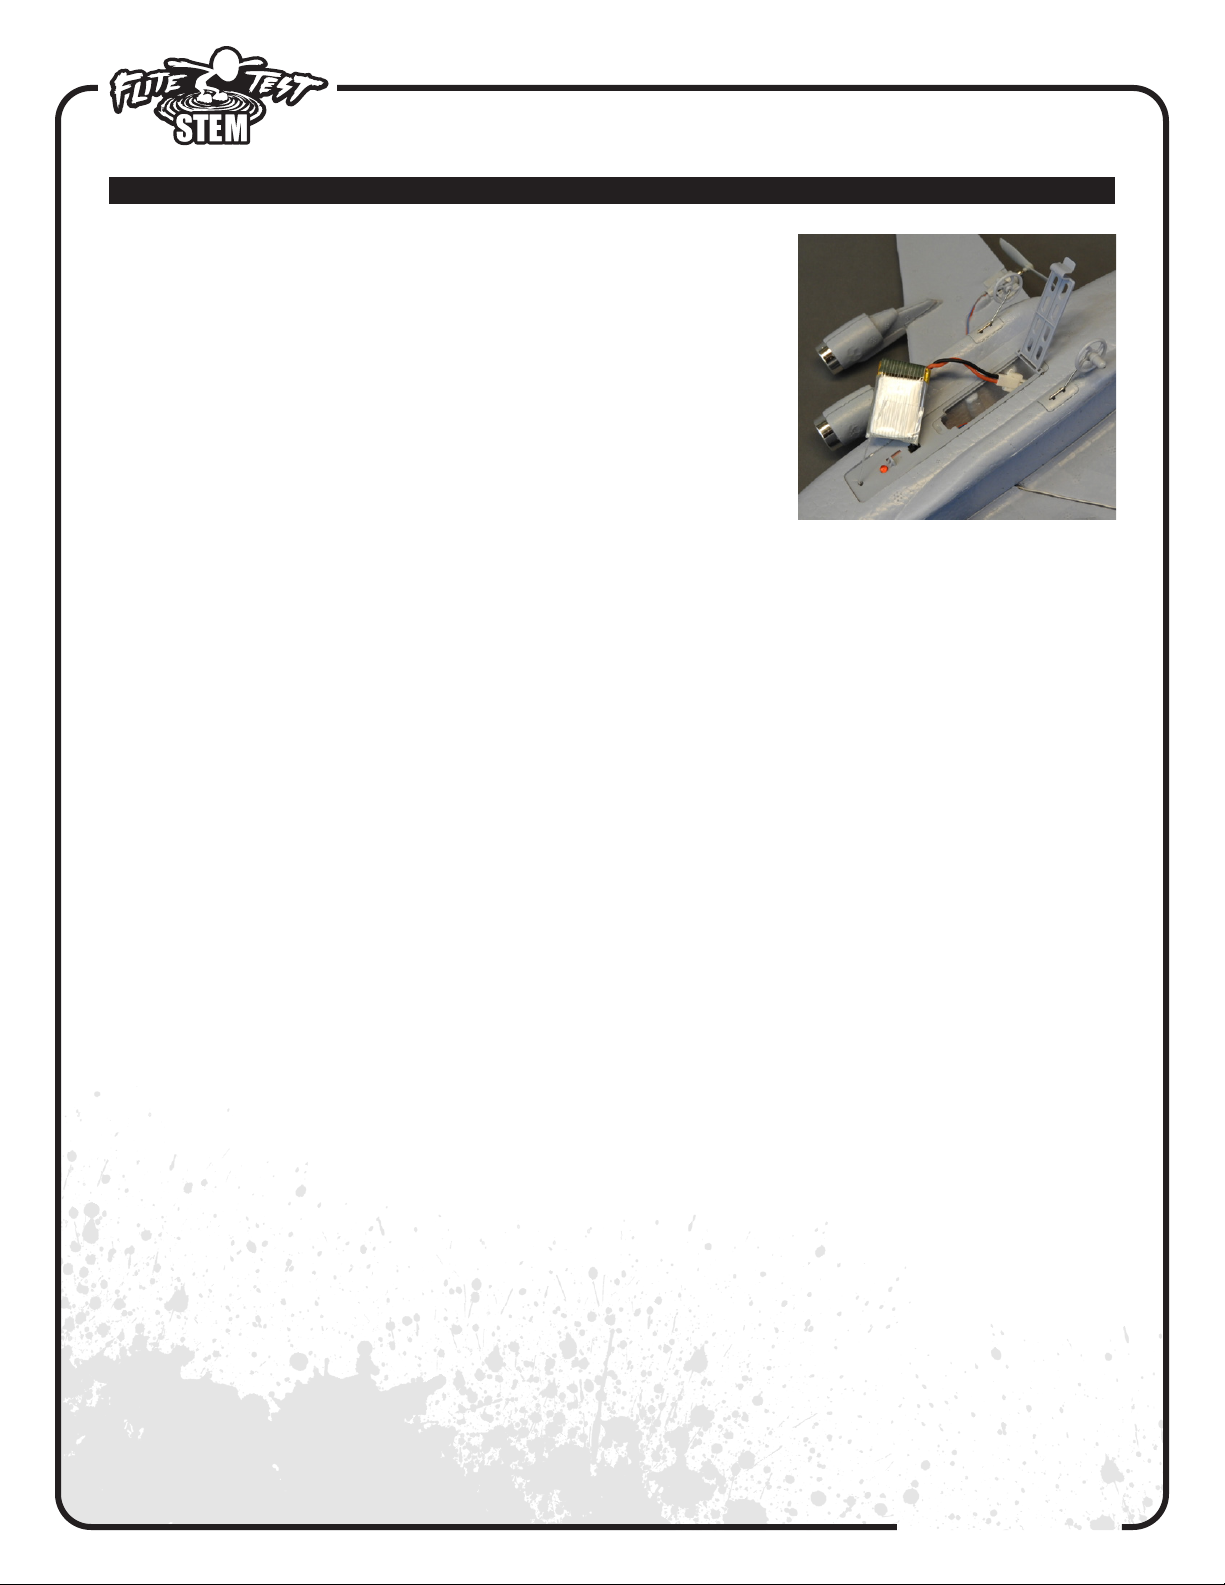
13) Carefully connect the motors to the Receiver
board. The RED plug (Left motor) goes to the
RED socket. The WHITE plug (Right Motor) goes
to the WHITE socket. Be careful, the plugs only
go in one way. Make sure the plugs are fully
installed.
12) Once satised with the location and t, remove
and add glue to the slot. Install the stabilizer
assembly to the fuselage at the angle you
determined. Make sure the assembly is straight
up and down.

www.flitetest.com
7
ASSEM BLY
14) Apply a thin layer of glue around the opening of
the fuselage. Carefully install the receiver board
with bottom cover so it is ush with the bottom.
Be careful not to get glue on the battery connector
or wire.
15) Glue the landing gear mounts into the bottom of
each wing and the front of the fuselage. Note: The
Nose gear mount has a atter shape.
17) Glue a Winglet onto each wing tip. Make sure they
both angle rearward.
16) Gently push the landing gear. Make sure the main
gear angle towards the back.
Note: If you will be hand launching, you may want
to remove the landing gear for a sleeker look.
When landing without the gear installed, choose
a grassy area that will not scratch the bottom of
the airplane.
www.flitetest.com
8
1. Linking the transmitter to the aircraft for the rst time.
a. Install a charged battery into the bottom of the plane.
b. Close the battery door.
c. Turn on the airplane rst. The LED will ash.
d. Turn on the Transmitter next. The LED’s on the transmitter and
the plane will ash.
e. Move the throttle from low to high and then back down to low.
The LED’s will glow steady.
f. Turn off the airplane and then the transmitter.
g. The transmitter will remember this link for future operation.
2. Operation of the airplane.
a. Turn on the transmitter. Make sure the throttle is at zero.
b. Turn on the airplane and set it on a level surface so it is not
moving. This will calibrate the gyro before ight.
c. The LED’s will be ashing.
d. Arm the motors by moving the throttle stick from low to high and
then back to low. The LED’s will now glow steady and the plane
is ready to y.
e. Check the motor control: Hold the airplane by the tail making
sure the propellers are clear of hitting anything. Move the left
stick (throttle) upwards partially. Both motors will begin to turn.
f. With the throttle up 1/4, move right stick left and right. You will
hear the motors speed up and slow down. The airplane turns by
speeding up one motor and slowing down the other motor while in
the air.
3. Stability system.
a. The stability system turns on after the throttle is raised. The gyro
will sense when the plane is unintentionally turning and then
automatically corrects for you. This makes ight much easier as it
can correct much faster than you can.
b. Self-leveling. When you are ying, and get into trouble, reduce
the throttle to 1/4 and let go of the sticks. The airplane will level
itself automatically and slowly descend. This will help you regain
orientation.
c. During ight, you will likely hear the motors speed up and slow
down, this is normal and indicates that the gyro system is
adjusting for the wind.
d. Note: When you reduce the throttle all the way down, the motors
will stop completely. This is good for when you touch down at
landing. However, the stability system will only be active when
the motors are running. We recommend that you always keep the
motors running at 1/4 throttle or higher while in the air.
PREFLIGHT

Copyright 2019 Flite Test. All rights reserved.
www.flitetest.com
9
FLY I NG
• Choose a wide-open area away from people,
buildings and power lines.
• This is a lightweight airplane which can be blown
around easily. Only y in calm wind conditions.
• Plug in and install a charged battery. Close the
battery door.
• Make sure the throttle stick is down and turn on the
transmitter.
• Turn on the airplane and place on a level surface.
• Arm the motors by moving the throttle from low to
high and then back to low. Once the LEDs glow
steady, you are ready to y.
!Caution: As a rule of thumb ALWAYS assume the propellers could spin at any time.
Whenever a battery is installed, stay clear of the propellers!
Taking off from a runway.
• Place the aircraft on a smooth surface. Gently advance the throttle and the airplane will slowly take off.
• Control altitude using the throttle. When the throttle is increased the airplane will climb. Reduce throttle
and the plane will descend.
• Control turning of the aircraft by moving the right stick to the left or right.
• We recommend always ying at 1/4 throttle or higher—this will keep the stability system active.
Hand launching.
• Grasp the plane gently from underneath.
• Face into the wind and point the airplane straight and level (NOT up or down).
• Advance the throttle to half and gently push the airplane straight forward.
• DO NOT throw it upwards or downwards, both could result in a crash.
• Once released, add in full throttle and gently climb out using small control inputs.
Flying tips:
• The plane ies itself. Your job is to control it. When it is pointing where you want it to go. Let go of the
sticks and let it y.
• A common mistake is to over control the airplane. Gentle movements are best.
• When learning, make small inputs and then let the stick go back to center.
• When ready to land, point the plane into the wind and keep the wings as level as possible. Lower the
throttle so the plane will descend. When the plane is ready to touch down, reduce the throttle to zero.
• When you notice the power starting to drop, land immediately.
• IMPORTANT! Always remove and unplug the battery after every ight. If not, the battery may slowly discharge
and be permanently damaged.
• Let the battery cool before recharging.
Copyright 2019 Flite Test. All rights reserved.
www.flitetest.com
10
SERVICE AND SUPPORT
If you have questions or if you require repairs, visit: www.itetest.com
REPLACEMENT PARTS
Part no. Description
FLT-80005 Freighter & Airliner 3.7V Lithium
polymer (LiPo) Battery
FLT-80006 Freighter & Airliner Glue
FLT-80007 Freighter & Airliner LED Light Set
FLT-80008 Freighter & Airliner USB Charge Cord
FLT-80009 Freighter & Airliner Props (L & R)
FLT-80500 Freighter EP Micro Airplane
Part no. Description
FLT-80501 Freighter Fuselage/Wing/Stabilizer Set
FLT-80502 Freighter Landing Gear
FLT-80503 Freighter Motor Left
FLT-80504 Freighter Motor Right
FLT-80505 Freighter Plastic Parts
FLT-80506 Freighter Receiver/ESC/Stabilizer
FLT-80507 Freighter Transmitter
CARE AND MAINTENANCE
!Caution! When working on your plane with the battery installed, always remove the
propellers in order to avoid the chance of injury if the motors accidentally turn ON.
Included is a handy tool for prying off the propellers if you need.
• Parts damaged beyond repair can be purchased
separately. Often though, parts can be repaired
easily, and you can get your airplane back into the
air with a little glue and ingenuity.
• This airplane is made from durable EPP foam which
can be glued with just about anything. Most people
use regular CA, or the glue that came in the box.
Use tape if needed to hold the parts together until
the glue dries.
• Always remove the batteries from the transmitter for
long term storage.
This manual suits for next models
1
Table of contents


