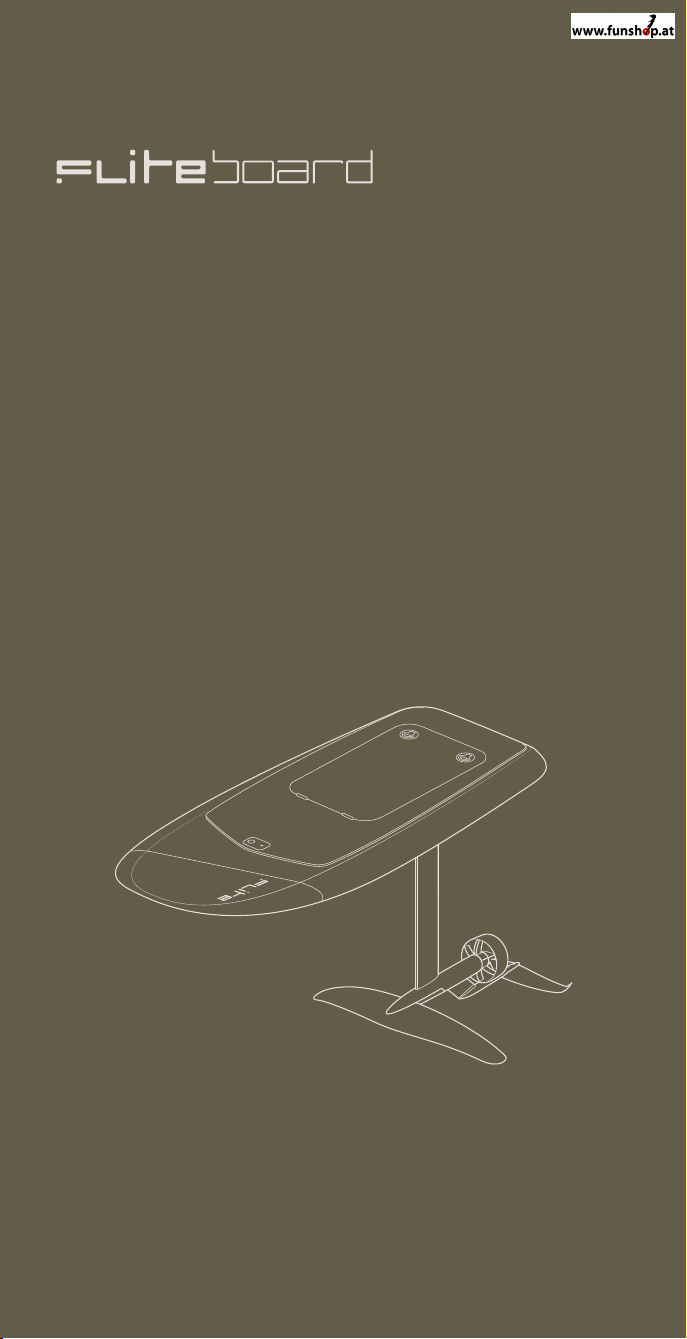
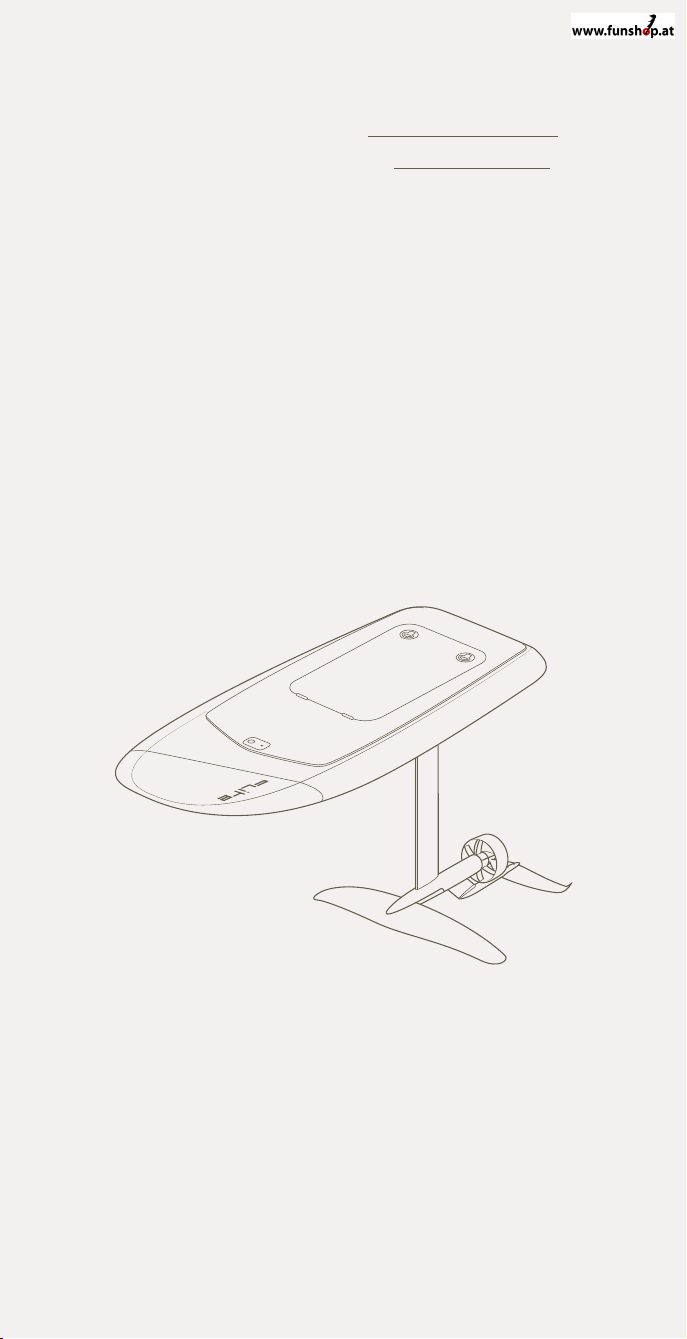
FliteBoard FliteBoard AIR User manual
1
User Guide

2
Important
IN ORDER TO OPERATE THE PRODUCT CORRECTLY AND AVOID DAMAGE,
SERIOUS INJURY OR DEATH, IT IS ESSENTIAL TO READ AND FOLLOW ALL
OF THE INSTRUCTIONS AND WARNINGS IN THE USER GUIDE PRIOR TO
ASSEMBLY, SETUP OR USE. BY USING A FLITEBOARD YOU AGREE THAT
YOU DO SO AT YOUR OWN RISK.
For the latest version
of this guide visit
support.fliteboard.
com
Watch our video
tutorials at
fliteboard.com/video
Fliteschool locations
can be found at
fliteboard.com/
fliteschool

33
Fliteboard User Guide
Safety & Disclaimer
4 Warning
4 Propulsion system
4 Hydrofoil system
Warranty and Compliance
5 Warranty
5 Repairs
6 Flitecell
7 Shipping compliance
Unboxing
8 Box 1: Fliteboard
9 Box 2: Flitecell
10 Box 3: eFoil + Flite Controller
11 Box 3: Accessories pouch
Getting Started
13 Charging Flite Controller
14 Charger procedure
15 Charging Flitecell
16 Flitecell Chargers
17 Charger indicator guide
18 Connect eFoil to Fliteboard
19 Connect the fuselage tail
19 Connect the wing
20 Connect the Stabiliser Wing
20 Connect Flitecell to Fliteboard
22 Turn on Fliteboard
23 Flite Controller overview
21 Connect Flite Controller
24 Flite Controller screen guide
26 Pairing Flite Controller with Fliteboard
27 Arm motor / unlock Flite Controller
Get Fliteboarding
28 Preparation
29 Select a suitable riding location
30 Arm the Flite Controller
31 Engage the motor and get moving
32 Getting to your knees
33 Standing up
34 Foiling for the first time
Foiling Pro tips
34 Foiling through turns
Storage & Maintenance
35 Fliteboard
36 Fliteboard AIR
37 Fliteboard Controller
38 Shipping and Transport
39 Trouble shooting guide
40 Technical Specifications

4
Safety & Disclaimer
All safety & disclaimer informa-
tion is subject to change at the
sole discretion of Fliteboard. For
up-to-date product information
visit support.fliteboard.com
Warning
Failure to operate this product
in a safe and responsible
manner could result in injury
or death to yourself or others
and/or damage to the
Fliteboard or other’s property.
THIS PRODUCT MUST BE
OPERATED WITH CAUTION
AND COMMON SENSE AND
REQUIRES SOME BASIC
MECHANICAL ABILITY.
FLITEBOARD IS NOT INTENDED
FOR USE BY CHILDREN UNDER
16 YEARS OF AGE,
SUBJECT TO LOCAL LAWS
AND REGULATIONS.
DO NOT USE WITH
INCOMPATIBLE COMPONENTS
OR ALTER THIS PRODUCT IN
ANY WAY OUTSIDE OF THE
DOCUMENTS PROVIDED BY
FLITEBOARD.
FLITEBOARD IS NOT A TOY.
EXERCISE CAUTION. ACT
RESPONSIBLY WHILE OPERATING.
CONSIDER THE SAFETY OF YOUR
ENVIRONMENT BEFORE OPER-
ATING FLITEBOARD. DO NOT
RIDE IN SHALLOW WATER (LESS
THAN 1.5M IN DEPTH), ROCKY
AREAS OR IN SEVERE WEATHER
CONDITIONS.
IT MAY BE NECESSARY TO OBTAIN
A LICENCE OR PERMIT TO USE A
FLITEBOARD IN CERTAIN STATES
OR COUNTRIES.
Propulsion System
The Fliteboard propulsion system
includes a powerful spinning
propeller.
KEEP BODY, FINGERS AND TOES
AWAY FROM THE FLITEBOARD’S
SPINNING PROPELLER.
CONTACT WITH THE PROPELLER
WILL CAUSE SERIOUS INJURY OR
DEATH.
NEVER TOUCH THE PROPELLER
IN OR OUTSIDE OF THE WATER.
NEVER HANDLE THE PROPELLER
WHILE THE FLITECELL IS CONNECTED.
ALWAYS FLITEBOARD A SAFE
DISTANCE FROM OTHER WATER
CRAFT, SWIMMERS, SURFERS
AND WILDLIFE.
NEVER FLITEBOARD IN SEAWEED
OR CONTAMINATED WATER.
Hydrofoil Safety
The Fliteboard hydrofoil system
comprises a mast (or strut), a
main wing and stabiliser wing.
These components include sharp
trailing edges and wing tips. Take
care not to kick or hit the sharp
edges when in the water.
FALLING ON THE HYDROFOIL
CAN CAUSE SERIOUS INJURY
OR DEATH.
ALWAYS WEAR AN APPROVED
PERSONAL FLOTATION DEVICE
(PFD) WHEN FLITEBOARDING.
ALWAYS WEAR A HELMET WHEN
FLITEBOARDING.
TAKE CARE TO LEARN STEP
BY STEP, FOLLOWING THE
INSTRUCTIONS IN THIS GUIDE
AND THE FLITEBOARD VIDEO
TUTORIALS AT
fliteboard.com/video

5
Warranty
Fliteboard comes with a Limited
Warranty which covers defects in
materials or workmanship of the
product and aligns to relevant
consumer laws of the location of
purchase. Further details about
the Fliteboard Limited Warranty
are set out in your Purchase
Agreement.
For our Australian customers:
Our goods come with guarantees
that cannot be excluded under
the Australian Consumer Law.
You are entitled to a replacement
or refund for a major failure and
compensation for any other
reasonably foreseeable loss or
damage. You are also entitled
to have the goods repaired or
replaced if the goods fail to be of
acceptable quality and the failure
does not amount to a major
failure.
Fliteboard has been extensively
tested with riders weighing up
to 100kg. Heavier, experienced
riders, may be able to use
Fliteboard, however our factory
specified limit for warranty and
other purposes is 100kg.
Fliteboard is much, much more
than a surfboard. Similar to any
other electric powered vehicle,
it needs to be serviced regularly
and maintained to ensure good
working order and to prevent
breakage. The first service
requirements should be met
within 100 hours of use or after
6 months, whichever comes
first. After the first service, your
Fliteboard should be serviced
every 100 hours of use, or each
12 months, whichever comes first.
Contact Fliteboard for details of
your nearest Tech Centre or other
service options. The Fliteboard
Limited Warranty is void if your
Fliteboard has missed the
required service schedule.
Repairs
If subjected to damage,
the epoxy construction boards
(Fliteboard and Fliteboard PRO)
can be repaired by your local
surfboard repair specialist. The
inflatable construction Fliteboard
AIR may be repaired using the
included repair kit.
Learning to Fliteboard
We recommend learning to
Fliteboard with an instructor
at an authorised Fliteschool.
Fliteschool locations can
be found at fliteboard.com/
fliteschool
PLEASE VIEW OUR HOW
TO FLITEBOARD VIDEO AT
fliteboard.com/video
TO LEARN THE PROPER
TECHNIQUE AND REVIEW RIDING
SAFETY INFORMATION.
FLITEBOARD IS NOT SUITABLE
FOR RIDING BREAKING WAVES IN
THE SURF ZONE. RIDERS DO SO
AT THEIR OWN RISK. FLITEBOARD
SHOULD NEVER BE RIDDEN NEAR
OTHER WATER USERS (INCLUD-
ING SWIMMERS AND SURFERS)
OR OFFSHORE FROM SWIMMERS
AND SURFERS (IN CASE FLITE-
BOARD IS PUSHED TOWARDS
SHORE IN A WAVE).
FLITEBOARDING CAN BE EASY
WHEN PROPER TECHNIQUE IS
APPLIED. INCORRECT TECHNIQUE
CAN RESULT IN INJURY
OR DAMAGE.
5

6
Flitecell
Flitecell is a carefully engineered
water resistant unit. If the Flitecell
is damaged (for example during
transportation or handling) the
seal may become compromised.
A damaged Flitecell that comes
into contact with water may result
in internal damage including
corrosion which could result in a
fire and/or explosion.
USE FLITECELL AT YOUR
OWN RISK.
DO NOT OPEN FLITEBOARD LID
UNDER ANY CIRCUMSTANCES
WHILST IN WATER.
SIGNS OF A COMPROMISED
FLITECELL:
— LOOSE SCREWS / RIVETS
— CONNECTOR COMING LOOSE
— CRACK IN HOUSING/CASE
— DEFORMATION
— BATTERY ACID ODOUR
— EXTREMELY HOT TEMPERATURE
DURING CHARGING (80°C OR
MORE )
CAREFULLY INSPECT FLITECELL
BEFORE EACH USE.
IF A FLITECELL CASING HAS
VISIBLE DAMAGE AND THE
FLITECELL FALLS INTO WATER,
TAKE IT OUT IMMEDIATELY
AND PUT IT IN A SAFE AND
OPEN AREA. MAINTAIN A SAFE
DISTANCE FROM FLITECELL UNTIL
IT IS COMPLETELY DRY. NEVER
USE FLITECELL AGAIN AND
DISPOSE OF FLITECELL PROPERLY.
FLITECELL MUST BE USED IN
TEMPERATURES FROM 0°C
TO 40°C. USE OF FLITECELL IN
ENVIRONMENTS ABOVE 40°C
CAN LEAD TO A FIRE OR AN
EXPLOSION. USE OF FLITECELL
BELOW 0°C CAN LEAD TO
PERMANENT FLITECELL DAMAGE.
ALWAYS KEEP FLITECELL
DRY. IF FLITECELL HAS BEEN
EXPOSED TO WATER. PLACE
IN A COOL DRY PLACE.
DO NOT DROP OR STRIKE
FLITECELL.
DO NOT PLACE HEAVY OBJECTS
ON FLITECELL OR CHARGER.
DO NOT CHARGE OR USE A
DAMAGED FLITECELL. IF YOUR
FLITECELL IS COMPROMISED,
CONTACT FLITEBOARD OR
AN AUTHORIZED FLITEBOARD
DEALER FOR FURTHER
ASSISTANCE.
DO NOT USE FLITECELL IF IT WAS
INVOLVED IN A CRASH OR HEAVY
IMPACT.
DO NOT USE A NON FLITECELL
FLITECELL. ANY DAMAGE
CAUSED BY A NONOFFICIAL
BATTERY FLITECELL WILL NOT
BE COVERED BY WARRANTY.
DO NOT DISASSEMBLE FLITECELL
IN ANY WAY OR FLITECELL MAY
LEAK, CATCH FIRE, OR EXPLODE.
ELECTROLYTES INSIDE FLITECELL
ARE HIGHLY CORROSIVE.
DO NOT HEAT FLITECELL. KEEP
AWAY FROM HEATING SOURCES
AND OUT OF DIRECT SUNLIGHT.
DO NOT PUT FLITECELL IN
A MICROWAVE OVEN, FREEZER
OR IN A PRESSURISED CONTAINER.
DO NOT OPEN FLITEBOARD LID
UNDER ANY CIRCUMSTANCES
WHILST IN WATER OR WITH WET
HANDS.
IN CASE OF A FLITEBOARD OR
FLITECELL FIRE, EXTINGUISH
WITH:
— COLD WATER WITHOUT ADDITIVE
— DRY POWDER IN LARGE
AMOUNT (USE METAL FIRE
EXTINGUISHER POWDER OR
DRY SAND IF ONLY A FEW CELLS
ARE IMPACTED)
FOR FURTHER INFORMATION
ABOUT INCIDENT RESPONSE
AND DISPOSAL. PLEASE REFER
TO THE MSDS.
DISPOSE OF THE FLITECELL IN
SPECIFIC RECYCLING BOXES
ONLY AFTER A COMPLETE
DISCHARGE. DO NOT PLACE
FLITECELL IN REGULAR TRASH
CONTAINERS. STRICTLY FOLLOW
YOUR LOCAL REGULATIONS
REGARDING THE DISPOSAL AND
RECYCLING OF BATTERIES.
6

77
Shipping Compliance
Shipping batteries can be illegal
and dangerous if not done in ac-
cordance with dangerous goods
shipping regulations. Always
consult an appropriate specialist
before shipping your Flitecell.
Refer to the included MSDS
regarding shipping your Flitecell
by air or sea.
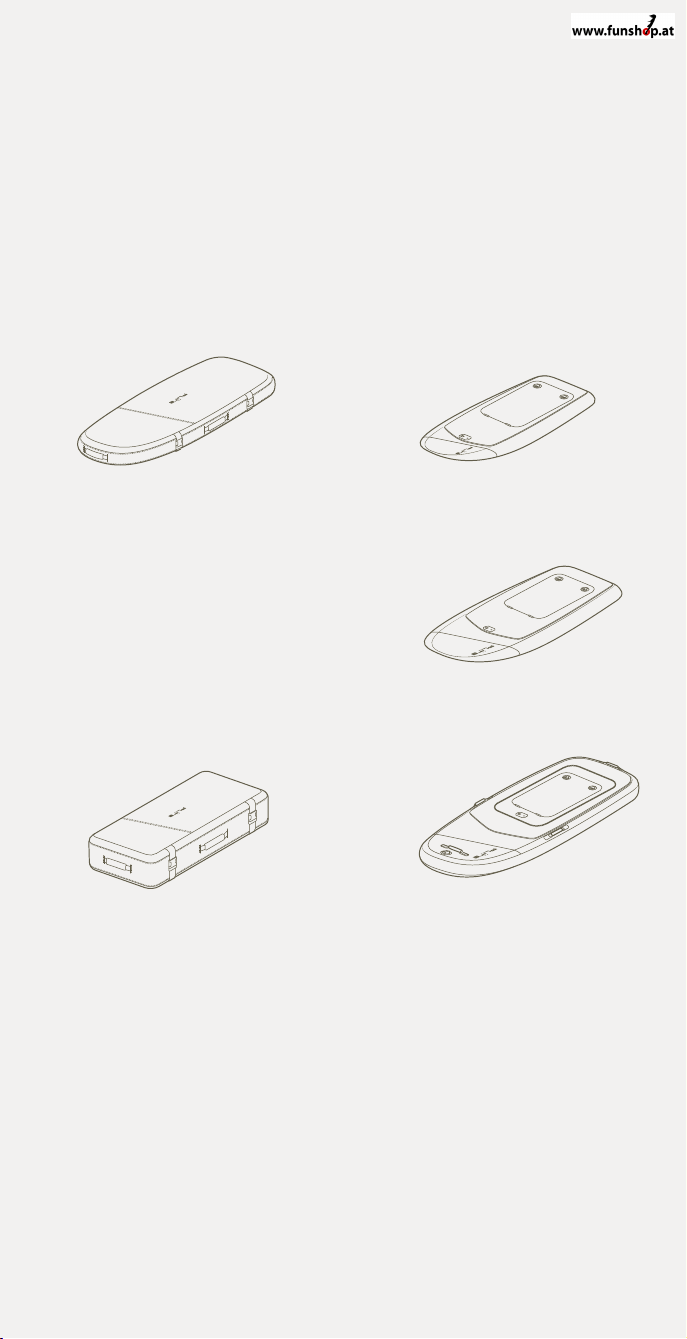
8
What’s in the box
You will receive your Fliteboard in three separate shipment packages.
Box 1: Fliteboard
Within the included padded board bag you will find
either Fliteboard, Fliteboard PRO or Fliteboard AIR
(depending upon your choice)
Fliteboard PROFliteboard travel bag
Fliteboard
Fliteboard AIRFliteboard AIR travel bag

9
What’s in the box
You will receive your Fliteboard in three separate shipment packages.
Box 2: Flitecell
Flitecell Explore
Flitecell travel case

10
there is a new fast
charger which needs
to be added
(havent seen this yet)
2 options for the
charger to choose
from
there is a new fast
charger which needs
to be added
(havent seen this yet)
2 options for the
charger to choose
from
Box 3: Flite eFoil travel bag
Within the included travel case you will find the following components:
Actual wing choice, mast
length and charger type are
dependent on your specific
configuration
Flyer Wing
+ cover
eFoil travel bag
Rear Stabiliser Wing
+ cover
eFoil system including:
— Flitebox
— Flite propulsion system
— Fuselage tail
Cruiser Wing
+ cover
Flitecell Lightweight
15A Charger
Flitecell Fast
20A Charger
Flitecell Premium
25A Charger
there is a new fast
charger which needs
to be added
(havent seen this yet)
2 options for the
charger to choose
from
there is a new fast
charger which needs
to be added
(havent seen this yet)
2 options for the
charger to choose
from
there is a new fast
charger which needs
to be added
(havent seen this yet)
2 options for the
charger to choose
from
there is a new fast
charger which needs
to be added
(havent seen this yet)
2 options for the
charger to choose
from

1111
there is a new fast
charger which needs
to be added
(havent seen this yet)
2 options for the
charger to choose
from
13mm socket tool
Andrew to conrm
Box 3: Flite eFoil travel bag
Within the included travel case you will find the following components:
Box 3: Accessories pouch
Within the included accessories pouch you will find the following components:
Accessories pouch
Flite Controller
USB wall charger
and charging cable
O-Ring + spare
Cruiser wing
Stabiliser Wing eFoil
Flyer wing
Tail
Tef-Gel
M6 Hex key
Flite Controller Stabiliser Wing shims
x3 styles
30mm
25mm
12mm
35mm
30mm
20mm
16mm
20mm
13mm socket tool
Andrew to conrm
13mm socket tool
Andrew to conrm
13mm socket tool
Andrew to conrm
13mm socket tool
Andrew to conrm
13mm socket tool
Andrew to conrm
13mm socket tool
Andrew to conrm
13mm socket tool
Andrew to conrm
13mm socket tool
Andrew to conrm
13mm socket tool
Andrew to conrm
13mm socket tool
Andrew to conrm
13mm socket tool
Andrew to conrm
12
Getting started
The best way to learn to Fliteboard is to find a Fliteschool in your area.
Locate your nearest Fliteschool at fliteboard.com/fliteschool
Watch the Fliteboard video guides at fliteboard.com/video
In order to operate the product correctly avoiding damage or serious
injury it is essential to read and follow all instructions and warnings in the
user guide prior ro assembly, setup or use.
IT IS BEST TO ASSEMBLE YOUR BOARD IN A CLEAN, DRY ENVIRONMENT.
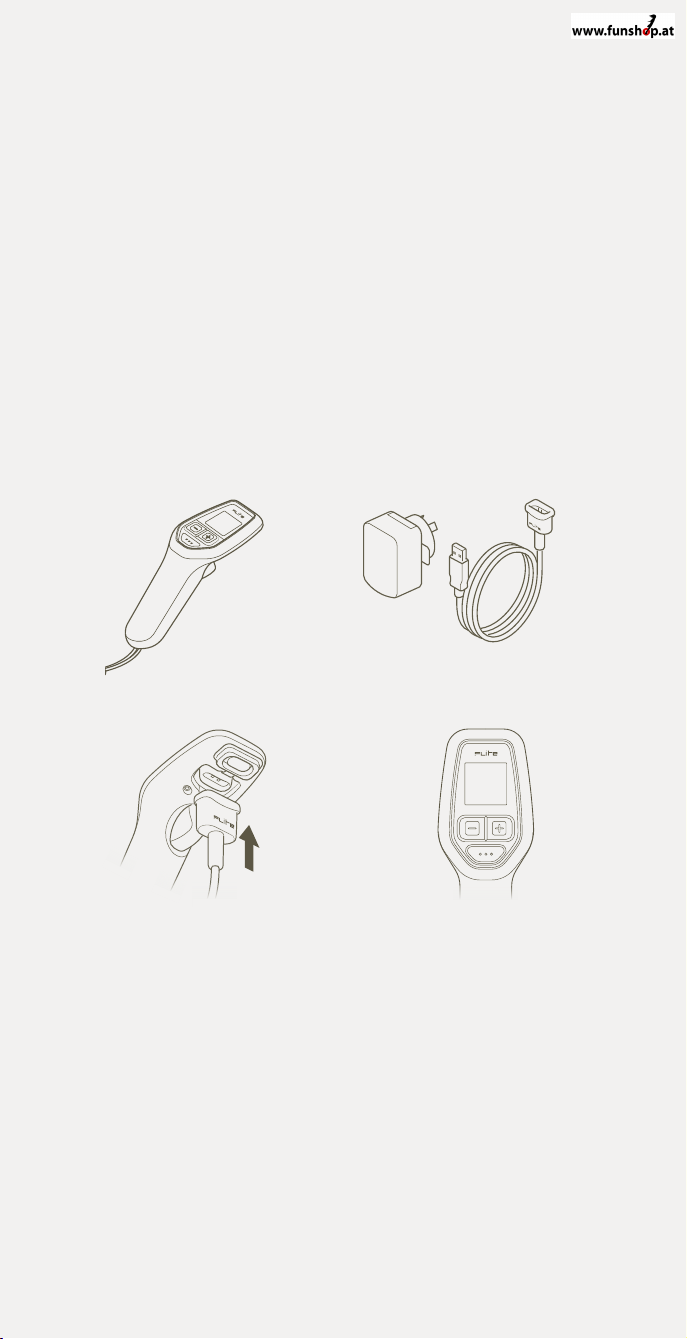
13
Charging Flite Controller
1 Remove Flite Controller from the accessories pouch.
(Located in the eFoil bag).
2 Remove Flite Controller USB Wall Charger and Charging Cable
from the accessories pouch.
3 Carefully peel out the rubber cover on the underside of Flite
Controller. Attach the magnetic charging plug, ensuring the gold
charging pins are connected.
4 Plug in the USB Wall Charger and turn on. When the Flite Controller
is charging correctly, the screen will show a charging message. After a
few minutes the screen will hibernate to speed the charging process.
Be careful not to disconnect the magnetic charging plug whilst
charging. Always check to ensure the Flite Controller is at least 50%
charged before each use.
1
3
2
4
14
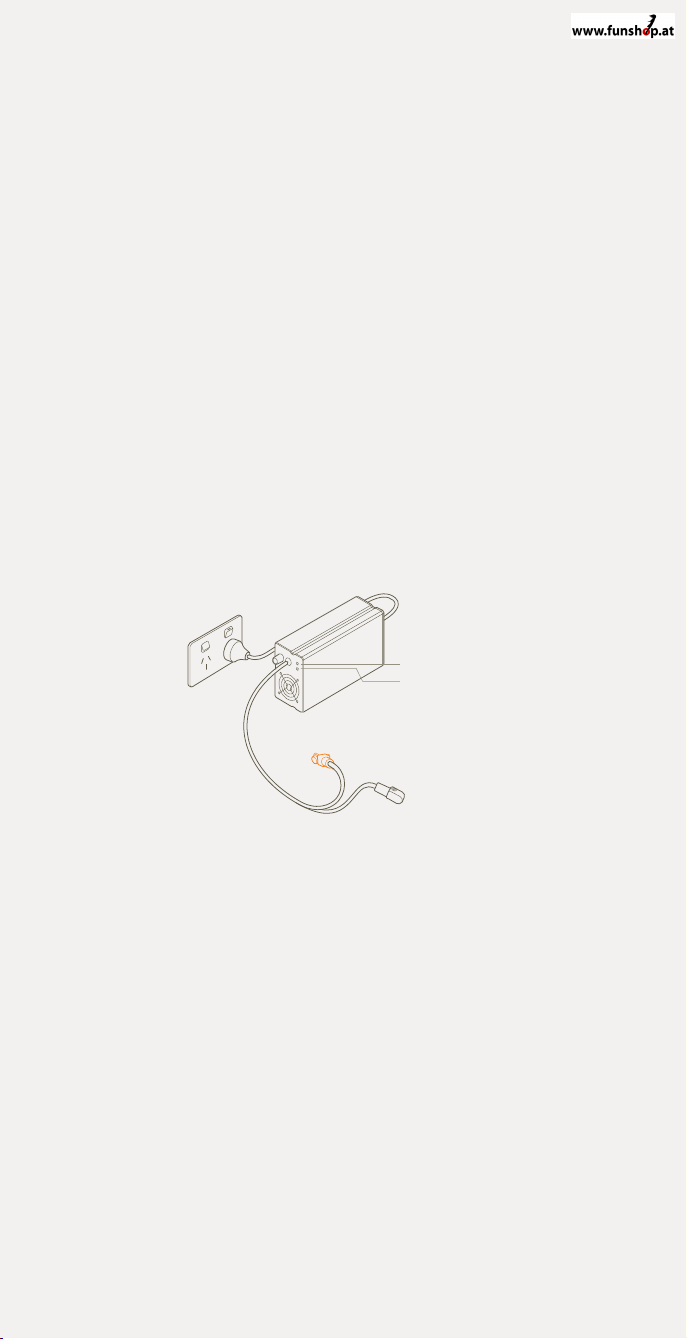
Flitecell Charger procedure
FLITECELL LIGHTWEIGHT 15A CHARGER MUST BE USED IN A
STANDARD VOLTAGE OUTLET- 110V OUTLET UNITED STATES OR
220V/230V IN AUSTRALIA AND EUROPE.
DO NOT COVER THE CHARGER OR INTAKE DURING CHARGING.
THE CHARGER SHOULD BE PLACED OUT OF THE REACH OF CHILDREN.
CHARGE IN AN INDOOR AREA WITH GOOD VENTILATION AND HEAT
DISSIPATION.
DO NOT CHARGE IN HUMID, HIGH TEMPERATURE CONDITIONS.
DO NOT CHARGE NEAR FLAMMABLES OR EXPLOSIVES. DO NOT
DISASSEMBLE THE CHARGER: THERE IS A DANGER OF HIGH VOLTAGE
IN CHARGER CASE.
FLITEBOARD DOES NOT BEAR ANY RESPONSIBILITY FOR INCORRECT
USE OF THE CHARGER. USERS MUST OPERATE THE CHARGER
AC TERMINAL
DC NEGATIVE
DC POSITIVE
INDICATOR 1
INDICATOR 2
FLITECELL LIGHTWEIGHT 15A SHOWN

1515
Charging Flitecell
1 Remove Flitecell from its travel bag.
2 Place Flitecell in a cool dry location away from flammable or hot items.
3 Connect Flitecell charger plugs to Flitecell terminals ensuring to
connect the orange (positive) connector to the orange terminal first and
the black (negative) connector to the black terminal.
4 Check that connections have been made correctly. Plug the charger
in the wall socket. A supplied magnet is required to be placed on
Flitecell, as shown by arrow, (5-10 seconds) to activate charging.
5 The charger will automatically turn o when the charging process is
complete.
FLITECELL IS A POWERFUL FLITECELL CONTAINING SIGNIFICANT
ENERGY. CHARGING A DAMAGED FLITECELL CAN RESULT IN A FIRE
OR EXPLOSION. ALWAYS INSPECT THE FLITECELL BEFORE CHARGING.
CHARGE THE FLITECELL UNDER SUPERVISION, IN A SAFE LOCATION,
AWAY FROM DIRECT SUNLIGHT, MOISTURE AND AWAY FROM
FLAMMABLE OBJECTS. AND SURFACES.
RED LIGHT FLASHES Capacity 0% — 10%
RED LIGHT ON Capacity 10% — 20%
GREEN LIGHT ON Capacity is 20% - 35%
GREEN LIGHT FLASHING Capacity 0% - 35% + Charging
TWO GREEN LIGHTS ON Capacity 35% — 65%
ONE ON + ONE FLASHES Capacity 35% — 65% + Charging
THREE GREEN LIGHTS ON Capacity 65% — 100%
TWO ON + ONE FLASHES Capacity 65% — 100% + Charging
Flitecell light Light meaning
4
MAGNET PLACED TO
ACTIVATE CHARGING
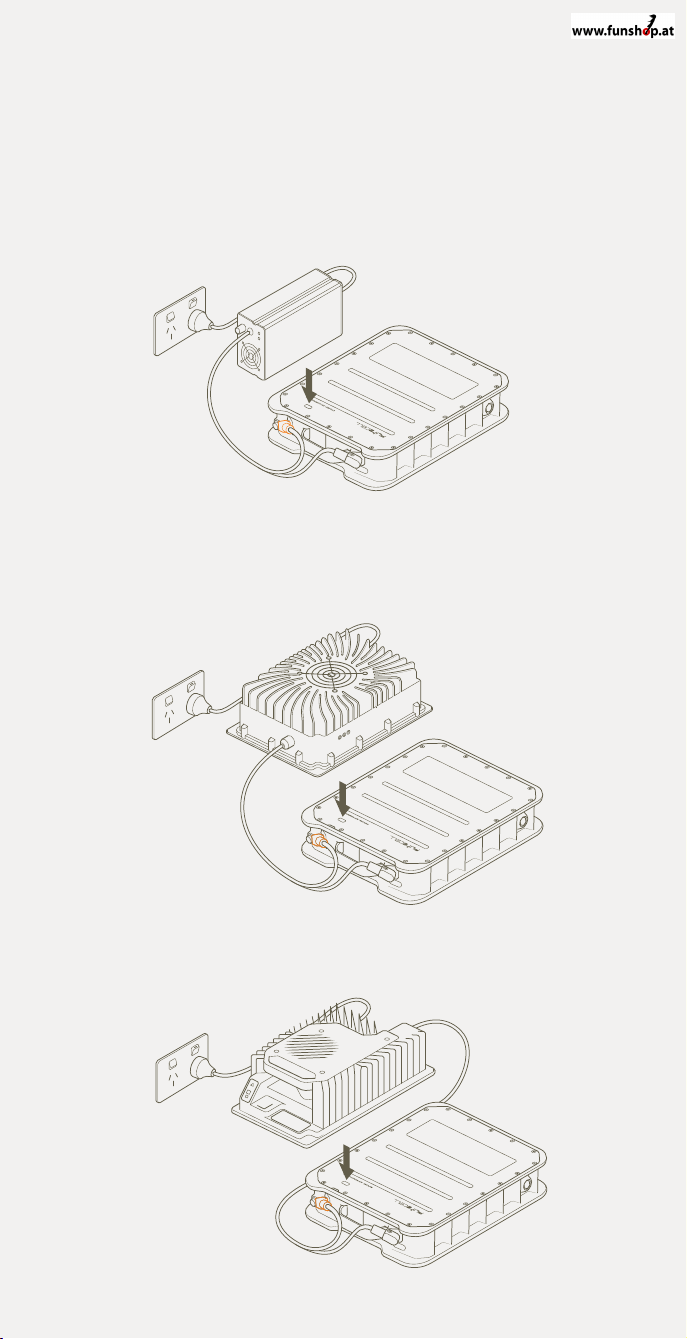
16
Flitecell Premium 25A
Flitecell Fast 20A
Flitecell Lightweight 15A
Flitecell Chargers

1717
After connecting the
Charger and Flitecell,
Charger does not work.
Indicator 2 displays green
Possible fuse blown
Contact Fliteboard
Technical Centre or
Fliteboard Support
Flitecell isn’t charged
fully but the light flashes
between red and green
Charger and Flitecell
are disconnected
Charger overheating, gone
into thermal protection
mode.
Reconnect Charger
and Flitecell
Cool charger.
Once temperature
is reduced, resume
charging
After connecting Charger
to AC Terminal, Charger
does not work and both
indicators are unlit
Plug may be loose,
Charger is not
connecting to power
Charger is damaged
Reconnect the AC plug
Contact Fliteboard
Technical Centre or
Fliteboard Support
Flitecell Premium 25A
Flitecell Fast 20A
Flitecell Lightweight 15A
Power On
Charging
Fully charged
Reverse Polarity. You have connected the charger
the wrong way, switch the charger connectors
Power On
Charging
Fully charged
Overheat protection. Internal temperature exceeds
80 degrees, charging has stopped.
Issue Cause Solution
Flitecell Charger Indicator Guides

18
Connect eFoil to Fliteboard
1 Remove the Fliteboard from its bag and place upside down on the
bag or other protective surface. Locate the Flitebox cavity on the
bottom of the board and ensure the 4 retaining screws are removed.
2 Check to ensure the orange o-ring is inserted, properly seated in the
Flitebox cavity o-ring groove, clean and free of sand,
grit or water.
3 Carefully lift the eFoil from its bag and place the Flitebox into the
cavity. While doing this ensure the power cables feed through into the
Fliteboard cavity.
4 Ensure the Flitebox is properly seated in the cavity and flush with the
board surface.
5 Insert the 4 x 20mm Stainless Steel Hex fasteners. Tighten them in
a cross pattern, first using your fingers to ensure the threads are
properly engaged, and then using the supplied hex key. Use a torque
of 6 Nm to tighten the fasteners.
6 Medium force needs to be applied when using the long arm of the
hex key to ensure the fasteners are tight.
7 When properly tightened, the eFoil should be secured and the o-ring
compressed. Failure to properly tighten the fasteners or fit the o-ring
will result in a board leak.
8 Be careful not to over-tighten the fasteners as this could result in
stripped threads or damaged fasteners.

19
Connect the fuselage tail
1 With the board upside down and the eFoil connected, take the 20cm
long aluminium fuselage tail from the travel bag and insert into the fin
under the propeller guard.
2 Add a thin layer of Tef-Gel from the tube supplied to the thread of the
supplied 12mm fastener bolt and carefully tighten using the hex key
using torque of 6 Nm.
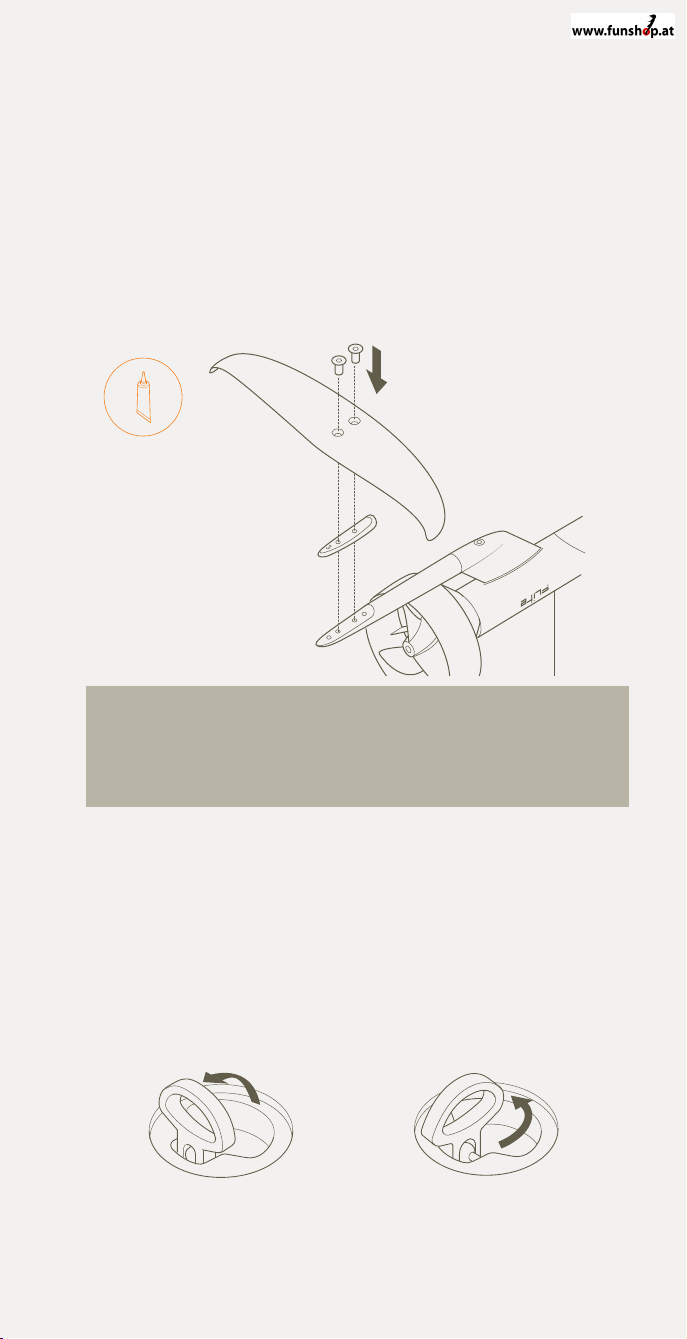
Connect the Wing
1 Remove either the Cruiser or Flyer Wing from the travel bag
and from its wing cover.
2 Place the wing in position as shown.
3 Insert the 3 fasteners taking care to ensure the correct set is being
used for the particular wing model you are fitting (Refer to page
11). ALWAYS add Tef-Gel to the fasteners first. The fasteners should
extend by approximately 6mm through the Wing when placed in the
countersunk holes.
4 Tighten the fasteners with the supplied hex key, ensuring the fasteners
are tight enough that the wing cannot move or wobble significantly
during use. Use a torque of 6 Nm to tighten the fasteners.
PRO TIP It’s a good idea to add your wing covers first to protect the
wing from damage, and also to protect you from the wing’s sharp
trailing edges.
TEF-GEL
TEF-GEL
20
Connect the Stabiliser Wing
1 Take the smaller Stabiliser Wing from the travel bag and remove
the wing cover.
2 Take the correct Stabiliser Wing shim from the accessories pouch
and fit between the Stabiliser Wing & the fuselage tail.
3 Use a 15mm and 20mm hex fastener to secure the Stabiliser Wing in place.
ALWAYS ADD TEF-GEL TO THE STAINLESS STEEL FASTENERS THAT ARE
BEING INSERTED INTO THE ALUMINIUM. IF LEAVING WINGS ATTACHED
FOR EXTENDED PERIODS, ENSURE THAT YOU LOOSEN FASTENERS AND
RE-APPLY TEF-GEL EVERY FEW WEEKS. FAILURE TO DO SO MAY RESULT IN
CORROSION AND DAMAGE TO YOUR EFOIL FASTENER INSERTS.
Connect Flitecell to Fliteboard
With the eFoil, fuselage tail and wings attached, it’s time to carefully
turn your board over so it stands on BOTH the front wing and nose
of the board.
1 Twist the Lid Latches and open the board Lid.
DO NOT OPEN LID WHILST IN THE WATER UNDER ANY CIRCUMSTANCES.
PRO TIP After extensive testing the Fliteboard team have determined
that the No. 3 Shim sets the board for the best overall balance and foot
positions when riding. We have supplied 4 degree and 5 degree Shims
for you to experiment with to customise your ride, however most riders
will prefer the 3 degree position.
2 3
4
1
2 3
4
1
TEF-GEL
This manual suits for next models
2
Table of contents
Popular Accessories manuals by other brands

Springfree
Springfree R132 Installation and user guide

GeoSIG
GeoSIG VE-3x Series Installation and operation manual

Primex Wireless
Primex Wireless SNS7ATPD user guide

Yamaha
Yamaha SYSTEM45 Service manual

PASCO
PASCO ME-8953 instruction sheet

System Sensor
System Sensor FAAST FL2011EI-HS Quick installation guide


