Floorwash 1400 Instruction manual

MANUALOFUSE ANDMAINTENANCE
1400
2
Foreword 3
Manualcontent, useandmaintenance 3
Storageofmanualofuseandmaintenance 3
Machinedelivery 3
Floorwashtechnical description 3
Serial number 3
Generalsafetyrules 3
Recommendations 4
Warnings 5
Technicaldata 6
Spareparts 7
Packagingspecifications anddimensions 8
Machineunpacking 8
Machine assembly 9
Howtoget started 10
ON/OFF 11
Functioning 12
Transport 14
Aftercleaning 14
Maintenance 16
Troubleshootingtips 17

3
FOREWORD
It isofoutmostimportanceto keepthemachineat its maximum efficiency bycarrying outthe
maintenancedescribedin this manualcarefully. It isimportant to keepthis instruction manual
inasafeplacesothat it canbereferredtowhenever necessary. Forfurtherrequirements,please
contact ourcustomerservice centreoryournearest authorized dealer.
MANUAL CONTENT,USE AND MAINTENANCE
The following manual hasbeendrawnuptoprovidecustomerswith allnecessaryinformationin
ordertousethemachineassafelyandsmoothlyaspossible.
STORAGEOF MANUAL OF USE ANDMAINTENANCE
Themanualof useandmaintenance shouldbe keptin a safeandeasyaccessible place in the
immediate proximityto the machine.Toavoid compromisingits readability, keepthis manual
awayfromsourcesofheat,liquids ordetergents.
MACHINEDELIVERY
TheFloorwashmachineisdelivered inaprotective packaging.Ensurethat the packagingis
fully intact andthat there arenosignsoftemperingwhen the productistakenover. The customer
shouldnotifyourcustomerserviceimmediatelyincaseofdamages.
Floorwash TECHNICALDESCRIPTION
The Floorwash is a mechanical floor scrubber-dryerthat ensures effective cleaning
surfaces including uneven superficies. Thecombined mechanical action of brush,water and
centrifugal forcewill guaranteethebestresultswith minimumeffort.It cleans,rubsandcollects
the filth andit isperfect forconstantandfrequentuse.Thisscrubberdryerisparticularly suited
forthe treatment andcleaning offloorsmadeofterracotta, pottery, setts,clinker,rubber,resin,
marble,linoleum, rawconcrete, flagstone, serizzo,granite,stone,carpetsandrugs.
SERIALNUMBER
Thelabel with the serial numberis located below the machine,in the underlying part of the
external left side.That numbershall be always notified for technical assistance or request of
spareparts.
GENERAL SAFETY RULES
Thisfloorscrubber-dryeriseasy touse;anyway, itisnecessarytoread thefollowing rulescarefully
inordertoavoiddamagestoboththeoperatorandthemachine.

4
Recommendations
• Themachine isnot intended to be usedbypersons(including children)
whosephysical,sensoryandmentalcapacities areimpaired,orwith lack
ofthe necessaryexperienceandknowledge,unlessthey aresupervised
or instructed in its use by personsresponsible fortheir safety.
• Children shall be supervised to ensure that they do not play with the
machine.
• Ifthe powersupplyisdamaged,itshallbereplaced bythe manufacturer
orits authorizedtechnical assistance.
• Thismachine issuitable forindoor use only.
• Do not use the machine on slopes.
• Incase ofemergency,removethe power cable fromthe outlet promptly.
• Unplug the power cable from the outlet before maintenance is
performed.
• Use only brushes provided with the machine or supplied by an
authorised dealer and/or reseller to avoid compromising safety and
warranty.
• The machine shall not be left unattended, but stored in a protected
areato prevent the machine frombeing moved accidentally.
5
Warnings
Alwaysunplug the power cable fromthe outlet when not in use
or beforeadjustmentsand maintenance areperformed.
Do not useorkeepthe machine outside in wet conditions,and
avoid direct exposureto rain.
Do not hold the plug ormachine with wet hands.
Themachine issuitable forusein dry conditions at a
temperature range of +5°Cto +35°C(+41°Fto +95°F).
Thepower outlet socketof the machine shallbe connected to
an approved earth.
Do not insert objects through openings.Do not usewhen
openings areclogged.
Protect the machine fromsunlight and UVradiation.
Do not suckgases,liquids or potentially explosiveand
combustible dusts.Thesesubstances maycorrode materials
usedin the construction of the machine.
Follow the basic safety rules for usein hazardousareas,such as
service station or gasdistributors.
Do not usethe machine in potentially explosiveatmospheres.
Do not place containersholding liquidson the machine.
Do not pull the power cable to carrythe machine.
Keepthe electrical cable away fromsourcesofheat.
Forusein workenvironments,do not hit shelves orscaffoldings
where there isa riskof objects falling.Theusershall be equipped
with adequate safetyequipment (gloves,footwear,helmet,
goggles,etc.).

6
Request original spareparts only to dealers and/orauthorized
resellersin case ofpartsreplacement ormaintenance.
Checkthe machine in anauthorizedservice centre at leastonce
ayear.
Organizethe disposalof waste materialscomplying scrupulously
with current regulations.
TECHNICAL DATA Floorwash 1400
Machineheight 140mm 140mm
Machinewidth 285mm 385mm
Machinelength 330mm 330mm
Frontbrush Ø86-700g/m
Rearbrush Ø54-1145g/m
Workingwidth 250mm 350mm
Workcapacity 280mq/h 500mq/h
Induction motorpower 400W -110V60Hz
Totalstoragecapacity 4l
Recoverytankcapacity 1l 1,8l
Totalemptyweight 10kg 11kg
5,5 in
11 in
13 in
14 in
5,382 sq ft/hr
400W - 110V 60Hz
1,05 gal
0,48 gal
24 lb
ø 86 - 700 rpm/m
ø 54 - 1145 rpm/m
7
41
15
50
38 51
18C 18D
VIT17 18A 18B
DAD2
37A
29
VIT19
39
16
DAD2 1A
1
18
VIT18
20A
20C
20D
20B 20
37
SPARE PARTS
1 COMPLETE NYLON EXTERNAL LEFT SIDE
1A NYLON EXTERNAL LEFT SIDE
DAD2 LOW SQUARE NUT 4MA
CA MACHINE BODY
15 UNIVERSALREAR BRUSH
16 UNIVERSAL FRONT BRUSH
18 COMPLETE HEXAGONSPRING PLUNGER CH10
18A HEXAGON PLUNGER INSERT BUTTON CH10
18B HEXAGON PLUNGER CH10
18C SPRING LATCHFORHEXAGONPLUNGER CH10
18D HEXAGON PLUNGER EJECT BUTTON CH10
20 COMPLETE HEXAGONSPRING PLUNGER CH7
20A HEXAGON PLUNGER INSERT BUTTONCH7
20B HEXAGON PLUNGER CH7
20C SPRING LATCHFORHEXAGON PLUNGER CH7
20D HEXAGON PLUNGER EJECT BUTTON CH7
37 COMPLETE NYLON EXTERNALRIGHTSIDE
37A NYLON EXTERNAL RIGHTSIDE
38 COMPLETE COVER
41 COMPLETE HANDLE
50 COMPLETE TANK
51 WASTE WATERTANK

8
PACKAGINGSPECIFICATIONS ANDDIMENSIONS
TheFloorwashmachineisdelivered inaprotective
packaging.
Ensurethatthe packaging isfully intact andthatthereare
nosignsoftemperingwhentheproductistakenover. In
caseofdamage,the customershallnotify ourcustomer
serviceimmediately.
MACHINE UNPACKING
Follow the procedurebelow:
1 Place thepackagingonthefloor/worktable softlybylaying it downontheright part.
2 Opentheexternalcardboardbyusingapairofscissors,whennecessary.(Donotuseanutility
knife).
3 Remove themachinebody, tankandextensibletube,andplacethemonthefloorsoftly.
4 Keep the cardboard boxand its components away fromsourcesof heat, in a dry and easily
accessibleplace.
Donotbreakor throwthepackaginganditscomponentsaway sothat itcanbeused
againforfuturetransportation.
For your safety, wearprotectivegloveswhen carryingouttheseoperations,inorderto
avoidinjuriesincaseofaccidental contact withsharp edgesof thecardboardbox,direct
contact with detergentresiduesormetaledges.
35 80
31

9
CLACK!
h2
h3
h1
CLACK!
MACHINEASSEMBLY
Follow the procedure below:
The Floorwashmachinehasafastassemblysystemsinceno tools arerequired.
Donotuse anytoolto avoidinjuriesordamagetothemachine.
1Place the bodyofthe machineonastablesurface
without slopes.
2Insert thehandleintheaxleofthemachinebody.
3Insertthe tankinthehandleatthe
desired height(3differentheights).
4Insertthesmall transparent watertubeintherelief
valvesituatedonthelowerpartofthetank.
5Hooktheelectrical cordintoitsappropriate
seatsituatedatthetopendofthetank.
10
HOW TOGET STARTED
TheFloorwashmachineisamechanicalcollectiondevicethat canachieve
excellent resultsevenwiththeuseof waterwithout detergent.
An excellentresult is achievedwith theuseof specificdetergents.
Themachinecomes with universal brushes(gr0.12).Anyway,itispossibletorequest
specificbrushes toourcustomerserviceaccordingtothetypeofsurfacetobetreated.
Usefoam-controlled detergents toavoid excessivefoaming. Do notusepureacids.
Wearprotectiveglovesbeforehandlingdetergents,alkaline oracidsolutions toavoid
hand injuries.
1Removethe tankcap.
2Pourtheliquid,cleanwaterand/ordetergentin
theconcentrationspecifiedonthelabel.
3Replacethe tankcap.
Fill thetankwith cleanwaterand/ordetergent foramaximum of2lt.
Use wateratatemperaturenotexceeding 40° below10°C.( 104°F– 50°F).
No chemicals in tank pre-treat oor with
sprayer bottle before cleaning with machine
11
1
2
3
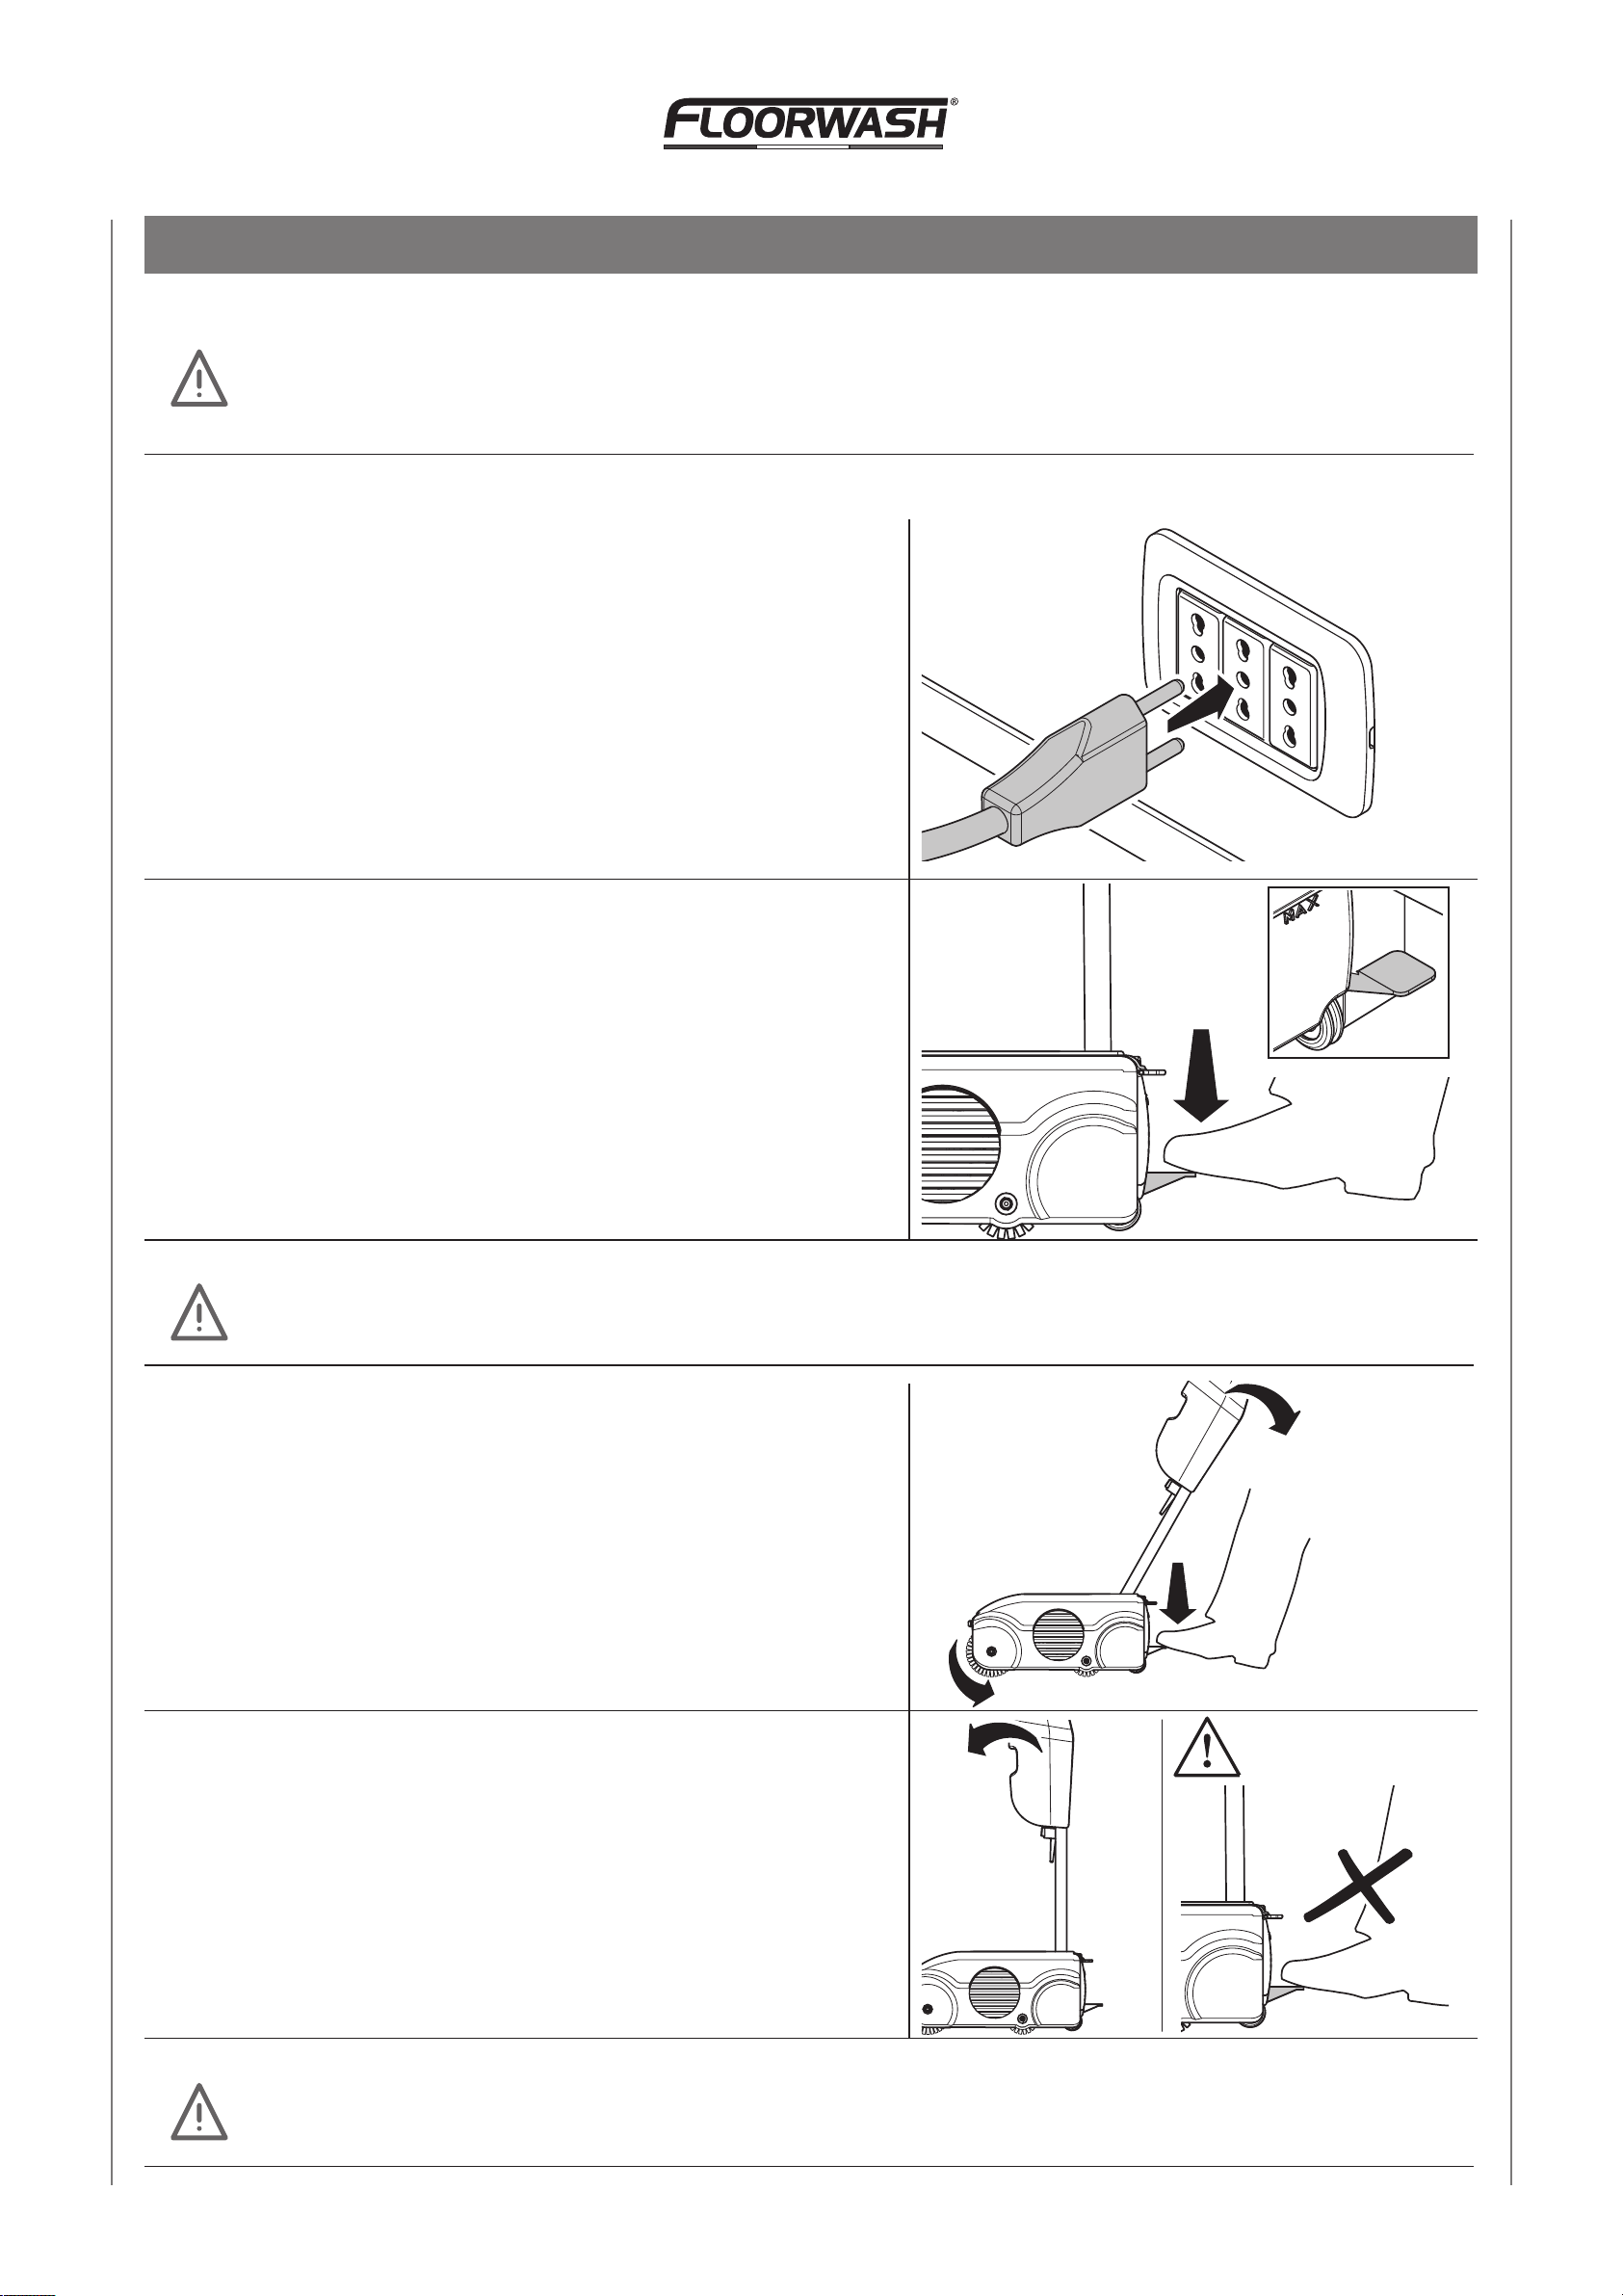
ON/OFF
Beforethe start-upof the device,checkthatthe electrical cordand the machineare
not malfunctioninginanyway.Ifthisisnot thecase,donotusethe deviceand
contactour servicecentre assoon aspossible.
1Insert theplugina230-voltwalloutlet.
2Pressthe kick-startpedalsituated atthe bottom-
rightsideofthemachine.
Itisimportant topressthekick-start pedalcompletelybefore loweringthetanktowards
you,so astoavoidanydamagetothecentralaxleof themachinebody.
3Whilepressing thekick-startpedal, lowerthetank
towardsyouslowly.Atthispoint,themachine
will switchonautomaticallyandbrusheswill start
rotating.
4Themachinewill switchoffautomaticallywhen
returningthetanktoavertical position(rest
position).
Donotpressthekick-start pedalwhenreturningthetanktotheoriginal position.
120
12
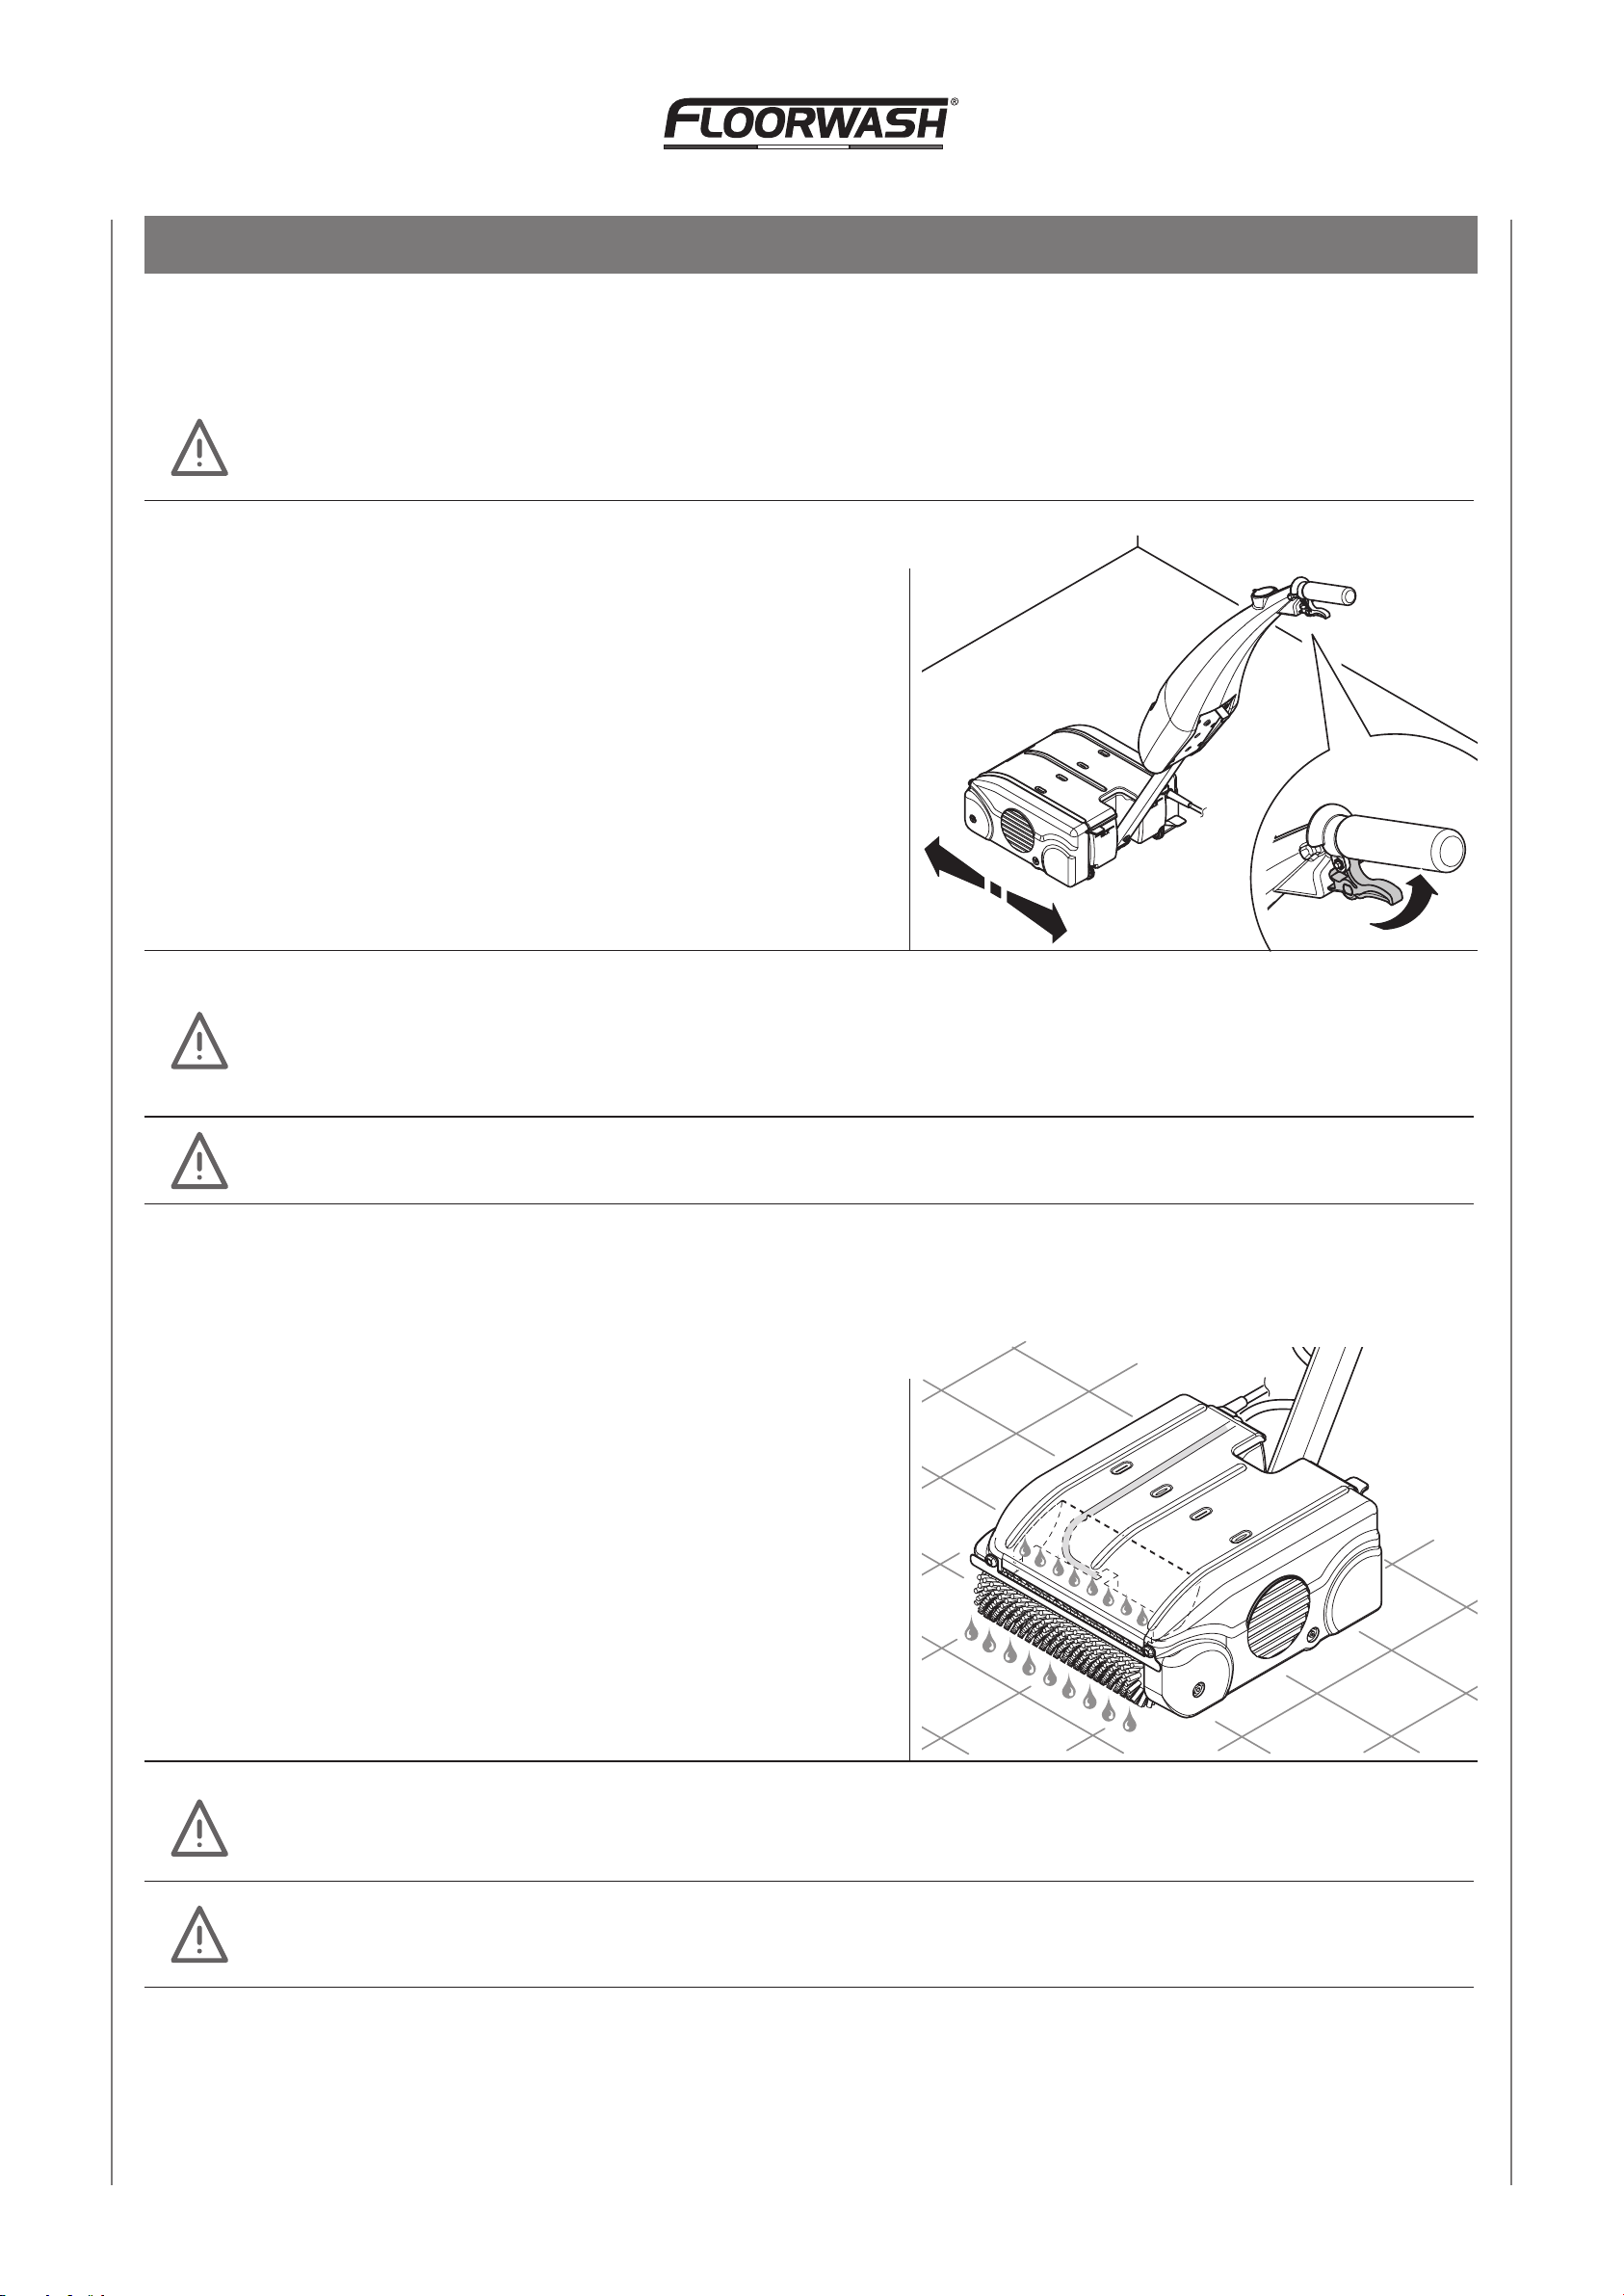
FUNCTIONING
Checkthat all stepsdescribedabovehavebeencompletedcorrectly beforeusingthe machine.
Beforestarting thewashingprocedurewith themachine,removeanysolidresidualsuchas
dustlumps,stones,glass,paperetc.fromthesurfacewhichhastobetreated.
1Afterthe enginehasturnedon,movethe
machinebackandforthwith linear movements.
Theleverplacedbeneaththehandlewill allow
youtodispensetheliquid previouslypouredin
thetank.
Theengineofthismachinehasasafetydevicethat will turnthemachineoffintheevent
ofanoverload.Inthiscase,restthemachinefor15minutes,andthencontinuefrom
where you leftoff. Iftheengine doesnot functionproperly,contact ourservicecentre.
Donot makecircular movementswiththemachinesothat itcancollectthedispensed liquid.
2Afterpulling thelever,theliquidwill distribute
uniformlyonthefrontcylinder brush.
Inthe ongoingstage justpulltheleverhalfway;intheretuningstage,releasethelever,thus
allowingtheliquid recovery.
Inthereturningstage,themachineshallpassthroughthesamehallway of the ongoing
stage, thus allowing acompleterecoveryofthedispensed liquid.

13
3Therecoveryofthedispensedliquid occurs
automatically bymeansofmechanicalcollection.
Theliquidwill flowintothewastesituatedinthe
lowerpartofthemachine.
Itisimportanttoemptythe waste when the seep liquidreachesthe maximummarkprinted
onthe backof the waste, thus avoidinganaccidental releaseof the same.

14
TRANSPORT
Totransportthemachinesafely,follow thesesteps:
Checkthatthetankisplaced inavertical positionbeforemovingthemachine.Theelectrical
cordshallbeunplugged fromtheoutlet.
1The machinehastwo rubberwheelssituated
inthelowerpart.Bypullingthetanktowards
you,without pressingthekick-start pedal,
thefrontpartofthemachinewill belifted up,
guaranteeinganeasytransportation.
Iftheliquid inthewastehasreachedthehighestlevel, itisnecessaryto emptyitbeforecarrying
the machine.
2It ispossibletolift theentiremachineup,inorder
tomoveit toanupperfloorofthehouse,by
usingthedesignatedslit situatedonthelower
partofthetank.
Donotlift themachineupbyusingtheupperknobofthetank.
Fortransportationwithvehicles,ensurethe machinesothatitcannotinanywaymove.
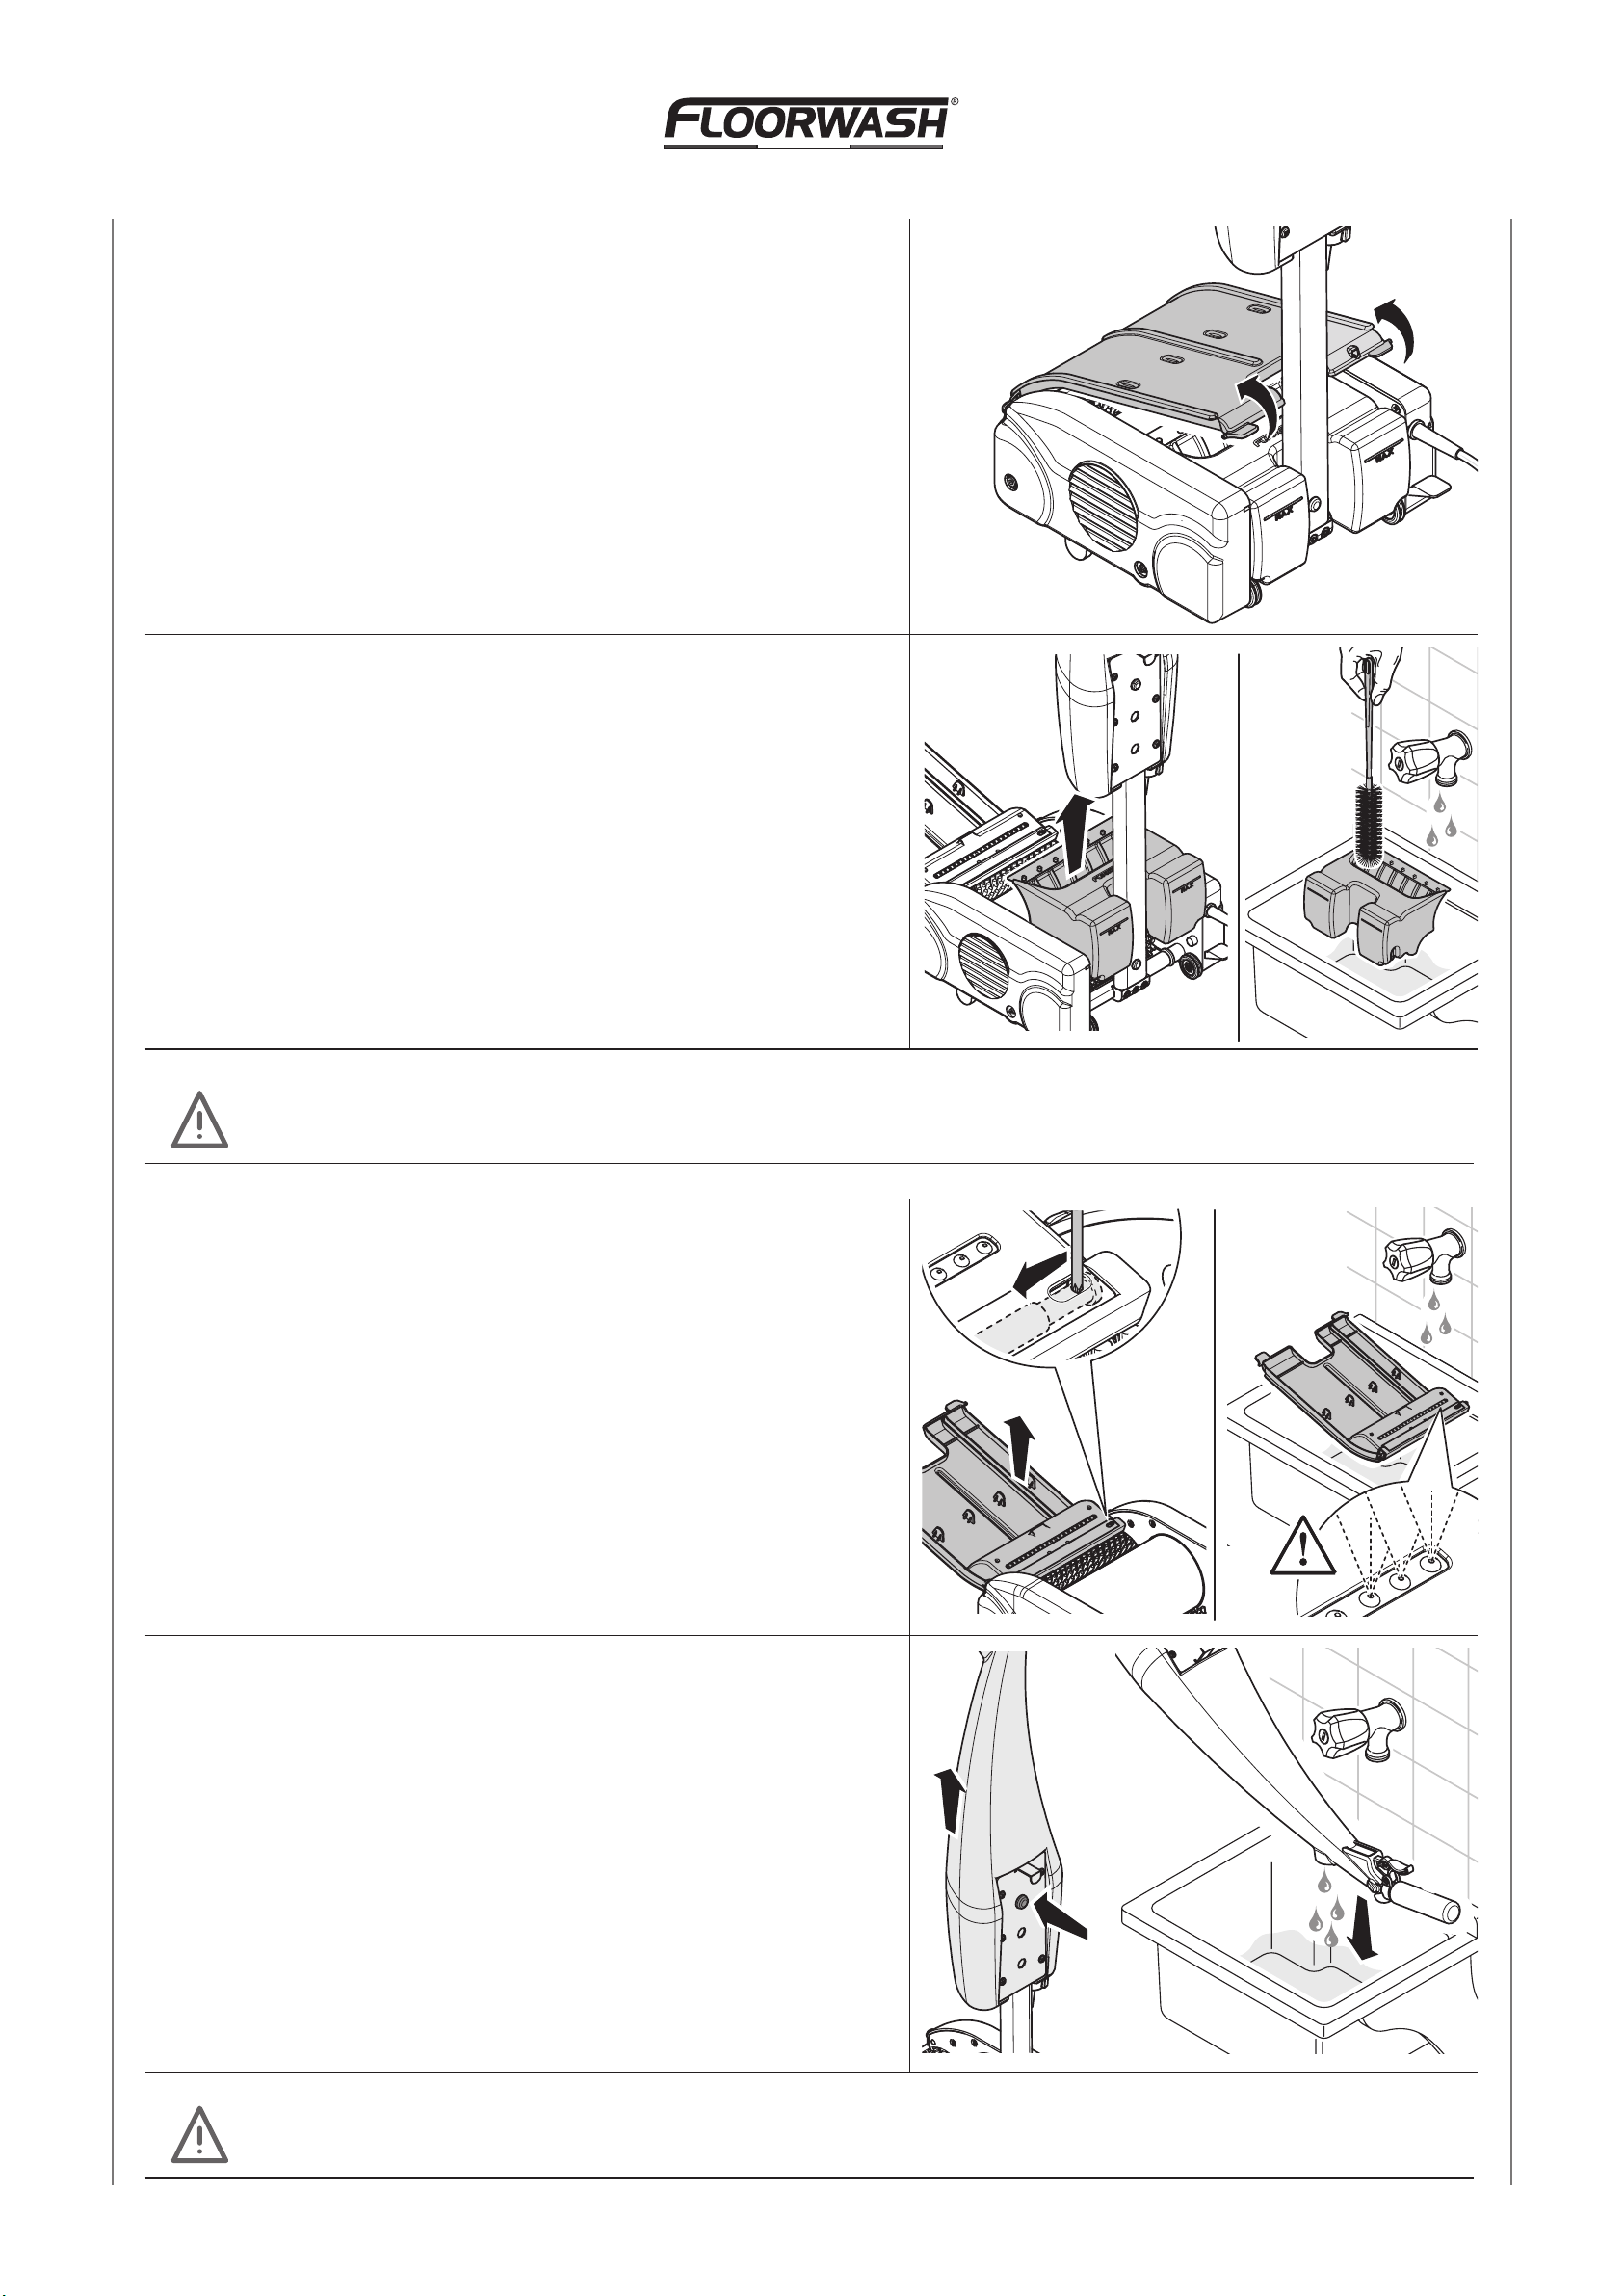
AFTERCLEANING
Aftercleaning,follow thesesteps:
Before carrying out anyoperation, checkthatthe electrical cord is unplugged fromtheoutlet.
Wearprotective gloves whencarryingout theseoperations,inordertoavoiddirect contact
withdetergent residuesor metaledges
OFF
CLACK!
15
1Opentheuppercoverofthe machinebypushing
thetwo lateral hooksup.
2Removeandemptythedirty waterwaste.Washit
with runningwater and,ifnecessary,useaspatula
toremoveanyresidualfromthebottom.
Thestainless-steel sheetwelded to thewasteisnotremovable.Donot tryto removeit.
3Unhookthe uppercoverandwashit
gently with runningwater.Check that
thedriptrayandthewatertube
arenotclogged.
4Unhookanddraintheclean watertank2
fromanyresidualofwater and/ordetergent.
Donot placethefootonthemachine bodywhilecarryingout thisoperation.
1
2
3
1
2
16
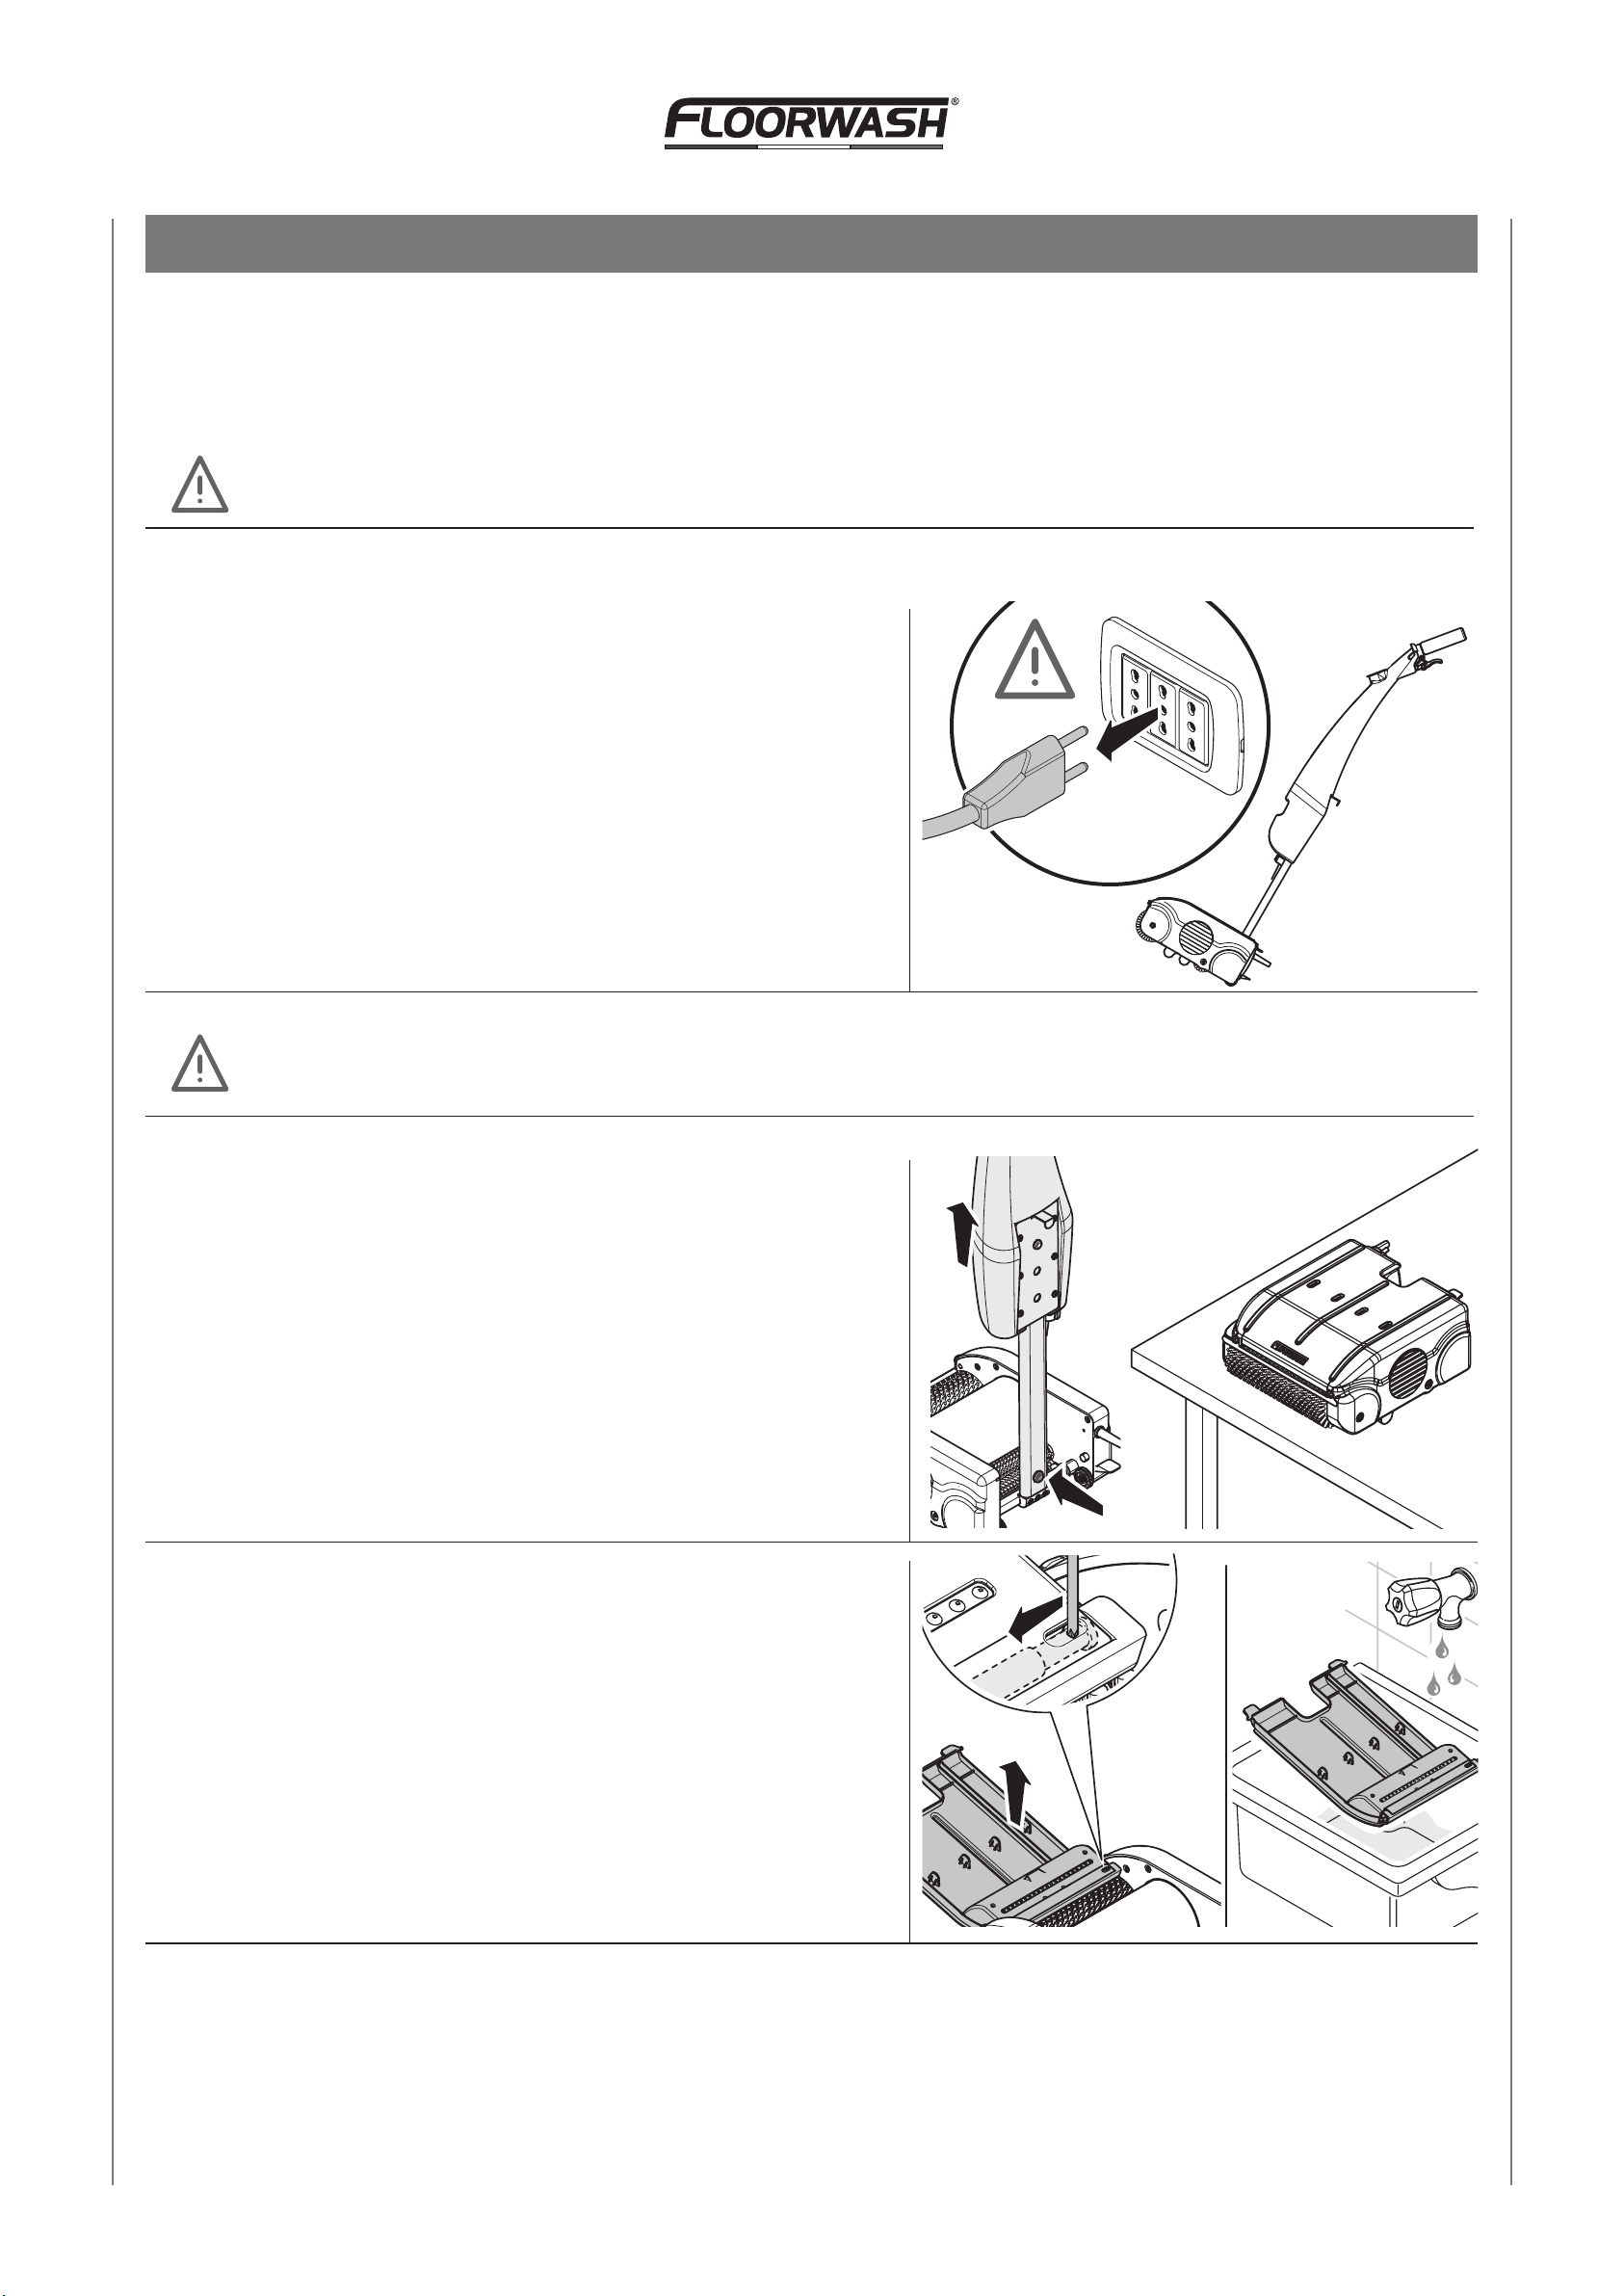
MAINTENANCE
Aregularmaintenancekeepsthemachinesafeandalwaysreadytouse.Carryoutthe following
operations:
Beforecarryingout anyoperation, checkthatthe electrical cordis unpluggedfromtheoutlet.
1Keepthemachineinasafeplacetoensureits
maintenance.
Wear protectivegloveswhencarryingout theseoperations,inorderto avoid direct contact
withmetal edgesorsharpplasticparts.
2Unhookthe handlefromthemachinebodyand
placeit onaworktable.
3Unhooktheuppercoverofthe machineand
washit thoroughlywith running water.
1
2
1
2

17
4Remove thebrushesbypressing thebutton
placedontheleft sideofthemachine.
Use adamp cloth toclean theinternal sides
ofthemachinewhile checking that
seals arenotclogged.
Donot cleanthemachine withsteamcleaners.
TROUBLESHOOTINGTIPS
Thefollowing areexamplesofsomeproblemsthat mayarise.
Ifaftercompleting theverifications listedbelow,youdonotachievepositiveoutcomes,please
contact ourservice supportimmediately.
Themachine doesnot work
Checkthat the power cordplug is inserted correctly. (230V)Checkthat the power cord is not
damagedorhasgotstripes.
Theengine turnsonbut brushesdonot rotate
Unplugthe powercable andcheckthat the central conveyorbelt isable to rotatebytrying to
moveit byhand.
Thefreshwater tank loses
Checkthatthewatervalve ofthecable isfully screwedtothe tank.
Checkthatthedrivecableanchoredtotheleveroftheliquid distributionisnottootaut.
Checkthat the tankisfully intact andthat therearenoholesand/orcracks.
Themachinedoesnot distribute well the washwater
Makesurethat the drip tray placed underthe cover isnot clogged. Checkthat the transparent
tubeisnotcloggedorcrimped.
Themachinedoesnot collect water
Checkthat the wasteisproperly insertedandthat the coveriscompletely closedandattached
tothe body.Checkthat the washwater dropsonaregularbasiswhenyoupull the lever.Check
that the brushesarenottoo worn.
2
1
1
3
3
2
120

18
NOTES


NamcoManufacturing
1651Blalock Rd,Houston, TX77080,U.S.A.
Tel. 1-800-634-5816Fax713-932-9254
bryan@namcomfg.com www.namcomfg.com
1729 Brittmoore Rd, Houston, TX 77043
Table of contents
Other Floorwash Scrubber manuals


Popular Scrubber manuals by other brands

Amperes Electronics
Amperes Electronics iPX5455 instruction manual

HAL Extraction
HAL Extraction 85U Safety and operating manual

Krüger Technology
Krüger Technology KF36E manual

Global
Global 293052 instruction manual

Advance acoustic
Advance acoustic Hydro-Retriever 4500 462000 Service manual

Vacula
Vacula Drainman Classic Operation manual


