Fluidart Pinnacle User manual

OWNER’S MANUAL
Pinnacle
Filter
by Fluidart®

Congratulations on making the smartchoice!
Fluidart Technologies filtration systems are designed
with the pond owner in mind. Our filtration systems
are unparalleled in quality, performance, ease of
operation, and maintenance. We are certain that you
will have many years of happy KOI keeping with our
system.
Contact us at info@fluidart.com or phone 1-888-499-3852
or 405-843-9060
Fluidart Technologies
Bead Filter
Owners Manual

Challenger Internals
Laterals
Bead Pack
Sludge Drain
Multiport
Valve
Spinner And
Backwash
Laterals
Drain Plug

Pump
Filter
Vortex
Tank
Suggested installation of
Fluidart Filtration System
Swing check valve installed below water
level in an easily accessed location will
make keeping the pump and Turbovortex
primed much more easy.
Swing check
valve

Introduction to Bead Filtration
How long have bead filters been in use?
Bead filters have been around since the mid-70's and got their start
In the food fish industry. Bead filters have been tested at various universities
around the country, including Louisiana State University and Langston
University in Oklahoma. In these tests, bead filters out performed
other filtration systems, when considering both biofiltration and clarification.
What is the theory behind bead filter operation?
Bead filters accomplishtwo goals, one being water polishing (solids capture) and the other being
biofiltration. Other filtration systems accomplish these goals, but are muchlarger and more difficult to
clean. The advantage of the bead filter is that it
provides a home for beneficial bacteria with high surface area for a large colony
per cubic foot and fine particulate straining all within the same vessel. The other
big advantage the bead filters have over other types of filters is that they are much
easier to clean. This makes the hobby of KOI or pond keeping much more
enjoyable, with less work involved in maintaining a healthy environment for the
fish.
How does a bead filter perform Mechanical Filtration?
Mechanicalfiltration or clarification is the process of removing suspended solids
from water. Suspended solids in arecirculating system are generally smallparticles
of undigested food, bacteria, andalgae. These solids tend to reduce the clarity of
water and cause problems in consuming tremendous amounts of oxygen, also needed
by our beloved fish. Bead filters remove solids fromwater by different mechanisms.
Physical straining is probably the most dominant mechanismremoving larger
particles (>50 microns). Finer particles (<20 microns) are removed at a lower rate
by a process called bioabsorption. The particles are capturedby bacterial biofilm
on the surface ofthe bead. Studies show that bead filters capture 100% of particles
>50 microns and48% of particles in the 5-10 micron range per pass. The more
passes the more solids captured.
**Important**in order for the bead filter to perform FINE micronstraining it
MUST be fully colonized with bacteria. Depending on the temperature this can
take up to 4-6 weeks, at temps. above 60-65 degrees F.

How does a bead filter perform Biofiltration?
Biofiltration depends on the establishment of a colony of bacteria on the surface of
the beads large enoughto convert dissolved toxic nitrogenous waste to harmless
compounds. When the bacteria are given the proper environment, they grow in a
thin biofilm on the surface of each bead. Each cubic foot of beads contain about
600,000 beads. This is one of the secrets of the beadfilters success--high surface
area per cubic foot for a large bacterial colony per cubic foot of filter media. The
two most commontypes of bacteria are, Nitrosomonas which is responsible for the
break down of ammonia in the system. The next is Nitrobacter, which is responsible
for the breakdown ofnitrite into relatively harmless nitrate.
**Important** in order for the bead filter to perform Biofiltration the beads
must be colonized with alarge enough colony to handle the load of dissolved
ammonia presented to it. This may take up to 4-6 weeks at temps. above 60-65
degrees. Until the colony has grown large enough, the pond owner MUST be
responsible for monitoring the levels of ammonia and nitrites in the pond water and
taking appropriate measures to correct dangerously high levels.
How do you size a bead filter?
When we start talking bead filter size, usually the first thing said is "I have a ___
gallon pond. What size filter do I need?" This just gets the conversationrolling.
The next question should be, "How many fish do you plan to keep in the pond?".
Fish have to eat and what it really boils downto is how many pounds of food is the
pond keeper going to feed per day. The larger the fish load and the more food that
will be fed, the larger the filter needs to be. A good rule of thumb when dealing
with bead filters is this: 1cu. ft. of beads will handle the solids capture and
nitrificationof up to one lb. of foodper day. 100lbs offish fed at 1% body weight
or 50lbs of fish fedat 2% body weight. This is feeding 35% protein food. Water
quality and clarity can be achieved by adjusting feeding rates and/or stocking
densities.
What pump do I use with my filter?
Almost any out of pond pump will work witha FLUIDART FILTER. 2 speed
pumps have proven to be favorites among many bead filter owners. 2 speed pumps
have the versatility of running onlow for normalfiltration and saving energy
dollars, while using high for backwashing. High is also great to have when you are
having friends over andyou want your waterfallto really roar!

Pinnacle Filter
Installation Instructions
1. Remove the filter fromthe box and locate the plastic bag containing the top cap
and open wrench.
2. Inspect the internals for any shipping damage. You will note that there are
plastic zip lock bands on the internals to hold them in place during shipping.
Cut and discard these as they are not needed.
3. Position the filter at the site of installation. Be sure that this is a level site with
full access to all sides of the filter, as you will need to use the sludge drain on a
regular basis and may eventually need to use the tank drain valve. We also
recommend that the filter be installed on a pad of some type to prevent settling.
4. Attach the multiport valves. Be sure that the "O" rings of the valve are properly
positioned. ** Important ** Hand tighten the unions, do not use a wrench as
you may over tighten the union and crack the outer ring.
5. Make pipe connections. The pressure (pump) line, returnline, and the waste line
connections are clearly labeled on the valve. **Important** Installa swing check
valve on the suction line from the pond to the pump. Install this below water
level and you will have much less trouble priming your pump. See ideal
installation diagram at the front of the manual. We also recommend that the
Wastewater is plumbed away from the site to prevent settling from moist
ground.
6. Fill the tank about one half full of water. Now pour the beads into the tank from
the top opening. When all the beads have beenplaced in the tank, screw the top
cap into place and tighten with the wrench provided.
7. Set the multiport valve to the filter position and open the air relief valve at the top
of the filter. Turn onthe pump and when water sprays out the air relief valve,
close it. Your filter is now operational.
8. Insert the section of PVC pipe that came with the filter into the upper union of
the spring check valve for the blower attachment. Glue this union. Then slide the
blower down onto the pipe and secure with setscrew. (Do Not Glue). When you
turn on the blower, the spring check valve will open, allowing pressurized air to
enter the filter tank for bead agitation. Only one multiport will come with a
blower attachment and can be attached to either set of bulkhead fittings.
* Special note * When lubricating connections, gaskets, or valves, use only silicone
based lubricants. Do Not use petroleum-based lubricants. Magic lube works well
and can be obtained at most pool and spa stores.

Pinnacle Filter
Operating Instructions
Now that your filter is installed and running there are a few simple things that you need to
know and understand.
FILTER MATURATION
This has been stated earlier, but is very important. It takes 4-6 weeks of operation at
temperatures above 60-65 degrees F. before there is a large enough colony of bacteria to
handle the bioconversion of ammonia and fine particulate straining. During this transition
period, the pond owner must watch the ammonia and nitrite levels in the pond. If they
become dangerously high, steps should be taken to correct the problem, such as a water
change. Also during this period fine particulate straining will not be fully mature and you
may notice your water being less polished than you would like. Both of the above issues will
improve with time and the growth of the bacterial colony. This will occur with any type of
bead filter used.
ULTRAVIOLET LIGHT STERILIZERS
Bead filters will remove suspended particles down to 5-10 microns in size.
However, some algae particles are smaller than 5 microns and will not be removed by the
beads. These tiny algae cells will give the water a green cast and affect the clarity of the
water. If the pond owner wants crystal clear swimming pool clarity, then a UV-light is
needed. UV-lights will also remove many harmful bacteria and decrease the suspended
bacterial counts in the water. We recommend the use of UV-lights for the above reasons.
BACKWASH INSTRUCTIONS
When you first start up your filter, we recommend that you let it run for two weeks before
you perform your first backwash. After that, once a week during the warm season should
be all that is needed. During the winter months backwashing can be reduced to as little as
once every 2-3 weeks. To perform a backwash, do the following:
Pre-Backwash Instructions
1. Open Sludge Drain for 15-20 seconds with Pump ON, then close drain.
2. Turn Pump OFF.
3. Turn Multiport to Backwash position.
4. Turn Pump ON for 10-15 seconds.
5. Turn Pump OFF.
Backwash Instructions
1. Move Multiport to Rinse position.
2. Turn the blower on for 1-2 minutes.*

3. Open Air Relief valve.
4. Turn Pump ON for 10-15 seconds.
5. Turn Pump OFF.
6. Move Multiport to Backwash position.
7. Turn Pump on until water runs clear.
8. Turn Pump OFF.
9. Repeat Steps 1-8 as needed.**
* While the blower is agitating the beads you should be able to hear the beads hitting the
inside of the tank. It should sound like individual beads ad not clumps. Running the
blower longer than 1-2 minutes at a time can cause overheating and damage the blower.
Note: Never run blower and pump at the same time.
** To achieve a thorough backwashing, you may need to repeat steps 1-8 several
times.Note: Be aware that large fluctuations in water temperatures from replacing too
much water too quickly can cause stress and/or death in fish.
Post Backwash Instructions
1. Move Multiport to Rinse position.
2. Turn Pump ON.
3. Open Sludge Drain until water runs clear.
4. Turn Pump OFF.
5. Move Multiport to Filter position.
6. Turn the Pump ON.
7. Add Dechlorinator to Pond as needed.
WATER MISER SLUDGE DRAIN.
The Water Miser Sludge drain allows a low volume backwash if water is expensive, in short
supply, or you have a low volume pond. To use your Water Miser Sludge drain, do the
following:
1. Turn off your pump and move the Multiport valve to the rinse position.
2. Turn on the blower and allow it to run for 2-3 minutes. Now open the Water

Miser Sludge drain valve with the blower running. You will notice water
being forced out of the sludge drain. Allow the blower to evacuate all the
water from the tank.
3. Now turn off the blower, close the sludge drain valve, and open the air release
valve at the top of the filter. With the multiport valve still in the rinse
position turn on the pump. You will be filling the tank with water at this point
and you will notice air rushing out of the air release valve at the top of the
tank. Whenwater exits the air release valve then the tank is full. Now turn
off the pump.
4. The tank is again filled with water. Now repeat steps #2 and 3 above. This
will agitate the beads and force the dirty water out of the tank. You can
repeat this step as many times as you would like. You are using only the
volume of the tank minus the volume of the beads to wash the beads each
time. This will use much less water than a hydraulic backwash.
5. When you are done with the above steps, fill the tank as above and do a rinse
on the beads. Run the water until clear and then go back to filter mode. You
are done and save many gallons of water.
*Note* If you leave your filter unbackwashed for two or more weeks, it is a
good idea to perform an extra long blower treatment on the beads.
*Word of Caution* If you leave you filter unbackwashed for extended periods of
time, and you live in an area with relatively soft water, you may want to buffer
your pond water. The bacteria in the filter can consume enough alkalinity in the
waterto cause a dangerous pH drop. Total alkalinity should be kept above
80ppm to avoid these potentially dangerous shifts. To increase alkalinity, add
sodium bicarbonate, do a water change, or add a commercially prepared pH
Buffer.
INTERNAL INSPECTION
We recommend that twice a season you inspect the output laterals, backwash
laterals, and the condition of the beads.
1. Backwash your filter then turn off the pumps and leave the valve in
the backwash position. Also open the sludge drain valve and the drain
plug at base of the filter.
2. Open the air release valve at the top of the filter. You will notice air
rushing into the filter. This represents water draining out of the filter.
3. When air stops being sucked into the filter, most of the water has
drainedout of the filter. Using the Hexagonal wrench that came with
the filterunscrew the top cap and remove.

4. Now inspect the beads. Do they look clean after the backwash? Are
thereareas of caked beads? If you find areas of dirty beads or caked
beads, you may need to adjust the length of time that you use the
blower, or increase the backwash time, or possibly the backwashing
frequency. If you find caked beads, now is the time to break them
apart. Using your hand or a stick, stir the beads and break up any
clumps that you might find.
5. Wipe any beads stuck to the output laterals off and inspect them.
Make sure that they clear of any obstructions. If there is material
inside the laterals, they can be unscrewed and removed. A baby bottle
brushcleaner works well for removing internally trapped solids.
Replace whendone.
6. Next, inspect the backwash laterals. They will need to be removed.
This can be done by pushing the output laterals at the top of the filter
to the side and reaching down in the filter and unscrewing the union
that holds the backwash lateral in place. When loose inspect them for
debris. Clean if needed then replace when done.
7. Replace the top cap using the wrench and make sure that it is secure.
Pay attention to the position of the air release valve so that it is
pointed in the direction you wish.
8. When the top cap is back on, with the air release valve open, move
the filter valve to the Filter position and turn on the pumps. When
water comes out of the air release valve, close the valve and
perform another backwash and rinse cycle before going back to
filtration. Now your done.
MEDICATING YOUR POND
Sometime during your career as a pondkeeper you may need to medicate
your pond with chemicals that will harm the bacterial colonies on the filter
media. To insure that they are not damaged follow these simple steps:
1. Do a good backwash on thefilter then turn off the pumps.
2. Move the valve to the "recirculate position". This will cause the
waterto bypass the filter while your treating your pond. Turn your
pumps back on.
3. Open the sludge drain at the bottom of the filter and then the air
release valve at the top of the filter. Water will start draining out of
the filter without loss of any beads. The bead pack will now be
surrounded with air instead of water. This will prevent any bacterial
loss from lack of oxygen. The beads will stay moist for several days.

4. When the medication period is over, close the sludge drain, but leave
the air release valve open. Turn off the pumps and move the handle
to the filter position. Now turn on the pumps. You will notice air
"whistling" out of the air release valve as the tank refills with water.
When watersprays out of the air release valve turn off the pumps. Do
a quick backwash and rinse, then go to filter mode.
*Note* Depending on the chemicals used, it is advisable to do a 50%
water change before starting the filter back up. Check with your dealer.
WINTERIZING YOUR FILTER
If you live in an area where you experience hard freezing, you may decide to
shut your filter down for the winter. Do the following:
1. Do a good backwash of the filter. Move the multiport valve to the "winter"
position.
2. Turn off your pumps and open the drain plugs on the pump strainer basket.
3. If you have a Turbovortex on your system, open the drain plug at the base of
the filter and open the priming cap, to drain water from the tank. Loosen all
connections so that any remaining water can drain out.
4. Open the drain plug at the base of the filter and then the air release valve at
the top of the filter. Water will drain out of the filter, but no beads will be lost.
5. Loosen all connections and drain exposed pipes, so that no water will be
trapped. This is especially important for your UV lights!
In the Spring:
1. Tighten all the connections that you loosened in the Fall.
2. Close the drain plug on the Turbovortex and the pump strainer basket. Fill
the Turbovortex half full of water. Replace the Bio-Balls and replace the lid
being careful to not over-tighten the lock ring. Prime the Turbovortex and
the pump strainer basket. When full close.
3. Move the multiport valve to the filter position and open the air release valve
at the top of the filter and close the sludge drain. Turn on the pumps. When
water comes out of the air release valve at the top of the filter, shut it and
turn off the pumps. Now do a good backwash and rinse before going to
the filter mode.
*Note* The bacterial colony on the beads in the filter will take some time to get
back up to full capacity. During the first few weeks of operation in the spring, it
is a good idea for the pond owner to do frequent checks of the ammonia and
nitrite levels.

Trouble Shooting
Decrease in water flow
1. If you notice that your waterflow is decreasing the most likely cause is that
the filter needsto be backwashed. The bead filter is designed totrap solids
and does it very well. When fully loaded with solids, the filter may restrict
flow. Perform a backwash and rinse.
2. If after backwashing the filter the water flow is still low, next check the
strainer basket on the pump. Be sure that it is clean and replace.
3. If you have a TURBOVORTEX on your system. Perform a backwash.
Pay attention to the amount of water flow available while backwashing the
TURBOVORTEX. This water is coming straight from the pond. If there is
little flow, then you have a supply problem, meaning that the bottom drain,
return line, or the skimmer is in need of cleaning. If these are clean and clear
then check the impellers on the pump to make sure that there are not any
objects trapped that would decrease their rpm. Ifthere is plenty of flow
while backwashingthe TURBOVORTEX, then the flow restriction is after
the pump.
4. If flow is still low after backwashing the TURBOVORTEX and there was
plenty of flow through thepump, then youneed to inspect the internalsof
the filter.
Check to see if the laterals are clear of obstruction and that the beads are not
caked into large clumps. When the bead pack gets "gelled" they are hard to
break apart with backwashing and doing ablower treatment. They may
need to be manually broken apart. When the beadsare gelled they tend to
cause "Channeling,” which means that the bead pack is totally clogged and
water will follow paths of little resistance through or around the bead pack.
When channeling is occurring you will notice that after backwashing the
filter quickly clogs and flow slows in intervals that used to take 1-2 weeks,
now flow slows in 2-3 days. Follow the directions in theinternal inspection
section of the filter operation section of the manual.
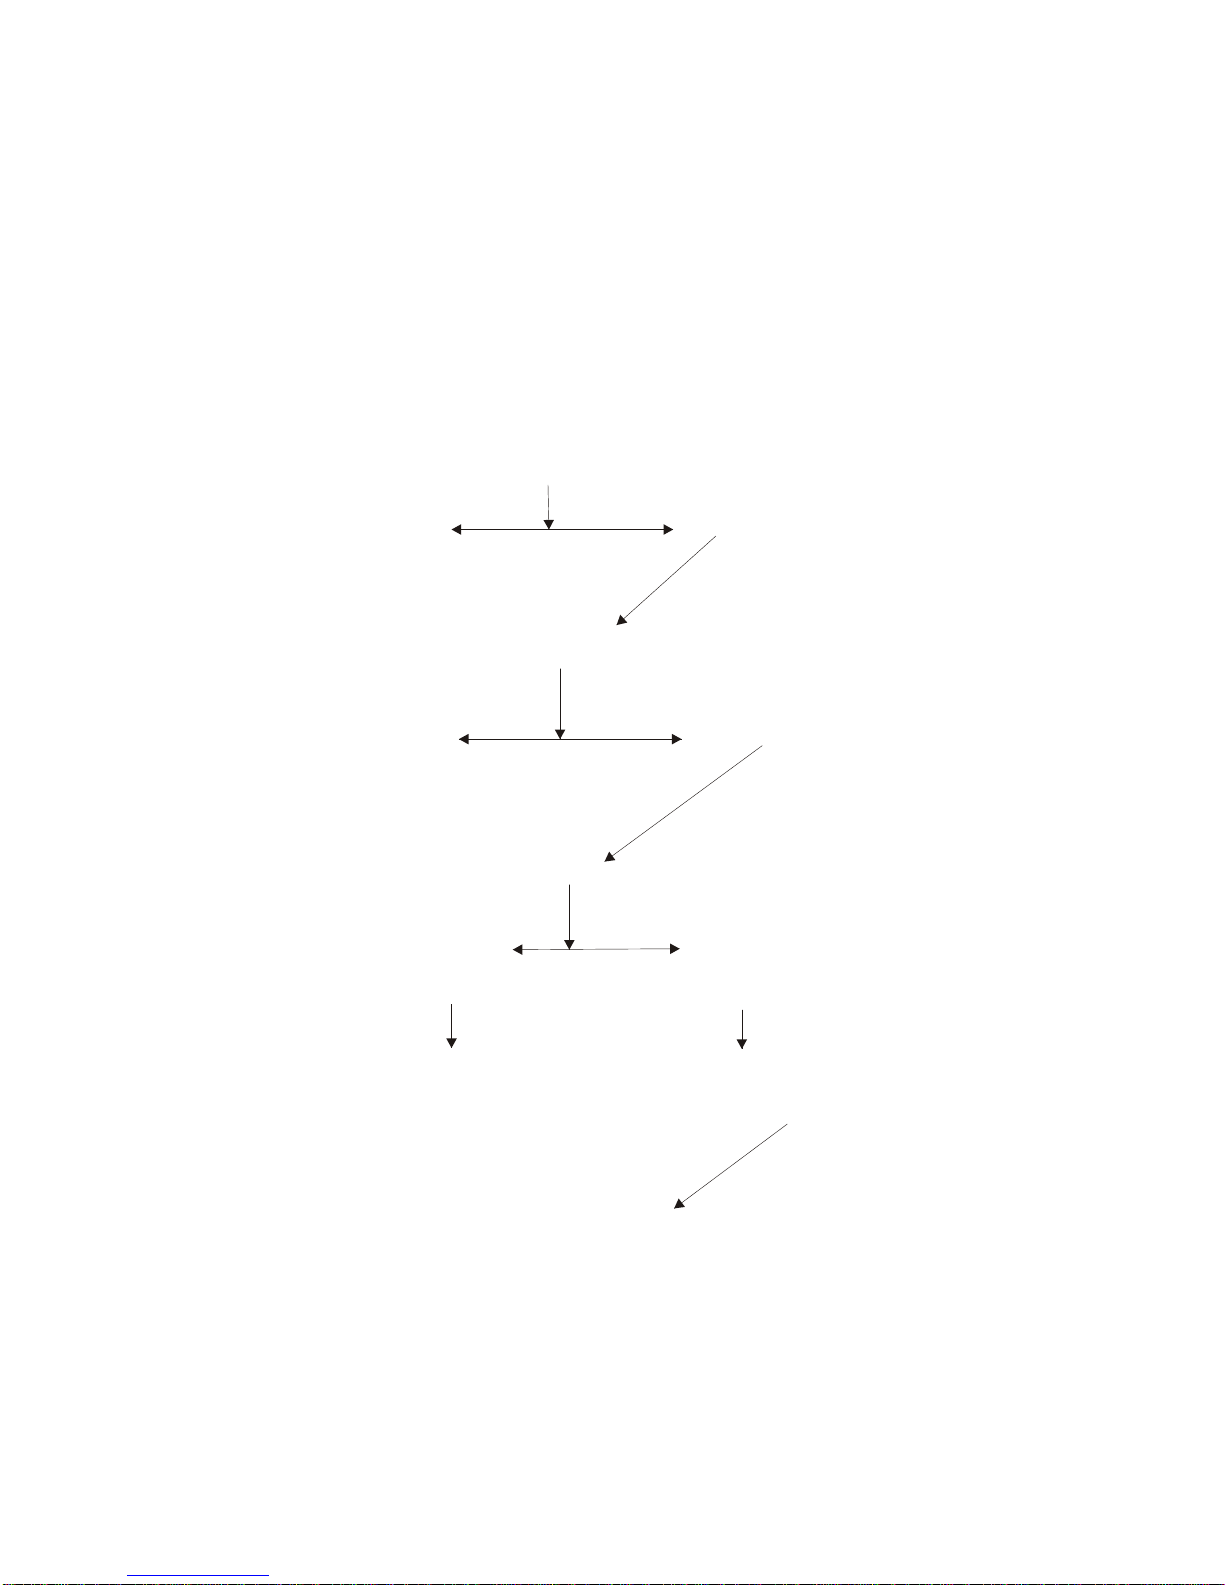
Trouble Shooting
Decrease in Water Flow
Backwash
Normal Flow Flow Still Low
ProblemSolved
Clean Pump
Strainer Basket
Dirty-Cleaned Clean -Flow Still Low
Normal Flow
ProblemSolved
Backwash the TURBOVORTEX
Good Flow through Low Flow through pump
pump while backwashing. while backwashing.
Flow still low Flow still low
Flow restriction after pump Flow restriction before the pump.
-inspect the internals of the -check bottom drain, return
filter and condition of the line, skimmer, and pump
beads. impeller.
Flow Still Low
Call Us -1-888-499-3852
5. If you follow the above steps and yourflow is still low, PLEASE, call us at
1-888-499-3852
6. See the following page fora quick flow chart of the above directions

Trouble Shooting
Decrease in water Clarity
1. If your filter hasa mature bacterial colony, which could take up to 4-6
weeks at temps. above 60-65 degrees F., and your water quality and clarity
have been good then decreases, the first thing to do is a good backwash and
rinse. Spend an extra amount of time with the bloweragitation of the beads.
2. If you clarity does not improve orimproves then decreasesquickly, open
the filter and inspect the internalcondition of the laterals and the beads. If
the beads are gelled and channeling is occurring, then the water will bypass
most of the bead pack and no mechanical filtration will occur. Manually
break up the beadsand make sure the laterals are clear of obstruction.
3. If your water clarity does not improve, and you have UV-lights on the
system, checkto see if the bulbsare stillworking. Dependingon the bulb,
some UV-light bulbs will only have killing powerfor sixmonths of continuous
run. Others will last for a year or more. Check to see when they were last
changed and replace if needed. They should be changed at least once a
season.
4. If your clarity does not improve, check the water flow out of the system.
The entire pond watervolume should be turned overthrough the filter
system at least 3-4 times per day. If turn overtime is slowthen the amount
of solids that the filter can capture will decrease. Check to make sure that
there are no flow restrictions. Follow the low flow trouble-shooting chart.
Also make sure that your pump islarge enough to move the amount of water
needed for enough turn oversthrough the filter.
5. If after following the above suggestions and the clarity is still off, PLEASE
call us at 1-888-499-3852 or your dealer.

Trouble Shooting
Decrease in Water Clarity
Backwash
Water Clarity Water Still
Improves Cloudy
ProblemSolved
Open Filter-
Clean laterals, Stir Beads
Backwash and rinse
Water Clarity Water Still
Improves Cloudy
ProblemSolved
Check UV Lights
Replaced Bulb Lights Okay
Water Clarity Water Still Cloudy
Improves
ProblemSolved
Check Water Flow
See Decrease Flow Chart Flow Normal
Flow Improves andClarity Water Still Cloudy
ProblemSolved
Call Us at 1-888-499-3852

Trouble Shooting
High Ammonia and Nitrite with previously stable state
If your pond hasbeen up and running at warm temperatures (60-70 F) for
six or more weeks and your ammonia and nitrite levels have been previously
controlled, but you experience a spike in the ammonia level try the following:
1. Perform an extra long blower treatment on the bead pack and an extra
long backwash. If the bead pack becomestotally clogged with solids, the
available surfacearea for bioconversion drops significantly. Backwashing
will open up the active surfacearea and bioconversion will resume.
2. If after backwashing the ammonia levels are stillhigh, open the filter.
Check the laterals to make sure they are clear, stir the beads to break up
any gelled areas and then backwash.
3. If ammonia levelsare still high, consider how much food is being fed to
the fish. One cubic foot of mature beads can handle around one pound of
35% protein food per day. Check to see how many cubic feet of beads are in
your filterand compare that with howmuch food yourfeeding.
4. If ammonia levelsare still high, check the flow rate through the filter.
The entire volume of the pond should be turned overthrough the filter 3-4
times per day. If the flow isdown for some reason, bioconversion of
ammonia will alsoslow. If you find the flow is in fact down, follow the
troubleshooting flow chart for correcting low flows.
5. If all the above are found to be in good condition, consider the fish load on
the pond. This actually also relates to the above discussion about amount of
food fed. If you have a heavily stocked pond you willalso be feeding more to
the fish and thus adding more nitrogen to the pond waterthat will have to be
bioconverted. Again, consider your filtersize and what your asking it to do.
6. If the ammonia levels are still high, call us at 1-888-499-3852

Trouble Shooting
High Ammonia and Nitrite-- Previously Stable
Backwash Filter
Decrease Ammonia Ammonia Still High
ProblemSolved
Open Filter
Check Laterals and
Stir Beads then Backwash
Decrease Ammonia Ammonia Still High
ProblemSolved
Check Amount of Food Fed
-1lb. Food/cubic foot beads
Too Much Food Food Amount Okay
Amount Reduced
Ammonia Decreased
ProblemSolved
Check Water Flow
See Decrease Flow Chart Normal Flow
Flow Down-Solution Found Ammonia High
Ammonia Decreases
ProblemSolved
Too Many Fish or
Too Many Big Fish?
Pond Over Stocked Pond Not OverStocked
Numbers reduced Ammonia Still High
Ammonia Decreases
ProblemSolved
Call us at 1-888-499-3852
Table of contents
Popular Water Filtration System manuals by other brands

Watts
Watts E-Treat ETREATWCS Installation, operation and maintenance manual

Dometic
Dometic RO400 User instructions

deconta
deconta C 25 L operating instructions

Astral Pool
Astral Pool Combo 27413 Instruction and operation manual

AQUA EL
AQUA EL DEKOR Operation manual

Aqua Guard
Aqua Guard Invisipure user manual


