Fly Dragon LIGHT SKY SUNNY MINI-HC User manual

SUNNY MINI-HC
E-mail:
n
Address: No. 43, Yunfeng Road, Xiuquan Street,
Huadu District, Guangzhou, China

1. Safety information........................................................................................................2
2. Technical information...................................................................................................4
3. Attachment and body size.........................................................................................5
4. Installation and connecting.......................................................................................6
5. Control panel..............................................................................................................9
6. Menu setting...............................................................................................................10
7. Channel function.........................................................................................................12
8. Circuit connecting diagram.......................................................................................13
9. Cleaning and maintenances.......................................................................................14
10.Troubeshooting..........................................................................................................15
11.Duty exonerative and copyright protection............................................................16
Contents
Congratulations on choosing our company product! We thank you for your custom.
◆Please note that this product, as all the others in the rich my company range, has
been designed and made with total quality to ensure excellent performance and
best meet your expectations and requirements.
◆Carefully read this user manual in its entirety and keep it safe for future reference.
It is essential to know the information and comply with the instructions given in this
manual to ensure the fitting is installed, used and serviced correctly and safely.
◆My company disclaims all liability for damage to the fitting or to other property or
persons deriving from installation, use and maintenance that have not been carried
out in conformity with this user manual, which must always accompany the fitting.
◆My company reserves the right to modify the characteristics stated in this user
manual at any time and without prior notice.

2
SAFETY IN FORMATION
Please do not install the fixture onto combustible surface.
The double insulation between the LV power supply and the control conductor on the fixture.
■Mounting surface and fire protection
Keep all combustible materials at least 20 cm away from the fixture.
■This lighting fixture is for professional use only - it is not for household use.
Make sure all parts for fixing the projector are in a good state of repair.
Make sure the point of anchorage is stable before positioning the projector.
Enhanced care has to be considered during the installation.
The safety chain must be prgperly hooked onto the fitting and secured to the framework.
The unit can be placed directly on the stage floor which can support 10 times
of the unit’s weight.
Make sure there are no flammable materials close to the unit while operating,
as it is fire hazard.
ta 40℃
This fixture is suitable for indoor use and wet locations. Do not immerse in water.
The ambient temperature Ta: -20℃ 40℃.~
3
The products referred to in this manual conform to the European Community Directives to which
they are subject:
Low Voltage 2014/35/EU
Electromagnetic Compatibility 2014/30/EU
Never look directly into the light source. You risk injury to your retina, which may induce blindness.
Do not look at LEDs with magnifiers, telescopes, binoculars or similar optical instruments that may
concentrate the light output.
Protection optical radiation
Protection against explosion
The protection screen, lens or ultraviolet screen on the lamp can be damaged to the degree
of failure if visible damage, such as a crack or deep mark, should be replaced。
The light source in this xture shall be replaced by the manufacturer or its service agent or
similar qualication.
Always disconnect from mains before replacing the light.
tc 80℃ The maximun temperature that can be reached on the external surface of the fitting,
in a thermally steady state,is 80℃ 。
Avoid contact bypersons and materials.
Allow the fixture to cool for at least 5 minutes before handling.
■The light source
Avoid any inflammable liquids, water or metal objects entering the unit. Once it happen,
cut off the mains power immediately.
4
TECHNIC AL INFORMATION
● 100-240V ~,50/60 HzPower supplies available:
● Rated power 530W PF : 0.96:
● DMX Connector IP66 waterproof signal line.:
● Power Connector IP66 waterproof Power input line.:
● Light source 36×15W W K LED:LUMILEDS hite 3000K-6000
● 30000hAverage life :
●Luminous ux of light source 36000 lm:
●Luminaire ux 30000 lm:
●Lens Angle 6°:
●Material of lens PMMA:
●Beam Angle standard 14°, optional 25° and 45°:
●Vertical tilt Angle ±90°:
●CCT 3000K -6000K:
●CRI Ra 90 : ≥
● : 1-30 times second electronic strobe and random strobe.Strobe /
:16Bit,0-100%The linear dimming,provides four dimming options.●Dimmer
●Control Mode:DMX512, RDM, Stand-alone mode ,Wireless DMX512(optional).
:Standard channel:1C ; channel: 3CH.● HChannel
● Display panel OLED black and white display. :
● Built-in program yes :
● Intelligent temperature control yes :
● Software upgrade :Update via DMX link Channel.
● RDM two-way transmission of RDM data.:
● Data connection 3-core waterproof signal transfer input line/output line (5-core waterproof line connector is :
optional).
Maximum number of signal connections dmx@ 25.
● Aluminum alloy, toughened glass. Outlooking :
●Surface treatment Gray-green ne sand, anti - salt spray corrosion. :
●IP protection level IP66:
●Heat dissipation mode natural heat dissipation.:
●Working environment temperature -40 ~ +45℃:
●Light size :916X275X397MM
Packing Size ):1000X390X370●
N.W.:31.5Kg ,G.W.:44Kg
Flycase Size:1025X360X525MM●
N.W.:31.5Kg ,G.W.:52.9Kg
5
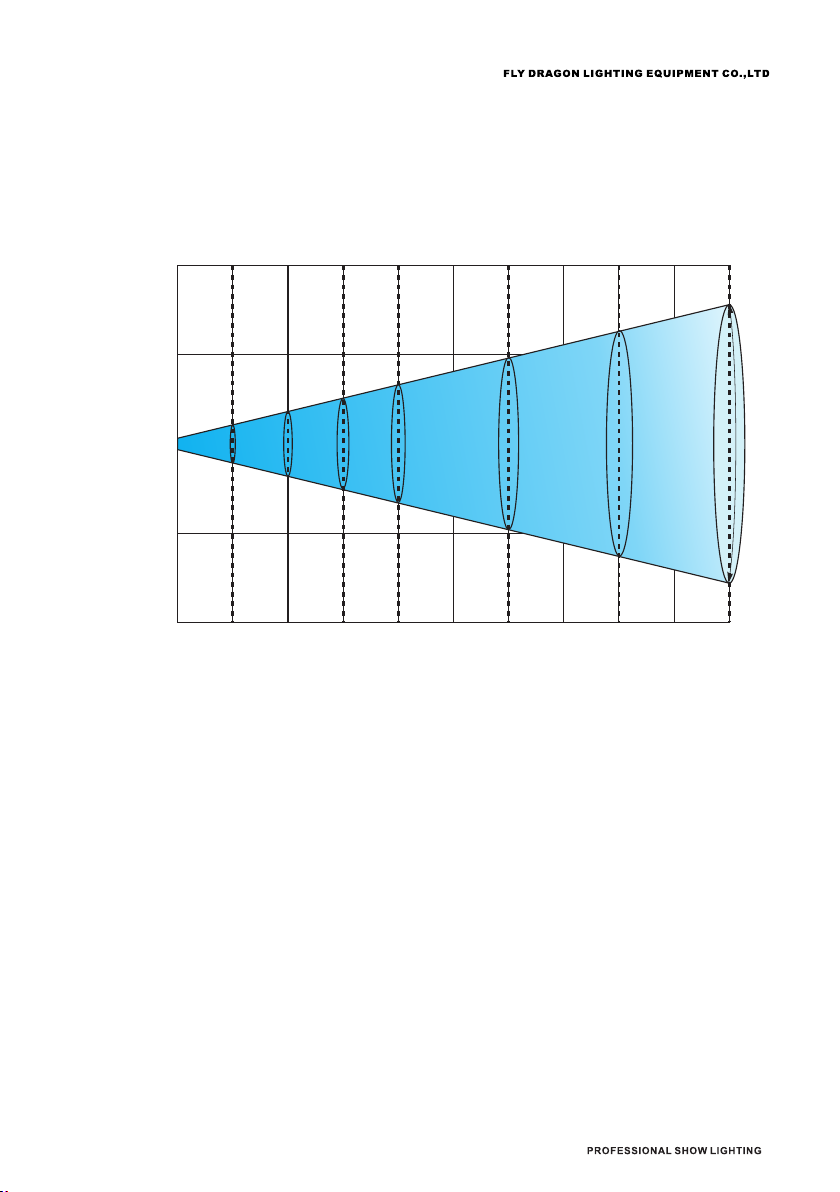
14°Lux(fc) 3000K
5700K
8700(809)
10100(939)
1154(107)
1328(123)
97(9)
115(11)
2600(24)
3000(279)
689(64)
680(63)
140(13)
185(17)
305(28)
340(32)
Distance,spot diameter and illumination diagram
10 20 30 40 500
Distance(m)
Diameter 10%(m) 4.36 8.85 13.6 17.8 21.5
5
2.16
15
6.76
0
5
10
5
10
14°

6
ATTACHMENT AND BODY SIZE
power cord
1
916
345
275
916 275
397

●After doing the above operation and making sure all the devices had been
installed with natural operate, press the power switch to check whether every
-thing is working normally.
●connection to the eiectricty mains must be carried out by a qualified electrical
installer.
7
or
L
N
black
blue
brown
yellow-green
white
green
Conductor Symbol
live
neutral
ground(earth)
Wire Color
(EU models)
Wire Color
(US models)
Wire color-coding and power connections:
POWER IN
N(White/Blue)
(Green/Yellow Green)
L(Black/Brown)
3
3

8
DMX - output
1 - Shield
2 - Signal (-)
- Signal (+)
- Not connected
- Not connected
3
1
2
3
DMX-input
- Shield
-Signal (-)
- Signal (+)
- Not connected
- Not connected
4
5
4
5
PIN3
PIN2
DMX IN
OUT
IN
OUT
IN
OUT
CONNECTOR
CABLE
I O P
V
CONNECTOR
CABLE
I O P
V
CONNECTOR
CABLE
I O P
V
4
4
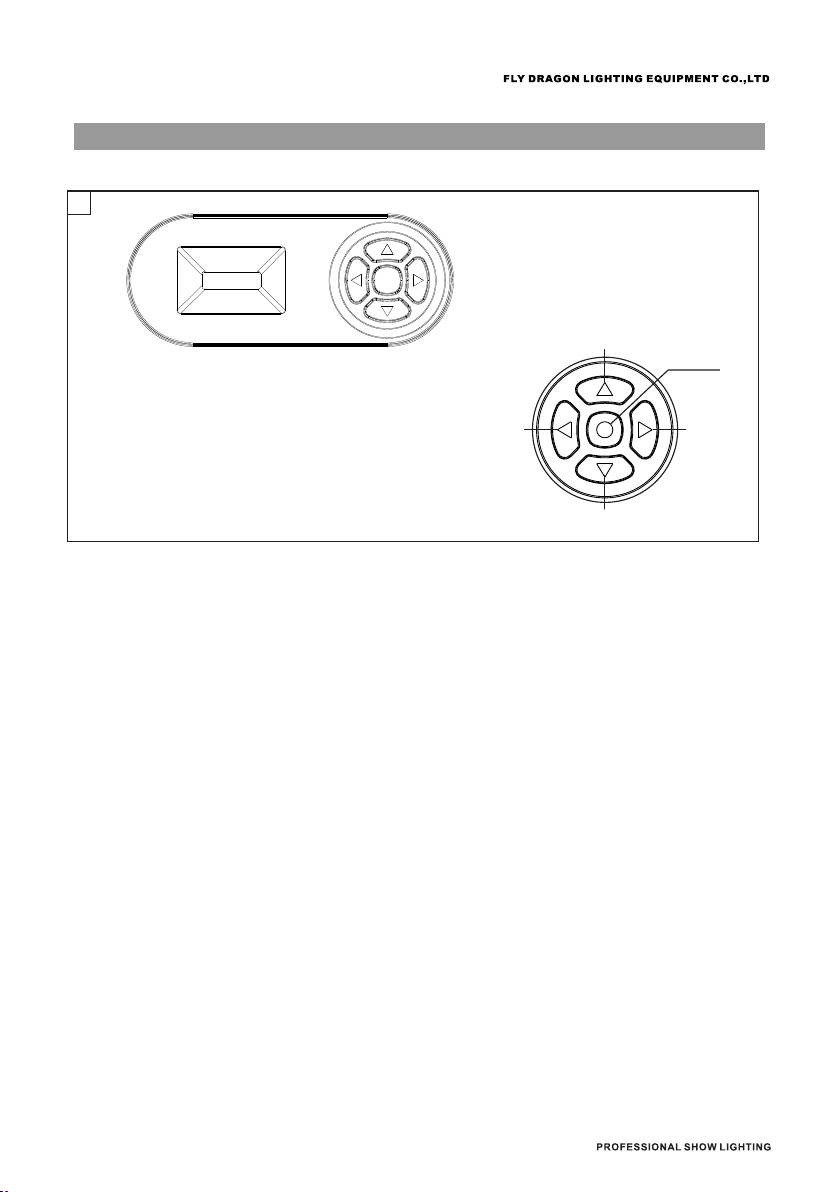
Up arrowhead : page up
Down arrowhead : page down
Left arrowhead : reduce
Right arrowhead : increase
Enter : OK function
Exit : in the choice screen
UP
DOWN
LEFT RIGHT
ENTER
CONTROL PANEL
9
5

MENU SET T ING/菜单设 置
10
Main menu Ⅰ menu Ⅱ menu Ⅲ menu ⅠV menu
Dmx Set
Dmx Addr Edit A001~AXXX
DMX Function
Hold/DMX (Default )
Black
Color Temp1
Color Temp2
Color Temp3
Color Temp4
Color Temp5
Color Temp6
Color Temp7
Color
Temp8
Color
Temp9
Color TempA
Color
TempB
Auto Run Mode Alone
(Default)
Master
Addr Edit(Auto) Yes/No
Information
Total Time Total
Time :****(H)
Total
LED :****(H)
Fixture Time Fixture :****(H)
LedOpen :****(H)
Soft Version V1.05
Clr Fixture Code
Yes/No
Info Strobe.Dimmer...........
Info Box Temp=
RDM Set
RDM UID = xxxxxxxxxxxx;
MANU..LABEL = LIGHTSKY
DEVICE
LABEL = SUNNY MINI-HC
Personal Set
Channel Mode
03CH (Default)
01CH
Color Temp1
Color Temp2
Color Temp3
Color Temp4
Color Temp5
Color Temp6
Color Temp7
Color Temp8
Color Temp9
Color Temp10
Color Temp11
Standby Key Lock CodeOn/Off (Default :Off )
SelectDimmer Hz
Select 24K Hz
Select 12K Hz
Select 6K Hz
Select 3K Hz
DimmerCurve
Linear (Default )
Square
I-Square
SCurve
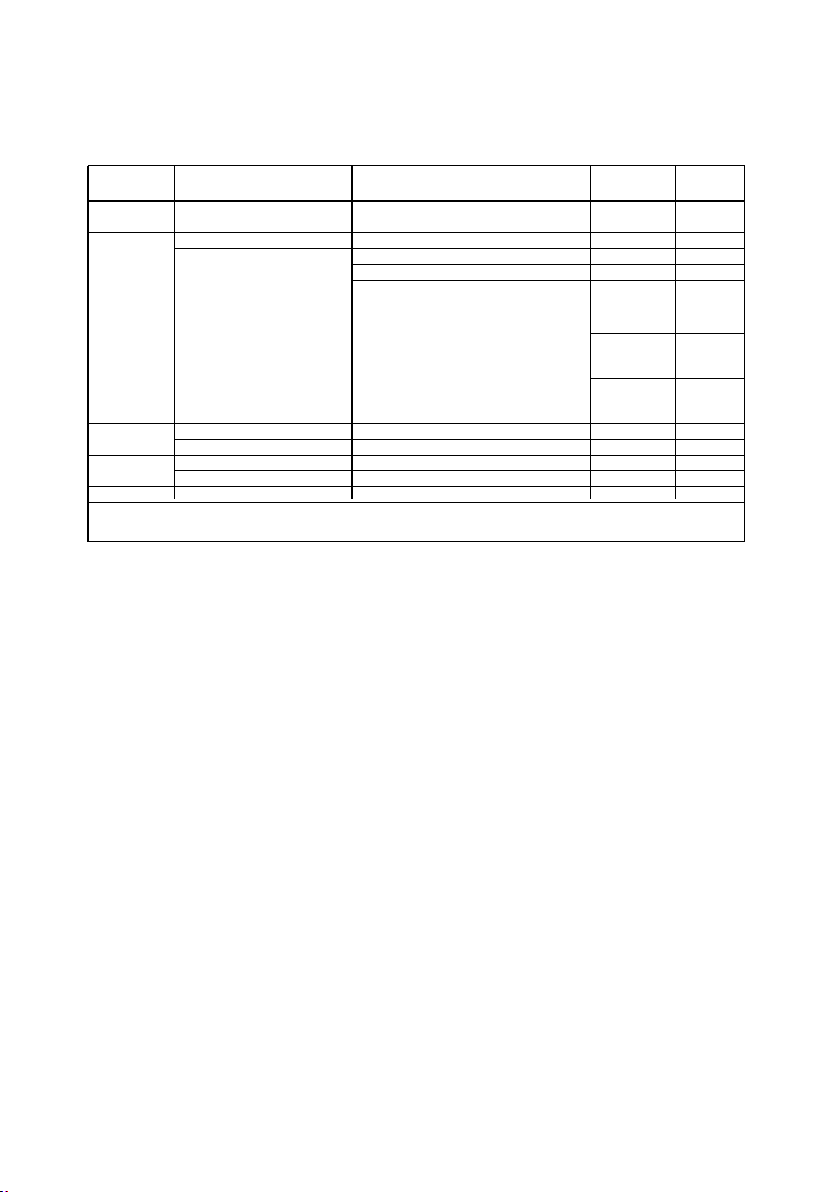
Special key function description:Press UP and DOWN buttons at the same time,keep 3 seconds,Show direction reversal;
Press Left and Right buttons at the same time.Hold for 3 seconds and switch between Chinese and English
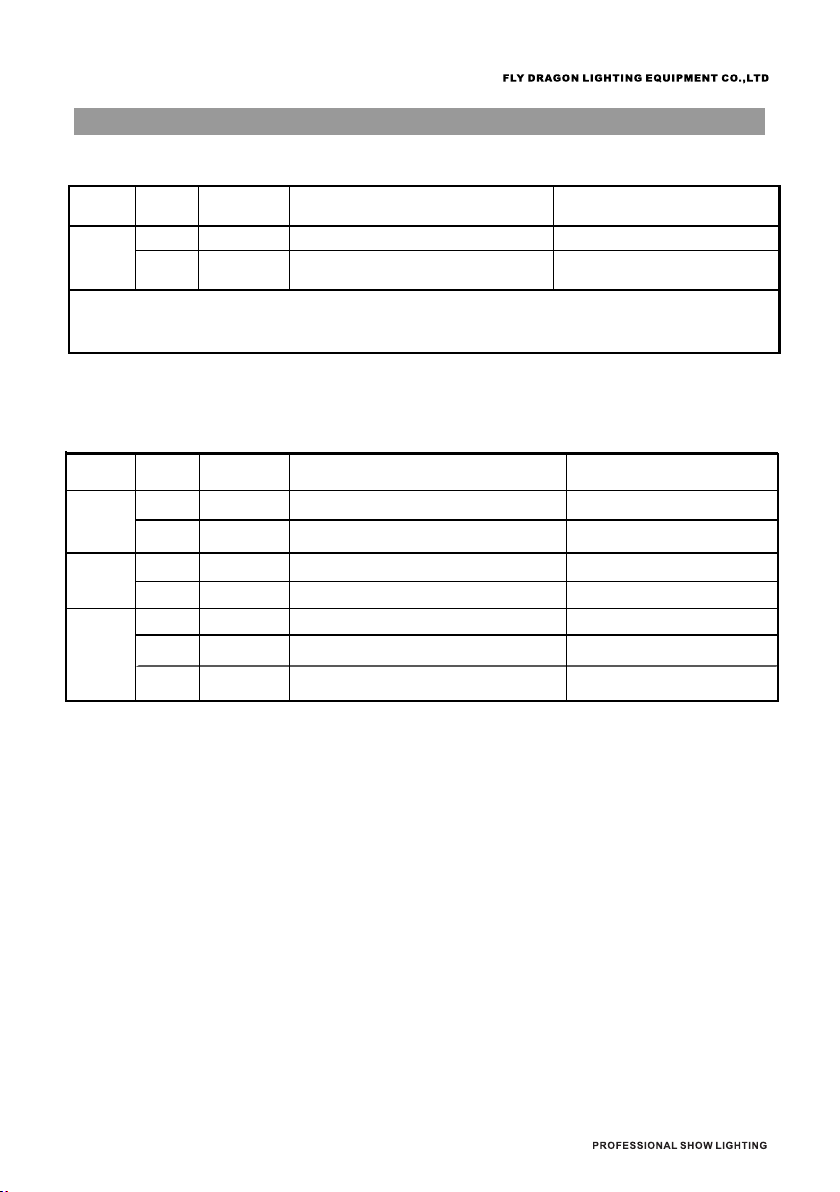
Main menu Ⅰ menu Ⅱ menu Ⅲ menu ⅠV menu
Manual
Control
Channel Dimmer...........
Service
Calibration Dimmer
Factory
Set
Reset Default
ClearTotalTime
Developer
Temp
To
Power
Manual
Or Dmx
:
On
LOGO Display On/Off
Default
Language English
Chinese (Default)
Normal (Default)
Rotate 180
Temp1;Temp2;
DisRotation
Temperature
:
On
On/Off
Default
:
On
On/Off
Default
11
CHANNEL F UNCTION
Standard channel( 1CH)
Channel Value Percentage Function Note
1 Dimmer
0..255
1
Red
0..255 0-100%
dimmer
from
dark
to
bright
2
SCtrobe
0..9
No function
3
10..255 Strobe effect slow to fast
channel( 3CH)
0-100% dimmer from dark to bright
Dimmer
Note: For the color temperature of the light coming out from channel 1, 1~11 color temperatures should
be selected in the "channel mode", and 1 color temperature is the default color temperature.
12
Channel Value Percentage Function Note
CCT
0..255 Color Temperature from small to Deep
13
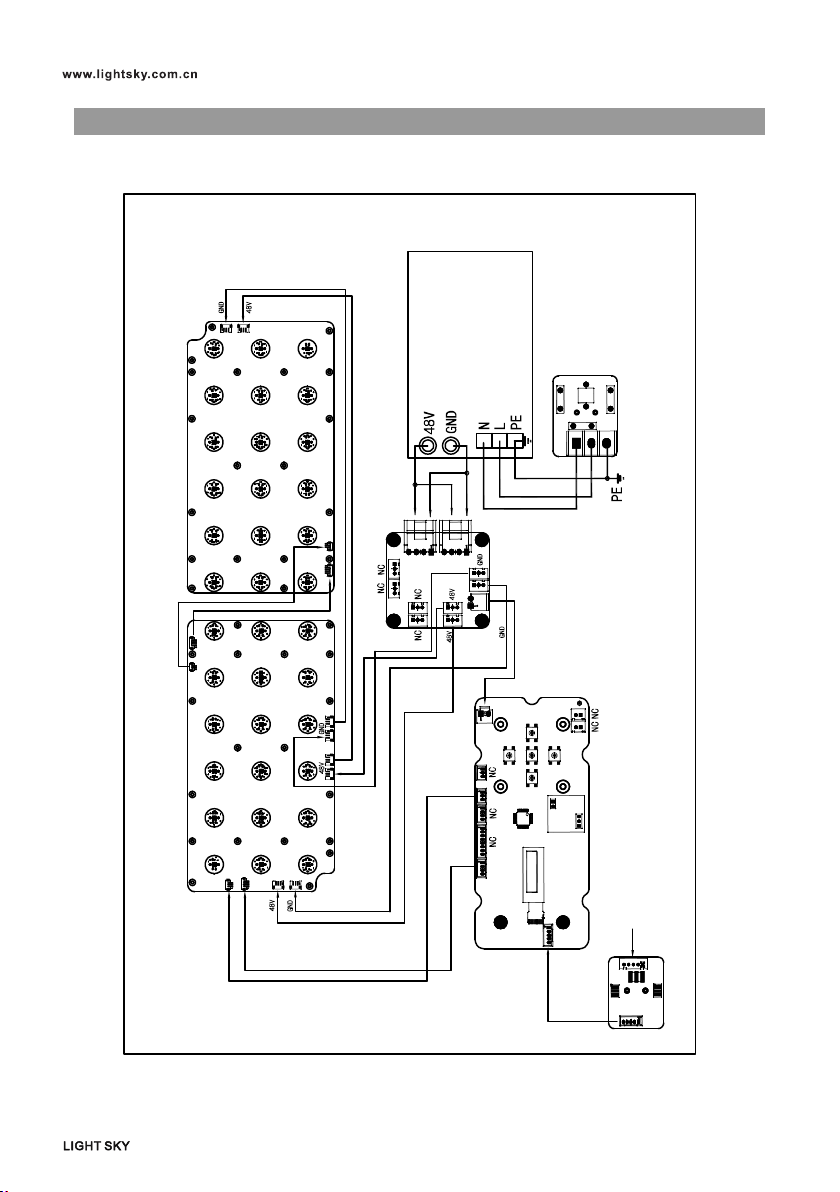
CIRCUIT CONNECTING DIAGRAM
LED board 1 LED board 2
temperature detect
signal control
switched power supply
Power lightning protection board
Power adapter board
Display board
Signal lightning protection board
DMX Signal input
signal control 1
signal control 1
temperature detect 1
temperature detect 1
14
CLEANING AND MAINTENANCES/清洁与保养
■1.In order to ensure the projector could work normally. It should be kept clean always .
The lens should also be regularly cleaned to maintain an optimum light output.
Do not use any type of solvent on lens. It will damage the projector.
■2.Suggestion: The continue usage of the light don't exceed 4 hours. Or it will shorter the
usage of the lamp. Please use the alternative operation to solve this problem.
The fixture power ON time is best not over 48 hours, or it would generate lamp
protection procedure.
■3.Please disconnect the power supply when begin to maintenance take down the light.
Please let the parts cool down 10 minute at least then begin to install.
■4.Please inspect the lens or other moving parts timing and keep them clear and static.
If find anything damaged or looseness must change a lamp or fix the lamp in order to
avoid the accident.
Please check the machenical parts is jamging.After cleaning,please add some
temperature -durable juice.
■5.The light use the strong cool system.It iseasy for the dirty to be colletced.Please do
clear the hot-sak one time two week at least.
■6. After you use the light,please check the intake place whether there are some wastepaper,
please clean it up,or the windmill will break down and causing fire.
CAUTION!
Disconnect from mains before starting maintenance operation.

15
TROUBESHOOTING/疑难处理
It is recommended some solution for some normal trouble shooting. Any inextricability
problems should always be handling by the professional person. Disconnect the power
supply before maintenance the light.
■ LED off / LED:
1.Please check if install the suitable voltage.
2.Please check whether the led will reach the end of their life can explode; please
replace a same description led.
3.Please check if the power supply is enough.
4.Please check whether the DMX 512 controller pass the "turn on" order.
■The light couldn't accept the control order:
1.Please check the start code address and the function option are correct.
2.Please check whether the communicate control cable is on good connection or the
cable is too long or interrupt.
3.Please check the control system is not valid, check the signal amplifier of chain
connected is valid.
4.Please check whether the communicate cable is too long or the other equipment is
mutually conjugate.
5.Please arrange the wire well, shorter the signal cable, put the high voltage cable
and low voltage cable separately.
6.Add the signal amplify isolator.
7.Signal cable is used the excellent screening doublet (Resistance 75 OHM).
8.The end of the light end and the end resistance.
■The light can't move:
1.Please check if the power supply is suitable for the light voltage data.
2.Please check the light if they are deformation, inside parts is broken, become wet
etc will lead the loose contact.
3.Please check the if the iniside lead wire and the connector is loose.
4.Please check the electric parts(such as the transformer,PCB board,contrller) is
short-circuit or burn down.
■
1.
2.
3.
4.
16
Table of contents
Other Fly Dragon Dj Equipment manuals


