Fly Kan NT100 User manual

4-Port USB Extender over Ethernet
Fly Kan
NT100
Version: NT100-190422-M-V1.0
www.fly-kan.com

EN - Safety Measures
(1) If product has an exposed circuit board, do not touch the product under power. (2) If Class 1 Laser Product.
Laser radiation is present when the system is open. (3) Wiring terminations should not be made with the
product and/or electric lines under power.(4) Product installation and/or mounting should be completed by a
certified professional as per the local safety and building code guidelines.(5) Cables (including power and
charging cables) should be placed and routed to avoid creating electric, tripping or safety hazards.
Support and Documentation Notice
All information, documentation, firmware, software utilities, and specifications contained in this package are
subject to change without prior notification by the manufacturer. To reduce the environmental impact of FlyKan
products, FlyKan documentation and software can be found online at http://www.fly-kan.com/ or Write to
support@fly-kan.com for Support.
market@fly-kan.com
Packaging Contents
1 x USB 2.0 Extender (PC-Host )
1 x USB 2.0 Extender (USB-DEVICE)
1x Universal Power Adapter For Remote
1 x USB 2.0 Cable
1 x QIG
System Requirements
1. Available AC electrical outlet
2. Available USB 2.0 / 1.1Port
3. Qualified Ethernet Cable
4. Up to 4 USB peripheral devices
Purchase Guidance
♦Please Do Use Standard Qualified CAT5e CAT6 Ethernet Cable.
♦Please Connect The NT100 (USB Over Ethernet Extender) directly to Computer. The Device does not support to
link any Network Router or Ethernet Switcher.
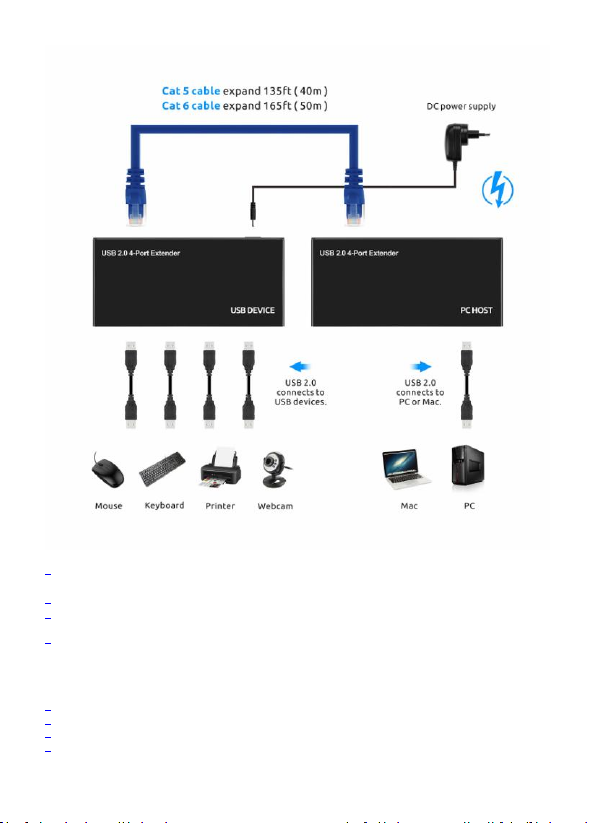
USB Ethernet Extender USB extender overcomes the 16 ft. cable length limitations of traditional USB 2.0 cables,
so you can create a more efficient, more flexible workspace. It gives you the freedom you need to place your USB
device further away, making it perfect for the homes, offices, classrooms, and many other environments. Now,
you can easily access and use your USB 2.0 device in a remote location, up to 165 ft. (50 m) away, using Cat5e or
Cat6 cable.
It’s an inexpensive USB-to-Ethernet solution that’s ideal for virtually any USB 2.0 device. You can connect a
webcam at the back of a classroom, or a printer in another room at the office, all up to 50 m away from your host
computer. Plus, with a power adapter included for the remote unit, you can connect power-hungry USB devices
such as external hard drives. The USB 2.0-over-Cat5-or-Cat6 extender is OS independent, so it supports a variety
of operating systems. Setup is easy with no additional drivers or software required, and the extender is backward
compatible with USB 1.1 and 1.0 peripherals.
Applications
♦Secured environments where the host computer must be in a secure,inaccessible location from the keyboard,
mouse, camera or other USB input devices
♦Use existing in-wall Cat5/Cat6 wiring to extend USB connections between rooms
♦Reduce cable clutter and the need for mid-point USB hubs/repeaters by running a single, easy-to-install
Cat5e/Cat6 cable
♦Industrial control environments where the host computer must be located away from interference or
contamination
Features
♦Four USB 2.0 ports at remote end over a single Cat5e/Cat6 cable
♦Maximum extension distance of up to 50m over Cat5e cabling
♦500mA of power per port
♦High Speed USB 2.0 compliant with data transfer rates up to 480Mbps
♦8kV Contact and 16kV Air Electrical Static Discharge (ESD) protection
♦No driver or software required
♦Plug-and-Play and hot-swap compatible
TAGs:NT100 USB 2.0 Extender|USB Extender | NT100 | NT50 | NT50-B |USB Ethernet solution|
FCC Statement
This equipment has been tested and found to comply with the limits for a Class B digital device, pursuant to part
15 of the FCC Rules. These limits are designed to provide reasonable protection against harmful interference in a
residential installation. This equipment generates, uses and can radiate radio frequency energy and, if not
installed and used in accordance with the instructions, may cause harmful interference to radio communications.
However, there is no guarantee that interference will not occur in a particular installation. If this equipment does
cause harmful interference to radio or television reception, which can be determined by turning the equipment
off and on, the user is encouraged to try to correct the interference by one or more of the following measures:
(1) Reorient or relocate the receiving antenna. (2) Increase the separation between the
equipment and receiver. (3) Connect the equipment into an outlet on a circuit different from
that to which the receiver is connected. (4) Consult the dealer or an experienced radio/ TV
technician for help.
This device complies with part 15 of the FCC Rules. Operation is subject to the following two conditions: (1) This
device may not cause harmful interference. 2) This device must accept any interference received, including
interference that may cause undesired operation.
Any changes or modifications not Expressly approved by the party responsible for compliance could void the
user’s authority to operate the equipment.
Disposal of Old Electrical & Electronic Equipment (Applicable in the European Union and other European
countries with separate collection systems).
This symbol on the product or on its packaging indicates that this product shall not be treated as
household waste. Instead it shall be handed over to the applicable collection point for the recycling
of electrical and electronic equipment. By ensuring this product is disposed of correctly, you will
help prevent potential negative consequences for the environment and human health, which could
otherwise be caused by inappropriate waste handling of this product. The recycling of materials will
help to conserve natural resources. For more detailed information about recycling of this product, please contact
your local Civic Office, your household waste disposal service or the shop where you purchased the product.
( ROHS Standard EN 62321-1:2013 )
The product carries the CE Mark
This is a class B product. In a domestic environment, this product may cause radio interference, in
which case the user may be required to take adequate measures.

4-Port USB 2.0 CAT 5 Extender
English
Model No.: NT100
Hardware Review
PC-HOST Front
1. USB Port x 1
2. LED x1
USB-DEVICE Front
4. USB Port x 4
5. LED x 4
PC-HOST Rear View
3. Link Port (RJ45)
USB-DEVICE Rear View
6. Link Port (RJ45)
7. Power Jack
Hardware Installation
1. Use a USB 2.0 cable to connect the Local Extender’s USB Port to a USB port on the computer.
2. Connect one end of an Ethernet cable to the Local Extender’s Link port.
3. Connect the other end of the Ethernet cable to the Remote Extender’s Link port, up to 50 meters away.
4. Plug the power adapter into an AC source; and plug the other end into the Remote Extender's Power Jack.
5. Use USB cables to connect up to four USB 2.0 peripheral devices to the Remote Extender’s USB ports.
4-Port USB 2.0 CAT 5 Extender
Deutsch
Model No.: NT100
Hardware Ü bersicht
PC-HOST Frontansicht
1. USB Port x 1
2. LED x1
USB-DEVICE Frontansicht
4. USB Port x 4
5. LED x 4
PC-HOST Rückseite
3. Link Port (RJ45)
USB-DEVICE Rückseite
6. Link Port (RJ45)
7. Power Jack
Hardware Installation
1. Verwenden Sie ein USB 2.0-Kabel, um den USB Port des Local Extenders an einen USB-Port des Computers
anzuschließen.
2. Schließen Sie ein Ende eines Ethernet-Kabels an den Link Port des Local Extenders an.
3. Schließen Sie das andere Ende des Ethernet-Kabels an den Link Port des Remote Extenders an, der bis zu 50
Meter entfernt ist.
4. Schließen Sie das Netzteil an eine Wechselstromquelle an und stecken Sie das andere Ende in die Netzbuchse
des Remote Extenders.
5. Verwenden Sie USB-Kabel, um bis zu vier USB 2.0 Peripheriegeräte an die USB Anschlüsse des Remote
Extenders anzuschließen.


