FLYKEYS LK06S User manual

LK06S DIGITAL PIANO
USER MANUAL
1
* The rated voltage of this device is fixed. The required voltage is printed on the nameplate of this device.
* Check the plug regularly, clean the dirt and ash piled up on the plug.
* This digital piano only matches with the provided power cable and plug.
* Please don't put electric cable beside heaters or radiators. Don't bend too much or cause damage to electric
cable. Don't put any heavy stuff on the wire. Don't put it where it may be run over or trampled to make
people stumble.
* Please do not open this device and try to dismantle inner components or transform it in any ways. This
device does not include any components for users to fix. If you find any problems, please stop using and
ask our qualified service staffs to examine and repair the device.

2
* In case of any liquid splashing into the device, please do not get this device rained or use it nearby
water, in a wet surrounding or put a container of liquid on it. If any liquid, like water, splashes into the
instrument, please cut off power and pull out the electric cable from the AC socket immediately. Then
ask our qualified service staffs to examine and repair the device.
* Do not plug with wet hands.
* Do not place any burning stuff, like candle, on the instrument. It may cause fire.
* When sensing any unusual situations, such as worn away and damage of power cable, sound suddenly stops
during playing and the smell and smoke it causes, please turn off the power immediately and pull out plug
from the socket. Ask our qualified service staffs to examine and repair the device.
* When pulling out plug from socket, please grab the plug instead of power cable. Drawing directly will
cause damage to the power cable.

3
* If not using the instruments for a long time or during a lighting storm, please pull out plug from the
socket.
* Do not connect the instrument to the socket by multiple connector, or it will lower the sound quality,
or it will make socket overheat
* Please carefully read the attachment that explains the assemble process. If assembling the instrument
in a wrong order, it will damage the instrument and hurt the user.
* Please connect the external equipment while the digital piano is off.
* Before using, please install the supporting screw and adjust it close to the ground, in case of trampling
pedal.
* In case of deformation of control panel and damage to inner components, please do not place this
device in an environment with a lot of dirt, vibration, extreme cold and hot (such as, direct sunshine,
closing to heater and inside a car under the burning sun).
* Please do not use this device near the television, radio, stereo, cell phone or other electronic devices.
This may make noise on the device itself and television or radio nearby.
* Please do not put this device on unstable place, or it may cause a sudden fall down.
* Before moving the device, please pull out all electric cables from the socket.
* When you set this device, please confirm the AC socket going to be used is reachable. The device
should be connected to the socket with protecting grounding connection. If you find any problems
and questions, please immediately turn off the power and pull out the plug from the socket.Even

4
The contents in this hand book is only for introduction purpose. It may be different from the instrument you buy.
though the power is turned off, there is still a small amount of electricity current flowing though it. If
you decide not using this device for a long time, please pull out the plug from AC socket.
* This product uses all extreme power switch as a device to cut off from network power. The power
switch button is on the right side of the keyboard.

5
Attention to installation ..........................................................................................................
Control Panel ........................................................................................................................
Power On\Adjust Volume\Headphone Connection ...................................................................
Record Function\Play/Stop\ Play Demo Song ............................................................................
Accompany Function\ Syn Start\Variation ...............................................................................
Voice Control\Teaching Function ...........................................................................................
Voice Restoration\Metronome ................................................................................................
Function Control\Chord ........................................................................................................
Accompany Volume\Octave ...................................................................................................
Transposition\Soundboard resonance ......................................................................................
Dual Voice ...........................................................................................................................
Split .....................................................................................................................................
Keyboard Split Point Setting\Effect ...........................................................................................
Reverb\ Chorus .....................................................................................................................
7
8
9
10
11
12
13
14
15
16
17
18
19
20

6
Beat\ Touch .........................................................................................................................
Percussion\Bluetooth function ................................................................................................
Back Inserting Panel Funciton\USB MIDI Function ....................................................................
Audio Connection .................................................................................................................
Voice List .............................................................................................................................
Rhythm List ..........................................................................................................................
MIDI Keyboard Percussion Check List .....................................................................................
Demo Song List ....................................................................................................................
Technical Specification ..........................................................................................................
Trouble Shooting ...................................................................................................................
21
22
23
24
25
29
32
35
37
39

7
Thank you for buying Our Digital Piano. No matter you are a student, piano hobbyist or the professional, this digital piano
will impress you with its perfect sound and fashion design. It can be competent with piano studying, music listening, MIDI
production, which satisfies your entertainment demand. It also has grand hammer dynamics keyboard, making you express
yourself easily.
For further information about this new digital piano, we suggest you should read this hand book carefully in order to make full
use of its advanced and convenient functions. Meanwhile, we also suggest you should keep this hand book well for reference in
the future.
If you like Our digital piano, please recommend to your friends.
In the process of installing the piano, be sure to contact the ground with the screw under the pedal, to make it close to the
ground, in order to avoid any damage of the pedal.
8
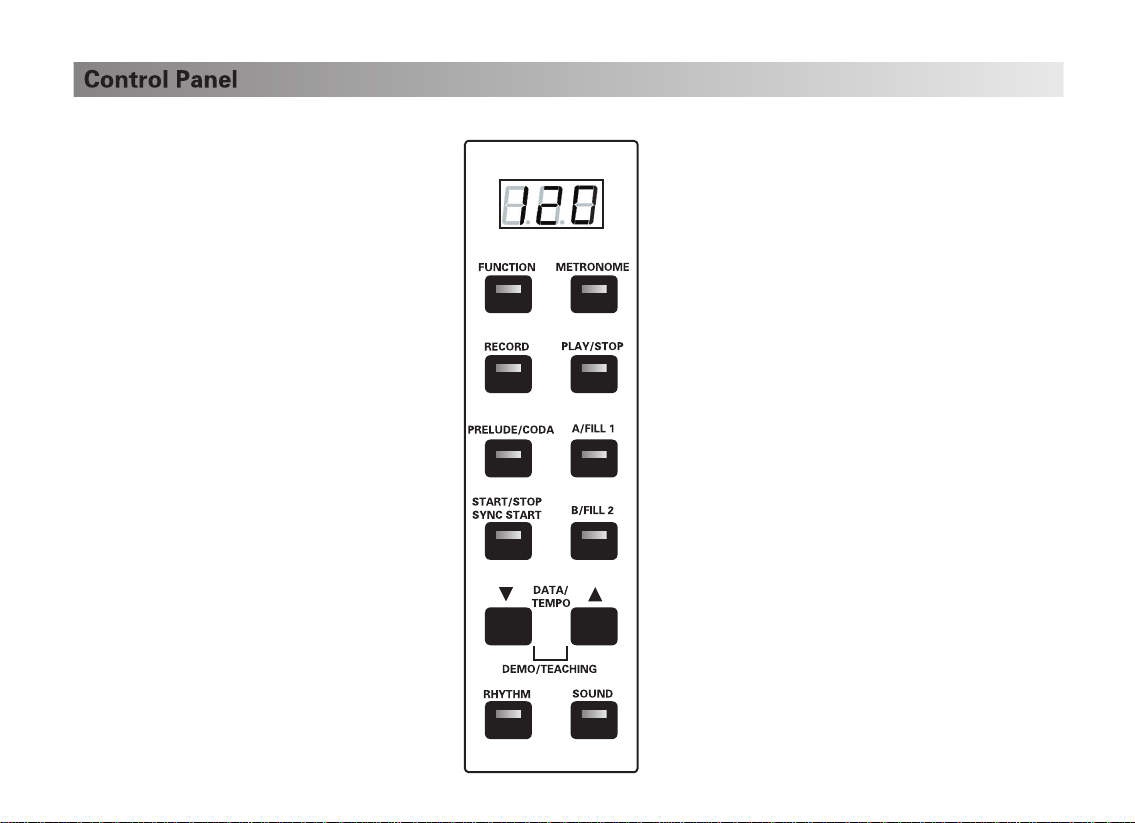
All the function keys are on the left side control panel of the digital piano.
9
Turn the Volume button on the control panel to set the volume.
Turn the button clockwise to raise volume. Turn the button anticlo
ckwise to reduce volume
Too loud sound, especially when you wear the headphone,
will do damage to hearing.
POWER
1) Connect the power to the piano and turn on the piano by pressing [Power] button.
Press the power button over 2 seconds to turn off the piano.
2) The default voice is grand piano.
Apart from the built-in speaker system, you can alsoconnect two
standard stereo headphones.Headphone jack is on the left side
under the keyboard.The built-in speaker system doesn't work
after connecting the headphone.And just the headphone volume
by switching master volume button.
10
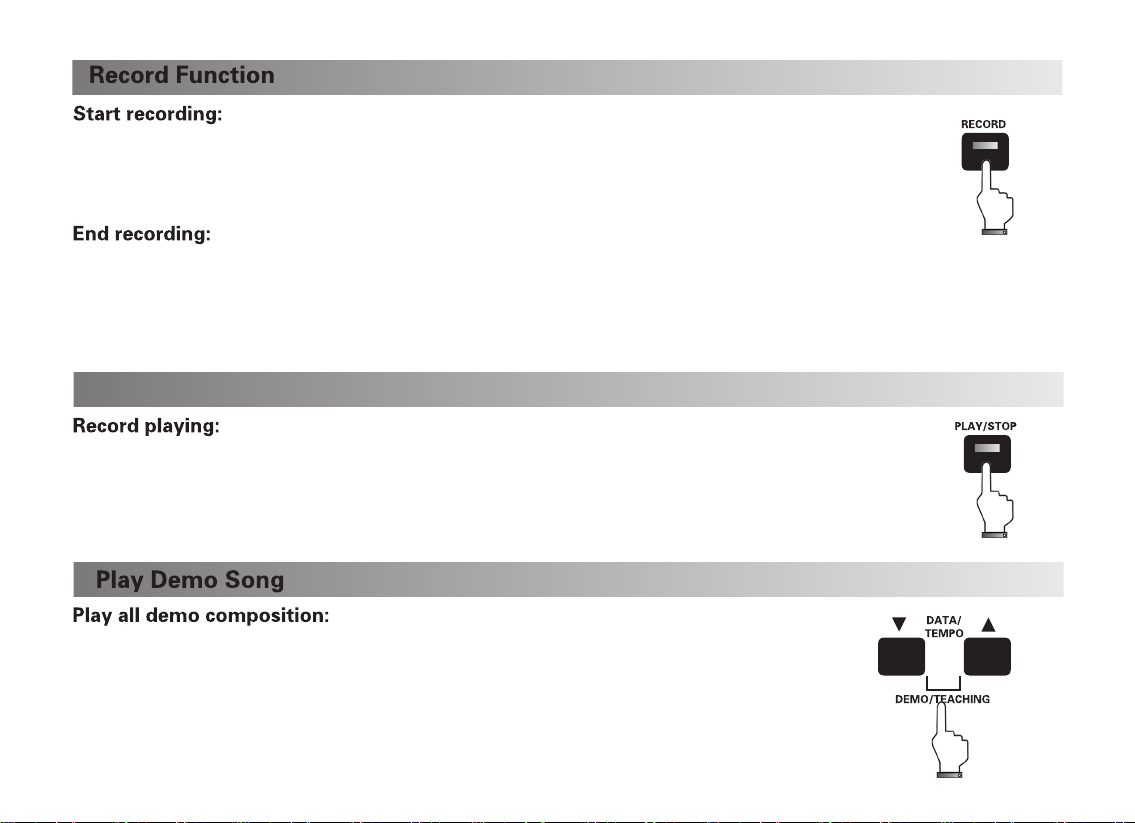
Press [RECORD] button and the indicate light turns on, which means
entering the record status. Meanwhile, the metronome starts automatically. It can be
turned off manually if it isn't needed. (This digital piano has accompaniment track which
can be recorded)
1) Automatic Ending: During the recording process, when the storage
space is full, recording will end automatically.
2) Manual Ending: Press the [RECORD] button during recording, and it will end recording.
Play/Stop
Press [PLAY/STOP] button and start replaying record.
Press [PLAY/STOP] button again to stop replaying.
Built-in 75 demo composition. Press [DEMO/TEACHING]
button to loop demo composition. Press [DEMO/TEACHING] button again to stop playing.
During the playing status, press [DATA/TEMPO+/-] button to select corresponding
composition.
RHYTHM SOUND
DATA/
TEMPO
DEMO/TEACHING
B/FILL 2START/STOP
SYNC START
A/FILL 1
PRELUDE/CODA
FUNCTION METRONOME
PLAY/STOP
RHYTHM SOUND
DATA/
TEMPO
DEMO/TEACHING
B/FILL 2START/STOP
SYNC START
A/FILL 1
PRELUDE/CODA
FUNCTION
RECORD
METRONOME
RHYTHM SOUND
B/FILL 2START/STOP
SYNC START
A/FILL 1
PRELUDE/CODA
FUNCTION
RECORD
METRONOME
PLAY/STOP

11
Long press [SYNC START] button, and the LED flashes. Press
any button on the keyboard and the automatic accompaniment
will start. Only the left keyboard will work if Chord Function is
turned on.
Press [RHYTHM] button to activate rhythm selection.
Press [DATA/TEMPO+/-] button to select rhythm within 5 seconds. (The
rhythm list is in the appendix)
The [RHYTHM] indicator light turns
off 5 seconds later after the rhythm is activated. Meanwhile, press
[DATA/TEMPO+/-] button to adjust automaticaccompaniment velocity.
Before the automatic accompaniment starts, press
[PRELUDE/CODA] button to start prelude and enter the main musical
A status automatically; When the automatic accompaniment is playing,
press the [PRELUDE/CODA]button and the automatic accompaniment
will stop automatically after playing a piece of coda.
In automatic accompaniment status, press[A/FILL 1] and
accompaniment will enter main musical A status; In automatic accom-
paniment status, press [B/FILL 2] and accompaniment will enter main
musical B status.
RHYTHM SOUND
B/FILL 2START/STOP
SYNC START
SOUND
DATA/
TEMPO
DEMO/TEACHING
RHYTHM SOUND
DATA/
TEMPO
DEMO/TEACHING
B/FILL 2
A/FILL 1
PRELUDE/CODA
FUNCTION
RECORD
METRONOME
PLAY/STOP
RHYTHM SOUND
DATA/
TEMPO
DEMO/TEACHING
B/FILL 2START/STOP
SYNC START
A/FILL 1
FUNCTION
RECORD
METRONOME
PLAY/STOP
DATA/
TEMPO
DEMO/TEACHING
START/STOP
SYNC START
A/FILL 1
PRELUDE/CODA
FUNCTION
RECORD
METRONOME
PLAY/STOP
DATA/
TEMPO
B/FILL 2START/STOP
SYNC START
PRELUDE/CODA
FUNCTION
RECORD
METRONOME
PLAY/STOP

12
Select Next Voice
Press [DEMO/TEACHING] button at the same time
Press one key
1) The default voice is 000 after power on.
2) Press [SOUND] Button to activate voices selection function. OLED will display corresponding voice
number. Press [DATA/TEMPO+/-] button to select any voice within 5 seconds.
Press one key and [DEMO/TEACHING] button to start teaching function. It will play the teaching composition.
RHYTHM SOUND
B/FILL 2START/STOP
SYNC START
A/FILL 1
PRELUDE/CODA
RHYTHM
DATA/
TEMPO
DEMO/TEACHING
B/FILL 2START/STOP
SYNC START
RHYTHM SOUND
B/FILL 2START/STOP
SYNC START
A/FILL 1
PRELUDE/CODA
FUNCTION
RECORD
METRONOME
PLAY/STOP
13
Use [DATA/TEMPO+/-]button to
change current beat velocity
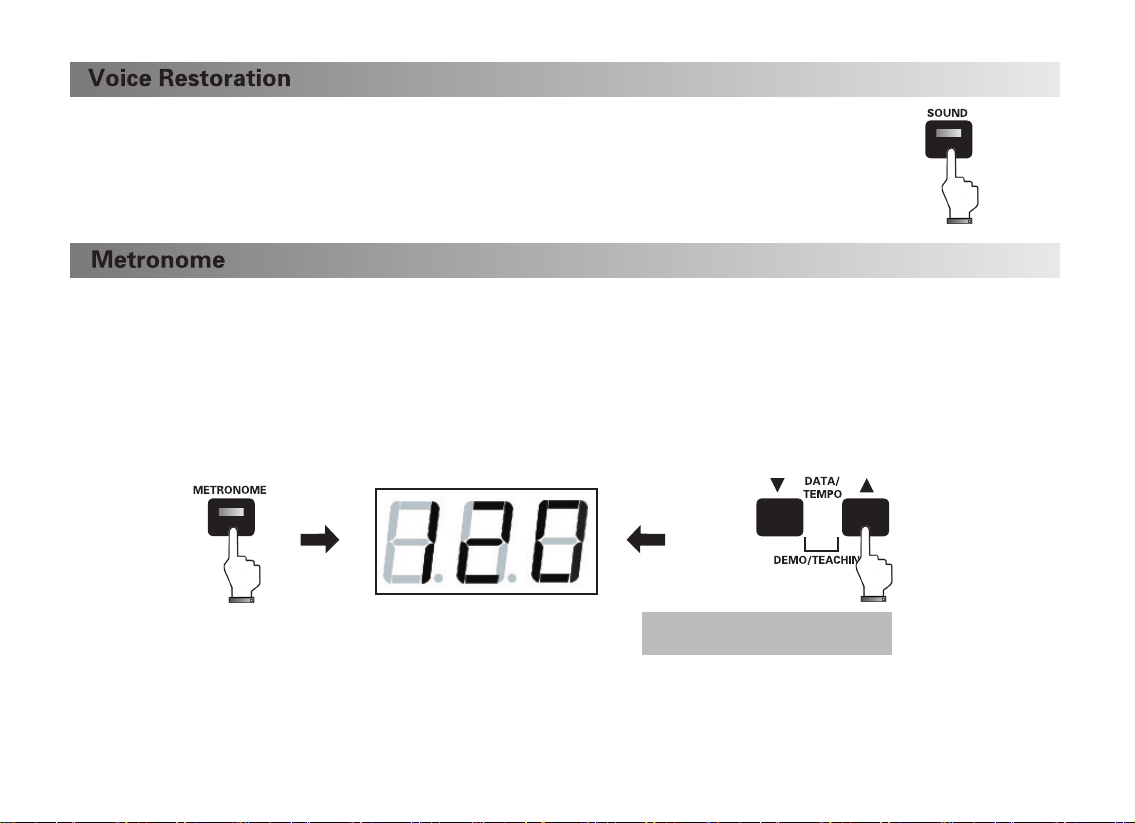
No matter in what playing status, long press [SOUND] button twice and the digital
piano will return to original status. The default voice is Grand piano.
1) Press [METRONOME] button on control panel to start metronome and the indicator light will flash. OLED will display
the beat velocity. The default velocity is 120 beats/min.
2) Press [DATA/TEMPO+/-] button to adjust beat velocity from 20 to 280 beats/min.
3) Press [METRONOME] button again to exit metronome setting. The digital piano will automatically save the current
setting.
4) Restart digital piano to return to default beat setting.
RHYTHM
DATA/
TEMPO
DEMO/TEACHING
RHYTHM SOUND
B/FILL 2START/STOP
SYNC START
A/FILL 1
PRELUDE/CODA
FUNCTION
RECORD
METRONOME
PLAY/STOP
DATA/
TEMPO
B/FILL 2START/STOP
SYNC START
A/FILL 1
PRELUDE/CODA
FUNCTION
RECORD PLAY/STOP

14
As a user-friendly instrument, all functions in this digital piano can be activated easily. Every function is corresponding to a key.
(The name of each function is printed under the key for reference.)
1) Press [Function] button, the indicator light turns on and function selection is activated.
Press a key within 5 seconds to select corresponding function.
2) Press [Function] button again or wait for 5 seconds without controlling, the indicator light
will turn off and exit function setting status. Now you can play the digital piano according
to the chosen function mode. (PS: Under the status of function setting, key pressing is
soundless.)
1) This digital piano contains one chord mode; press
[Function] button and the indicator light turns on.
Press [Chord On] button within 5 seconds to start
automatic chord function.
ON OFF
CHORD OCTAVE TRANSPOSE
ACCOMPA-
NYVOLUM
E
DUALVOICEOFFON OFF OFF
SPLIT SPLITPIANO EFFECT
EFFECT
REVERB CHORUS
BEAT
SOFT
TOUCH
HARD
STANDARD
PRECUSSION
SPLIT POINT
OFF OFF
ON
CHORUSOFFREVERBOFF
KEYBOARD FUNCTION
SOUNDBOARD
RESONANCE
EFFECTOFF 12 3 4
5 6
ON OFF
CHORD OCTAVE TRANSPOSE
ACCOMPA-
NYVOLUM
E
A/FILL 1
PRELUDE/CODA
FUNCTION
RECORD
METRONOME
PLAY/STOP

15
2) Press [FUNCTION] button, indicator light turns on. Press [CHORD OFF] button within 5
seconds to turn off automatic chord function.
1) Press [FUNCTION] button, indicator light turns on.
Press [ACCOMPANIMENT VOLUME+/-] button within
5 seconds to adjust accompaniment volume.
2) Press [FUNCTION] button again or wait for 5 seconds
without controlling, the indicator light will turn off and
exit accompaniment volume adjusting.
1) Press [FUNCTION] button, indicator light turns on. Press
[OCTAVE+/-] button within 5 seconds to adjust pitch.
2) Press [FUNCTION] button again or wait for 5 seconds
without controlling, the indicator light will turn off and exit
pitch adjusting.
ON OFF
CHORD OCTAVE TRANSPOSE
ACCOMPA-
NYVOLUM
E
RHYTHM SOUND
DATA/
TEMPO
DEMO/TEACHING
B/FILL 2START/STOP
SYNC START
A/FILL 1
PRELUDE/CODA
RECORD
METRONOME
PLAY/STOP
ON OFF
CHORD OCTAVE TRANSPOSE
ACCOMPA-
NYVOLUM
E
A/FILL 1
PRELUDE/CODA
RECORD
METRONOME
PLAY/STOP

16
This function can transpose a note to +/-12 semitone in a range of octachord.
1) Press [FUNCTION] button and indicator light turns on.
Press [TRANSPOSITION +/-] button within 5 seconds to
adjust pitch. Adjusting range: -12 to +12.
2) Press [FUNCTION] button again or wait for 5 seconds
without controlling, the indicator light will turn off and
transposition select function turns off.
1) Press [FUNCTION]button, The indicator light up, Press
[SOUNDBOARD RESONANCE]key within 5 seconds, the
Soundboard Resonance function is activated. The piano
will play with soundboard resonance effect.
2) Press[FUNCTION],the indicator light on, press [SOUNDBOARD
RESONANCE OFF] key within 5 seconds, the function will be off.
ON OFF
CHORD OCTAVE TRANSPOSE
ACCOMPA-
NYVOLUM
E
RHYTHM SOUND
DATA/
TEMPO
DEMO/TEACHING
B/FILL 2START/STOP
SYNC START
A/FILL 1
PRELUDE/CODA
RECORD
METRONOME
PLAY/STOP
DATA/
TEMPO
B/FILL 2START/STOP
SYNC START
A/FILL 1
PRELUDE/CODA
RECORD
METRONOME
PLAY/STOP
DUALVOICEOFFON OFF OFF
SPLIT SPLITPIANO
KEYBOARD FUNCTION
SOUNDBOARD
RESONANCE

17
1) Press [FUNCTION] button, indicator light turns on.
Press [DUAL VOICE] button within 5 seconds toenter
dual voices status.
2) Select 2nd voice by [DATA/TEMPO+/-] button. 1st voice should be adjusted
before pressing [DUAL VOICE] button.
3) Press [Function] button and indicator light turns on.
Press [Dual Voice Off] button to turnoff dual voice
effect within 5 seconds to return to 1st voice.
RHYTHM SOUND
DATA/
TEMPO
DEMO/TEACHING
B/FILL 2START/STOP
SYNC START
A/FILL 1
PRELUDE/CODA
RECORD
METRONOME
PLAY/STOP
DUALVOICEOFFON OFF OFF
SPLIT SPLITPIANO
KEYBOARD FUNCTION
SOUNDBOARD
RESONANCE
B/FILL 2START/STOP
SYNC START
A/FILL 1
PRELUDE/CODA
RECORD
METRONOME
PLAY/STOP
DUALVOICEOFFON OFF OFF
SPLIT SPLITPIANO
KEYBOARD FUNCTION
SOUNDBOARD
RESONANCE
Select Next Voice
RHYTHM SOUND
B/FILL 2START/STOP
SYNC START
A/FILL 1
PRELUDE/CODA
FUNCTION
RECORD
METRONOME
PLAY/STOP
RHYTHM
DATA/
TEMPO
DEMO/TEACHING
B/FILL 2START/STOP
SYNC START
A/FILL 1
PRELUDE/CODA
RECORD PLAY/STOP
18
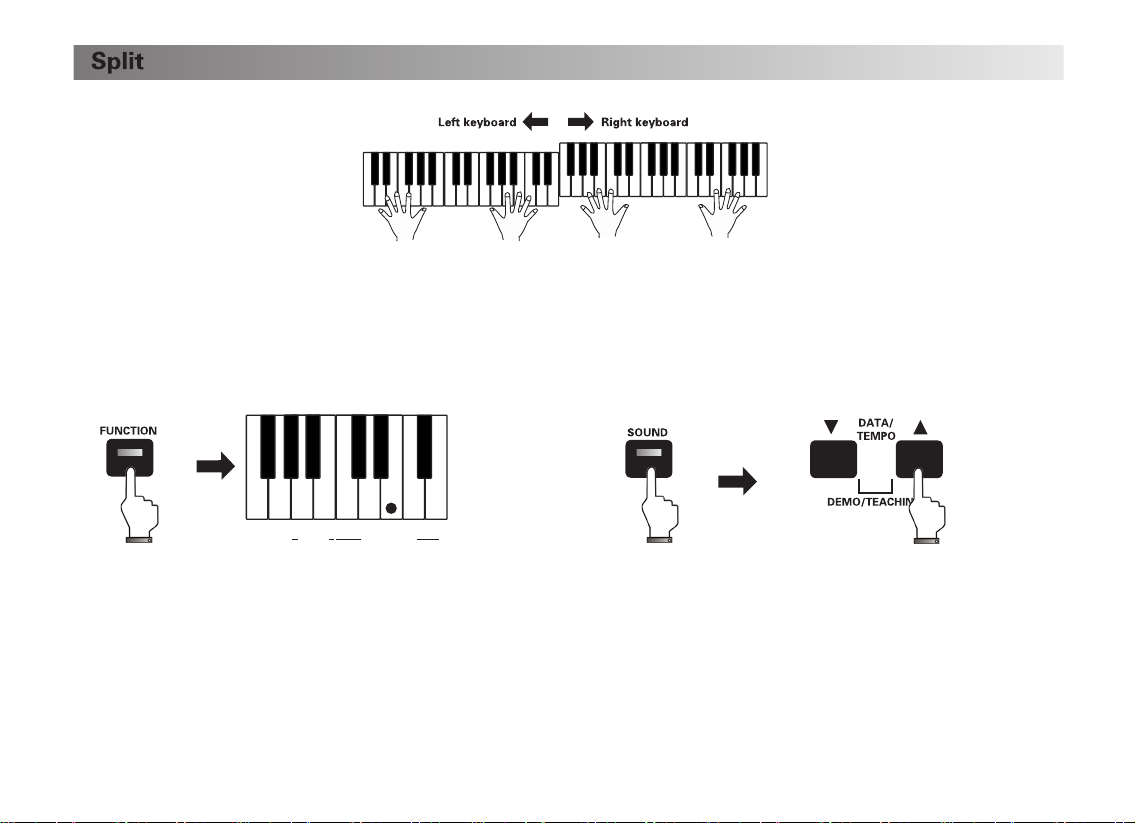
This function can divide the keyboard into two individual playing zones.
1) Before pressing [SPLIT] button, select voice for the left keyboard; Press [FUNCTION] button,the indicator light
turns on, press [SPLIT] button within 5 seconds to enter split status. The keyboard is divided into two individual
zones. The split point is Central C. Select voice for the right keyboard by [DATA/TEMPO+/-] button.
2) Press [FUNCTION] button and the indicator light turns on. Press [SPLIT OFF] button to exit split status within
5 seconds. Press [FUNCTION] button and the indicator light turns on.
Press [SPLIT] button within 5 seconds to enter split status. The split point divides the keyboard into two
individual playing zones.
DATA/
TEMPO
B/FILL 2START/STOP
SYNC START
A/FILL 1
PRELUDE/CODA
RECORD
METRONOME
PLAY/STOP
DUALVOICEOFFON OFF OFF
SPLIT SPLITPIANO
KEYBOARD FUNCTION
SOUNDBOARD
RESONANCE
RHYTHM SOUND
B/FILL 2START/STOP
SYNC START
A/FILL 1
PRELUDE/CODA
FUNCTION
RECORD
METRONOME
PLAY/STOP
RHYTHM
DATA/
TEMPO
DEMO/TEACHING
B/FILL 2START/STOP
SYNC START
A/FILL 1
PRELUDE/CODA
FUNCTION
RECORD
METRONOME
PLAY/STOP
19
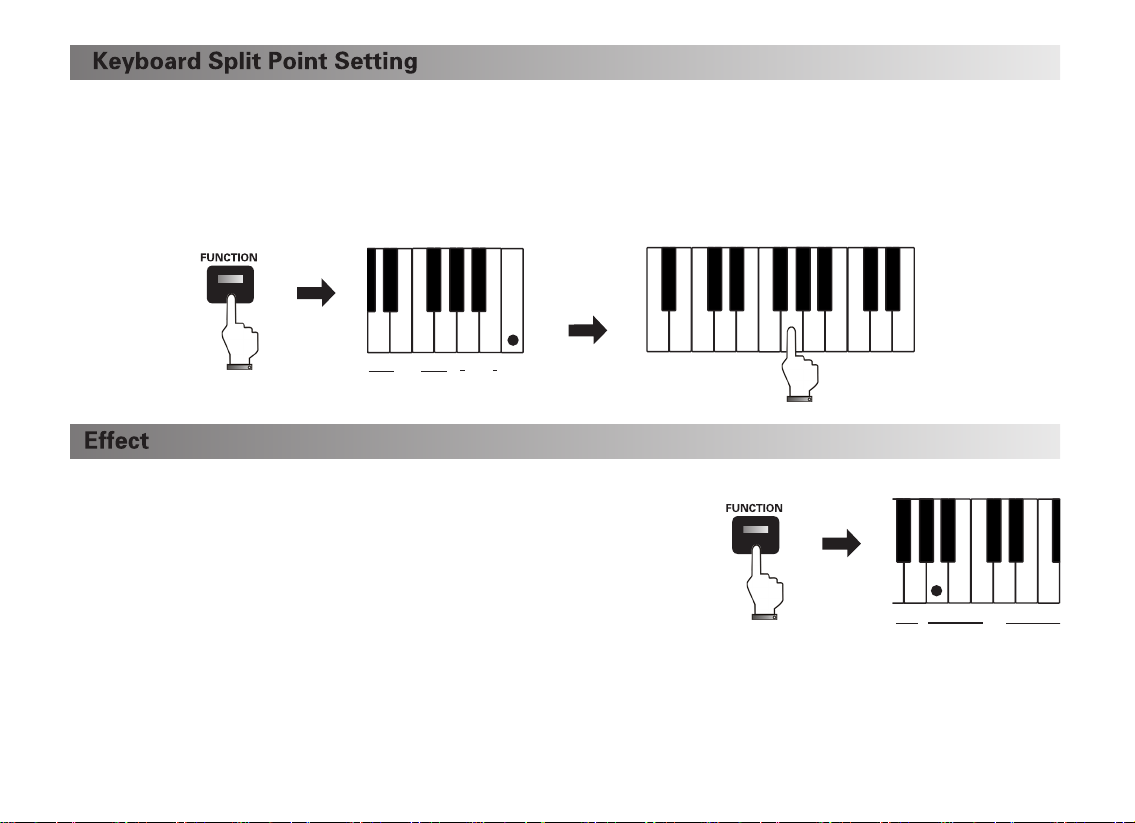
Press [FUNCTION] button and the indicator light turns on. Press [SPLIT POINT] button within 5 seconds to enter split point
setting status. Now press a key to set the split point; Press [FUNCTION] button again or wait for 5 seconds without controlling
until the indicator light turns off, the split point is set.
1) Press [FUNCTION] button and the indicator light turns on.
Press [EFFECT] button within 5 seconds to activate effect
function and sound will have special effect.
2) Press [FUNCTION] button and the indicator light turns on.
Press [EFFECT OFF] button within 5 seconds to turn off effect function.
DUALVOICEOFFON OFF OFF
SPLIT SPLITPIANO EFFECT
EFFECT
REVERB CHORUS
BEAT
SOFT
TOUCH
HARD
STANDARD
PRECUSSION
SPLIT POINT
OFF OFF
ON
CHORUSOFFREVERBOFF
KEYBOARD FUNCTION
SOUNDBOARD
RESONANCE
EFFECTOFF 12 3 4
5 6
RHYTHM SOUND
DATA/
TEMPO
DEMO/TEACHING
B/FILL 2START/STOP
SYNC START
A/FILL 1
PRELUDE/CODA
RECORD
METRONOME
PLAY/STOP
DUALVOICEOFFON OFF
OFF
SPLIT SPLITPIANO
EFFECT
EFFECT
REVERB CHORUS
BEAT
CHORUSOFFREVERBOFF
KEYBOARD FUNCTION
SOUNDBOARD
RESONANCE
EFFECTOFF
12 3
5 6
DATA/
TEMPO
B/FILL 2START/STOP
SYNC START
A/FILL 1
PRELUDE/CODA
RECORD
METRONOME
PLAY/STOP
Table of contents
Other FLYKEYS Musical Instrument manuals


