Musicmaker’s Kits 12/11 User manual

12/11 Solid Top
Hammered Dulcimer
Kit
Musicmaker's Kits Inc.
P.O. Box 2117
Stillwater, MN 55082
(651) 439 9120
www.harpkit.com

3/5/2010
2
12/11 HAMMERED DULCIMER KIT
Parts List:
1 Soundboard (1/4" solid wood)
1 Back (1/4" plywood)
1 Front rail (longest)
1 Rear rail (shortest)
4 Inner braces
2 Pinblocks (right & left)
2 Wood dowels (1/4" dia, 12" long)
2 Wood dowels (1/4" dia, 14" long)
2 Bridges (maple)
Hardware:
46 tuning pins
23 RH screws 1" X #8 (hitch pins)
1 Drill bit (3/16")
Music wire
50 ft of .018" (#7 gauge)
50 ft of .020" (#8 gauge)
50 ft of .022" (#9 gauge)
Black delrin rod (30")
Tuning wrench
2 Brass tubes (3/8" dia, 15" & 16")
Double sided playing hammers
Assembly instructions & tuning chart on transparency
INSTRUCTIONS:
_____1. Check over your kit to identify all the parts. If you have ordered our Partially Assembled kit,
the first seven of these parts have already been assembled. You should check the remaining parts
in your kit, and then skip to step #13 and begin there. If anything is missing or unsatisfactory, let
us know right away so we can supply replacements without causing you too much delay in the
project.
_____2. Begin by placing the plywood BACK on your work table so that the PUNCH MARKS FACE
UP. This is important because this hammered dulcimer is not symmetrical: THERE IS A RIGHT
AND A LEFT TO THIS BOX! The right side is cut at a steeper angle than the left, to allow the
bridges to be about parallel to each other when you string it up. (The punch marks have no other
significance other than to show you which side faces up.)
NOTE: This instrument will have 46 wire strings stretched across the top, all trying to break the
glue joints and destroy your handiwork, so take care to assemble the box securely. When gluing
parts together, you should wipe off any dust that is on the surfaces to be joined, use enough
woodworking glue to allow some to squeeze out between the parts when clamped, and use enough
clamps to draw the wood surfaces together without any cracks showing. If you are short on clamps,
circle the neighborhood and borrow some more! Do not attempt to assemble this box without
woodworking clamps.

3/5/2010
3
_____3. Place the two
laminated maple
PINBLOCKS on the
BACK, so that they
line up with the edges
of the plywood. Note
that the right-hand
pinblock is longer
than the left. When
satisfied with the fit,
glue the PINBLOCKS
to the BACK, using
clamps to hold the
parts together firmly
until dry.
_____4. Place the FRONT RAIL and the REAR RAIL in position between the pinblocks. We KNOW,
THEY DO NOT REACH THE PINBLOCKS! That is intentional. There should be about a 1/4" gap
at each end of the rails when you line them up along the edges of the back. This interesting
engineering feature allows for better vibration of the top and back, without sacrificing stability.
You must also note that these rails are recessed along the top edges. Glue and clamp them
to the BACK with the recessed edges facing up.
_____5. Now is the best time to plan out your soundholes in the SOUNDBOARD. There are
two punches in the top showing where soundholes should be located, but the size and
shape of these holes is a matter of your personal artistic preference -- a great opportunity
to make this a unique instrument.
The soundholes we cut are 2-1/8" diameter circles to fit the laser-cut Rosettes shown
in our catalog, but you may vary from that without affecting the sound of the instrument.
Some folks like to cut an interesting shape such as a leaf, an animal, or a geometric pattern
right into the wood. Use a FINE-TOOTHED blade on your jig saw or saber saw to cut the
soundholes (or a SHARP drill bit for cutting round holes).

3/5/2010
4
_____6. Test fit the INNER BRACES. They have been cut to fit with pre-determined spaces
between them, as shown. Again, these braces should not touch the PINBLOCKS. When
positioned correctly, outline each piece with a pencil, as you will need to remove some and
put them back in the same place.
NOTE: THERE IS A
"RIGHT" AND "LEFT"
SIDE TO EACH INNER
BRACE. THE ANGLE AT
ONE END IS SLIGHTLY
DIFFERENT FROM THE
ANGLE AT THE OTHER
END. MATCH THEM TO
THE ANGLES OF THE
PINBLOCKS.
Just remove enough of the brace to clear the visibility around
the soundholes. This will make the finished dulcimer look
nicer, without sacrificing strength.
_____7. When satisfied with all the INNER BRACES, glue and clamp them in place to the
plywood BACK of the instrument.
HINT: BEFORE GLUING
THESE INNER BRACES
INTO PLACE, set the
SOUNDBOARD on top of
the instrument and
look through the
soundhole(s). If a brace
is clearly visible, then
you should cut out a
section of that brace, as
shown.

3/5/2010
5
HINT: We like to cut a couple of
scrap pieces of 2 X 4 material,
each about 14" long. Lay these
across the braces and clamp
each end, as shown, so they hold
the braces firmly in place until
dry. Small sections of INNER
BRACING may have to be glued
and clamped separately,
depending on how you trimmed
around the soundholes.
NOW IS A GOOD TIME TO SIGN YOUR NAME INSIDE THE INSTRUMENT. WE ENCOURAGE
PEOPLE TO IDENTIFY THE NAME, DATE, AND LOCATION OF THE BUILDER FOR FUTURE
REFERENCE. DO THIS ON THE INSIDE OF THE BACK WHERE IT CAN BE SEEN THROUGH A
SOUNDHOLE.
_____8. Now you can glue the SOUNDBOARD to the dulcimer box. Put adhesive on both
PINBLOCKS and on the raised edges of the FRONT AND REAR RAILS. Carefully position
the SOUNDBOARD so that all the edges are aligned with the rest of the box, and clamp all
glued surfaces securely.
CAUTION: PAD YOUR CLAMPS to avoid denting the wood! Use large scraps of wood
to distribute the clamping pressure over a wider area and to prevent the clamps from
marring the surface of the SOUNDBOARD and BACK.
CHECK AGAIN TO MAKE SURE THE TOP IS ALIGNED PROPERLY, NOT CROOKED.
_____9. When the dulcimer box is dry, trim any excess wood from the top and back that
overhangs the sides of the box. You will also want to sand around all the edges to smooth
out the joints and remove any glue drips and smudges. A power sander is very helpful for
this task. Use a coarse (80 grit) sandpaper at first. Then switch to a medium (120 grit) to
remove the scratches of the coarse paper.
CAUTION: BE CAREFUL NOT TO SAND OFF THE PUNCH MARKS FOR THE TUNING PIN
HOLES AND HITCH PIN HOLES ALONG THE TWO SIDES OF THE BOX.

3/5/2010
6
CAUTION: If using a router on this
box, be careful not to let the router bit
“fall into” the gaps in the sides. A good
way to prevent this from happening is
to clamp a guide fence to the router
base, as shown here.
____10. We like to trim off the two
sharp corners of the box slightly with a
bandsaw, as shown. This softens the
look of the instrument and also
alleviates a potentially dangerous object
for small children to bump into.
____11. We also recommend rounding
over all the sharp edges of the dulcimer
to make it smooth to the touch all
around. Use either a router or an
orbital sander for this operation.
____12. Drill the holes for the tuning
pins and hitch pins. A drill press would
be helpful on this step, but not
absolutely necessary. You can achieve
adequate results with a hand electric drill. Just try your best to hold the drill straight (vertical) as
you work.
Wrap a piece of masking tape around the drill bit to mark the correct depth.
HITCH PIN HOLES: Drill the 23 hitch pin holes along the left side of the top with a 9/64" bit,
boring ONE INCH deep.
TUNING PIN HOLES: Drill the 46 tuning pin holes along the right side of the top using the
new 3/16" drill bit provided in this kit. Bore the holes 1-1/4" deep (you do not want the
tuning pin to ever reach the very bottom of the hole).

3/5/2010
7
IF YOU ORDERED A PARTIALLY ASSEMBLED KIT, BEGIN WORKING HERE:
____13. Use a medium (150 grit) sandpaper to smooth out all surfaces so they feel good to your
hand. Work the sandpaper with the grain so you don't scratch the surface.
Carefully check all the joints and glue seams to remove any glue residue that might remain visible,
because that will show up as ugly smudges under the finish.
____14. Sand the maple bridges to remove any rough spots. We like to leave the blackened insides
of the bridge “legs” for contrast. It looks great on the finished instrument.
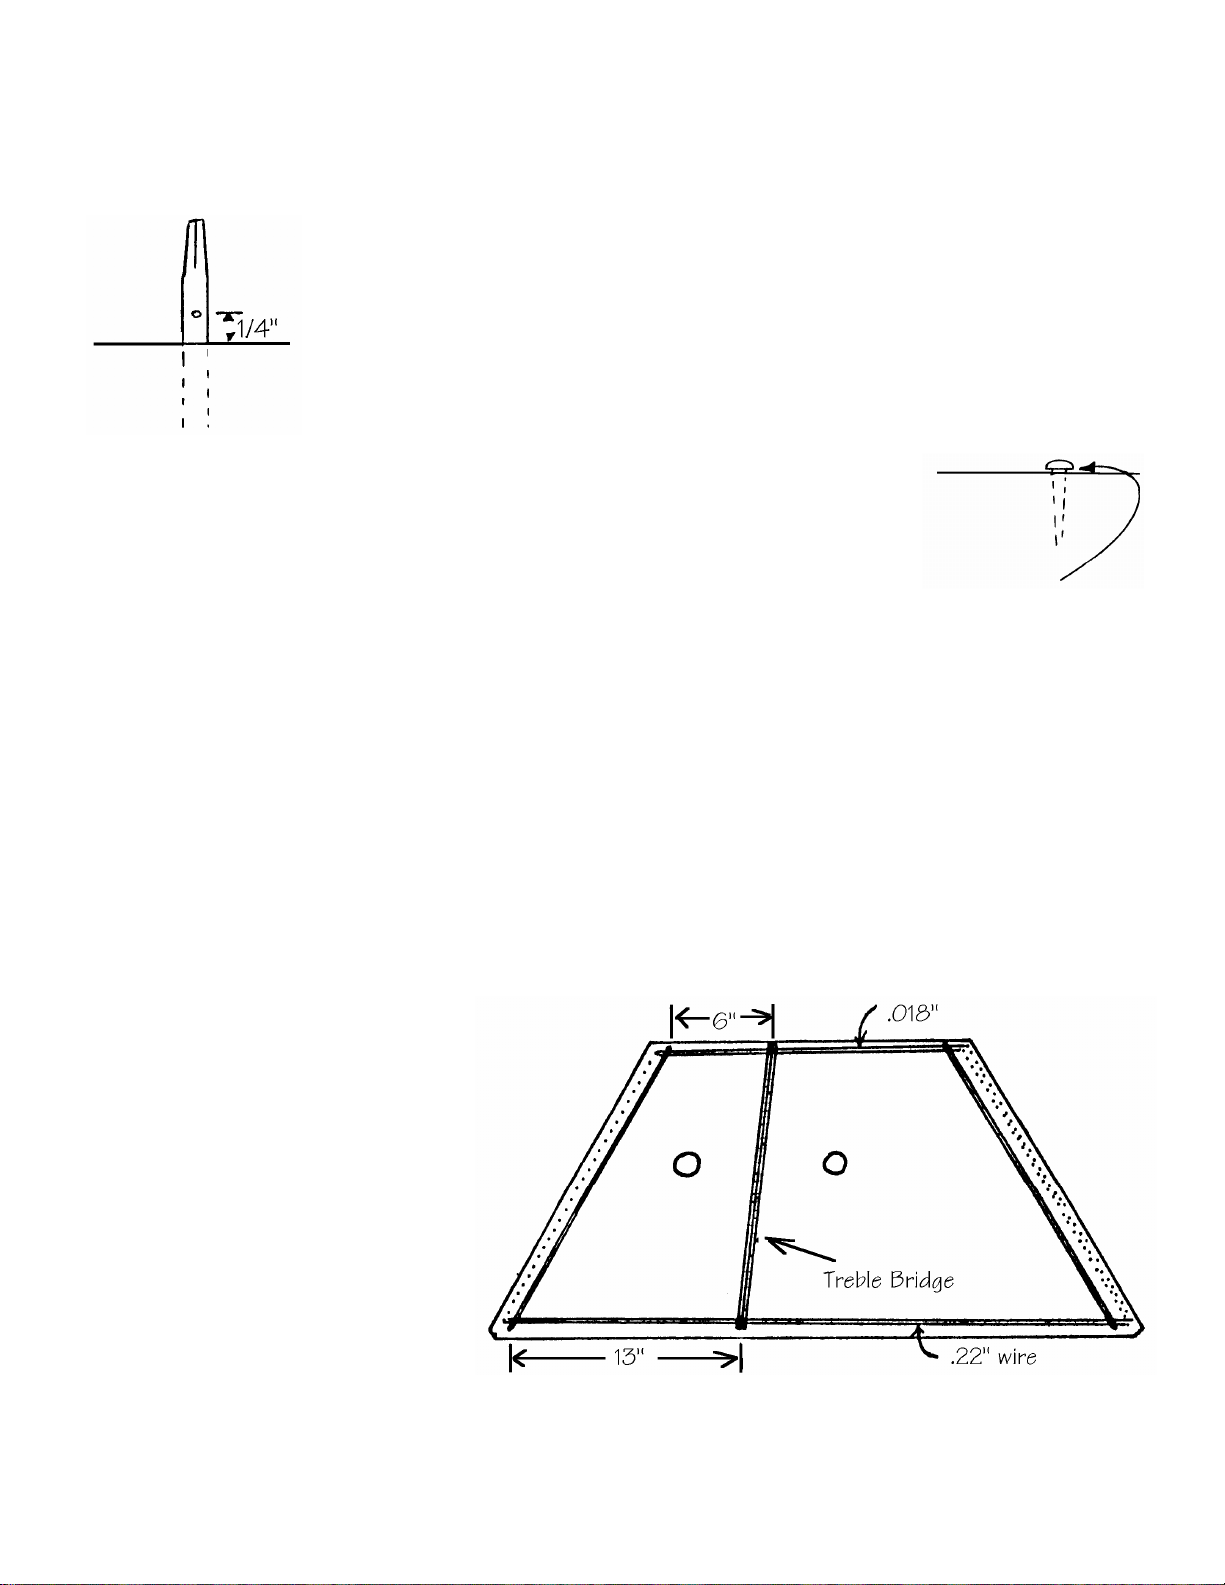
____15. Notice that the
bridges have a few tiny
holes drilled along the tops.
These are for marking dots
to help guide you in your
playing. You need to fill
these holes with short
pieces of the black delrin
(plastic) rod provided in the kit. Push one end of the delrin rod into a hole and clip it off as close to
the wood as you can with a wire cutter. Repeat this procedure for each hole.
CAUTION: IF YOUR KIT HAS SEVERAL PIECES OF BLACK DELRIN, BE SURE TO
LEAVE TWO PIECES LONG ENOUGH TO SPAN THE LENGTH OF THE TWO BRIDGES.
____16. Sand these marking dots smooth with the surface of the bridges.
____17. When satisfied with your sanding, apply the finish of your choice. Here are a few
suggestions:
STAIN -- STAINS are coloring agents and should only be used if you dislike the natural color of the wood. We
usually do not apply stains to our projects, especially when they are made with naturally beautiful hardwoods
such as mahogany, cherry or walnut. These woods look very nice with just a clear finish. But, if you want to
color the wood differently, your staining should be accomplished before applying a surface finish such as oil,
varnish, or lacquer.
OIL -- An oil finish will give your wood a low luster appearance, bringing out the natural color of the grain,
but it tends soak into the wood and appear dry and "thirsty" after awhile. The principal advantage of an oil
finish is that it can be applied and wiped dry immediately, so you can proceed to installing hardware (and
strings) right away. The disadvantages of oil are that it usually does not give much surface protection or
sheen, although there are some brands that include waxes and/or varnishes to give more surface build-up
and luster.
VARNISH -- Any regular varnish will work fine on this project, but we recommend our wipe-on polyurethane
called MUSICMAKER'S INSTRUMENT FINISH. Our complete finishing kit (code FINISHKIT) includes detailed
instructions, sandpaper sheets, along with a 1/2 pint can of wipe on gel urethane varnish. The advantages of
finish are its simple application, durability, and deep, soft luster.
LACQUER -- Many professional instrument makers still use lacquer for their finish. The most readily
available lacquer is called Deft Clear Wood Finish. It is best to purchase a can of liquid to brush on as a
sealer coat first, and then use an aerosol can of the same product to spray on the final coats. The advantage
of this finish is its quick drying time, but the disadvantage is the strong odor of the toxic lacquer fumes.
CAUTION: Lacquer finish will not work over Heat Transfer decorations -- it dissolves the toner.

3/5/2010
8
____18. Don't forget to apply finish to the maple bridges and the playing hammers too!
____19. Once the finish is dry, you can install the hardware. The 46
holes along the right side of the box are for the threaded tuning pins.
Insert these pins right-side up (that is, THREADED END FIRST) into
the holes using a hammer to tap them until they are about half-way in
(the small hole should be about 1/4" above the wood).
HINT: YOU MAY WISH TO PLACE A SCRAP OF WOOD ON THE
SURFACE OF YOUR DULCIMER NEAR WHERE YOU ARE
POUNDING, SO THAT YOU DON'T ACCIDENTALLY MAR THE TOP
BY AIMING INCORRECTLY WITH THE HAMMER -- OUCH!
____20. The 23 holes along the left side are for the hitch pins (round-
head screws). You can use a hammer to pound these in partway, but
change to a screwdriver to finish the job, so the screw heads are just
slightly above the wood surface.
NOW YOU ARE READY FOR STRINGING! You may want to ask a friend to help you with
this part of the project, as it often seems to require more than two hands....
YOU ALSO WILL NEED THE TUNING WRENCH (SUPPLIED IN THE KIT), SOME
MASKING TAPE, AND A WIRE CUTTER FOR THESE NEXT FEW STEPS.
____21. Place both brass tubes in their grooves along either side of the instrument and
hold them in place with a little masking tape until you have a few strings in place.
____22. Cut the black delrin into two long pieces to fit along the top of each maple bridge.
They are meant to rest in the grooves along the tops of the bridge "legs".
____23. Stand the TREBLE
BRIDGE (it is the longer of the
two) on the instrument so that
the upper end is about 6 inches
from the brass tube to the left,
and the lower end is about 13
inches from the lower end of the
same brass tube. Hold the
bridge in place temporarily with
a little masking tape. BE SURE
TO PUT THE BLACK DELRIN
ROD ALONG THE TOP.

3/5/2010
9
____24. Locate the coil of wire marked #9 (.022") and pull out
about 8 feet from one end. This will be used for the longest
course (pair) of strings at the front of the instrument. Here is how
to install it:
a) Poke the end of the wire into, but not so far through
that it could poke your finger, the small hole in the lowest tuning
pin at the lower right corner of the dulcimer.
b) Use the tuning wrench to turn the pin
CLOCKWISE about one-half turn before putting
tension on the wire.
c) Pull on the wire to "set" it in the
pin. This puts a kink in the wire at the point
where it enters the tiny hole in the tuning pin. If the
wire pulls out of the pin when you pull on it, cut off
the kinked end and try again.
NOTE: This may seem like a silly exercise, especially if the wire keeps coming out of its place when
you pull. You will appreciate installing strings this way because the sharp ends are left hidden in
the tuning pins where they can't poke your fingers or catch on your clothing. It does work....
d) Keeping tension on the wire at all times, turn the
pin about two complete revolutions with the tuning wrench,
guiding the wire DOWNWARD as it winds around the pin.
e) Maintain tension on the wire as you stretch it
across the dulcimer (over the treble bridge) to the lower left
corner and wind it around the lowest brass screw.
f) Pull the wire back across (over the treble bridge) to the right corner again and cut it off
from the coil so that you have about 2 inches excess wire to wind onto the second tuning pin. No
need for more than a ½ loop around the hitch pin because the wires will be equal tension.
g) Poke that end of the wire into (but not all the way through) the second
tuning pin and turn the pin about one-half turn clockwise before "setting" the wire as you did with
the other end.
h) Continue turning the pin clockwise to wind the excess wire DOWNWARD toward the wood
until all the slack is taken up.
WA-LA! You have just installed your first course (pair) of strings. If you are not completely
frazzled by now, you'll succeed with the rest of the project just fine!
____25. Now, to hold the upper end of the treble bridge firmly in place, we recommend attaching
the highest course (pair) of strings at the rear of the instrument. FIND THE COIL OF WIRE

3/5/2010
10
MARKED #7 (.018") FOR THIS COURSE. Attach this wire in the same way as you installed the
first pair, following steps "a" through "h", and using the last pair of tuning pins on the right and the
last hitch pin on the left.
____26. You should be able to remove the masking tape that was holding the parts in place.
____27. BEFORE PROCEEDING
TO THE REST OF THE STRINGS,
you must insert the two longer
1/4" wood dowels (14" long) under
the soundboard to act as bridge
supports. These dowels are NOT to
be glued permanently in place, but
just pinched between the
soundboard and the inner bracing.
You may wish to move them later
to adjust the tone of your
instrument. Position them as
shown for now.
IMPORTANT: These 14” dowels need to rest on both the FRONT RAIL and the REAR
RAIL in order to fully support the soundboard. Be sure to push them far enough so they
span the entire frame!
The rest of the strings that cross the treble bridge will be attached to EVERY OTHER PAIR
OF TUNING PINS and EVERY OTHER HITCH PIN. The pins that are left between these
treble courses will be used for the strings that cross the bass bridge. We will get to those
later.
ANOTHER NOTE: The size of the wire gets smaller as you progress toward the rear of the
instrument, and the notes become higher in pitch. Here is the preferred arrangement of
wire sizes for the treble bridge:
STRING SIZE CHART
.022" wire FRONT 4 COURSES
.020" wire MIDDLE 4 COURSES
.018" wire REAR 4 COURSES
THIS MAKES A TOTAL OF 12 COURSES OF WIRE ON THE TREBLE BRIDGE, ONE
OVER EACH "LEG" OF THE BRIDGE.
____28. Continue stringing the wires across the treble bridge, bringing them up to a
reasonable tension, but not trying to actually tune them yet. Be sure to change sizes of
wire according to the chart above.
____29. When all 12 courses are in place on the treble bridge, you can begin stringing the bass
bridge. Stand the bass bridge toward the right side of the instrument as shown in the drawing.
You will have to tip it sideways in order to slide it into place under the other strings. The "legs"
should all fit between the wires that pass over the treble bridge.

3/5/2010
11
IMPORTANT: One end of the
bass bridge is marked with an
inlay dot at the very end (on top
of the last "leg"). That end
should be placed toward the
front of the instrument, for the
longest string.
____30. When satisfied with the
placement, lay the black delrin
in its groove on the bridge, and
hold the parts in position
temporarily with masking tape.
____31. Insert the other 1/4" wood dowels (12" long) under the soundboard on either side of the
bass bridge, as shown. These 12” dowels do not need to reach the rear rail – just push them in so
the ends are resting on the front rail. Again, these dowels can be moved around later to enhance
the sound of the bass notes.
____32. The longest course (near the front of the instrument) will be .022" wire. You will attach it
to the dulcimer in virtually the same manner as you did the treble strings, WITH ONE IMPORTANT
EXCEPTION: the bass strings must go OVER THE BASS BRIDGE, and UNDER THE TREBLE
BRIDGE! Just an interesting twist to complicate matters a little for you....

3/5/2010
12
HINT: We find the easiest way to put the string under the treble bridge is to put a bend in the wire
about 3' from the end, then push that bend under the treble bridge and hook it around the hitch
pin. Then the two ends can be cut to proper length and attached to the tuning pins.
____33. String all 11
bass courses in the
same way you did the
treble ones (you're an
expert by now, right?),
changing wire sizes
according to the
following chart:
STRING SIZE CHART
.022" wire FRONT 3 COURSES
.020" wire MIDDLE 4 COURSES
.018" wire REAR 4 COURSES
This makes a total of 11 courses of wire on the bass bridge, one over each "leg".
HURRAH!! THE STRINGS ARE ALL IN PLACE. I hope you aren't keeping track of all the
time invested in this project....
TUNING
____34. Before you can successfully tune this instrument, you must make sure the
TREBLE BRIDGE is in just the right position. It must divide the vibrating portion of its
strings into a perfect ratio of 2:3 in order to play a proper scale, because you will play some
notes on the right side and some on the left, and the length of the strings helps determine
their pitch.
You can slide the treble bridge sideways one way or the other to achieve this proper
placement. You may make careful measurements and calculations to verify its location, or
you may verify it "by ear", which is perhaps the better approach, since your ear is what will
complain if the darn thing is out of tune!
Here's how to go about it:
a) Pluck the lowest string (at the front of the instrument), on the right side of the
treble bridge. If the string is so loose that it just "twangs", then tighten it up until you get a
clear sound.
b) Pluck THAT SAME STRING on the left side of the bridge to see if that note is a
musical fifth interval above the first note. "So, what is a musical fifth interval?" you ask.

3/5/2010
13
The FIFTH INTERVAL is the span between "do" and "sol" on the scale. So if you
pluck the string on the right side of the bridge and consider that note as "do", then you can
sing "do, re, mi, fa, sol" and check to see if the note on the left side of the bridge (same
string) matches the note "sol". Or, a quicker way to sing the fifth interval is to hum the
song "Twinkle, Twinkle, Little Star". The span between the first "Twinkle" and the second
"Twinkle" is a fifth interval. Of course, if you can't sing in tune, then you'll find this a
worthless exercise! Go back to measuring the 2:3 ratio of vibrating lengths, or find a
musical friend.... Seriously, you can obatin perfect accuracy regardless of your musical ear
by using an electronic tuner. We offer a good one in our MUSICMAKER’S catalog.
c) Now, if the note on the left of the bridge is HIGHER than it should be (more than
a fifth interval above the right side), then you must LENGTHEN the amount of wire on that
left side of the bridge to lower the pitch. Do that by sliding the bridge to the right, just a
little. Then test the interval again.
d) If the note on the left side of the bridge is LOWER than it should be (less than a
fifth interval above the right side), then you must SHORTEN the length of wire vibrating on
the left side of the bridge to raise the pitch. Do that by sliding the bridge to the left, just a
little. Then test the interval again.
e) Once you are satisfied with the interval on the longest string at the front of the
dulcimer, test it also on the shortest string toward the rear of the dulcimer. Use the same
techniques for adjusting until you hear a perfect fifth.
f) Now that the front and rear of the treble bridge are correctly placed, you need only
make sure that the rest of the bridge is lined up in a straight line between the ends. That
should ensure that all the strings will give a fifth interval from the right side to the left.
NOTE: If you happen to find a string that does not sound a fifth interval across the treble
bridge, then something else is amiss. Chances are, the string is not making firm contact
with the brass tube along the right-hand side. To correct this problem, you must unwind
the string part way from the tuning pin and then re-wind it so that the windings go
DOWNWARD toward the wood, making firm contact with the brass tube. (This is only
important for strings that cross the treble bridge. No need to worry about those that cross
the bass bridge.)
WHEW! NOW YOU CAN ACTUALLY BEGIN TUNING....
____35. We like to start with just the bass bridge strings first, beginning at the lowest
strings near the front of the dulcimer. You may want to cut out the tuning chart provided
in the kit and slide it under the strings for ease in determining what note to tune the
strings to.
ALL PAIRS ARE TO BE TUNED IN UNISON
The lowest pair of strings crossing the bass bridge will be tuned to the G below middle C.
The next pair that crosses the bass bridge will be tuned to A below middle C and the next to
B, and the next pair to middle C, etc, as shown on the tuning chart.

3/5/2010
14
IMPORTANT! Be careful to check that you are turning the proper pin for the string you
wish to tune. Then pluck the string and turn the pin while string is still vibrating so you
can hear the pitch change and you can stop turning when you reach the proper tone.
Tune all the strings that cross the bass bridge, according to the tuning chart (note that you
must skip every other pair of pins on your way toward the rear of the instrument).
____36. Because the treble bridge is placed to give you a fifth interval from the right side to
the left, you need only tune one side of the treble bridge -- the other side will automatically
come into correct pitch. (That's the first break you've had in this project, huh?)
So, go ahead and tune the longest pair of wires at the front of the instrument to middle C#
on the right side of the treble bridge. Tune the next pair to D above middle C and the next
to E, etc, as indicated on the tuning chart.
____37. Now, don't expect the instrument to be playable yet.... By the time you finish
tuning the highest string on the treble bridge, the bass strings will have already gone out of
tune. Don't give up! This won't happen every time. Two things are occurring that
contribute to the problem on a new instrument: 1) the wire is actually stretching a little,
and 2) the box is flexing slightly under the tension of all those strings.
Give the instrument a little time to adjust (say, overnight) and then tune it again. It should
hold pretty well after the second or third tuning.
CONGRATULATIONS! YOU REALLY DID IT. WE HOPE YOU ENJOY LEARNING TO PLAY
YOUR HAMMERED DULCIMER. WITH PROPER CARE, IT SHOULD GIVE YOU MANY
YEARS OF MUSICAL PLEASURE.
DULCIMER HAMMERS
Our double-sided hammers come with one side plain wood and the other padded with
leather, so you can change the brightness of your instrument by simply rolling the
hammers over.

3/5/2010
15
CARE AND FEEDING OF A HAMMERED DULCIMER
STRINGS: You should not need to replace the strings of your instrument unless they
break or become rusty. To prevent rusting, I simply wipe the strings occasionally with a
rag dipped in household oil.
TUNING PINS: Occasionally we hear from someone whose tuning pins have rusted.
This can happen if exposed to excessive moisture or salt water. So if you live in a humid
climate or near the ocean, I recommend treating the tuning pins to an occasional oil bath
too.
WOOD SURFACES: The main challenge will be to remove the dust from under the
strings. Not that I mind a little dust, but when you finally decide to tackle the situation, I
recommend pushing a rag through the narrow spaces with a small dowel or thin stick.
You may wish to treat the rag with a dust-gathering solvent or a furniture polish -- that's
fine. We often use Endust, Aulwood, Old English, or plain old Johnson's Lemon Wax. They
all work well.
TONE ADJUSTMENTS
As you begin playing your dulcimer, you may find a need to adjust the volume or tone
of certain areas of the instrument. You want a nice even volume from bass to treble.
If you wish to increase the sound of the low notes on the bass bridge, for example,
you may slide the wood dowels away from the bridge a little bit. You may have to loosen
the bass strings to accomplish this. A small adjustment (1/2") makes quite a difference in
sound!
The same thing can be done with the dowels under the treble bridge. Sliding the
dowels closer to the bridge will quiet the sound, and moving them further way from the
bridge will make it louder. If you find the sound ringing or "howling" too much, you will
want to slide the tone dowels closer to the bridge.

3/5/2010
16
ACCESSORIES FOR THE HAMMERED DULCIMER
We carry a number of items to help you enjoy playing this unusual instrument. Here is a
brief list of accessories – please refer to our website our catalog for current pricing.
Pair double-side hammers
Gig bag for 12/11 Hammered Dulcimer
Electronic Tuner (chromatic)
External Pickup & Cord for Tuner
Scissor Stand kit, 25”
Finished Scissor Stand, 25”
Scissor Stand kit, 37”
Finished Scissor Stand, 37”
Adjustable Hammered Dulcimer Stand kit
Finished Adjustable Stand
Podium music stand kit (cherry)
FinishedCherryPodium
Podium music stand kit (walnut)
Finished Walnut Podium
MUSICMAKER’S KITS, INC.
PO BOX 2117
STILLWATER, MN 55082-3117
(651) 439-9120
Table of contents
Other Musicmaker’s Kits Musical Instrument manuals

Musicmaker’s Kits
Musicmaker’s Kits SMARTWOOD HARP KIT User manual

Musicmaker’s Kits
Musicmaker’s Kits 31 String Gothic Harp Kit User manual

Musicmaker’s Kits
Musicmaker’s Kits 17/16 User manual

Musicmaker’s Kits
Musicmaker’s Kits limfin-p User manual

Musicmaker’s Kits
Musicmaker’s Kits CIGAR-BOX UKULELE KIT User manual