Flylink GOLDKEY C320 User manual
1
GOLDKEY C320 (AK-S8)
User Manual
1 Introduction
Thank you for choosing our smart watch phone.
Watch phone GOLDKEY C320 (AK-S8) comes with Android 4.4 system, which supports GSM
network (850MHz, 900MHz, 1800MHz, 1900MHz) and 3G network WCDMA 2100MHz. Basic
functions of GOLDKEY C320 (AK-S8) are as follows:
1 Screen resolution: 240*240 pixels, capacitive screen;
2 Built-in GPS;
3 MTK6572 chip;

2
4 3M HD camera;
5 RAM: 512MB ROM: 4GB;
6 GPRS, EDGE, HSDAP, HSDAP+, Bluetooth 4.0, WiFi, USB2.0
Note: For saving power consumption after using the watch, please deactivate GPS, WiFi and
Bluetooth functions and return to the standby state.
2. Safety Precautions
* Safety Warnings and Precautions
Please read these precautions carefully before using the watch phone to ensure proper use of
it.
* Please turn off the watch when you are in the plane, hospitals or other places where cell
phones are prohibited to be used. Otherwise it will affect the normal operation of electronic
equipments and medical instruments. Please comply with the relevant provisions of the
workplaces when you use the watch in these places.
* When approaching the places of fuel, chemicals, explosives, etc, please abide by the laws,
regulations and related marks.
* Please don’t use the watch in the places with weak signal coverage or near high-precision
electronic devices. Radio wave interference may cause malfunction of electronic devices and
other problems. In particular, a special attention is needed in the vicinity of the following
devices: hearing aids, pacemakers, medical electronic devices, fire detectors, automatic
doors and other automatic control devices. For impacts on the equipment, please consult the
device manufacturer or your local distributor.
* Precautions to Use the Watch
Do not disassemble or modify the watch, otherwise it will cause damage or leakage to it. For
disassembling it, please ask professionals for help. Non-professionals may not dismantle the
machine.
Do not beat the touch screen or use it to beat other objects, otherwise it will cause liquid
leakage or damage to LCD. LCD liquid into the eyes may cause blindness. Please rinse
immediately your eyes if any liquid splashed into the eyes (do not rub them), and immediately
ask the doctor for help.
Do not use needles or other sharp objects to touch any keys and touch screen, otherwise it
will damage the watch or cause improper operation.
3
Please avoid the watch is close to any magnetic objects, e.g., magnetic card. Radiation
waves of watch phone may remove the data stored on the floppy disks, stored value cards or
credit cards.
Please ensure the watch is free from damp, water or other liquids which will cause short
circuit, leakage or other defects to the watch.
3 Preparation before Using the Watch
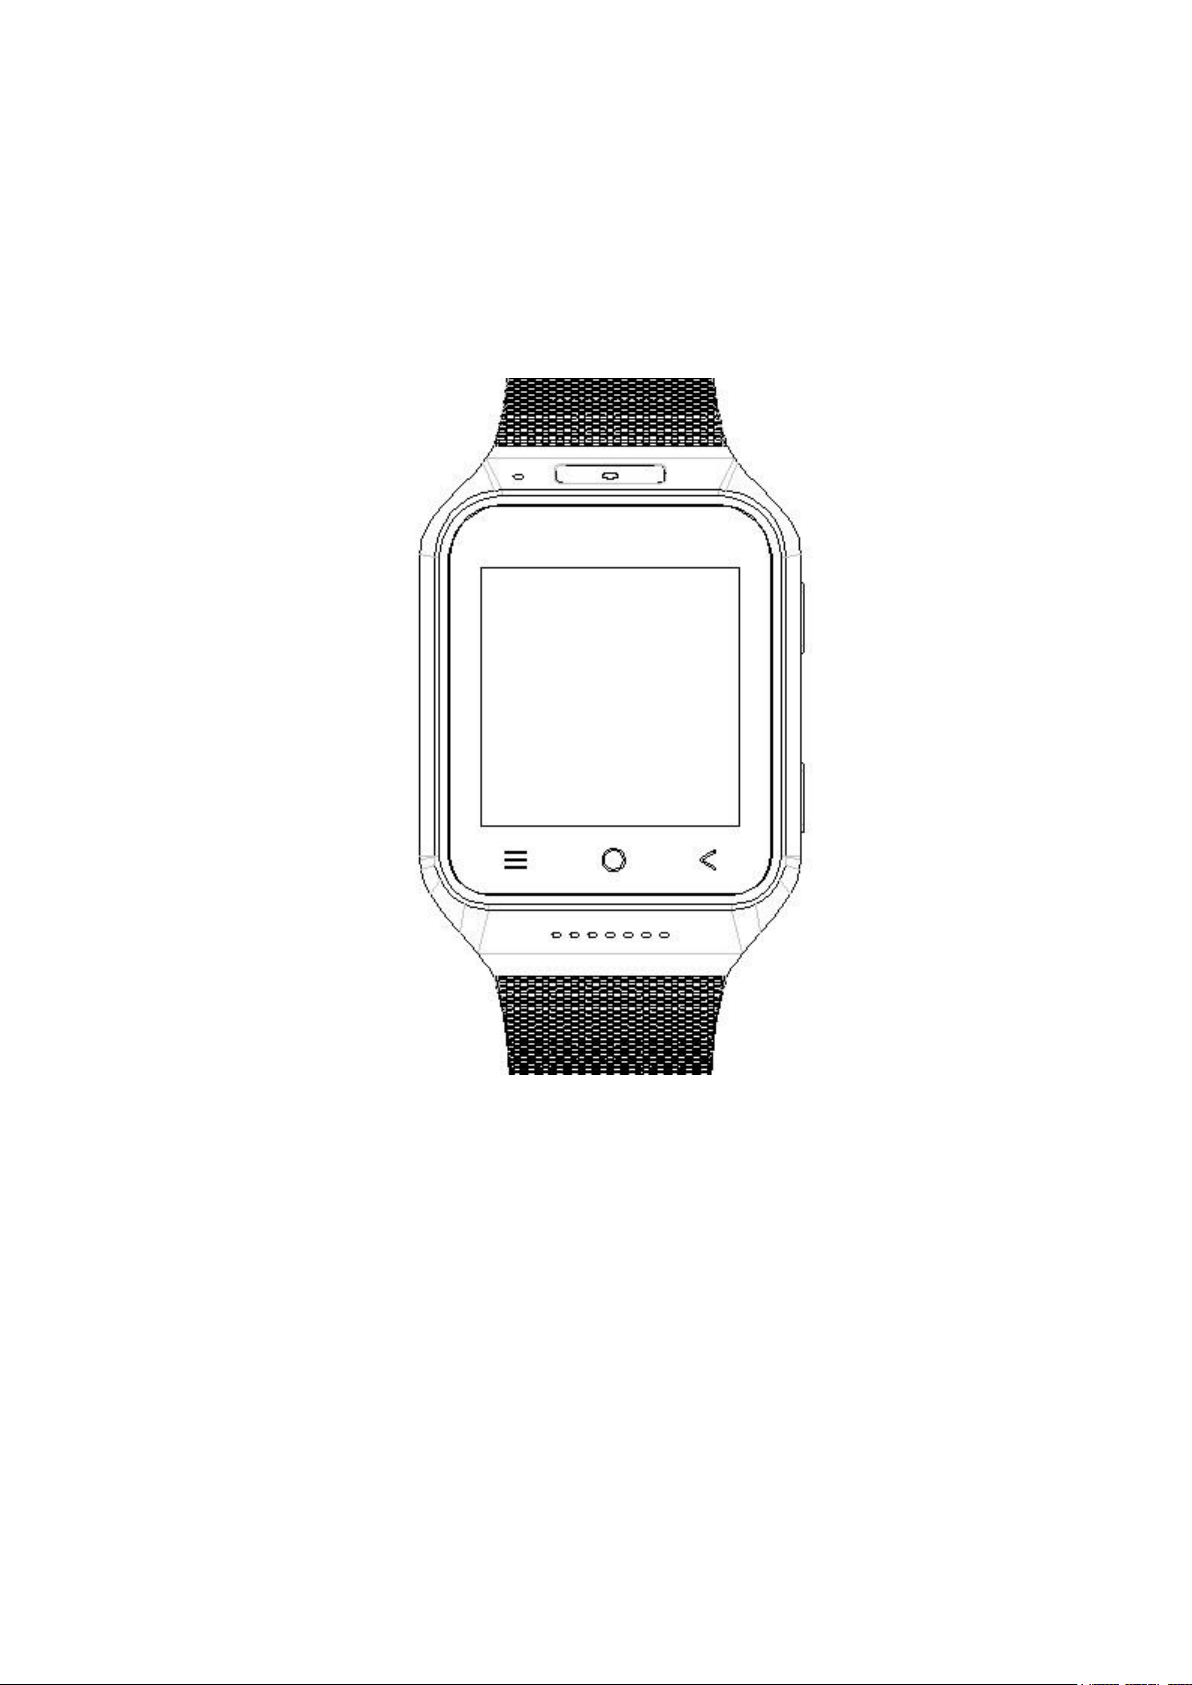
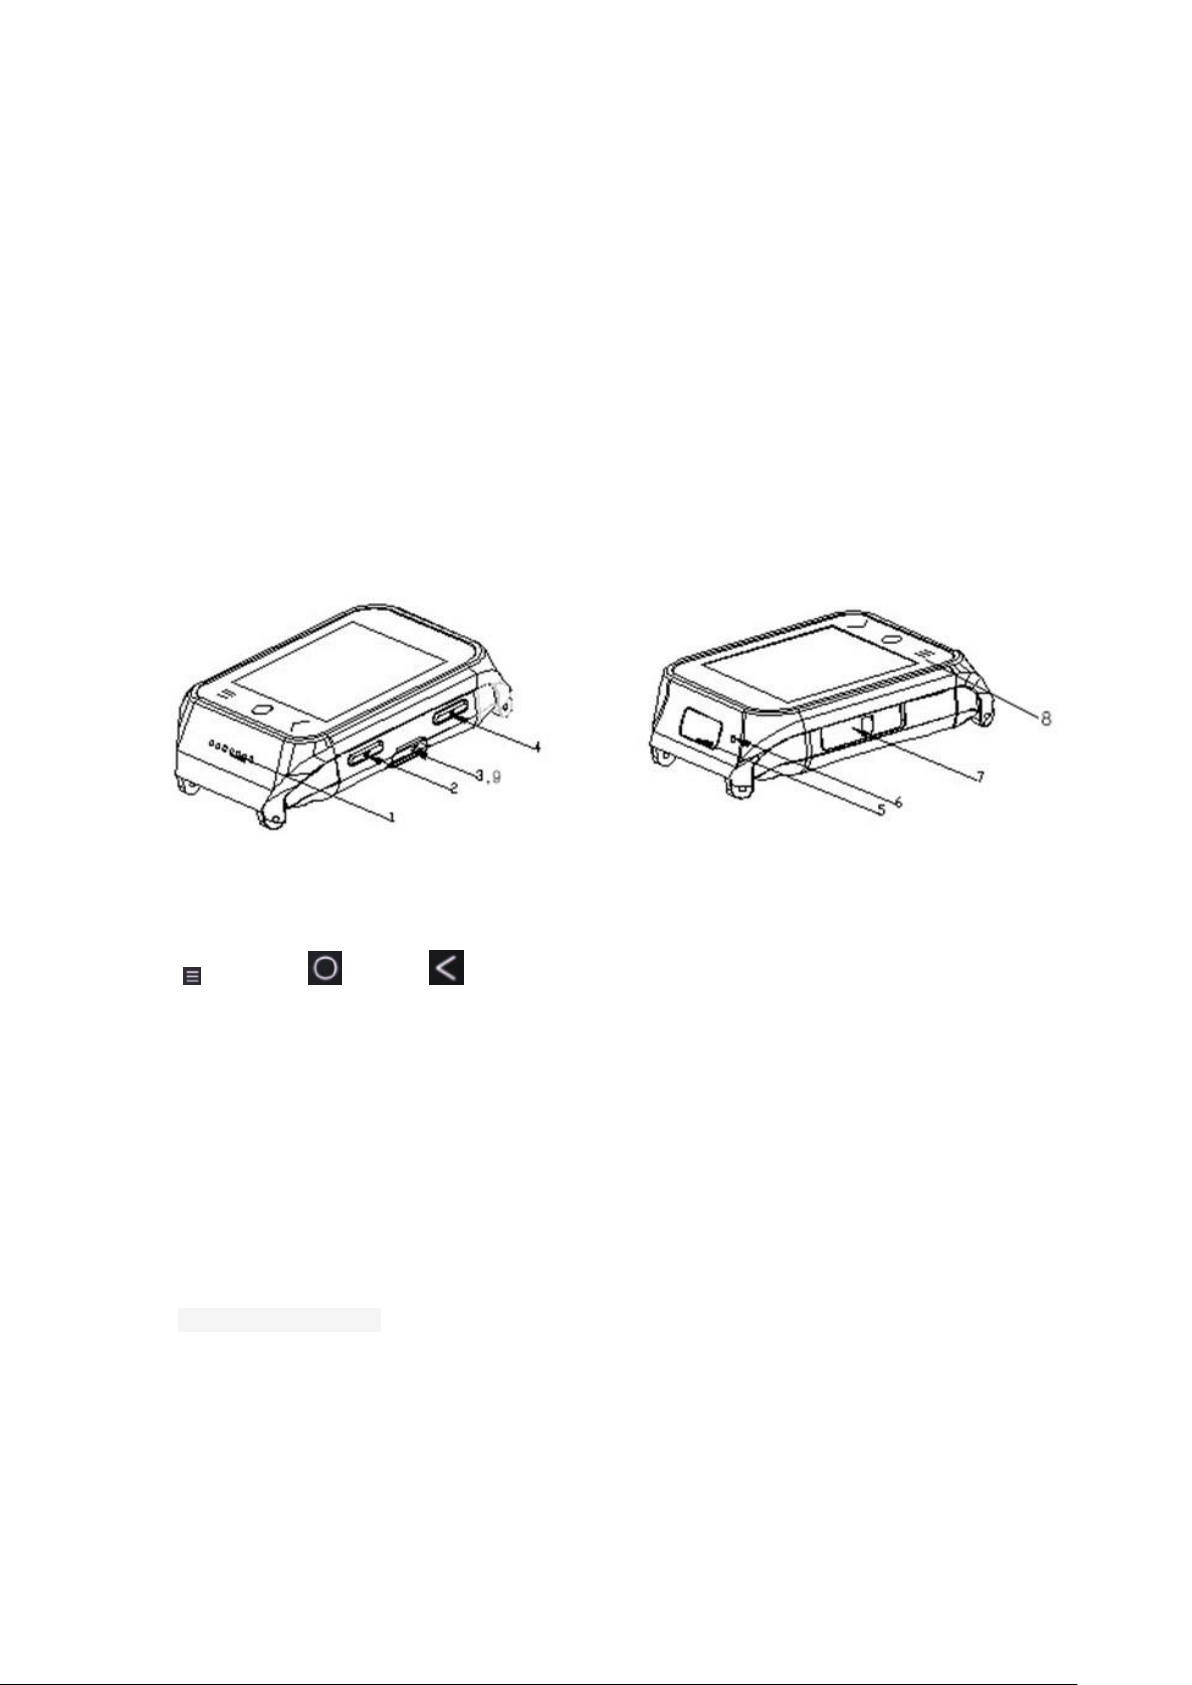
A. Product Introduction
1: Speaker; 2: Volume; 3: USB Port; 4: Turn On/Off; 5: Camera; 6: MIC; 7: SIM Card Slot
8: 3 virtual buttons on the touch screen
Option;Home;Return
9: USB port on the side of the watch multiply works for the data cable and charger。
A. Battery Instuction
Warning: Must power off the watch phone before assembling the battery. Prohibited to remove
the battery case directly when in the boot or connect with other external power, it may damage
the SIM card and phone; This machine is built-in battery, non-professionals do not disassemble
B. SIM card installation
Before installing the SIM card, please turn off your phone, Find the SIM card slot, insert the
SIM card then locked the holder(as shown) Make sure the sheet metal side of the SIM
Please put the SIM card in the place which children can not reach
Bent or improper operation will may damage the SIM card when insert and remove the SIM

4
card, please take care.
This watch’s SIM card support the GSM and 3G network.
C. Charge the battery
The starting condition into the charging plug, the battery icon in the upper right of the screen
intensity stripe rolling said charging has started, when the fringe fills the icon stops rolling, said
battery charging has been completed, after charging pull out the plug; the off state to insert the
charger plug screen battery icon started rolling, charging plug is completed
Warning: When the battery is low, the screen will display warning information, when the
battery is empty, the watch will automatically shut down.Please do not let the battery in a state
battery is low for a long time, otherwise you will damage the battery quality and longevity.To make
sure the watch work well, please use our standard charger.
D. Power ON/OFF
Power on/off button is at the top left (beside camera),long press to turn on/off ,short press to
dark/bright screen.
Note: Where mobiles are banned or using mobiles may cause interference and danger, then
please don’t turn on your device, and you’d better remove your battery.
E. Volume button
Volume button is under of left side(beside speaker),Press “return”to volume control function,
Slide on the screen to adjust the volume
5
4 Standby interface and clock
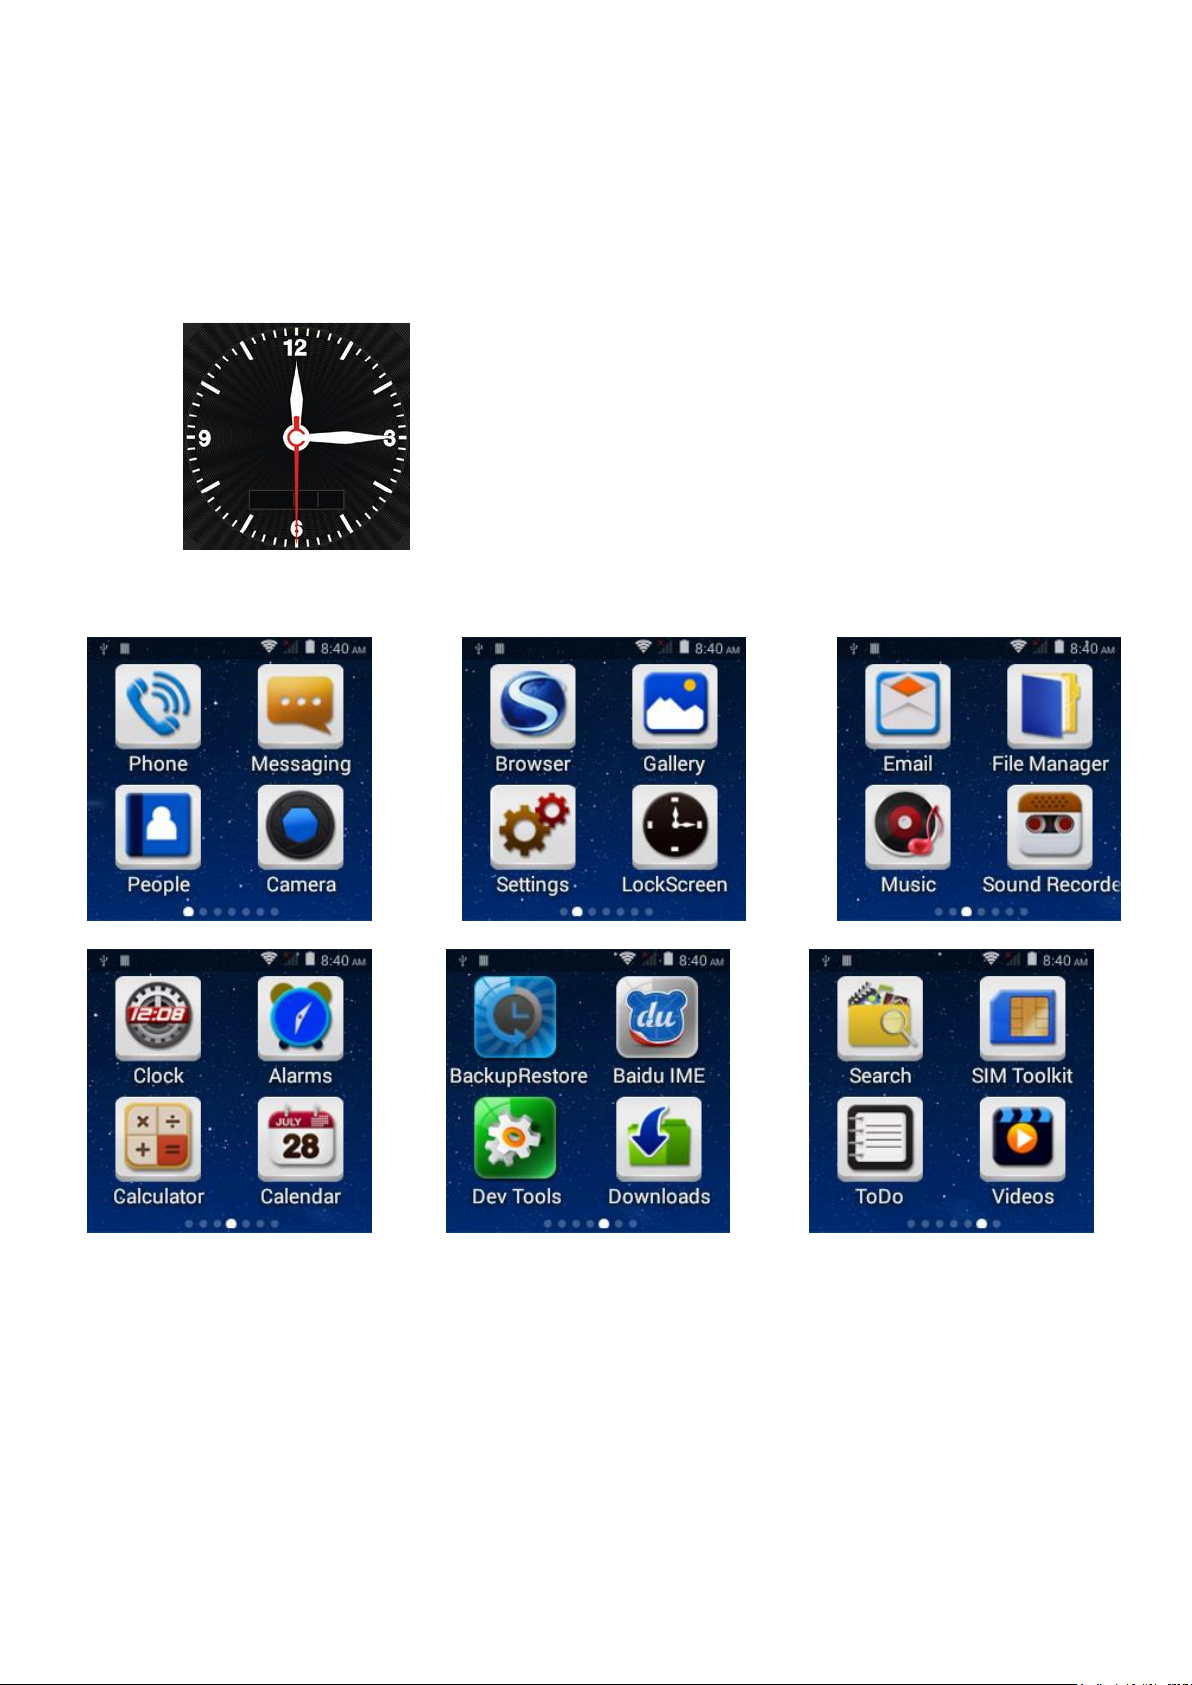
4.1 Analog clock : Press “power on” button shortly to turn on/off the analog clock
4.2 Main Menu:When the watch is standby, slip the screen to enter into Main Menu .

6
4.2.1 Circles under the main surface means quantity of APP pages in the device, bright circle
means current page. Slip the screen freely left or right, then click the Icon to your idea Apps.
4.2.2 Click the icon to enter into , slip the screen towards right, will enter
into , you can check Contacts and Logs.
4.2.3 Click the icon to enter into Messaging,slip the screen towards right, enter into ,
you can write or delete message.
5. Status Bar
Slide down from the top of the screen to drag the status bar, click on the upper right corner of the
icon view WIFI,Bluetooth,battery power, GPS State. Slide up to put away the status bar
Note: To save battery after use, turn off GPS WiFi Bluetooth and so on, returns to the
standby mode.
6. Settings
6.1 Settings menu
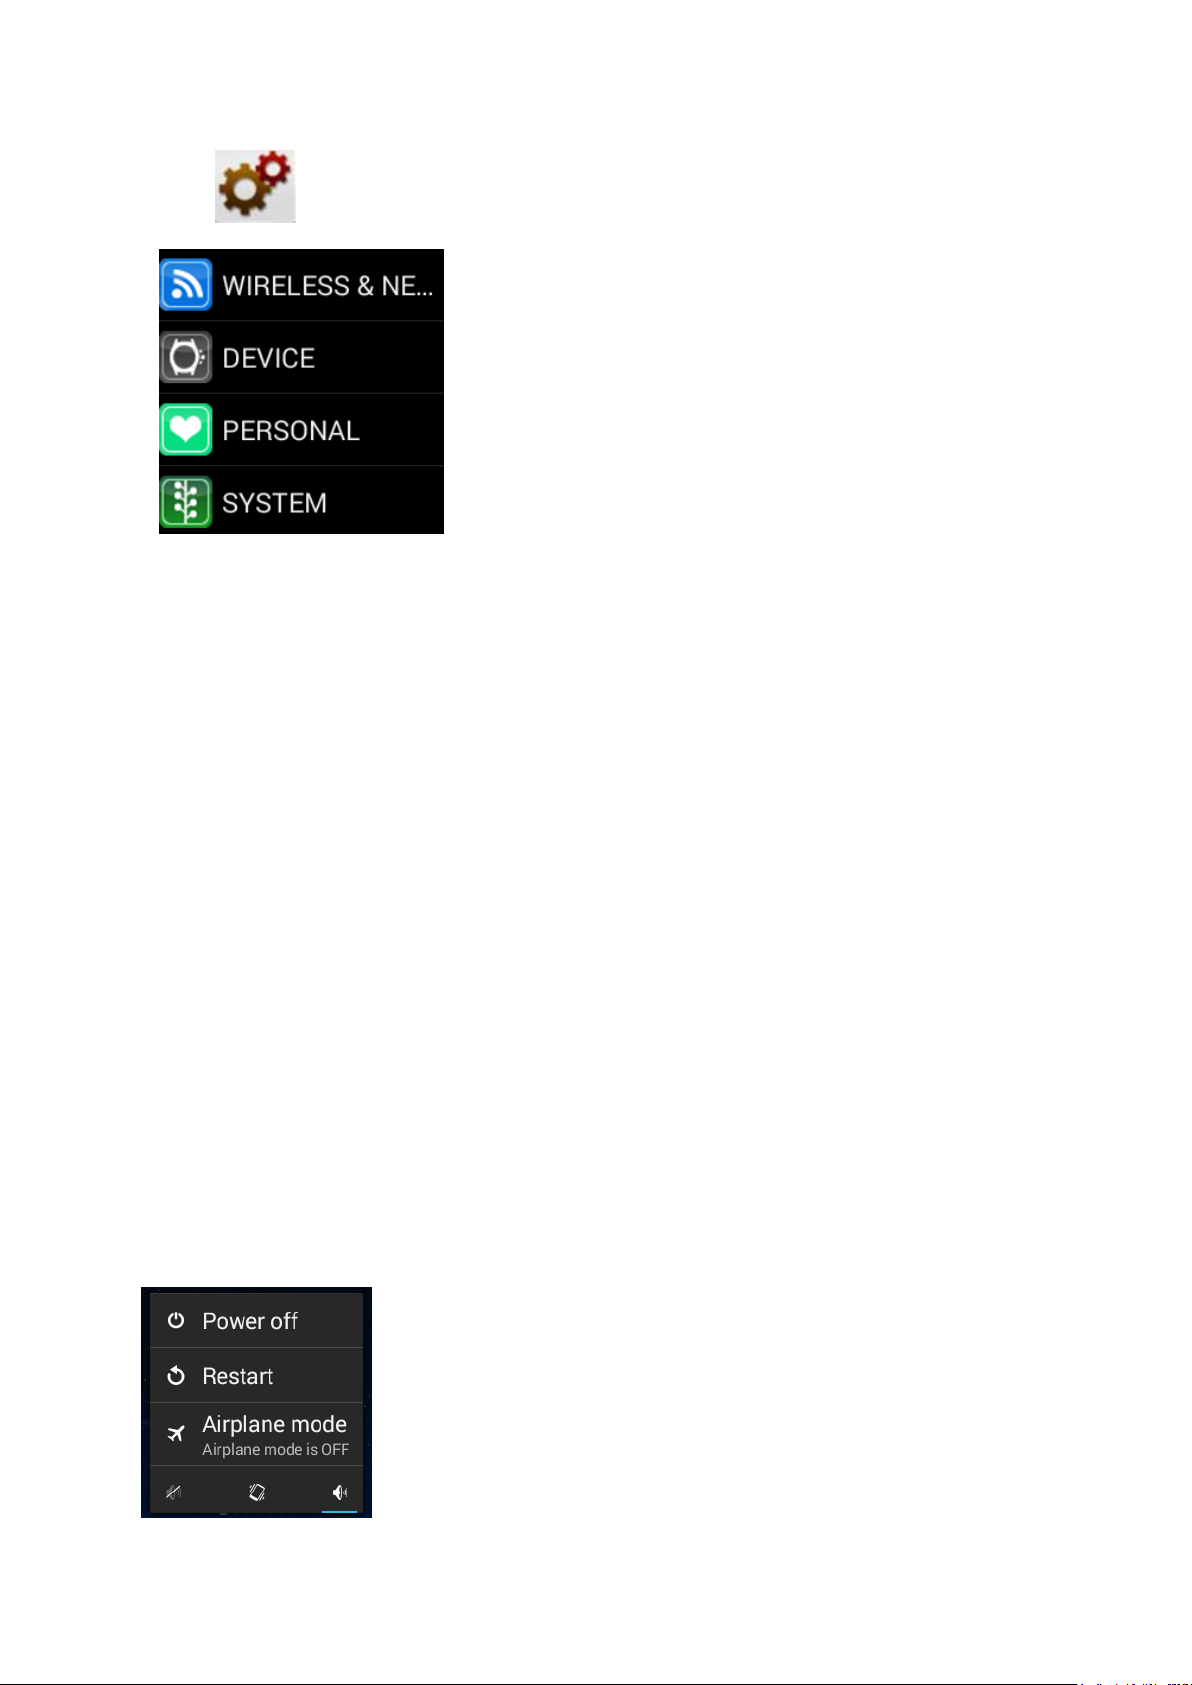
7
Click to enter settings menu
6.2 Other features are as follows
People
Messaging
Camera
Browser
Gallery
Lock Screen (Clock)
File Manager
Music
Sound Recorder
Clock
Calculator
Calendar
Videos
6.3 Airplane Mode
Long press”power on/off” button will display the operation interface: Power off; Restart; Airplane
Mode and at the bottom, there are: Silent mode, Vibrate model; Normal model(as shown)
Choose the “Airplane mode”you need
1.Wireless&Network: Setup WLAN (WIFI),Bluetooth, traffic usage.
2.Device: Set the Scene Mode, Display, Storage,batteries.
3.Personal: set Location Information,Safe,Languages and Input
Methods,Backing up and resetting and adding account
4.System: Set the Date and Time, Timer, Accessibility features, Developer
options, About cell phones
8
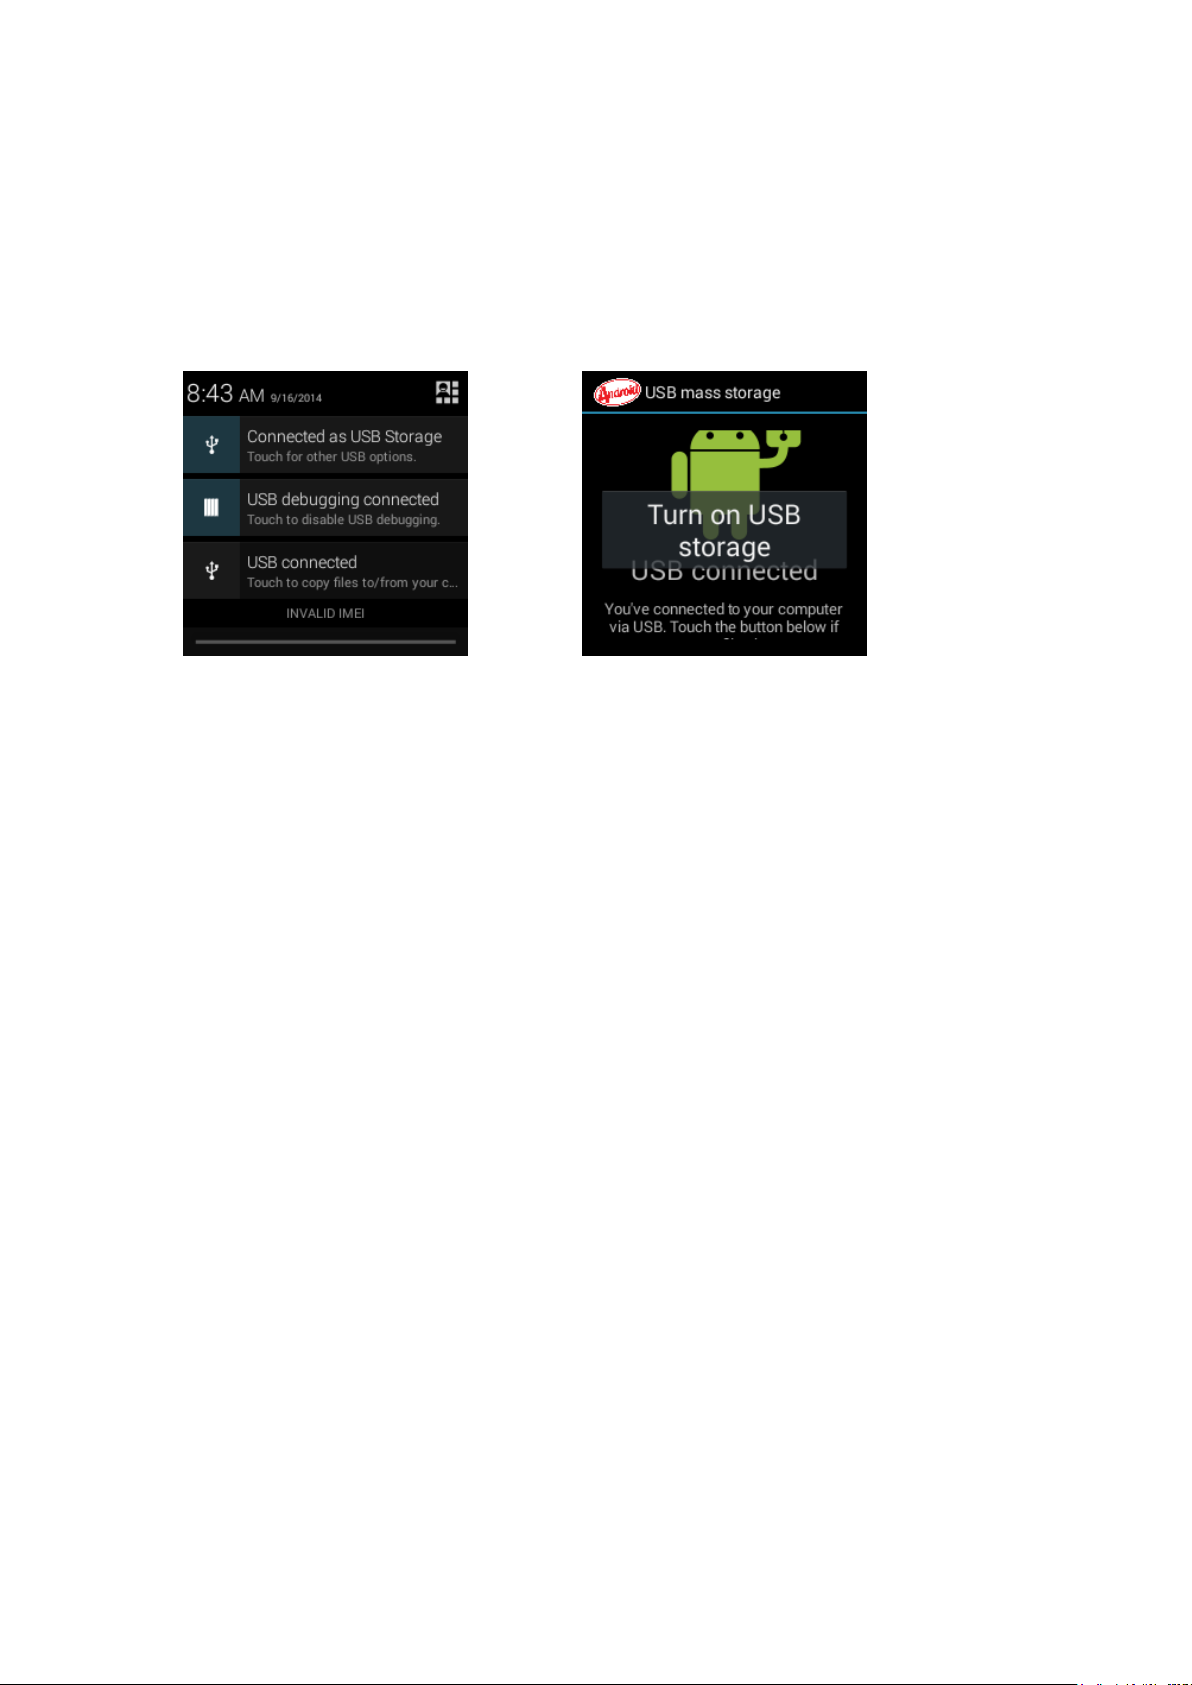
7. Connect PC
Watch will auto charging when connect with PC.
Watch can be used as a U-disk: When connect watch with PC via usb cable, will display
a dialog options as shown, confirm it as usb storage. If return then only charging.
8. Common Troubleshooting
If any problems appearred when using the watch phone, please follow below solution
ways. If the problems are still existed, please contact the distributor or appointted
maintenance personnel
The watch phone can not power on.
• Press “on” button till startup screen
• Check the battery power
• Check if the battery poor contact, remove it and install the battery again, then power on
No feedback for several minutes
• Press “off” key
• Remove the battery and install again, then power on.
Using time is short
• Please make sure have not closed the screen savers
• Please make sure enough charging time(more than 3 hours)

9
• After charging parts of power, Battery level indicator might be inaccurate. Please wait
about 20minutes to get the accurate indication after removing the battery charger.
Cannot connect the network
• Please try in another place
• Please confirm the net service place from your network supplier
• Please make sure your SIM card is effective from your network supplier
• Try to select the network by hand
• Please try it later if the network is busy.
Cannot dial the watch phone
• Please make sure the telephone NO. is correct and press the call button
• For the internet calling, please check the country code and area code.
• Please make sure the phone with net work and not in busy status
• Please make sure your Sim card have enough money and did not prohibit the calling
• To inquiry your register information from your network supplier (such as limit, SIM card
validity and so on )
• Please make sure did not set the call limited
• Please check if set the fixed dialing
Music cannot be played
• Please check if the music format is supportable, such as MMF format
• Please check the music is existed without deleting: you can update your playing list and
make sure it is under “my music” file.

10
FCC Regulations
This mobile phone complies with part 15 of the FCC Rules. Operation is subject to the
following two conditions: (1) This device may not cause harmful interference, and (2) this
device must accept any interference received, including interference that may cause
undesired operation.
This mobile phone has been tested and found to comply with the limits for a Class B digital
device, pursuant to Part 15 of the FCC Rules. These limits are designed to provide
reasonable protection against harmful interference in a residential installation. This
equipment generates uses and can radiate radio frequency energy and, if not installed and
used in accordance with the instructions, may cause harmful interference to radio
communications. However, there is no guarantee that interference will not occur in a
particular installation If this equipment does cause harmful interference to radio or television
reception, which can be determined by turning the equipment off and on, the user is
encouraged to try to correct the interference by one or more of the following measures:
‐Reorient or relocate the receiving antenna.
‐Increase the separation between the equipment and receiver.
‐Connect the equipment into an outlet on a circuit different from that to which the
receiver is connected.
‐Consult the dealer or an experienced radio/TV technician for help.
Changes or modifications not expressly approved by the party responsible for compliance
could void the user‘s authority to operate the equipment.
The manufacturer is not responsible for any radio or TV interference caused by unauthorized
modifications to this equipment. Such modifications could void the user’s authority to operate
the equipment.
RF Exposure Information (SAR)
This smart watch meets the government’s requirements for exposure to radio waves.
This smart watch is designed and manufactured not to exceed the emission limits for
exposure to radio frequency (RF) energy set by the Federal Communications Commission of
the U.S. Government. The exposure standard for Wrist-Worn employs a unit of measurement
known as the Specific Absorption Rate, or SAR. The SAR limit set by the FCC is 4.0 W/kg for
Wrist-Worn, and 1.6 W/kg for next to the month exposure conditions.
Tests for SAR are conducted using standard operating positions accepted by the FCC with
the watch transmitting at its highest certified power level in all tested frequency bands.

11
Although the SAR is determined at the highest certified power level, the actual SAR level of
the watch while operating can be well below the maximum value. This is because the watch
is designed to operate at multiple power levels so as to use only the poser required to reach
the network. In general, the closer you are to a wireless base station antenna, the lower the
power output. The highest SAR value for the model watch as reported to the FCC when
tested for use next to the mouth is 0.59 W/kg and Wrist-Worn as described in this user guide
is 2.35 W/kg. While there may be differences between the SAR levels of various watches and
at various positions, they all meet the government requirement.
The FCC has granted an Equipment Authorization for this model watch with all reported SAR
levels evaluated as in compliance with the FCC RF exposure guidelines. SAR information on
this model watch is on file with the FCC and can be found under the Display Grant section of
www.fcc.gov/oet/ea/fccid after searching on FCC ID: 2AD4JGOLDKEYC320.
To comply with RF exposure requirements, a minimum separation distance of 10mm must be
maintained between the user’s mouth, and this model watch including the antenna during
voice communications.
This device is restricted to worn on the wrist operations.
This manual suits for next models
1
Table of contents
Other Flylink Watch manuals


