Flysight Visoon HD900 User manual

Manual for Multi-screen Tablet Visoon HD900
Ver: 1.0
Visoon HD900Visoon HD900Visoon HD900

Features:
Analog and digital video input. You can connect your portable DVD player,
professional camera, Raspberry PI, Zotac Zbox Pico, Xbox, PS or FPV
equipment via HDMI and use it as a screen for preview. Also possible to connect
analogue video sources like digital camera or video transmitters etc. Unique
feature worldwide the analogue video input!
Compatible with DJI Phantom 3/4 / Inspire / Matrice etc.
9 " touchscreen, state of the art Exynos 5260 processor, 2GB RAM and 64GB
EMMC storage.
Equipped with a 2K HD display resolution of 2560 * 1600 pixels, a brightness of
500cd/m2 and a non-glare display, it perfectly match outdoor activities. Front
and back camera for photo and video recording. Supports WiFi 802.11 b/g/n,
Bluetooth 4.0 and GPS navigation. Integrated speakers.
Android 4.4.2.
Ver: 1.0
Visoon HD900Visoon HD900Visoon HD900
Hardware:

Instructions
Content
Instructions.................................................................................................................. 02
Main Functions............................................................................................................. 04
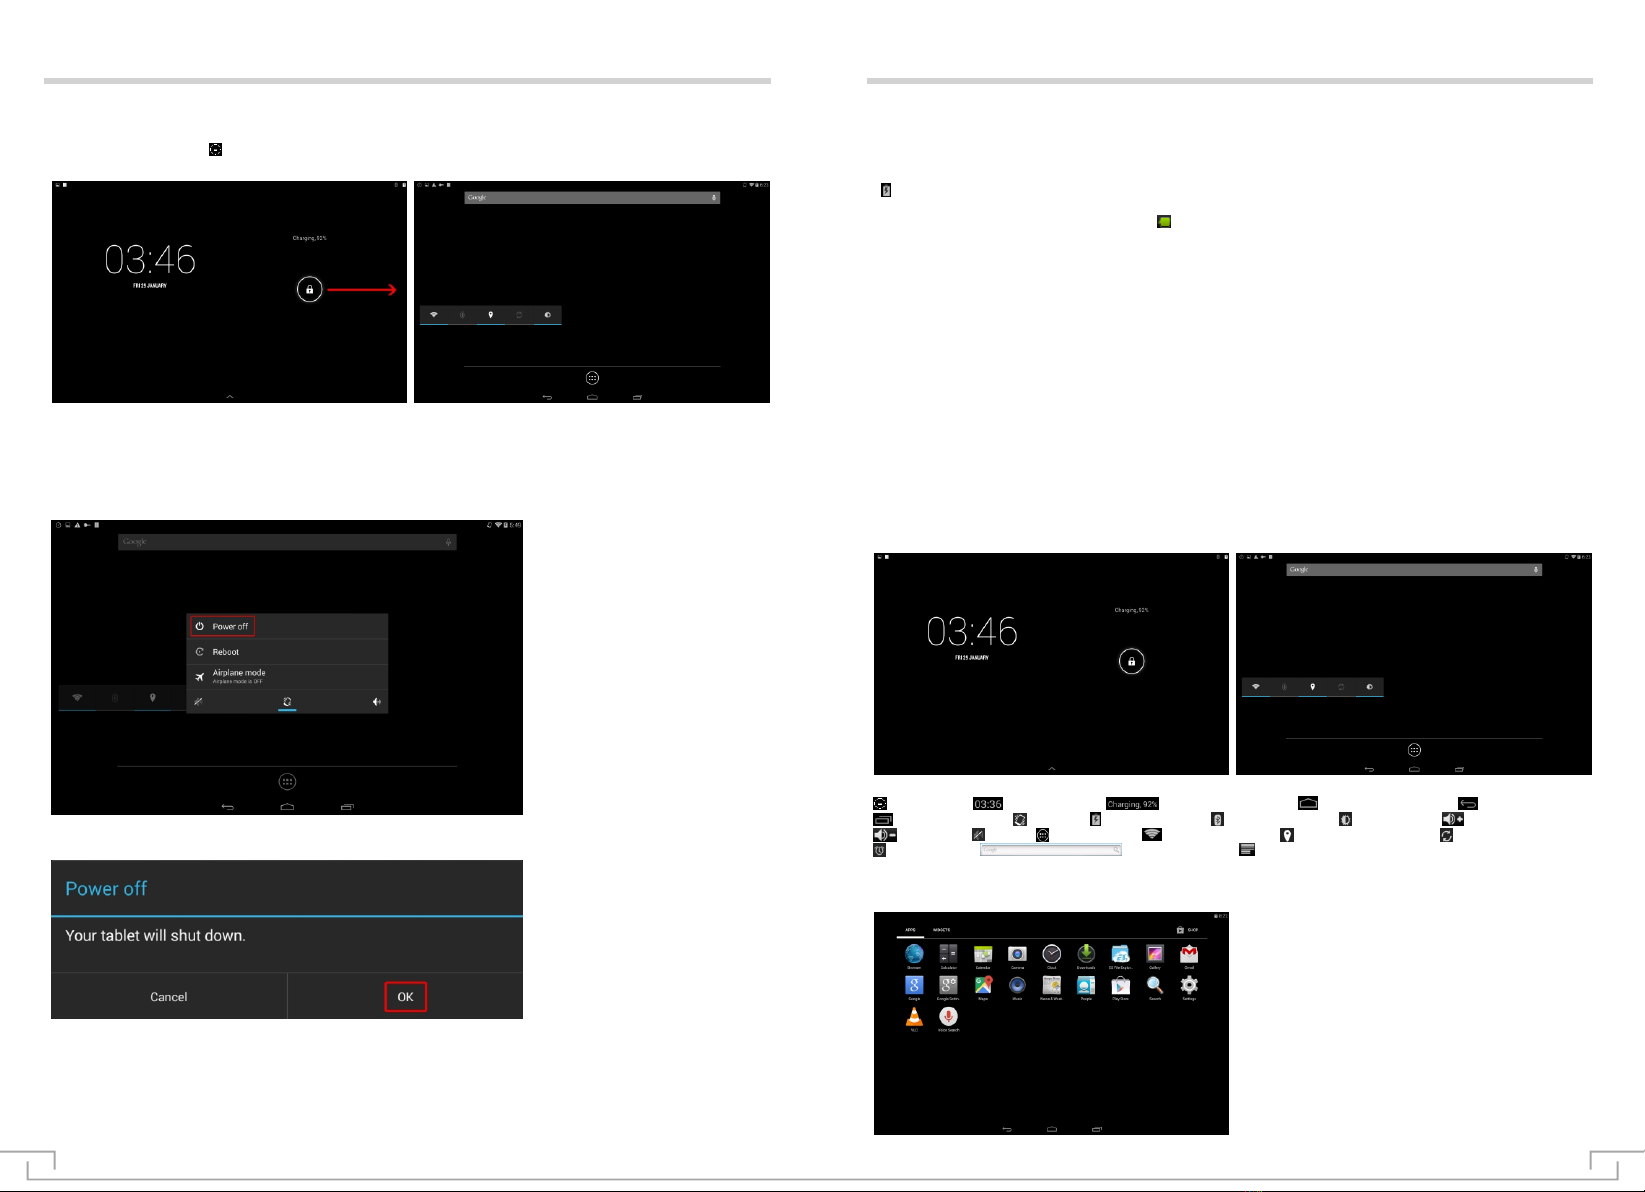
Power on/off Operation..................................................................................................05
Battery Management and Charging.................................................................................06
Utilization of Function Icon.............................................................................................06
Wi-Fi............................................................................................................................07
Bluetooth......................................................................................................................07
HDMI Input................................................................................................................... 09
AV Input........................................................................................................................09
HDMI Output.................................................................................................................09
USB Interface............................................................................................................... 10
Use TF Memory Card.....................................................................................................14
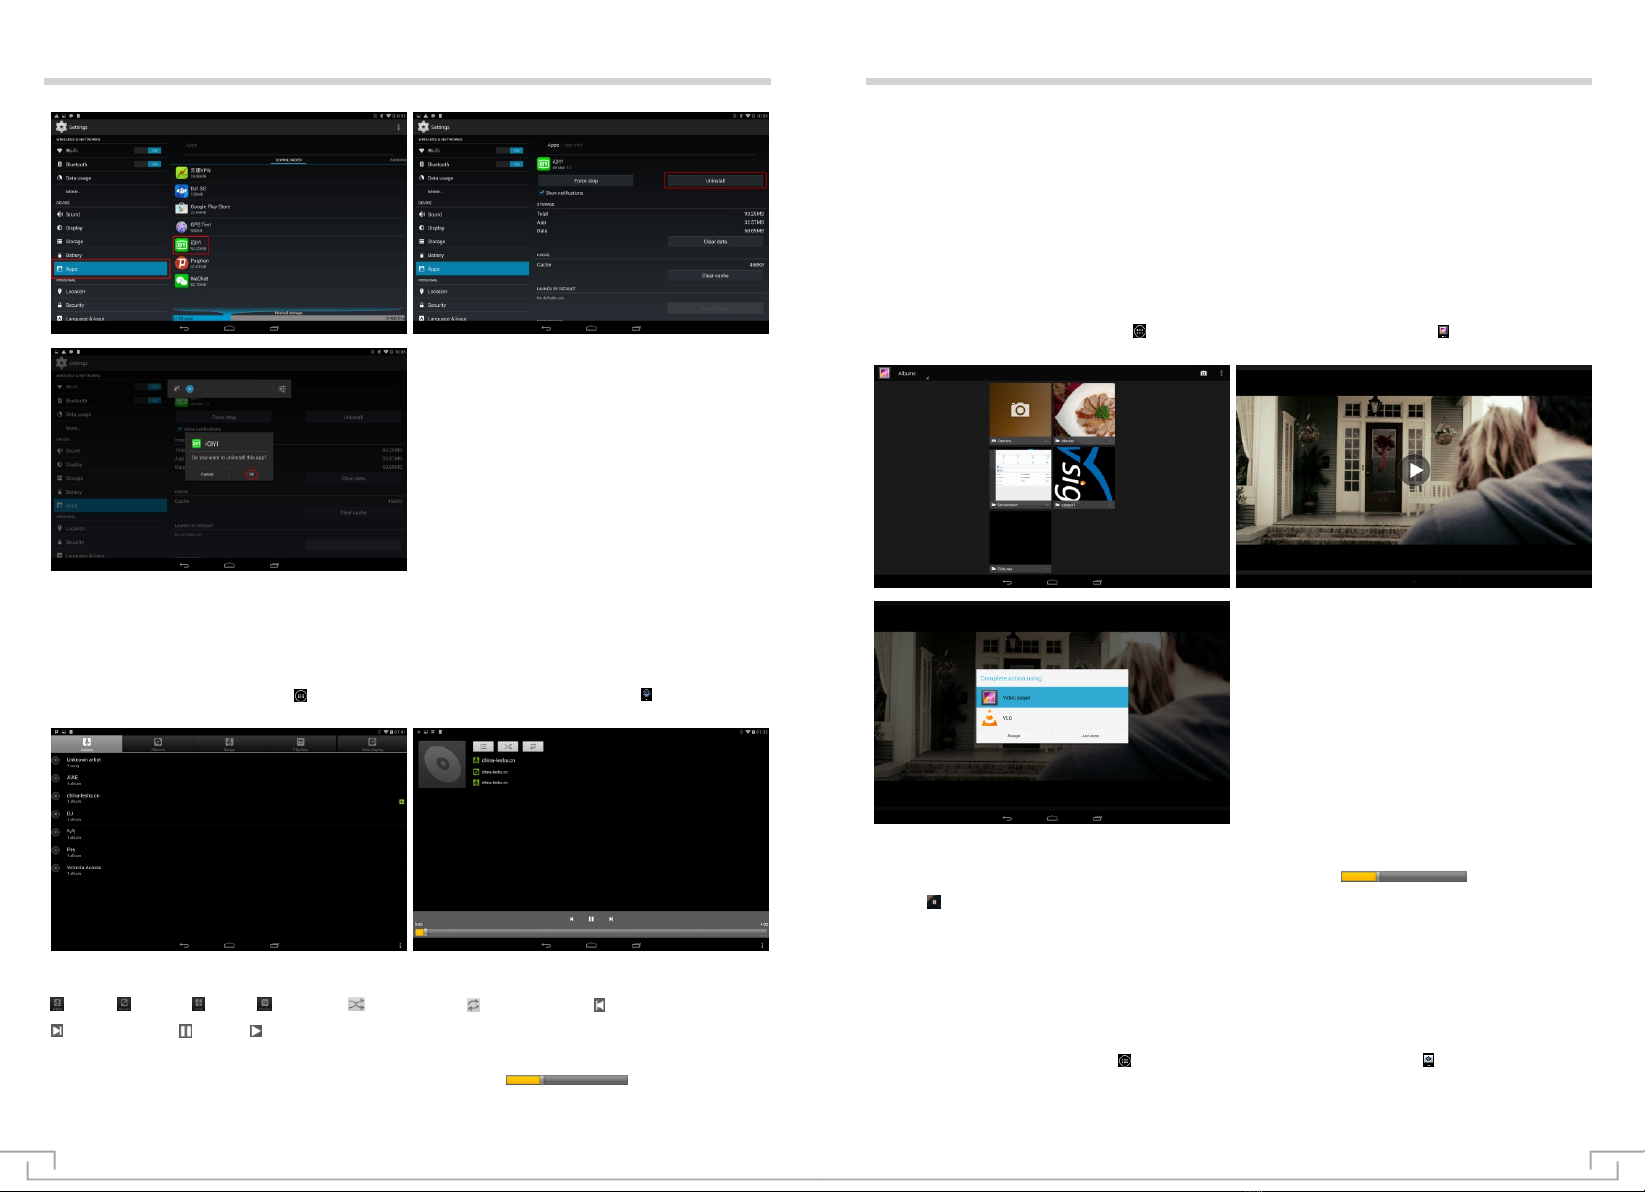
APK Install and Uninstall................................................................................................14
Music...........................................................................................................................15
Video...........................................................................................................................16
Camera........................................................................................................................16
Gallery.........................................................................................................................19
Resource Manager........................................................................................................20
IE Internet Explorer....................................................................................................... 21
Email............................................................................................................................21
Inbox............................................................................................................................22
Map..............................................................................................................................23
Voice Search.................................................................................................................24
Calendar.......................................................................................................................24
Calculator.....................................................................................................................25
Alarm Clock/Countdown Counter/Stopwatch...................................................................25
Setting.........................................................................................................................26
Software Upgrade.........................................................................................................32
Main Specification Table..................................................................................... ..........33
Troubleshooting......................................................................................... ..................34
◆ Points for Attention
Thank you for using the product of our company. We will provide reliable products manufactured and tested
under the strict environment for you. In order to play all performances of the multi-screen tablet and avoid
improper use and operation, please carefully read this operation manual before using this product, thank
you!
● Don’t place the multi-screen tablet under hot, cold, dust and damp environment.
● Don’t let the multi-screen tablet fall down or collide the TFT screen with hard objects when using this
product as it will damage the screen and TFT displays abnormally. Users will be responsible for product
damage due to personal causes or other force majeure.
● Don’t arbitrarily unload application program , so as not to create the tablet or part of the function can not
be used.
● Try to avoid the operation of the tablet in a dry environment, in order to prevent static electricity.
● Keep the tablet far away from the electromagnetic field of other electrical equipment such as audio;
loudspeaker of the audio may generate very strong magnetic field. Open magnetic field may make data lose
and damage LCD screen.
● Don’t charge the tablet with other excluded equipment, otherwise, there will lead to battery fires and
damage risk.
● Keep away from combustion source when using the tablet, otherwise, it may cause battery explosion or
ignition risk.
● Don’t place heavy objects on the tablet, otherwise, it will damage the tablet.
● When the computer is used as a mobile HDD, users shall export documents by correct document
management operation method. The company is not responsible for any error operation caused fire lost.
● The charging voltage of the product is 5V, please use standard special charging equipment to charge the
product.
● When using earphone, please guarantee the volume of the earphone is within the acceptable scope to
avoid damaging your hearing.
Note: the company reserves the right of improving the product. Performances and functions of
product with different hardware and software versions may generate certain differences. Therefore,
additional notice will not be issued for incurred change.
◆ Reduce battery consumption
The tablet provides some options for helping you to save battery volume. The utilization time of the tablet
can be extended after each charge by customizing the following options and canceling the running function
in the background.
Start power saving mode.
● When not in use, you can switch to sleep mode by pressing the power button.
● Close unnecessary application program via task manager.
● Cancel Bluetooth function.
● Cancel WLAN function.
● Cancel automatic synchronizing function of application program.
● Reduce the time of background light.
● Turn down the brightness of the display screen.
● Turn down the volume and so on.

1. Charging Indicator
3. Micro USB Interface
5. AV IN Interface
7. HDMI OUT Interface
9. Volume -
11. Power
13. Front Camera
15. Loudspeaker
17. Flashlight
2. Built-in MIC
4. Earphone Interface
6. HDMI IN Interface
8. TF Card Slot
10. Volume +
12. Optical sensor
14. Loudspeaker
16. Rear Camera
Definition description of HD900 component interface function
● Accessories
Instructions
Instructions
Manual for Multi-screen T ablet Visoon HD900
Ver: 1.0
Visoon HD900
manual
AV Cable
DRC01HDMI Cable
USB Data Line
03 04
Power Adapter Sun Shade
● Appearance and accessories
◆ Know your tablet and accessories
Main functions
● Screen specification: 9 inch 2K super HD LCD screen(2560*1600),16:9; brightness: 500cd/m2; contrast
ratio: 1200:1; 16000000 colors, adopts 10 point capacitive touch screen with anti glare enhancement
processing.
● Android 4.4.2 intelligent operating system, built-in Wi-Fi module; it can work in places with hot spot or WIFI
network. It can provide many application experiences, such as web browser, news information, instant
message, email, micro-blog, online games, online video, stock quotes, weather forecast, map and interesting
software and so on.
● Support Bluetooth 4.0.
● Support GPS navigation.
● HDMI OUT interface (high-definition output interface HDMI1.4), externally connected to display equipment.
● HDMI IN interface(high-definition input interface HDMI1.4), (support1080i/P@30/24Hz,
720p@60Hz,480P@60Hz), externally connected to HDMI signal input.
● AV interface (analog signal input interface) ,support PAL/NTSC automatic identification, resolution ratio
640*480,input signal 720*576.
● Built-in G-Sensor gravity sensor, automatically rotate display contents according to holding direction so that
you can select the most suitable angle under various application environment and you can experience
wonderful G-sensor gravity sensing game.
● LCD screen can automatically adjust brightness according to environment light.
● Support multi-media video format: comprehensively support high-definition 1080P(1920×1080)video
documents with format of AVI、MOV、 MEPG 1/2/4、H.264、FLV and WMV.
● Support multi-media audio format: MP3, WMA, WAV, AAC, OGG and other formats of music files, support a
variety of EQ mode, support multi-task operation.
● Support high-definition picture files with formats of JPEG, BMP and GIF, support functions of thumbnail
browser, lantern slide play, picture rotating and picture zoom.
● Memory device: in addition to internal memory, it also supports TF expansion. The tablet can use memory
card with the maximum capacity of 64GB (relying on manufacturing of memory card and type). Some memory
cards are incompatible with our tablet, please use genuine memory card.
● Equip with high-definition front camera (5.0 megapixel ) and high-definition rear camera (8.0 megapixel).
● Support interfaces: earphone, micro USB, TF card, HDMI input, AV input, HDMI output.

Power on/off operation
● Power on /unlock: under state of power off, press “power on-off key” for 3 seconds, the system displays
starting LOGO and enters into the desktop of the system in about 30 seconds. The screen is under locking
state, press the icon of “ ” for unlocking by right sliding, the tablet will be automatically unlocked and enter to
the home screen. As shown in the drawings:
● Power saving mode and screen locking: press “power on/off key” for a short time after starting, the system
will go into the SLEEP power saving mode, the screen will be black, meanwhile, it will go into screen locking
state. Press “power on/off key” again, system to restore the state of the light screen within 1S.
● Power off: under starting state, press the on/off key for 3 seconds, the power off confirmation interface will
be displayed on the screen, which is shown in the figure:
05 06
Select “POWER OFF” and click “OK” for confirmation, then the system will automatically power off.
[Attention]: when the electric volume is low, the tablet will continuously alarm. If it is not charged, the tablet
will automatically power off; if it can not start, Please check whether the machine battery has electricity, to
ensure that there is a certain amount of electricity, and then try to boot.
Battery management and charging
Utilization of Function icon
When the tablet is used for the first time, you should power the tablet off to charge 5~6 hours to ensure the full
charge of the battery and then use.
Correctly Insert the miniature end of the power adapter into the USB MICRO socket of the tablet while the other
end will be inserted into power socket. The charging indicator light of the tablet is red, the desktop battery icon
“ ” turns green, it means charging is on, please wait until the battery is charged sufficiently, please don’t
remove the charger in the process. The charging indicator light will turn green after charging is completed, if
the green strip on the desktop battery icon “ ” is stationary, it indicates charging is completed.
When you are in a state of full run out of battery power, please wait for a minute, and then restart.
[Attention]:
In order to ensure the best use status of lithium battery, please note the following:
● Don’t charge under high temperature environment (Like a balcony or direct sunlight).
● Lithium battery needn’t be discharged, also do not need to be exhausted before charging, you can charge
when the battery is still with some electric volume.
● If you do not use the tablet for a long time, please fully charge it once at least two weeks, so as to avoid
excessive battery discharging and affect the charging performance.
●Definition of desktop icons
: unlock key; : system clock; : charging indicator; : back to homepage; : return key;
: run the task bar; : vibrate; : charging icon; : Bluetooth icon; : brightness; : volume+;
: volume -; : mute; : function list; : Wifi connection; : locating information; : refresh;
: alarm clock; : Google search; : menu;
●List of application program

Wi-Fi
Know how to use the network function of the tablet to start and connect to wireless local area network (WLAN)
(Wi-Fi) complying with IEEE 802.11 b/g/n standard. It can be connected to Internet and other internet devices
that can be connected to access point or wireless hot spot.
● Open WIFI setting: Click the function module menu icon “ ”, enter the menu list, click “ ” to enter the
settings page, click "Wi-Fi" to set entering, and then to the right to drag the "Wi-Fi" slider to open WIFI, enter
the network settings. As shown in Figure:
●. When you click the encrypted network, enter network password, cab check the password, enter the
password to click the finish, click the connection. As shown in figure:
07 08
Bluetooth
Bluetooth
Please do not use Bluetooth for illegal purposes (such as pirated copy files or illegal eavesdropping for
commercial purposes). The company will not undertake any liability for consequences due to illegal utilization
of Bluetooth function.
● Open Bluetooth setting:
› Click the functional module menu icon “ ”, enter function menu list, click “ ” for entering setting page, click
“Bluetooth” setting, and then to the right to drag “Bluetooth” slider to open it. As shown in Figure:
● Look for Bluetooth device, match and communication:
› Click the icon “ ”, enter function menu list and select setting →Bluetooth→
› Select the device, according to the prompt matching success, as shown in figure:
› We can rename the matched device and exit from communication by clicking“ ”.
● Send data via Bluetooth:
› Select documents or items from the suitable application program.
› Select one option to send data via Bluetooth.
› Search the device starting Bluetooth and match with it.
● Receive data via Bluetooth.
› Open application program list and select setting →Bluetooth, and then select the device name.
› After receiving the prompt, it means successful matching.
› Choose acception to confirm the communication between the two devices. Received data is saved in the SD
card/Bluetooth folder.

HDMI input
AV input
External HDMI signal source (attention: support max 1920*1080P 30Hz)
The external device sets up HDMI output state, connect to the “IN” interface of the tablet via HDMI cable (C-
type interface), the tablet will automatically switch to HDMI play. It will automatically exit after removing HDMI
cable.
(Attention: the tablet supports 1080P high-definition output, In order to ensure the display effect, please
choose to support the better quality cable with HDMI 1.4). Connection as shown in figure:
09 10
HDMI output
USB interface
Click function module menu icon “ ”, enter the function menu list, click “ ” icon to enter the setting page,
click "developer option” setting to enter (open developer option reference setting), tick the block behind
the“USB debugging”, as shown in Figure:
◆ Open USB debug switch
External AV signal source (support automatic identification of PAL and NTSC).Click function module menu
icon“ ”, enter the function menu list, select the icon “ ” to enter the AV IN interface. Through the "AV IN"
interface, the tablet automatically switches to the AV state, and automatically and will automatically exit after
removing the external AV cable.(when the AV cable is not removed, function keys displayed by sliding down
the screen from the top, press the return key to exit. )
Connection as shown in figure:
Attention: when HDMI and AV are input at the same time, the priority switch to HDMI. If it need be
switched to AV, the HDMI cable must be removed.
The external display device is set to the HDMI state, via the HDMI cable (D type interface) connected to the
tablet "OUT" interface to output. (Note: as it supports 1080P high-definition output, please select high-quality
HDMI cable supporting HDMI 1.4 to guarantee display effect. Different external display equipment can not
display fully appearing on the left and right sides of the screen, due to different display ratio.)
Connection as shown in figure:
External devices connect the tablet via the USB MICRO data cable ,then there is the prompt as following
dialog box, click "OK" to confirm.
● Download and install “DJI-GO” APK: download this APK via DJI official website and copy it into the flash
or TF card of the tablet, and then install and use.
● Double click the icon “DJI-GO apk”, then twice“Next”on the bottom right corner, then “Install” on the
bottom right corner, then “installing” is on, after “App installed” showed on the screen, click “Done” on the
bottom left corner ,now the whole installation is complete,there is icon“ ”, as shown in figures:
USB interface can support USB mouse and USB keyboard.
◆ Support DJI INSPIRE 1,PHANTOM 3/4 &MATRICE equipment.

USB interface USB interface
● Start DJI PHANTOM 3/4 and its RC transmitter, connection as shown in figure:
11 12
● Click “OK” for confirmation according to the prompt, as shown in the figure as below (Attention: as USB
transmits high-speed data signal, please use good quality USB cable to guarantee stability of transmitted data.
If the USB cable can not be connected or display mosaic phenomenon happens, please replace it with better
USB cable.)
● Click “Enter Camera View”, there is following figure shown:
● Connect the tablet and RC transmitter via USB cable, pop up dialog box as shown in figure:

USB interface
Click “skip” on the above figure to enter the next figure as below:
● Click “X” on the above figure to finish the whole connection. Now you can make some specific function
operation of the aircraft like Phantom 3/4, Inspire and so on via “DJI-GO apk” : such as one-key return and one-
key take-off. Please refer to operation manual of air-crafts like DJI Phantom 3/4. Application interface as shown
in the following figure:
Note: If working with Phantom 3 Professional,please operate the taking photos mode as followings: On
the application interface,click MENU→Image Ratio→16:9,as shown in the following figure:
13 14
APK installation and uninstall
APK installation: the tablet supports the third party application program based on Android platform. Most of
application programs can be obtained from the network, copy them into Flash or TF card ,then install them for
use.
● Click the function module menu icon “ ” and enter function menu list, click the source manager icon “ ” to
enter the management interface, click APK application installation package to run until its installation is
completed, there will be corresponding software menu, an example of Auto Test4.2.apk apk as shown in the
following figures:
The tablet is equipped with slot for TF memory card to read multimedia files in the TF card. When using, the TF
card need be correctly inserted into the tablet according to the mark slot marking: push the card inward until the
voice of clatter is heard. When taking out the memory card: please push the memory card into the slot and then
release, the memory card will automatically pop up, then take it out.
● Please correctly insert the card into the slot.
● When operating the memory card (such as reading and copying), don’t pull out the memory card, otherwise
there may be a data error.
● Memory card shall not be used under high-temperature and high-humidity environment.
● Keep the memory card away from liquid and corrosive materials.
● The tablet can use memory card with the maximum capacity of 64GB (depending on memory card
manufacturer and type). Some memory cards are incompatible with your equipment, please use the genuine
memory card.
Use TF memory card
● APK uninstall: click the function module menu icon “ ” and enter into function menu list, click the icon “ ”
and enter the setting page, click “Apps” setting to select system software that you want to unload, click
“Uninstall” button, pop up dialog box to click "OK", which means uninstalling is successful. As shown in the
following figures:

APK installation and uninstall
15 16
Music
Music
Click the function module menu icon “ ” and enter function menu list, click the music icon “ ” and enter music
play, music will be played by double clicking your preferred songs, as shown in the below figures:
●Description of music icon function
● Play music
Play progress of audio can be adjusted by dragging play progress bar .
● When the audio list of the tablet does not have music file, the system will automatically upload music files of
TF card to the play list after opening the audio of the tablet (the formats of audio files supported by the tablet
include: mp3, wav, midi and wma).
● Music play list area, if there is a large number of songs, the page can be turned by moving the touch screen
upwards or downwards.
● Double click your preferred songs and enter the audio interface of the tablet, start to play audio files.
● Under the audio play interface, you can conduct operations of playing last song or next song, pause or play
via the function key.
: artist; : album; : song; : play list; : random play; : loop playback; : play last song.
: play next song; : pause; : play.
Video
● Click the function module menu icon “ ” and enter function menu list, click the icon “ ”. Select your
preferred video files according to your file storage situation and open it to play.
● Formats of video files supported by the tablet include: AVI, MOV, MEPG1/2/4, H.264, FLV and WMV.
● Play progress of video can be adjusted by dragging play progress bar .
● Click “ ” to pause play operation.
Camera
Know how to photograph and review photos and video.
Click the function module menu icon “ ” and enter function menu list, click the icon “ ” and enter the
photographing interface, as shown in the below figure (default in the rear camera status):

Camera Camera
● Only take common simple photos, you can do as followings:
1. Align the camera lens to the object and make the necessary adjustment.
2. Use the camera photographing key or shortcut: it can photograph by pressing “volume +”, “volume –” and
“ ” under the photographing mode.
● Take complex photos
If you want to take photos with more auxiliary functions, please click icon “ ”, as shown in the below figure:
◆ Take photos
: video recording : take photos : view mode : auxiliary function
: exposure : setting : flashlight : switch
Click auxiliary function icon , as shown in the following figures:
1. adjust exposure value.
2. More options (locating, count down,
3. Change flashlight setting: flashlight can be manually
: auxiliary function : exposure : setting : flashlight : switch
4. Switch between the front camera and the rear camera, click the icon , as shown in the following figure:
● These icon functions are the same with the above ones for taking photos in the rear camera status.
● Focusing adjustment: as shown in the below figure.
photo dimension, white balance, view mode). turned on or turned down or set the camera to use
flashlight when needed.
17 18
Focusing box can be pressed by using two fingers, and then corresponding adjustment will be made for the
focal distance by separating fingers or folding two fingers.
› Self-define camera setting.
Before taking photos, select “ ” to access the following options:
● Click the icon “ ”, as shown as following figure:
◆ Video recording
● Click the icon , enter simple recording mode.
● If you want to record more complex video. please
click the auxiliary function icon “ ”, as default rear
camera status, as shown in the following figure:

Camera
3.Click the icon , you can turn on or off the flashlight.
4. Click the icon , you can switch between the front and the rear camera to enter the video recording in the
front camera status, click the icon , as shown as the following figure:
: white balance : setting : switch
These icon functions are the same with the above ones for the video recording in the rear camera status.
: white balance : setting : switch : flashlight
● Record video
1. Align the lens to the object and conduct necessary adjustment.
2. Select “ ” to start recording.
3.Select “ ” to finish recording.
The video will be automatically stored.
Gallery
Gallery
● Click the function module menu icon “ ” and enter
function menu list, click the icon “ ” for entering
picture browsing interface:
Click the icon “ ” for selecting in aspects of photo
album, place, date, figure and label by viewing
folder.
1. Click the icon , as shown as following figure. 2. Click the icon , as shown as following figure.
Select photo album →folder → image.
View pictures, open “ ”, it can enter setting following option functions after entering sub menu:
● Roll towards the right or the left for viewing more photos.
Place two fingers on the screen and slowly separate or fold for zoom in or out that can also be achieved by
double clicking the screen. Please double click the screen for back to the original dimension.
1. If you want to delete photos, select →delete.
2. If you want to start the slide show, select → start the slide show. Click on the screen to stop the slide show.
3. If you want to edit photos via image editor,select →edit.
4. If you want to for cut off one part from the image,select → cut.
5. If you want to set the photo as wallpaper or image of contact person,select → setting the photo for.
6. If you want to review details of photo,select →detailed information.
7. If you want to print photos via WLAN link,select-print.
Resource manager
Click the function module menu icon “ ” and enter function menu list, click the resource manager icon “ ” to
enter the management interface. As shown in the below figure:
Pull-down folders and relevant files can be unfolded by clicking [SD Card1], [local] and [network hard disk].
Adding, copying, pasting and deletion can be also conducted. Select “last”, “next” or “last layer” to find
corresponding path by pressing single folder or file for long time, click “edit” and select to paste to
corresponding path on the displayed box.
19 20

IE Internet Explorer
[Note] The explorer has used present popular third party IE software. Please operate in accordance with IE
explorer standard operation .
Click the function module menu icon “ ” and enter function menu list under the circumstance that WIFI is
normally connected (WiFi setting), click IE explorer “ ” for entering IE interface, click address bar, input
website and click it to transfer for entering corresponding web for browsing corresponding website information:
Email
Know how to send or check out emails via personal or corporate email address.
Click the function module menu icon “ ” and enter function menu list under circumstance that WIFI is normally
connected (WiFi setting), click the icon “ ”of Gmail for entering the email login interface:
If Google email address is not available, please click “New” and add Google account.
If Google email address is available, please directly click “Existing”, input user name and password and then
click next step →next step →login.
Email
Inbox
Automatically enter main interface of in-box after successful login:
This interface will list emails in the in-box, it can review email, reply to the sender and reply to all senders and
receivers via double-click.
Description about email button
: more; : write a new mail; : send; : search; : add appendix
Open application program list and select email → icon of writing a mail.“ ”
Add receiver of the mail.
1. Manually input email address, multiple addresses are separated with semicolon or comma under the
English mode.
2. Select email address from the list.
› Select topic field and input topic
› Select text input field and input text of email.
› Select files that need be added “ ”.
› Select “ ” to send emails.
If users are offline or are not in the service area, the email will be always kept in the outbox before it is online
or it is in the service area.
◆ Write a mail
21 22

◆ Check out email
After opening the email account, previous emails can be searched offline or new email can be checked out by
connecting to email server. After extracting email information, it can be checked out offline.
Inbox
Open application program list and select email.
Select Refresh to update mail list.
Select email.
The below options can be used in the mail view:
● Select for searching for email information.
● Select Refresh for refreshing emails.
● Select for creating new mail.
● Select for replying email.
● Select for replying all emails.
● Select for forwarding emails to other contact persons.
● Select for deleting emails.
● Select for marking email with star mark.
● Select → for archiving email conversation.
● Select → for moving emails to other folders.
Map
Click the function module menu icon “ ” and enter into function menu list, click the icon “ ”, it will be
reminded of selecting “Agree” for entering Google Map to view the map and start locating service.
View the map: the image can be amplified or reduced by clicking the zoom in or out icon at the bottom left
corner. The image can be moved towards up and down and the right or the left by dragging the touch screen.
Map relevant information can be searched via place name.
Voice search
Calendar
Click the function module menu icon “ ” and enter function menu list, click the icon “ ” for entering.
Click the function module menu icon “ ” and enter function menu list, click the icon “ ” for entering the
calendar interface:
Attention: the calendar interface can be accessed after logging in via Gmail account when the tablet is used
for the first time or used through factory resetting. If there is not account, new Google account need be applied.
● Change review mode
Select review mode tab for changing review mode of calendar. Review mode can also be changed by clicking
the screen with two fingers and then folding or separating two fingers.
Enter the calendar interface, click the icon “ ”, review calendar activity in different ways such as day, week,
month and schedule.
23 24

Can refresh and set some relevant information by clicking “ ”.
Calculator
Alarm clock/countdown counter/stopwatch
Click the function module menu icon “ ” and enter function menu list, click the icon“ ” of the calculator to
open the calculator:
Click the function module menu icon “ ” and enter function menu list, click the icon “ ” for entering into
clock interface:
● Click the icon “ ” for setting alarm clock.
The tablet supports to set multiple alarm clocks at the same time. Tick boxes behind clock number of alarm
clock, as shown in the below figure:
It can set details of alarm clock by clicking any clock number of above alarm clocks: time of alarm clock, ring
of alarm clock, vibrate or not, repeated situation of alarm bell, label setting.
Every day: set the alarm clock to ring the bell repeatedly at the same o’clock of every day;
Monday, Tuesday, Wednesday, Thursday, Friday, Saturday, Sunday: check number of days that you require,
for example: you require alarm clock from Monday to Friday, please respectively check boxes behind Monday
to Friday and set the alarm clock to ring the bell repeatedly at the same o’clock from Monday to Friday; none:
the alarm clock will be rung for once.
Alarm clock/countdown counter/stopwatch
Calendar
● Click the icon “ ” for setting stopwatch.
● Click the icon “ ” for setting countdown counter.
Open application program list and select setting.,
Select setting type and then select option.
Setting
◆ Basic setting
● WIFI setting
Start WIFI function to connect to WIFI network and
access to Internet or other network equipment.
25 26

● Bluetooth setting
Start Bluetooth function to exchange information within short distance.
● Flux utilization situation:
Record utilization quantity of data.
● More
Change setting to control connection with other equipment or network.
1. Flight mode.
All wireless functions of the tablet will be canceled and non-network function can be used after starting flight
mode.
2. VPN: set and manage virtual private network (VPN).
3. Voice.
Change different voice settings of equipment.
Setting Setting
› Volume: adjust volume of various voices of the equipment.
› Prompt tone of default notice: select file of default prompt tone.
› Prompt tone for touching: set the tablet so that a voice will be generated after selecting application program or
option.
› Prompt tone for locking the screen: set the tablet so that a voice will be generated after locking or unlocking
the touch screen.
› Vibration when touching: the tablet selects vibration when touching through setting.
● Display
Change the setting to control display and background light of the tablet.
› Brightness: adjust brightness of the screen display. The screen highly automatically controls the switch.
› Wallpaper: change wallpaper setting, select source of wallpaper (ES file browser, dynamic wallpaper, image
depot, wallpaper).
› Sleep: setting of sleep time
› Interactive screen protection: start interactive screen protection setting selection according to individual
preference.
● Battery
Check electric volume of battery consumed by
the tablet.
› Font size: change font size, this setting will be used in application program for creating or displaying items.
› Project screen: the tablet will be displayed by projecting to wireless display
screen via the same wireless network together with the display screen that supports wireless network.
● Application program manager
Check and manage application program of the
tablet.
● Position information
Use GPS satellite: position is searched by using GPS
satellite through setting.
● Storage
Review storage information of the tablet and
memory card.
● Safety
Change safety setting of the tablet .
› Screen safety protection:
1. Screen locking: set the display way for locking the screen.
2. Start small part: start and close down small parts.
3. Information of the tablet owner: input your information, your information will be displayed on the locked screen.
27 28

Setting Setting
◆ Language and input
Change setting of language and text input.
◆ Backup and resetting
› Encryption: set password to encrypt data stored in the tablet. Password must be input when starting the tablet.
As encrypted data may be used for over one hour, please charge the battery at first before starting this setting.
› Password: it will be set so that input content will be displayed after inputting password.
› Equipment management:
1. Equipment manager: review manager recognized by the tablet, the tablet manager can be allowed as new
strategy of the tablet application.
2. Unknown source: set the tablet to install application program downloaded from any sources.
3. Verification application: prohibit to install application that may generate dangers or warn before installation.
› Voucher storage:
1. Storage type: hardware support.
2. Trusted voucher: set as utilization certificate and voucher to guarantee safe utilization of application
program.
3. Install from storage space of the tablet: install encryption certificate stored in USB storage tablet.
4. Eliminate certificate: delete voucher from the tablet and reset password.
● Language input method:
› Language: select display language.
› Spell check tool: setting of spell check tool.
› Individual dictionary: setting of languages in individual dictionary.
● Keyboard and input method
› Default: select text input method.
› Google input method: start Google input method.
› Android keyboard (AOSP): setting of Android keyboard (AOSP).
› Google voice input: setting of Google voice input.
› Japanese IME: start Japanese IME.
● Speech
› Speech search: starting setting of speech search.
› Text To Speech (TTS) output.
Select TTS engine: Google text to speech engine, Pico TTS.
Routine: speed, listening to the sample, , default language status.
● Mouse/touch tablet
› Pointer speed: adjust the connection to the pointer speed of the mouse or touch control board of the tablet.
› Automatically confirm date and time: set the tablet to receive time information from network and automatically
update time and date.
› Set date: manually set present date.
› Set time: manually set present time.
› Select time zone: select time zone.
› Use 24-hour system: the time will be displayed as per the format of 24 hours or the format of 12 hours via
setting.
› Select date format: select date format.
Accessible service is special function designed for some personnel with physical disability. Accessibility of the
tablet interface and function can be improved by changing setting.
◆ Auxiliary functions
Backup and restore: can back up application data to Google server. Back up account and restore auto backup
settings and data.
● Individual data: recover factory setting, reset setting as factory default value and delete all data.
●Add account: add Google MAP Company.
●Date and time
Change setting to control how the time and date are displayed on the tablet. If the battery has not been
charged all the time, time and date will be reset.
29 30

Setting Setting
● Talk Back: start verbal reminder, the tablet will say out specific contents that you have touched, selected and
activated.
● Subtitle: subtitle setting.
● Amplification: starting of amplification gesture.
● Large-size font: starting of large-size font.
● Auto-rotating screen: interface will automatically rotate when you rotate the tablet via setting.
● Say-out password: starting say-out password.
● Shortcut of auxiliary functions: add shortcut to auxiliary function setting. This shortcut will appear when
pressing the power key.
● Text to Speech (TTS) output.
Select TTS engine: Google text to speech engine, Pico TTS.
Routine: speed, listening to the sample, , default language status.
● Touch and press delay: setting of short delay, intermediate delay and long delay.
◆ About the tablet
Check the information related to the tablet such as model and version. It can be downloaded via firmware
update (FOTA) service. If firmware update need be checked, please select system update →update.
Starting method of developer option: click application program on the standby interface → click setting
→select →about the tablet →continuously click internal version number (can preview rest number of times
according to pop up reminder) →developer option can be dispatched by returning to the former menu.
Change setting of application program development.
Software upgrade
● USB debugging: start USB debugging mode to connect the tablet to the computer via USB data line.
● Allowable analog position: allow to send analog position and service message to position management
service for test.
● Position of display pointer: set the coordinate and track of display pointer when touching the screen.
● Position of display touch: set the display pointer when you touch the screen.
The tablet need be turned off before upgrading. Upgrading files will be copied to root directory of TF memory
card (note: TF card for upgrading must be 4G at least and has not been partitioned). TF memory card will be
inserted into the tablet as per the marked method. Keys of “POWER” and “volume +” will be pressed at the
same time until “Flysight” logo comes out,then release the keys, enter upgrading interface to upgrade. It will
restart automatically after the upgrading,then the upgrading is complete.
Attention: please make sure the electric volume of the battery is sufficient before upgrading. Please do
not cut off electricity in the process of upgrading. Please ask for upgrading files with dealers.
31 32

Main specification table Troubleshooting
1. The tablet can not be started.
●The tablet may not be started when the electric volume of the battery is extremely insufficient, please charge
the battery via USB computer or power adapter and try to restart the tablet under the premise of guaranteeing
sufficient electric volume.
●Press the POWER key on the top of the tablet for 20 seconds and then restart the tablet to confirm whether
the tablet is normal or not.
●Check whether the charger is well connected or not.
2. Standby time of the tablet is too short.
●Utilization time of lithium battery will be different due to different temperature environment and utilization
situation. If the environmental temperature is too high or too low, utilization time of the battery will be affected.
It is recommended that the tablet is used under normal temperature!
●From the aspect of utilization situation, the power consumption of large screen of the tablet is relatively large.
Meanwhile, actual utilization time is also different due to volume increase, starting of special effects of sound
stage and frequent operation.
3. Voice can not be heard via earphone.
●Please check whether the volume is set as 0 or not.
●Check whether music files damaged or not, and confirm through playing other music. If the document is
damaged, it may generates severe noise or leap sound.
4. Files can not be copied.
●Confirm whether the tablet is correctly connected to the tablet or not.
●Confirm whether memory space of the memorizer is full or not.
●Confirm whether USB cable is damaged or not.
5. Connection is not established after connecting the tablet to the computer.
●Make sure USB cable is compatible with the tablet.
●Make sure that the tablet has installed proper drivers and drivers have been updated.
6. Can not find another Bluetooth equipment.
●Make sure the tablet has started wireless function of Bluetooth.
●Make sure that the device you want to connect has started with Bluetooth wireless capability (if necessary).
● Make sure that the distance from the tablet to another Bluetooth equipment is within the maximum Bluetooth
scope (10m).
33 34
Audio format
support
Processor Exynos 5260
Technical specifications
16GB EMMC
Front camera 5 Mega Pixel, Back camera 8 Mega Pixel with flashlight
HDMI output HDMI 1.4 Type D
HDMI input HDMI 1.4 Type C (max resolution 1920*1080p @ 30Hz)
AV input
(analogue)
Interfaces
Micro USB 2.0
Headphone jack 3.5mm
2GB DDR3
RAM
Storage
9 inch (22,86cm)
Display Screen
Brightness 500cd/m2
Contrast 1200:1
Resolution 2560*1600
10 point anti glare touchscreen
Supports Transflash cards 128MB ~ 64GB
802.11b/g/n
Bluetooth
Wifi Standard
Expandable memory
Bluetooth 4.0 (Enhanced Data Rate)
GPS supports GPS navigation
Speaker 0.5 Watt
Power supply 10W
Operation System Android 4.4.2
Dimensions 237.5(H)* 154 (W)* 10.5(D)mm(not include sun shadow)
242(H)* 159 (W)* 18(D)mm( include sun shadow)
Weight 580g(not include sunshade) 730( include sunshade)
Supported
languages
Simplified chinese, tradiotional chinese, english, japanese, french,
german, spanish and other
Video format
support
Supports 1080p (1920*1080), file format including AVI, MOV,
MPEG 1/2/4, H.264, FLV, WMV ...
Mp3, WMA, AAC, OGG …
supports PAL and NTSC
supported resolutions AV-input: 640*480, 720*576
Table of contents