INSTRUKTION / INSTRUCTION
FMM 9000-series Rev. 003 – 11.06. FMM nr 08830500
4
tavaa käyttää tiivistemassaa. Tukiholkkia ei tarvita liitettäessä sekoitin
Soft PEX® -putkella.
Astianpesukoneen sulkuventtiilillä varustettu sekoitin
Jos sekoittimeen ei liitetä astian- tai pyykinpesukonetta, lähtevä liitäntä on suljettava
mukana seuraavalla tulpalla. Eräissä sekoittimissa on kaksi astianpesukoneliitäntää,
pesupöydän ylä- ja alapuolella. Näissä sekoittimissa on aina asennettava toinen sulku-
tulpista, käyttämättä jäävään liitäntään.
Juoksuputken asennus
110° rajoitinlevy on asennettava. Se sijoitetaan rajoitinuloke eteenpäin ja käännetään
kuvan osoittamalla tavalla, uloke alaspäin.
Tehtaalla hana kootaan antamaan kylmää vettä.
Yksiotehanan muuttaminen kylmästä lämpimään veteen: Irrota käsipyörä, katso kuva
6, kierrä karaa myötäpäivään kunnes se pysähtyy rajoittimeen. Palauta käsipyörä kiinni-
asennossa. Yksiotehanan muuttaminen lämpimästä kylmään veteen: Irrota käsipyörä,
katso kuva 6, kierrä karaa vastapäivään kunnes se pysähtyy rajoittimeen. Palauta
käsipyörä auki-asennossa.
Ympäri kääntyvä juoksuputki
Sekoittimet, joiden juoksuputken kääntymäkulma on rajoitettu (110º), on hyvin helppo
muuttaa ympäri kääntyviksi. Kierrä vain irti juoksuputken holkin takana oleva ruuvi.
Virtauksen ja lämpötilan rajoitin
Nosta vipu ylös ja ruuvaa se irti hatun alla olevasta kuusiokoloruuvista (kts kuva 5):
Rajoittimella voidaan asentaa neljä erilaista virtaaman voimakkuutta. Nosta se pois ja
käännä haluttu rajoittimen pala taaksepäin. Mitä suurempi pala on takanapäin, sitä pie-
nempi virtaama. Eri virtaamat ovat noin 100, 85, 60 ja 50%. Lämpötilanrajoitus tehdään
nostamalla ja säätämällä lämpötilarengasta. Mitä enemmän sitä käännetään myötäpäi-
vään (miinusta kohti) sitä enemmän se rajoittaa lämpimän veden tuloa.
Sisäyksikön vaihto
Vivun irrotus: ota sini/puna-nappi pois ja löysää kuusiokoloruuvia (2,5 mm:n kuusio-
koloavain) noin yksi kierros, nosta vipu pois.Kuusiokoloruuvi sijaitsee peitekuvun alla.
Irrota peiteholkki ja kierrä auki suuri mutteri, joka pitää sisäosan paikallaan, käytä avainta
FMM 6086. Ota kasetti irti. Puhdista pesä. Huuhtele ja puhdista sekoittajan poresuutin
sisäyksikön vaihdon jälkeen.
Astianpesukoneen sulun vaihto
Katso myös 2.
Juoksuputken tiivisteiden vaihtoVoitelu
Käytä ainoastaan silikonirasvaa.
Poresuuttimen puhdistus
Kierrä poresuutin silloin tällöin irti ja puhdista sen sisus veden mukana tulleista epäpuh-
tauksista. Jos se on kalkkiutunut, pese se etikkaliuoksella.
Tekniset tiedot
Lämmin käyttövesi max 80ºC. Käyttöpaine 50-1000 kPa.
Koepaine max 1600 kPa.
Käytöstä poistetut FMM-tuotteet voi palauttaa FM Mattssonille kierrätyk-
seen.
ENGLISH
Always close the main supply valve before maintenance
(service). (Except for when calibration of temperature or flow limits is performed).
Function
The water flow is controlled by moving the lever vertically. The higher the lever is set, the
more water flow is obtained. When the lever is depressed, the water is shut off.
The temperature is controlled by moving the lever laterally. When positioned at the ex-
treme right, only cold water is obtained, and at the opposite extreme left, only hot water
is delivered.
Dishwasher shut off valve
The control is occuring as a knob or as a lever, see illustration 2.
Open position: Knob, wing upward. Lever upward.
Closed position: Knob marking ”0” upward. Lever sideways.
Installation
Inlet tubes
Some models have threaded inlet tubes connected to the mixer body. They are tight-
ened and will not come loose by normal handling when connecting the mixer to the
water supply. Even if they are unthreaded, up to one turn, the o-ring will seal properly.
Installation instruction for Great Britain
If mixers are connected to unbalanced systems, a check-valve should be attached to
the cold water inlet, which is at high pressure.
For mixers with hand showers, double check-valves should be installed at the both
inlets, cold and hot water.
Supporting bushes
When connecting the inlet tubes to the water supply, supporting bushes must be used in
the connected end of the tubes. The supporting bush is not needed when using a mixer
with Soft PEX®-pipe.
Mixer attachment
Most of the models are attached by a stud screw, where the fixing nut is turnable to
match different plate dimensions. Mixers with this attachment system must have an o-
ring on the under side of the body base to seal against the plate/china ware. Ensure that
it is positioned in its slot before tightening. This does not apply, if the mixer is equipped
with a plug-chain bracket.
The enclosed supporting plate is to be used when installing single handle mixer on the
sink. The supporting plate is placed nearest under the sink with the flat side against the
sink sheet. Then fasten the mixer with the nut and the bracket towards the flange of the
supporting plate.
Models with dish-washer connection
If the dishwasher/washing machine is not connected, the enclosed cap must be at-
tached to the outlet tube. Some models have two connections, for either above or below
desk dishwashers. On these mixers the one connection not used must be plugged with
the enclosed cap.
The swivel limitation washer to 110° must be installed. It is positioned with the limit-
ing lug forwards and with the bent lug downwards.
The mixer is preset to supply cold water.
Resetting the single hole mixer from cw to hw. Remove the knob, see illustration 6, and
turn the spindle clockwise to stop. Reassemble the knob, at closed position. Resetting
the single hole mixer from hw to cw. Remove the knob, see illustration 6, and turn the
spindle counter-clockwise to stop. Reassemble the knob, at open position.
Resetting the 60 c/c mixers: Shut off the main supply and interchange the external
plugs. Resetting the 160 c/c-mixers: Move the plug to the other hole in the extra outlet
port. (The plug in the right hole provides hot water to the dish washer outlet).
Unrestricted swivel spout
Dismount the screw.
Flow and temperature limitation
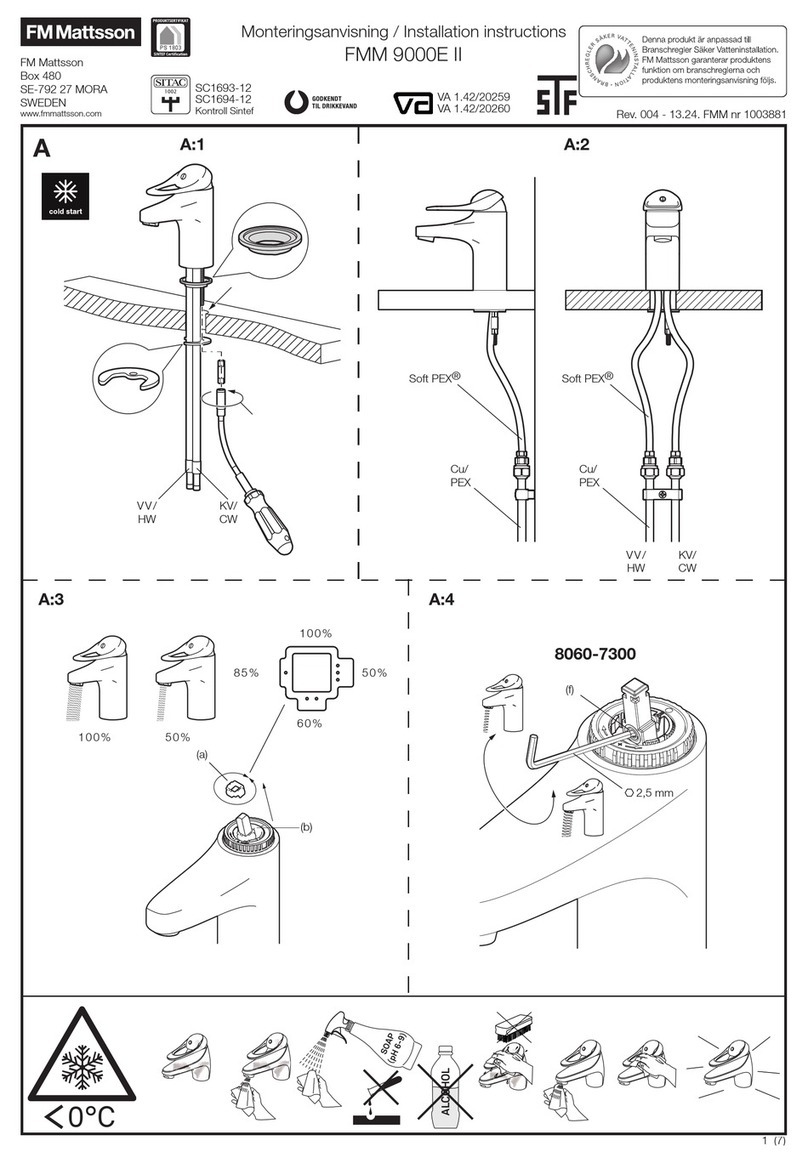
Dismount the lever and the cover sleeve (see illustration 5). Four different flows can be
set with the square washer. Pull it off, and turn desired lug backwards against the stop
notch. The larger lug, the less flow is accessible. The different flows are 100% and appr.
85%, 60% and 50%. The temperature limitation is obtained by regearing the cogs of
the temperature ring. The more it is turned clockwise, (towards ”-”) the less hot water is
accessible.
Replacing the control cartridge
To dismount the lever, pull out the red/blue button carefully and untighten the hex socket
screw (2,5 mm) appr. one turn. The socket head screw is located high up under the lever
dome. Take off the cover bush and untighten the large nut which holds the cartridge.
Use the key FMM 6086. Remove the old cartridge, and if it is stuck, bend with two
screwdrivers. Clean the body. Following replacement of cartridge, flush and clean the
aerator.
Replacement of the dishwasher cartridge
See also 2.
Replacement of spout seal rings
Lubrication
Use only silicone grease for lubrication.
Cleaning the aerator
Unscrew the aerator every now and then and clean the insert from impurities. If the insert
has lime deposits, wash in vinegar solution.
Technical data
Max hot water temperature 80°C. Water supply pressure 50-1000 kPa. Max test pres-
sure 1600 kPa.
Worn out products may be returned to FM Mattsson for recycling.


