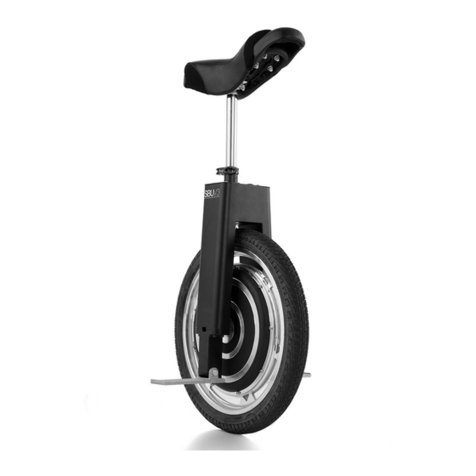
Focus Designs SBU V3 User manual

1"
MANUAL"FOR"THE"SBU"V3"
Focus Designs Inc.
SBU
The Electric Self-Balancing Unicycle
OWNER’S MANUAL
3rd Edition, 2012
Copyright © 2012 by Focus Designs Inc.
focusdesigns.com
IMPORTANT:
This manual contains important safety, performance
and service information. Read it before you take the
first ride on your new SBU and keep it for reference.
A SPECIAL NOTE FOR PARENTS:
As a parent or guardian, you are responsible for the
activities and safety of your minor child, and that
includes making sure that the SBU is properly fitted to
the child; that it is in good repair and safe operating
condition; that you and your child have learned and
understand the safe operation of the SBU; and that you
and your child have learned, understand and obey not
only the applicable local motor vehicle, unicycle and
traffic laws, but also the common sense rules of safe
and responsible unicycling. As a parent, you should
read this manual, as well as review its warnings and
the SBU’s functions and operating procedures with
your child, before letting your child ride the SBU.

2"
MANUAL"FOR"THE"SBU"V3!
For"Your"Records:"
Congratulations on the purchase of your new Focus
Designs SBU! This manual is designed to give you the
information you need for the safe operation and
maintenance of your new SBU. Please read it
thoroughly before riding your SBU.
Please take this opportunity to record important
information about your new SBU.
IMPORTANT NOTICE!!!
Please visit
focusdesigns.com/user
REGISTER YOUR SBU
We cannot guarantee a warranty
claim unless you do this!
Your Name ________________________
Date of Purchase ___________________
Location of Purchase _______________
Your Location ______________________

MANUAL"FOR"THE"SBU"V3"
3!
Table"of"Contents!
General Warning:...................................................................... 5!
Fit .................................................................................................... 6!
Does your SBU fit you?................................................................6!
Seat Adjustments...........................................................................6!
Safety First.................................................................................. 7!
Mechanical Safety Check ...................................................... 8!
Frame ..................................................................................................9!
Tire.......................................................................................................9!
Tube.................................................................................................. 10!
To replace the tube: .................................................. 10!
Operation.................................................................................. 11!
Pushbutton Switch ..................................................................... 11!
Safety Lock..................................................................................... 12!
Automatic Fall Detection ......................................................... 12!
LED Status Indicator .................................................................. 12!
Normal Operation ..................................................... 12!
Low Battery Mode...................................................... 13!
Depleted Battery Mode .............................................. 13!
Fall Detect Mode ....................................................... 13!
Factory Readout Modes ............................................. 14!
Battery Pack................................................................................... 14!
Battery Protection Mode – AKA Pushback................... 15!
Folding Foot Wedges................................................................. 15!
Battery Charger ........................................................................... 15!
First ride ................................................................................... 16!
Make sure it fits .......................................................................... 16!
Make sure the SBU is in tip top shape .............................. 16!
Be safe ............................................................................................. 16!
About your first ride ................................................................. 16!
Changing / Modifying the SBU, or Adding
Accessories.............................................................................. 19!

4"
MANUAL"FOR"THE"SBU"V3!
Appendix A - Safety ............................................................ 21!
Appendix B - Specifications............................................. 25!
Rigid Construction ..................................................................... 25!
Truly Hands-Free ....................................................................... 25!
Elegant Electronics..................................................................... 25!
Motion-Learning Technology ............................................... 26!
Turn AssistTM ............................................................ 26!
Push BackTM .............................................................. 27!
Smart SenseTM ........................................................... 27!
High-Performance Vehicle ..................................................... 27!
Hill Climbing............................................................. 27!
Top Speed................................................................. 27!
Weight Limit.............................................................. 27!
Range ....................................................................... 27!
Regenerative Braking ................................................ 28!
Charger............................................................................................ 28!
Battery ............................................................................................. 29!
The Human Interface................................................................. 29!
Adjustable Seat Post.................................................. 30!
Dimensions and Travel Specs:.............................................. 30!
Riding Mode.............................................................. 30!
Compact Mode.......................................................... 30!
Storage Mode............................................................ 30!
Appendix C - Warranty ...................................................... 32!

MANUAL"FOR"THE"SBU"V3"
5!
General"Warning:"
Like any sport, unicycling involves risk of injury and
damage. By choosing to ride the SBU, you assume the
responsibility for that risk. You need to understand,
and to practice the rules of safe and responsible riding
and of proper use and maintenance. Proper use and
maintenance of your SBU reduces risk of injury. This
Manual contains many “Warnings” and “Cautions”
concerning the consequences of failure to maintain or
inspect your SBU and of failure to follow safe cycling
practices.
The combination of the safety alert symbol and the
word WARNING indicates a potentially hazardous
situation, which, if not avoided, could result in serious
injury or death.
The combination of the safety alert symbol and the
word CAUTION indicates a potentially hazardous
situation, which, if not avoided, may result in minor or
moderate injury, or is an alert against unsafe practices.
The word CAUTION used without the safety alert
symbol indicates a situation, which, if not avoided,
could result in serious damage to the SBU or the
voiding of your warranty. Many of the Warnings and
Cautions say, “You may lose control and fall.” Because
any fall can result in serious injury or even death, we
do not always repeat the warning of possible injury or
death. Because it is impossible to anticipate every
situation or condition, which can occur while riding,
this Manual makes no representation about the safe
use of the SBU under all conditions. There are risks

6"
MANUAL"FOR"THE"SBU"V3!
associated with the use of any unicycle which cannot
be predicted or avoided, and which are the sole
responsibility of the rider.
Fit"
Does"your"SBU"fit"you?"
Correct fit is an essential element of SBU safety,
performance and comfort - it will result in the correct
fit for your body.
The SBU is designed for riders with
an inseam of at least 26”,
although it is possible for
riders of any height to ride the SBU, it will require
assistance from another person while learning how to
ride the SBU for the first time. The SBU is easy to
adjust to fit your body; there is simply one item that
addresses fit, the seat height.
WARNING: If your SBU does not fit properly, you may
lose control and fall. Adjust the SBU for proper fit,
have someone assist you during the learning to ride
process. We recommend two people on either side of
you for balance support.
Seat"Adjustments"
If you are a beginner, we recommend you set the seat
height at a level that allows you to place both feet flat
on the ground while straddling the SBU’s seat. This is
important when learning to balance left and right on
the SBU. After you have mastered left right balance,
we recommend you raise the seat for a higher level of
riding comfort.
The seat is adjusted using the quick-release clamp
located on the seat post. Make sure to observe the
Minimum Insertion requirements of the seat post. The

MANUAL"FOR"THE"SBU"V3"
7!
seat post should be inserted into the SBU frame AT
LEAST TWO INCHES. Once your seat is at the desired
height, tighten the clamp slightly, and align the seat
with the wheel, making sure they are in line with each
other, and then tighten so that the seat post does not
have movement in any direction. Your SBU may come
with a seat post that is too long. It may need to be
trimmed down with a tube cutter. Consult your local
hardware store to have them cut the tube to length if
this is needed.
WARNING: Always make sure that your seat post does
not extend from the frame beyond the Minimum
Insertion requirements of three inches; the seat post
may break, or separate from the frame, which could
cause you to lose control and fall.
WARNING: After any seat adjustment, be sure that the
seat clamp is properly tightened before riding. A loose
seat clamp can cause damage to the seat post, or can
cause you to lose control and fall. A correctly
tightened seat clamp will allow no seat movement in
any direction. Periodically check to make sure that the
seat clamp is properly tightened.
Safety"First"
Always wear an approved helmet when riding your
SBU. Be sure to attach the chin strap, and follow the
helmet manufacturer’s instructions for fit, use and care
of your helmet.

8"
MANUAL"FOR"THE"SBU"V3!
Also wear other required and recommended safety
equipment such as: elbow pads, kneepads, shin
guards and wrist guards.
See Appendix A for more Safety Information.
WARNING: Many states require specific safety
devices. It is your responsibility to familiarize yourself
with the laws of the state where you ride and to comply
with all applicable laws. This includes properly
equipping yourself and your SBU as the law requires.
"
Mechanical"Safety"Check"
Routinely check the condition of your SBU before every
ride. Some service and maintenance can and should be
performed by the owner, and requires no special tools
or knowledge beyond what is presented in this
manual. The following are examples of the type of
service you should perform yourself. A qualified
mechanic using the correct tools and procedures
specified by Focus Designs, Inc should perform all
other service, maintenance and repair in a properly
equipped facility.
WARNING: Before performing any work on the SBU
make sure to disengage the power by turning the
safety lock into the “locked” position. This will prevent
the SBU from an accidental power on.
Nuts,"bolts,"wires,"battery,"top"plate,"etc."
Make sure nothing is loose or damaged. Check all
bolts and nuts to make sure they are tight. Check
wiring for damage. With the SBU turned OFF, lift it off
the ground by two or three inches, while holding
bounce the tire on the ground. Anything sound, feel or

MANUAL"FOR"THE"SBU"V3"
9!
look loose? Do a quick visual and tactile inspection of
the whole SBU. Any loose parts or accessories? If so,
secure them. If you’re not sure, ask someone with
experience to check.
Frame"
Check the frame particularly in the area around welded
joints; the seat post and clamp for any deep scratches,
cracks or discoloration. These are signs of stress-
caused fatigue and indicate that a part is at the end of
its useful life and needs to be replaced.
Tire"
Make sure the tire is sufficiently inflated but below the
maximum recommended pressure that is printed on
the sidewall of the tire. The best way to inflate a tire to
the correct pressure is with a bicycle pump, which has
a built-in pressure gauge. Check the tire and look for
any cuts in the tread and sidewall. Check to make sure
the tire bead is seated evenly on the rim. Replace a
damaged tire before riding.
WARNING: Riding the SBU with a flat or under-inflated
tire, will void your warranty.
WARNING: Never inflate a tire beyond the maximum
pressure marked on the tire’s sidewall. Exceeding the
recommended maximum pressure may blow the tire
off the rim, which could cause damage to the SBU and
injury to the rider and bystanders – it will also void
your warranty.

10"
MANUAL"FOR"THE"SBU"V3!
CAUTION: Pencil type automotive tire gauges can be
inaccurate and should not be relied upon for
consistent accurate pressure readings. Instead use a
quality dial gauge.
Tube"
If the tube is damaged or punctured we recommend
replacing the tube, patches should only be used for an
emergency repair and the patched tube should be
replaced as soon as possible.
To#replace#the#tube:#
i. Make sure the SBU is in the “off” position.
ii. Remove the 8 bolts holding the wheel to the
frame.
iii. Carefully move wheel away from the frame by
letting out the slack in the wire being fed
through the frame.
iv. Remove the tire using a bicycle tire remover,
and remove the damaged tube.
v. Place a new tube in the tire; place tire onto the
wheel making sure the tire bead is seated
evenly on the rim.
vi. Inflate the tire to recommended pressure that
is printed on the sidewall of the tire.
vii. Place wheel back onto frame fork, paying
attention to the proper orientation of the
wheel.
viii. Securely fasten the 8 bolts back to the
frame. Spin the wheel to make sure it is secure
and spins freely.
ix. Check to make sure everything is secure, and
you are ready to ride again.

MANUAL"FOR"THE"SBU"V3"
11!
CAUTION: Riding the SBU while damaged will void your
warranty; inspect your SBU before each ride to make
sure it is in good running condition. Doing so will
prolong the life of your SBU and possibly your own life.
Live long and prosper, my friend!
WARNING: The SBU is technologically advanced and
complex. The only serviceable parts on the SBU are
the tire, tube, and seat. All electronic and drive
components need to be serviced by Focus Designs Inc.
or an authorized service group.
WARNING: Many service and repair tasks require
special knowledge and tools. Do not begin any
adjustments or service on your SBU until you have
learned how to properly complete them. Improper
adjustment or service may result in damage to the SBU
or an accident, which can cause serious injury or
death.
"
Operation"
It’s important to your safety, performance and
enjoyment to understand how things work on your
SBU. We urge you to read and understand the
operation of your SBU. If you have even the slightest
doubt as to whether you understand something in this
section of the Manual, contact Focus Designs.
Pushbutton"Switch"
The SBU is powered ON and OFF by the pushbutton key
switch on top of the enclosure. Always make sure the
SBU is firmly on the ground in the upright, ready to
ride position, before turning the SBU on. Once the

12"
MANUAL"FOR"THE"SBU"V3!
switch is pressed in to the on position the SBU will
self-balance in about 1 second and the status LEDs will
light. Never leave the SBU switch in the on position
when charging or storing.
Safety"Lock"
The SBU safety lock needs to be in the “open” or “on”
position in order for the pushbutton switch to
work. When the safety lock is in the locked mode the
SBU will not activate.
WARNING: The SBU’s motor starts automatically at
power up, keep all hands and feet away from moving
parts.
Automatic"Fall"Detection
If the SBU detects a fall it will cut power to the motor
automatically. If this happens the SBU will remain in
fall detection mode disabling the SBU. To power the
SBU up again, Turn the SBU off and then on again by
using the pushbutton switch. This process resets the
SBU and makes it ride able again.
LED"Status"Indicator"
The LED on the pushbutton switch is the only status
indicator for the SBU. The LED will indicate certain
modes that the SBU is in.
Normal#Operation#
In normal operating conditions the SBU will display a
solid LED.

MANUAL"FOR"THE"SBU"V3"
13!
Low#Battery#Mode#
As the battery gets closer to the end of its capacity
during your ride the LED will begin to flash. As you see
a slow pulse (pictured below) your battery is nearing
the end of its charge.
Depleted#Battery#Mode#
Once your battery charge has been fully exhausted it
will display many quick blips (pictured below). The SBU
will also “push back” into a mode that makes it
unrideable… this is for the SBU’s (and your) protection.
Fall#Detect#Mode#
Upon a fall the SBU LED will blink two times followed
by a single pulse (pictured below). The SBU will also
disable itself not allowing you to ride it. To reset the
SBU simply press the button off and then on again.

14"
MANUAL"FOR"THE"SBU"V3!
Factory#Readout#Modes#
Occasionally the SBU will blink in a special pattern of
short bursts. These modes are very rare and will only
be needed to troubleshoot the SBU with a qualified
professional.
WARNING: Do not overpower the balancing capabilities
of the SBU by aggressively leaning forward or
backward. Loss of control, serious injury or death may
occur from ignoring safety warnings.
Battery"Pack"
The SBU utilizes the latest technology in high power
battery packs. This pack is capable of very high power,
long life, and is inherently safer than standard battery
technology. Although the technology is much safer
than standard battery technology, care must be taken
to never overcharge, undercharge or damage the
battery in any way. The Battery Pack is a split pack and
is located beneath the top plate in each side of the
SBU. The battery will run the SBU for at least an hour
under normal operating conditions. The Battery Pack
is fitted with black and red high current
connectors. To remove or disconnect the battery,
disconnect the internal wires and carefully remove
each of the battery half-packs. Always unplug the
Battery Pack from the SBU when storing the SBU for an
extended period of time. The battery pack should be
charged at least every three months.

MANUAL"FOR"THE"SBU"V3"
15!
WARNING: Never overcharge, undercharge or
physically damage the Battery Pack. If the Battery Pack
appears to be damaged or is not holding a charge, DO
NOT USE IT!
Battery#Protection#Mode#–#AKA#Pushback#
If (at any time) the rider demands too much current by
any number of factors (i.e. trying to go too fast, a very
steep or sudden incline, operating with a very low
battery) the SBU will moderately “push back” the
rider. Once this mode is experienced the rider should
heed this caution and ride less aggressively.
Folding"Foot"Wedges"
Your SBU is equipped with folding foot wedges. These
foot wedges can be folded in order to make the SBU
more compact.
Battery"Charger"
Only use the charger supplied by Focus Designs. The
high power battery pack must only be charged by the
supplied charger. Do not attempt to charge by any
other means. The Battery Charger has a connector that
plugs into the Charging Port of the SBU. Connect AC
power to the charger first, and then simply plug the
connector into the Charging Port. The charger
automatically stops charging when the battery pack is
full. Charge time depends on discharge state of the
battery pack and may take up to three hours. The
battery self balances for about an hour after it is fully
charged while still connected to the charger. After
about an hour after indicating fully charged,

16"
MANUAL"FOR"THE"SBU"V3!
disconnect the charger from the battery; do not leave
the charger connected for extended periods of time.
"
First"ride"
Make"sure"it"fits"
Read the “Fit” section before you ride.
Make"sure"the"SBU"is"in"tip"top"shape"
Perform the Mechanical Safety Check before you ride.
Be"safe"
Read all safety instructions first.
About"your"first"ride"
Pick a controlled environment, away from cars, people
(other than your assistant), obstacles or other hazards.
Ride to become familiar with the controls, features and
performance of your new SBU.
Do not lift the SBU off the ground while powered ON.
The SBU will attempt to balance and spin the wheel at a
rapid rate in the air. If the SBU is (accidentally) lifted
up while powered, turn it OFF, place it firmly on the
ground and turn it back ON.
Power ON the SBU in the upright (ready to ride)
position.
Get familiar with how the SBU balances.
Hold the SBU by placing your hand on the seat, push
the SBU forward and backward. Notice how the SBU
remains balanced under your hand.

MANUAL"FOR"THE"SBU"V3"
17!
Straddle the seat. Try walking while straddling the
SBU. Notice that the SBU stays underneath you
remaining balanced.
Walk forward, the SBU moves forward, walk backward,
the SBU moves backward.
TIP: Do not hold onto the seat while on the SBU!
This is the number one mistake made by new riders. If
you push, pull or hold onto the seat the SBU thinks you
are either leaning forward or backward. Use your arms
for balance, not seat holding.
TIP: Twisting does the balancing left and right.
Most people think that you lean left or lean right to
balance but in fact you must twist into the fall. For
example… if you feel you are falling to the left, twist
your hips and legs (as you squeeze onto the seat) so
that you turn the SBU into the left direction. You will
need your hands on the outside to generate rotational
momentum. Try to use a very smooth motion and not
a jerky motion. You will find that smaller adjustments
are more effective, and take less exertion.
Arms up and out, look up and out.
Just think Leonardo DeCaprio in Titanic: “I’m the king
of the world!” Arms up and out, looking straight
ahead, not down at the ground or SBU. And say it
loud: “I’m the king of the world!” And remember: don’t
grab the seat.
First thing to learn is the speed control.

18"
MANUAL"FOR"THE"SBU"V3!
While sitting on the SBU, put one foot on the peg and
the other in front of you hovering above the
ground. Lean forward to move forward and then lean
back slow down and stop. Perform this exercise until
you are comfortable with the SBU’s speed control.
Again: Lean back to slow down and stop.
Lean forward to move forward, lean back to slow down
and stop.
Recap
Arms up, look up, no seat grabbing, lean forward to
move forward, lean backward to slow down and
stop. Make sure you’ve mastered these things before
moving on to the next step.
Now you’re ready to put both feet on the pedals.
Hips, just remember it’s all in the hips. To balance left
and right, twist your lower body to steer the SBU in the
direction you’re falling. Shifting weight to steer will
not work, you must twist your body to steer and
balance. The balls of your feet should be on the pegs
so you can also use your ankles to twist the SBU for
minor balancing adjustments. Just like a bike, it’s
easier to balance with some speed. But don’t forget to
lean back to slow down or stop if you’re going too
fast!
Again, twist your lower body to steer.
Do not try to lean or shift your weight, use those hips,
and the hips don’t lie.
Your goal is to balance with very small movements.
Use baby steps. First time riders tend to over correct
when trying to balance left and right.

MANUAL"FOR"THE"SBU"V3"
19!
To turn, you twist your lower body (and the SBU).
Squeeze the seat with your legs in the direction you’d
like to go. It’s all in the hips and don’t worry if you
don’t get it right away, turning takes a while to learn
and master.
Practice, practice, practice.
It takes about 20 to 30 minutes to get going forward
and stopping with your feet on the pegs. It takes
about another 2-5 hours to feel fully confident riding
and turning. Don’t lose heart, keep practicing, you will
get it. If you’re getting frustrated take at least a 15-
minute break and try again – remember that each
attempt on the SBU is building muscle memory.
Remember, this is fun.
"
Changing"/"Modifying"the"SBU,"or"Adding"
Accessories"
There are many components and accessories available
to enhance the comfort, performance and appearance
of your SBU. However, if you add accessories, you do
so at your own risk. Focus Designs has most likely not
tested that accessory for compatibility, reliability or
safety for the SBU. Check with Focus Designs before
adding any accessories to your SBU.
WARNING: Failure to confirm compatibility, properly
install, operate and maintain any component or
accessory can result in serious injury or death and will
void your warranty.

20"
MANUAL"FOR"THE"SBU"V3!
CAUTION: Changing or modifying any factory
components of your SBU will void your warranty.
If you enjoyed reading our manual up to this part, you
are going to absolutely n3rd out with the following
appendices.
… and if you didn’t enjoy it… tough!
We’re engineers, not writers.
!
But just in case this is a bit boring, here is a trivia fact:
Roughly 2/3 of Americans admit to reading in the
bathroom. Are you part of the 2/3 right now?
Other manuals for SBU V3
1
Table of contents
Other Focus Designs Bicycle manuals
