FOFANA NINJA User manual

User Manual
and Setup Guide
Step 3. Attaching Obstacles
•Select desired positions for obstacles. Shorter
distances apart are recommended for smaller
users (approximately 16 inches apart is a good
place to start). First obstacle should be placed 6-10
feet from tree on the course line.
•With safety ring on underside of line, pull line
through safety ring to make a loop. See Images 1
and 2.
•Thread carabiner through the line looped through
the safety ring. Do not attach carabiner to safety
ring. See Images 3 and 4.
•Attach obstacles to carabiners in desired order.
•Use ratchet to fully tighten line before use.
Set Contents
•1 obstacle course line
•1 anchor line with
ratchet
•2 tree protectors
•2 gymnast rings
•1 climbing ladder
•2 free movement rings
Safety Guidelines
•For ages 6 and up.
•Adult supervision required.
•Weight limit 250 lbs.
•Adult assembly required, including site selection
and installation.
•Choose trees of at least 1 foot in diameter. Trees
should be between 25-55 feet apart.
•Do not attach to unhealthy trees, this may result in
injury.
•Load stress test must be performed before use.
•All watchers should maintain a 10 foot distance to
prevent injury.
•1 standard length
monkey bar
•1 long monkey bar
•1 spinning wheel
•8 carabiners
•8 safety rings
•1 carry bag
Step 1. Determine height for obstacle course
•Line should be set so that the shortest user’s feet
hang 12 inches from the ground while hanging
from the gymnast rings.
•To determine the height of course, measure
shortest user from feet to fingertip with hand held
high, then add 24 additional inches. This should
include the 12 inch gap to ground, plus the length
of obstacle. For example, your shortest user is 72
inches from feet to fingertip, add 24 inches, the
height of the line should be 86 inches from the
ground.
•Special Note: The farther apart the anchor trees
are, the more the course line will sag in the middle.
This is normal, but should be taken into account
when setting line height.
•The line height may need to be adjusted for best
user experience.
Step 2. Setting up the line
•Wrap tree protectors around desired tree trunks at
pre-calculated line height. Use of a step ladder may
be necessary.
•Secure anchor line with ratchet to tree. Wrap line
around tree, then thread ratchet through loop on
the end of the line. Pull ratchet until line is snug
around tree with no slipping.
•Take course line and wrap around other tree. Pull
loose end through loop and tighten to prevent
slipping.
•Folding the line in half before threading through
loop will help line stay flat when connected.
Image 3
Image 2
Image 1
Image 4
If you have any questions or problems, please contact
us, we are glad to help!
Visit Fofana.co/Ninja
Step 4. Connecting and tightening the line
•Make sure both ends of line are secured at the
same height.
•With ratchet handle facing down, feed end of
course line through ratchet. See Image 5.
•Pull end of line to take up all the slack. Make sure
line is not twisted. See Image 6.
•Pull tight through ratchet. Pull on smaller release
handle to unlock ratchet. Use ratchet handle to
tighten further. See Image 7.
•Keep ratcheting the line tighter until the line is
tight. When fully tightened, pull release lever to
close and lock handle in place. See Image 8.
•Special note: Make sure course line is threaded
straight though ratchet and not at an angle as this
could weaken the ratchet and cause breakage or
damage to the line.
Image 6
Image 7
Image 5
Image 8
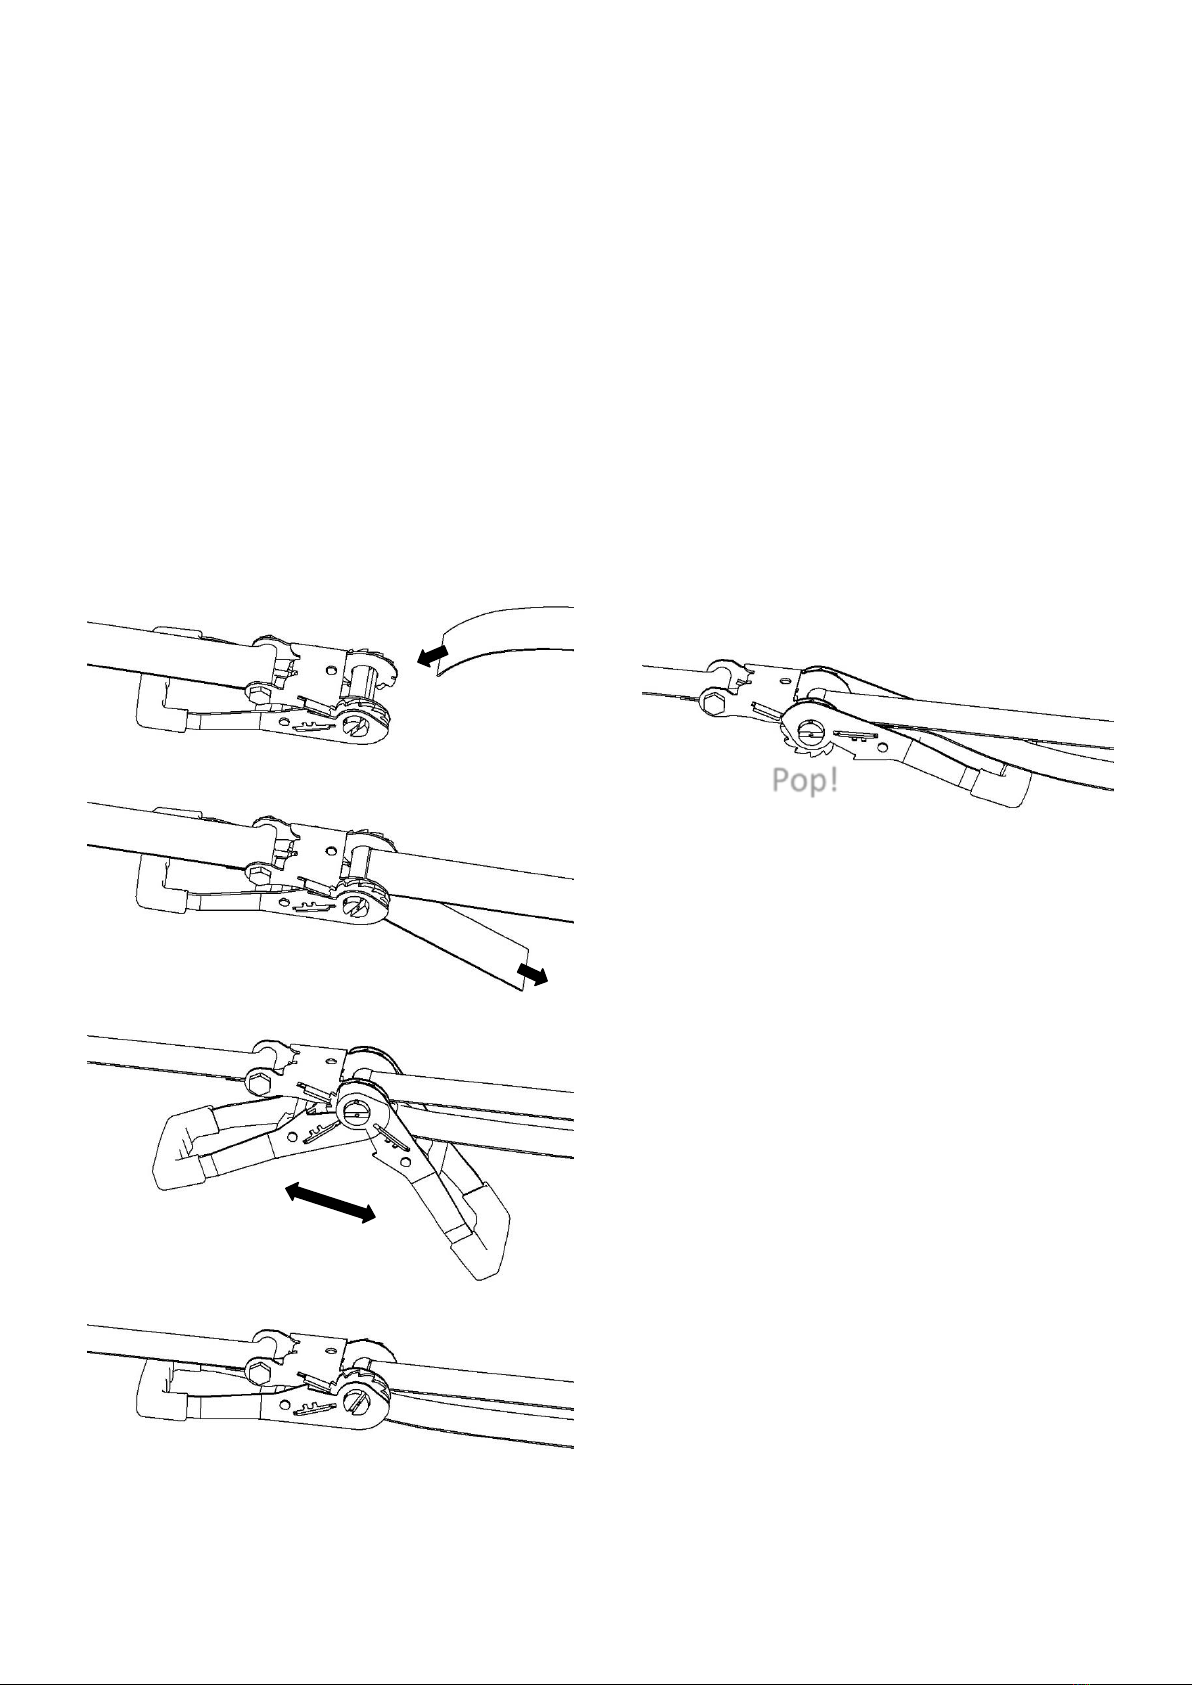
Step 6. Releasing the line
•When you are ready to take down the line or want
to adjust the spacing of obstacles, you will need to
release the line tension.
•Unlock the ratchet handle by pulling the release
lever firmly.
•Fully open the ratchet and firmly press the ratchet
handle until the line snaps loose. A popping sound
can be heard. See image 9.
•Once tension is loosened, obstacles can be
repositioned.
Step 5. Mandatory load stress test
•Make sure all connections are tight.
•Bystanders should maintain a safe distance from
the line, at least 10 feet.
•Using either a 250 lbs person or weight, test line
by suspending weight 5 feet from each end.
•Watch for line dipping, or slipping around anchor
trees. Tighten line if necessary.
Image 9
Pop!
If you have any questions or problems, please contact
us, we are glad to help!
Visit Fofana.co/Ninja
Helpful Tips
•This is a conditioning course, do not expect to be
able to complete it the first few times. You will
improve over time. If it is too difficult, set course
line height lower so that toes reach the ground.
Course can be raised to recommended height
when ready.
•Distance between obstacles can be customized to
user’s ability or preference.
•When line is loosened, carabiners may slide
position. It is not necessary to completely undo
course line to change positions of obstacles.
However, never use course unless line is fully
tightened.
•A section should be left clear for free movement
rings usage. This can be as the first obstacle, last,
or in the middle between obstacles.
•If you are unsure about your health, please
consult a health professional before use.
•There is possibility for injury or even death. Adult
supervision is required.
•Have fun! Try new obstacle combinations. Try
timing yourself to check for improvement.
Customers value reviews written by other customers
who purchased this product. We would appreciate if
you wrote a review that reflects your experience with
the product.
Table of contents


