fomex RX-FREE 7s User manual

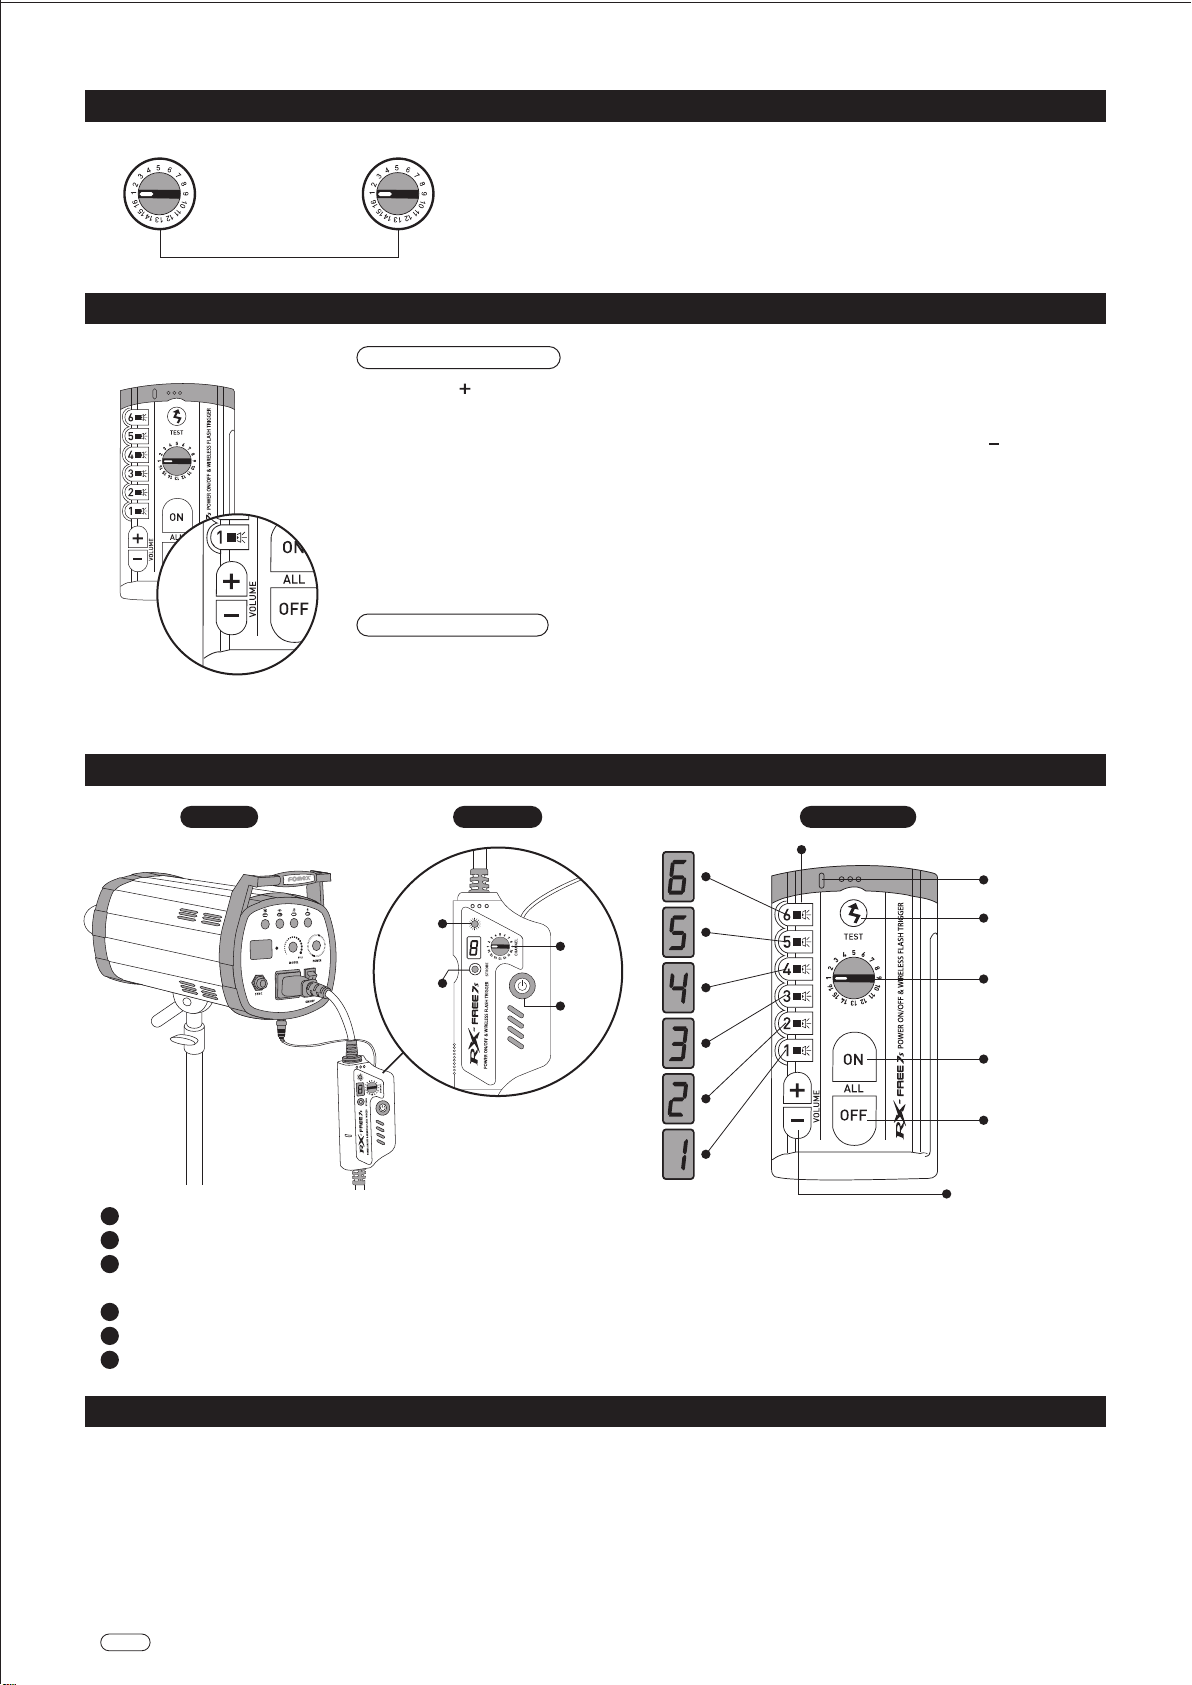
TransmitterReceiver
IndividualStrobeon/offbutton
TESTButton
SyncChannel
Battery Cover
AllStrobesON
AllStrobesOFF
StrobeLightVolume ControlButton
2.5mmSyncPort
Part Reference
Transmitter Set up
Receiver Setup
Model RX-FREE7s
SyncSpeed 1/250sec
Frequency 2.4GHz
BatteryTransmitter 1xAA1.5V
Channels 16
Receiver AC100V-220V
Maxrange Upto30 meters
POWER ON/OFF & WIRELESS FLASH TRIGGER
SyncChannel
Power Button
AC100V-200V
StatusLED
Strobe Light Volume Cord
Connectortostrobe
MiniFemaleCable
StrobeChannelButton
Installa AA1.5Vbatteryintothetransmitter.
Slidethe transmitterintothehot shoe ofyour cameraand tightenthe lock wheel.
Usethe included2.5mmsync cordtoconnectthetransmittertoa PCsyncportofyour camera.
Unplugthe ACpowercord fromthe studiostrobeand plugitintotheRX-Free7s receiver.
Insert thepowercordof thereceiverintothe ACpowerport ofthe strobe.
Plugprovided3.5mm sync cordtothereceiver.
Insert connected3.5mmsync cordto minimalecable,thento thesync portofstrobe.
(If6.3mm sync portused foryourstrobe,connectusing jackconverterprovided.)
Connectmini femalecable ofthereceiverto theminijack porton the bottomof thestrobe.
1
2
3
4
5
1
1 3 4 5
2
※Followtheprocedure①>②> ⑤or①>②> ③>④dependingon strobespecification.
※Chooseeither 2-1or2-2 processdepending on thetypeofcamera.
1
2-1
2-2
2-1 2-2
3.5mmSyncCord
MinimaleCable
3.5mmsocket
to6.33mm
JackConverter
ReceiverStrobe
Changing Channels
Operation
Safety Warnings
High-Speed Sync Mode &Light Volume Control Button
SetthesameChannel
ReceiverChannel TransmitterChannel
High-Speed Sync Mode
LightVolumeControl
Transmitter
Status
LED
Strobe
Channel
Button
Sync
Channel
StatusLED
IndividualStrobeON/OFFButton
TESTButton
SyncChannel
AllStrobeON
AllStrobeOFF
StrobeLightVolume
ControlButton
Power
Button
AC100V-200V
A/S www.fomex.co.kr Tel:+822545 0004 Fax:+82 2 3444 9399 [email protected]
- Press & hold " " button on the FREE-7STransmitter when the LED lamp on the top of the test button blinks fast,
it’s on the high-speed sync mode.(Canon,Nikon - The speed of transferring the high speed sync mode is different,
normal.)
- Ifyouwanttoexitfromhigh-speedsyncmodetonormalsyncmode,pleasepress&hold" "button.Whenpressing
OFF button,it’s also released,but the power of receiver is turned off together.(Canon,Nikon - The speed of exiting
fromthe normalsyncmode isdifferent,normal.)
- Ifthe transmitterisnotusedinthehigh-speedsyncmode,itgoestothesleepmode.TheLED lampisn’ton.(Canon,
Nikon-Thespeedofenteringthesleep modeisdifferent,normal.)Toreleasethesleepmode,please pressanybutton.
*Dependingonthecameramodel,the high speed sync function may not be operatednormally.
TheStrobeshouldbeprovidedlightvolumecontrolfunction.Thisfunctioncanbeusefulwhenthestrobeislocated
in high places. Press the desired individual number on the transmitter for 2 seconds until the RED LED lamp is
blinkingthenpress+/-controlbuttontochangethelightvolume.(Note:Lightvolumecontrolfunctionisoperated
withthestrobewith a built-in receiveronly.)
RX-Free 7s has 16 channels to operate,the transmitter and the receiver must be on the same
channel.Selectthedesiredchannelonthetransmitterandthe receiver.Maintainatleast 50cm
distancebetweenthetransmitterandthe receiverforanti RFinterference.
- Donot removeinstruments'coversduringoperation.
- Donot operatethe RX-Free7snearflammable gases orfumes.
Operationof anyelectricalinstrument createsanextremesafetyhazard.
- Turnyourequipmentoffbeforemakingelectrical connectionsorchanging batteries.
- Installnew batteriesintotheRX-Free7ssystem.Weakbatterieswill shortenthe distanceof transmissionandreception.
- Toavoidbattery leakage,alwaysremovebatterieswithin theunitsare notinuse formore thana month.
- Donot use orleavethedevicesinconditions ofextremehot,coldorhigh humidity.
Ensureyourstrobesareturnedoff.
Connectsingle receivertoeachstrobeasindicated.
Poweryourstrobeon. Setindividual number(1-6) bypressingthestrobe channelbutton
(ex.Main strobe-Ch.No.1,Sub-strobe-Ch.No.2,Spotlite-Ch.No.3,Backgorund-Ch.No.4,Ceiling-Ch.No.5)
Ensurethe syncchannelon thereceivermatchesthatofthe transmitter.
Once“AllStrobeOn”button ispressed,all thestrobe arepoweron.
Whenturn on/offtheindividual strobe,please pressindividual strobeON/OFF buttononthe transmitter.
1
2
3
4
5
6
VER.201811
Popular Camera Accessories manuals by other brands


Campbell
Campbell CM10K instruction manual

GreenWorks Pro
GreenWorks Pro LB60A00 owner's manual

Mastervolt
Mastervolt MLI Ultra 12/2750 User and installation manual

Ikelite
Ikelite 6132.51 instruction manual

Shuangdeng Group Co.
Shuangdeng Group Co. GFM Series manual

Square Jellyfish
Square Jellyfish JELLY-GRIP TRIPOD MOUNT WITH JELLY LONG LEGS user manual


