Trek Diamant Range Boost Battery User manual

C
Trek/Diamant
Range Boost Battery
Manual
ENGLISH | DEUTSCH | ESPAÑOL | FRANCAIS
586593-1

1
English Table of Contents
2 Preparation
3 Disconnect the Motor
5 Connect the Y Cable
6 Install the Range Boost Battery Mount
9 Reconnect the Motor
12 Reinstall RIB and Test the
RBB Assembly Release Mechanism
Deutsch Inhaltsverzeichnis
15 Vorbereitung
16 Motor abklemmen
18 Y-Kabel anschließen
19 Halterung für Range Boost-Akku montieren
22 Motor wieder anschließen
25 RIB wieder einsetzen und RBB-
Entriegelungsmechanismus prüfen
Español Índice
28 Preparación
29 Desconexión del motor
31 Conexión del cable con forma de Y
32 Instalación del soporte para batería Range Boost
35 Conexión del motor
38 Reinstalación de la batería RIB y comprobación
del mecanismo de liberación del conjunto de la
batería Range Boost
Francais Table des matières
41 Préparation
42 Débranchez le moteur
44 Raccordez le câble Y
45 Installez le support de la batterie Range Boost
48 Rebranchez le moteur
51 Réinstallez la batterie intégrée amovible
et testez le mécanisme de blocage de la
batterie Range Boost
ENGLISH | DEUTSCH | ESPAÑOL | FRANCAIS

ENGLISH
ENGLISH
2 3
Install the Range Boost Battery
Preparation
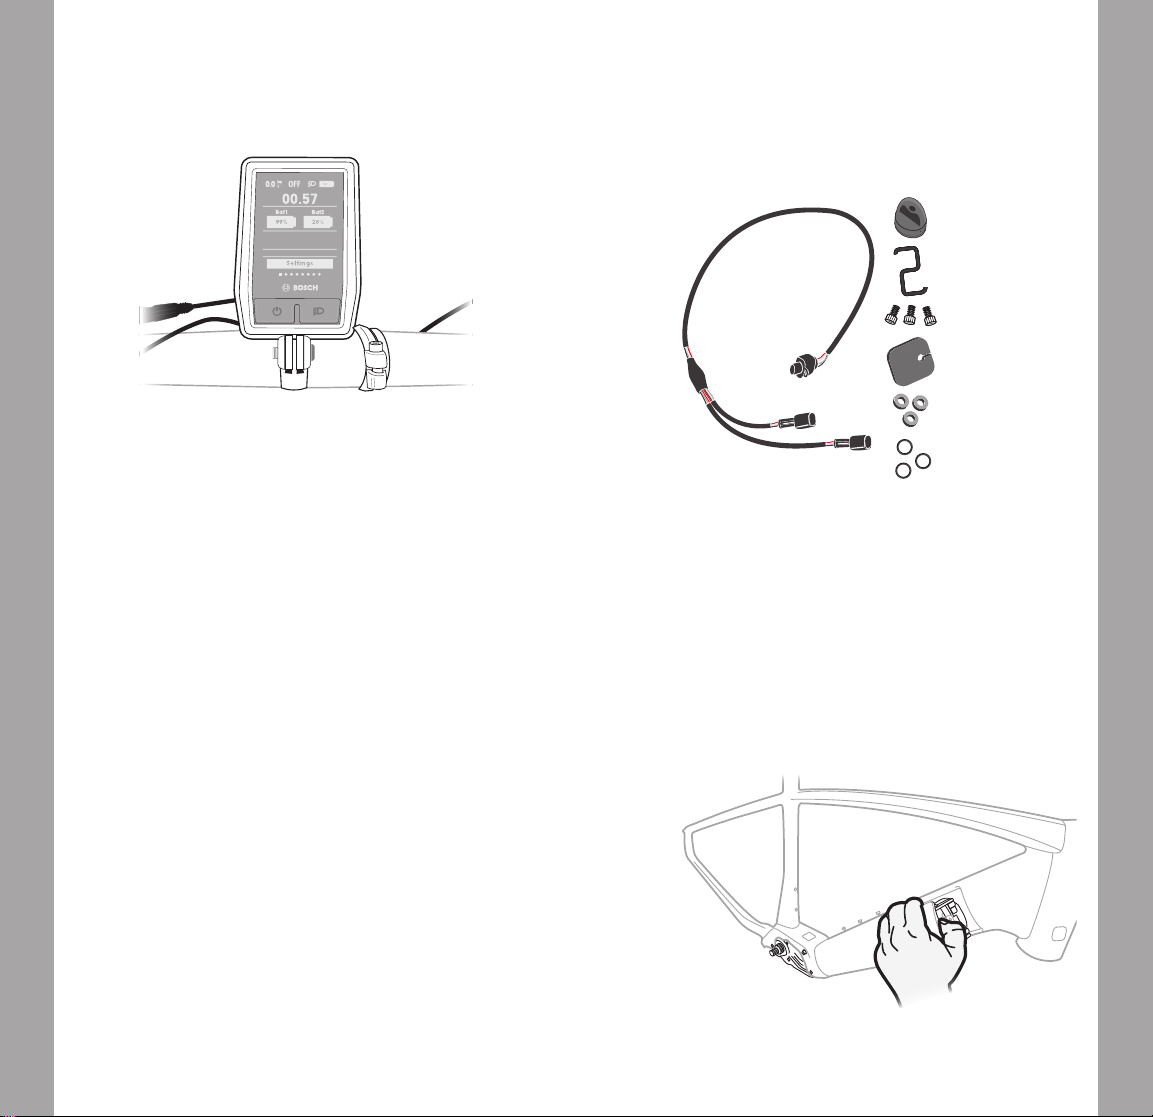
Package Contents:
Contact Cover (1)
Mounting Spacers (3)
O-Ring (3)
Y Cable (1) S Hook (1)
M5 Mounting
Bolts (3)
Motor Mount-Y
Cable Plug (1)
Tools Required:
• S Hook
• T25 Torx wrench (carbon frame)
• IP40 Torx Plus wrench
• 4mm hex wrench
• 3mm hex wrench (aluminum frame)
• Small Phillips screwdriver
• Torque wrench with appropriate sockets
• Bosch connector and diagnostic tool
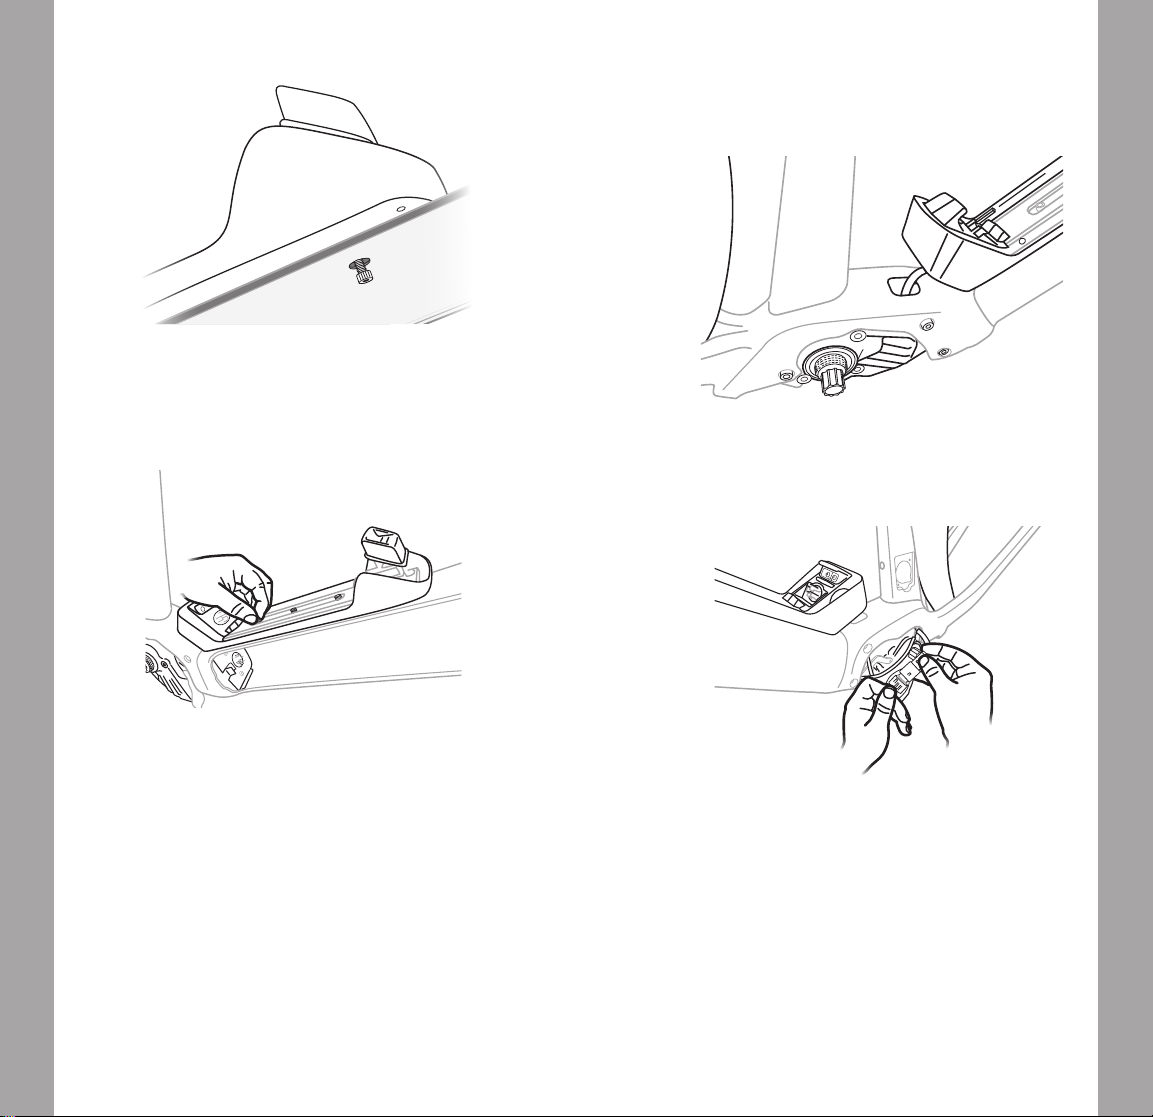
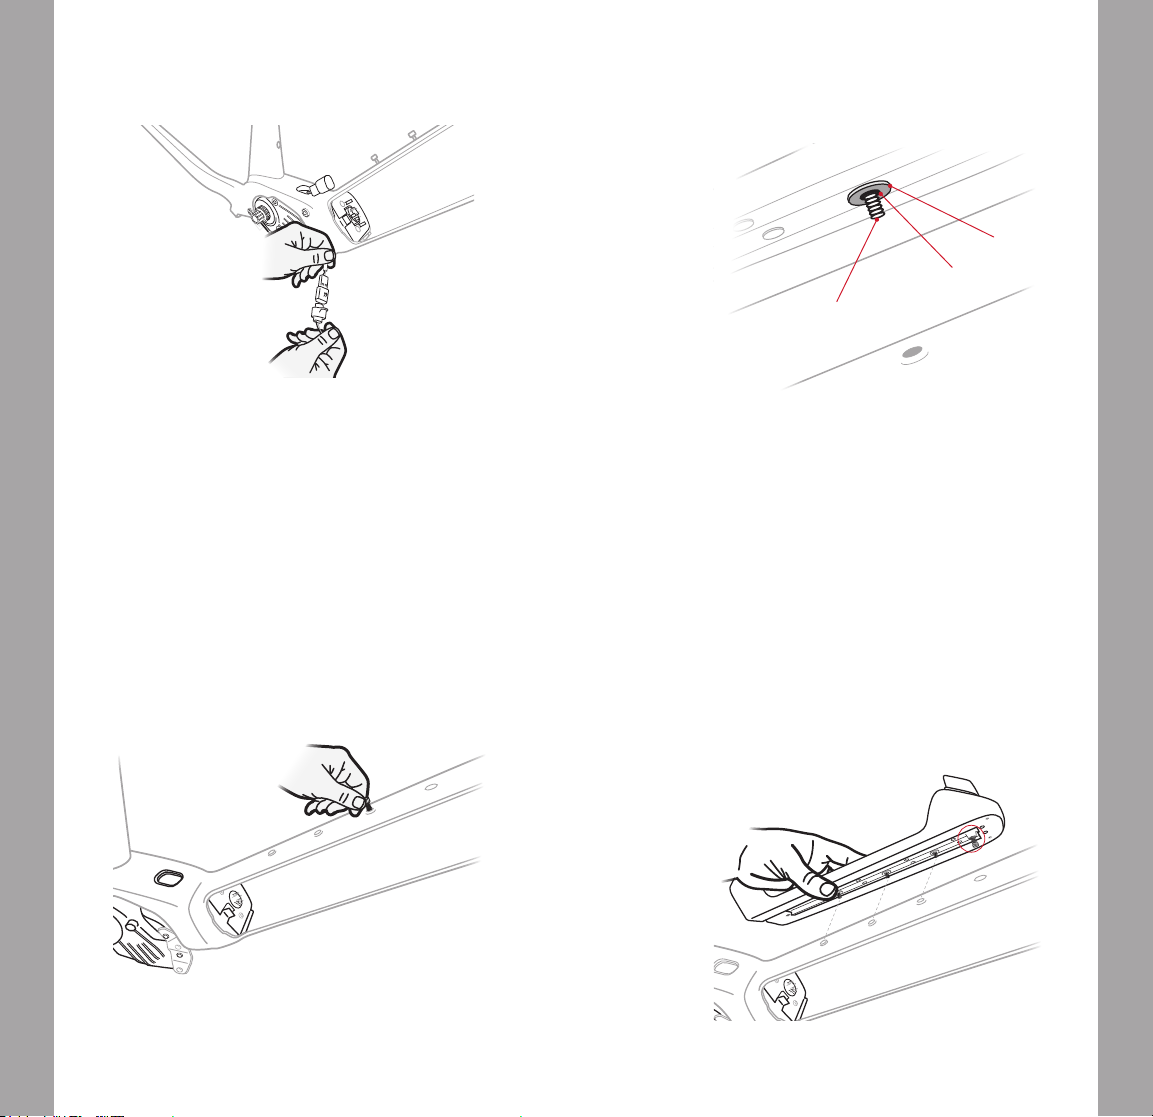
Remove the Rechargeable Integrated Battery (RIB).
Disconnect the Motor
1. Remove the four motor guard bolts and remove the motor
guard.
2. Use the IP40 Torx Plus wrench to LOOSEN the two aft
motor bolts. Do not remove the bolts.
3. Use the IP40 Torx Plus wrench to remove the front four
motor bolts (2 per side).
IMPORTANT: Once the front motor bolts are removed,
support the motor to prevent it from swinging freely.

ENGLISH
ENGLISH
4 5
4. Support the motor and install the S hook. Install the hook
as shown (from the inside of the motor housing) to protect
the bike’s nish.
5. Unplug the battery cable from the motor.
Connect the Y Cable
A
B
C
1. Temporarily remove the S hook and support the motor
with one hand.
2. Use a small Phillips head screwdriver to remove the screw
in the plastic cover (see Figure A).
3. Remove the cover from the top of the motor housing
(see Figure B).
Figure A Figure B
4. Re-install the S hook to support the motor.
5. With the battery cable disconnected from the motor, pull
the connector out from behind the motor.

ENGLISH
ENGLISH
6 7
6. Connect the B end of the Y cable to the battery connector.
7. Tuck the excess Y cable (B end) behind the rear battery
mount in the base of the down tube.
8. Route the rest of the Y cable (A end) over the top of and
behind the motor.
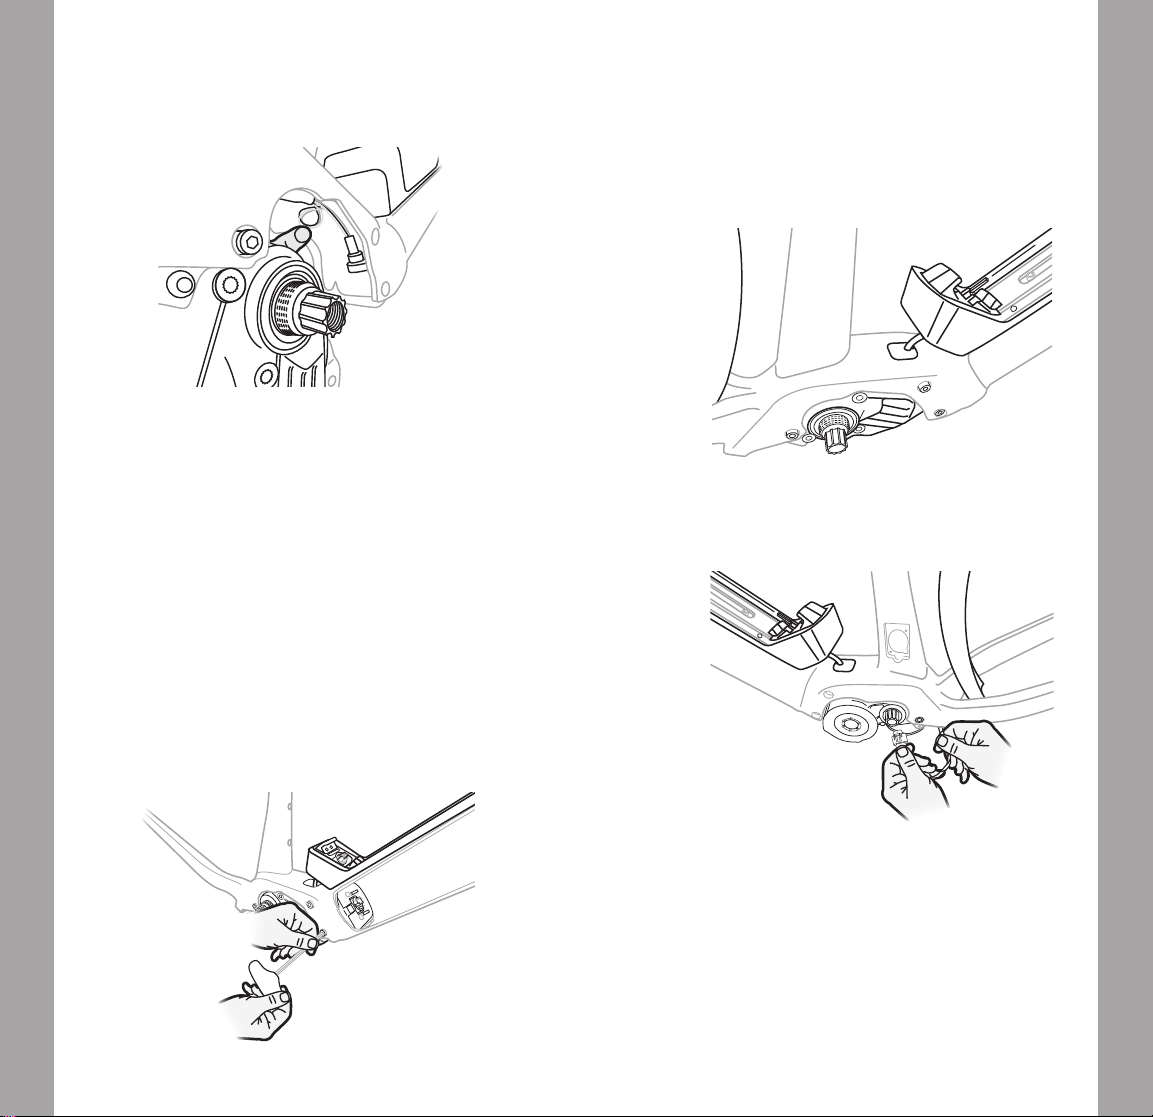
Install the Range Boost Battery Mount
1. Remove the three water bottle cage bolts (4mm) and the
round rubber plugs from the down tube.
2. For each of the three holes in the Range Boost Battery
Mount, use (in order) the three bolts, spacers, and o-rings
to create the Range Boost Battery Mount assembly.
BOLT
O-RING
SPACER
NOTES: There are three spacers included in the Range
Boost bag of contents for carbon frames. Carbon frames
will need spacers between the Range Boost Battery
Mount and the frame to prevent surface damage to the
bike frame.
The o-rings act as a retention system to keep the
spacers and bolts in place on the mount.
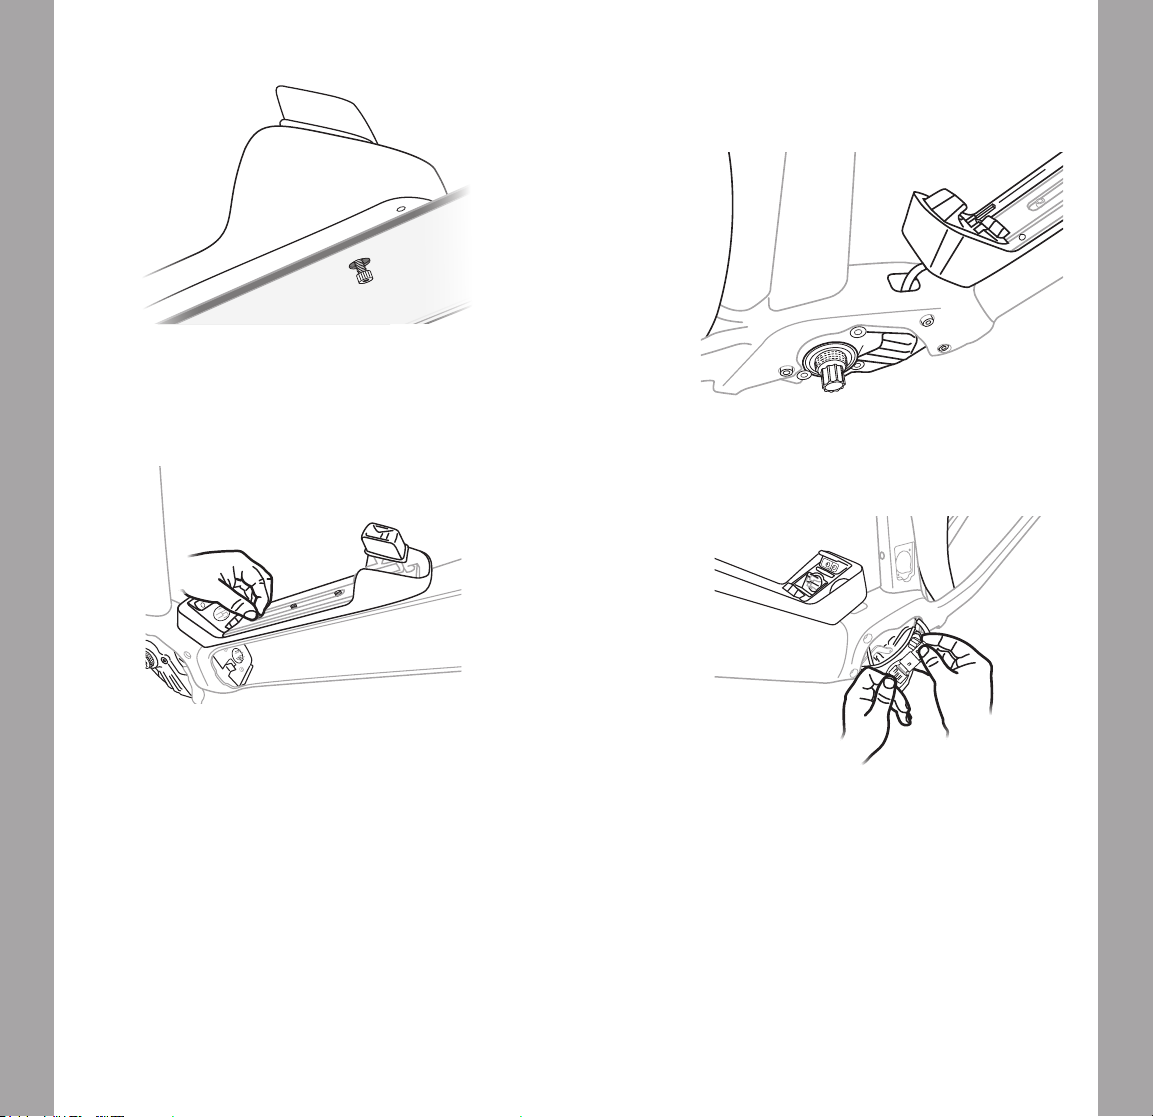
3. Place the Range Boost Battery Mount assembly on the
down tube with the holes lined up.
4. Screw this plunger bolt (circled) out to decrease the lock
travel with RIB installed. Screw this plunger bolt in if the
lock impedes installation of the RIB battery.
ENGLISH
ENGLISH
8 9
NOTE: Make sure the Range Boost Battery plunger is in
the middle of the down tube hole.
5. Tighten the three bolts to 5Nm. Do not overtighten.
Use only the bolts supplied in the kit. If a different length is
needed then only use Grade 8 or better bolts.
Reconnect the Motor
1. Insert the Range Boost Battery cable into the hole on the
top of the motor housing.
2. From the inside of the motor housing, connect the Range
Boost Battery cable to the A end of the Y cable.
ENGLISH
ENGLISH
10 11
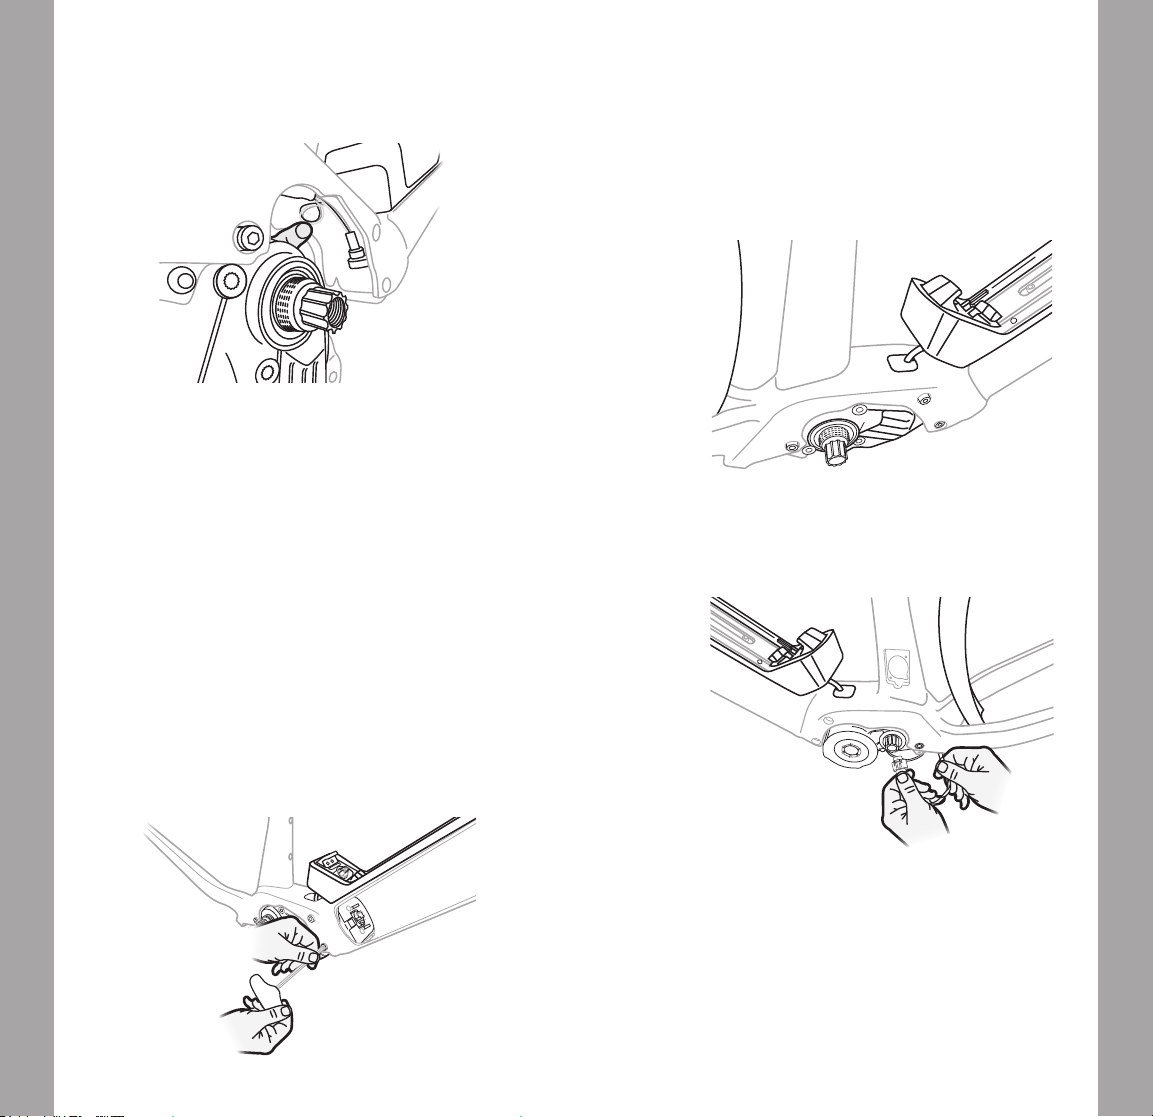
3. Arrange the A end of the Y cable and the Range Boost
Battery cable in the forward end of the motor housing
(behind the internal battery rear mount).
4. Remove the S hook.
5. Rotate the motor up into the motor housing.
Pro Builder Tips:
a. As you rotate the motor up, wiggle the Range Boost
Battery cable on top and the motor power plug in
the rear for ease of motor re-installation.
b. Make sure no cables are pinched when moving the
motor into place.
6. Install the four forward motor mount bolts.
7. Use the IP40 Torx Plus wrench and torque all forward and
aft motor mount bolts to the manufacturer’s spec.
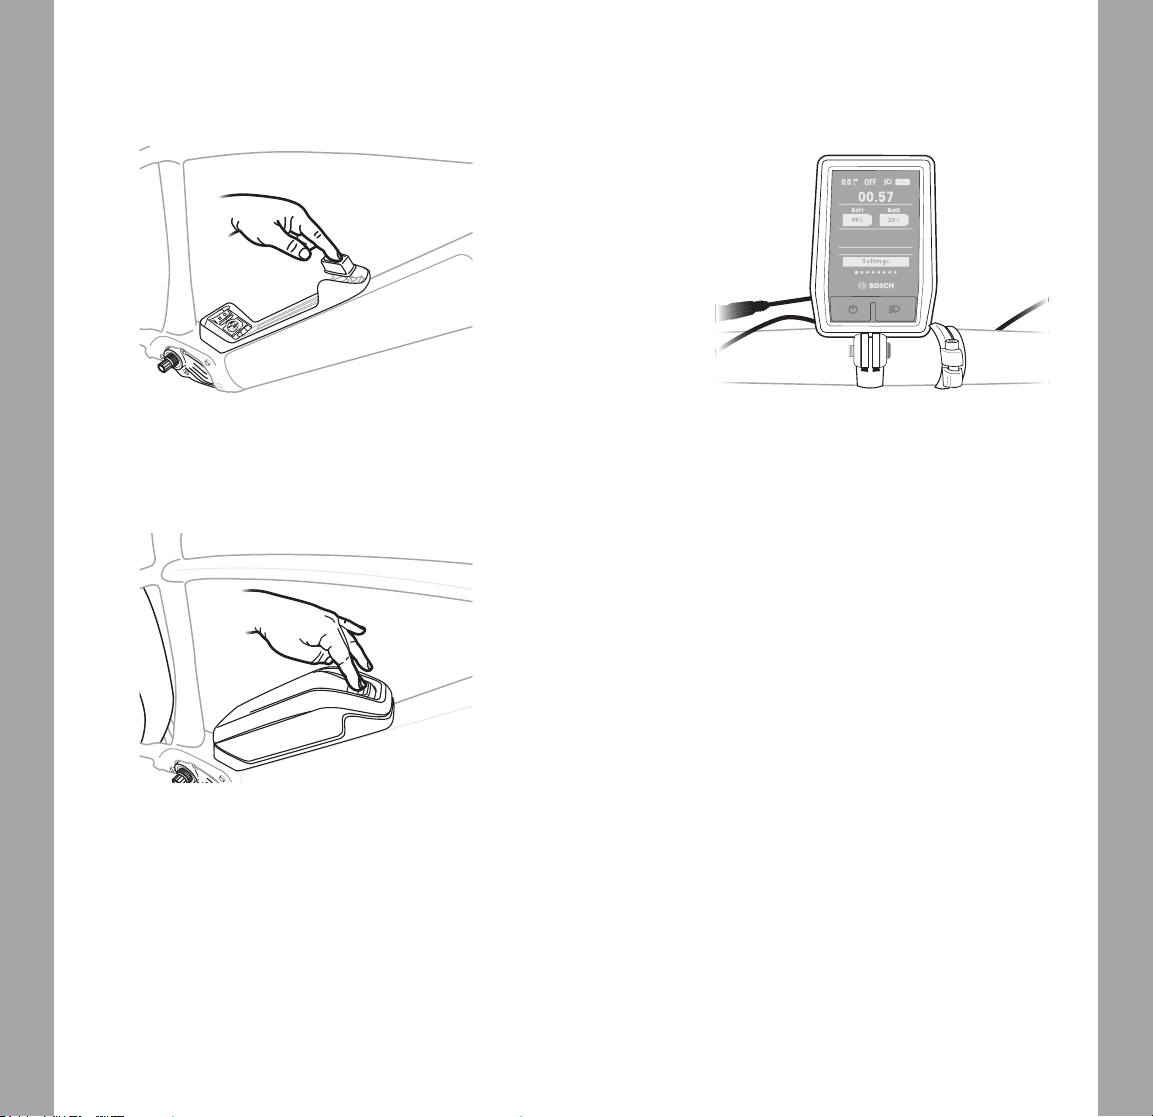
8. Put the grommet around the battery cable.
9. Put as much cable inside the motor housing as possible.
10. Install the grommet into the hole on top of the motor
housing.
11. Reconnect the motor power plug back on to the motor.

ENGLISH
ENGLISH
12 13
12. Reinstall the motor guard. Use the 3mm hex wrench
(aluminum frame) or the T25 Torx wrench to torque the
bolts to 5Nm.
Reinstall RIB and Test the
RBB Assembly Release Mechanism
1. Reinstall the RIB.
IMPORTANT: The Range Boost Battery assembly bolt
(plunger) inside the RIB cavity should not contact the
RIB or in any way impede the RIB installation.
1. You should not be able to depress the Range Boost
Battery lock button. The button should move down only
1-5mm when depressed.
2. Install the Range Boost Battery in the tray. Again depress
the lock button. The Range Boost Battery assembly
should not be released.
DEUTSCH
15
ENGLISH
14
3. On the controller, when you power up you should see you
have two batteries and it should also display the charge
for each battery.
4. Use the Bosch connector and diagnostic tool to make
sure all the rmware is up to date.
Installation des Range Boost-Akkus
Vorbereitung
Packungsinhalt:
Kontaktabdeckung
(1)
Distanzscheiben (3)
O-Ringe (3)
Y-Kabel (1) S-Haken (1)
M5 Montageschrauben
(3)
Motorgehäuse¬
Kabelstopfen
für Y-Kabel (1)
Erforderliches Werkzeug:
• S-Haken
• T25 Torx-Schlüssel (Carbon-Rahmen)
• IP40 Torx Plus-Schlüssel
• 4mm Inbusschlüssel
• 3mm Inbusschlüssel (Aluminium-Rahmen)
• Kleinen Kreuzschlitz-Schraubendreher
• Drehmomentschlüssel mit passenden Bit-Aufsätzen
• Bosch Steckverbinder und Diagnosetool
Den RIB-Akku (Rechargeable Integrated Battery) herausnehmen.

DEUTSCH
DEUTSCH
16 17
Motor abklemmen
1. Die vier Schrauben des Motorschutzes herausschrauben und
den Motorschutz abnehmen.
2. Mit dem IP40 Torx Plus-Schlüssel die hinteren zwei
Motorschrauben LÖSEN. Die Schrauben nicht komplett
herausdrehen.
3. Mit dem IP40 Torx Plus-Schlüssel die vorderen vier
Motorschrauben (2 pro Seite) herausdrehen.
WICHTIG: Sobald die vorderen Motorschrauben entfernt
wurden, muss der Motor abstützt werden, um ein nach
unten schwingen zu verhindern.
4. Den Motor abstützen und den S-Haken einsetzen. Den Haken
wie abbildet verwenden (von innen am Motorgehäuse), um den
Lack des Bikes zu schützen.
5. Das Akkukabel am Motor ausstecken.

DEUTSCH
DEUTSCH
18 19
Y-Kabel anschließen
A
B
C
1. Kurzzeitig den S-Haken entfernen und den Motor mit einer
Hand abstützen.
2. Mit einem kleinen Kreuzschlitz-Schraubendreher die Schraube
der Kunststoffabdeckung entfernen (siehe Abb. A).
3. Die Abdeckung am Motorgehäuse von oben entfernen
(siehe Abb. B).
Abb. A Abb. B
4. Den S-Haken zum Abstützen des Motors wieder einsetzen.
5. Bei abgeklemmtem Akkukabel den Steckverbinder hinter dem
Motor herausziehen.
6. Den Stecker B des Y-Kabels mit dem Steckverbinder des
Akkukabels verbinden.
7. Das restliche Kabel von SteckerB hinter der hinteren
Akkuhalterung unten am Unterrohr verstauen.
8. Das Kabel von SteckerA hinter dem Motor nach oben führen.
Halterung für Range Boost-Akku montieren
1. Die drei Flaschenhalterschrauben (4mm) und die runden
Gummistopfen aus dem Unterrohr entfernen.

DEUTSCH
DEUTSCH
20 21
2. Bei jedem der drei Löcher für die Halterung des Range Boost-
Akkus erst die Schrauben, dann die Distanzscheiben dann die
O-Ringe (in dieser Reihenfolge) einsetzen.
SCHRAUBE
0-RING
DISTANZSCHEIBE
HINWEISE: Im Lieferumfang des Range Boost-Akkus
sind drei Distanzscheiben für Carbon-Rahmen enthalten.
Bei Carbon-Rahmen sind Distanzscheiben zwischen der
Halterung des Range Boost-Akkus und dem Rahmen
erforderlich, um Oberächenschäden am Bike-Rahmen zu
vermeiden.
Die O-Ringe dienen als Einbauhilfe, um die Distanzscheiben
und Schrauben an der Halterung zu xieren.
3. Die Halterung des Range Boost-Akkus an den Löchern im
Unterrohr ausrichten und einsetzen.
4. Diese Kolbenschraube (Kreis) herausdrehen, um den
Entriegelungsmechanismus bei eingesetztem RIB-Akku zu
reduzieren. Diese Kolbenschraube hineindrehen, wenn der
Entriegelungsmechanismus das Einsetzen des RIB-Akkus
behindert.
HINWEIS: Achte darauf, dass die Kolbenschraube
des Range Boost-Akkus im Loch des Unterrohrs mittig
ausgerichtet ist.
5. Die drei Schrauben mit einem Anzugsdrehmoment von 5Nm
festziehen. Die Schrauben nicht zu stark anziehen.
Nur die im Lieferumfang enthaltenen Schrauben verwenden.
Wenn eine andere Schraubenlänge erforderlich ist, dürfen nur
Schrauben der Festigkeitsklasse Grade 8 oder höher verwendet
werden.

DEUTSCH
DEUTSCH
22 23
Motor wieder anschließen
1. Das Kabel für den Range Boost-Akku in die Rahmenöffnung
unten am Unterrohr einführen.
2. Innen im Motorgehäuse das Kabel für den Range Boost-Akku
mit dem SteckerA des Y-Kabels verbinden.
3. Das restliche Kabel von SteckerA des Y-Kabels sowie
das Kabel für den Range Boost-Akku im vorderen Bereich
des Motorgehäuses verstauen (hinter der innenliegenden
Akkuhalterung).
4. Den S-Haken entfernen.
5. Den Motor nach oben in das Motorgehäuse bewegen.
Pro-Tipp:
a. Wenn der Motor nach oben bewegt wird, am
Kabel für den Range Boost-Akku sowie hinten
am Motoranschlussstecker wackeln, um den
Wiedereinbau des Motors zu vereinfachen.
b. Beim Positionieren des Motors darauf achten, dass
keine Kabel eingeklemmt werden.
6. Die vier vorderen Motorschrauben einschrauben.
7. Den IP40 Torx Plus-Schlüssel verwenden und alle vorderen
und hinteren Motorschrauben mit dem vom Hersteller
vorgeschriebenen Anzugsdrehmoment festziehen.

DEUTSCH
DEUTSCH
24 25
8. Den Kabelstopfen um das Akkukabel legen.
9. So viel Kabel wie möglich im Motorgehäuse unterbringen.
10. Den Kabelstopfen oben am Motorgehäuse in die
Rahmenöffnung einsetzen.
11. Das Akkukabel wieder mit dem Motor verbinden.
12. Den Motorschutz wieder montieren. Mit dem 3mm
Inbusschlüssel (Aluminium-Rahmen) oder dem T25 Torx-
Schlüssel die Schrauben mit einem Anzugsdrehmoment von
5Nm festziehen.
RIB wieder einsetzen und RBB-
Entriegelungsmechanismus prüfen
1. Den RIB-Akku wieder einsetzen.
WICHTIG: Die Montageschraube (Kolbenschraube) der
Halterung für den Range Boost-Akku im RIB-Akkufach darf
den RIB-Akku nicht berühren oder das Einsetzen des RIB-
Akkus anderweitig behindern.
DEUTSCH
DEUTSCH
26 27
1. Die Entriegelungstaste des Range Boost-Akkus sollte nicht
gedrückt werden können. Die Taste sollte sich beim Betätigen
nur 1–5mm nach unten bewegen.
2. Den Range Boost-Akku in die Halterung einsetzen. Erneut die
Entriegelungstaste drücken. Die Range Boost-Akkueinheit
sollte nicht freigegeben werden.
3. Beim Einschalten sollten auf dem Controller nun zwei Akkus
angezeigt werden und außerdem sollte der Ladezustand jedes
Akkus zu sehen sein.
4. Mithilfe des Bosch Steckverbinders und Diagnosetools kann
die Firmware auf den aktuellen Stand gebracht werden.

ESPAÑOL
ESPAÑOL
28 29
Instalación de la batería Range Boost
Preparación
Contenido del paquete:
Tapa del contacto
Espaciadores de
montaje (3)
Junta tórica (3)
Cable con
forma de Y (1)
Gancho con
forma de S
Tornillos de montaje
M5 (3)
Conector del soporte
del motor-cable con
forma de Y (1)
Herramientas necesarias:
• Gancho con forma de S
• Llave Torx T25 (cuadros de carbono)
• Llave Torx Plus IP40
• Llave Allen de 4 mm
• Llave Allen de 3 mm (cuadros de aluminio)
• Destornillador Phillips pequeño
• Llave dinamométrica con adaptadores compatibles
• Conector y herramienta de diagnóstico Bosch
Extrae la batería RIB (Rechargeable Integrated Battery)
Desconexión del motor
1. Quita los cuatro tornillos del protector del motor y retira el
protector.
2. AFLOJA los dos tornillos traseros del motor con la llave
Torx Plus IP40. No retires los tornillos.
3. Utiliza la llave Torx Plus IP40 para extraer los cuatro tornillos
delanteros del motor (2 a cada lado).
IMPORTANTE: Una vez que hayas quitado los tornillos
delanteros del motor, sujétalo para que no se balancee.

ESPAÑOL
ESPAÑOL
30 31
4. Sujeta el motor y coloca el gancho con forma de S. Coloca
el gancho tal y como se muestra en la imagen (por la parte
interna de la carcasa del motor) para proteger el acabado de
la bicicleta.
5. Desenchufa el cable que conecta la batería con el motor.
Conexión del cable con forma de Y
A
B
C
1. Quita momentáneamente el gancho con forma de S y sujeta el
motor con una mano.
2. Utiliza un destornillador Phillips pequeño para quitar el tornillo
de la tapa de plástico (ver Figura A).
3. Quita la tapa de la parte superior de la carcasa del motor
(ver Figura B).
Figura A Figura B
4. Vuelve a colocar el gancho con forma de S para sujetar el
motor.
5. Con el cable de la batería desconectado del motor, tira del
conector para sacarlo por detrás del motor.
ESPAÑOL
ESPAÑOL
32 33
6. Conecta el extremo B del cable con forma de Y al conector de
la batería.
7. Guarda el exceso del cable con forma de Y (extremo B) por
detrás del soporte trasero de la batería en la base del tubo
diagonal.
8. Guía el resto del cable con forma de Y (extremo A) por encima
y por detrás del motor.
Instalación del soporte para batería
Range Boost
1. Quita los tres tornillos (4 mm) del portabidón y los tapones
redondos de goma del tubo diagonal.
2. Para instalar el soporte de la batería Range Boost, utiliza (en
este orden) el kit de tornillo, espaciador y junta tórica en cada
uno de los tres oricios del soporte.
TORNILLO
JUNTA TÓRICA
ESPACIADOR
NOTAS: En la bolsa que incluye la tornillería hay tres
espaciadores para los cuadros de carbono. Los cuadros de
carbono requieren el uso de espaciadores entre el soporte
de la batería Range Boost y el cuadro para evitar daños en
la supercie del cuadro.
Las juntas tóricas actúan como sistema de retención para
que los espaciadores y los tornillos no se muevan de su
sitio al colocarlos en el soporte.
3. Coloca el soporte de la batería Range Boost, incluyendo los
tornillos, los espaciadores y las juntas tóricas, sobre el tubo
diagonal alineándolo con los oricios.
4. Aoja el tornillo del émbolo (rodeado con un círculo) para
reducir el recorrido del bloqueo con la batería RIB instalada.
Aprieta este tornillo si el bloqueo impide la instalación de la
batería RIB.
ESPAÑOL
ESPAÑOL
34 35
NOTA: Asegúrate de que el émbolo de la batería Range
Boost está en el centro del oricio del tubo diagonal.
5. Aprieta los tres tornillos a 5 Nm. No aprietes en exceso.
Utiliza únicamente los tornillos suministrados en el kit. Si
fuera necesario usar tornillos de diferente longitud, utiliza solo
tornillos de grado 8 o mejores.
Conexión del motor
1. Introduce el cable de la batería Range Boost por el oricio de
la parte superior de la carcasa del motor.
2. Desde el interior de la carcasa del motor, conecta el cable de
la batería Range Boost al extremo A del cable con forma de Y.
ESPAÑOL
ESPAÑOL
36 37
3. Coloca el extremo A del cable con forma de Y y el cable de la
batería Range Boost en el extremo delantero de la carcasa del
motor (por detrás del soporte interno trasero de la batería).
4. Retira el gancho con forma de S.
5. Rota el motor hacia arriba hasta acoplarlo en la carcasa
del motor.
Consejos del experto:
a. Al rotar el motor hacia arriba, mueve el cable de la
batería Range Boost de la parte superior y el conector
de alimentación del motor de la parte trasera para
facilitar la instalación del motor.
b. Cuando estés colocando el motor, asegúrate de no
pillar ningún cable.
6. Instala los cuatro tornillos de sujeción de la parte delantera
del motor.
7. Con la llave Torx Plus IP40 aprieta los tornillos delanteros
y traseros del motor de acuerdo con las especicaciones
del fabricante.
8. Pon el pasacables alrededor del cable de la batería.
9. Coloca dentro de la carcasa del motor la máxima cantidad
de cable posible.
10. Instala el pasacables en el oricio de la parte superior de
la carcasa del motor.
11. Vuelve a enchufar el conector de alimentación del motor en
el motor.
Table of contents
Languages:


