for Living 068-7561-2 User manual

Kitchen Cart
Model No. 068-7561-2
Toll-free: 1-877-483-6759
Assembly Instructions
IMPORTANT : Please read and understand this manual before any assembly. Before beginning
assembly of product, make sure all parts are present. Compare parts with packaging contents
list. If any part is missing, or if you have any questions, contact the service centre
at 1-877-483-6759 ( toll-free ).

Step 1 - requires E, F, I, G, H, P
Step 2 - requires C, W, X
Made in China
Imported by Trileaf Distribution Trifeuil Toronto, Canada M4S 2B8

Step 1 - requires E, F, I, G, H, P
Step 2 - requires C, W, X
Step 1 - requires E, F, I, G, H, P
Step 5 - requires K, L, W, X
Step 6 - requires A, B, Y, Z, CC
Step 9 - requires W
3
Table of Contents
Important Safety Instructions
Table of Contents 3
Important Safety Instructions 3
Parts List 4
Assembly 6
15Technical Specications
15Warranty
IMPORTANT: RETAIN FOR FUTURE REFERENCE, AND READ CAREFULLY.
Warning!To reduce the risk of serious injury, read the following safety instructions before assembling
and using this product.
•
•
This product is intended for indoor use.
When it comes to products for your home, it’s essential they stand up to the realities of everyday
family life. Designed with your family in mind, For Living products combine timeless style and
family-friendly features. Now you can focus on what’s important creating lasting memories with
your family.
•The product should be placed on at, horizontal ground.
•Any assembly or maintenance of the product must be carried out by adults only.
Plastic bags can be dangerous. To avoid danger of suffocation
•
keep this bag away from babies and children.
MC

4Model No. 068-7561-2
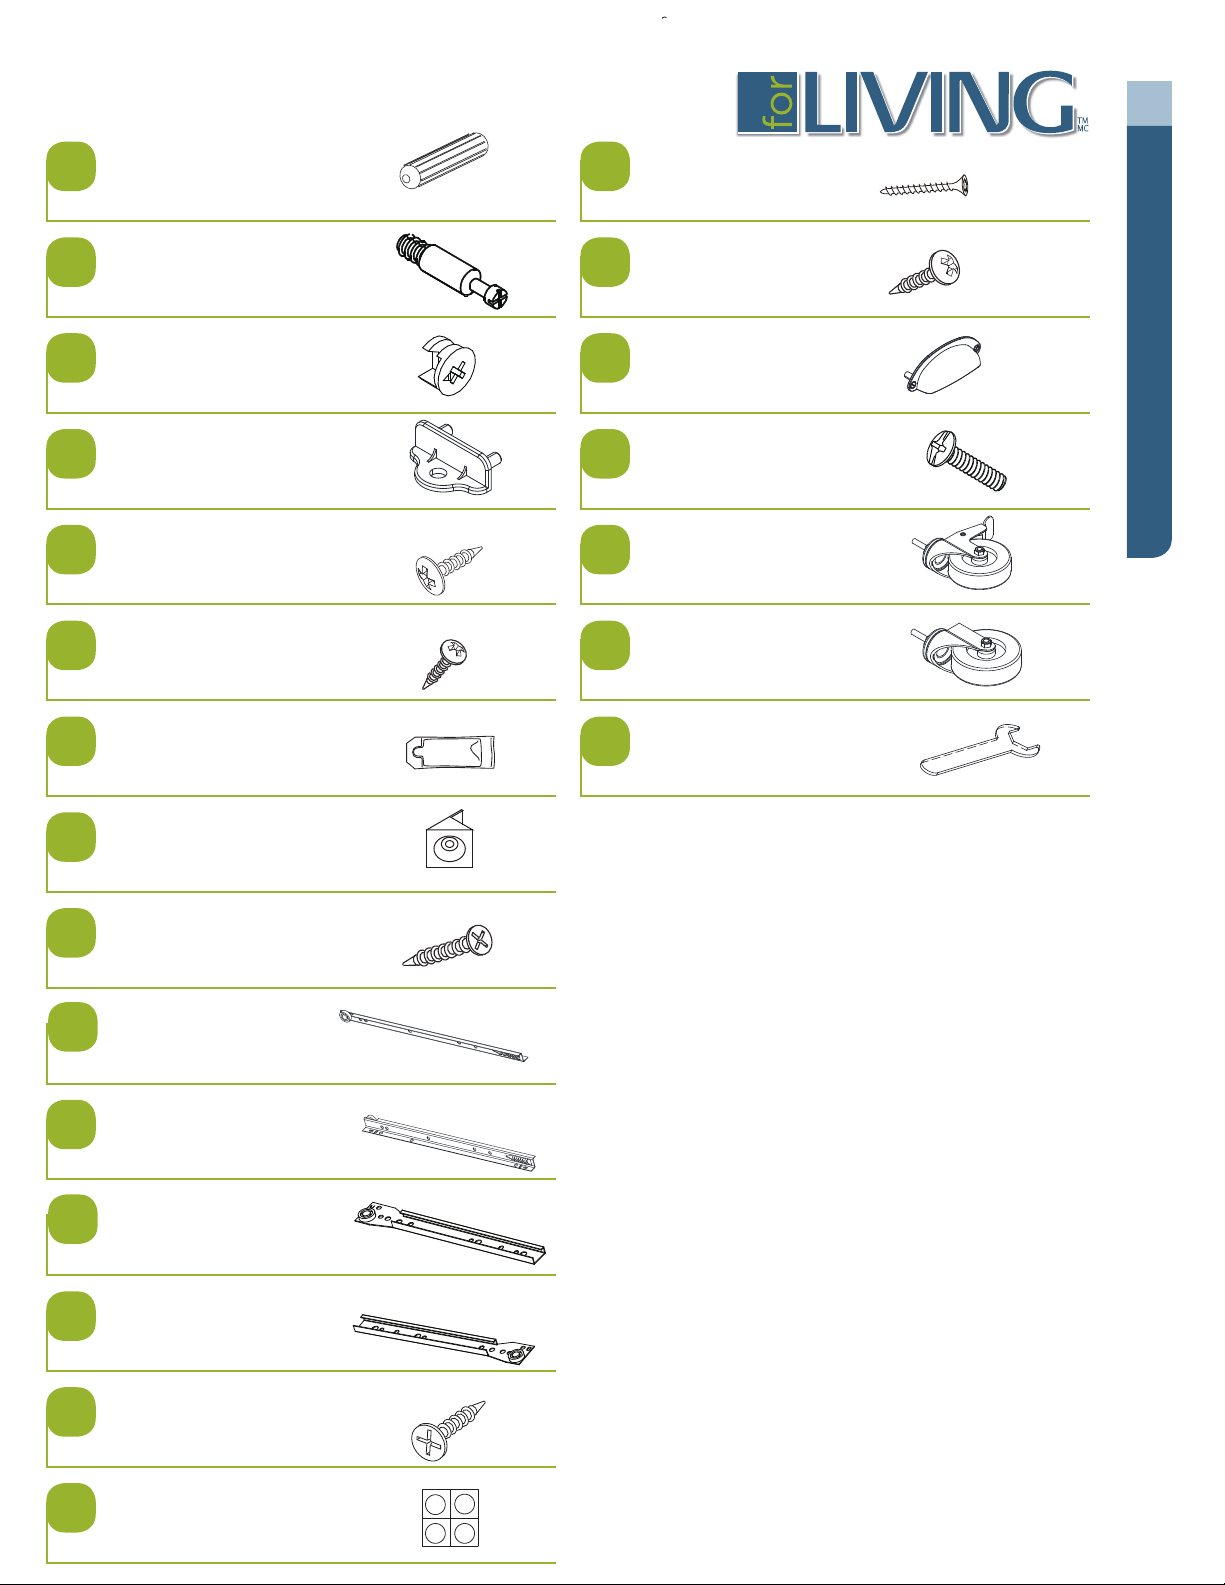
Parts List
Lower shelf - 1 Right drawer side - 1
Lower shelf trim - 2
Bottom back trim - 1
112
2
3
Bottom front trim - 1
4
Upper shelf - 1
5
Left side frame - 1
6
Right side frame - 1
7
Top trim - 1
8
Top - 1
9
Back panel - 1
10
Left drawer side - 1
11
Drawer back - 1
13
Drawer bottom - 1
14
Drawer face - 1
15
Step 5 - requires K, L, W, X
Step 6 - requires A, B, Y, Z, CC
Step 9 - requires W
Step 5 - requires K, L, W, X Step 9 - requires W
Step 13
Step 12 - requires N, Z, C
, X
Step 13
Step 12 - requires
, X
Step 13
Step 12 - requires
5
Parts List
Wood dowel - 16
Cam bolt - 22
Cam - 22
Screw 3.8 x 35 mm - 4
Screw 4 x 25 mm - 2
Pull - 1
Bolt - 2
Screw 3 x 10 mm - 12
Cam covers - 8
Drawer connector - 2
Screw 3.5 x 12 mm - 4
Screw 4.7 x 12.5 mm - 2
Drawer connector - 4
Screw 3 x 16 - 4
Glue - 1 Wrench - 1
Locking castor - 2
Castor - 2
Rail track (right) - 1
Rail track (right) - 1
Rail track (left) - 1
Rail track (left) - 1
AP
B Q
C R
DS
E T
F U
GV
H
I
J
K
L
M
N
O
D x 4 E x 4 F x 4
E x 4 F x 4
Hardware List
A X 35 pcs B X 25 pcs C X 4 pcs E X 17 pcs
F X 2 pcs
D X 14 pcs
G X 34 pcs
st
B X 25 pcs C X 4 pcs E X 17 pcs
D X 14 pcs
G X 34 pcs H X 6 pcs I X 2 pcs J X 2 pcs
L x 2
pcs
M x 2
pcs
N x 2
pcs
E
C

N, Z, CC
N, Z, CC
E X 17 pcs
J X 2 pcs
Model No. 068-7561-2
6Model No. 068-7561-2
Assembly
ImportantNote:
+/- on the cam should be positioned
as shown.
Do not overtighten the cam bolt.
1. 2. 3.
4. 5.
HELPFUL HINTS
Readeach section carefully before starting. It is very importantthateach step is performed in
Makesure all parts are included. Most board parts are labelled or stamped on the raw edge.
Work in spacious area, preferably on a carpet, near the place theunitwill be located.
Do not use power tools to assemble yourfurniture. Power tools may strip ordamage the parts.
•Identify, sort and count the parts beforebeginning assembly.
•Compression dowels should be tappedinwith arubber mallet.
•Slides have a lip on the right side only.
•Back panels provide stability and support.
•Unit may collapse withoutthe back panel installed.
Clean the productwith your choice of furniture polish and asoft cloth. DO NOT USE harsh
chemicals or abrasive cleaners.
•Move your new furniture carefully. Twopeople are needed to liftandcarry the unit to its new
location.
•Neverpush or drag your furniture (especially on acarpet).
This illustration shows how the cam fastening system works.
Needed for assembly:
HammerScrewdriverScrewdriver2 people
160º~185º

Step 1
Requires 1, A, G
Step 2 x 2
Requires 2, B
AG
Assembly
1
A
G
B
2
B
7
Assembly
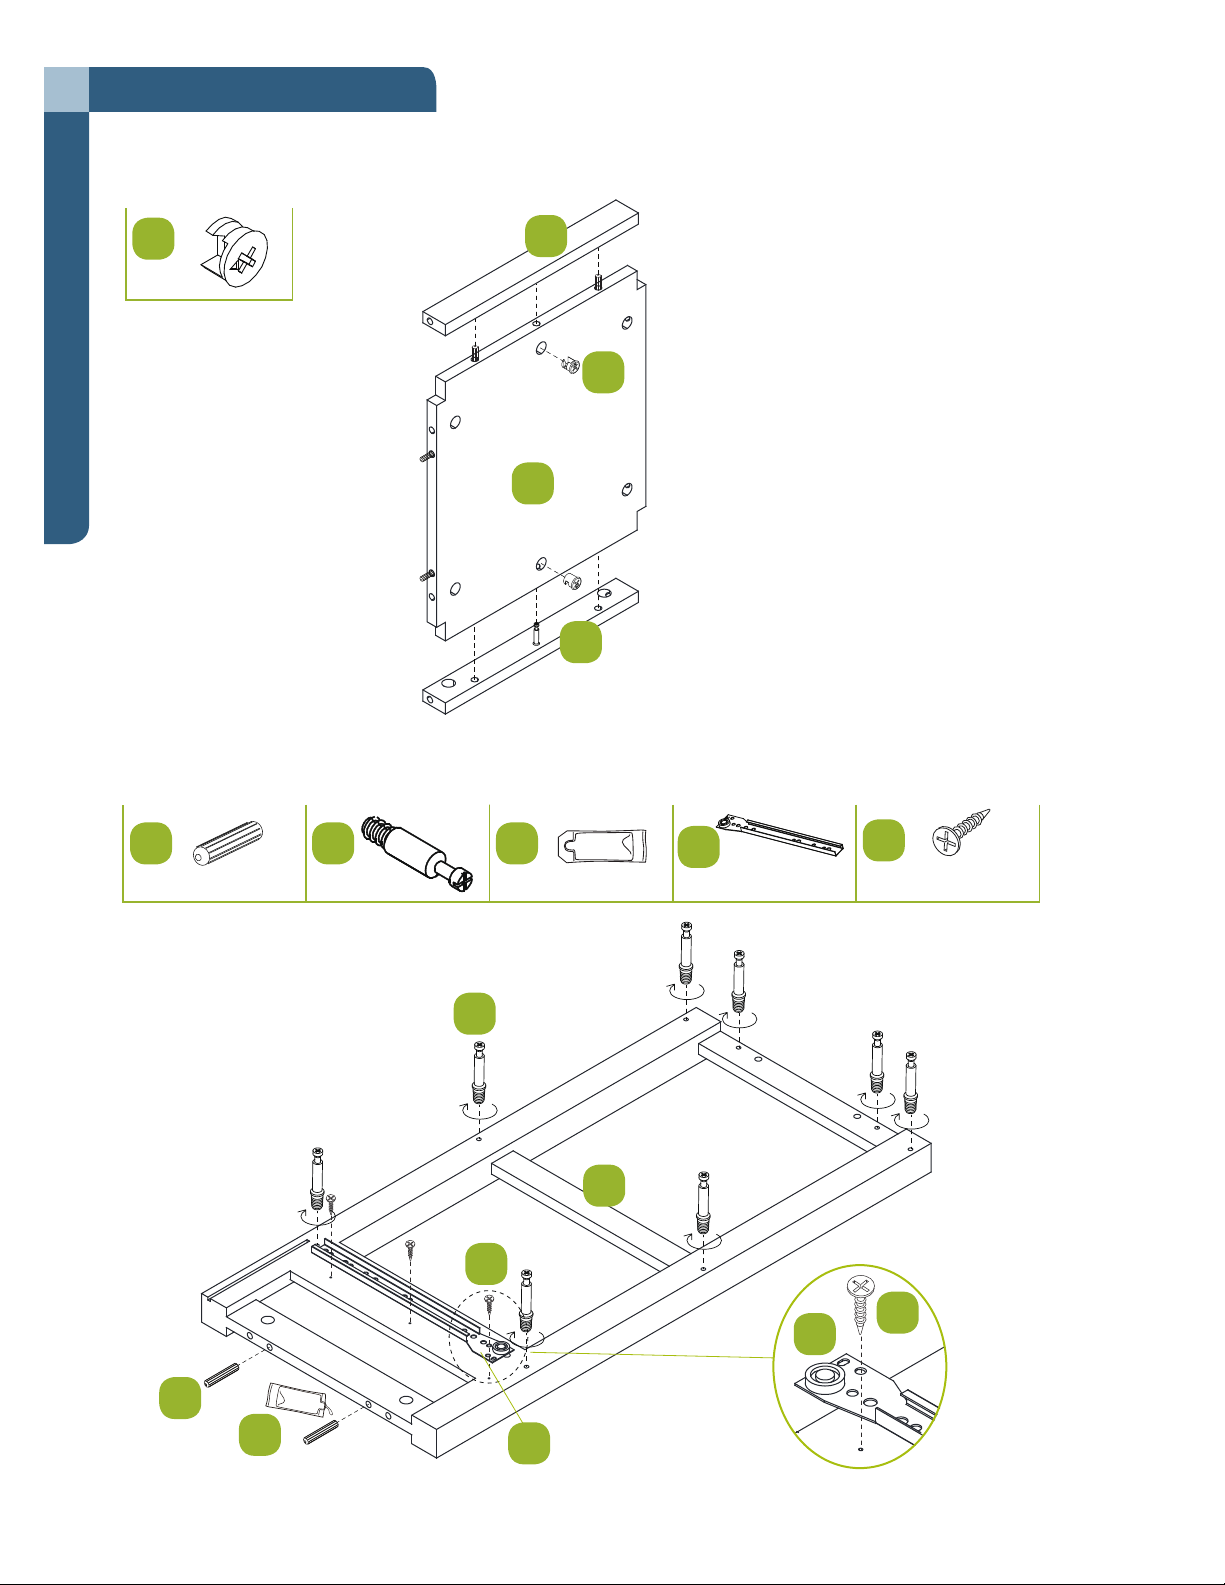
LN
Step 3
Requires 1, 2, C
Step 4
Requires 6, A, B, G, L, N
5
5
A
B G
A
3 x 10 mm
C
C
1
2
2
L
L
N
N
B
G
A
D x 4 E x 4 F x 4
Hardware List
STEP 1
A X 35 pcs B X 25 pcs C X 4 pcs
F X 2 pcs
D X 14 pcs
G X 34 pcs
X 2
6
Step 3 - requires D, W, X
Step 4 - requires J, W, X
8
Assembly
Model No. 068-7561-2

Step 3 - requires D, W, X
Step 4 - requires J, W, X
Step 5
Requires 3, 4, A, G
Step 6
Requires 7, A, B, G, M, N
Step 2 - requires C, W, X
Step 3 - requires D, W, X
Step 4 - requires J, W, X
AG
4
3
AG
M
M
N
N
B
7
G
A
E X 17 pcs
D X 14 pcs
MN
B G
A
3 x 10 mm
Hardware List
STEP 1
A X 35 pcs B X 25 pcs C X 4 pcs
F X 2 pcs
D X 14 pcs
G X 34 pcs
X 2
E x 4 F x 4
Step 7
Step 8 - requires Q, R, S, W, X
Step 11 - r
9
Assembly

Step 7
Step 8 - requires Q, R, S, W, X
Step 10 - r
Step 11 - r
Step 7
Requires 1, 3, 4, 5, 6, 7, C, O
Step 8
Requires T, U, V
Step 6 - requires A, B, Y, Z, CC
Step 7
Step 8 - requires Q, R, S, W, X
Step 10 - r
Step 11 - r
U V
T
CO
1
C
O
4
5
6
7
3
T
T
1
U
U
V
E X 17 pcs
Step 11 - requires O, X, AA
Step 14 - requires
Step 15 - requires T
10
Assembly
Model No. 068-7561-2

Step 10 - requires M, V
Step 11 - requires O, X, AA
Step 14 - requir
Step 15 - requir
Step 9
Requires 8, 9, B, Q
Step 10
Requires 9, 10, C
Step 10 - requires M, V
Step 11 - requires O, X, AA
Step 14 - requir
Step 15 - requir
STEP 1
X 2
4 x 25 mm
C
BQ
B
Q8
9
C
9
10
BB
11
Assembly

equires BB
es T, U
Step 11
Requires H, I
Step 12
Requires 11, 12, 13, D, E, P
equires BB
es T, U
3 x 16 mm
3.5 x 12 mm 3.8 x 35 mm
I
H
I
10 H
D
E
P
11
12
13
E P
D
12
Assembly
Model No. 068-7561-2
°90
2)
1)
I
H

4.7 x 12.5 mm
Step 1 13
Requires 14, 15, F, R, S
Step 14
Requires J, K, N
Assembly
14
15 R
S
F
K
N
J
11
12
15
R S
F
st
B X 25 pcs C X 4 pcs E X 17 pcs
D X 14 pcs
G X 34 pcs H X 6 pcs I X 2 pcs J X 2 pcs
L x 2
pcs
M x 2
pcs
N x 2
pcs
E
3 x 10 mm
K N
J
Hardware List
STEP 1
A X 35 pcs B X 25 pcs C X 4 pcs E X 17 pcs
F X 2 pcs
D X 14 pcs
G X 34 pcs
X 2
13
Assembly
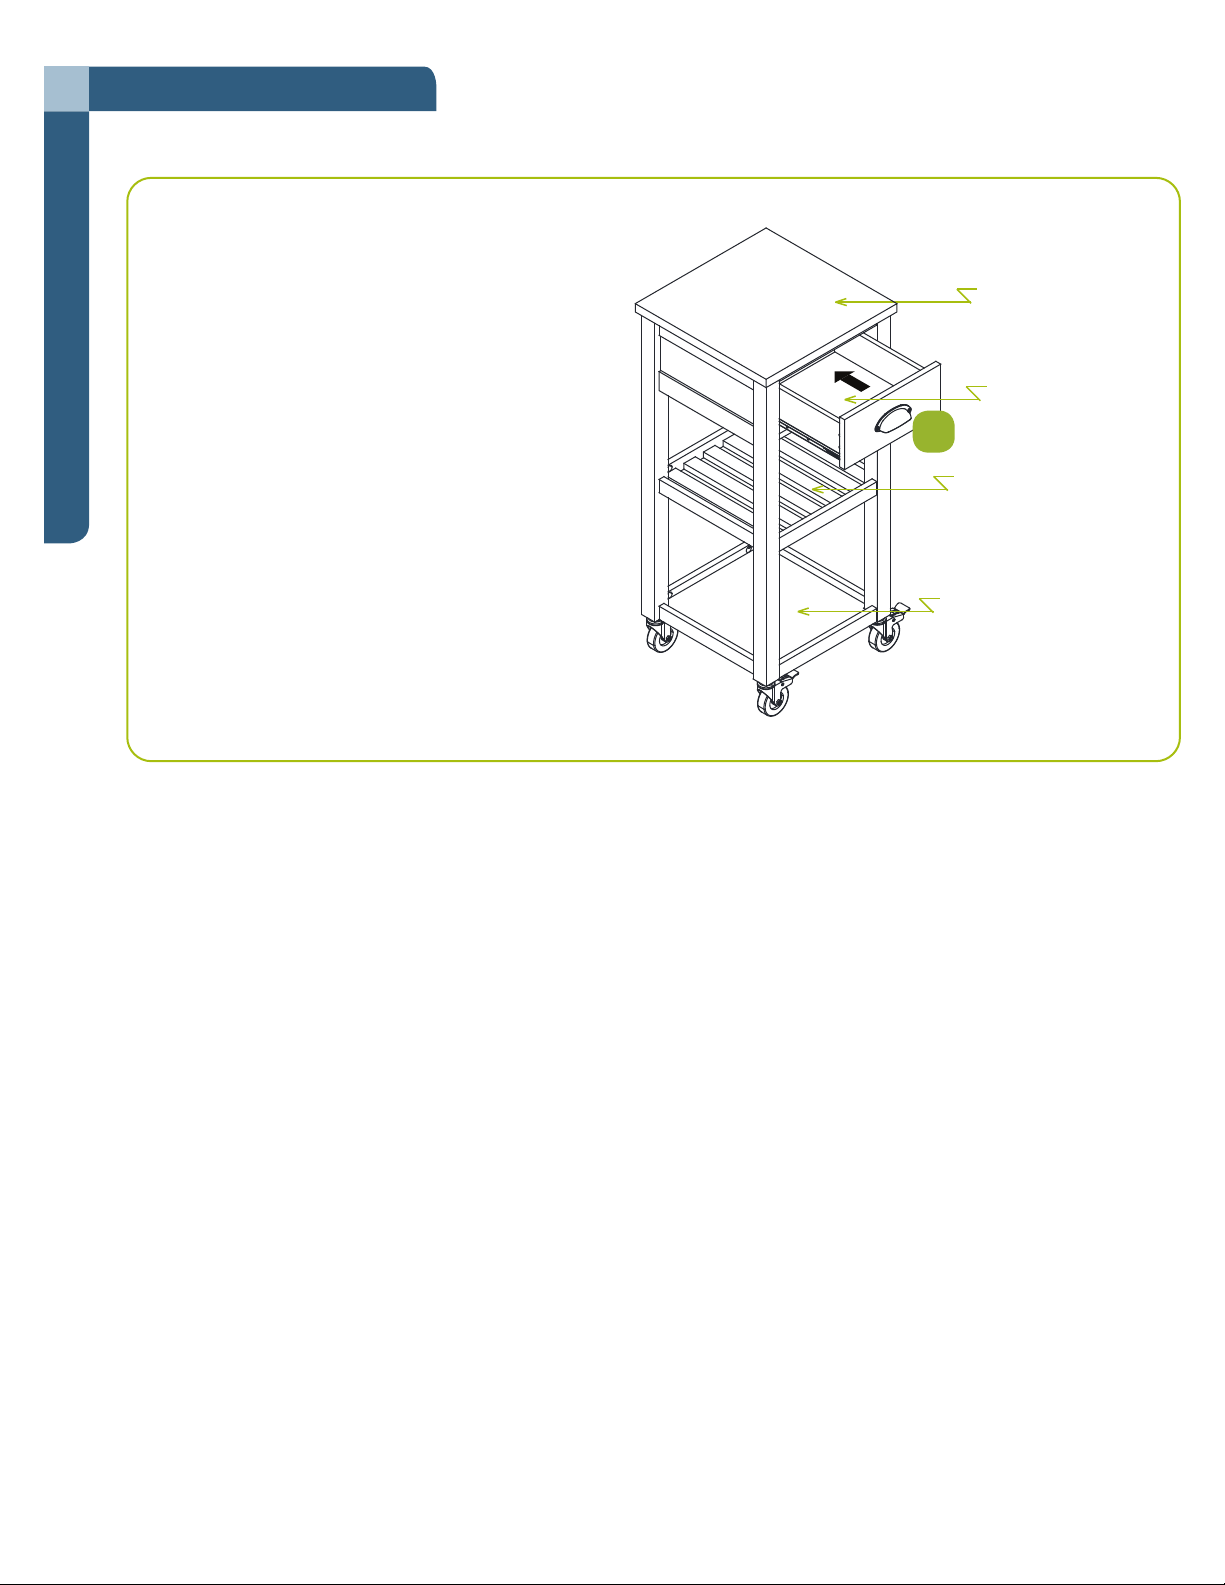
Enjoy your furnitureStep 15
22 lb 15 oz
(10.4 kg)
15
3 lb 5 oz
(1.5 kg)
16 lb 2 oz
(7.3 kg)
16 lb 2 oz
(7.3 kg)
14
Assembly
Model No. 068-7561-2
WEIGHT LIMITS
Please make sure that all the items are
removed before moving the assembled unit.
The unit must be lifted by more than one person
not dragged or pushed. Failure to do so will
cause product damage, instability, product collapse,
and/or serious injury.
This unit has been designed to support the maximum
loads shown. Exceeding these load limitscould
cause sagging, instability, product collapse,
and/or serious injury.

15
Technical Specications
Dimensions (L x W x H) 40 x 40 x 92.2 cm
15 3/4 x 15 3/4 x 36 5/16"
Product weight 14 kg
30 lb 14 oz
Warranty
This For Living product carries a one (1) year warranty against defects in workmanship and materials. Trileaf Distribution
agrees to replace a defective product free of charge within the stated warranty period, when returned by the original
purchaser with proof of purchase. This product is not guaranteed against wear or breakage due to misuse and/or abuse.
MC


Desserte
Nº de modèle : 068-7561-2
Numéro sans frais : 1 877 483-6759
Instructions d'assemblage
IMPORTANT : Veuillez lire attentivement et bien comprendre le présent guide avant d'assembler cet article.
Avant de commencer l'assemblage, assurez-vous que toutes les pièces sont présentes. Comparez les
pièces à la liste decontenu de l'emballage. S’il manque des pièces, ousi vous avez des questions,
communiquez avec leservice d’assistance téléphonique sans frais au 1 877 483-6759 (numéro sans frais).

Step 1 - requires E, F, I, G, H, P
Step 2 - requires C, W, X
Fabriqué en Chine
Importé par Trileaf Distribution Trifeuil Toronto, Canada M4S 2B8

Step 1 - requires E, F, I, G, H, P
Step 2 - requires C, W, X
Step 1 - requires E, F, I, G, H, P
Step 5 - requires K, L, W, X
Step 6 - requires A, B, Y, Z, CC
Step 9 - requires W
3
Consignes de sécurité importantes
Table des matières 3
Consignes de sécurité importantes 3
Liste des pièces
4
Assemblage
6
15
Fiche technique
15
Garantie
IMPORTANT : LISEZ CE GUIDE ATTENTIVEMENT ET CONSERVEZ-LE POUR TOUTE CONSULTATION ULTÉRIEURE.
Table des matières
Avertissement!Pour réduire le risque de blessures graves, lisez les
consignes de sécurité suivantes avant d'assembler et d'utiliser ce produit.
Lorsqu’il s’agit d’articles pour la maison, il est essentiel qu’ils puissent faire face aux réalités de la vie
quotidienne. Conçus en fonction de la famille, les articles For Living allient un aspect traditionnel à des
caractéristiques de conception soucieuses des besoins de la famille. Vous pouvez maintenant vous
concentrer sur ce qui est important, soit de créer des souvenirs mémorables dans votre famille.
•
•
Ce produit est destiné à une utilisation en intérieur.
•Le produit doit être placé sur un sol plat et horizontal.
•Tout montage ou d'entretien du produit doivent être effectués par les adultes.
•Les sacs en plastique peuvent être dangereux. Pour éviter dangereuse de suffocation
conservez ce sac hors de la portée des enfants.
MC

4Nº de modèle : 068-7561-2
Tablette inférieure – 1 Côté droit du tiroir – 1
Garniture de tablette inférieure – 2
Garniture arrière de fond – 1
112
2
3
Garniture avant de fond – 1
4
Tablette supérieure – 1
5
Cadre latéral gauche – 1
6
Cadre latéral droit – 1
7
Garniture supérieure – 1
8
Panneau supérieur – 1
9
Panneau arrière – 1
10
Côté gauche du tiroir – 1
11
Côté arrière du tiroir – 1
13
Fond du tiroir – 1
14
Face du tiroir – 1
15
Step 5 - requires K, L, W, X
Step 6 - requires A, B, Y, Z, CC
Step 9 - requires W
Step 5 - requires K, L, W, X Step 9 - requires W
Liste des pièces
Step 13
Step 12 - requires N, Z, C
Table of contents
Languages:
Popular Outdoor Cart manuals by other brands


Sound Cart
Sound Cart MiniCart Sound Cart manual

VonHaus
VonHaus 2515213 instructions

Perrot
Perrot RollcarTV-3 operating instructions

Office Star Products
Office Star Products WorkSmart DOL8000 operating instructions

SYAS Technology
SYAS Technology SCE1 Manual book

Choice
Choice 109CARTBS2 Assembly instructions