Forlinx SoM FET1052-C User manual

2
2
Attentions
MUST READ BEFORE WORKING WITH OK335xD
Product Operation Environment:
Hot-plug of CPU module and peripheral modules is strictly prohibited.
Please follow all the warnings and instructions marked on the product.
Please keep the product dry. Once splashed or immersed by any liquid, cut off the power and
dry it out immediately.
Please store and operate the product in ventilating conditions to avoid damages brought by
over high temperature.
Please do not use or store the product in dusty or untidy conditions.
Please do not use or store the product in alternate cold and hot conditions to avoid
condensing which will damage components.
Please do not treat the product rudely. Any falling-off, knocking and violate shaking may cause
destruction to circuit and components.
Please do not clean the product with organic solvents or corrodible liquids.
Please do not dismantle or repair the product by yourself. Contact us when the product
malfunctions.
Please do not modify the product by yourself or use fittings unauthorized by us. Otherwise,
the damage caused by that will be on your part and not included in guarantee terms.
Any questions please feel free to contact Forlinx Technical Service Department..

3
3
Copyright Announcement
Please note that reproduction of this User Manual in whole or in part, without express written permission from
Forlinx, is not permitted.
4
4
Updating Record
Date
Version
Updated
Manual
SoM
Carrier board
Sept., 2019
V1.2
V1.1/V1.2
V1.1/V1.2
Added SoM occupied pins description, carrier board
unavailable pins marks and notes.
Oct., 2018
V1.1
V1.1/V1.2
V1.1/V1.2
1. Modified description about pin definition about SoM
pins J1-63 to J1-79;
2. added SoM pull-up and pull-down pins configuration;
3. Modified incorrect description about audio network
marks, change SAI1_RXD to SAI2_RXD;
4. added OV5640 circuit description
Aug., 2018
V1.0
V1.1
V1.1
First draft
5
5
Technical Support and Innovation
1. Technical Support
1.1 information about our company’s software and hardware
1.2 problems related to our software and hardware manual
1.3 after-sale technical support for OEM and ODM
1.4 requirement of source code and other info which is lost or updated
1.5 failure diagnose and other after-sale service
2. Range of Technical Discussion ( non-compulsory)
2.1 modification and comprehension of source code
2.2 how to implant OS
2.3 software and hardware problems occured in self-modifying and programming
3. Accesses to Technical Support
3.1 Tel (non-instant messenger): 0312-3119192
3.2 Email address (non-instant messenger) :
3.2.3. About Android: android@forlinx.com
3.3 Forum (non-instant): http://bbs.witech.com.cn
4. Timetable for Technical Support
9:00am to 11:30am, 13:30pm to 17:00pm, Monday to Friday
Support will not be available on public holidays. Please send your questions to the email addresses
above or Column Technical Support in forum. We’ll reply as soon as we are back.
5. Access to Materials
Log in “bbs.witech.com.cn”. Click “materials for development board”and download what you
need.
6
6
Contents
Attentions.................................................................................................................................................... 2
Chapter 1 Overview of Freescale i.MX RT1050..................................................................................................8
Chapter 2 Overview of SoM FET1052-C.......................................................................................................... 10
2.1 Exterior of SoM FET1052-C................................................................................................................10
2.2 Dimension Drawing..............................................................................................................................11
2.3 SoM Parameters....................................................................................................................................12
2.3.1 Frequency.................................................................................................................................. 12
2.3.2 Power Supply............................................................................................................................ 12
2.3.3 Working Environment............................................................................................................... 12
2.3.4 SoM Interface Speed................................................................................................................. 12
2.4 SoM Resource...................................................................................................................................... 13
2.5 SoM FET1052-C Pin Definition.......................................................................................................... 14
2.5.1 SoM Connector Schematic........................................................................................................14
2.5.2 SoM FET1052-C Pin Details.................................................................................................... 15
2.6 SoM FET1052-C Pin Spec...................................................................................................................19
2.6.1 Power Pins................................................................................................................................. 19
2.6.2 Reset Control Pin.......................................................................................................................19
2.6.3 Boot Pin..................................................................................................................................... 19
2.6.4 Function Control Pin................................................................................................................. 20
2.6.5 UART.........................................................................................................................................20
2.6.6 CAN Pin.................................................................................................................................... 20
2.6.7 IIC..............................................................................................................................................20
2.6.8 SD.............................................................................................................................................. 20
2.6.9 NET........................................................................................................................................... 21
2.6.10 LCD......................................................................................................................................... 21
2.6.11 JTAG........................................................................................................................................21
2.6.12 USB......................................................................................................................................... 22
2.6.13 TOUCH................................................................................................................................... 22
2.6.14 SoM Pull-up and Pull-down Pins............................................................................................23
2.7 SoM Hardware Instruction................................................................................................................... 23
Chapter 3 OK1052-C Carrier Board Introduction............................................................................................. 25
3.1 Overview of OK1052-C....................................................................................................................... 25
3.2 OK1052-C Dimensions........................................................................................................................ 26
3.3 Carrier Board Resource........................................................................................................................26
3.4 OK1052-C Carrier Board Introduction................................................................................................ 27
3.4.1 Carrier Board Power..................................................................................................................27
3.4.2 LED........................................................................................................................................... 28
3.4.3 Power key and reset key............................................................................................................28
3.4.4 Boot configuration.....................................................................................................................30
3.4.5 UART.........................................................................................................................................31
3.4.6 RTC............................................................................................................................................32
3.4.7 Audio......................................................................................................................................... 32
3.4.8 Ethernet......................................................................................................................................33

7
7
3.4.9 SWD/ JTAG...............................................................................................................................35
3.4.10 LCDS Connector..................................................................................................................... 35
3.4.11 USB OTG................................................................................................................................ 36
3.4.12 USB 2.0................................................................................................................................... 37
3.4.13 CAN.........................................................................................................................................37
3.4.14 ADC.........................................................................................................................................38
3.4.15 SPI........................................................................................................................................... 39
3.4.16 KEYPAD................................................................................................................................. 40
3.4.17 TF card.....................................................................................................................................40
3.4.18 Camera.....................................................................................................................................41
Appendix 1 Hardware Designing Guideline...................................................................................................... 43
Appendix 2 Connectors Dimension................................................................................................................... 44
Appendix 3 Minimum System........................................................................................................................... 46

8
8
Chapter 1 Overview of Freescale i.MX RT1050
The i.MX RT1050 is a new processor family featuring NXP’s advanced implementation of the Arm
Cortex®-M7 core, which operates at speeds up to 528 MHz to provide high CPU performance and
best real-time response.
The i.MX RT1050 processor has 512 KB on-chip RAM, which can be flexibly configured as TCM
or general-purpose on-chip RAM. The i.MX RT1050 integrates advanced power management
module with DCDC and LDO that reduces complexity of external power supply and simplifies
power sequencing. The i.MX RT1050 also provides various memory interfaces, including SDRAM,
RAW NAND FLASH, NOR FLASH, SD/eMMC, Quad SPI, and a wide range of other interfaces
for connecting peripherals.
Targeting Application
•UAV
•Robotic and motor control
•Intelligent lighting
•Commercial solar inverter
•Indoor conditioner
•Home appliance
•Concentrator
9
9
The i.MX RT1050 also provides various memory interfaces, including 16-bit SDRAM, QuadSPI NAND FLASH,
QuadSPI NOR FLASH, and a wide range of other interfaces for connecting peripherals, such as WLAN, Bluetooth™,
GPS, displays, and camera sensors. The i.MX RT1050 also has rich audio and video features, including LCD display,
basic 2D graphics, camera interface, SPDIF, and I2S audio interface.
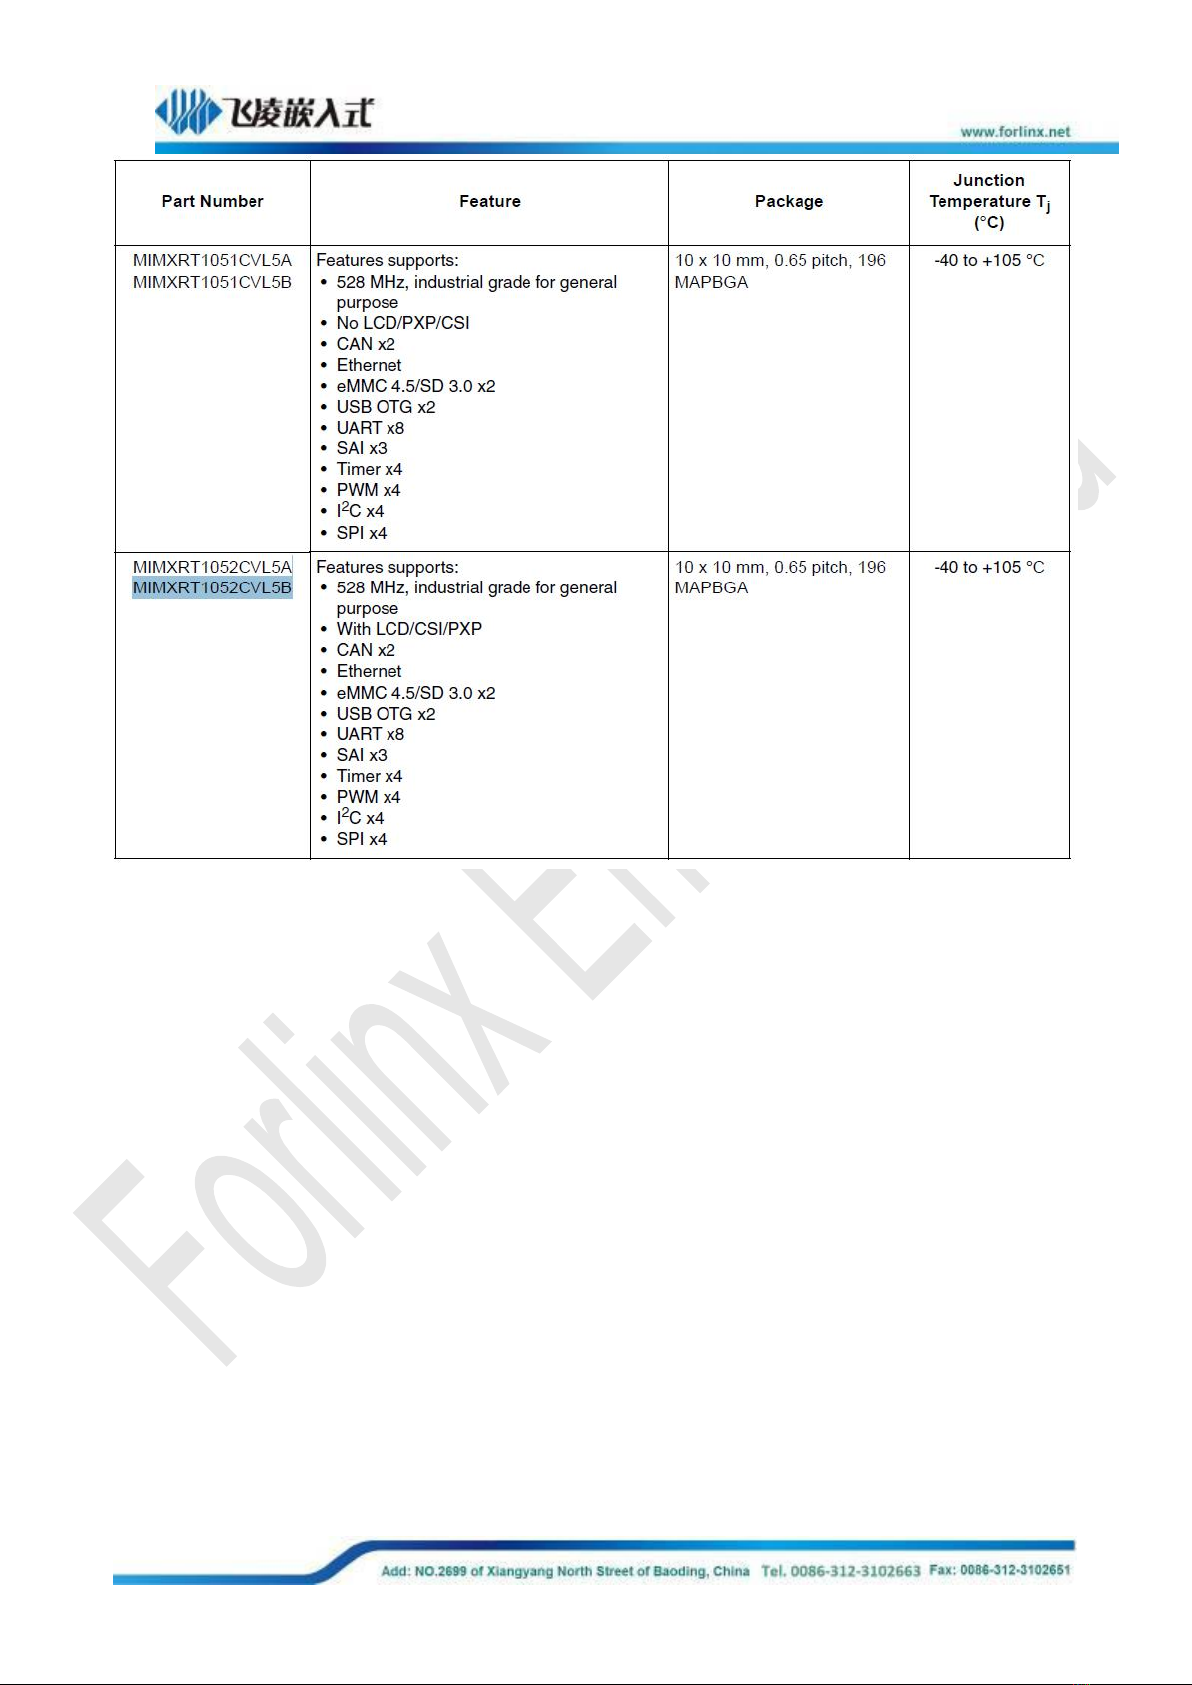
The CPU used on SoM FET1052-C is MIMXRT1052CVL5B
For more details about i.MX RT1050, please refer to NXP website

10
10
Chapter 2 Overview of SoM FET1052-C
2.1 Exterior of SoM FET1052-C
1) SoM FET1052-C with 16M SDRAM and 4M QSPI NOR Flash
Front side Back side
2) SoM FET1052-C with 32M SDRAM and 16M QSPI NOR Flash
Front side Back side
11
11
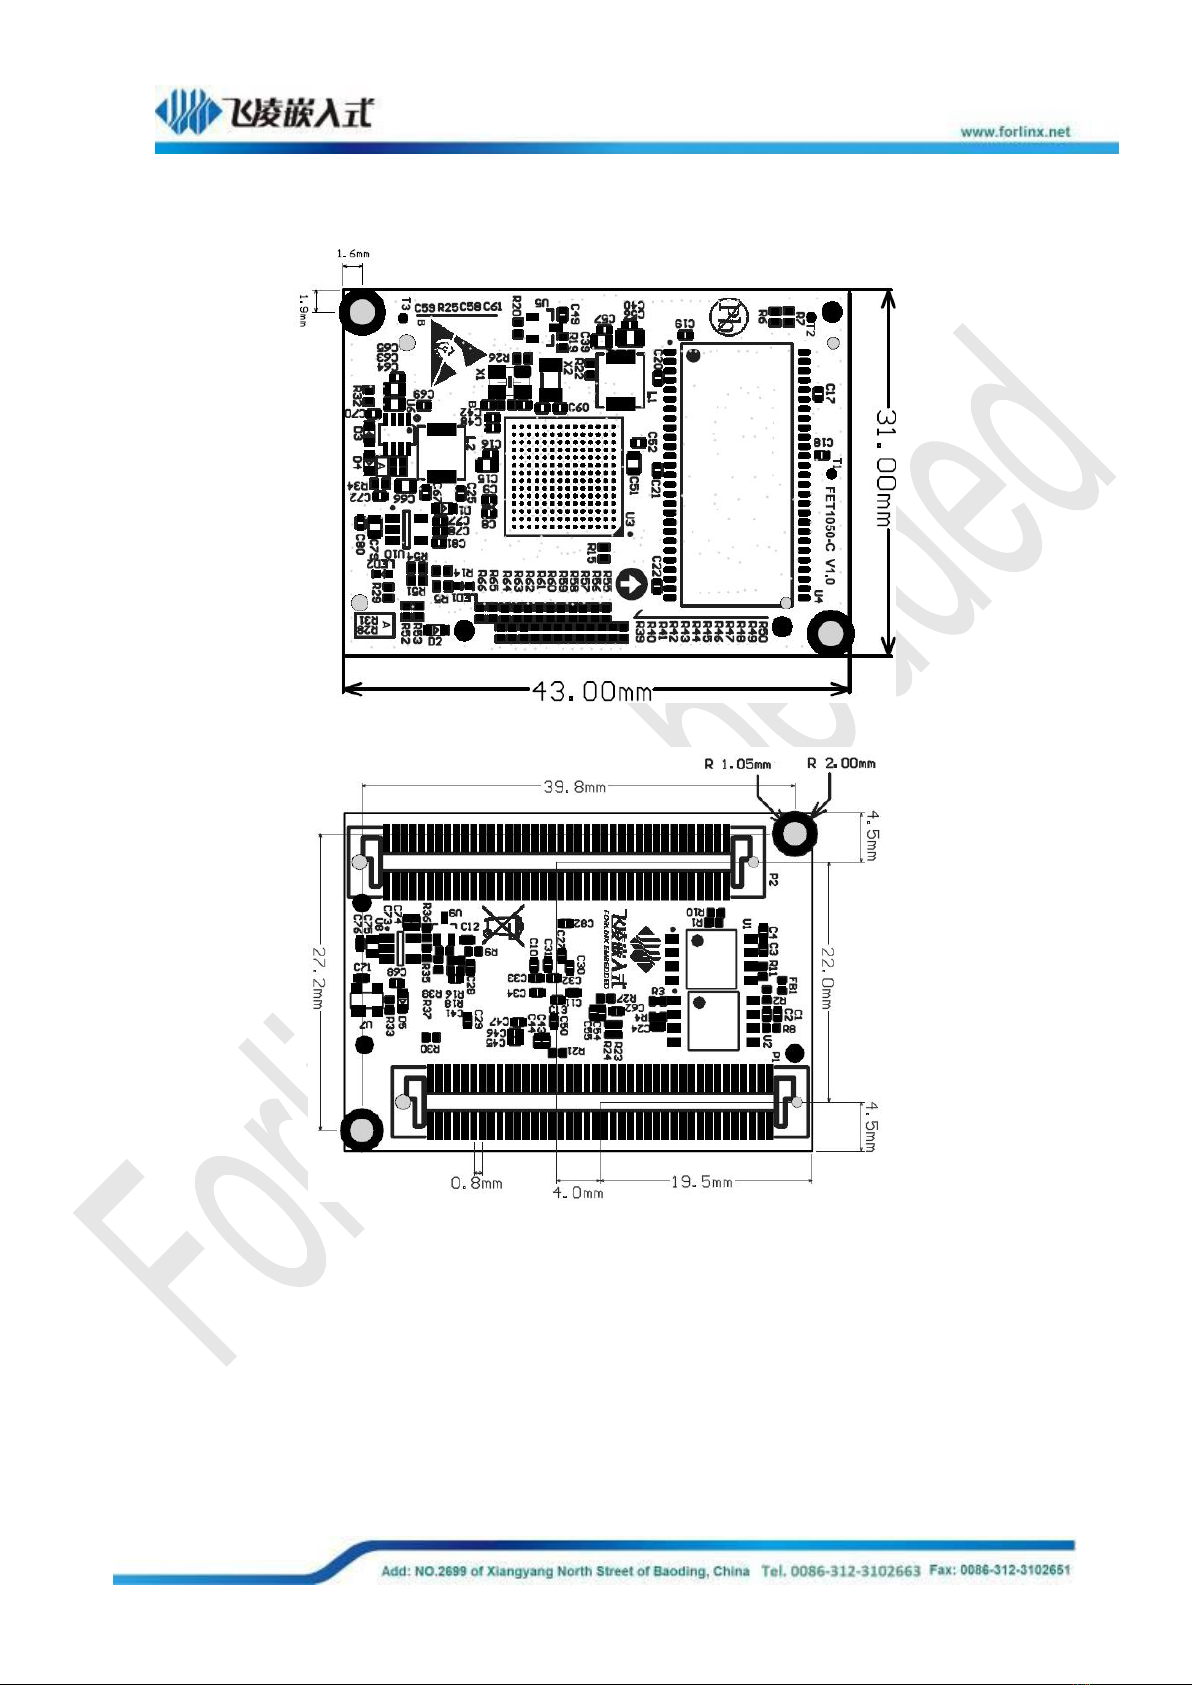
2.2 Dimension Drawing
Dimensions: 31mmx 43mm
PCB: EING, 4-layer, 1.6mm
Packing connector: 2x connectors with 80 pins with pith of 0.8mm, connector model is
ENG_CD_5177983, and connector model on carrier board is ENG_CD_5177984, as for connector
dimensions please refer to the appendix.
The SoM could be fixed on carrier board by duplex copper cylinder(M2* 5mm) and assorted screw
is M2* 4mm.

12
12
2.3 SoM Parameters
2.3.1 Frequency
Item
Spec.
Note
Minimum
Classic
Maximum
Unit
System frequency
--
--
528
MHz
--
RTC
--
32.768
--
KHz
--
2.3.2 Power Supply
Item
Pin NO.
Spec.
Note
Minimum
Classic
Maximum
Unit
Main power
VSYS
4.5
5
5.5
V
--
2.3.3 Working Environment
Item
Spec.
Note
Minimum
Classic
Maximum
Unit
Temperature
Working
-40
25
+85
℃
Industrial grade
Storage
-40
25
+125
℃
Humidity
Working
10
--
90
%RH
Non-condensing
Storage
5
--
95
%RH
2.3.4 SoM Interface Speed
Interface
Spec.
Note
Minimum
Classic
Maximum
Unit
UART
--
115200
--
bps
SPI
--
--
52
MHz
IIC
--
100
400
Kbps
CAN
--
--
1
Mbps
SD/ MMC/ SDIO
--
--
50
Mbps
--
USB
--
--
480
Mbps
--
AD
0.7
--
1.25
us
Fadc=40MHz

13
13
2.4 SoM Resource
Interface
QTY
Spec.
LCD
1
Up to RGB 888, WXGA up to 1366x 768
Camera
1
8-bit DVP, up to 5.0MP
SD/ MMC/ SDIO
≤2
Up to UHS-1 SDR104 SD and 1-bit or 4-bit transferring mode of SDIO card
(104MB/s)
SD/ MMC/ SDIO1: 4-bit data bus
SD/ MMC/ SDIO2: 8-bit data bus (used as eMMC on SoM)
SD/ MMC/ SDIO3: 8-bit data bus
SD/ MMC/ SDIO4: 4-bit data bus
USB
2
USB2.0 (up to 480Mbps), integrated with HS USB Phy
SAI
≤3
Up to 3x IIS audio
SPDIF
1
Sony and Philips digital audio interface
UART
≤8
Each up to 5.0Mbps
eCSPI
≤4
Full duplex enhanced synchronous serial interface, up to 52Mbit/ s, it could be
configured as host/ slave mode, four chip selections for multiple peripherals
IIC
≤4
Ethernet
≤1
10/ 100Mbps
PWM
≤32
16-bit
JTAG
supported
Keypad
supported
8* 8
QSPI
≤2
On SoM, the two QSPi are mounted with QSPI NAND Flash and QSPI NOR
Flash
CAN
≤2
CAN2.0B
ADC
≤10
Two 12-bit analogy and digital converter (ADC), integrated with input up to 10
channels
ISO7816-3
≤2
Up to 3x PWMSS, and each has below features
eHRPWM: 16-bit timer, up to 2 separate PWM output
eCAP: 32-bit timer, 1 special for input capture
eQEP: rotating decode unit
EBI
1
16-bit parallel bus

14
14
2.5 SoM FET1052-C Pin Definition
2.5.1 SoM Connector Schematic
P1
P2
15
15
2.5.2 SoM FET1052-C Pin Details
Table 1 P1 connectors (odd) pin definition
NUM
BALL
Signal
GPIO
VOL
Spec.
Default Function
J1_1
K1
K1_SD1_D1
GPIO3_IO15
3.3V
SD data 1
SD1_D1
J1_3
J1
J1_SD1_D0
GPIO3_IO14
3.3V
SD data 0
SD1_D0
J1_5
J3
J3_SD1_CLK0
GPIO3_IO13
3.3V
SD data clock
SD1_CLK0
J1_7
J4
J4_SD1_CMD
GPIO3_IO12
3.3V
SD data command
SD1_CMD
J1_9
J2
J2_SD1_D3
GPIO3_IO17
3.3V
SD data 3
SD1_D3
J1_11
H2
H2_SD1_D2
GPIO3_IO16
3.3V
SD data 2
SD1_D2
J1_13
-
GND
-
-
J1_15
P2
P2_FlexSPI_CLK_B
GPIO3_IO04
3.3V
QSPI_B clock
FlexSPI_CLK_B
J1_17
N3
N3_FlexSPI__B_SS0
GPIO3_IO05
3.3V
QSPI_B chip selection
FlexSPI_B_SS0
J1_19
M3
M3_FlexSPI_D1_B
GPIO3_IO02
3.3V
QSPI_B data 1
FlexSPI_D1_B
J1_21
M4
M4_FlexSPI_D0_B
GPIO3_IO03
3.3V
QSPI_B data 0
FlexSPI_D0_B
J1_23
L5
L5_FlexSPI_D3_B
GPIO3_IO00
3.3V
QSPI_B data 3
FlexSPI_D3_B
J1_25
M5
M5_FlexSPI_D2_B
GPIO3_IO01
3.3V
QSPI_B data 2
FlexSPI_D2_B
J1_27
-
GND
-
J1_29
L3
L3_FlexSPI__A_SS0
GPIO3_IO06
3.3V
QSPI_A chip selection
FlexSPI_A_SS0
J1_31
L4
L4_FlexSPI_A_CLK
GPIO3_IO07
3.3V
QSPI_A clock
FlexSPI_A_CLK
J1_33
P3
P3_FlexSPI_D0_A
GPIO3_IO08
3.3V
QSPI_A data 0
FlexSPI_D0_A
J1_35
N4
N4_FlexSPI_D1_A
GPIO3_IO09
3.3V
QSPI_A data 1
FlexSPI_D1_A
J1_37
P4
P4_FlexSPI_D2_A
GPIO3_IO10
3.3V
QSPI_A data 2
FlexSPI_D2_A
J1_39
P5
P5_FlexSPI_D3_A
GPIO3_IO11
3.3V
QSPI_A data 3
FlexSPI_D3_A
J1_41
-
GND
-
J1_43
N7
N7_OTG_2_D_N
--
--
OTG2 data
OTG_2_D_N
J1_45
P7
P7_OTG_2_D_P
--
--
OTG2 data
OTG_2_D_P
J1_47
M8
M8_OTG1_D_N
-
-
OTG1 data
OTG_1_D_N
J1_49
L8
L8_OTG1_D_P
--
--
OTG1 data
OTG_1_D_P
J1_51
H10
H10_USB_OTG1_ID
GPIO1_IO01
3.3V
OTG1 ID detection
USB_OTG1_ID
J1_53
--
GND
--
--
J1_55
H11
H11_ADC2_02
GPIO1_IO29
3.3V
ADC touching Y+
TOUCH_Y+
J1_57
G12
G12_ADC2_03
GPIO1_IO30
3.3V
ADC touching X-
TOUCH_X-
J1_59
H12
H12_ADC2_01
GPIO1_IO28
3.3V
ADC touching Y-
TOUCH_Y-
J1_61
J14
J14_ADC2_04
GPIO1_IO31
3.3V
ADC touching X+
TOUCH_X+
J1_63
J13
J13_CSI_DATA06
GPIO1_IO27-
3.3V
CSI data 6
CSI_DATA06
J1_65
L12
L12_CSI_PIXCLK
GPIO1_IO20
3.3V
CSI pixel clock
CSI_PIXCLK
J1_67
L13
L13_CSI_DATA07
GPIO1_IO26
3.3V
CSI data 7
CSI_DATA07
J1_69
M13
M13_CSI_DATA08
GPIO1_IO25
3.3V
CSI data 8
CSI_DATA08
J1_71
K12
K12_CSI_MCLK
GPIO1_IO21
3.3V
CSI clock
CSI_MCLK
J1_73
H13
H13_CSI_DATA09
GPIO1_IO24
3.3V
CSI data 9
CSI_DATA09
16
16
J1_75
K10
K10_CSI_HSYNC
GPIO1_IO23
3.3V
CSI horizontal sync.
CSI_HSYNC
J1_77
J12
J12_CSI_VSYNC
GPIO1_IO22
3.3V
CSI vertical sync.
CSI_VSYNC
J1_79
-
GND
GND
Table 2 LEFT (J302) connectors (even) pin definition
NUM
BALL
Signal
GPIO
VOL
Spec.
Default Function
J1_2
C6
C6_SEMC_D8
GPIO4_IO30
3.3V
SEMC bus data 8
SEMC_D8
J1_4
C5
C5_SEMC_D9
GPIO3_IO31
3.3V
SEMC bus data 9
SEMC_D9
J1_6
C4
C4_SEMC_D11
GPIO3_IO19
3.3V
SEMC bus data 11
SEMC_D11
J1_8
C3
C3_SEMC_D14
GPIO3_IO22
3.3V
SEMC bus data 14
SEMC_D14
J1_10
D5
D5_SEMC_D10
GPIO3_IO18
3.3V
SEMC bus data 10
SEMC_D10
J1_12
D4
D4_SEMC_D12
GPIO3_IO20
3.3V
SEMC bus data 12
SEMC_D12
J1_14
E5
E5_SEMC_D13
GPIO3_IO21
3.3V
SEMC bus data 13
SEMC_D13
J1_16
E4
E4_SEMC_D15
GPIO3_IO23
3.3V
SEMC bus data 15
SEMC_D15
J1_18
--
GND
J1_20
E3
E3_SEMC_D0
GPIO4_IO00
3.3V
SEMC bus data 0
SEMC_D0
J1_22
F4
F4_SEMC_D2
GPIO4_IO02
3.3V
SEMC bus data 2
SEMC_D2
J1_24
F2
F2_SEMC_D4
GPIO4_IO04
3.3V
SEMC bus data 4
SEMC_D4
J1_26
F3
F3_SEMC_D1
GPIO4_IO01
3.3V
SEMC bus data 1
SEMC_D1
J1_28
G4
G4_SEMC_D3
GPIO4_IO03
3.3V
SEMC bus data 3
SEMC_D3
J1_30
G5
G5_SEMC_D5
GPIO4_IO05
3.3V
SEMC bus data 5
SEMC_D5
J1_32
H4
H4_SEMC_D7
GPIO4_IO07
3.3V
SEMC bus data 7
SEMC_D7
J1_34
H3
H3_SEMC_DM0
GPIO4_IO08
3.3V
SEMC bus data mask
off code
SEMC_DM0
J1_36
H5
H5_SEMC_D6
GPIO4_IO06
3.3V
SEMC bus data 6
SEMC_D6
J1_38
--
GND
GND
J1_40
L6
L6_WAKEUP
GPIO5_IO00
3.3V
Wakeup key
WAKEUP
J1_42
M6
M6_ONOFF
-
3.3V
Power key
J1_44
L7
L7_PERI_PWREN
GPIO5_IO02
3.3V
External power control
PERI_PWREN
J1_46
M7
M7_POR_B
--
3.3V
CPU reset pin
POR_B
J1_48
K7
K7_PMIC_ON_REQ
GPIO5_IO01
3.3V
External power enable
PMIC_ON_REQ
J1_50
N6
N6_OTG1_VBUS
--
5V
OTG1 power
OTG_1_VBUS
J1_52
P6
P6_OTG2_VBUS
--
5V
OTG2 power
OTG2_VBUS
J1_54
--
GND
--
--
J1_56
L10
L10_CAN2_RX
GPIO1_IO15
3.3V
CAN sending
CAN2_RX
J1_58
H14
H14_CAN2_TX
GPIO1_IO14
3.3V
CAN receiving
CAN2_TX
J1_60
M12
M12_UART2_RX
GPIO1_IO19
3.3V
UART2 sending
UART2_RX
J1_62
L11
L11_UART2_TX
GPIO1_IO18
3.3V
UART2 receiving
UART2_TX
J1_64
M14
M14_GPIO1_IO00
GPIO1_IO00
3.3V
GPIO
GPIO1_IO00
J1_66
K11
K11_I2C1_SDA
GPIO1_IO17
3.3V
IIC data
I2C1_SDA
J1_68
J11
J11_I2C1_SCL
GPIO1_IO16
3.3V
IIC clock
I2C1_SCL
J1_70
P13
P13_CLK1_OUT_N
--
--
Clock output
CLK1_OUT_N
J1_72
N13
N13_CLK1_OUT_P
--
--
Clock output
CLK1_OUT_P
17
17
J1_74
--
POR_BUTTON
--
3.3V
SoM reset pin
BUTTON
J1_76
--
GND
GND
J1_78
--
5V_SYS
--
5V
SoM power
5V_SYS
J1_80
--
5V_SYS
--
5V
SoM power
5V_SYS
Table 3 J2 connectors (odd) pin definition
NUM
BALL
Signal
GPIO
VOL
Spec.
Default Function
J2_1
B2
B2_SEMC_A9
GPIO4_IO18
3.3V
SEMC bus address 9
SEMC_A9
J2_3
C2
C2_SEMC_A0
GPIO4_IO09
3.3V
SEMC bus address 0
SEMC_A0
J2_5
B1
B1_SEMC_A6
GPIO4_IO15
3.3V
SEMC bus address 6
SEMC_A6
J2_7
G3
G3_SEMC_A2
GPIO4_IO11
3.3V
SEMC bus address 2
SEMC_A2
J2_9
G1
G1_SEMC_A1
GPIO4_IO10
3.3V
SEMC bus address 1
SEMC_A1
J2_11
G2
G2_SEMC_A10
GPIO4_IO23
3.3V
SEMC bus address 10
SEMC_A10
J2_13
H1
H1_SEMC_A3
GPIO4_IO12
3.3V
SEMC bus address 3
SEMC_A3
J2_15
--
GND
GND
J2_17
F1
F1_SEMC_BA1
GPIO4_IO22
3.3V
SEMCBANK selection
SEMC_BA1
J2_19
E1
E1_SEMC_CS0
GPIO4_IO29
3.3V
SEMC bus chip
selection
SEMC_CS0
J2_21
D2
D2_SEMC_RAS
GPIO4_IO25
3.3V
SEMC row latch saving
SEMC_RAS
J2_23
D1
D1_SEMC_WE
GPIO4_IO28
3.3V
SEMC writing enable
SEMC_WE
J2_25
C1
C1_SEMC_BA0
GPIO4_IO21
3.3V
SEMCBANK selection
SEMC_BA0
J2_27
D3
D3_SEMC_CAS
GPIO4_IO24
3.3V
SEMC column latching
SEMC_CAS
J2_29
--
GND
GND
J2_31
A12
A12_ENET_TX_DATA1
GPIO2_IO24
3.3V
Ethernet sending data 1
ENET_TX_DATA1
J2_33
B12
B12_ENET_TX_DATA0
GPIO2_IO23
3.3V
Ethernet sending data 0
ENET_TX_DATA0
J2_35
A13
A13_ENET_TX_EN
GPIO2_IO25
3.3V
Ethernet sending enable
ENET_TX_EN
J2_37
C13
C13_ENET_RX_ER
GPIO2_IO27
3.3V
Ethernet sending error
ENET_RX_ER
J2_39
C12
C12_ENET_RX_EN
GPIO2_IO22
3.3V
Ethernet sending enable
ENET_RX_EN
J2_41
E12
E12_ENET_RX_DATA0
GPIO2_IO20
3.3V
Ethernet receiving data 0
ENET_RX_DATA0
J2_43
D12
D12_ENET_RX_DATA1
GPIO2_IO21
3.3V
Ethernet receiving data 1
ENET_RX_DATA1
J2_45
B13
B13_ENET_TX_CLK
GPIO2_IO26
3.3V
Ethernet sending clock
ENET_TX_CLK
J2_47
--
GND
-
GND
J2_49
B14
B14_PWM3
GPIO2_IO31
3.3V
PWM3
PWM3
J2_51
C14
C14_GPIO2_IO30
GPIO2_IO30
3.3V
GPIO
GPIO2_IO30
J2_53
D13
D13_SD1_CD_B
GPIO2_IO28
3.3V
SD card plug detection
SD1_CD_B
J2_55
D14
D14_WDOG_B
GPIO2_IO29
3.3V
Watchdog
WDOG_B
J2_57
--
GND
GND
J2_59
G10
G10_JTAG_TRSTB
GPIO1_IO11
3.3V
JTAG reset input
JTAG_TRSTB
J2_61
F14
F14_JTAG_TDI
GPIO1_IO09
3.3V
JTAG data input
JTAG_TDI
J2_63
E14
E14_JTAG_TMS
GPIO1_IO06
3.3V
JTAG mode selection
JTAG_TMS
J2_65
F12
F12_JTAG_TCK
GPIO1_IO07
3.3V
JTAG clock input
JTAG_TCK
J2_67
F13
F13_JTAG_MOD
GPIO1_IO08
3.3V
JTAG/ SW mode convert
JTAG_MOD
18
18
J2_69
G13
G13_JTAG_TDO
GPIO1_IO10
3.3V
JTAG output
JTAG_TDO
J2_71
--
GND
GND
J2_73
F11
F11_BOOT_MODE0
GPIO1_IO04
3.3V
Boot mode selection 0
BOOT_MODE0
J2_75
G14
G14_BOOT_MODE1
GPIO1_IO05
3.3V
Boot mode selection 1
BOOT_MODE1
J2_77
G11
G11_GPIO1_IO03
GPIO1_IO03
3.3V
GPIO
GPIO1_IO03
J2_79
M11
M11_PWM0
GPIO1_IO02
3.3V
PWM0
PWM0
Table 4 J2 connectors (even) pin definition
NUM
BALL
Signal
GPIO
VOL
Spec.
Default Function
J2_2
A2
A2_SEMC_CKE
GPIO4_IO27
3.3V
SEMC bus clock enable
SEMC_CKE
J2_4
B3
B3_SEMC_CLK
GPIO4_IO26
3.3V
SEMC bus clock
SEMC_CLK
J2_6
A3
A3_SEMC_A12
GPIO4_IO20
3.3V
SEMC bus address 12
SEMC_A12
J2_8
B4
B4_SEMC_A11
GPIO4_IO19
3.3V
SEMC bus address 11
SEMC_A11
J2_10
A4
A4_SEMC_A8
GPIO4_IO17
3.3V
SEMC bus address 8
SEMC_A8
J2_12
A5
A5_SEMC_A7
GPIO4_IO16
3.3V
SEMC bus address 7
SEMC_A7
J2_14
B6
B6_SEMC_A5
GPIO4_IO14
3.3V
SEMC bus address 5
SEMC_A5
J2_16
A6
A6_SEMC_A4
GPIO4_IO13
3.3V
SEMC bus address 4
SEMC_A4
J2_18
D6
D6_SEMC_DM1
GPIO3_IO24
3.3V
SEMC address mask
off code
SEMC_DM1
J2_20
--
GND
GND
J2_22
B7
B7_SEMC_DQS
GPIO3_IO25
3.3V
SEMC bus sync. signal
SEMC_DQS
J2_24
A7
A7_SEMC_RDY
GPIO3_IO26
3.3V
SEMC bus input
SEMC_RDY
J2_26
C7
C7_SEMC_CSX0
GPIO3_IO27
3.3V
SEMC bus chip select
SEMC_CSX0
J2_28
--
GND
GND
J2_30
C8
C8_LCDIF_DATA00
GPIO2_IO04
3.3V
LCD data 0
LCDIF_DATA00
J2_32
B8
B8_LCDIF_DATA01
GPIO2_IO05
3.3V
LCD data 1
LCDIF_DATA01
J2_34
A8
A8_LCDIF_DATA02
GPIO2_IO06
3.3V
LCD data 2
LCDIF_DATA02
J2_36
A9
A9_LCDIF_DATA03
GPIO2_IO07
3.3V
LCD data 3
LCDIF_DATA03
J2_38
B9
B9_LCDIF_DATA04
GPIO2_IO08
3.3V
LCD data 4
LCDIF_DATA04
J2_40
C9
C9_LCDIF_DATA05
GPIO2_IO09
3.3V
LCD data 5
LCDIF_DATA05
J2_42
D9
D9_LCDIF_DATA06
GPIO2_IO10
3.3V
LCD data 6
LCDIF_DATA06
J2_44
A10
A10_LCDIF_DATA07
GPIO2_IO11
3.3V
LCD data 7
LCDIF_DATA07
J2_46
--
GND
--
GND
J2_48
C10
C10_LCDIF_DATA08
GPIO2_IO12
3.3V
LCD data 8
LCDIF_DATA08
J2_50
D10
D10_LCDIF_DATA09
GPIO2_IO13
3.3V
LCD data 9
LCDIF_DATA09
J2_52
E10
E10_LCDIF_DATA10
GPIO2_IO14
3.3V
LCD data 10
LCDIF_DATA10
J2_54
E11
E11_LCDIF_DATA11
GPIO2_IO15
3.3V
LCD data 11
LCDIF_DATA11
J2_56
A11
A11_LCDIF_DATA12
GPIO2_IO16
3.3V
LCD data 12
LCDIF_DATA12
J2_58
B11
B11_LCDIF_DATA13
GPIO2_IO17
3.3V
LCD data 13
LCDIF_DATA13
J2_60
C11
C11_LCDIF_DATA14
GPIO2_IO18
3.3V
LCD data 14
LCDIF_DATA14
J2_62
D11
D11_LCDIF_DATA15
GPIO2_IO19
3.3V
LCD data 15
LCDIF_DATA15
J2_64
--
GND
GND
19
19
J2_66
E8
E8_LCDIF_HSYNC
GPIO2_IO02
3.3V
LCD horizontal sync
LCDIF_HSYNC
J2_68
D8
D8_LCDIF_VSYNC
GPIO2_IO03
3.3V
LCD vertical sync.
LCDIF_VSYNC
J2_70
E7
E7_LCDIF_DE
GPIO2_IO01
3.3V
LCD data enable
LCDIF_DE
J2_72
D7
D7_LCDIF_CLK
GPIO2_IO00
3.3V
LCD clock
LCDIF_CLK
J2_74
--
VDD_COIN_3V3
--
3.3V
RTC power input
VDD_COIN_3V3
J2_76
--
GND
GND
J2_78
K14
K14_UART1_TXD
GPIO2_IO12
3.3V
UART1 sending
K14_UART1_TXD
J2_80
L14
L14_UART1_RXD
GPIO2_IO13
5V
UART1 receiving
L14_UART1_RXD
2.6 SoM FET1052-C Pin Spec.
Note1: all pins of the SoM are defined by below listed default function, please don’t change it,
otherwise, it may conflict with original driver
Note2: if users have requirement to expand function, please refer to datasheet and other related files
Note3: default function pins marked as “no for carrier board” are already used by the SoM, should
not be used for carrier board
Note4: pins listed in signal name column are default functional pin of the SoM, the red colored
information is carrier board pin definition name.
2.6.1 Power Pins
Pin Name
Signal Name
I/O
Default Function
Pin No.
Power
GND
-
Ground
J1_79
5V_SYS
Power input
SoM general power pin, 5V
J1_78
5V_SYS
Power input
SoM general power pin, 5V
J1_80
GND
--
Ground
J1_76
VDD_COIN_3V3
--
CPU RTC power pin, 3.3V
J2_74
2.6.2 Reset Control Pin
Pin Name
Signal Name
I/ O
Default Function
Pin No.
CPU reset
POJ2_B
I
CPU reset pin, it could be hang if not need
J1_46
SoM reset
POJ2_BUTTON
I
SoM power cut and reset, low power valid
J1_74
2.6.3 Boot Pin
Pin Name
Signal Name
I/ O
Default Function
Pin No.
Boot Pin
BOOT_MODE1
I
Boot Type
J2_75
BOOT_MODE0
I
J2_73
LCDIF_DATA07
I
Boot Device
J2_44
LCDIF_DATA06
I
J2_42
20
20
2.6.4 Function Control Pin
Pin Name
Signal
I/ O
Default Function
Pin No.
Function
control
ONOFF
I
Boot key, it could be hung if
not use
J1_42
PERI_PWREN
O
PMIC Standby signal
J1_44
WAKEUP
I/ O
CPU waken up, it could be
configured as general
purpose IO
J1_40
PMIC_ON_REQ
O
It’s used for carrier board
powering control, high level
valid
J1_48
2.6.5 UART
Pin Name
Signal
I/ O
Default Function
Pin No.
UART1
UART1_TXD
O
UART1(debug port)
send data
J2_78
UART1_RXD
I
UART1(debug port)
receive data
J2_80
UART2
UART2_RXD
I
UART2 receive data
J2_60
UART2_TXD
O
UART2 send data
J2_62
2.6.6 CAN Pin
Pin Name
Signal Name
I/ O
Default Function
Pin No.
CAN
CAN2_RX
I
CAN receiving
J1_56
CAN2_TX
O
CAN sending
J1_58
2.6.7 IIC
Pin Name
Signal Name
I/ O
Default Function
Pin No.
IIC
I2C1_SDA
I/ O
IIC1 data
J1_66
I2C1_SCL
O
IIC1 clock
J1_68
2.6.8 SD
Pin Name
Signal
I/ O
Default Function
Pin No.
SD
SD1_D1
I/ O
SD data 1
J1_1
SD1_D0
I/ O
SD data 0
J1_3
SD1_CLK
O
SD clock
J1_5
SD1_CMD
O
SD command
J1_7
SD1_D3
I/ O
SD data 3
J1_9
SD1_D2
I/ O
SD data 2
J1_11
This manual suits for next models
1
Table of contents
Popular Industrial Equipment manuals by other brands

SUHNER
SUHNER LXC 2-TOP Technical document

Beko
Beko BEKOMAT 12 Original Installation And Operation Manual

Formax
Formax FD 280 Operator's manual

Siemens
Siemens SIMATIC NET CP 442-1 RNA Equipment manual

Graco
Graco Sharpe 7004 Instructions - parts

Bosch
Bosch Rexroth PS5000 Comissioning, Operating Instructions

Rodix
Rodix FEEDER CUBE FC-40 Plus Series Adjustments and Set Up

Siemens
Siemens 8MF1 Series operating instructions

WPC
WPC MRTALPCH611LDC3 operating instructions

Adkins
Adkins Alpha Calender Roll-Master 1.2 Operator's handbook

Sterilor
Sterilor Sel Installation instructions & use & care guide

MAKSIWA
MAKSIWA CBC.T instruction manual


