Lance LT-30 User manual

Owner’sManual
MODEL LT-30 VACUUM TUMBLER


LANCE VACUUM TUMBLER
Owner’s Manual
Vacuum Tumbler
Rev. 2003
D
115 VAC
60 HERTZ
SINGLE PHASE


I N T R O D U C T I O N PAGE I
Last printed 1/31/2012 4:04:00 PM
Version Rev. 2003D-0
1rc
LT-30 VacuumTumbler Owner’s Manual
INTRODUCTION
Congratulations on your Lance Vacuum Tumbler purchase. The vacuum tumbler was
designed to give you years oftrouble free operations and to help in the processing and
preparation of your quality food products.
Please read this owner’s manual to gain the maximum benefits ofyour vacuum tumbler
and its different components.
Anoteabout cleaning: Given all the various ways equipment is used in different
environments, werecommend the owner consult sanitation experts on how to properly
clean each piece ofmachinery in their plantand to do bacterial testing to insure that the
equipment is cleaned properly.
For Sales & Parts call:
Phone (847)673-0300
EMAIL: [email protected]

I N T R O D U C T I O N PAGE II
Last printed 1/31/2012 4:04:00 PM
Version Rev. 2003D-0
General
This owner’s manual contains information pertinent to your Model LT-30 Vacuum
Tumbler. Basic instructions and maintenance information is provided. Please read
carefully. Failure to do so could result in bodily injury and/or damage to the equipment.
Receiving Problems:As in all cases, before signing the bill of lading, be sure all items
have been received as listed and there is no damage in shipment. If needed, a claim
must be made immediately to the local truck line office and noted on the bill of lading.
Model Nr.________ Serial Nr.___________ Owner:___________________________
Ship Date:____________________________ Location:__________________________

I N T R O D U C T I O N PAGE III
Last printed 1/31/2012 4:04:00 PM
Version Rev. 2003D-0
Specifications
Construction:
All stainless steel construction
Physical Dimensions:
Machine: 47-in. long x 27-in. wide x 35-in. high
Drum: 20-in. diameter x 30-in. long
Weight: 250-lbs.
Capacity Product and Liquid:
Gallons: 40
Liters: 150
Pounds: 200
Vacuum Pump System*:
Pump capable of delivering 22-in. hg (Mercury)
Easily accessible liquid trap
Drum Speed:
Single Speed Drive: 1-9 r.p.m.
Timer Controls:
Tumbler Timer: 99 hours/59 minutes
Intermittent Timer*:
On Time: Up to 99 hours/59 minutes
Off Time: Up to 99 hours/59 minutes
Electrical:
115 VAC, 60 Hertz, single phase
Variable Speed Motor: 1/5 horsepower, 5.0 Amps
Vacuum Pump Motor: 3.3 Amps
*Optional Equipment
Note:
Specifications are subject to change at any time.

I N T R O D U C T I O N PAGE IV
Last printed 1/31/2012 4:04:00 PM
Version Rev. 2003D-0
Table of Contents
INTRODUCTION.......................................i
General ................................................... ii
Specifications .......................................... iii
SECTION 1
SAFETY ....................................................1
Warning .................................................2
General Safety Guidelines........................3
SECTION 2
STARTUP ..................................................4
SECTION 3
OPERATIONAL .........................................7
SECTION 4
MAINTENANCE......................................15
SECTION 5
SCHEMATIC ...........................................22
SECTION 6
PARTS ....................................................24
SECTION 7
SERVICE HISTORY ..................................36
ICONS
................................Warning
..................................Caution

I N T R O D U C T I O N PAGE V
Last printed 1/31/2012 4:04:00 PM
Version Rev. 2003D-0
Index
A
Adjusting the Aim of a Photo-Eye.........................20
C
Check Tumbler Motor Control................................6
Check Vacuum Pump Control ................................5
Checking Control Panel .........................................5
Checking the Aim of a Photo-Eye.........................19
Cleaning ...........................................................i, 17
Cleaning Precautions ...........................................16
Cleaning Vacuum Hose .......................................17
Cleaning Your Machine .......................................16
D
Direct Start Continuous Tumbling ........................10
Direct Start Intermittent Tumbling ........................11
Drive-Train Assembly ...........................................27
E
Electrical Assembly ...............................................29
Emergency Stop Photo-Eyes .................................17
F
Flushing Vacuum Valve on Drum.........................16
Frame Assembly...................................................25
Frequently Ordered Parts .....................................34
G
General.................................................................. ii
General Safety Guidelines .....................................3
I
Installation .............................................................5
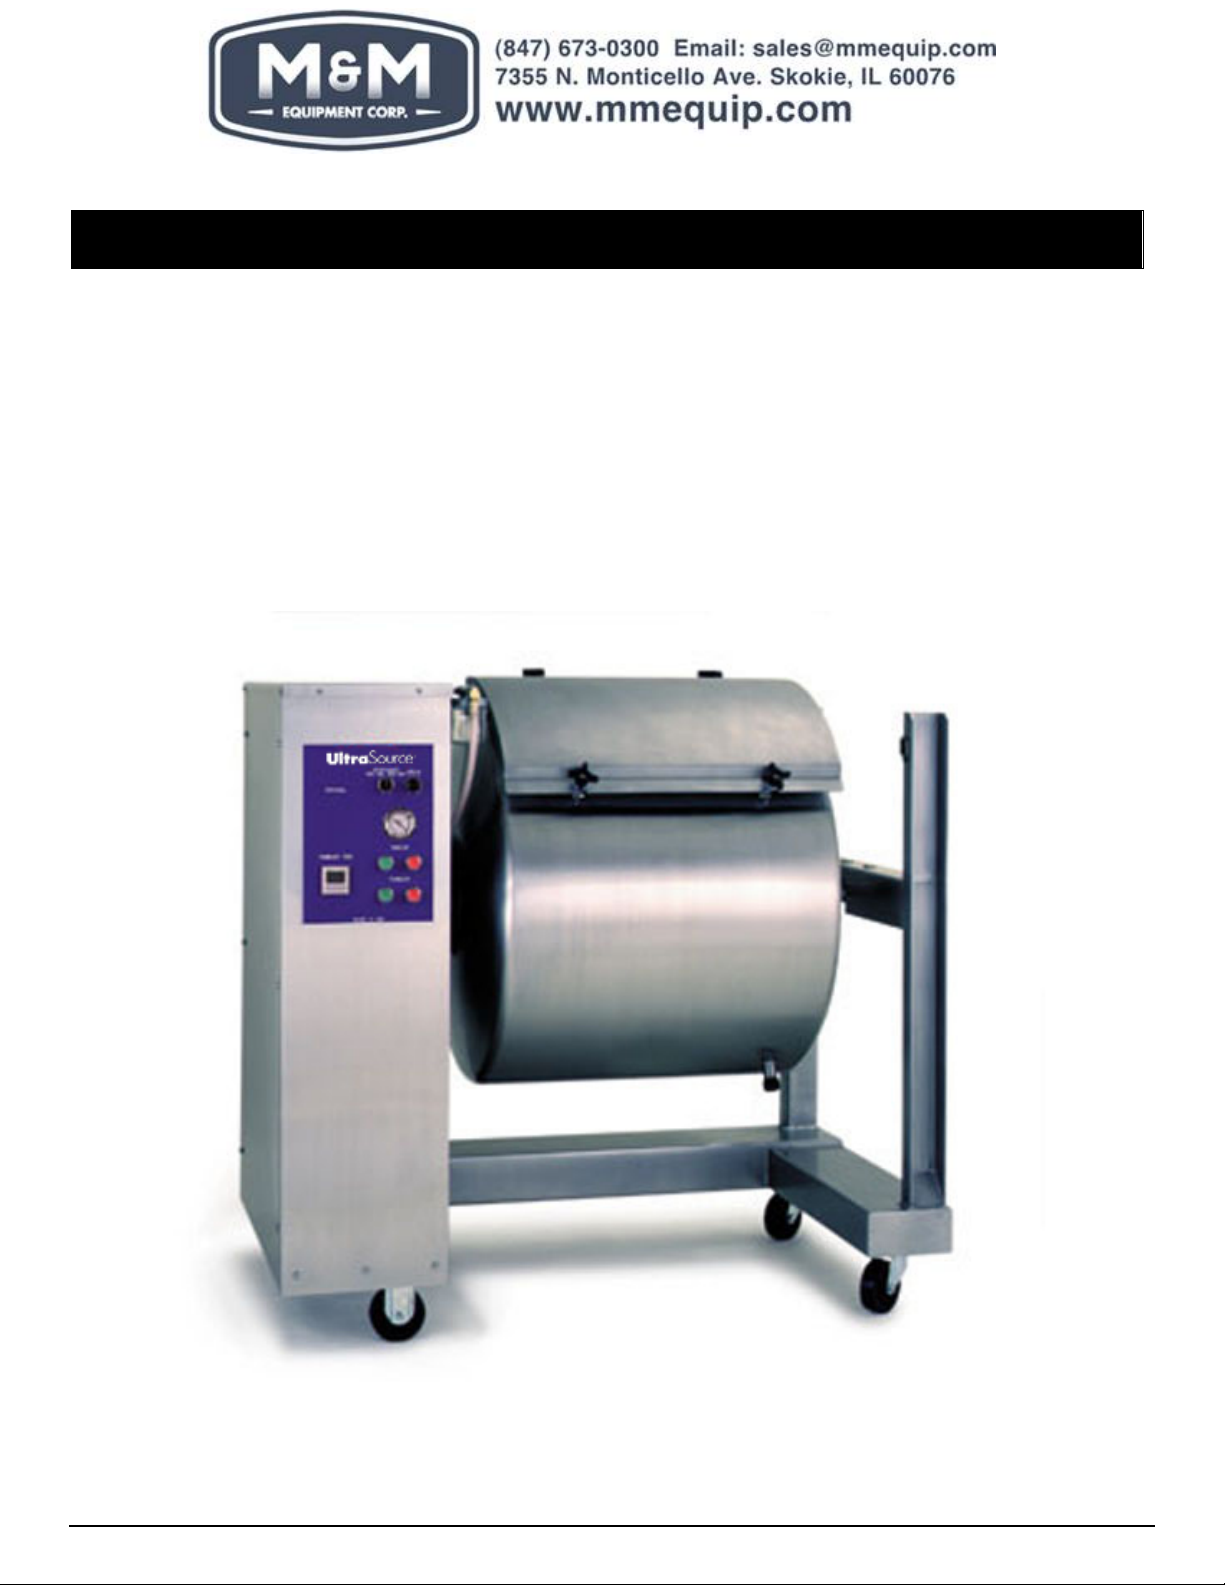
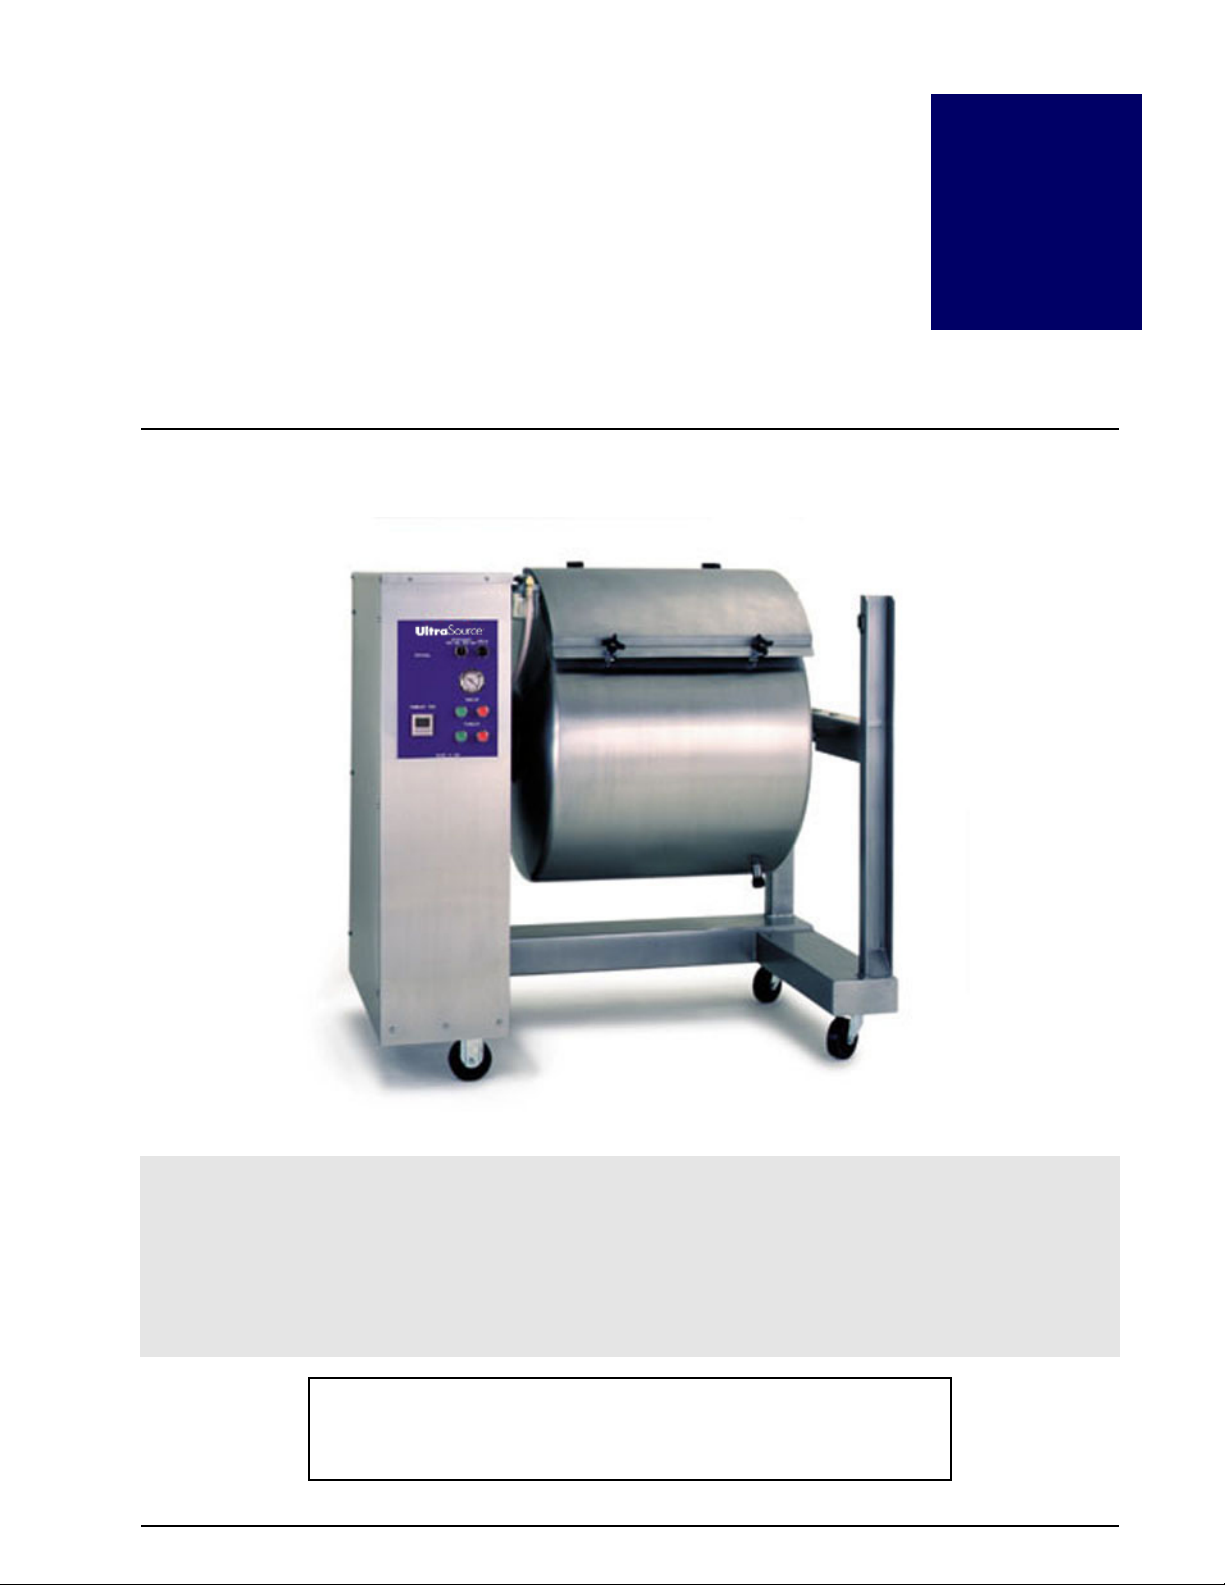
INTRODUCTION..................................................... i
L
Loading and Tumbling ...........................................8
Lubrication ...........................................................18
M
Maintenance ....................................................... 15
Maintenance and Cleaning ................................. 16
Manual Unloading ................................................ 9
O
Operating Instructions ........................................... 7
P
Procedures for Tumbling...................................... 13
Pump Assembly ................................................... 32
R
Recommended On-Hand Spare Parts ................. 31
S
SAFETY .................................................................. 1
Service History ..................................................... 36
Setting the Control Timer..................................... 10
Single Phase Power Schematic ............................ 23
Specifications......................................................... iii
STARTUP................................................................ 4
T
Table of Contents .................................................. iv
Troubleshooting Guide........................................ 21
U
Unloading the Drum ............................................. 9
Unpacking............................................................. 5
V
Vacuum Assembly ............................................... 26
W
WARNING ............................................................. 2


S A F E T Y PAGE 1
Last printed 1/31/2012 4:04:00 PM
Version Rev. 2003D-0
SAFETY
Warning ...................................................................................2
General Safety Guidelines..........................................................3
Section
1

S A F E T Y PAGE 2
Last printed 1/31/2012 4:04:00 PM
Version Rev. 2003D-0
WARNING:
The following procedures and guidelines must be followed precisely toavoid
problems that can result in property damage, personal injury,ordeath. Ifyou
have anyquestions related to this information.
The Model LT-30 Vacuum Tumbler must be installed with a minimum of 12-in. of
horizontal clearance from any part of other machinery, building walls, etc. It is the
owner’s responsibility to insure that the Model LT-30 Vacuum Tumbler installation
conforms to all local, state, and national codes and regulations.
For safe operation, the vacuum tumbler must be kept clean. A thorough weekly cleaning
schedule is recommended with a basic daily cleanup procedure. See the MAINTENANCE
Section for additional details on cleaning your vacuum tumbler.
Should you notice any unusual changes to your normal tumble schedule or the
operation of the vacuum tumbler, turn off the power and immediately investigate the
problem. Never operate the vacuum tumbler under suspect conditions.
Never make anyadditions orchanges tothe Model LT-30 Vacuum Tumbler. This will
void the warranty andcould adversely affect the safety or operation of your vacuum
tumbler.
DO NOTattempt to operate your Model LT-30Vacuum Tumbler without reading and
understanding this entire owner’s manual.

S A F E T Y PAGE 3
Last printed 1/31/2012 4:04:00 PM
Version Rev. 2003D-0
General Safety Guidelines
Obvious safety guidelines should be observed.
⇒Be sure to turn off power to your vacuum tumbler before any maintenance work
is performed.
⇒Never go near the machine with loose hair, clothes, bracelets, chains, rings, ties, etc.
to avoid the chance that they become tangled in the moving parts of the machine.
⇒As a consequence, the operator shall wear suitable clothes for the working
environment and the situation he/she isin


S T A R T U PPAGE 4
Last printed 1/31/2012 4:04:00 PM
Version Rev. 2003D-0
STARTUP
Installation.................................................................................5
Unpacking .................................................................................5
Checking Control Panel .............................................................5
Check Vacuum Pump Control.....................................................5
Check Tumbler Motor Control ....................................................6
Section
2

S T A R T U PPAGE 5
Last printed 1/31/2012 4:04:00 PM
Version Rev. 2003D-01
Installation
Unpacking
1. Carefully remove the crate from the skid.
2. Remove the machine from the skid.
3. Wipe down outside of the machine and drum.
4. Clean inside of the drum.
Checking Control Panel
1. Plug the power cord into 115-volt receptacle with a 15 Amp circuit breaker.
2. Press the (RST/ENT) button on the tumbler timer.
3. Check the photo-eye for power. (The red light on the back of the photo-eye should
be on. This can be seen through the observation windows near each photo-eye. The
light on the photo-eye must be on. If it is not on, wipe the face of the photo-eye and
the reflector opposite them to remove all moisture. If still not on, see instructions for
checking aim of the photo-eyes.)
Check Vacuum Pump Control
1. Turn on the vacuum pump. It should run.

S T A R T U PPAGE 6
Last printed 1/31/2012 4:04:00 PM
Version Rev. 2003D-0
Check Tumbler Motor Control
1. Set variable speed control to 20.
2. Set tumbler timer to 2 minutes. See "Setting the Control Timer" in the OPERATIONAL
section.
3. Press the tumbler start button—the drum will now turn.
4. Turn the variable speed control up and down. The drum will speed up and slow
down.
5. The drum will turn until the tumbler timer counts down to zero, at which time the
drum will stop.
6. Press the (RST/ENT) button on the tumbler timer.
7. The machine is now ready to use.


O P E R A T I O N PAGE 7
Last printed 1/31/2012 4:04:00 PM
Version Rev. 2003D-0
OPERATING INSTRUCTIONS
Loading and Tumbling ...............................................................8
Unloading the Drum/Manual Unloading ....................................9
Setting the Control Timer/Standard Control Panel with Electric Tumbler Timer
Direct Start Continuous Tumbling......................................... 10
Setting the Control Timer/Standard Control Panel with Interval and Tumbler Timer
Direct Start Intermittent Tumbling......................................... 11
Procedures for Tumbling ......................................................... 13
Section
3

O P E R A T I O N PAGE 8
Last printed 1/31/2012 4:04:00 PM
Version Rev. 2003D-0
Loading and Tumbling
1. Clean the machine drum.
2. Put the drain cap on the drum.
3. Load the product into the drum.
4. Place the gasket over the drum opening.
5. Place the cover on the gasket.
6. Make sure the gasket is under the cover all the way around by pushing it up and
into the opening or by visual inspection.
7. Tighten the cover by alternately tightening the knob in a diagonal pattern.
8. Plug the machine into the proper voltage receptacle.
9. Check for power to the photo-eye through observation windows (Red light should
be on. If not, wipe the photo-eye face and reflector to remove moisture.)
10. Turn on vacuum pump.
11. Open vacuum valve on the drum (next to the drum cover). Make sure the vacuum
passage to the drum is clean and that it is to the top. Pulling vacuum with the
fitting not at the top position will result in liquid being drawn into the vacuum
pump. (THIS WILL DAMAGE THE PUMP!)
12. Push vacuum hose onto drum fitting.
13. Run vacuum pump until 15 inches of vacuum is drawn. (Higher vacuum can be
drawn if desired).
14. Shut off the valve on the drum.
15. Remove the hose from the drum.
16. Turn off the vacuum pump.
17. Set the tumbler timer to the desired time.
18. Set the variable speed knob to the desired speed.
19. Make sure the vacuum hose is disconnected.
20. Press tumbler start button. The drum will now rotate until the tumbler timer runs
down to zero.
Machine can be stopped at any time by pressing the tumbler stop button or by breaking
the beam from the photo-eye to the reflector.
To restart the machine, press the tumbler start button. It will run for the time remaining
on the timer.
Table of contents
Popular Industrial Equipment manuals by other brands

VIA Technologies
VIA Technologies WorkX Connect quick start guide

Siemens
Siemens 3SU1400-1LL10-.BA1 Original operating instructions

SAF
SAF SI12-22K10 Repair instructions

Kurt
Kurt 3600H Series Operating instructions manual

Kalamazoo
Kalamazoo 2FS instruction manual

Fremco
Fremco MiniFlow RAPID operating manual