Formac Studio TVR User manual
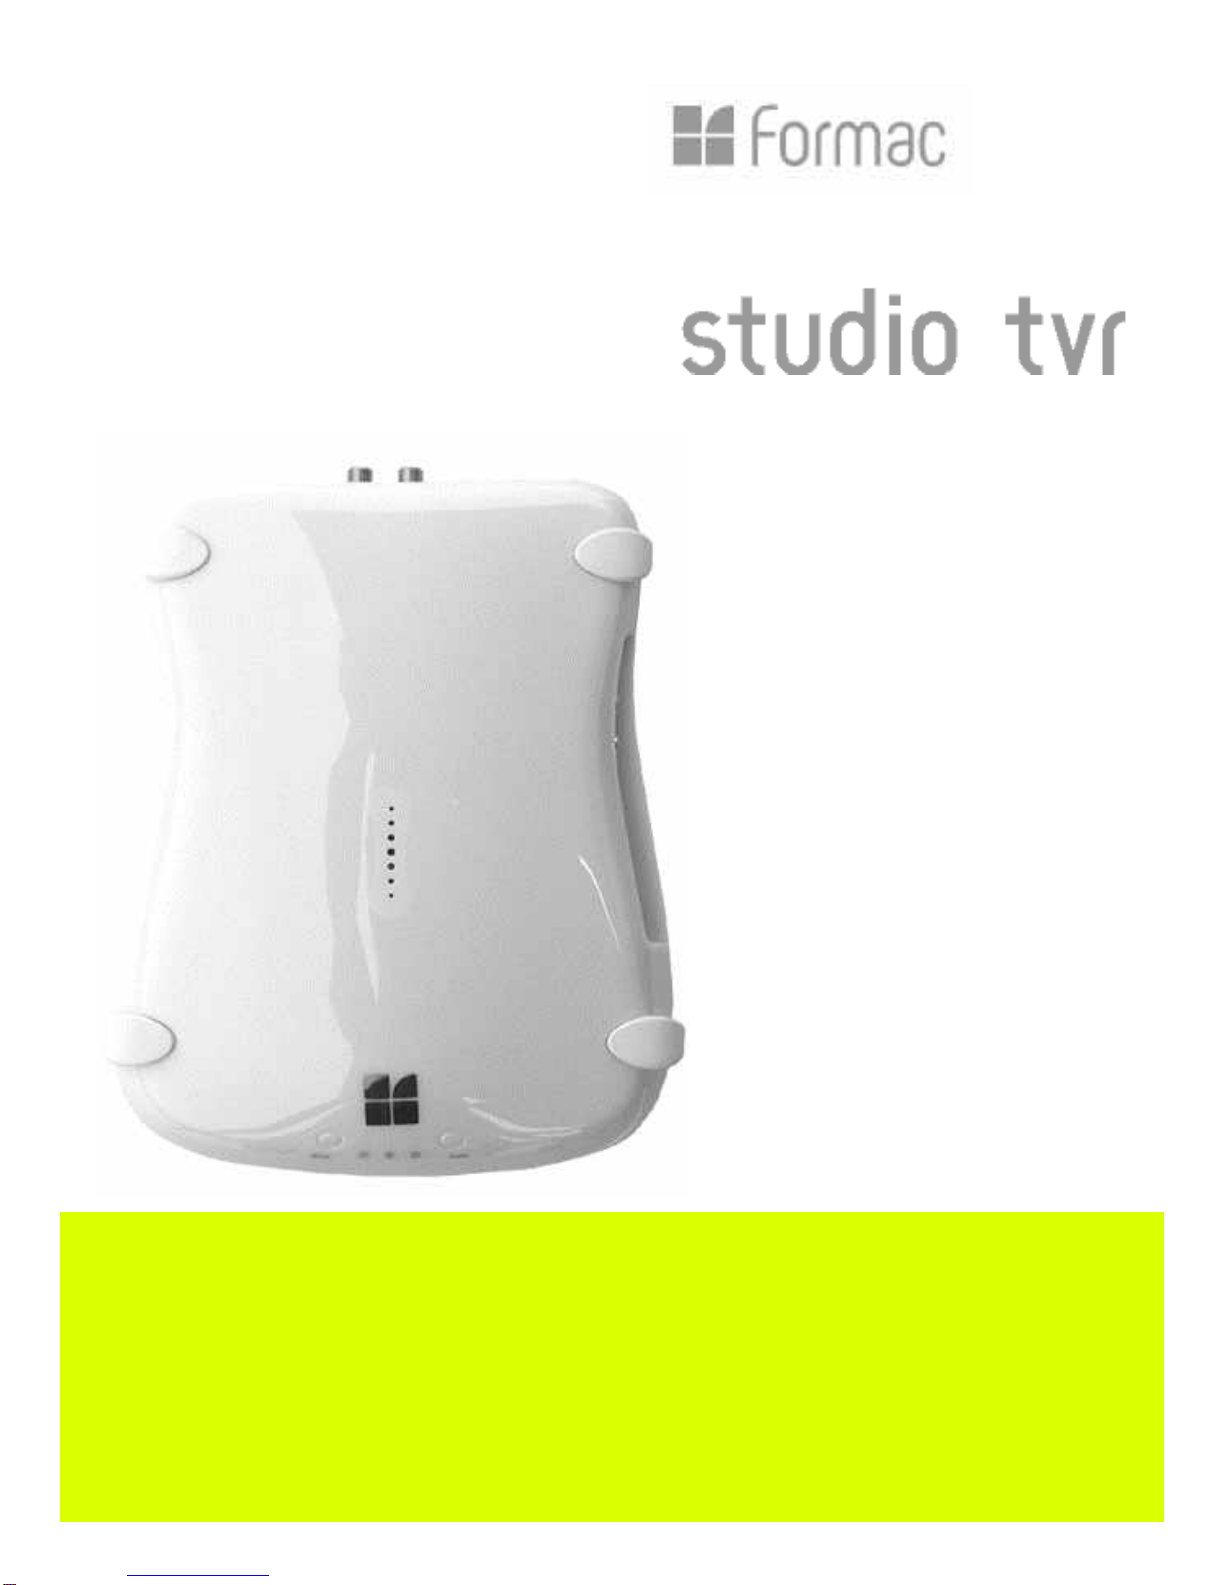
Watch, record and edit
TV on your Macintosh
User’s Guide
Includes Installation, Setup
and Troubleshooting

2
License Agreement
© 2003 Formac Electronics, Inc.
All rights reserved. No part of this publication may be reproduced,
stored in a retrieval system, or transmitted in any form by any means,
electronic, mechanical, by photocopying, recording, or otherwise,
without the prior written permission of Formac Electronics.
Information furnished by Formac Electronics is believed to be
accurate and reliable; however, no responsibility is assumed by Formac
Electronics for its use, or for any infringements of patents or other
rights of third parties which may result from its use. No license is
granted by implication or otherwise under any patent rights of Formac
Electronics.
Use, duplication, or disclosure by the United States Government is
subject to restrictions as set forth in subparagraph (c)(1)(ii) of the
Rights in Technical Data and Computer Software clause at 48 C.F.R.,
252.277-7013, or in subparagraph (c)(2) of the Commercial Computer
Software Registered Rights clause at 48 C.F.R., 52-227-19.
Trademarks
Formac and Formac Studio are registered trademarks of Formac
Elektronik GmbH and its subsidiaries in the United States and in other
countries where Formac products are sold or distributed.
All other names are trademarks or registered trademarks of their
respective holders. Mention of third-party products is for informational
purposes only. Formac Electronics assumes no responsibility with
regard to the performance of those products.
All specifications are subject to change without prior notice. Actual
contents may differ slightly from those pictured or represented.
Made in Germany by Formac Elektronik, GmbH.

3
Contents
1. Quick Start
4
1.1. Congratulations
4
1.2. What you need to get started
4
1.3. Setting up Studio TVR
4
1.4. Quick Reference 7
2. Everything TV
8
2.1. Watching Television
8
2.2. Pausing live Television
8
2.3. Scheduling & Recording Television
9
2.4. Using the Online Program Guide
10
2.5. The Movie Library
11
3. The creative side of TV
11
3.1. Cropping commercials
12
3.2. Exporting and converting movies
12
3.3. Editing TV: Integration with Apple’s iMovie 3
14
4. Using Studio TVR as a media converter
15
4.1. Recording video to and from external devices
15
4.2. Digital audio recording
16
5. Tips to make Life easier
17
5.1. Preferences
17
5.2. Troubleshooting
19
6. Learning more, Service, and Support
21
7. Warranty
21

4
1. Quick Start
1.1. Congratulations
Congratulations on purchasing your Studio TVR, the
world’s only FireWire TV recording solution based on the high-
quality Digital Video (DV) format. With Studio TVR you can:
> Watch up to 125 TV channels in a scalable window or full-
screen
> Pause live TV
> Schedule recordings via the free online program guide
> Export your recordings to a regular TV or VCR
> Work creatively with Television
and much more …
1.2. What you need to get started
The Studio TVR requires a Macintosh with:
> G3 processor or higher (800 Mhz or more recommended)
> Built-in FireWire interface
> Mac OS 10.2 or later
> QuickTime 6 or higher
Your Studio TVR includes the following components:
> Studio TVR hardware
> User’s Guide
> FireWire cable
> Software CD
Note: There is no power supply included with the Studio TVR as
it runs bus-powered with most Macintosh. For details please
check the “Troubleshooting” section.
1.3. Setting up Studio TVR
To set up your Studio TVR please follow these easy steps:
Step one: Installing the software
1) Insert the software CD into the CD drive of your computer and
double-click on the CD icon that appears on your Macintosh
desktop.
2) Double-Click on the “Installer” icon and follow the on-screen
instructions.
5
Note: The software installation may require you to enter a name
and password. This password is your standard Administrator
password, which you created when installing OSX. If you forgot
your password please check with Apple on how to retrieve it.
3) Once you have completed the installation you will find the
“Formac Studio TVR” folder in the OSX Application folder. It
contains the following items:
> Studio TVR application
> Studio Audiomaster application
> Studio TVR scripts
4) After the installation please restart your computer.
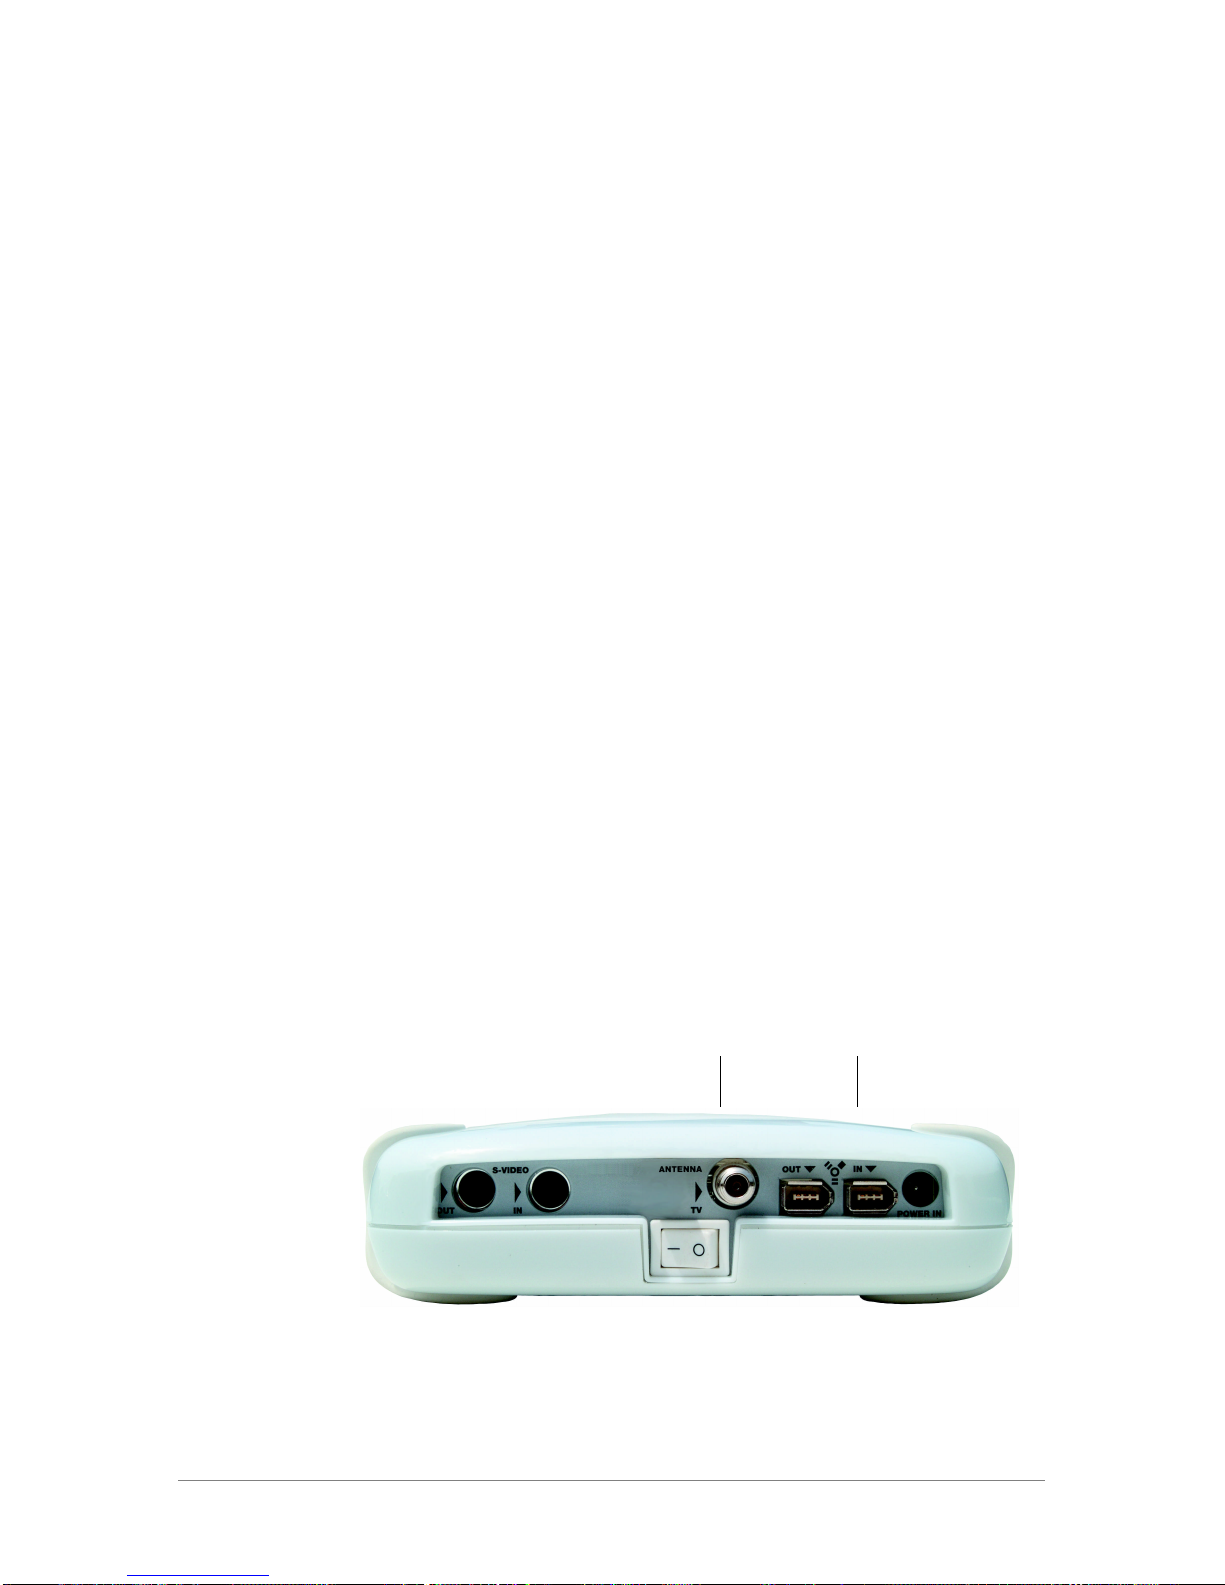
Step two: Connecting the Studio TVR
Connect your studio properly:
1) Make sure your Studio TVR is turned OFF. The power switch
on the back panel of the unit must be on the “0” position.
2) Connect the FireWire cable to the FireWire port of your Studio
TVR and to your Macintosh. FireWire is bi-directional so it does
not matter which port you use.
3) Connect your cable/antenna (Coax) to the TV port on the
backside of your Studio TVR. Make sure the cable/antenna
provides a clear and strong signal (if in doubt test with a regular
TV first).
4) Turn ON your Studio TVR. The green power LED and one of the
mode LEDs (“a” or “d”) light up.
TV-Input FireWire
6
Step three: Setting up the TV functionality
1) Launch the “Studio TVR” software in your applications folder.
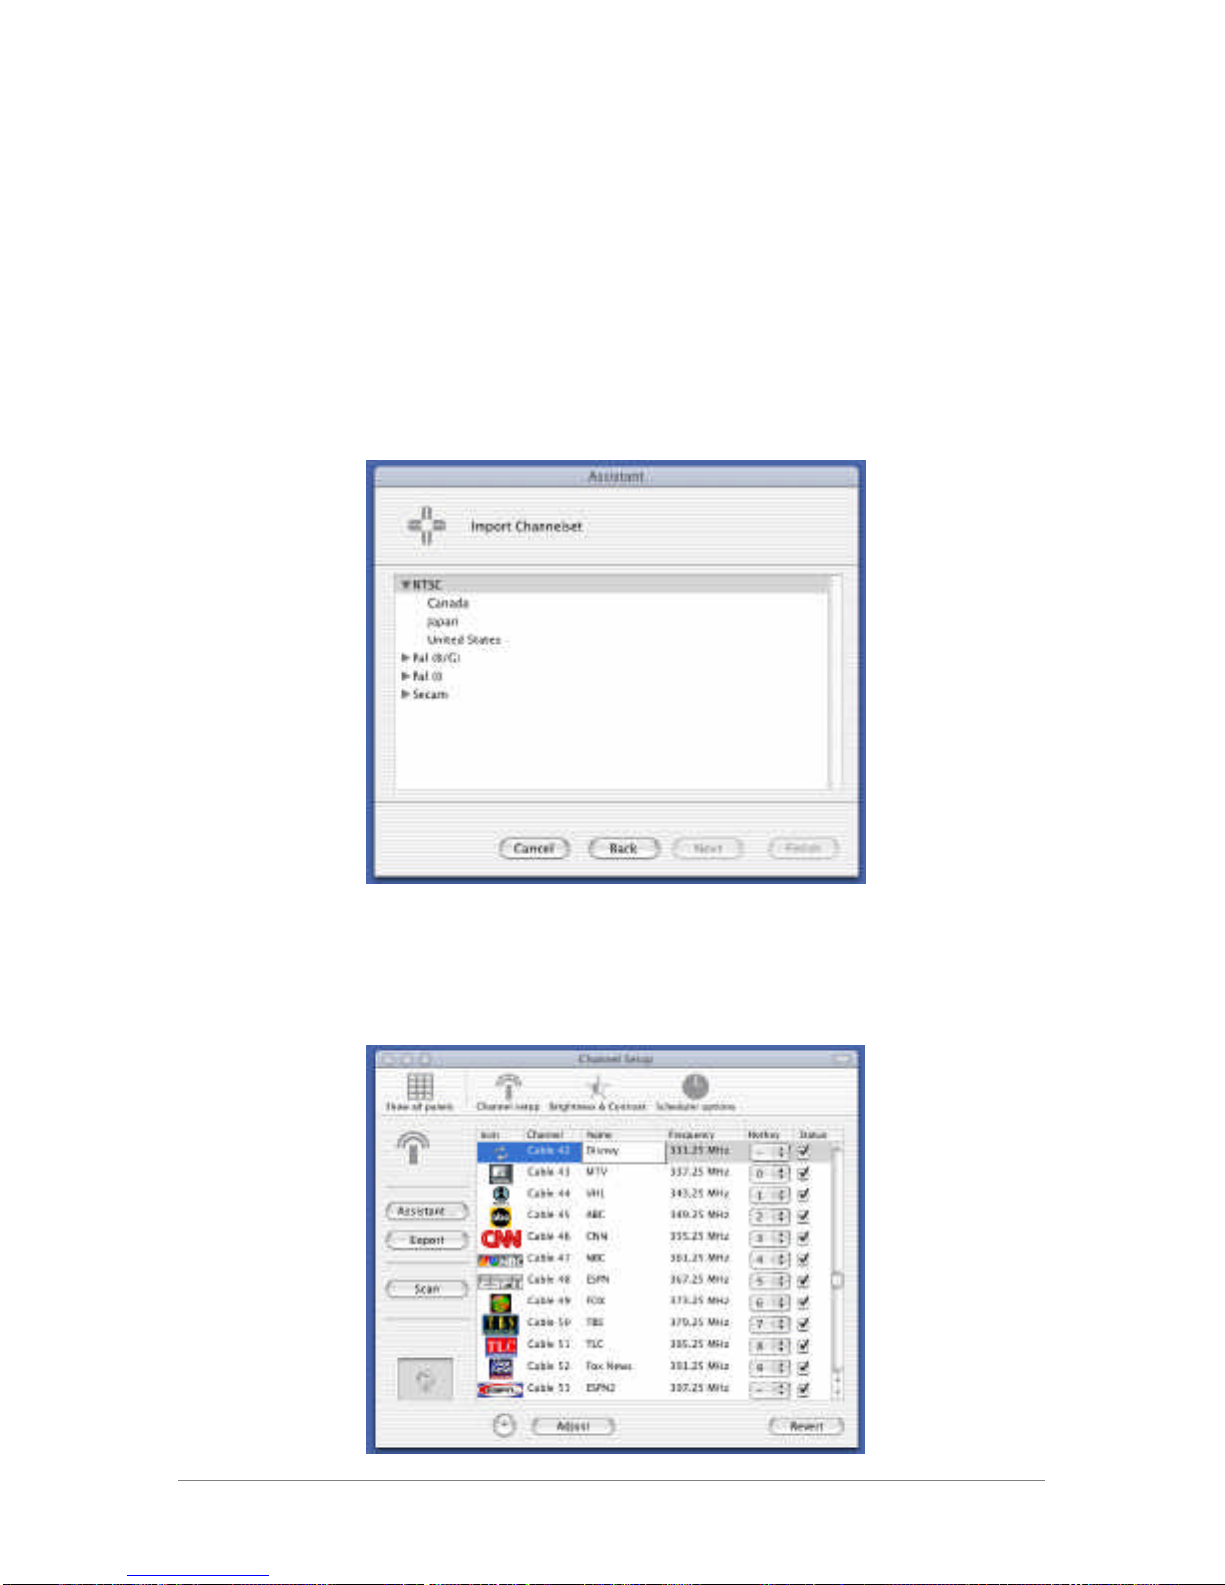
2) The first time you start your Studio TVR software the
“Assistant” walks you through the channel set-up.
Note: If the “Assistant” does not start automatically, you can
launch it from the “Preferences” menu (“Channel Setup”).
3) Choose the “Create New Channel List” option and click
“Next”. The next window shows a list of video standards:
Please click on the small triangle next to your video standard
and then on your country. All United States and Canadian users
choose NTSC.
4) Create your channel list.
7
Click on the "Scan" button and the software will automatically
scan and save all available antenna and cable channels.
Channels that are received properly will be check-marked. These
channels are later accessible through your channel list.
You can
4Fine-tune each channel by clicking on the “Adjust” button.
4Name each channel by double-clicking in the name field.
4Assign a logo to each channel (JPEG or TIFF). Simply select
the channel and drag-and-drop the picture file into the field in the
lower left corner of the window (marked with two arrows).
4Assign “hot keys” for up to 10 channels for fast access via
the keyboard.
Note: Please make sure that you ONLY connect the FireWire
cable and the coaxial cable of the antenna/cable when you scan
the channel list for the first time. Once the channel list is saved
you may connect other devices via the RCA or S-Video port.
5) Ready. Steady. Go!
Simply close the channel list and the TV window will appear.
You are all set.
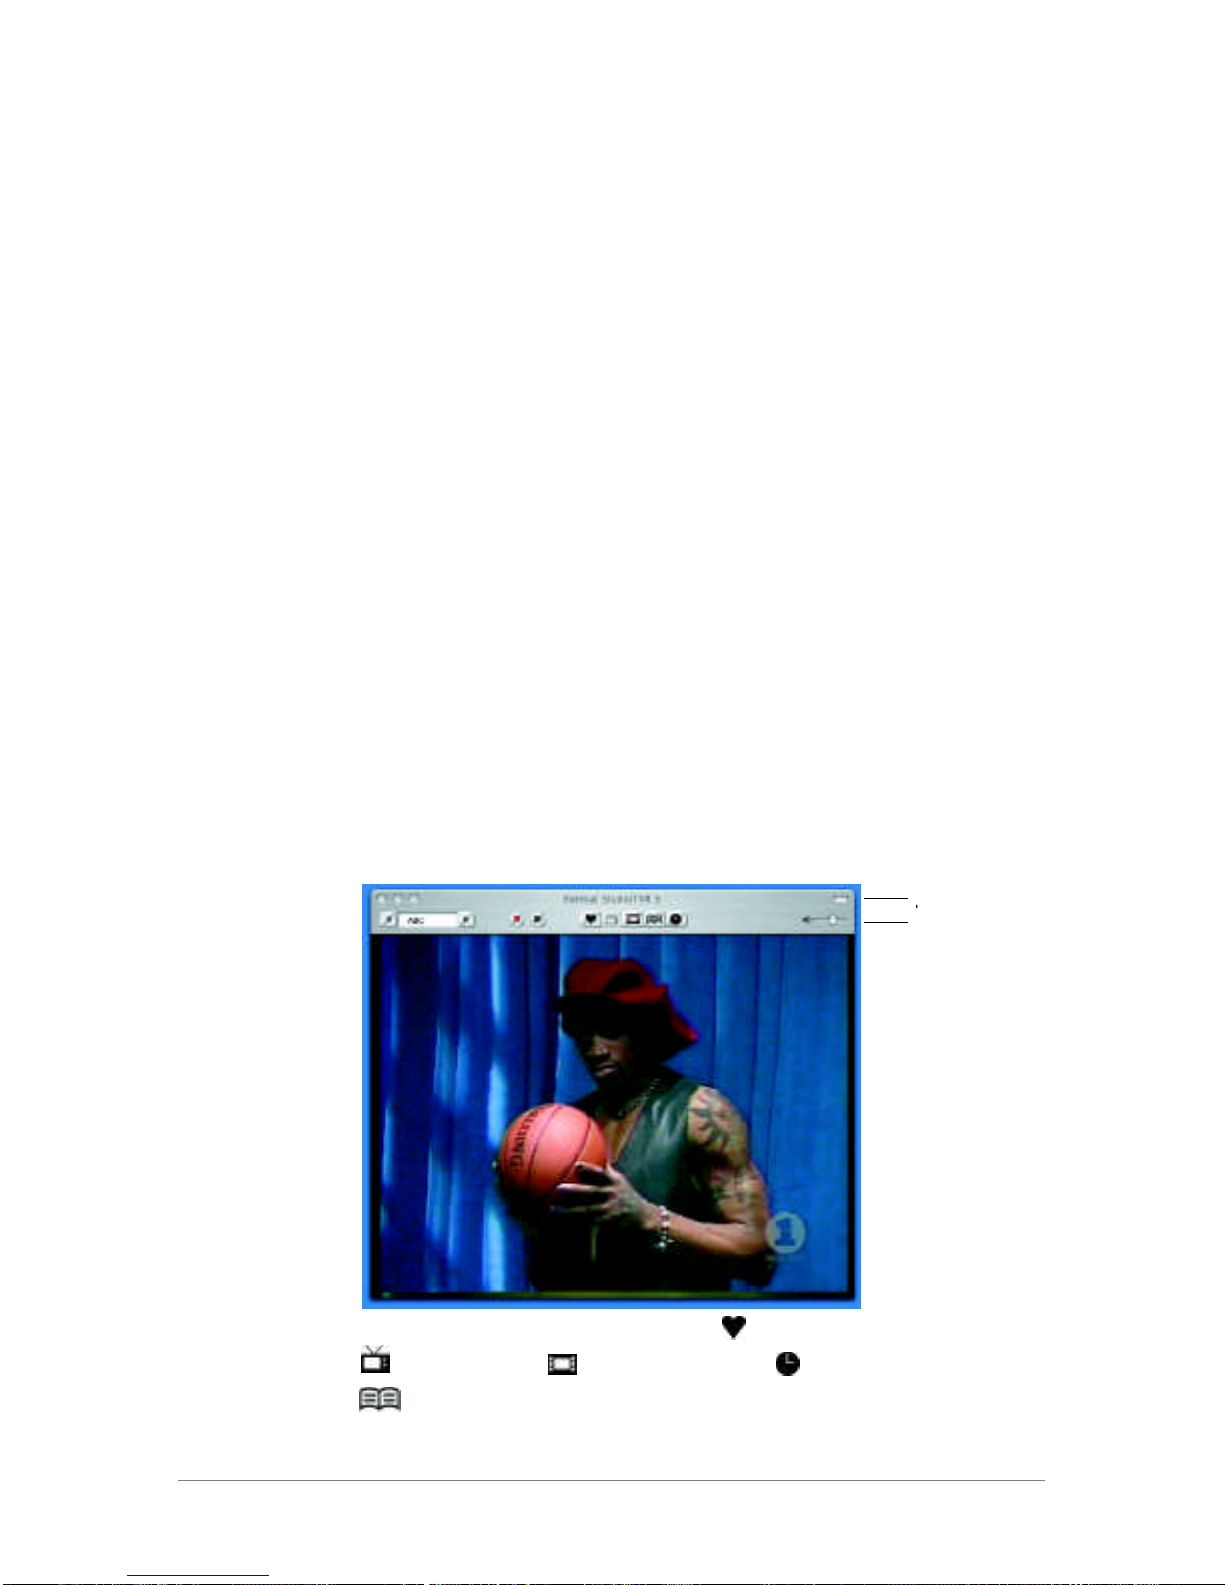
1.4. Quick reference
The TV window and its functionality:
R = Record / II = Pause Live TV / = Favorite Channel List
= Watch TV / = Movie Library / = Scheduler /
= Online Program Guide
Click to hide menu
bar
Volume control

8
2. Everything TV
2.1. Watching Television
1) Switching TV channels
There are different ways to switch between TVs channel:
4Use the left and right arrows in the menu bar (or on your
keyboard)
4Click on the channel display to access a pull-down menu
4Click on the favorite channel list
4Use the hot keys defined in the channel set-up list
2) Changing the size of the TV window
To select a standard size for your TV window please click on the
“Studio TVR Display” menu. The following sizes are available:
4Quarter Size
4Half Size
4Full Size
4DV Size
4TV Modus (full-screen)
You can also scale the window to any size and ratio by grabbing
the lower right corner and dragging it diagonally.
Tip: Click on the green “+” icon to optimize the size of the TV
window for your display.
Note: The TV modus uses a standard resolution of 640 by 480.
To tell your computer to switch to this resolution automatically
please go to the “Display options” in the “Preferences” menu
and check-mark the “Switch to best screen size” option.
2.2. Pausing live Television
Pausing live TV allows you to interrupt a live broadcast at any
point of time and resume watching whenever you are ready. To
pause the TV show you are currently watching
1) Click on the “pause” (II) button in the menu bar of your TV
window. The TimeShift buffer opens and the “pause” button
turns into a “play” button.
2) When you are ready to resume watching simply click on the
“play” button (4).

9
The slider on the TimeShift Buffer shows where you are in the
movie since you hit the “pause” button. Moving the slider to the
right allows you to forward the movie until you have reached the
actual live stream. If you want to exit the pause mode
completely click on the TV icon.
Note: Pausing live TV requires your Macintosh to record the
video temporarily. As the Studio TVR records in high quality DV
(3.5 MB/sec) please make sure you have sufficient disk space
available. Please set the TimeShift Buffer accordingly and read
Chapter 5.1. “Preferences” (Record Options) for more detail.
2.3. Scheduling & Recording Television
Studio TVR allows you to record instantly or at a scheduled time
in the future.
Instant recording
1) Click on the “record” (R) button in the menu bar of your TV
window. A recording window opens with the time of your
recording and the available disk space. The recording button
starts pulsing.
2) To stop the recording click on the “record” (R) button again.
Enter the name of the recording and click on “Save”. The movie
is automatically added to the movie library.
Tip: You can also record single pictures/frames. Simply click on
the picture in the video and drag-and-drop it on your desktop.
Scheduling
You can schedule recordings manually or via the online program
guide. Click on the “Scheduler” icon ( ) in the menu bar of
your TV window, and a calendar will open.
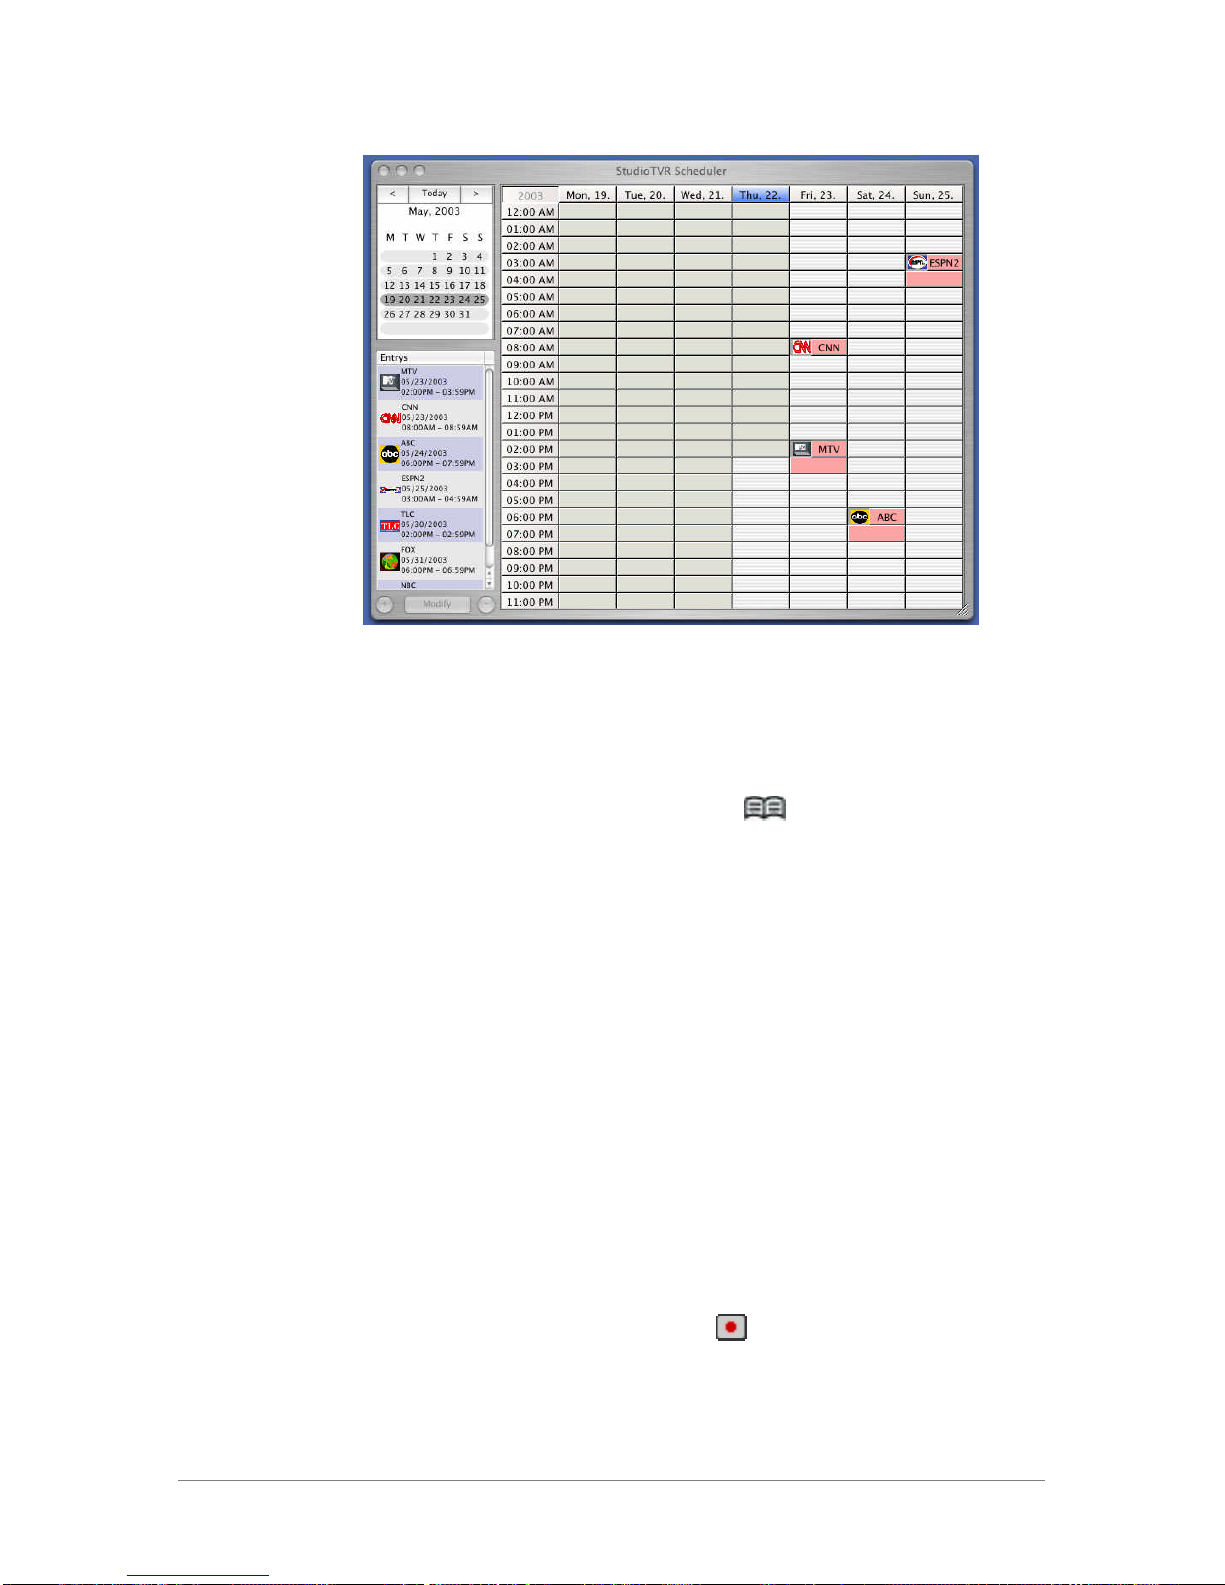
10
1) To schedule manually click on the day and time of your
recording. The scheduling timer opens. Determine the starting
& ending time, channel, and name of the recording. The “Add”
button activates your schedule.
2) To use the online program guide (powered by TitanTV) click on
the “Online Program Guide” button ( ) in the menu bar of the
TV window, and the software starts your browser to access
Formac’s installation website. As a new user you first have to
register your account with TitanTV, providing them with
information such as location of your computer and type of TV
service (cable, antenna, or satellite). Once registered TitanTV
will provide you with your individual program guide for your
region.
Note: Your Macintosh can be in SLEEP mode, but your Studio
TVR must be turned on at the time of the scheduled recording.
The TVR software will launch automatically.
2.4. Using the Online Program Guide
The online program guide helps you to find and schedule shows
fast and efficiently. To schedule a recording
1) Search the show you want to record
2) Click on the red “PVR” button ( ) assigned to the show
The schedule is automatically downloaded into your calendar and
your Studio TVR will record the show at the specified time & day.

11
To watch a show that is currently playing, click on the “Watch
Now” Icon ( ). The Studio TVR tunes immediately to the
channel you selected.
2.5. The Movie Library
All recorded movies can be accessed via the movie library ( ).
Each movie is represented with a thumbnail screenshot. Double-
click on the thumbnail picture and the respective movie will
appear in the TV window. Click on the “play” button at the
bottom of the screen to start the playback of the video. Please
refer to the next chapter for the other features like cropping
commercials.
3. The creative side of TV
3.1. Cropping commercials
Tired of commercials? The Studio TVR software allows you to
delete undesired content conveniently:
1) Select the recording by double-clicking on the thumbnail
picture
2) Use the slider and the time bar to navigate to the starting
point of the scene that you wish to delete. Click on the “Select
Start” button in the edit window underneath the TV window.
12
4) Navigate with the slider to the end of the movie sequence to
be deleted. Click on the “Select End” button.
5) To delete the marked scene click on “Clear”. You can also
“Copy” and “Paste” a marked movie sequence.
Note: To finally save the changes made to your recording(s)
please switch back to the TV modus. The software will prompt
you to confirm or decline the changes made.
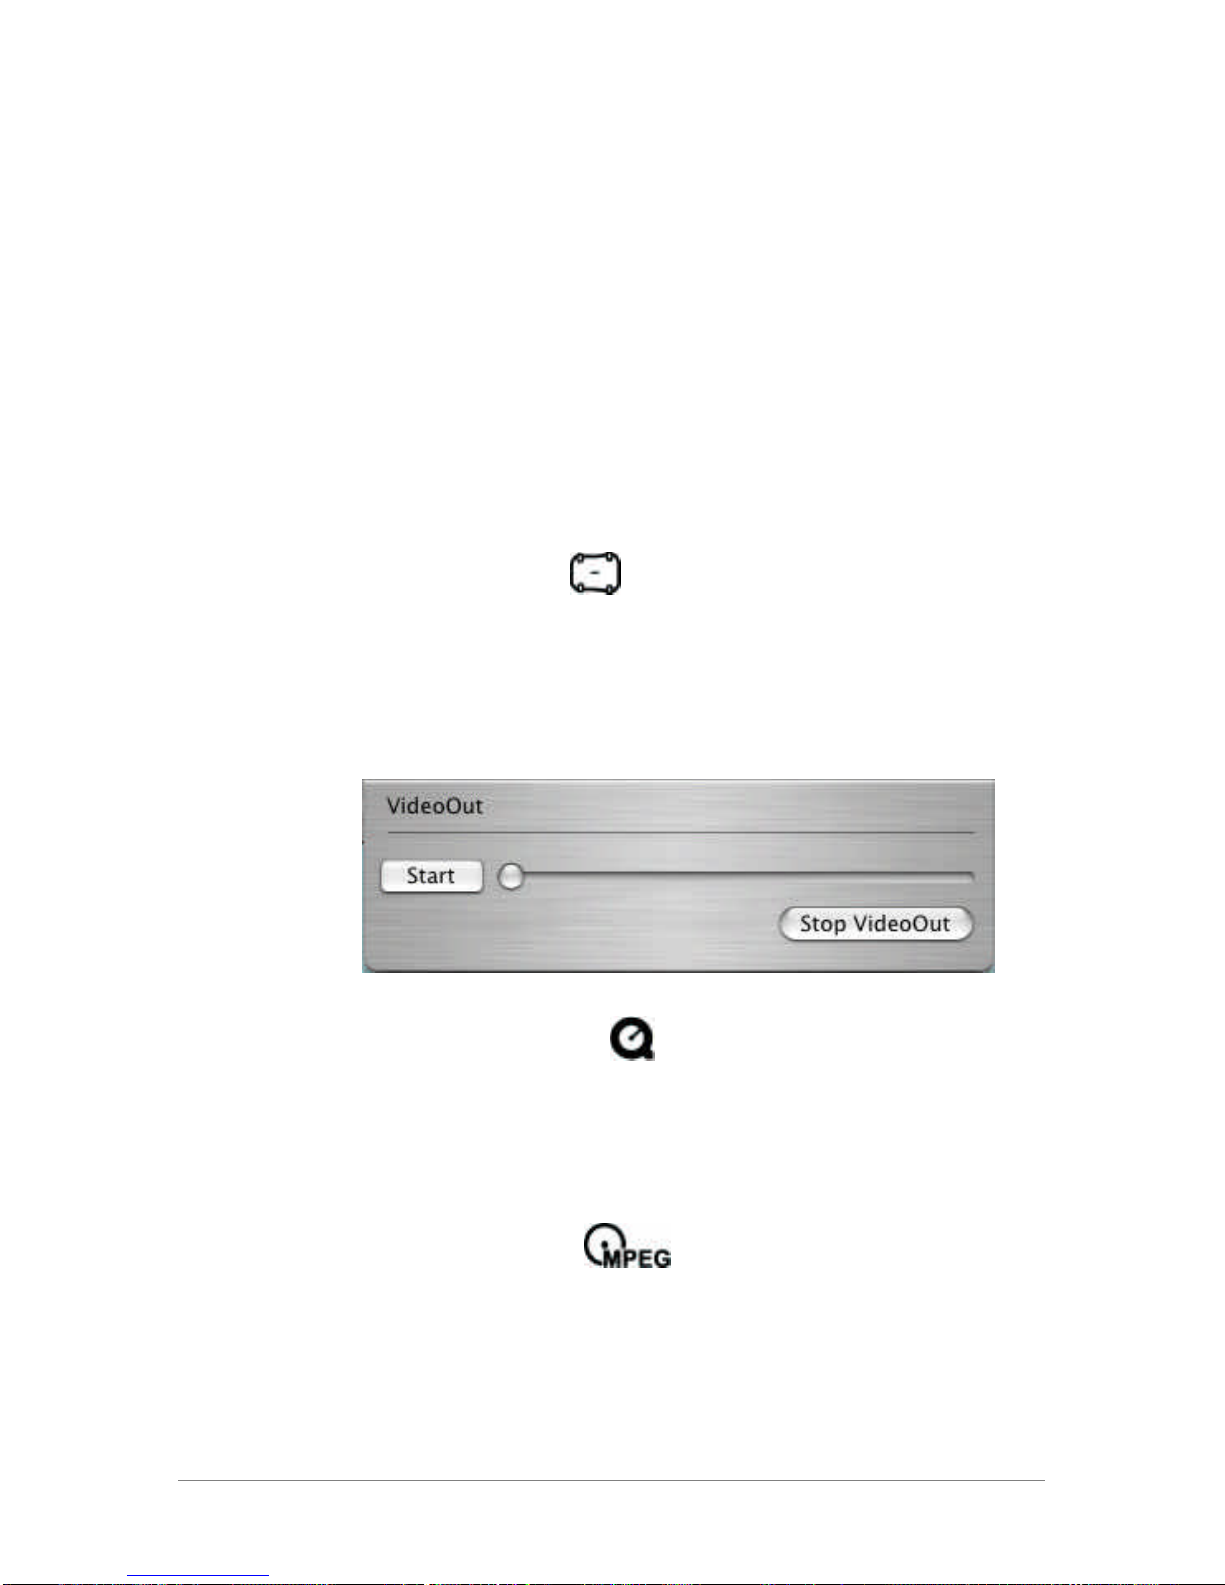
3.2. Exporting and converting movies
The Studio TVR provides three exporting options for your
recordings:
1) Export to Studio
This feature allows you to export your movie via the RCA
(Composite) or S-Video outputs of the Studio TVR to any external
device such as a TV or VCR. To export a recording, connect a TV
or VCR to the outputs of the Studio TVR and click on the “Export
to Studio” button. To start the playback click on the “Start”
button in the VideoOut window.
2) Export to QuickTime
All recordings are originally in native DV and can be converted to
any QuickTime format to ensure compatibility with other software
applications. Please refer to Apple’s information on QuickTime
for more details.
3) Export to MPEG2
The Studio TVR software incorporates Formac’s proprietary
MPEG2 software encoder. MPEG2 is the format required for
DVD creation. To burn your movies on DVD or CD:
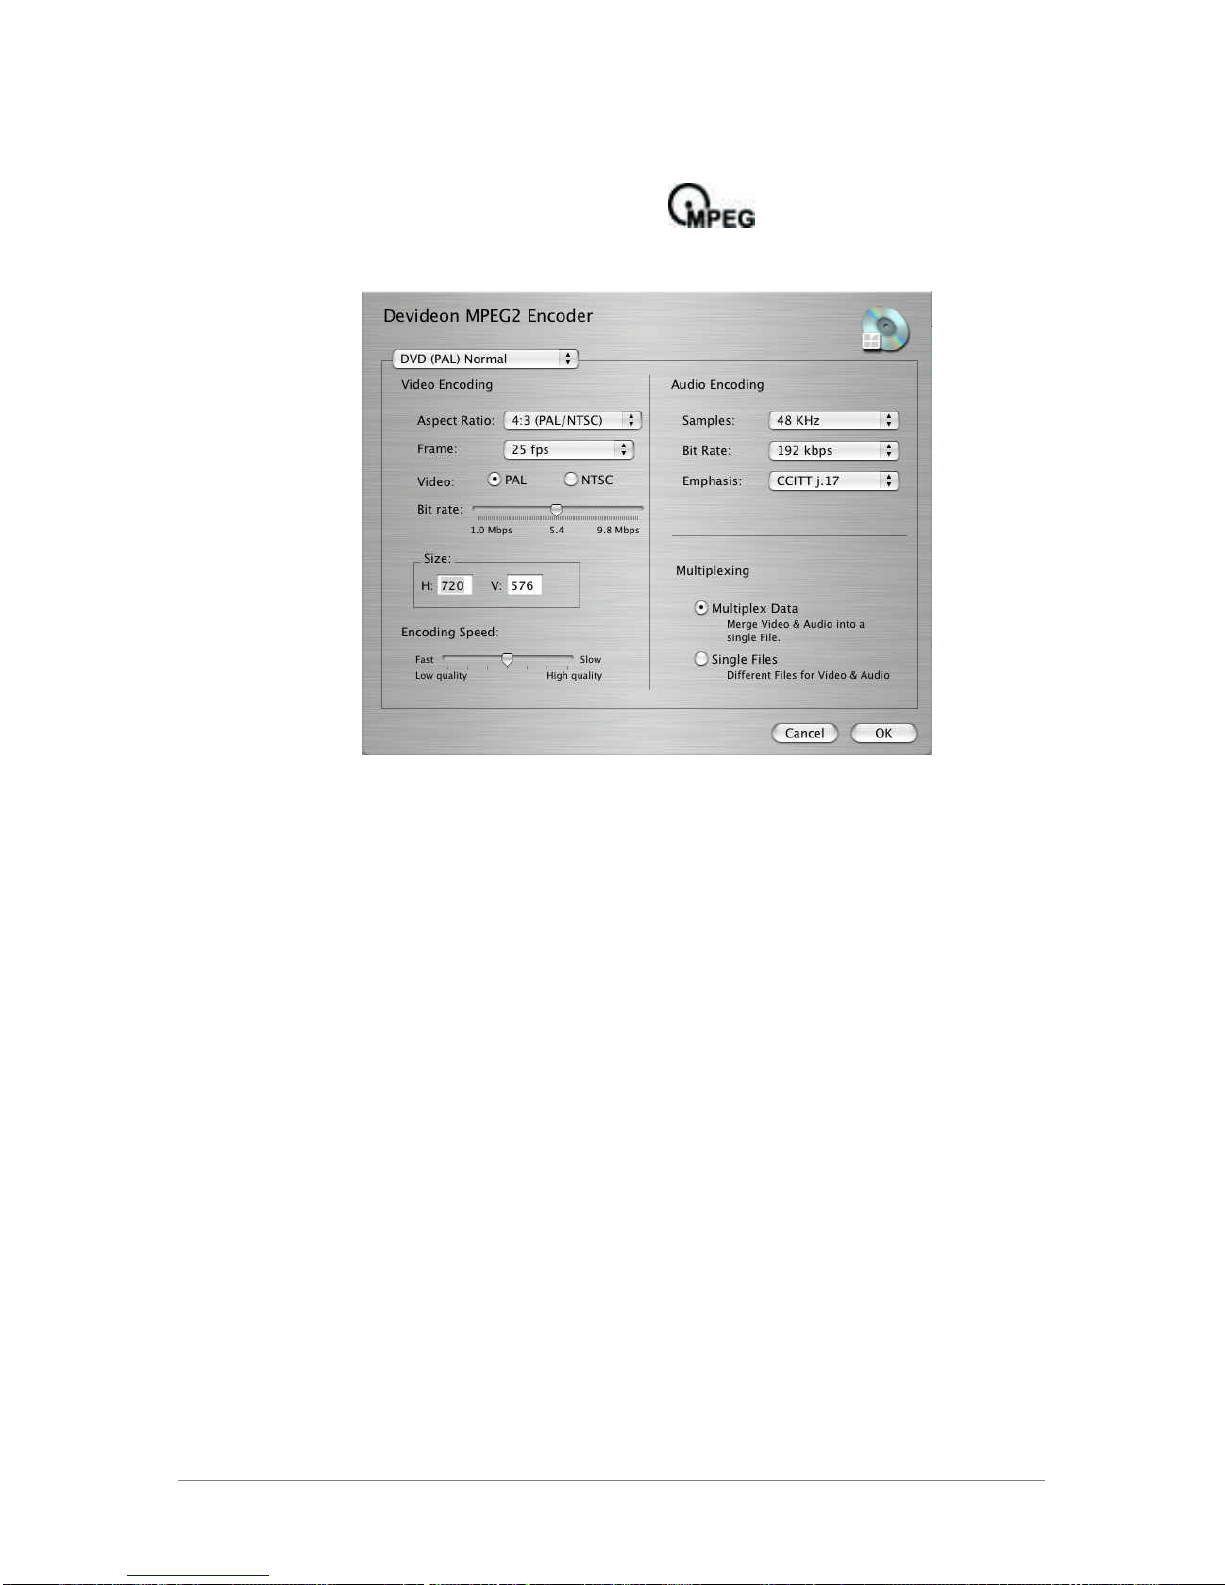
13
A) Select the movie to be encoded to MPEG 2
B) Click on the “MPEG” Icon
C) Adjust the settings of the MPEG2 Encoder:
Format: US and Canadian customers please choose “DVD
(NTSC) Normal”, “DVD (NTSC) High Quality” or “SVCD (NTSC)”.
Aspect Ratio: For recordings with the Studio TVR please choose
the 4:3 ratio.
Frame rate: For NTSC recordings please choose 29.97 fps. PAL
recordings require 25 fps.
Video: US and Canadian customers please choose NTSC.
Bitrate: The higher the bitrate, the better the encoding quality,
and the more time it takes for the encoding. Very high and low
bitrates might affect the compatibility of the created DVD.
Size: NTSC recordings should be encoded with 720 by 480.
Encoding speed: The faster the encoding, the lower the
encoding quality – and vice versa.
Audio Encoding: To ensure maximum compatibility please
choose a 48 Khz sample rate and a bitrate of 192 kbps. The
Emphasis should be on “CCITT j.17”.
14
D) Adjust the settings and click on “OK” to start the encoding. A
small time bar next to the thumbnail displays the encoding
progress.
E) When the encoding is finished you can burn the video on DVD
or SVCD with Formac’s devideon superdrive (optionally
available).
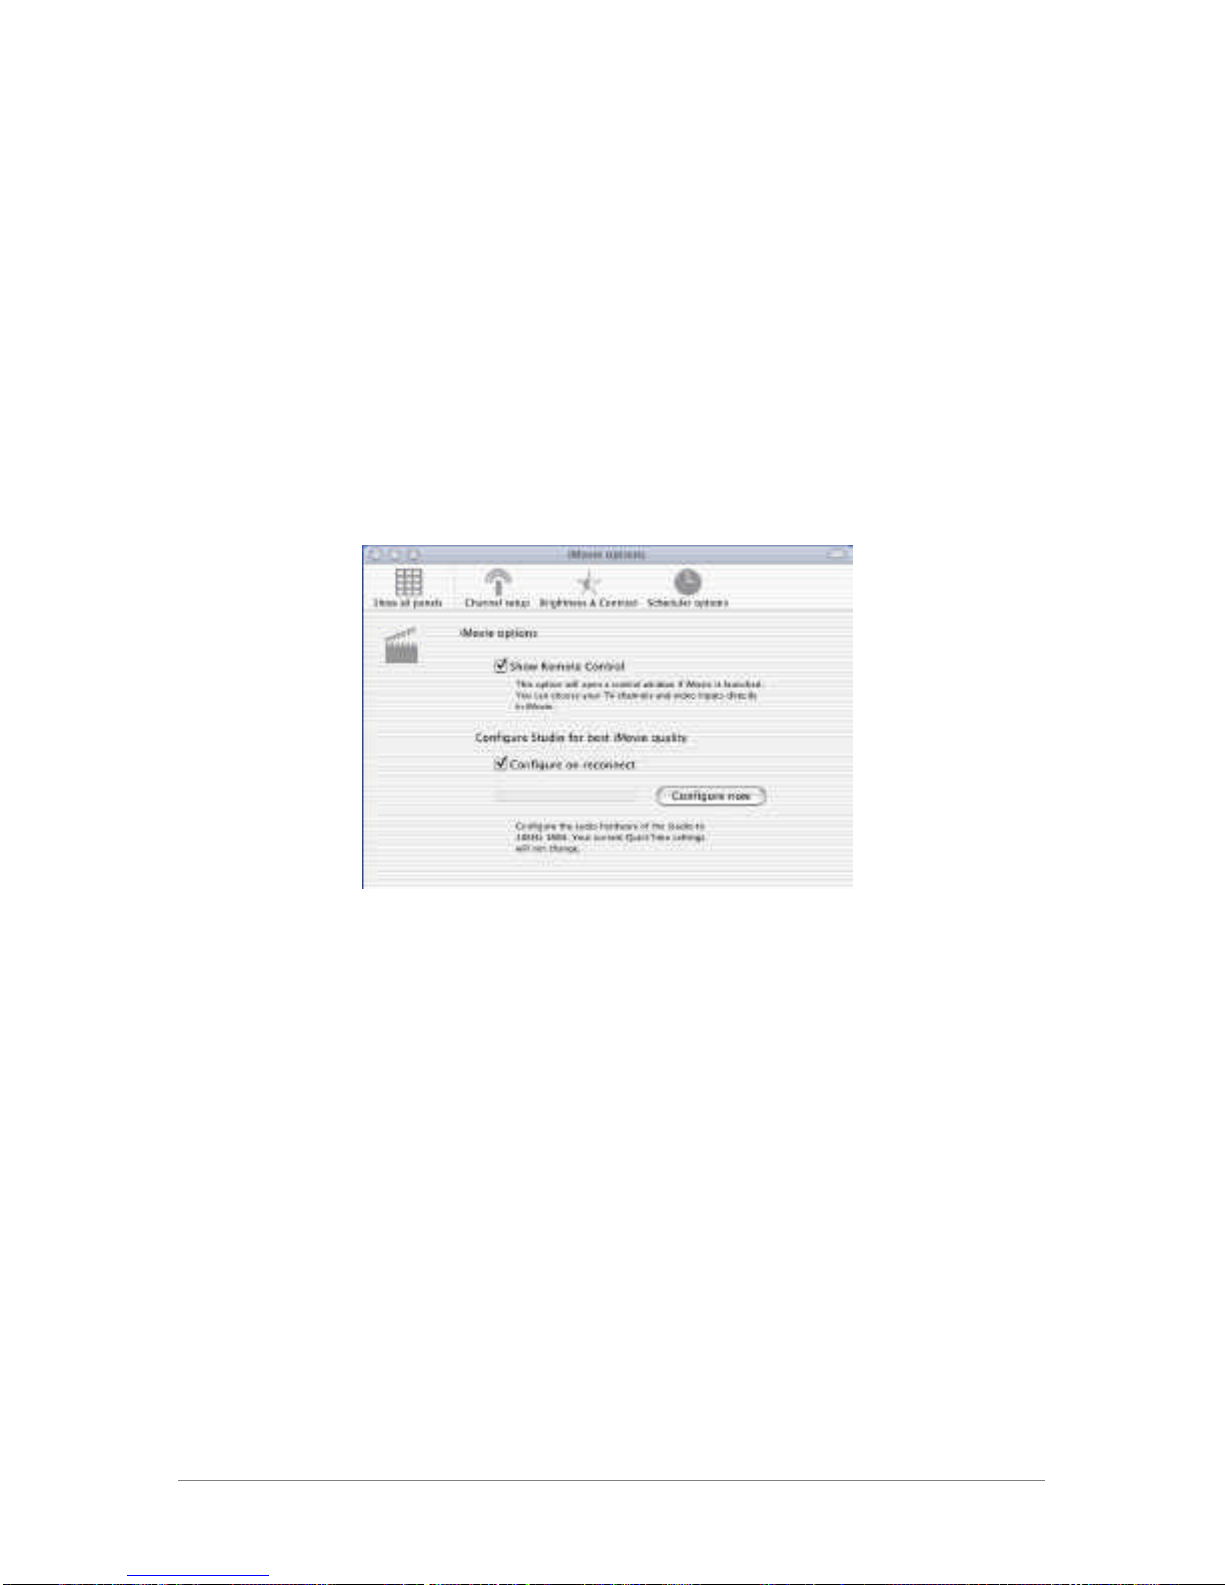
3.3. Editing TV: Integration with Apple’s iMovie 3
Studio TVR records in native DV and recordings can be edited in
any application that supports the DV format. Due to its
popularity Formac provides special settings for Apple’s iMovie 3
(Preferences > iMovie options).
Show Remote Control: Opens software remote control when
iMovie is launched. Switch channels and record TV directly in
iMovie.
Configure on reconnect: Video and audio settings are optimized
for iMovie.
Tip 1: Click on the yellow “-“ icon to make the remote control
disappear.
Tip 2: Movies recorded with Studio TVR can be imported directly
into iMovie. Make sure the “Record Options” in the
“Preferences” are set to “DV Movie”. Open iMovie and drag-and-
drop the video files in the movie clip section.
Note: The iMovie 3 features of the Studio TVR are limited to
units with a firmware version 1.06 or higher (you can check your
firmware under preferences > TV/FM-tuner info).

15
4. Using Studio TVR as a media converter
4.1. Recording video to and from external devices
The Studio TVR also converts analog media to digital, and vice
versa. The following inputs and outputs are available:
The LEDs on the front of the Studio TVR indicate the following:
a = Analog-to-Digital conversion (video input)
d = Digital-to-Analog conversion (video output)
Use the mode button to toggle between the conversion modes.
Use the reset button to reset the device.
Recording from external devices
1) Connect the outputs of your video device (e.g. VCR or DVD
Player) to the Composite or S-Video inputs of your Studio TVR.
Connect both video and audio cables.
TV-Input 2X FireWire
S-Video In & Out
Audio In & Out Composite Video In & Out

16
2) Hit “play” on your video device
3) Launch the Studio TVR software
4) Choose the “Composite” or “SVideo” channel
5) You can now watch and record the video directly in your
Studio TVR software.
Recording to external devices
1) Connect the inputs of your video device to the Composite or
S-Video outputs of your Studio TVR. Connect both video and
audio cables.
2) Launch the Studio TVR software
3) Choose the channel that you want to record.
4) Hit “record” on your video device
For instructions on how to export your recorded movies to
external resources please refer to chapter 3 “Export to Studio”.
Tip: The Studio TVR simultaneously transfers the input from the
coax-antenna/cable to its outputs. Connect a standard TV set to
the outputs of your Studio TVR to watch the respective channel
on a bigger screen.
Note: To import or export movies with third party editing
applications such as Apple’s iMove, Final Cut Pro and Adobe
Premier please refer to the manufacturer’s manual.
4.2. Digital audio recording
To import audio from external devices, launch Formac’s
Audiomaster software.
17
1) Connect the outputs of your audio device (Tape or CD) to the
audio inputs of your Studio TVR
2) Select the quality of the “Studio Audio CODEC”. The higher
the sampling rate, the better the quality.
3) Click on “Start SoundInput”
4) Set the record location
5) Adjust the audio settings. To optimize the audio recording
quality set the same sampling rates for the hardware and
software encoding.
6) Click on the red record button and push “play” on the audio
device.
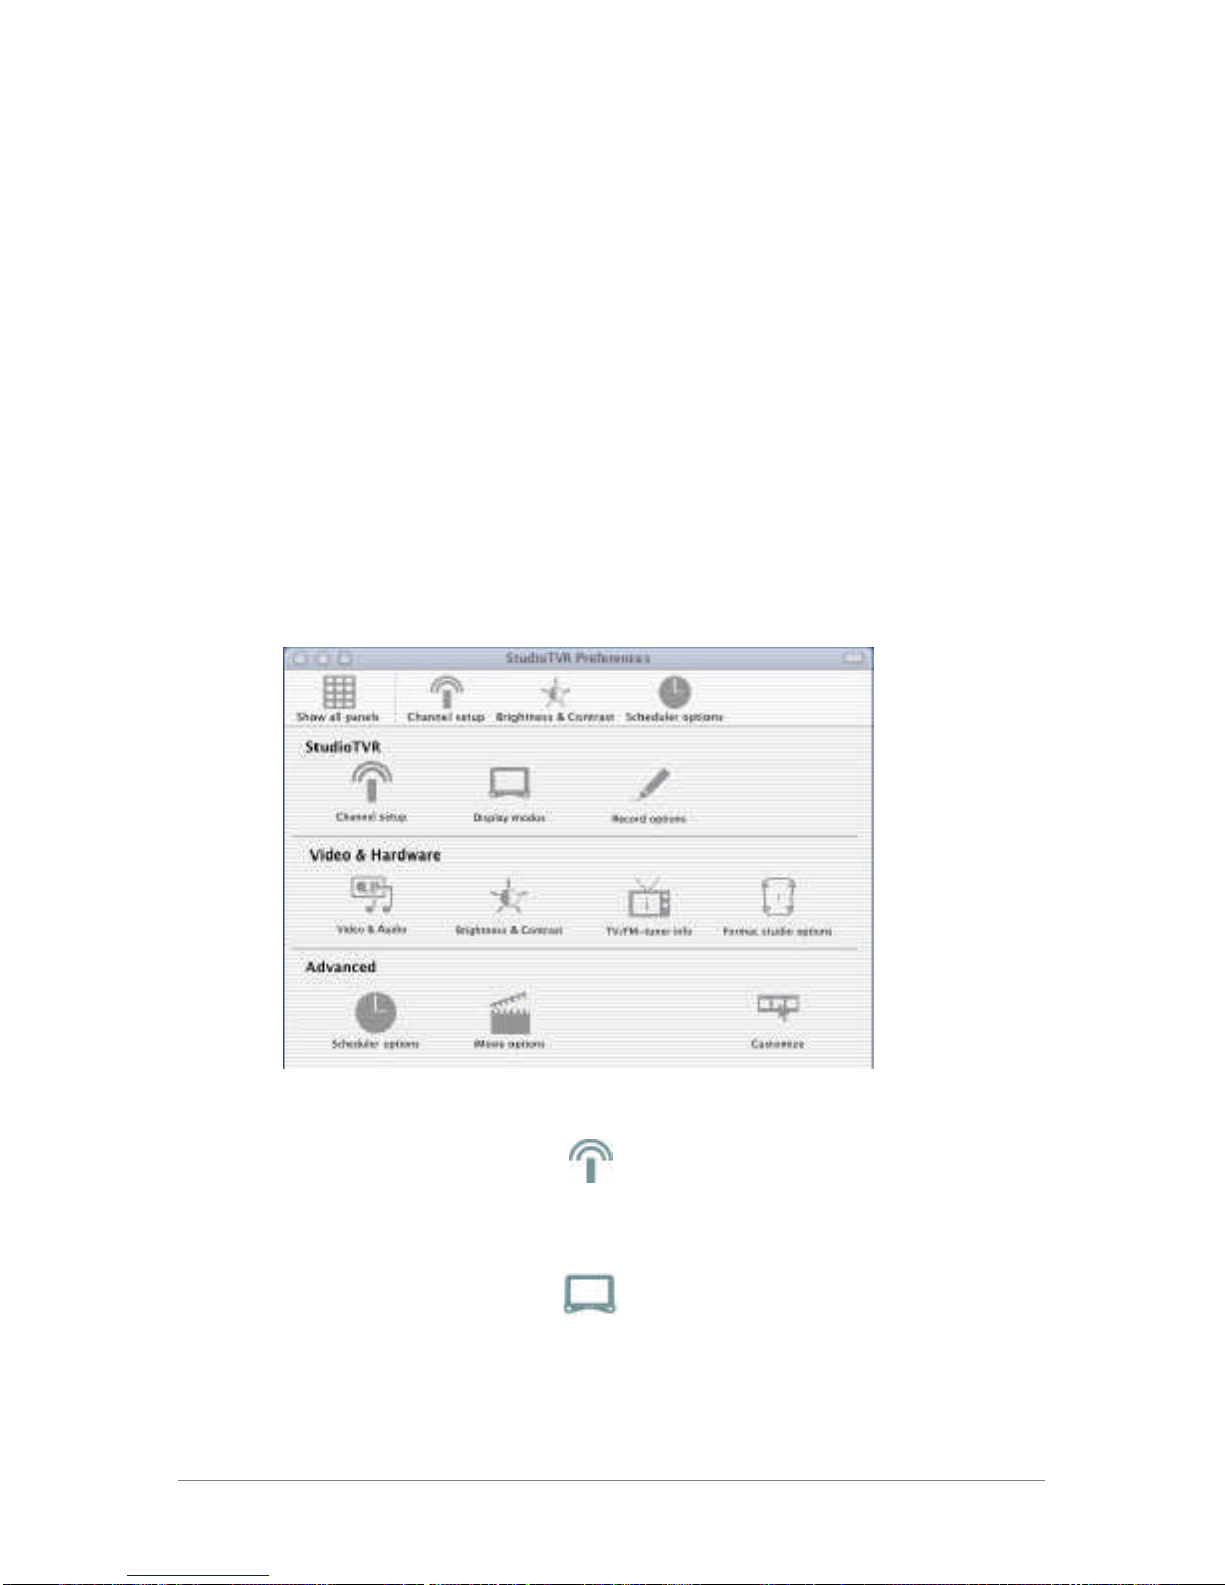
5. Tips to make Life easier
5.1. Preferences
1) Channel Setup
Access and modify your channel list. Use the Assistant to
create a new channel list.
2) Display Modus
Switch to best screen size sets your display resolution
automatically to 640 by 480 when TV modus is selected (full-
screen playback).

18
Choose between three options when hiding the application: 1)
Just hide Studio TVR 2) Play video in dock (small TV screen in
dock appears with live video) 3) Stop playing
Float the display to ensure it is always visible.
3) Record options
Record location: Set the location for saving your movies.
Movie type: Choose DV movie for compatibility with iMovie and
other video applications that support DV. The TimeShift
functions are only available if you select “DV movie”.
TimeShift: Set the size of the TimeShift Buffer, i.e. how much
space (and therefore recording time) the software reserves on
your hard disk for pausing TV. For reference: One hour of
recorded DV uses approx. 13 GB of disk space. Example: If you
set your TimeShift Buffer to 15 minutes, the Studio TVR will
record 15 minutes of video when you click on the “pause”
button. After 15 minutes the Studio TVR will write over the
beginning of your recording, i.e. you have to resume watching not
later than 15 minutes after you hit the “pause” button, if you do
not wish to miss the beginning of your recording.
High Quality Playback: Disable if you experience dropped frames
on a slower Macintosh.
4) Video and Audio Settings
For maximum performance we recommend to set the Video
Source to “DV Video” and the compressor to “DV/DVCPRO –
NTSC”. Set the Audio source to “DV Audio” (First 2 channels)
and the compressor to “None”.
Tip: In case of audio/video synchronization issues we
recommend to lower the sampling rate to 44kHz or 32 kHz at 16
bit.
5) Brightness & Contrast
Adjust Brightness, contrast, saturation and color for the video
signal.

19
6) TV/FM-Tuner info
Provides information about your firmware and tuner version for
software updates and compatibility reference.
7) Formac studio options
Allows you to choose between Low, Normal or High quality for
movie previews. If your Macintosh does not have sufficient
processing power you might experience dropped frames in your
video playback. We recommend changing the preview quality to
normal or low.
8) Scheduler options
Customize when the Studio TVR application is launched before
the start of a scheduled recording, or setup recording
notifications.
9) iMovie options
Please see chapter 3.3. “Integration with iMovie 3”
10) Customize
Customize the preference toolbar.
5.2. Troubleshooting
Q1: When I try to start the TVR application I get an error
message and the application quits.
A1: To use the software, the Studio TVR must be connected
properly to your Macintosh (via FireWire) and must be turned on
(green Power LED must be lit). To check if the Studio TVR is
recognized please go into the Apple System Profiler > Devices
and Volumes, and check the FireWire information.
Note: Is your studio connected properly, but not being
recognized? Your Macintosh might not supply sufficient power
via the FireWire port. Make sure you do not have any other
FireWire peripherals that draw power from your FireWire port
(e.g. iPod). Please buy an external power supply (check
Formac’s website for specifications).

20
A2: Make sure the software is properly installed and you are
running the latest version. Please check our website for
updates.
A3: There may be conflicts with other peripherals. Please
remove any FireWire, USB or PCI devices and uninstall
respective software packages.
Q2: I do not get a video signal!
A1: Make sure your Studio TVR is in the Analog-to-Digital mode.
Press the mode button to toggle between the modes or reset
the studio.
A2: Make sure your antenna/cable or video device is connected
properly and delivers a video stream.
A3: Make sure you have set the video settings correctly
(Chapter 5, Video and audio settings).
Q3: I do not receive any TV channels.
A1: Make sure that ONLY the FireWire cable and the
antenna/cable is connected to the Studio TVR when you create
your channel list.
A2: Make sure your cable/antenna delivers a strong and clear
signal (if in doubt test with a standard TV).
Q4: The audio and video is not in sync!
A1: Your Macintosh might not have enough processing power.
Please adjust the audio sample rates to 44kHz or 32 kHz at 16
bit. Please also check the answers to Question 5, as they are
related.
Q5: I am experiencing dropped frames when playing back
video or TV.
A1: Your Macintosh might not have enough processing power.
Please make sure you are not running several applications at
the same time to free up processing power.
A2: You might have another FireWire peripheral that interferes
(e.g. hard disk).
A3: Dropped frames also occur when your Studio TVR does not
get enough power. Either your Macintosh does not support
Table of contents
Popular Recording Equipment manuals by other brands


Daktronics
Daktronics Sportsound SSR-300 Operation manual

Clearaudio
Clearaudio Double Matrix Professional user manual

ETA Systems
ETA Systems ETA-ECS6RM manual

Kenwood
Kenwood G-EQ300 instruction manual

Patton electronics
Patton electronics NetLink 2701/B user manual

Cochlear
Cochlear Baha 5 SuperPower user manual