manuals.online logo
Brands
  1. Home
  2. •
  3. Brands
  4. •
  5. Forms + Surfaces
  6. •
  7. Outdoor Light
  8. •
  9. Forms + Surfaces Aptos Pedestrian User manual

Forms + Surfaces Aptos Pedestrian User manual

Length/Width
Depth
APTOS™PEDESTRIAN
SURFACE MOUNT INSTALLATION & WIRING INSTRUCTIONS
page 1 of 5 | 12-08-20
© 2020 Forms+Surfaces® | All dimensions are nominal. Specifications and pricing subject to change without notice. For the most current version of this document, please refer to our website at www.forms-surfaces.com.
T 800.451.0410 | www.forms-surfaces.com
TOOLS NEEDED
MATERIALS INCLUDED
STEP BY STEP
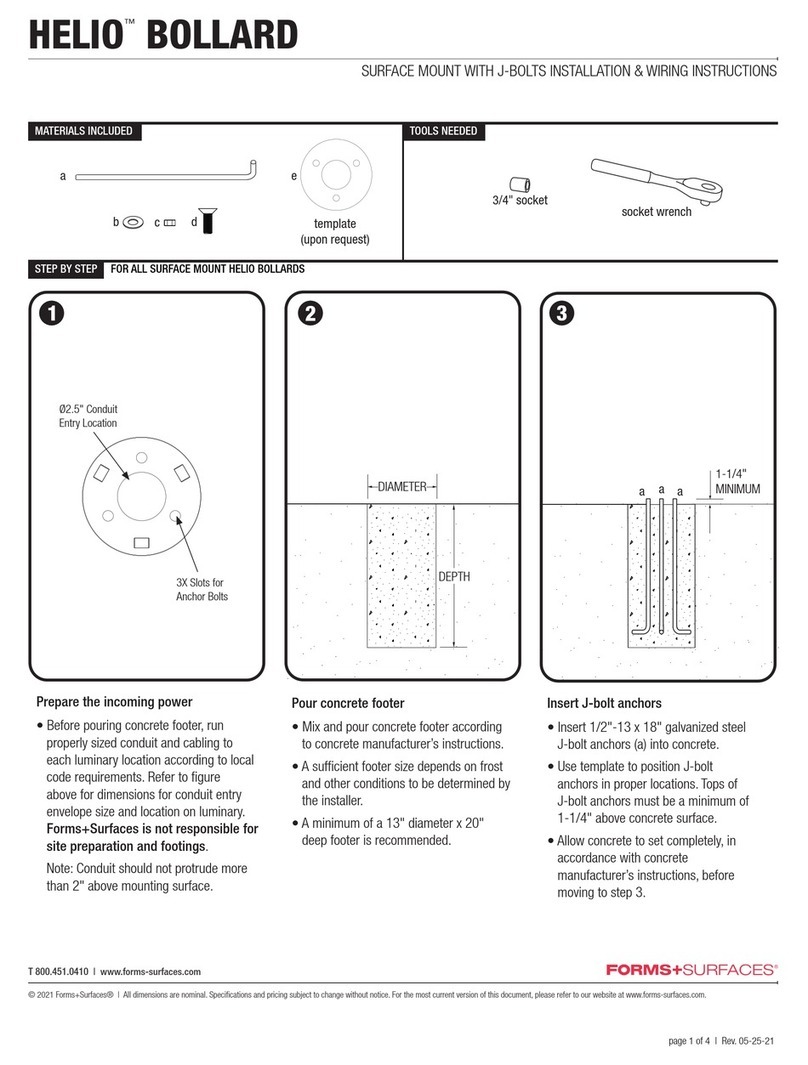
Prepare the incoming power
• Before pouring concrete footer, run
properly sized conduit and cabling to
each fixture location according to local
code requirements. Refer to figure
above for dimensions for conduit entry
envelope size and location on fixture.
Forms+Surfaces is not responsible
for site preparation and footings.
Note: Conduit should not protrude more
than 2" above mounting surface.
Pour concrete footer
• Mix and pour concrete footer according
to concrete manufacturer’s instructions.
• A sufficient footer size depends on
frost and other considerations to be
determined by the installer. (A minimum
of a 20" square x 45" deep footer is
recommended.)
Insert J-bolt anchors
• Insert 3/4"-10 x 24" galvanized steel
J-bolt anchors (a) into concrete.
• Use template (included) to position J-bolt
anchors in proper locations. Tops of J-bolt
anchors must be a minimum of 1-3/4"
above concrete surface.
• Allow concrete to set completely, in
accordance with concrete manufacturer’s
instructions, before moving to step 4.
FOR ALL APTOS PEDESTRIAN LIGHTING
1/8" and 5/32"
security hex bit
Template
(upon request) Loctite
a
ratchet
1-1/8"socket
1/8" hex bit 5/16" hex bit
wire strippers
c
f
e
b
g
h
d
Ø .88
Ø 7.50
Ø 4.01
Ø 1.88
Ø 12.50
2.95
a a
1 3/4"
Minimum
door side
11-13mm
(0.47in.)
APTOS™PEDESTRIAN
SURFACE MOUNT INSTALLATION & WIRING INSTRUCTIONS
page 2 of 5 | 12-08-20
© 2020 Forms+Surfaces® | All dimensions are nominal. Specifications and pricing subject to change without notice. For the most current version of this document, please refer to our website at www.forms-surfaces.com.
T 800.451.0410 | www.forms-surfaces.com
Locate wires
Note: Installation should be performed only
by qualified individuals.
• Before proceeding with wiring of fixture,
check to ensure that all applicable site
wiring and safety codes have been
followed.
• Remove two screws on access door at
base of light pole with 1/8" security hex
bit, and remove access door.
• Locate wires at base of light fixture.
Ensure power supply is shut off and circuit
being used is isolated.
Caution: Installation of a surge
protector as part of each unit’s wiring
is recommended.
Prepare wires
• Prepare wiring from site junction box and
bollard by stripping and removing 11-
13mm (.47") of insulation.
Note: Wire used should be 22-14 AWG
copper conductors.
Connect wires
• Insert ground (green), neutral (white), and
positive (black) wires into provided wire
nuts, being sure to match wire color codes
from junction box to fixture.
• Tighten wire nuts until exposed wire ends
are below bottom of wire nut.
• Inspect all wiring and connections before
turning power supply on.
Caution: Light fixture rated for 120-277
VAC power.
STEP BY STEP FOR ALL APTOS PEDESTRIAN LIGHTING
9
8
APTOS™PEDESTRIAN
SURFACE MOUNT INSTALLATION & WIRING INSTRUCTIONS
page 3 of 5 | 12-08-20
© 2020 Forms+Surfaces® | All dimensions are nominal. Specifications and pricing subject to change without notice. For the most current version of this document, please refer to our website at www.forms-surfaces.com.
T 800.451.0410 | www.forms-surfaces.com
Position & attach pole
• Slide base plate over J-bolt anchors and
lower pole to concrete level. Keep pole
supported until attached and tightened.
STEP BY STEP FOR ALL APTOS PEDESTRIAN LIGHTING
Attach and tighten washers and nuts
• Slide 3/4" washer (b), then thread 3/4"-
10 nut (c) onto each J-bolt anchor.
• Use 1-1/8" socket and socket wrench to
tighten all nuts until snug.
Attach base covers
• Place the four base plate covers in
position and thread 8-32 x 1/2" button
head cap screw (d) into each end hole
and tighten with 5/32" security hex bit.
c
b
c
b
dd
7
APTOS™PEDESTRIAN
SURFACE MOUNT INSTALLATION & WIRING INSTRUCTIONS
page 4 of 5 | 12-08-20
© 2020 Forms+Surfaces® | All dimensions are nominal. Specifications and pricing subject to change without notice. For the most current version of this document, please refer to our website at www.forms-surfaces.com.
T 800.451.0410 | www.forms-surfaces.com
10
Install luminaire mounting bolt[s]
• Apply LOCTITE®243™ thread locker
or similar on fastener threads of 1/2"-
20 x 1-1/4" mounting bolt[s] (e) and
thread into pole to use as alignment for
luminaire using 5/16" hex bit. Leave at
least 5/8" of threads exposed in order
for luminaire to slide over bolt.
STEP BY STEP FOR ALL APTOS PEDESTRIAN LIGHTING
Hang luminaire[s]
• Place the power cable and connector
coming from the body through the middle
hole in the luminaire mounting plate so
that the cable and connector are clear of
the mounting surfaces.
• Hang luminaire[s] on the 1/2"-20 bolts
and align lower bolt holes.
Secure luminaire[s]
• Apply LOCTITE®243™ thread locker or
similar on fastener threads of 2x 1/4"-20
x 1-1/8" bolts (f) and tighten to secure
luminaire[s] using 5/32" hex bit.
• Tighten 1/2"-20 x 1-1/4" bolts (e).
11 12
e e
f f
APTOS™PEDESTRIAN
SURFACE MOUNT INSTALLATION & WIRING INSTRUCTIONS
page 5 of 5 | 12-08-20
© 2020 Forms+Surfaces® | All dimensions are nominal. Specifications and pricing subject to change without notice. For the most current version of this document, please refer to our website at www.forms-surfaces.com.
T 800.451.0410 | www.forms-surfaces.com
Connect power to luminaire[s]
• Locate the wire and connectors coming
from inside the pole and the luminaire.
• Snap connector together so that the wire
colors are aligned correctly.
• Confirm that connectors are securely
connected and placed out of the way for
the lower cover to be attached.
STEP BY STEP FOR ALL APTOS PEDESTRIAN LIGHTING
Attach luminaire lower cover[s]
• Raise lower cover[s] into position.
• Place #10 Delrin Washers (g) over 10 -
24 x 1" bolts (h) and apply LOCTITE®
243™ thread locker or similar on fastener
threads. Insert into luminaire and tighten
using 1/8" hex bit to secure lower cover.
13 14
h
g

Other Forms + Surfaces Outdoor Light manuals

Forms + Surfaces 3RIVERS PEDESTRIAN User manual

Forms + Surfaces

Forms + Surfaces 3RIVERS PEDESTRIAN User manual

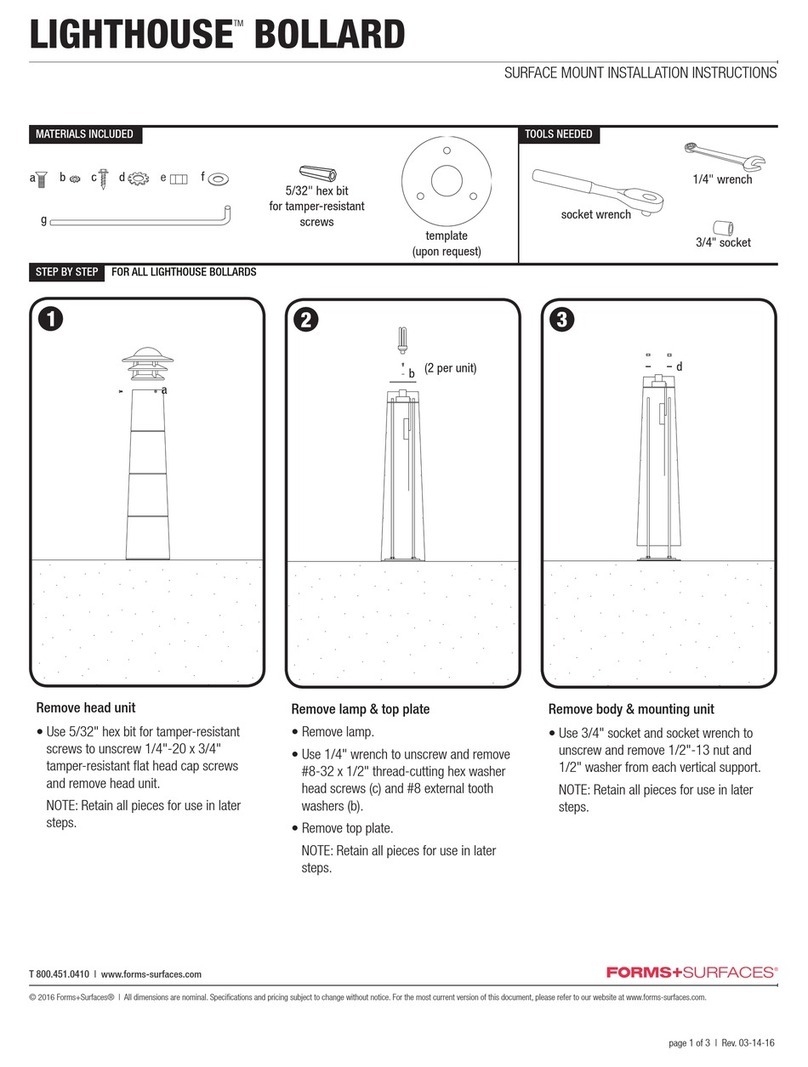
Forms + Surfaces HELIO BOLLARD User manual

Forms + Surfaces

Forms + Surfaces HELIO BOLLARD User manual

Forms + Surfaces LIGHTHOUSE Series User manual

Forms + Surfaces

Forms + Surfaces LIGHTHOUSE Series User manual

Popular Outdoor Light manuals by other brands

Beurer IL 30 Instructions for use

Beurer

Beurer IL 30 Instructions for use

Quoizel BCR9007MBK installation guide

Quoizel

Quoizel BCR9007MBK installation guide

Outsunny INbkb050V01 quick start guide

Outsunny

Outsunny INbkb050V01 quick start guide

LUCIDE COMBO-LED 27874/25/30 quick start guide

LUCIDE

LUCIDE COMBO-LED 27874/25/30 quick start guide

BEGA 77 008 Installation and technical information

BEGA

BEGA 77 008 Installation and technical information

ferm living OYSTER Assembly manual

ferm living

ferm living OYSTER Assembly manual

Pilz PIT si1.2 operating instructions

Pilz

Pilz PIT si1.2 operating instructions

Volt VPL-1049-4-BBZ installation instructions

Volt

Volt VPL-1049-4-BBZ installation instructions

GlacialLight GL-SD07 Series user manual

GlacialLight

GlacialLight GL-SD07 Series user manual

OttLite SCEQB00Z-CA quick start guide

OttLite

OttLite SCEQB00Z-CA quick start guide

modway EEI-5622 Assembly instructions

modway

modway EEI-5622 Assembly instructions

LIGMAN AR-20993-LC instruction manual

LIGMAN

LIGMAN AR-20993-LC instruction manual

DS Produkte SJ0717 instructions

DS Produkte

DS Produkte SJ0717 instructions

BEGA 84 121 Instructions for use

BEGA

BEGA 84 121 Instructions for use

IKEA ADELLOVTRAD manual

IKEA

IKEA ADELLOVTRAD manual

JONATHAN Y JYL7604A quick start guide

JONATHAN Y

JONATHAN Y JYL7604A quick start guide

alverlamp LEX90052 quick start guide

alverlamp

alverlamp LEX90052 quick start guide

American Gas Lamp CRAFTSMAN manual

American Gas Lamp

American Gas Lamp CRAFTSMAN manual

manuals.online logo
manuals.online logoBrands
  • About & Mission
  • Contact us
  • Privacy Policy
  • Terms and Conditions

Copyright 2025 Manuals.Online. All Rights Reserved.