Fornelli FEA 45 SONATA User manual
EN
User’s Manual
BUILT-IN OVENS
BUILT-IN
ELECTRICAL
OVEN
FEA 45
SONATA
COMPANY SPECIALIZING IN BUILTIN OVENS
AND HOBS
FEA 45 SONATA
FEA 45 SONATA WH

Installation and operation instructionsInstallation and operation instructions
OVENS
Dear Customer!
Thank you for purchasing a “FORNELLI” product. We hope, this appliance will meet your ex-
pectations and be a reliable assistant of yours in your kitchen. For correct and safe operation of
the appliance, please carefully read all the chapters in the present manual. Keep your manual
for the entire service life of the product you have purchased.
Reading the first part of the manual, you will learn some important conditions to provide for
safe operation of the appliance. To keep your appliance in good condition for a long time, we
oer you a lot of helpful advices on the product care and cleaning. In the manual there are
some hints on energy saving.
On the last pages of the manual you can read recommendations which will help you remove
minor failures, if any, during operation of your appliance.
Your new appliance is made of high-quality materials and fully conforms to any standard of the
European Economic Community.
The manufacturer reserves the right to make changes to the product design in order to im-
prove its performance. Our household appliances are subject to continual improvement, the
performance is enhanced and their design is updated. Therefore, drawings and symbols in the
manual may dier from those for the model you have purchased.
Enjoy your meal!
The manufacturing date is in the serial number of the product. The serial number is on the internal label
which is on the side of the oven. Serial number explanation SPG/201408C/0001-50:
This example: the appliance was manufactured in August 2014.
SPG / 201408C / 0001 - 50
Code year month
manufacturing
order
number in
the batch
number of this
specification
in the batch

Installation and operation instructions Installation and operation instructions
OVENS
1
Installation and operation instructions
CONTENTS
SAFETY HINTS AND STATEMENTS
Connection requirements........................................................................................................................................................2
Safety statements........................................................................................................................................................................2
How to avoid damage to the appliance ..........................................................................................................................3
Energy saving advice .................................................................................................................................................................3
SCOPE OF SUPPLY AND TECHNICAL DATA
Scope of supply.............................................................................................................................................................................4
Oven technical data....................................................................................................................................................................4
YOUR NEW OVEN
Oven use ...........................................................................................................................................................................................5
Control console.............................................................................................................................................................................5
Oven control elements .............................................................................................................................................................5
Electronic programmable device.........................................................................................................................................6
Timer ..................................................................................................................................................................................................8
Oven mode selection switch .................................................................................................................................................9
Recommendations on roasting jack use ......................................................................................................................10
Thermostat ...................................................................................................................................................................................10
RECOMMENDATIONS ON FOOD PREPARATION
Hints on cooking..........................................................................................................................................................................11
Hints on baking ............................................................................................................................................................................11
Recommendations on food preparation ......................................................................................................................12
OVEN CARE
Oven care ......................................................................................................................................................................................13
OVEN INSTALLATION
Oven installatio............................................................................................................................................................................14
Connection to the mains........................................................................................................................................................16
Minor repairs ...............................................................................................................................................................................16
Replacement of lamps ............................................................................................................................................................ 17
Appliance disposal upon expiry of its service life ................................................................................................... 17
The product has been manufactured in line with European standards and is CE, TUV,
ISO 9001 and EAC certified
TM FORNELLI
FORNELLI ELETTRODOMESTICHI S.R.L. VIA DEGILI AUSONI 7-01/A CAP 00 185, Rome, Italy

Installation and operation instructions
OVENS
2
CONNECTION REQUIREMENTS
These are only qualified professionals who
are permitted to mount and install the appli-
ance, in compliance with the instructions and
a connection diagram. The appliance shall be
connected to a reliable grounding system to
conform to valid standards of electrical saf-
ety.
The manufacturer disclaims all liabilities for
damage to humans and property, if the ap-
pliance is not or improperly connected to a
grounding system.
Prior to switching on the appliance, please
check, if there are any foreign subjects inside
the oven, such as packaging elements, etc.
It is strictly prohibited to install and connect
ovens with mechanical damages to compo-
nents and power cables.
Attention! Before the first use of the appli-
ance we recommend you to heat the oven
with a grid and baking pans placed at cor-
responding levels inside the oven and a
maximum heating temperature set. Then,
open the oven door, switch on the cooker
hood and air the room to remove odors of
lubricants that have been used for pre-
servation of equipment during its storage
time before installation. Then, you have to
wash and wipe dry the oven and its com-
ponents.
SAFETY STATEMENTS
The appliance shall only be used for prepa-
ration of food, do not use it for heating the
premises.
During operation, the appliance heats up. Its
inner surfaces, heating elements and steam
exit point become very hot. Do not let children
stay near the appliance being used.
Stay close to the oven when cooking the food
with use of fats or sun flower oil, because they
can inflame when overheated.
The cables of electrical appliances must not
touch hot elements of the oven. This may re-
sult in damage to wire insulation.
Upon occurrence of failures, cut o power
supply tripping the automated circuit breaker.
No inflammable objects may be kept inside
the oven. They may burn upon accidental po-
wering on.
During long-term operation at high tempera-
tures the door handle may also become very
hot. Please, take care!
The continuous cooking time using the ap-
pliance shall not exceed 10 hours. Upon this
time switch o the appliance and let it cool
down completely!
Attention! To avoid breakdown of the
appliance, keep in unpacked at a room
temperature within 2 hours at least pri-
or to switching on in cold months.
SAFETY HINTS AND STATEMENTS

Installation and operation instructions Installation and operation instructions
OVENS
3
HOW TO AVOID DAMAGE
TO THE APPLIANCE
Do not cover dishes being cooked, do not
place alu foils at the bottom of the oven, for
that causes excessive accumulation of heat.
As a consequence, the cooking time chan-
ges, and enamel of the appliance may be da-
maged.
Do not pour water into the hot oven – this can
damage the enamel inside the appliance.
If you are going to bake a fruit cake, we re-
commend you to use a special tin, deep
enough, because fruit juice dropping o the
tin may mark the surfaces, and it is almost
impossible to remove these stains.
Do not lean your elbows against and do not
sit down on the oven door. The oven door
must close firmly, please keep the door seal
clean all the time.
These are only qualified professionals of the
after-sales service who are permitted to re-
pair the appliance, having a special work per-
mit issued by the manufacturer. An indepen-
dent repair or involvement of unauthorized
persons may lead to occurrence of danger.
ENERGY SAVING ADVICE
1. If cooking takes a protracted period of
time you may switch o the oven 10 mi-
nutes before the end of cooking time. The
food will be cooked thanks to residual
heat inside the apparatus.
2. Do not open the oven more often than re-
quired. Opening the door, you lose a large
amount of heat, which, in turn, increases
the cooking time.
3. You will optimally utilize the oven space,
using oblong tins for baking, placed in
parallel, at the same level, or baking at
dierent levels at the same time.
4. Use dark or black baking tins. They are
the best to resist the heat inside the oven.
5. Should you wish to cook food using a grill,
place your food in the middle to achieve
the best cooking results.
SAFETY HINTS AND STATEMENTS

Installation and operation instructions
OVENS
4
SCOPE OF SUPPLY*
Your oven is classified as a built-in appliance.
The scope of supply includes as follows:
- Oven – 1 piece;
- Baking pan – 2 pieces;
- Grid – 1 piece;
- Roasting jack with a holder – 1 piece;
- User’s manual;
- Set of self-tapping screws.
* The scope of supply is subject to change without
prior notice.
TECHNISCHE DATEN DES BACKOFENS
Dieses Gerät entspricht den folgenden EWG-Stan-
dards:
— 73/23/EEC — nach Unterspannung;
— 89/336/EEC — nach elektrotechnischer Ver-
träglichkeit;
— 93/68/EEC — nach Allgemeinstandards;
— 89/109/EEC — nach Materialien bzw. Objek-
ten, die mit Lebensmitteln in Berührung kommen
können.
Der Werksschild mit Angabe des Modells des
Back-ofens, der Seriennummer und der Höchst-
leistung befindet sich auf der Oberfläche des Ein-
bauteils bzw. auf der Frontseite des Gehäuses des
geöneten Backofens.
Sizes of oven elements and its recess.
Oven total volume: 48 L; oven usable volume: 45 L.
Sizes of oven elements Height Width Depth
(Length)
Face panel size 594 447 21
Built-in part size 577 408 550
Recess used to build-in the appliance 600 410 575
Electrical power of heating and other elements of the oven,
maximum power consumption, Watt
Power-supply voltage: 220—240 V~, 50/60 Hz.
Energy eiciency class: A Protection Rating: 1
Element Power, W
Grill 2000
Upper heating element 1800
Lower heating element 900
Ring-type heating element 1600
Convector motor 13
Cooling motor 11
Oven illuminating lamp 25
Roasting jack motor 4
Maximum power consumption 2736
Net weight, kg: 29.

Installation and operation instructions Installation and operation instructions
OVENS
5
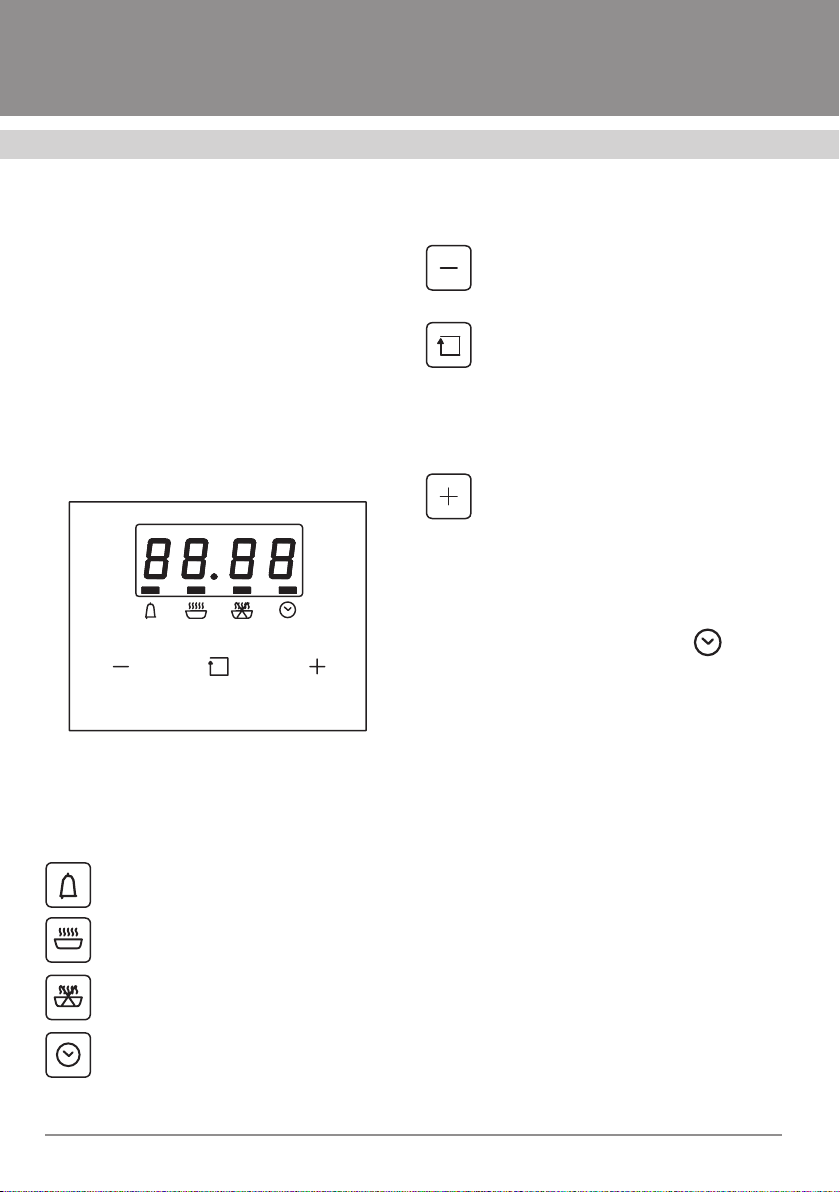
CONTROL CONSOLE
1. The push-pull* mode selection switch is
used to select a cooking mode desired.
2. The electronic programmable device en-
ables to set actual time, cooking duration
and end of cooking. In some models it can
also be used as a timer.
3. The push-pull* temperature selector
(thermostat) is used to set a tempera-
ture value required for cooking (tempera-
ture values ranging from 50ºC to 270ºC).
The values of temperatures are indicated
around the selector.
4. The heating elements operation control
lamp (to indicate whether the heating ele-
ments are on / o to keep a chosen cook-
ing temperature). The feature is conve-
nient for preheating the oven. You select
a temperature value, required for prepara-
tion of your dish, switch on the oven and
start cooking after the control lamp is o.
The lamp being o means the oven has
been preheated to the temperature you
have selected.
OVEN CONTROL ELEMENTS
Your new oven has a multifunction system
used for preparation of food. This enables to
select the best cooking mode for a dish you
wish to cook. The mode required may be se-
lected with switches on the control console.
To decrease the temperature of the exter-
nal surface of the oven, built into a piece of
kitchen furniture, the models are equipped
with a cooling fan which is on, with any mode
OVEN OPERATION
* The control knob is recessed into the console. To set a value required, you should do the fol-
lowing: press the knob to move it up, set a value desired, turning the knob clockwise / coun-
terclockwise. Then, press the knob again to recess it.
MAX
60
80
100
120
140
160
180
200
220
Installation and operation instructions
OVENS
6
selected, after the temperature of the oven
surface has reached a critical value. Upon
switching on the cooling fan, you can feel the
air flowing through the gap between the con-
trol console and the oven door.
Each mode of the oven, regardless of the
design of switches, has a special symbol to
designate it. On the control console they are
presented as pictograms. Let us consider the
purpose and positions of each switch.
ELECTRONIC PROGRAMMABLE
DEVICE
Fig. 2. Electronic programmable device.
The device consists of a display and symbols
and control keys beneath it (Figure 2). The
symbols have meanings as follows:
Timer
Cooking time
End of cooking time
Clock
The control keys perform functions as fol-
lows:
A key used to decrease a displayed
value.
A key used to change modes. Re-
peated activation of the key results
in switching to the next mode. The
blinking rectangular symbol and the
pictogram beneath that show the ac-
tual mode.
A key used to increase a displayed
value.
Upon connection of the oven to the mains,
“12:00” will be displayed on the electronic
programmable device, and the rectangu-
lar symbol above the pictogram will be
flashing. This is to show that actual time shall
be set. befindet.
The actual time shall be set using keys “+” or
“–“. Upon selection of a time desired, press
the mode selection button to enter the value
or wait 5 seconds to automatically store the
settings.
Please, pay attention: disconnecting the
oven from the mains, you will have to set time
again.

Installation and operation instructions Installation and operation instructions
OVENS
7
Settings for automated start
and end of cooking
Should you wish to have any dish cooked to
a given time and be sure that its cooking will
take a certain amount of time, you can pro-
gram the electronic device as you need. For
that, you have to set the cooking time and
end of it, using a method as follows:
– press the mode selection key several
times to move the rectangular symbol on the
display to a position above the symbol
. Using the “+” and “–“ keys set a time re-
quired for cooking. Store the value, pressing
the mode selection key again.
– press the mode selection key several
times to move the rectangular symbol on the
display to a position above the symbol .
Using the “+” and “–“ keys set a desired time
of cooking end. Store the value, pressing the
mode selection key again.
– use the control knobs to set a required
oven mode and cooking temperature. Af-
ter the settings have been made, indicators
above and will blink to show that
the automated cooking mode has been set in
a proper way.
Let us take an example: you know that cook-
ing your dish will take 45 minutes. You want
to have the dish cooked at 14:00 o’clock. You
have made settings required as described
above. At 13:15 the oven will switch on, the
cooking will start, and the display indica-
tors will blink. The oven will switch o sharp
at 14:00. There will be a sound signal given,
and the indicators will keep blinking. Press
any key to turn o the sound signal. Turn the
temperature and mode control knobs to the
OFF position.
Semiautomatic cooking
BIn this mode you can select one of the cook-
ing methods.
1. You know that it will take a certain amount
of time to cook a dish you want to cook.
press the mode selection key several times to
move the rectangular symbol on the display
to a position above the symbol . Using
the “+” and “-“ keys set a time required for
cooking. Set the temperature and the oven
mode. The oven will start operating, at that
the indicator above the symbol will
blink. At the lapse of the set time the oven will
switch o, and a sound signal will be given.
The indicator
will keep blinking. Press
any key to turn o the sound signal. Turn the
temperature and mode control knobs to the
OFF position.
Attention: the cooking time shall not exceed
10 hours.
2. You wish to have a dish cooked at a certain
point of time.
Press the mode selection key several times to
move the rectangular symbol on the display
to a position above the symbol . Using
the “+” and “-“ keys set a desired time of
cooking end. Set the temperature and oven
mode. The oven will switch on, and the indi-
cator » will keep blinking. At a set point
of time the oven will switch o, a sound signal
will be given, but the indicator
will keep
blinking. Press any key to turn o the sound
signal. Turn the temperature and mode control
knobs to the OFF position.

Installation and operation instructions
OVENS
8
Attention! The oven will switch on right af-
ter setting this mode, and the oven operating
time will depend upon the o time you have
programmed. Be careful: longer cooking time
may result in burning of food and its spoilage.
Due to special features of the display the end
of cooking time can be set only before 23:59.
Timer
The purpose of the electronic timer is to only
give the sound signal. In the “Timer” mode,
upon completion of the countdown, the heat-
ing elements will not switch o automatically.
They will only switch o by turning the tem-
perature and mode control knobs to the OFF
position. The “Timer” mode is convenient be-
cause it reminds you on time and operates as
an alarm clock. You can set a point of time at
which a sound signal must be given within a
range as follows: 00:01 – 23:59.
To set a timer value, press the mode selection
key several times to move the rectangular
symbol on the display to the position above
Use the “+” and “-“ keys to set a time you
desire. The countdown will start right after
the setting has been made. Upon completion
of the countdown, the sound signal will be
given, and the indicator will keep blink-
ing. Press any key to turn o the sound signal.
Necessary additional
information
Any mode of the electronic programmable
device may be cancelled at any time. For
that you have to use the mode selection key
to select the function set and use “–“ to set
“00:00”. Another method is to press and hold
“+” and “–“ at the same time.
Upon power cut, the functions of the elec-
tronic programmable device are no more
stored. The actual time, as well as the other
functions must be set and stored again.

Installation and operation instructions Installation and operation instructions
OVENS
9
OVEN MODE
SELECTION SWITCH
Fig. 3. Oven mode selection switch.
OFF
All the heating elements and illumina-
tion inside the oven are o.
LIGHT
All the heating elements are o, it is
only the illumination which is on. This
mode is convenient for preparation for clean-
ing the internal surfaces of the oven, to see
what surfaces need cleaning.
Upper and lower heating
Upper and lower heating elements
are in operation. The heat is uniformly
supplied above and below onto dishes be-
ing cooked or fried. This is an ideal mode for
baking bread, a sponge cake or fruit cake at
the same level. This is also suitable for cook-
ing lenten roast meat (veal and wild game).
Grill with convector
The grill heating element is in opera-
tion, and the convector is to distribute
the heat throughout the entire volume.
Lower heating with convection
This is only the upper heating which is
in operation. This is a perfect mode for
especially thin bakery food.
Oberhitze
Nur das obere Heizelement ist in
Funktion. Diese Funktion passt ideal
für ein besonders dünnes Gebäck.
Grill
This is only the grill heating element
that is on. It is in the upper part of the
oven. This enables to thoroughly fry large
quantities of food and is a perfect solu-
tion for beefsteak, chicken, turkey, fish and
toasts.
3D Konvektion
The fan and circular heating elements
are on that are in the rear wall of the
oven. The hot air circulates throughout the
entire oven volume to produce uniform tem-
perature at any level. One can cook various
dishes – at several levels and at the same
time, saving energy and time.
Defrosting
This is only the convector fan that is
in operation. This is used to speed up
defrosting and / or food drying by means of
forced air circulation. The oven door must be
at that closed.

Installation and operation instructions
OVENS
10
RECOMMENDATIONS ON USE
OF ROASTING JACK
Its operation is combined with that of the grill.
Put the food lengthwise, fix it using forks. After
that do the following:
– insert the roasting jack end into the hol-
low shaft of the motor which is in the rear
wall of the oven;
– install a support for the roasting jack
grooves;
– unscrew the handle;
– place the fat pan at the lowest level;
– upon completion of cooking, screw the
handle again and take the roasting jack
out of the oven.
Attention! There is no separate control system
for the roasting jack. Its motor automatically
starts along with other modes. In this connec-
tion the roasting jack must be installed with the
control handle in the OFF position.
THERMOSTAT
Using this switch (Position 3, Figure 1), one
can select a temperature inside the oven,
at which the food is going to be cooked. The
temperature is to be set by smooth rotation of
the switch clockwise, within the range 50ºC –
270ºC. This is the oven heating control lamp to
indicate whether the oven is heated to a given
temperature (Position 4, Figure 1). If the lamp is
on, this means, all the heating elements of the
oven selected with use of the mode selection
switch are on, and the oven has not been heat-
ed yet to a given value of temperature. As soon
as the temperature inside the oven exceeds the
given value, the heating element will be o, and
the control lamp will be o, too. The thermo-
stat keeps the given temperature, alternatively
switching the heating elements on and o.
Attention!
REMINDER: your oven will NOT SWITCH
ON with at least one of the two switches
on the control console being in the OFF
position!
HINTS ON COOKING
In the present manual you can find some rec-
ommendations on cooking time and tempera-
ture. More detailed information is presented in
books on cooking. Please, be aware that the
table data are specified for products being put
into a cold oven. With an oven preheated, the
cooking time decreases by 5 – 10 minutes.
Basing upon properties and amount of food to
be cooked, as well as a level at which the food
being cooked is going to be placed, the cook-
ing time and temperature may vary.

Installation and operation instructions Installation and operation instructions
OVENS
11
The table presents two methods of cooking
the same dish. Each method description oc-
cupies three columns in the table. The data
below are only approximate, because the
cooking mode and cooking time may change,
depending upon an amount and properties of
the food.
HINTS ON BAKING
Baking temperatures and time depend upon
an amount and properties of bakery dough.
Therefore the table data are given as inter-
vals. Start baking at lower temperatures
presented in the table. Then, as it may be re-
quired, increase baking temperatures. Please
keep in mind that lower baking temperatures
always provide for uniform browning.
Attention!
Tins shall be placed upon a grid at all
times!
The cake top is burnt. Place baked food at a
lower level, decrease temperature and slight-
ly increase the baking time.
The cake bottom is burnt. Place the baked
food at a higher level. Set a lower tempera-
ture next time.
You bake food at various levels (the “con-
vection” mode is not at that used). At higher
levels the baked food are browner as opposed
to lower ones. Select a slightly lower tem-
perature which would result in more uniform
baking. Foods being baked at dierent levels
cannot be ready at the same time. Let the food
being placed at the lower pan be baked 5 – 10
minutes longer or put that pan into the oven
earlier than the others.
Flat cookies “stick” to the pan surface.
Place the pan into the oven again. Keep it
there within a short time. Take the pan out.
Now you can easily take them o.
The cake remains within the tin even over-
turned. Use a knife to carefully separate the
cake from the tin edge. Overturn it again. Use
wet cold towels to cover it (several layers).
Next time properly grease the tin and dredge
it.
You have measured the oven temperature
using your own thermometer and found a
temperature dierence. The oven tempera-
ture is measured by the manufacturer using
a test grid at the lapse of a certain time. The
temperature is measured in the midpoint of
the test grid. The type of used dishware and
accessories also have impact upon mea-
sured values.
The values measured by you will always dier
from the values set.
How can one determine whether yeast-
fermented dough has got baked thor-
oughly or not. 10 minutes before the end of
cooking time according to your recipe, pierce
baked food using a wooden stick at the high-
est point. The food is ready, unless the dough
sticks to the stick.
The cake rises in the middle, but its edges
are “fallen”. Do not grease the edges of a
round-shaped tin. Upon completion of bak-
ing, use a knife to separate the cake from the
tin.
Water vapor may form during baking. Its
greater amount escapes through the evapo-
ration outlet. Vapors may condense upon
tiles and furniture pieces close to the oven.
This physical phenomenon is quite normal.

Installation and operation instructions
OVENS
12
TIPS FOR THE PREPARATION OF FOOD
Temp.
oC
Position/
level
Cooking
time
Temp.
oC
Position/
level
Cooking
time
Biscuit 180 320-25 160 1 or/and 3 25-30
wheat flat bread 230 410-15 210 1 or/and 3 10-15
small biscuits 180 315-20 160 1 or/and 3 15-20
torteletts 200 330-45 180 135-45
glaze torteletts 200 320-30 180 1 or/and 3 25-35
torteletts with brandy 230 415-30 210 1 or/and 3 20-35
cookies 200 310-15 180 1 or/and 3 15-20
loaf 220 220-40 200 125-45
lasagne 200 330-40 180 135-45
pizza 220 120-25 200 125-30
beef 200 220-30 180 120-30
pork meat 200 230 180 130-35
mutton 190 225 170 125
chicken 190 220 170 120-25
duck 190 230 170 135
goose 190 220 170 125
turkey 170 120 160 125
vegetables 200 330-40 180 135-45
meat quiche 160 22-3 hours 150 12-4 hours

Installation and operation instructions Installation and operation instructions
OVENS
13
CATALYTIC PANELS
Onto the surface of the farther wall of the
oven a layer of self-cleaning, catalytic enam-
el is applied. Self-cleaning carries during the
oven operation. But in fact, some badly-burnt
stains can only be removed upon repeated
operation of the oven.
Residues of flavors can easily be removed us-
ing a soft cloth or a brush.
Slight changes to the enamel color have im-
pact upon its self-cleaning properties.
OVEN CARE
Attention!
Before cleaning, wait till the oven
cools down. Disconnect the oven,
unplugging it or tripping the switch.
Do not clean the appliance using steam, do not
practice power wash.
It would be fair enough to wipe the external sur-
face of the appliance with a piece of wet cloth.
If this is not suicient, use a detergent agent
or warm soapy water. With severe contamina-
tions, not being removed by means of ordinary
detergent agents, use special-type cleaning
foam for ovens. Cleaning agents shall be only
applied onto enameled surfaces.
In no circumstances use abrasives because
they leave scratches and dead spots. If you
happened to accidentally use them, wash them
o with water immediately.
Baking pans can be washed with a soft
sponge, using a dishwashing detergent, or in
a dishwasher. To wash chrome-plated guides
for baking pans also use a dishwashing deter-
gent and a soft sponge. To remove badly-burnt
stains use a harder sponge. Upon cleaning,
wipe the surface with a dry piece of cloth.
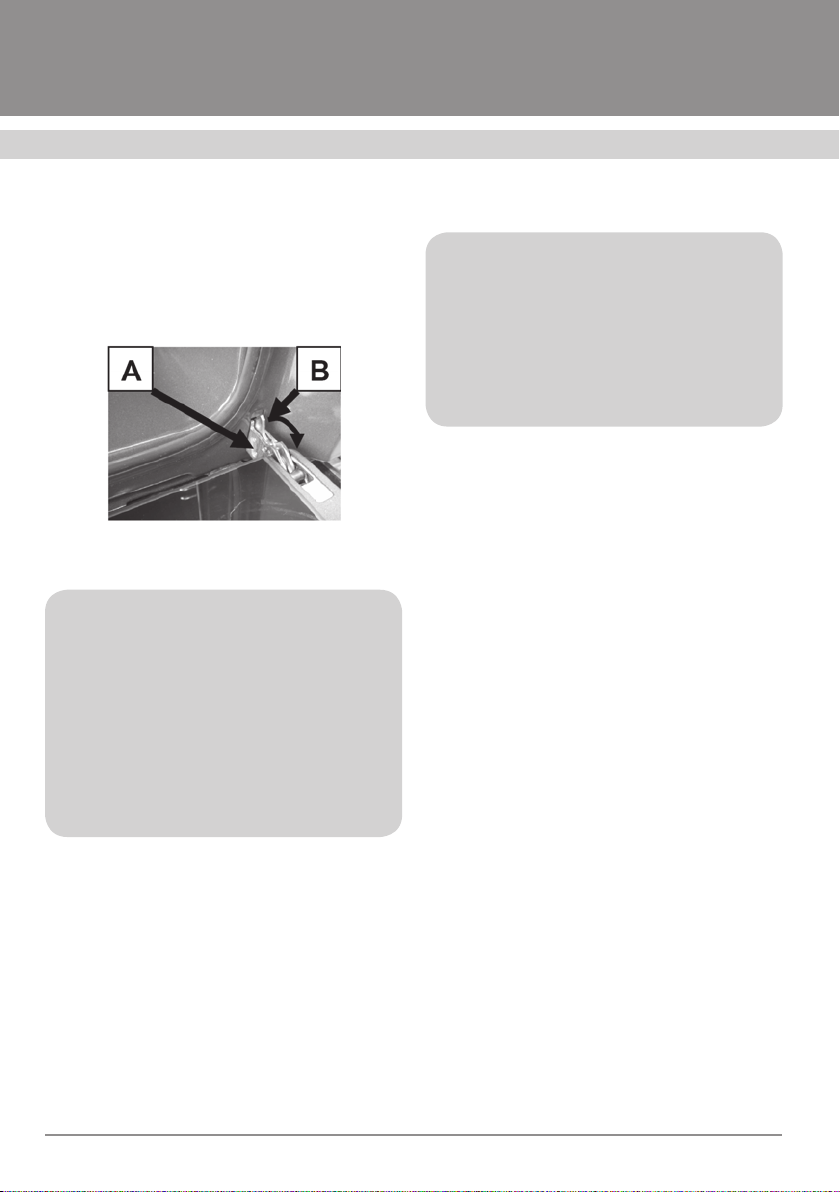
For easier cleaning you may take o the oven
door (Figure 4).
For that, fully open the door. Snap the hook “B”
of the door hinge “A” from its normal position
to the rearmost one, on both hinges. Open the
door in such a way so that the hooks “B” bump
up against the edge of recess in the oven door.
Installation and operation instructions
OVENS
14
Pull the door up and push. With the door lifted
to a suicient height, take hinges out of their
seats in the oven body.
The door shall be mounted in reversed order.
Fig. 4
Attention!
Do not touch the door-locking hooks
when the door is being removed. Do
not place heavy objects upon the door,
do not stand on it. This may lead to the
door damage or injuries of the user. Do
not use the oven, until the door is pro-
perly mounted again.
OVEN INSTALLATION
Attention!
These are only qualified experts who
are permitted to install the oven. The
oven shall only be connected to the
mains with the power cut o. The same
applies to performance of any works
with electrical components of the oven.
Should the oven be installed in close vicin-
ity to other electrical appliances located in
the kitchen, make sure they will not inter-
fere with each other. Before the first use
please check whether you have removed all
the protecting films used for transportation
of the appliance.
Surfaces of kitchen furniture items, adjoin-
ing the oven, shall resist temperatures of
up to 1000ºC. Otherwise they may be dam-
aged or deformed due to exposure to high
temperatures. If your furniture is not de-
signed to temperatures like that, we recom-
mend you to use heat-insulating face plates
to be laid onto walls of the furniture items.
You can order and purchase these heat-
insulating face plates at agencies selling
kitchen furniture.
The manufacturer disclaims any respon-
sibility for damage to humans or property
resulting from improper installation of the
oven or its misuse.
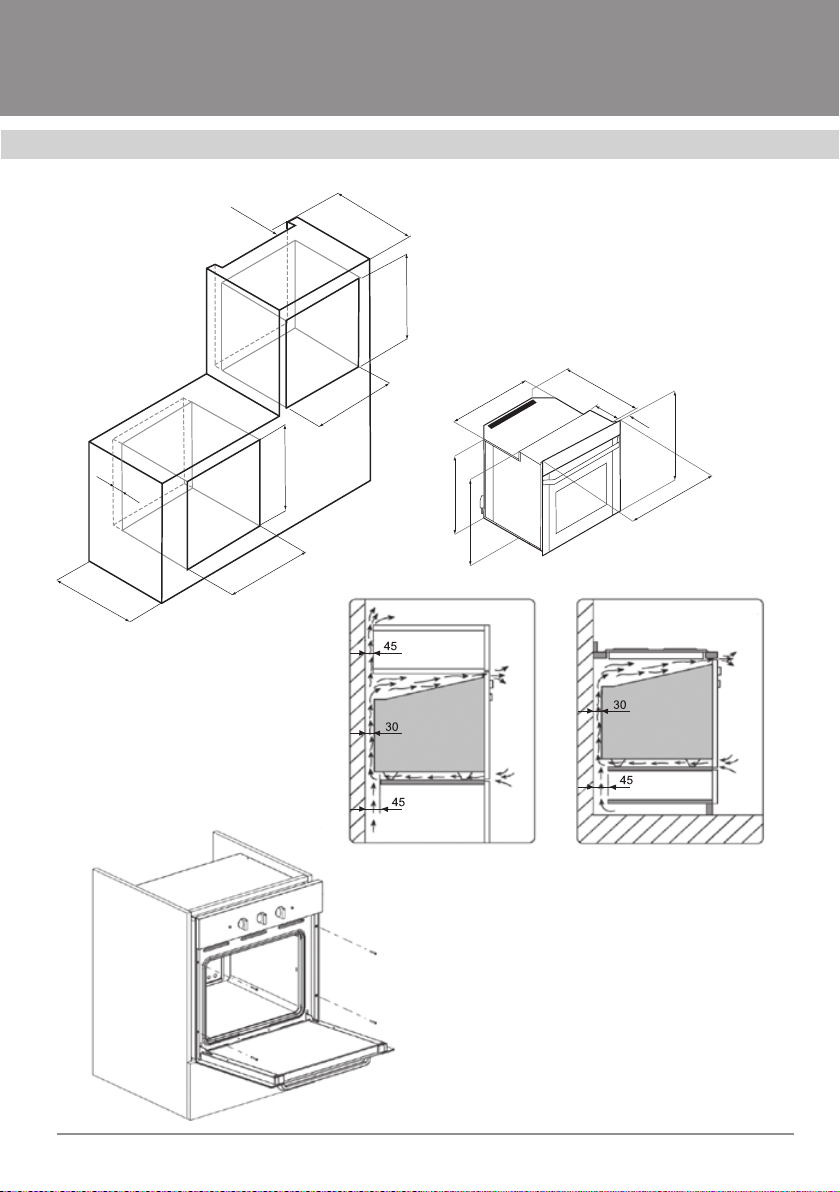
Prior to installation, make sure that a re-
cess in the kitchen furniture, meant for
your oven, has dimensions corresponding
to those in Figure 6.
Installation and operation instructions Installation and operation instructions
OVENS
15
45
45
595
594
550
367 22
470,2
577
600
410
408
447
410
575 MIN
575 MIN
Fig. 6. Oven building-in diagram.
Fig 7. Attaching the oven to the furniture

Installation and operation instructions
OVENS
16
Fig. 8. Lamp replacement
In the recess, between the rear wall and a
rack, onto which the oven will be placed,
there must be a gap, of minimum width 45
mm, to provide for proper ventilation. To
prevent any damage and overheat, there
must be another gap, minimum 30 mm, be-
tween the oven and the rear wall of a piece
of furniture item.
The oven can be built-in into a standard
opening, as shown in Figure 6, both under
the tabletop and within a column.
To attach the oven to the furniture, use 4
screws which are within special openings
in the frame (see Figure 7).
Be careful placing the oven into the open-
ing, do not use the door as a leverage. Use
special transportation handles.
CONNECTION TO THE MAINS
Make sure that voltage and frequency of the
mains conform to the values indicated in the
manufacturer’s plate. This plate is at bottom
of the oven face panel. You can see that, if
you open the oven door.
The appliance is designed for the mains op-
erational parameters as follows: 220 – 240 V,
one-phase current of 50 / 60 Hz frequency.
The electrical connections shall also include
a ground contact.
After you have built-in and connected the
oven, make sure that a socket that is going to
be used for connection to the mains is easily
accessible.
The product scope of supply also includes a
power cable. That shall be equipped with a
plug to resist a load as stated in the technical
data table. If it turns out, for some reason or
other, that the cable length is not suicient,
a qualified expert is permitted to replace the
cable with a longer one, but it is expressly
prohibited to splice the cable. Selecting a
cable, pay special attention to its thermal re-
sistance and cross-section.
MINOR REPAIRS
Trouble Possible causes Instructions and remedies
The oven is out of order
Fuses blown-out Check fuses in the electric ser-
vice panel
Power cut Check whether power is supplied
to the kitchen
Condensate between glasses
of the oven door
Excess moisture content in
the kitchen
Wipe the lower section of the
oven door to prevent damage to
the kitchen furniture

Installation and operation instructions Installation and operation instructions
OVENS
17
Fig. 8. Lamp replacement
LAMP REPLACEMENT
To illuminate the inside of the oven, a special,
high-temperature lamp is used (T 300ºC,
lamp base E14, wattage 25 W).
ATTENTION! Cut the power prior to
replacing the lamp.
Remove the globe and unscrew the burnt-
out lamp. Screw another one, of similar data.
Mount the globe (Figure 8).
APPLIANCE DISPOSAL UPON EXPIRY
OF ITS SERVICE LIFE
The present appliance shall not be disposed
as domestic household waste. Instead, it
shall be delivered to a licensed electric and
electronic waste disposal and collection
point. Following the waste disposal regula-
tions, you will help prevent potential dam-
age to the environment and humans which
would otherwise occur due to inappropriate
handling of the wastes of that type. For more
detailed information on disposal of your ap-
pliance please contact local authorities,
waste collection and disposal services or a
sales agency where you have purchased the
product.
Prior to disposal keep the appliance away
from children.
To prepare the product for disposal, unplug it
and make the cable and plug inoperable (for
that, you can cut the cable, for instance). In
such a way you will prevent further unauthor-
ized use of the appliance.
STORAGE
Keep the appliance in a dry place, away from
sources of high temperatures and sunlight.
During storage avoid rapid temperature
changes. Storage of an unpackaged product
is not permitted.
TRANSPORTATION
Package dropping and any mechanical im-
pact upon it are strongly prohibited.

Installation and operation instructions
OVENS
18
The products are subject to free repair, if used only
for personal, family or other needs, not related to
business activities, or satisfying household requi-
rements in an oice of a company, institution or
enterprise. The use of the products for purposes
diering from above is deemed violation of the
operation regulations.
The warranty certificate confers a right on free
repair of the product within 12 months from the
purchase date. Should you have any questions re-
garding the maintenance service, please contact
the oicial representative of the brand. The con-
tact details are on the web site of our partner kro-
na-steel.com. Within the warranty period defective
parts of the products are subject to free repair or
replacement with new ones. It is the Service Cen-
ter that has to decide whether the defective pro-
ducts shall be repaired or replaced.
The service life of the product is 7 (seven) years.
The service life starts on the purchase date. If it
turns out to be impossible to determine the purc-
hase date, the service life shall start on the manu-
facturing date, encoded in the product serial num-
ber which is on the manufacturer's plate.
The manufacturer’s plate availability is an obliga-
tory condition! Make sure it is available and keep
it for the entire service life of the product. If it is
not available, it may turn out impossible to deter-
mine the product model, manufacturing date. As
a consequence, a request for a free repair may be
declined.
The free repair is only possible with a properly and
duly filled in warranty certificate, sale receipt for
a product purchased, other documents to confirm
the warranty period of the product submitted for
repairs or diagnostics.
When buying a product, make sure the warrant
certificate is duly filled in, contains no corrections
and bears the purchase date, the stamp of a sales
agency and signature of a sales assistant (inclu-
ding a tear-o card), model and the serial number
of the product.
Before you call a Service Center specialist, please
carefully read the operation regulations. If the pro-
duct turns out to be non-defective upon diagnos-
tics performed by the specialist, the Service Cen-
ter reserves the right to demand an ungrounded
call payment from the customer, basing upon the
current price list.
For your safety, these are only licensed and autho-
rized specialists and companies who are permit-
ted to carry out installation and connection of gas
operating equipment.
Please keep receipts and other documents with
regard to installation and connection of your pro-
duct for its entire service life.
Any complaints with regard to quality of the com-
ponents are subject to consideration only upon the
quality inspection (technical condition inspection)
to be conducted by a representative of the autho-
rized Service Center.
Kõik pretensioonid toote kvaliteedi ja detailide
komplektsuse suhtes vaadatakse läbi pärast (teh-
nilise olukorra) kvaliteedikontrolli hoolduskeskuse
autoriseeritud esindaja poolt.
The manufacturer shall not be liable for any dama-
ge to a customer or property of a customer and not
be obliged to perform free repairs on the occur-
rence of any of the following:
– documents are missing to confirm the right for
free repairs;
– repairs have not been performed by authorized
persons, the product design has been chan-
ged, the product intervention is found, conflic-
ting with the operation regulations;
– the operation regulations have been violated,
stated in the product manual;
* Except backlight lamps, unless its replacement procedure is described in the operation manual.
It is only the replacement procedure that is free, not the lamp itself.
Warranty service conditions
This manual suits for next models
1
Table of contents
Other Fornelli Oven manuals


Popular Oven manuals by other brands


Thermo Scientific
Thermo Scientific PRECISION 6502 Installation and service manual

F.Bertazzoni
F.Bertazzoni PROFS30XT Installation, use & care manual

Svan
Svan SKG4600X user manual

ZANKER
ZANKER KOB10301XB user manual

Dreamiracle
Dreamiracle TO5712A user manual

Wood Stone
Wood Stone Bistro 3030 WS-BL-3030-RFG Installation and operation manual