Forstreich Maschinenbau TR300 User manual

Operating Manual
for the
Remote-controlled Felling Wedge
TR300
Version 2 English
As at 25/02/2020
The right to make technical changes is reserved.

Operating Manual Remote-controlled Felling Wedge TR300 1
Contents
1. About this Operating Manual ..................................................................... 2
1.1 Validity ................................................................................................................................. 2
1.2 Description of the warning symbols ................................................................................... 2
1.3 Other symbols in this Operating Manual ........................................................................... 2
2. Safety information ..................................................................................... 3
2.1 Intended use ........................................................................................................................ 4
2.2 Improper use and limitations of use................................................................................... 4
2.3 Qualifications of the personnel........................................................................................... 5
2.4 Important things to know ................................................................................................... 5
2.5 Action in an emergency....................................................................................................... 6
3. Technical data ............................................................................................ 7
4. Setup and function..................................................................................... 7
4.1 Setup .................................................................................................................................... 7
4.2 Function ............................................................................................................................... 8
5. Operation................................................................................................... 9
5.1 Initial use.............................................................................................................................. 9
5.2 Before each use ................................................................................................................... 9
5.3 Transport to the job site.................................................................................................... 10
5.4 Evaluate the tree and prepare the workspace................................................................. 10
5.5 Prepare the tree................................................................................................................. 11
5.6 Apply safe felling techniques ............................................................................................ 12
5.7 Inserting the remote-controlled felling wedge ................................................................ 14
5.8 Affix fall protection............................................................................................................ 15
5.9 Using the Split Level Back Cut ........................................................................................... 15
5.10 Safety distance................................................................................................................. 16
5.11 Felling the tree................................................................................................................. 16
5.12 Extending the lift of the TR300 ....................................................................................... 17
5.13 After felling, preparation for further use ....................................................................... 17
6. Maintenance .............................................................................................18
6.1 Batteries............................................................................................................................. 18
6.2 Inspection........................................................................................................................... 18
6.3 Lubrication ......................................................................................................................... 18
6.4 Cleaning.............................................................................................................................. 18
6.5 Functional check ................................................................................................................ 19
6.6 Tips and tricks..................................................................................................................... 19
7. Storage......................................................................................................19
8. Disposal.....................................................................................................19
9. Accessories and spare parts.......................................................................20
10. Warranty.................................................................................................20
11. Service.....................................................................................................21
12. EC Declaration of Conformity ..................................................................21

Operating Manual Remote-controlled Felling Wedge TR300 2
1. About this Operating Manual
1.1 Validity
This Operating Manual applies to the remote-controlled felling wedge TR300, referred to
here on as the TR300.
It is intended for use by forestry professionals.
The Operating Manual contains important information to transport, operate, use, and
maintain the TR300 safely and correctly, as well as guidance on how to remedy simple
malfunctions.
1.2 Description of the warning symbols
Symbol
Meaning
Warning of the risk to the health, life, or property of person using the
wedge.
The signal words have the following meaning:
Signal word
Meaning
DANGER!
Indicates a hazard that is likely to cause death or serious injury.
WARNING!
Indicates a hazard that has the potential to cause death or serious injury.
CAUTION!
Indicates a hazard that can lead to lost time injury.
ATTENTION!
Indicates a hazard that could cause property damage, that is, to the
environment, physical assets, or the device itself.
1.3 Other symbols in this Operating Manual
Symbol
Meaning
Read Operating Manual –read and understand this Operating Manual
before initial use!
Wear a protective helmet –when carrying out forestry work and using
this device, wear a protective helmet with hearing protection and eye
protection!

Operating Manual Remote-controlled Felling Wedge TR300 3
Wear protective gloves –when carrying out forestry work and using this
device, wear suitable protective gloves!
Wear protective boots –when carrying out forestry work and using this
device, wear protective boots with a cut-resistant insert and steel toe
cap!
Wear protective clothing –when carrying out forestry work and using
this device, wear cut-resistant trousers and close fitting, high visibility (hi-
viz) clothing!
2. Safety information
Warning: There is a risk of serious damage to personal health or property if you do
not follow the safety and warning instructions in this Operating Manual.
The TR300 was manufactured in accordance with the generally accepted regulations of
technology. There is a risk of personal injury and property damage if you do not observe the
following basic safety instructions and warnings in this Operating Manual.
•Before working with the TR300, read and understand this Operating Manual.
•Keep the Operating Manual in a legible state.
•Ensure that the Operating Manual is available to all users at all times.
•Ensure that persons operating the TR300 are experienced tree fallers, who
understand the rules and regulations contained in the Approved Code of Practice
for Safety and Health in Forest Operations (ACOP).
•Always wear the correct personal protective equipment when working with the
chainsaw and the TR300:
Wear a protective helmet –when carrying out forestry work and using this device, wear a protective
helmet with hearing protection and eye protection!
Wear protective gloves –when carrying out forestry work and using this device, wear suitable
protective gloves.
Wear protective boots –when carrying out forestry work and using this device, wear protective
boots with a cut-resistant insert and steel toecap!
Wear protective clothing –when carrying out forestry work and using this device, wear cut-resistant
trousers and close fitting hi viz clothing!
Operating Manual Remote-controlled Felling Wedge TR300 4
•The operator must meet the mental and physical requirements for forestry work
and must not be under the influence of alcohol, drugs or medication.
•Ensure there are no loose or damaged parts before using the TR300.
•Only use the TR300 with original accessories and spare parts.
Irrespective of the instructions in this Operating Manual, any country-specific health and
safety regulations must be applied.
2.1 Intended use
The TR300 is a felling aid which should only be used for tree felling. It is powered by a
cordless impact wrench and is operated with a wireless remote control, allowing the faller to
retreat to a safe position before activating the wedge to fell the tree.
Caution: The TR300 does not replace machine assistance using a winch rope or
hydraulic attachment!
The TR300 may not be used:
•To fell trees that have a heavy back or side lean,
•To fell trees that show evidence of fungus or rot where the felling cuts are made.
Additional safety measures (such as machine assistance), must be applied when felling trees
that display the above conditions. The TR300 can only be used when felling trees in a forest
environment. Ensure any intended use does not exceed the specifications of the TR300 (see
Section 3 “Technical Data”).
The TR300 should only be used on trees that could be felled using manual wedging
techniques. Always ensure the TR300 is securely positioned in the back cut before activating
it. To comply with these instructions the operator of the TR300 must have read and
understood this Operating Manual, in particular Section 2.4.
2.2 Improper use and limitations of use
Improper Use: Improper use of the TR300 wedge is prohibited.
•Users should not reconstruct or modify the TR300, or use it outside of the
instructions in Section 2.1 “Intended use”;
•Users should not use the TR300 under operating conditions other than those
described in this Operating Manual;
•Users should not disregard the necessary care instructions before and during use.

Operating Manual Remote-controlled Felling Wedge TR300 5
Improper use of the TR300 will result in the invalidation of all warranty claims. The
manufacturer is not liable for damage to the TR300 and for personal injury caused by
improper use or care of the device.
Limitations of use
Information: In high temperatures (+ 50° C) or heavy frost (-20° C), the battery may
shut down. It can be “woken up” by placing it on the charger or by pressing the display
button.
Information: Avoid subjecting the cordless impact wrench to sudden impact or
blows. Do not use the TR300 for prolonged periods in adverse weather conditions
2.3 Qualifications of the personnel
Any person using the TR300 must be familiar with this Operating Manual and have the
necessary knowledge and skills to safely operate and maintain the TR300. Persons operating
and servicing the TR300 must have the following qualifications:
• Relevant training in forest operations and a basic knowledge of tree felling and timber
harvesting methods
• First-aid training
• Competence in operating a chain saw
Persons operating or servicing the TR300 and carrying out any felling work must not be
under the influence of alcohol, drugs or medications that affect their ability to react. No
person under the age of 18 may carry out the felling work or use the TR300.
2.4 Important things to know
General safety instructions
•The instructions in this Operating Manual must be complied with to prevent dangerous
situations and avoid damage.
•All relevant accident prevention regulations and other generally recognised safety,
occupational health, and road traffic regulations must be complied with.
•Only use the TR300 if it is in good condition.
•Only use or repair the TR300 with technically sound, original accessories and spare parts.
Safety instructions pertaining to the workplace
•Ensure that there are no unauthorised persons or structures present in the felling area.
•Block off any access points to the felling area with clear warning signs and barrier tape.

Operating Manual Remote-controlled Felling Wedge TR300 6
•Apply and maintain the “Two Tree Length”rule.
•Clear around the tree before making any felling cuts.
•Ensure the area around the tree is stable and clear of any debris that may affect footing.
•Clear an adequate escape route away from the tree, the recommended angle of this
escape route is 45o away from and opposite the intended direction of fall
•Place the required tools so that they can be readily accessed, but do not impede
movement around the tree.
•Ensure that there is a first-aid kit on site.
•Ensure weather conditions are favourable when using the TR300. Felling in strong winds,
thunderstorms, icy weather, or on frozen ground is not recommended.
•Only work in daylight.
2.5 Action in an emergency
If there is a risk of personal injury or damage to the TR300, for example, through a
malfunction or a dangerous situation:
•Immediately switch the TR300 off.
•Leave the TR300 in the back cut.
•Manually insert plastic wedges to relieve pressure on the TR300 wedge.
•Leave the danger area immediately.
•Once the situation has been made safe, remove the TR300 from the tree and return it to
the dealer for repair.
•If the plastic wedge between the plates has jammed in the back cut, do not press the
Forward button as this will damage the plates.

Operating Manual Remote-controlled Felling Wedge TR300 7
3. Technical data
Description
Mechanical felling wedge
TR300
Max. compression force (tonne)
25
Weight incl. 5.0 Ah battery and remote (kg)
10.1
Length (mm)
800
Width (mm)
130
Height (mm)
150
Stroke/revolution (mm)
3
Impact rotation speed (1/min)
0 - 2400
Range of remote control approx.(m)
with no obstructions
50
Remote control auto-off time (min)
2
Entire system auto-off time (min)
320
4. Setup and function
4.1 Setup
Spring steel sheet
Plastic wedge
Spindle
Remote control
Impact nut with pivot
Lithium ion battery
Aluminium rail
Guard rail
Handle
Drive unit
Operating Manual Remote-controlled Felling Wedge TR300 8
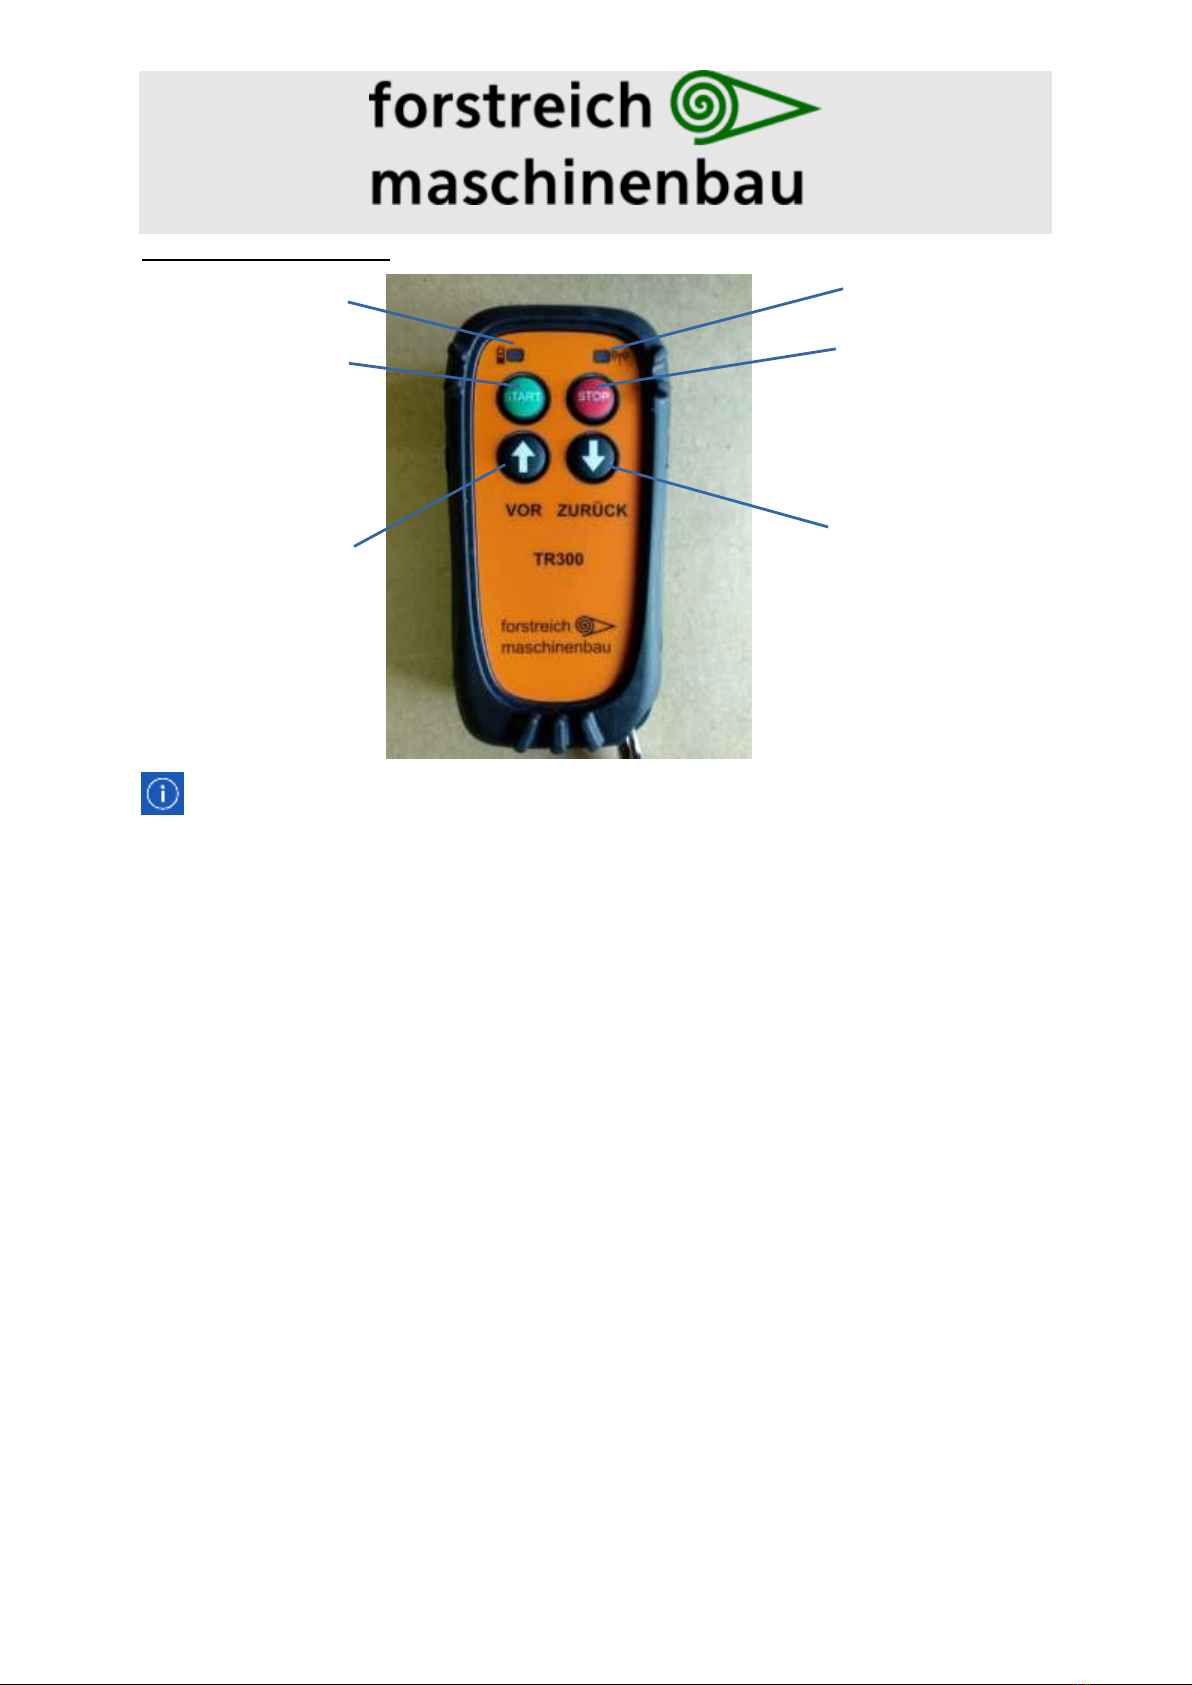
Wireless remote control:
Information: The display of the wireless connection flashes regularly to indicate the
correct connection. In case of an error, the LED flashes continuously.
4.2 Function
The TR300 is a tool that should only be used in tree felling operations. The TR300 is inserted
into the back cut of the tree being felled. The serrations on the steel plates must be in
contact with wood fibre (not bark encasement). These serrations bite into the wood fibres,
holding the wedge in the cut. During activation, the plastic wedge is driven between the
steel plates to create the required lift.
When “Start” is pressed on the remote-control, the wireless connection is activated. It takes
a moment for this connection to activate. When “Forward” is then pressed, the spindle will
rotate clockwise and push the plastic wedge out between the two steel plates. The spindle
will stop automatically when it reaches the stop at the end of its thread.
When the “Back”button is pressed, the spindle rotates anti-clockwise, retracting the plastic
wedge to its original position. The spindle will stop automatically when the plastic wedge is
fully retracted. For large diameter trees, two remote-controlled felling wedges can be used
next to each other.
If the remote control is faulty or lost, the same functions can be activated with the manual
switch on the motor unit of the wedge.
Start
Stop
Forward/fell
Backwards/retract
wedge
Display battery status
Display wireless connection

Operating Manual Remote-controlled Felling Wedge TR300 9
Information: The remote control will switch off automatically after 2 minutes with no
operation. It can be reactivated by simply pressing the green “Start” button again.
Information: To avoid total discharge of the battery, the TR300 will automatically
shut down after 4 hours of inactivity. To reactivate, simply remove and re-insert the battery.
5. Operation
5.1 Initial use
Remove all components from the packaging, check to make sure they are complete.
Read the Operating Manual.
Before using the wedge, fully charge the battery or batteries.
Carry out a pre-start check, by activating the TR300 to full extension and retraction.
Check that the front and rear end stops are working correctly.
5.2 Before each use
Do not operate the TR300 in heavy rain, wind, or extreme temperatures.
Caution: In high temperatures (+ 50° C) or heavy frost (-20° C), the battery may shut
down. The battery can be “woken up” by putting it on the charger or by pressing the display
button. Do not use the battery outside these temperature limits.
Ensure that the batteries are fully charged!
Always have a fully charged back up battery!
Before use, check all components for damage and obvious defects!
Caution: If the remote-controlled felling wedge TR300 shows any defects, it must not
be used!
Carry out a function check by fully extending and retracting the TR300 felling wedge. Check
that the front and rear end stops are reached.
Keep two replacement batteries (type AAA) in a suitable place for the remote control.
Have at least 4 polypropylene wedges and a suitable hammer available to facilitate the
correct operation of the TR300.

Operating Manual Remote-controlled Felling Wedge TR300 10
5.3 Transport to the job site
Ensure the TR300 is secured in the tool compartment of the vehicle transporting it to the
workplace.
Use the provided shoulder strap to carry the TR300 to the felling face.
The TR300 wedge can also be carried by holding on to one of the guide bars, or the rear
handle. Avoid disturbing the remote control aerial mounted on the rear end of the motor
unit when carrying the wedge in this fashion.
5.4 Evaluate the tree and prepare the workspace
Before starting any felling, assess the tree to be felled for any overhead hazards, excessive
lean, decay or unstable ground.
Pay particular attention to:
Height, diameter, lean, and side lean
Shape of the crown and excessive branch weight on one side
Sailers, dead wood and any dry or loosely hanging branches
Wind strength and direction
Interlocked branches or vines likely to restrict tree movement
Obstructions in the intended direction of fall, including roads, powerlines, fences,
waterways, etc.
Warning: The TR300 should not be used to fell trees with excessive back or side lean.
It should also not be used for trees where there is evidence of rot or decay in the trunk of the
tree to be felled.
Operating Manual Remote-controlled Felling Wedge TR300 11
Warning: The TR300 should not be considered a replacement for machine assistance.
5.5 Prepare the tree
Once the felling direction has been determined, clear around the tree and check that there
are no obstructions in the intended direction of fall. Clear a suitable escape route away from
the tree at the recommended 45oangle opposite the intended direction of fall. Remove any
flanges or scallops likely to affect the insertion of the felling cuts or the strength of the hinge
wood.
Trim roots in a box-shaped manner. Note: this technique may not be suitable when felling
radiata pine in New Zealand.
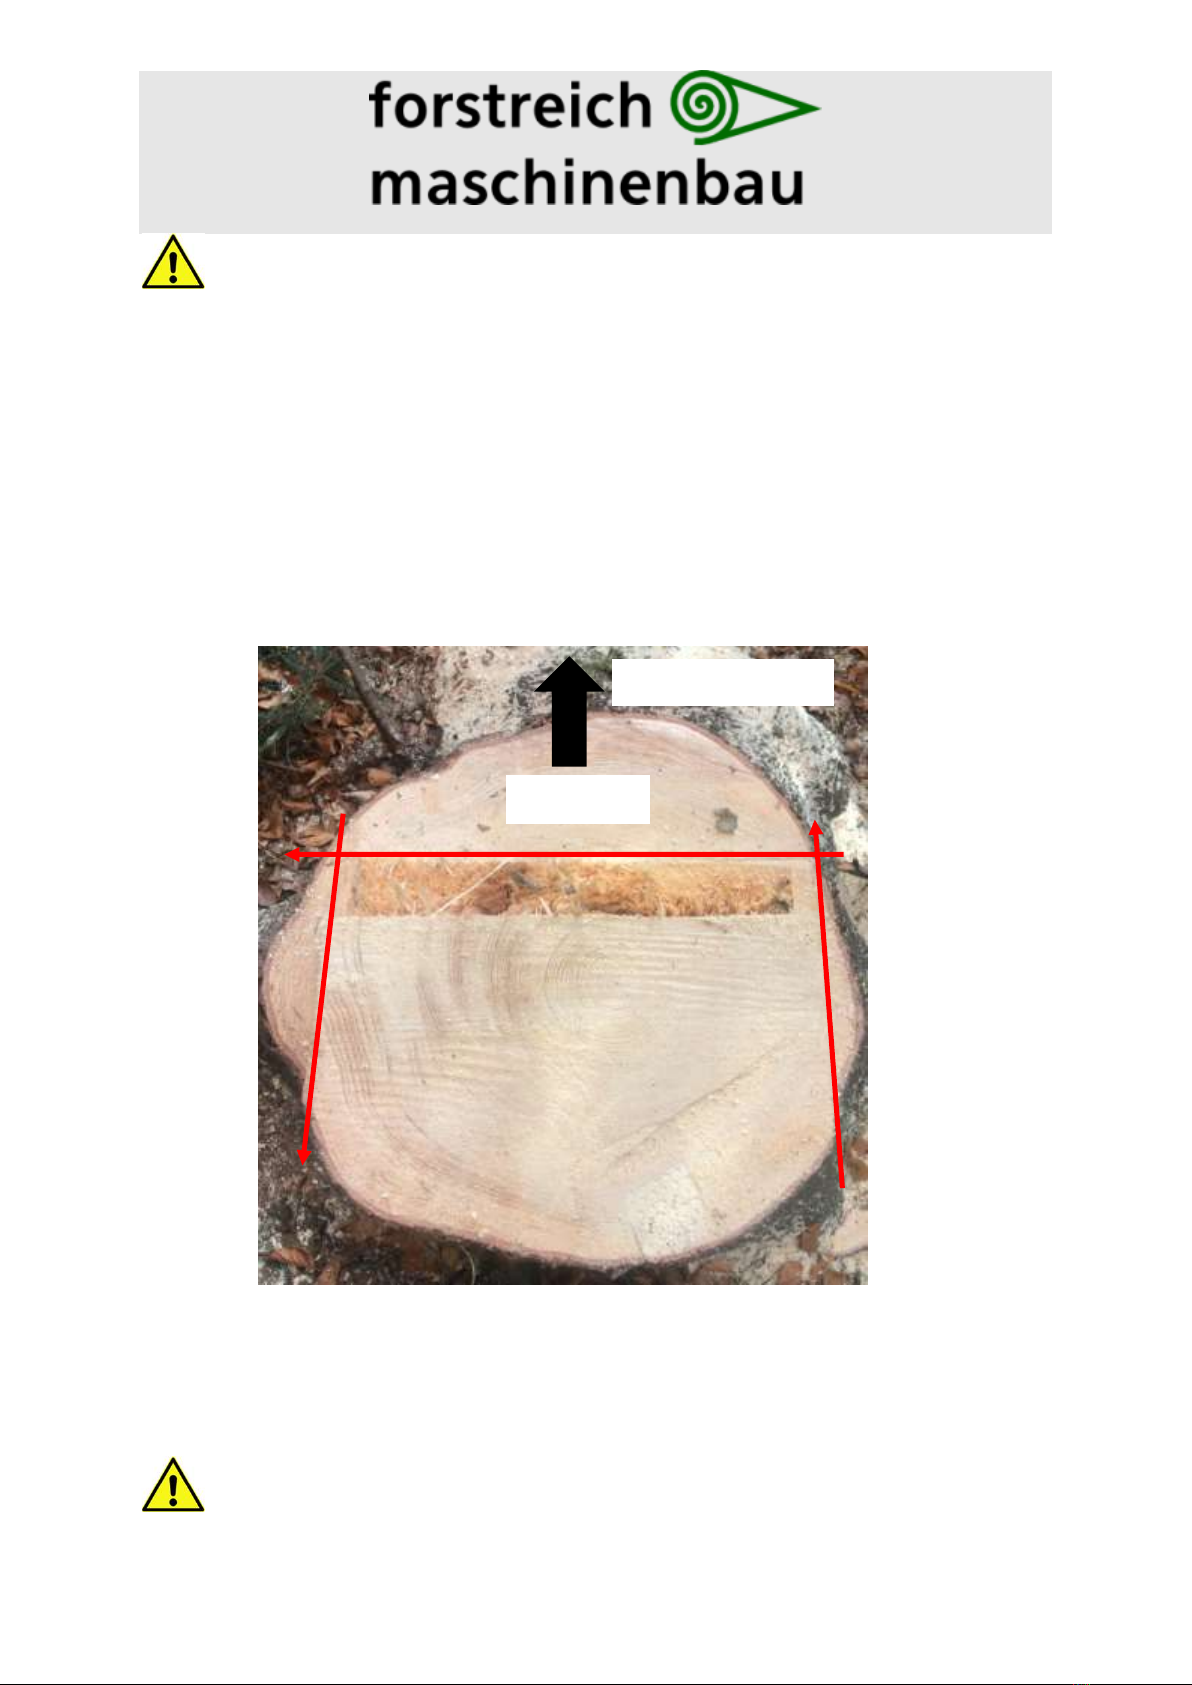
Determine where the TR300 should be inserted in the back cut and trim the bark off the
stem at this point. Ensure that there is enough distance between the outer edge of the tree
and the hinge for the wedge to fully extend.
Caution: If the distance to the hinge is too short, the TR300 can be pushed out of the
cut, or the tip of the plastic wedge can be damaged when it comes up against the hinge.
1.Cut
2.Cut
3.Cut
Felling direction

Operating Manual Remote-controlled Felling Wedge TR300 12
Make sure that after making the slot for the wedge, the wood fibres in the tree run as
vertically as possible and the bark is completely removed.
5.6 Apply safe felling techniques
First, the scarf must be established to determine the intended direction of fall.
Make sure that the depth of the scarf is between 1/5 to 1/3 of the tree diameter. The top-
cut angle must be between 45° and 60° from horizontal.
Caution: Ensure that there are no overcuts in the scarf!
On particularly large trees a keyhole or bore cut can be made.
Ensure the correct bore cut technique is used to insert the keyhole in the middle of the
proposed hinge, on the same plane as the bottom cut of the scarf.
Caution: Except when bore cutting, position the chainsaw against the tree trunk to
minimise the risk of kickback.
Once the scarf cuts have been made, use the quarter cut technique to do the first part of the
back cut. This can be done by standing to the side of the tree and, using a pushing chain,
Sink floor:
1/5 to 1/3 of
the trunk-Ø
Hinge width: Min
1/10 of the tree
diameter
Hinge step:
1/10 of the tree
diameter (at least 3
cm)
Felling cut
Scarf opening:
45° to 60°
Top of scarf
Operating Manual Remote-controlled Felling Wedge TR300 13
cutting half of the remaining tree diameter from the back of the tree, through to the
required hinge width (approx. 10% - 15% of tree diameter). Alternatively the faller can bore
in behind the scarf to create the correct hinge width, then cut back to the rear of the tree,
making sure the hinge is not damaged by overcutting the bore cut.
Trim the bark off the stem where the TR300 is going to be inserted.
Information: Wing cuts should only be used if they can be inserted safely and it is
certain that they will not compromise the strength of the hinge.
Information: To improve the accuracy of the cuts and prevent premature failure of
the hinge, vertical side cuts can be made in the tree to remove fluting, see diagram.
This technique is optional in New Zealand conditions.
Caution: Ensure the hinge width is correct, (a minimum of 10% of tree diameter
across the full diameter of the tree). Leave extra hinge wood on particularly heavy trees or
trees with unusual characteristics.
Insert a plastic wedge in the first part of the back cut and drive it in until it is firm.
An alternative method (as shown in the photographs) is to use the split level back cut and
place both the plastic wedge and the TR300 in the first part of the back cut. This technique
requires the first part of the back cut to be made wider to enable both the plastic wedge and
the TR300 to be inserted side by side. The angled release cut of the split level method can
then be done after the TR300 has been inserted. From the safe side of the tree, insert the
second part of the quarter cut back cut, cutting through the other half of the back cut to
establish the correct hinge width.
Caution: Avoid cutting the plastic wedge already inserted in the first part of the back
cut.
Caution: Avoid cutting into the hinge.
Operating Manual Remote-controlled Felling Wedge TR300 14
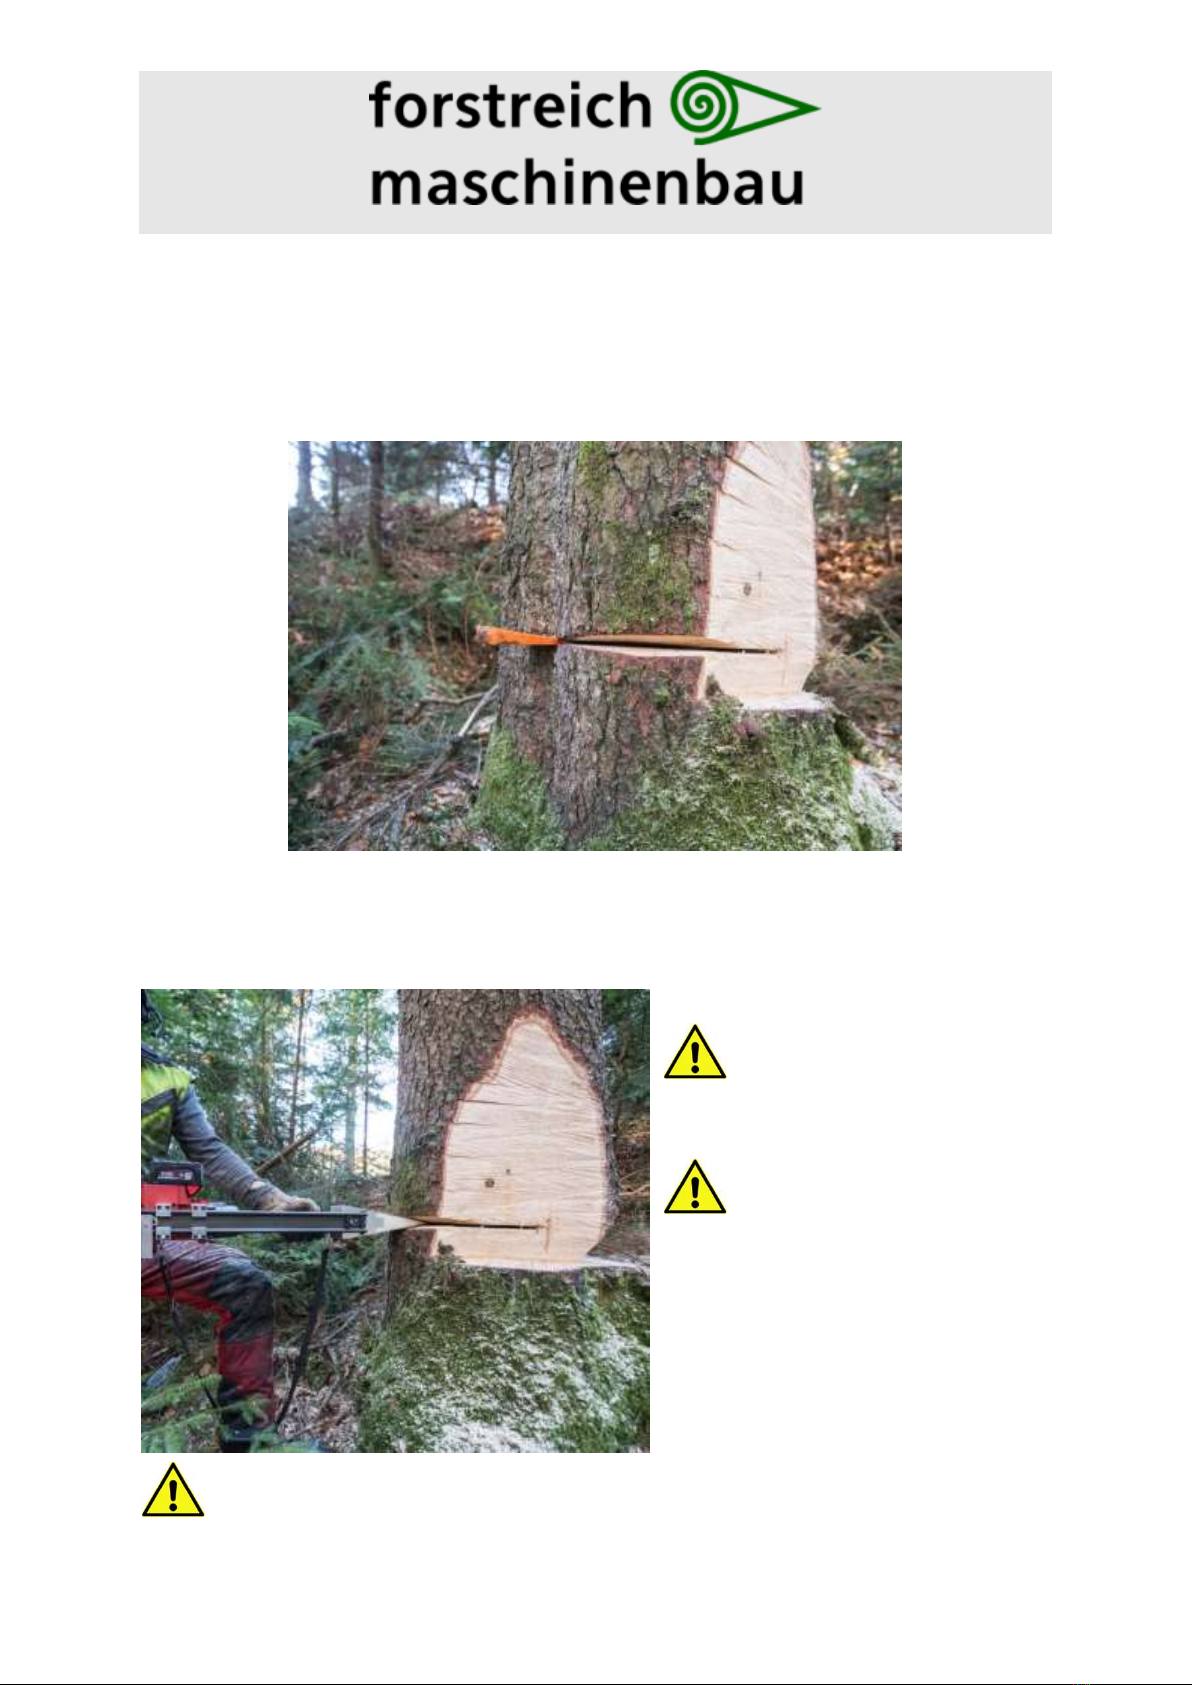
5.7 Inserting the remote-controlled felling wedge
To insert the TR300, cut a sloping groove in the back cut to allow the wedge to be pushed in
to a minimum depth of 7cm (up to the serrations on the lifting plates). Expand the opening
of the groove to 2 - 3 cm and ensure there are no lips or steps in it. Check that the back cut is
deep enough to take full extension of the plastic wedge as it is driven out between the steel
plates.
Symmetrically expand the point of insertion
Insert the TR300 so that it is perpendicular to the tree and opposite the intended direction
of fall.
Caution: Do not hit the felling
wedge with a hammer
Caution: Damage to the plastic
wedge or the spindle could occur if the
wedge is not correctly inserted in the
groove
Ensure that there is enough space
between the TR300 and the hinge for
the extending plastic wedge.
Caution: If the distance to the hinge is too short, the TR300 can be pushed out of the
cut or the plastic wedge damaged when it makes contact with the hinge.

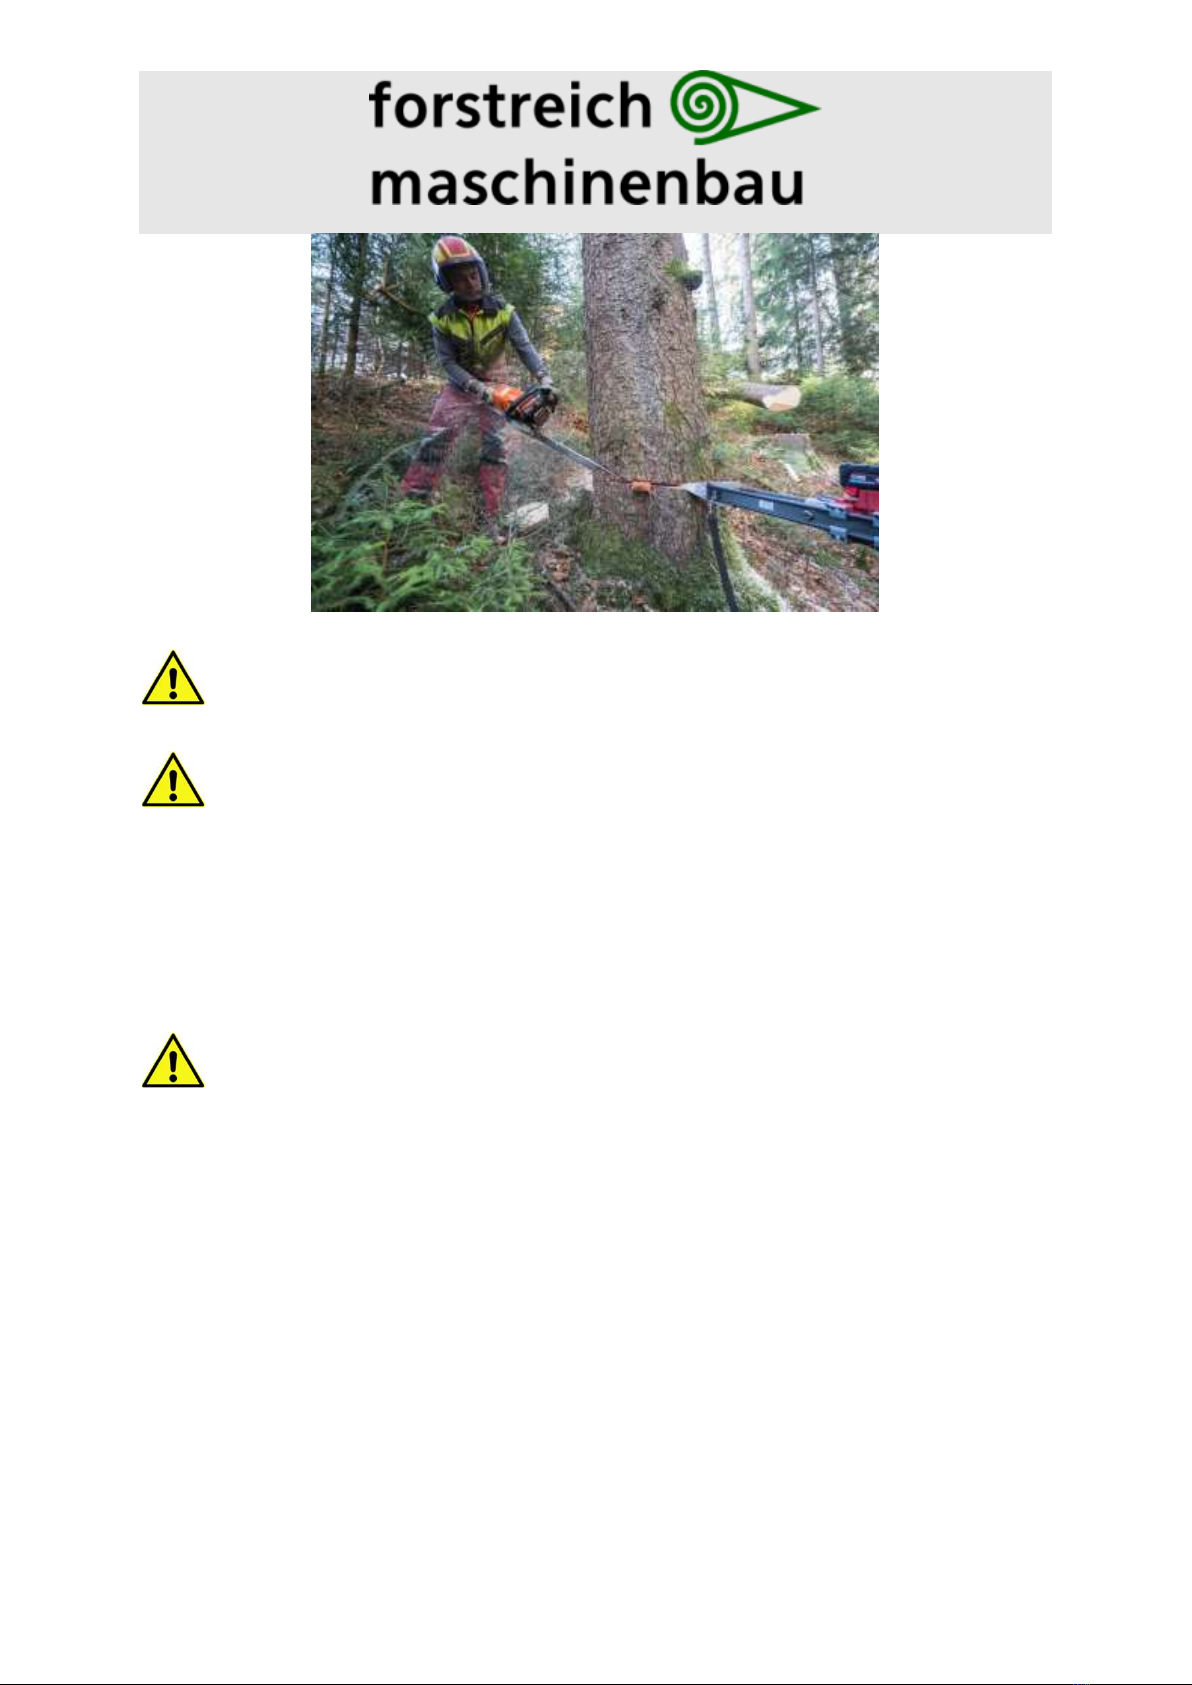
Operating Manual Remote-controlled Felling Wedge TR300 15
Use the manual switch to pre-load the wedge and ensure that the serrated plates have
gripped into the wood fibres in the groove before retreating to the safe position. This should
prevent the TR300 from being pushed out of the back cut.
Warning: Do not touch the spindle when it is turning.
5.8 Affix fall protection
If there is a risk of the TR300 going with the falling tree (for example, on steep terrain), use a
hammer to hit the piton (the small steel spike attached to the head of the wedge on a cord)
in to the stump (below the back cut).
Caution: If there is a risk that the TR300 could fall from a height of 60 cm or more, it
must be secured with the piton.
5.9 Using the Split Level Back Cut
Caution: Ensure that no person or machine is in the danger area (that is, within two
tree lengths).
If using the alternative split level back cut technique, insert the final sloping back cut from
the safe side of the tree, see photo. Avoid overcutting the hinge and undercutting the plastic
wedge.
Operating Manual Remote-controlled Felling Wedge TR300 16
Inserting the release cut of a split level back cut
Caution: Undercutting the plastic wedge can damage the wedge or reduce the
available lift. It could also result in the saw tip becoming jammed in the cut.
Caution: Avoid using the chainsaw in the same cut as the TR300. Doing so could
result in a serious harm injury or damage to both the chainsaw chain and the TR300.
5.10 Safety distance
Once all of the felling cuts have been made, move at least 10 metres away from the tree
before activating the TR300.
Caution: The wireless remote control of the TR300has a range of about 50 m. The
safe area should be at least 10 m from the tree that is being felled, but still in a position to be
able to see the tree and the danger area.
5.11 Felling the tree
Check that there is no one within the two tree length zone before activating the TR300.
Push the “Start” button on the remote and wait a few seconds until the system is active.
Press the “Forward” button to start the felling and watch the wedge to ensure it is lifting the
tree.
Note: The TR300 has a power function that automatically kicks in as the load on the lifting
plates increases. When the TR300 goes in to power mode, the spindle speed decreases and
the motor unit makes a “rat a tat, tat” noise, similar to a jack hammer.
Operating Manual Remote-controlled Felling Wedge TR300 17
Caution: During the felling process, watch the TR300 to ensure that it does not spit
itself out of the back cut.
Information: The motor will automatically stop at the front stop. Once it is in this
position, it can only be turned “backwards”.
5.12 Extending the lift of the TR300
Caution: Ensure the tree being felled is safe and stable before re-entering the felling
area.
Secure the partially jacked tree with two stacked plastic wedges. Insert these wedges
carefully to avoid any unexpected movement.
Caution: Ensure eye protection is worn to protect the faller from the stacked wedges
accidentally spitting out of the cut as they are driven in.
Reverse the TR300 felling wedge carefully, ensuring that the top of the tree does not come
back against the intended direction of fall. Then, either insert the TR300 deeper into the
back cut, or place a suitable wooden spacer in the groove below the wedge and push it in
until it is firm. Use the button on the motor unit to set the TR300 in the back cut. Move back
to a safe position before activating the TR300 again. Always watch the tree crown for
unexpected movement.
Caution: Ensure the plastic wedge in the TR300 does not come up against the hinge
when it is fully extended.
5.13 After felling, preparation for further use
Caution: Once the tree is on the ground, wait at least 10 seconds for the crowns of
the surrounding trees to stop swaying. There is a risk that branches could be dislodged and
fall into the work area.
When the workplace is safe, retrieve the TR300 and retract it back to the start position using
either the remote control, or the hand switch.

Operating Manual Remote-controlled Felling Wedge TR300 18
Caution: When reversing the TR300, ensure that hands are kept clear of moving
components. The lateral plastic guards have been mounted on the head of the TR300 as
“safety flaps”.
Information: When retracting, the motor automatically stops at the rear stop. Once it
has reached this point, the TR300 can only be extended.
6. Maintenance
The following maintenance instructions must be observed:
Repairs to the TR300 should only be carried out by authorised personnel or the
manufacturer.
Always remove the battery before any maintenance work is done, (unless activation is
necessary during maintenance, e.g. when lubricating the spindle).
6.1 Batteries
Charge the Milwaukee battery and the reserve battery fully in accordance with the battery
operating instructions. Comply with the instructions of the battery manufacturer regarding
charging and storage.
Only use the supplied original charger to charge batteries. Observe the operating
instructions for the battery charger.
6.2 Inspection
Inspect the TR300 felling wedge for defects before use. Check all components for cracks,
deformation, and damage.
Regularly check the threaded nut for wear.
Do not use damaged components!
6.3 Lubrication
Ensure the threaded spindle is sufficiently lubricated before each use. Spray it with grease
and turn it back and forth to distribute the lubrication.
Ensure that the surfaces between the plastic wedge and the steel sheets are lubricated
before each use.
6.4 Cleaning
Regularly remove the dirt and wood shavings from the TR300; this increases the service life.
Carefully clean the spindle and wedge with a cloth, do not use strong, corrosive, harsh /

Operating Manual Remote-controlled Felling Wedge TR300 19
abrasive cleaning agents. The ventilation slots in the drive unit can be blown out with
compressed air. After cleaning, grease all sliding surfaces.
Caution: Wear work gloves to avoid the risk of cuts from sharp edges!
6.5 Functional check
Carry out a functional check by extending and retracting the TR300. Check that the front and
rear stops are safely reached without the power function being activated. The power
function should only activate when the TR300 is under load. If it is activated when not under
load, check for resistance in the spindle or sliding guide. This may be due to inadequate
cleaning/ or lubrication.
6.6 Tips and tricks
You can easily disassemble and straighten any distorted steel plates, unless they are
obviously cracked or broken.
The steel plates must be replaced if there are cracks or other forms of damage.
If necessary, send the plates, or the whole TR300, to the manufacturer for inspection and/or
repair.
Only use original spare parts–contact the distributor for these parts.
7. Storage
Only store the TR300 in a safe dry place.
Always remove the battery from the TR300 when not in use.
To avoid discharging the Milwaukee battery, the receiver on the TR300 will automatically
switch off after 3 hours of inactivity. It can be reactivated by removing the battery and re-
installing it, or by putting it on the charger.
8. Disposal
If the TR300 is no longer usable and/or cannot be repaired, it must be disposed of in
accordance with local regulations. Dispose of the components properly. Ensure that no
harmful substances are released into the environment.
Table of contents
Other Forstreich Maschinenbau Power Tools manuals


