Fortec Star Distec VideoPoster-IV User manual

The information contained in this document has been carefully researched and is, to the best of our
knowledge, accurate. However, we assume no liability for any product failures or damages, immediate or
consequential, resulting from the use of the information provided herein. Our products are not intended for
use in systems in which failures of product could result in personal injury. All trademarks mentioned herein
are property of their respective owners. All specifications are subject to change without notice.
Manual
Distec
VideoPoster-IV
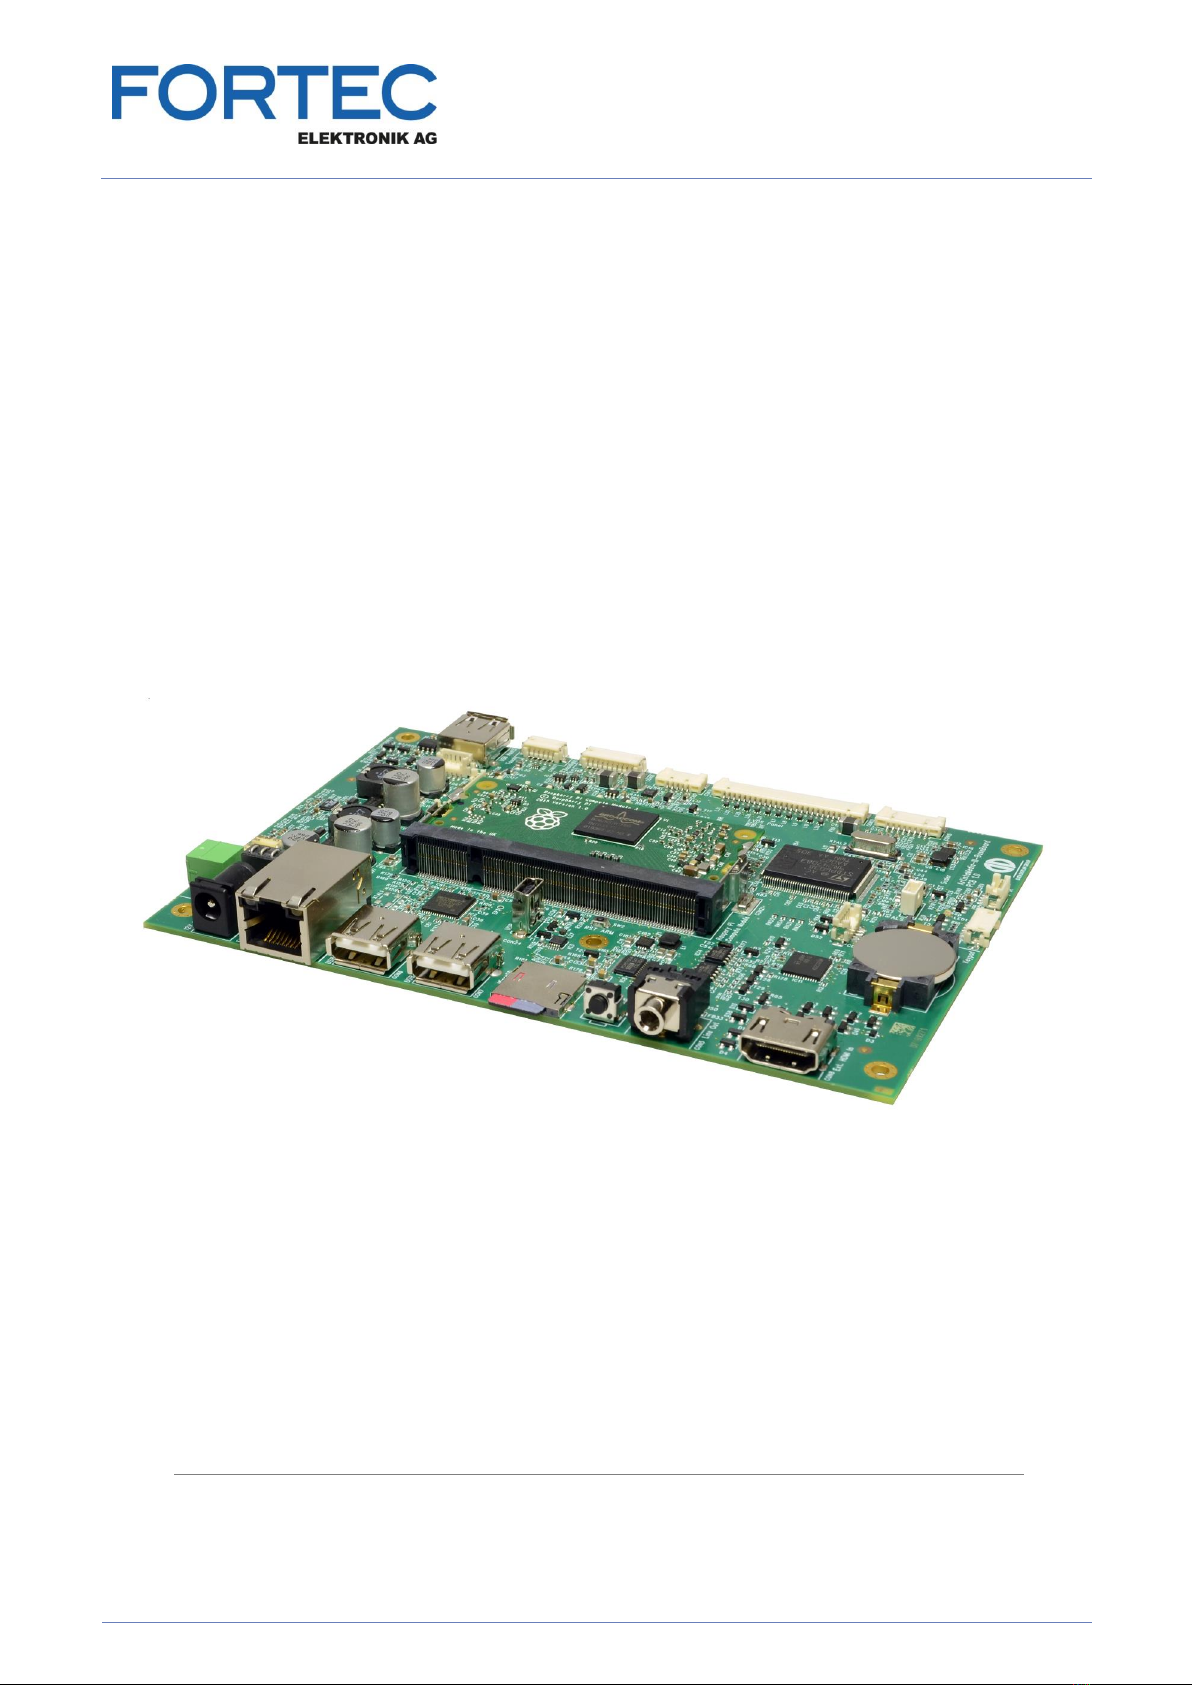
Industrial Full HD Media Player based on Raspberry Pi CM3
PA-35-XXX
Version 1.1
11.06.2018

Manual
VideoPoster-IV
Version 1.1
11.06.2018
Page 3 of 29
Table of Contents
1Revision History......................................................................5
2Introduction ...........................................................................6
3Features...............................................................................6
4Software...............................................................................7
4.1 ACC........................................................................................................ 7
4.2 Artista Device Finder .................................................................................... 8
5Device Configuration via Web Browser ..........................................9
5.1 System Information.................................................................................... 10
5.2 View Logs............................................................................................... 10
5.3 Network Configuration ................................................................................ 11
5.3.1 Using DHCP ............................................................................................ 11
5.3.2 Using Static IP Addresses............................................................................ 11
5.4 Wi-Fi Configuration .................................................................................... 12
5.5 Date and Time.......................................................................................... 14
5.6 Content Auto Update.................................................................................. 16
5.7 Audio Settings.......................................................................................... 16
5.8 Display Settings........................................................................................ 16
5.9 Http Access............................................................................................. 17
5.10 Advanced ............................................................................................... 17
5.10.1 Firmware Update / Board Setup ................................................................ 17
5.10.2 Artista Device Finder Support................................................................... 18
5.10.3 HDMI Input Priority................................................................................ 18
5.10.4 Serial Port Configuration......................................................................... 18
5.10.5 Media Storage Formatting (Memory Card).................................................... 18
5.10.6 Master Reset....................................................................................... 19
5.11 Restart................................................................................................... 19
6Default VideoPoster-IV Configuration .......................................... 19
7Playlist Upload...................................................................... 20
7.1 USB Upload............................................................................................. 20
7.2 ACC Push Upload ..................................................................................... 20
7.3 Polling of Remote FTP Server....................................................................... 20
7.4 Playlist Example ....................................................................................... 21
8Multiple Playlists ................................................................... 23
9Transition Effects .................................................................. 23

Manual
VideoPoster-IV
Version 1.1
11.06.2018
Page 4 of 29
10 Logging to Content Sources ..................................................... 24
11 Firmware Update................................................................... 25
11.1 Upload the new Firmware via Web Frontend...................................................... 26
11.2 Upload the new Firmware via USB Flash Drive................................................... 26
11.3 Upload the new Firmware via ACC 3.x............................................................. 26
11.4 Download the new Firmware from an FTP Server ............................................... 26
12 Supported Media Formats........................................................ 27

Manual
VideoPoster-IV
Version 1.1
11.06.2018
Page 5 of 29
1 Revision History
Date
Rev.No.
Description
Page
15.09.2017
1.0
Initial version
All
11.06.2018
1.1
- Updated screen shots of Web Frontend
- Added chapter “Wi-Fi Configuration”
- Added chapter “Firmware Update”
8 –16
11, 12
24, 25

Manual
VideoPoster-IV
Version 1.1
11.06.2018
Page 6 of 29
2 Introduction
VideoPoster-IV is an industrial media player based on Raspberry Pi Compute Module 3 (CM3) for displaying
shows containing still images and video clips. On start-up, it automatically loops over a playlist until a content
update is detected.
Updates for the show can be distributed over various sources. They can be detected on hot-plugged USB flash
drives or directly be uploaded to the device via network. Another method to receive content updates is to
configure the device for periodically polling a remote FTP server.
3 Features
Auto-play and auto-loop of playlist after power on
Playback of Full-HD videos and still images
H.264 (MPEG-4, Part 10) video decoding up to 1080p30
Seamless video playback
Various transition effects for still images
Content update via USB flash drive or network
Auto Content Update from remote FTP server
Playlist scheduling
Playlist triggering via network, RS-232 and USB button board
Wi-Fi connectivity via Raspberry Pi USB Wi-Fi adapter
3 GB internal flash memory to store content
Optional MicroSD card up to 128 GB to store content
External HDMI input to connect other HDMI sources to the display
Stereo audio line out
Free Windows®software ACC for easy playlist generation and distribution
Free Windows®software Artista Device Finder to find the devices in the local network
HttpCtrl programming interface for system integrators

Manual
VideoPoster-IV
Version 1.1
11.06.2018
Page 7 of 29
4 Software
4.1 ACC
ACC is free Windows® software to generate and distribute content for VideoPoster-IV conveniently.
Features:
-Create playlists with videos and images
-Define trigger events to switch between different playlists
-Encode videos if the current format is not supported by VideoPoster-IV
-Export the playlist to an USB flash drive, if VideoPoster-IV is not connected to network
-Administrate VideoPosters connected to the local network (LAN) in the Device Manager
-Transmit playlists over network directly to the media player
-Monitor the current status of the connected VideoPosters
For further details please refer to the ACC manual.
Please contact your sales contact in the FORTEC Group to get the ACC software.
Manual
VideoPoster-IV
Version 1.1
11.06.2018
Page 8 of 29
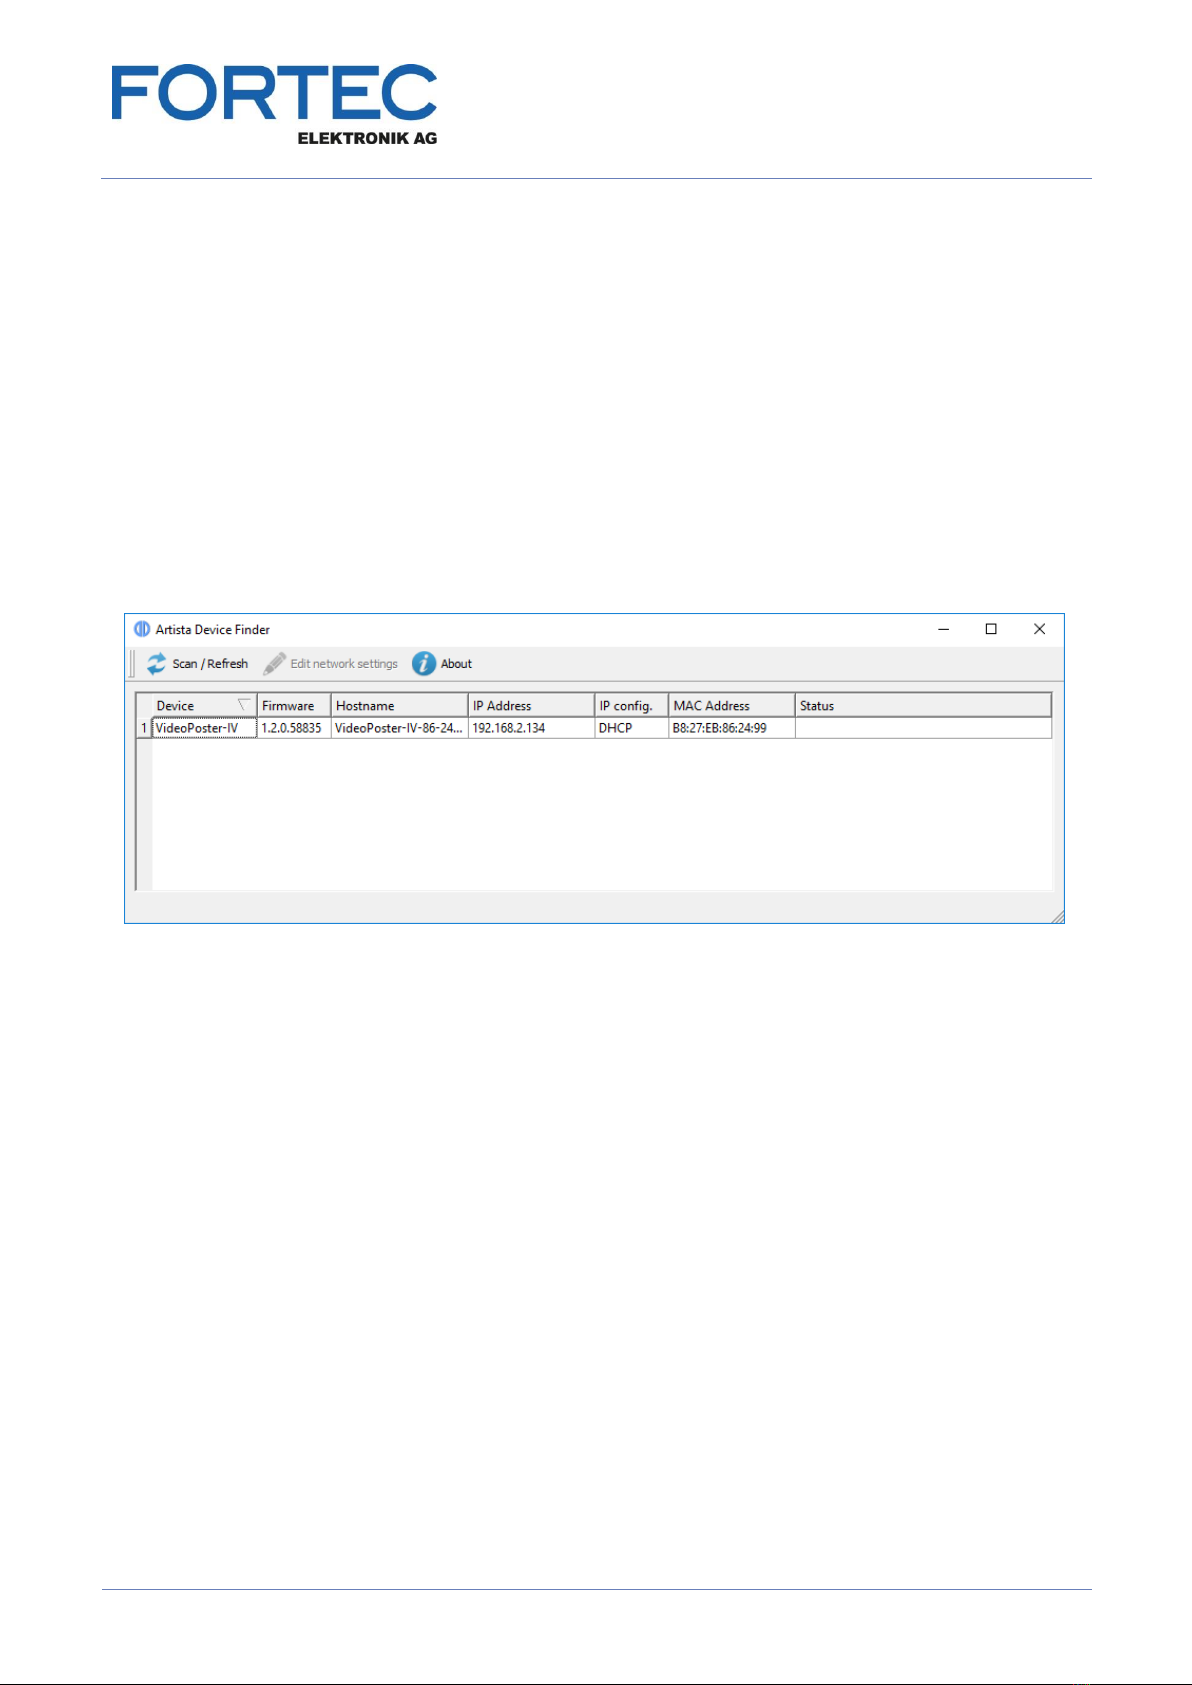
4.2 Artista Device Finder
Artista Device Finder is free Windows® software to find and configure VideoPoster-IV devices in the local
network. This works even if the network interface of the media player is not configured correctly yet.
Features:
-Scan the local network for connected VideoPosters
-Configure the network interface of the device. E.g. enable / disable DHCP, change the hostname, IP
address, etc.
-Open the web frontend of VideoPoster-IV in the web browser for further device configuration
-Export the network connection data to be imported into ACC later
For further details please refer to the Artista Device Finder manual.
Please contact your sales contact in the FORTEC Group to get the Artista Device Finder software.

Manual
VideoPoster-IV
Version 1.1
11.06.2018
Page 9 of 29
5 Device Configuration via Web Browser
The VideoPoster-IV configuration interface can be accessed with any common web browser like Firefox,
Chrome, Internet Explorer, and many others. You can establish the connection by using the Windows software
Artista Device Finder or by typing the IP address of your device into the browser manually. The current IP
address of VideoPoster-IV is displayed on the screen during the system start after power on. When you are
asked for the device password, use the default password (see Default VideoPoster-IV Configuration).
The menu on the left gives access to the various functions provided by the web frontend.
Manual
VideoPoster-IV
Version 1.1
11.06.2018
Page 10 of 29
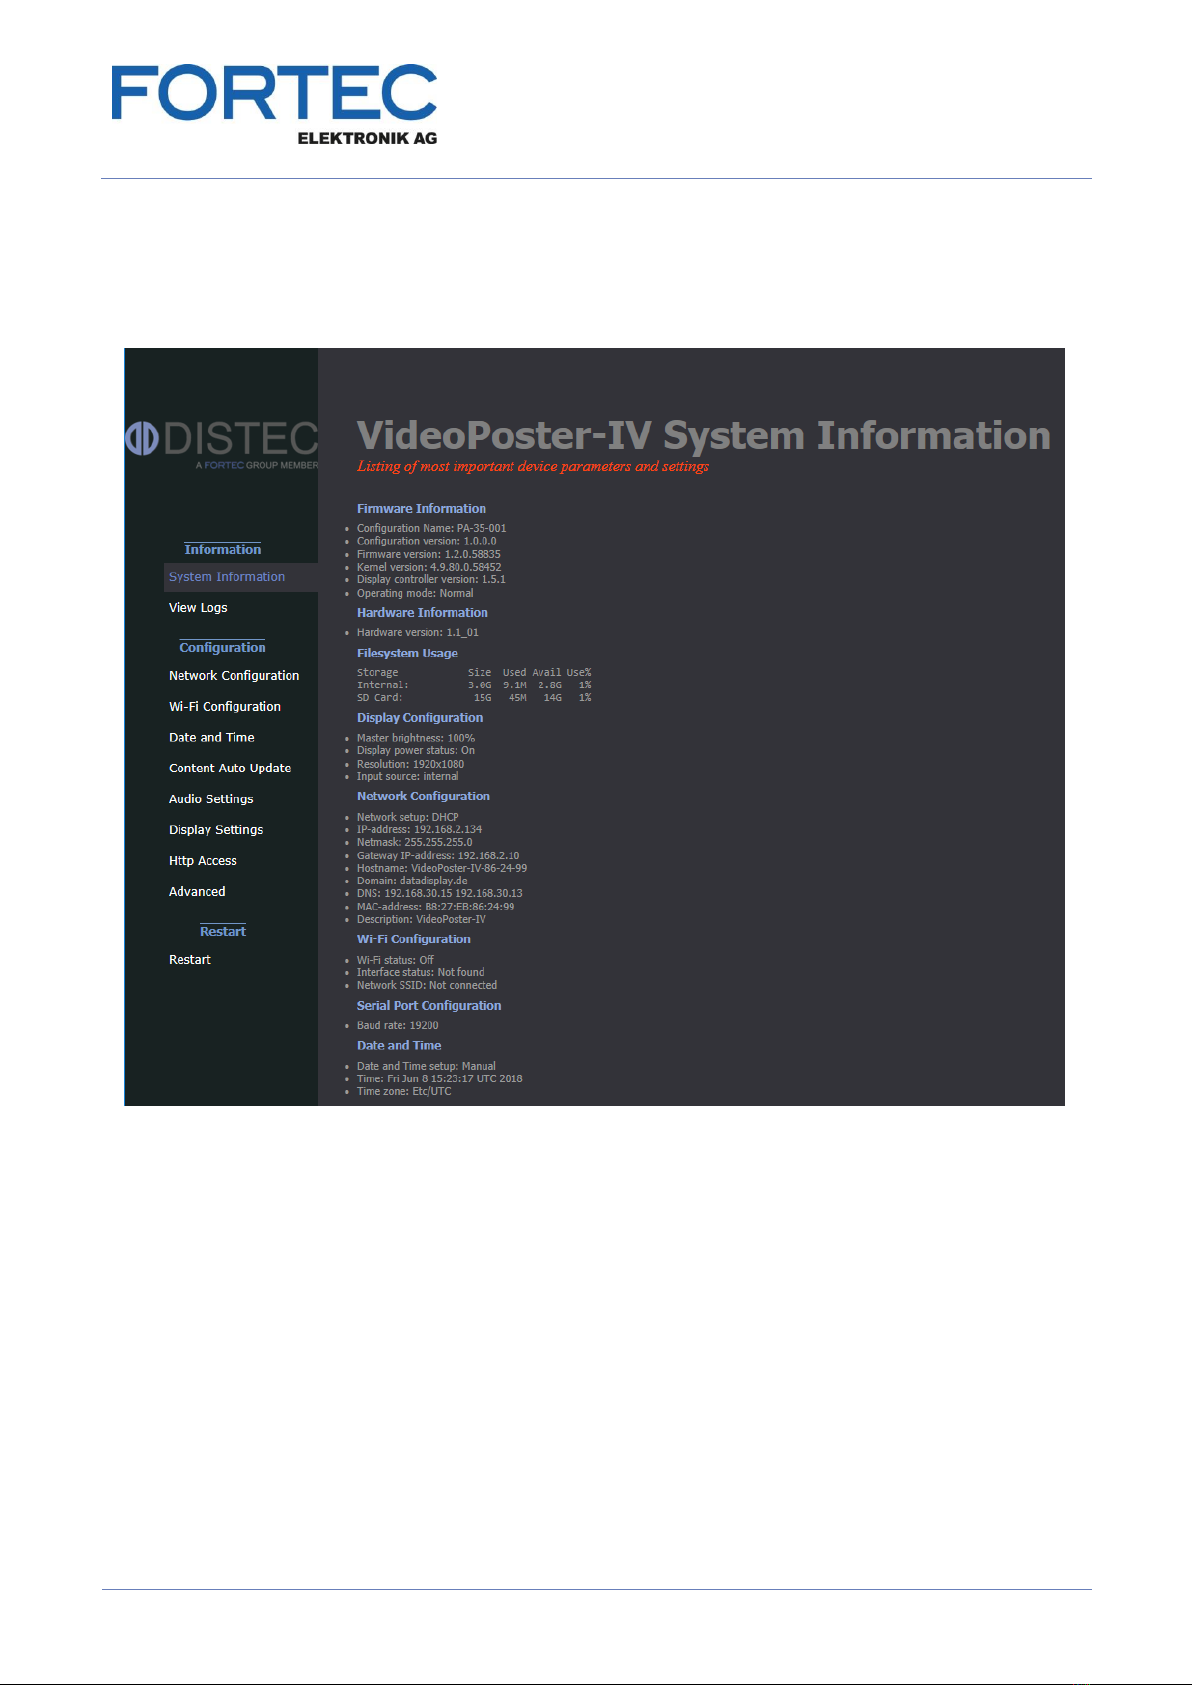
5.1 System Information
This page provides details about the system. If you should have any technical questions for our support team,
please attach the displayed information page to your e-mail. This will speed up processing of the inquiry.
5.2 View Logs
VideoPoster-IV operation can be monitored through its log files. There are several dedicated log files on the
board, each committed to logging of a particular subsystem:
Player –shows content playback status and error messages
Updater –shows content update status or error messages
Setup Manager –shows which setup files have been executed on the board
Event Manager –shows errors related to event processing
The log files can be erased by clicking “Clear”.

Manual
VideoPoster-IV
Version 1.1
11.06.2018
Page 11 of 29
5.3 Network Configuration
The first step in configuration of the VideoPoster-IV is setting up its network parameters. The settings entered
can be applied by clicking “Submit configuration”. “Reset configuration” can be used to reset all fields. This will
have no effect on the actual configuration settings - only the form inputs will be cleared.
5.3.1 Using DHCP
To use DHCP for network configuration, tick the “Use DHCP” checkbox. If the device should be reachable by its
hostname, the DHCP server must be able to pass hostnames to the DNS. The default hostname of
VideoPoster-IV has the following form: VideoPoster-IV-xx-xx-xx (VideoPoster-IV- followed by the last 3 bytes of
its MAC address), but can be set to something more descriptive if needed. The network settings will be
displayed on the splash screen shown during start-up of the device.
If DHCP setup fails, the device’s network will be configured with its default settings (see Default VideoPoster-IV
Configuration).
5.3.2 Using Static IP Addresses
To use a static network configuration for VideoPoster-IV, disable the “Use DHCP” checkbox. In this mode the
following network parameters can be set manually:
-IP address of VideoPoster-IV
-Netmask
-IP address of the Gateway
-Hostname of VideoPoster-IV
-Domain
-IP address of the Nameserver (one or more Nameserver addresses separated by space)
When using a static IP address it must be assured that this address is not used by any other device connected
to the network. Please contact your network administrator for details and configuration parameters.
Manual
VideoPoster-IV
Version 1.1
11.06.2018
Page 12 of 29
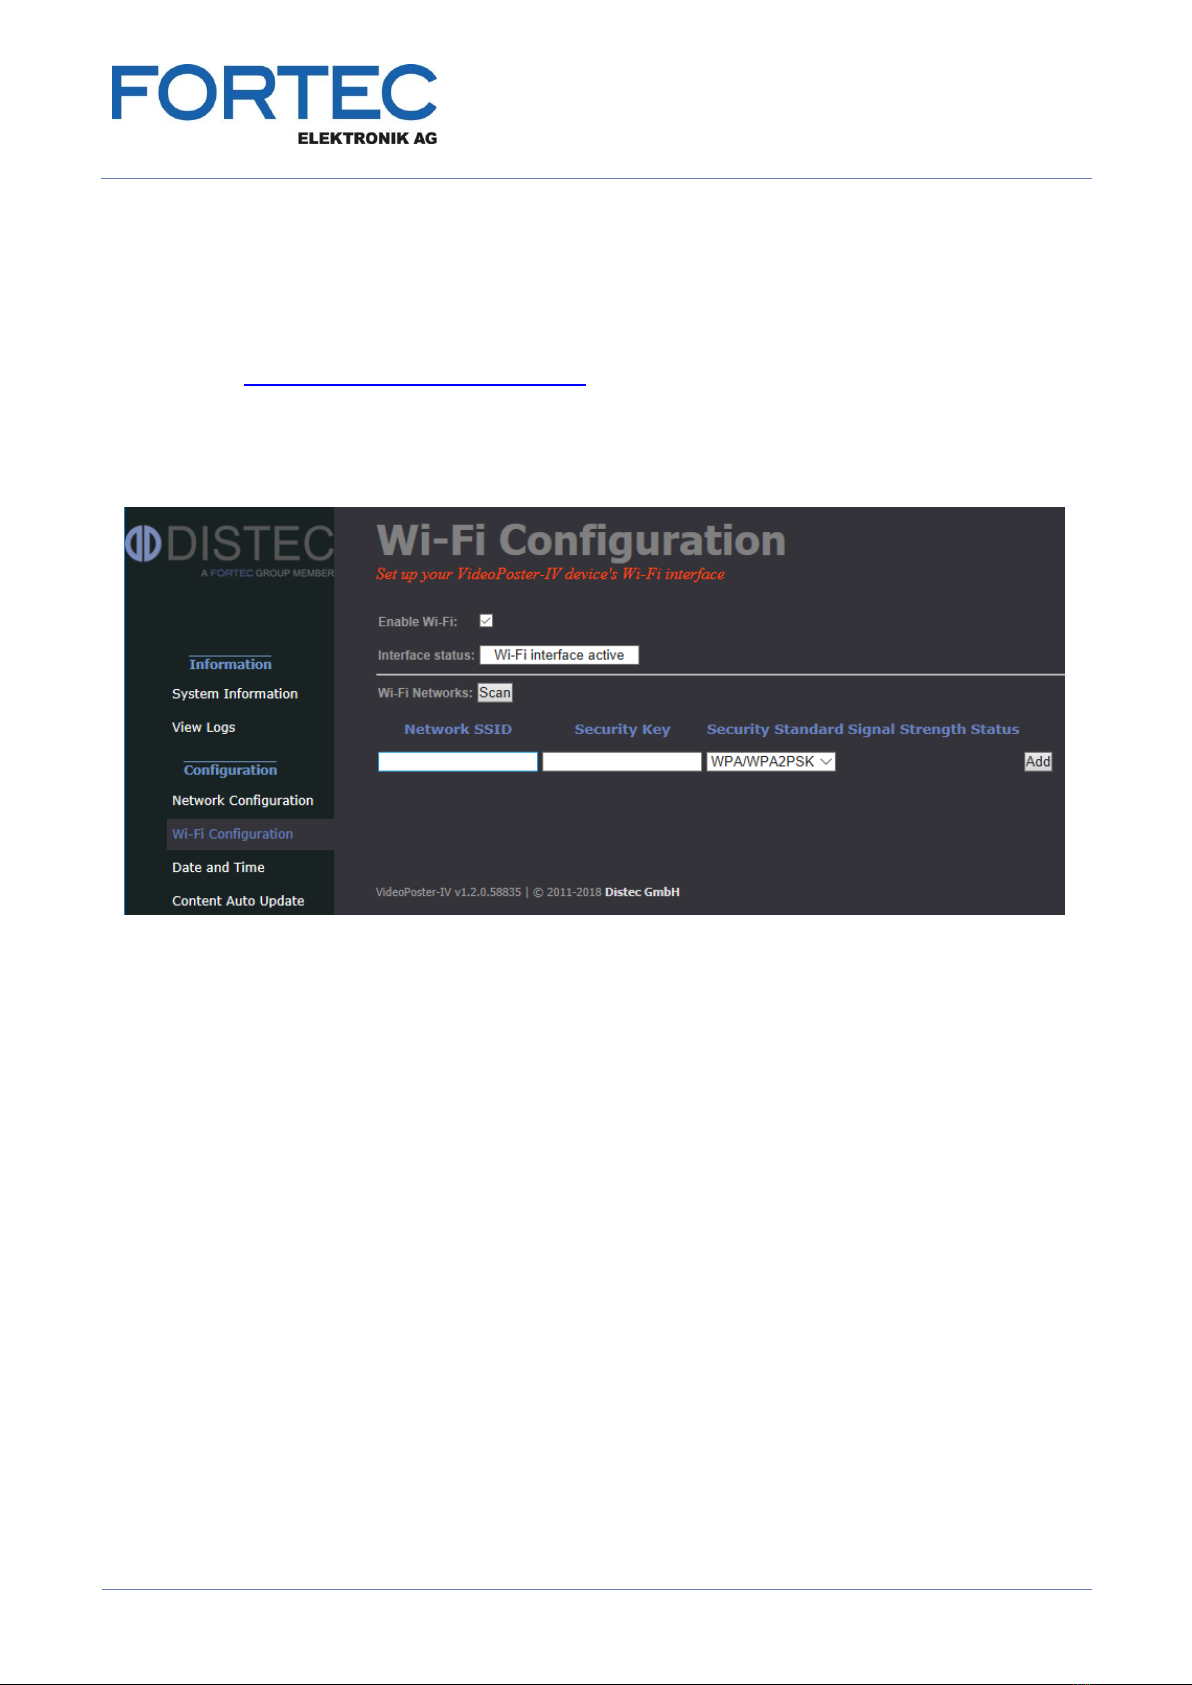
5.4 Wi-Fi Configuration
With firmware version 1.2.0 and above VideoPoster-IV can be connected to wireless (Wi-Fi) networks.
To use VideoPoster-IV with Wi-Fi networks, the original Raspberry Pi USB Wi-Fi adapter is required.
It has the following Distec part number:
PC-04-032 Raspberry Pi USB WiFi Adapter
Detailed information about the adapter can be found here:
https://www.raspberrypi.org/products/raspberry-pi-usb-wifi-dongle/
Detailed information about the supported network connections of VideoPoster-IV:
-VideoPoster-IV can use either wired network (LAN) or wireless (Wi-Fi) network. It is not possible, to
use both network connections at the same time
-The wired network connection has a higher priority than the Wi-Fi network connection. That means that
the wireless network connection is used, if the Wi-Fi connection is configured properly and the network
cable is NOT connected to VideoPoster-IV
-VideoPoster-IV can connect to just one Wi-Fi network at the same time
Supported Wi-Fi security standards:
-WPA / WPA2PSK (recommended)
-WEP
-None
Wi-Fi connection status details:
Status
Description
Conditions
Authentication failed
A wrong security key has been used.
Press the button “Remove” to remove
the connection and add it with the
correct security key again
VideoPoster-IV is currently connected via
wired (LAN) network.
The corresponding Wi-Fi network is
currently in the range of VideoPoster-IV
Connected
The new Wi-Fi connection has been
stored and can be used after a restart of
VideoPoster-IV. Make sure, the network
cable is disconnected from VideoPoster-
IV at power on
VideoPoster-IV is currently connected via
wired (LAN) network.
The corresponding Wi-Fi network is
currently in the range of VideoPoster-IV
VideoPoster-IV is connected and using
the corresponding wireless (Wi-Fi)
network
VideoPoster-IV is currently connected via
the corresponding wireless (Wi-Fi) network
Not connected
The corresponding Wi-Fi connection is
stored on VideoPoster-IV but is currently
not connected since another Wi-Fi
connection is connected already.
VideoPoter-IV can just connect to one
Wi-Fi network at the same time
VideoPoster-IV is currently connected via
wired (LAN) or wireless (Wi-Fi) network.
The corresponding Wi-Fi network is
currently in the range of VideoPoster-IV
Not in range
The corresponding Wi-Fi network is
stored on VidePoster-IV but is currently
NOT in the range of VideoPoster-IV
VideoPoster-IV is currently connected via
wired (LAN) or wireless (Wi-Fi) network.
The corresponding Wi-Fi network is
currently NOT in the range of
VideoPoster-IV
Unknown
The corresponding Wi-Fi network is
currently in the range of VideoPoster-IV
but is NOT stored on VideoPoster-IV
VideoPoster-IV is currently connected via
wired (LAN) or wireless (Wi-Fi) network.
The corresponding Wi-Fi network is
currently in the range of VideoPoster-IV
Manual
VideoPoster-IV
Version 1.1
11.06.2018
Page 13 of 29
Steps to setup a Wi-Fi connection with VideoPoster-IV:
-Disconnect VideoPoster-IV from power supply
-Connect VideoPoster-IV via a patch cable to a wired network (LAN)
-Insert the Raspberry Pi USB Wi-Fi adapter into a free USB port of VideoPoster-IV
-Power on VideoPoster-IV and wait until the message “No playlist” or the content appears on the screen
-Connect to the web frontend of VideoPoster-IV with a web browser. Details about this can be found
here Device Configuration via Web Browser
-Select the menu “Wi-Fi Configuration”
-Make sure, the interface status is “Wi-Fi interface active”. That means, that the USB Wi-Fi adapter is
detected by VideoPoster-IV
-Enable the checkbox “Enable Wi-Fi”
a.) Scan for Wi-Fi networks in the range of VideoPoster-IV and connect to it:
-Press the button “Scan” to find all Wi-Fi networks detected by VideoPoster-IV
-Enter the “Security Key” of the Wi-Fi network to be used
-Press the button “Add” to save the network parameters accordingly
oVideoPoster-IV tries to connect to this network
oPress the button “OK” after 5 seconds to return to the “Wi-Fi Configuration” page
oCheck the status of the Wi-Fi network connection. It must be “Connected”. That means, that
VideoPoster-IV is able to connect to the Wi-Fi network, but it is not used yet
-Disconnect VideoPoster-IV from wired network (LAN)
-Restart VideoPoster-IV to connect it to the Wi-Fi network
-The network parameters of VideoPoster-IV are shown during startup on the screen (IP address,
network mask and Gateway IP)
b.) Manually add Wi-Fi networks currently out of range of VideoPoster-IV:
-Enter the “Network SSID” of the Wi-Fi network to be used
-Enter the “Security Key” of the Wi-Fi network to be used
-Select the “Security Standard” of the Wi-Fi network to be used
-Press the button “Add” to save the Wi-Fi network configuration on VideoPoster-IV
-Bring VideoPoster-IV to the installation place and start it without attached network cable. It connects to
the preconfigured Wi-Fi network automatically then
Manual
VideoPoster-IV
Version 1.1
11.06.2018
Page 14 of 29
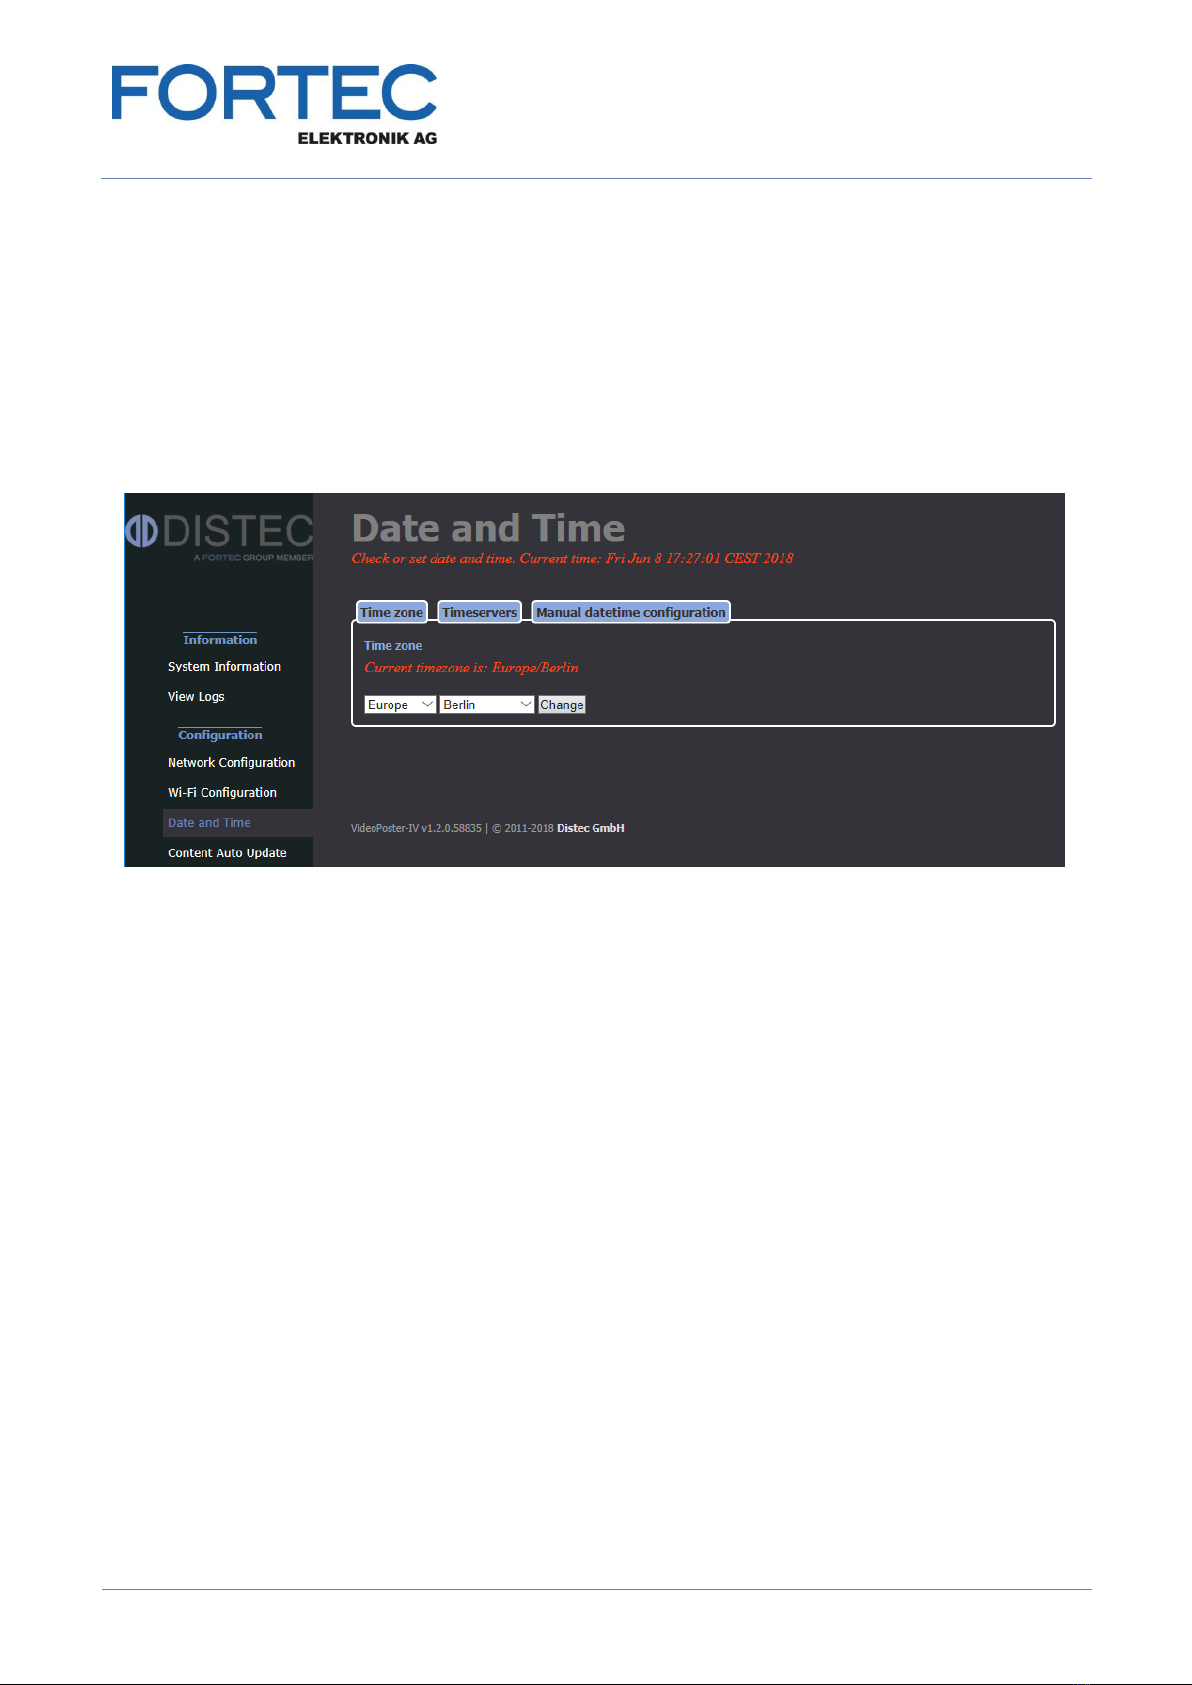
5.5 Date and Time
The time zone and the current time of your location can be set here. Setting the correct time is important if you
plan to use playlist scheduling.
Setting the time zone of your location:
-Select the menu “Data and Time”
-Select the tab “Time zone”
-Select the continent and town of your location
-Click “Change” to store your selection
Enable usage of time servers:
Time servers in the local area network (LAN) or internet can be used to automatically synchronize the time of
VideoPoster-IV with the local time.
Execute the following steps to enable them:
-Select the menu “Data and Time”
-Select the tab “Timeservers”
-Enter the address of the time servers of your choice or leave the preselected standard time servers
-Click “Use timeservers”
Note:
-To verify, if the usage of time servers has been enabled, check the red status message in the tab “Time
servers”:
oDisabled: Time servers are currently NOT in use
oEnabled: Clock is synchronized to the time server
-To verify, if the device is really synchronized to the time server, check the “System Information”:
oSelect the menu “System Information”
oCheck the “NTP details” in the “Date and Time” section
Not synchronized: Message “No association ID’s returned”
Synchronized: Table with valid NTP details is displayed
-Usually it takes a few seconds until VideoPoster-IV is synchronized to the time server
Manual
VideoPoster-IV
Version 1.1
11.06.2018
Page 15 of 29
Manual date and time configuration:
The local date and time can also be set manually. Since VideoPoster-IV has a battery buffered Real Time
Clock (RTC) on-board, the current setting is valid even if the device is not supplied with power.
-Select the menu “Data and Time”
-Select the tab “Manual datetime configuration”
-Enter the current date and time
-Click “Set new Date and Time”

Manual
VideoPoster-IV
Version 1.1
11.06.2018
Page 16 of 29
5.6 Content Auto Update
VideoPoster-IV can periodically poll a remote FTP server for new playlists using a given interval. This menu
allows you set up the connection to a remote FTP server that provides playlist updates.
To setup content auto update the following form fields must be filled out:
Check the Enable polling checkbox to activate polling (disabled by default)
Enter hostname or IP of the FTP server in the FTP server field
Enter the number of the FTP server’s port (usually 21) in FTP port
Provide a valid username and password in the Username and Password fields
In Playlist dir provide the path on the remote server where the PlaylistContent directory is located.
Please do not append “PlaylistContent” to this path and make sure that the folder exists!
The Polling interval field is used to specify the interval between polls in seconds
On submit a connection check will be executed. If the browser lists the contents of the PlaylistContent directory
on the FTP server all settings are correct and polling will be enabled. For backward compatibility when the
PlaylistContent directory is missing the device will use the directory specified in Playlist dir directly instead.
VideoPoster-IV uses the following sequence for content update:
Check the playlist.ddx file on the FTP server. If its size or last modified time has changed since the
last download, the file will be downloaded
Verify playlist file properties to make sure it can be played on the device. If it can’t, it will be discarded.
Check which media files are new or changed and thus not available locally yet
Download all new media files and store them locally. If any file is missing, the playlist will be discarded.
On success stop playback and move all downloaded files from the intermediate download directory to
the live directory.
Delete all outdated media files from the local storage and schedule new show for playback
Restart playback with the new playlist
The device is also able to just update individual files in the playlist. This is intended for situations where some
items of the playlist are provided by a third party. These items must be marked as extern in the playlist –please
see playlist specification documentation for details.
5.7 Audio Settings
This page can be used to set a master volume level for audio playback. Its allowed values range from 0% to
100%. Volume values given in the playlist are regarded as per cent from this value.
5.8 Display Settings
This page can be used to set a master brightness level for video display. Its allowed values range from 0% to
100%. Brightness values given in the playlist are regarded as per cent from this value.
Manual
VideoPoster-IV
Version 1.1
11.06.2018
Page 17 of 29
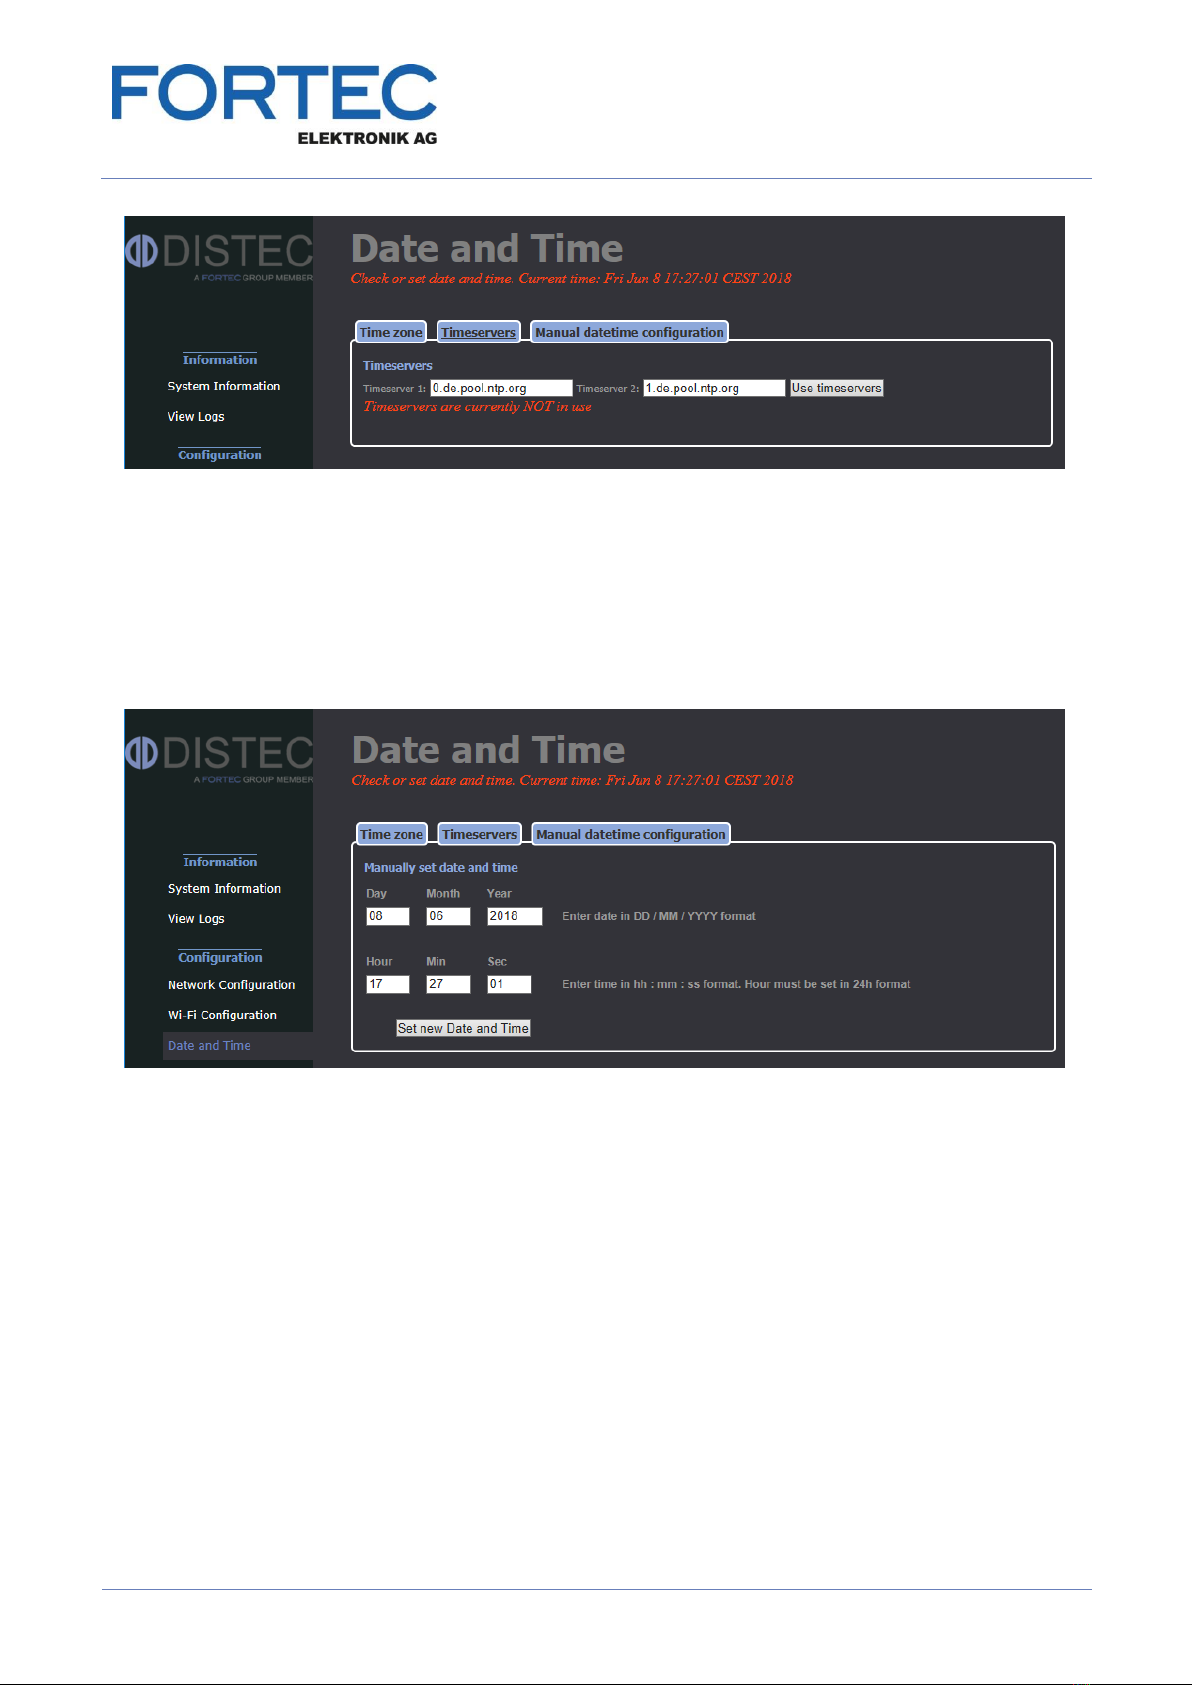
5.9 Http Access
The password for accessing the web frontend can be changed by using the following menu:
The new password must be entered twice to prevent the device from being inaccessible due to typing errors.
Form data can be reset by clicking “Clear”. By pressing “Submit” the new password will be activated and you
will have to re-login on changing to any other page of the web frontend.
5.10Advanced
In Advanced Options you can choose to update VideoPoster-IV firmware, change its hardware configuration, or
format the SD card, if available.
5.10.1 Firmware Update / Board Setup
The following function can be used to apply firmware update or setup packages to VideoPoster-IV.
Please contact your sales contact in the FORTEC Group to get the required file.
To check information about your device, select System Information from the menu on the left.
Please make sure that the firmware update or setup file you are going to install is compatible with your
hardware.
Click the Browse button and then choose the correct firmware update or setup file.
Then press Upload to VideoPoster-IV to upload and install the software on the device.
Warning:
Do not power off your device while the update process is running!
This can damage the hardware!

Manual
VideoPoster-IV
Version 1.1
11.06.2018
Page 18 of 29
5.10.2 Artista Device Finder Support
Here you can enable or disable support for the Artista Device Finder tool. If enabled (default), network
configuration can be done remotely from a PC connected to the same physical network (for browser access,
the PC and the device have to be in the same subnet, for Artista Device Finder this is not mandatory). Please
see the Artista Device Finder manual for more information.
5.10.3 HDMI Input Priority
The external HDMI input port of VideoPoster-IV can be used to show content from an external HDMI source
like PCs, media players or Set-Top-Boxes on the screen. Per default, the external player has priority over the
on-board media player but this can be disabled.
If the HDMI input priority is enabled, the video signal coming from the external HDMI input port is displayed on
the screen instead of the signal coming from the internal media player. If the external HDMI source is
disconnected or switched off, the system switches back to the internal media player automatically. If HDMI
input priority is disabled, the external HDMI input signal is ignored.
Click the button to disable or enable the HDMI input priority accordingly.
5.10.4 Serial Port Configuration
The baud rate of the serial port of VideoPoster-IV can be configured to one of the following values: 1200, 2400,
9600, 19200, 57600, 115200
The default value is 19200.
To change the baud rate, select the desired value via the drop down menu and click “Submit configuration”.
5.10.5 Media Storage Formatting (Memory Card)
The on-board flash memory of VideoPoster-IV provides 3 GB of storage space. Alternatively an external
microSD card can be used to go beyond this limitation.
This card must be formatted with this function in VideoPoster-IV before it can be used. Using Windows®
compatible FAT32 formatted microSD cards is no option, because the data can easily get corrupted due to
sudden power loss of VideoPoster-IV.
Note: After formatting, all files will be deleted and the new file system will not be usable with any
version of Windows®
Formatting the memory card may take a while (around one minute, depending on the card size). Please do not
leave the formatting page or switch off the device and wait for a confirmation report to be printed. Also a
splash screen containing a status message will be displayed on your device’s screen while formatting.
Click “Format Media Storage” and confirm the warning dialog by clicking “OK” to start formatting.

Manual
VideoPoster-IV
Version 1.1
11.06.2018
Page 19 of 29
5.10.6 Master Reset
Master reset sets all configuration parameters of VideoPoster-IV back to their factory default values, clears the
internal storage and reboots the device!
Click “Perform Master Reset” to execute this function and wait until VideoPoster-IV has restarted.
5.11Restart
In some cases it might be necessary to restart VideoPoster-IV. The device will automatically restart in 10
seconds, but can also be restarted immediately by clicking the Restart button. Press Stop if you got on this
page by mistake and don’t need to restart.
6 Default VideoPoster-IV Configuration
Default Network Configuration:
Parameter
Default Value
Notes
DHCP
Enabled
IP Address
192.168.0.1
Default IP address, if no DHCP server is available
Netmask
255.255.255.0
Default netmask, if no DHCP server is available
Hostname
VideoPoster-IV-xx-xx-xx
xx-xx-xx represents the last 6 bytes of the device’s MAC
address
Default Login Data:
Parameter
Default Value
Notes
Login Name
Artista
Not configurable
Password
Artista

Manual
VideoPoster-IV
Version 1.1
11.06.2018
Page 20 of 29
7 Playlist Upload
VideoPoster-IV supports three upload procedures: via USB, direct content upload with the ACC software and
by polling of remote FTP servers. Please check the playlist type and display resolution prior to uploading to the
device. If they don’t match the playlist will be refused, and the old one will continue playing.
Detailed information about the supported media file formats can be found in section
Supported Media Formats
7.1 USB Upload
To upload via USB insert a USB pen drive which has the show in the PlaylistContent directory contained in the
drive’s root, and the device will automatically detect and copy its content. It is safe to remove the flash drive
when the show starts playing. ACC can be used to create shows and export them to the USB drive.
7.2 ACC Push Upload
ACC must be used to upload content to VideoPoster-IV. In ACC you have to setup a network connection to
VideoPoster-IV device and commence upload (see ACC manual for details). The device will detect the upload
and if it contains a valid playlist, will automatically start playing it.
7.3 Polling of Remote FTP Server
This mode is turned off by default, so it must first be activated and correct settings for network connection to the
remote server must be provided (see Content Auto Update). Once this is done, the device will poll the
PlaylistContent folder on the remote server for playlist updates. You can use ACC to upload shows to FTP
server.
Normally, only the playlist.ddx file is checked for changes. If a particular item has to be checked for changes
the attribute “extern=true” has to be added to its <src> element (see playlist example). VideoPoster-IV will
additionally poll these items and update them even if the playlist remains unchanged.
Table of contents
Other Fortec Star Media Player manuals


