Fortec Star PTI 1320 User manual

………………………………………………………
Precautions 1
Product Overview 2
Menu Functions 42
After- sales Service
APPENDIX 63
………………………………………………………………
………………………………………………………
…………………………………………… 6
……………………………
…………………………………………….…62
…………………………………………………………………
……………………
Operation Instructions
Table of Contents

PRECAUTION
- 1 -
Precaution
*Please read this manual carefully before the installations and operations.
Transportation Security
No heavy stress, violent vibration or water splash are allowed during transportation, storage. The
unit should be transported in separated packing. In shipments of distributor and delivery of
maintenance, any damages caused by integral packing are not covered by warranty.
Installation
Avoid heavy stress and violent vibration during installation. Don’t touch the dome cover directly
by hand. When connecting the power source, please follow all electric safety standards and only use
the power supply designated for this device. Keep the video and control signal in a decent distance
from high voltage devices and cable. Don’t apply power to dome before finishing the installation.
Internal Environment
Keep metal and inflammable material away from dome body to avoid fire short circuit and
damage. Please prevent all liquids material from entering the dome. If this occurs, please shut down
the power and pull out the plug-in. Then please inform the technical personnel immediately.
Electrical Safety
The video image would be interfered when the dome is installed near Television, radio transmitter,
voltage changer and audio amplifier.
Camera Protection
Avoid shooting very bright objects directly into the camera’s CCD (such as the sun or light fittings)
and avoid fixating the camera lens on bright static object for long time, as it will cause Irreparable
damage to the camera’s CCD.
Cleaning Method
Please don’t use abrasive and violent detergent to clean the dome. Please choose dry fabric and
neutral detergent. And please use lens paper to clean the lens.
*Internal removing, assembly, repair and operations should be only
performed by qualified service personnel.
Please use our production under the following environmental standards:
Environmental Temperature:
-35 ~60 ℃
Environmental Humidity:
<95%
Barometric Pressure:
86~106KPa
Power Supply:
DC12V/5A

PRODUCT OVERVIEW
- 2 -
Product Overview
Special Features
•High definition
H.264 compression algorithm, save the network bandwidth and hard disk storage space, aspect ratio of
16:9 and 4:3 adjust at will; h. 264 main profile level and M - JPEG video streaming can be output at full
frame speed. support for dynamic coding parameters adjustment
•Zoom and automatic focusing
With 20 x optical zoom, more than 20 times digital zoom and autofocus function, not only can provide
an ideal field of vision, but also can realize perfect automatic focus
•Double stream free switch
Support the double stream, choose the main stream or sub stream according to different application.
• Supported protocols
Support TCP/IP、PPPoE、DHCP、UDP、MCAST、FTP、SNMP 、Onvif、CGI、PSIA etc
•Voice intercom function
Support Voice intercom
• Alarm function
Support the local and network linkage signal; Provide area, mobile sensitivity detection alarm, regional
block alarm
Main Features
•Stepless speed changes, auto zoom/speed matching
• Pan 0.01~360o/S, Tilt 0.01o~120o/S, Preset: 360o/S (high speed IR speed dome)
• Pan 0.5o~35o, Tilt 0.5o~35o, Preset:35o/s (for Vari-speed IR dome)
• Auto object track with zoom in/out and motion detection (Auto Track Model)
•Timing actions for 7 days of programmable schedule
• Built-in Semi-conductor heater & digital temperature sensor
• PWM cooling fan vari-speed temperature control
• Reserved network interface and space for network module
• Pan Tilt accuracy +/- 0.1o, 256preset positions
• 8 cruising tracks, each cruising track has 32 presets
• 4 pattern tours,10 Mins memory, 500 programmable instructions

PRODUCT OVERVIEW
- 3 -
• Multi-Protocol through RS485 or coaxial cable.
• 8 auto scan with use-defined left and right boundaries and settable scan speed
• 8 Privacy Zones with defined English camera title
• Auto Compatible PELCO_P, PELCO_D compatible
• Guard Location: the dome will rotate back to preset position after a period of vacant time
• Alarm triggering: the alarm can trigger preset, auto scan, cruising and pattern tours functions
•Soft Address Function: the use can set up the dome address without uninstall the dome
Integrated Super Speed PTZ Rotator
• Delicate stepping motor, stable, sensitive and accurate
• 360° Pan and 90° Tilt range (auto-flip) without blind area
• Stepless speed change, auto zoom/speed matching
•Near / far IR Light auto matches camera zoom in/out
Built-in High Definition Day/Night Camera
• Auto iris, auto back light compensation
• Auto/manual white balance
• Auto/manual brightness control
• Auto/manual focus
• Multiple compatible camera brands including Sony, Samsung, LG, CNB, Sanyo etc.
All-weather Outdoor Design
•5 Inch High die-cast alloy aluminum construction
• High Precision Mould with high heat conductivity
•Fully enclosed isolation design for heat sink
• Nanometer Dustproof, waterproof and fog-proof lens
•IP66 Waterproof
•3000V lightning and surge current protection
Function Instructions
•Focus / PTZ Speed Auto Match
The pan/tilt rotation speed could be automatically adjusted according to the focus in/out, which
makes it much more practical for manual target tracking. (Only for the auto tracking IR speed dome)
•Auto Flip
When the camera tilts downward and goes just beyond the vertical position, the camera will
rotate 180 degrees.
•Preset Position Set up and Call Up

PRODUCT OVERVIEW
- 4 -
In the Preset function the dome stores the current pan/tilt angle, zoom and other position
parameters in its memory. When necessary the dome recalls these parameters and adjusts the camera
to a particular position. The user can store, recall and clear the presets easily and promptly by using
the keyboard controller. The dome can store up to 256 presets.
•Auto Scan
Users can set up the left and right boundaries by control keyboard. Then speed dome can scan
between this boundary. It supports up to 8 groups of scanning paths.
•Cruising Track
The preset position can be programmed to be recalled in a set of sequences. This sequence can be
set to let the camera scan from one position to the next in a cycle at a set speed. This feature is called
the “auto cruise”. The cruise sequence and dwell time of each preset can be set. It supports up to
8cruising tracks, each cruising track with 32 presets.
•Pattern Tour
Dome can memorize 600S running path or 500 programmable instructions. When start pattern
tour, speed dome will move automatically according recorded action path. It supports 4 groups of
pattern tours.
•3D Positioning
The dome automatically return to preset position if there is no operation in period of vacant time.
•Default Action
When you start up the dome camera or do not send commands over a long time, the dome
camera will return to its default functions which include the home place, auto pan, auto cruise and
pattern.
•Dome Address Setup
The dome supports up to 256 addresses and the dome will only response to the instructions given
to its own address. Please check the dip switch on the bottom of the dome for address setup.
•Privacy Mask Protection
Set black mask areas to protect the privacy zones. The black privacy locations can be set, and
support up to 8 mask zones.
•Coordinates and Directions Display
User can define the dome’s direction of due north, which will help to show up the exact moving
directions on screen. And zone title is supported to display when the dome moves to the specified
zone.

PRODUCT OVERVIEW
- 5 -
•Auto Tracking
The dome will automatically fix and track the moving object according to the user’s setup via OSD.
•Motion Detection
The dome will detect the changes in the defined video zone and trigger alarm.
It supports to 8 video Locations, each with 4 detection zones.
•PTZ and Lens Control
1) Zoom Control
Users can control zoom by keyboard to get near or far images.
2) Focus Control
The default setting is auto focus. The camera will auto focus based on the center of the video
display to get the clear image. In some special occasions, the user could do the manual focus to get the
desired image effect.
3) Auto Iris Control
Auto Iris is aiming to detect the environmental lights condition and adjust the iris to get the
stabilized brightness of the image.
4) Auto Back Light Compensation
In the highly bright background, auto back light compensation is aiming to compensate the
brightness of the dark object and adjust the background brightness to get a clear image.
5) Auto/Manual White Balance
Auto/Manual WB adjust depending on the environment light changes.
6) Day and Night Switch (Only for Day/Nigh Camera)
Speed dome camera can auto switch according to the environmental illumination changes.
7) OSD Setup (Only for camera with menu)
Call upon preset No.95 to enter into OSD menu setup interface. Click “Focus” to choose menu
items and click “Iris” to set menu contents.
•Alarm(optional)
The speed dome support 7 alarm input,1alarm output. Alarm input mode can be set up normally
open or normally closed.

OPERATION INSTRUCTIONS
- 6 -
Operation Instructions
Technical Data
Power Supply:
DC12V+10% 50W
Decoder:
Built-in
Manual Speed:
Pan:0.01o~360o/S, Tilt: 0.01o~120o/S (high speed)
Pan:0.01o~100o/S, Tilt:0.01o~100o/S (Vair-speed)
Preset Speed:
360 o/S (high speed) / 100o/S (Mid-speed)
Pan Angle:
360o continuous pan rotation
Tilt Angle:
90o(Auto Flip)
Number of Preset:
256
Preset Accuracy:
+0.1o
Alarm input&output:
7input,1 output
Auto Scan:
8 auto scan tracks, user-defined left and right boundaries and scan
speed
Auto Cruising:
8 cruising tracks, each cruising tracks has 32 preset positions,
user-defined dwell time
Pattern Tour:
4 patterns, up to 500 instructions per pattern
Guard Location:
The dome will rotate back to preset position after a period of vacant
time.
Operating Humidity:
0~90%
Operating Temp:
-35 oC +60oC

OPERATION INSTRUCTIONS
- 7 -
Main Functions Fast Call Up
Our IR Speed dome supports 220 preset positions. You can activate some special functions by
calling upon code number 65-99.
Serial
No.
Command
Fast Call Up
Note
1
Start Auto Scan
Call 99
Default to start auto scan
of group No.1
2
Start Auto Cruise
Call 98
Default to start auto
cruise of group No.1
3
Start Pattern Tour
Call 97
Default to start pattern
tour of group No.1
4
Start Auto Scan of Group
No.
Call 80+ Call pp+ Call 99
pp means:Group No.1-8
5
Start Auto Cruise of
Group No.
Call 80+ Call pp+ Call 98
6
Start Pattern Tour of
Group No.
Call 80+ Call pp+ Call 97
pp means:Group No.1-4
7
Close OSD Menu
Call 96 or Call 26
8
Open OSD Menu
Call 95or Call 25
9
Remote Reset
Call 94
10
Recover Factory Default
Call 82

OPERATION INSTRUCTIONS
- 8 -
General Operations
3.1 Factory Setting
Products have default network parameters as below for your reference when
leave our factory. These parameters can be changed according to your need.
IP:192.168.0.99(for customized camera, please refer to specific label instruction)
Subnet Mask:255.255.255.0
Gateway:192.168.0.1
WEB Port:8000
User computer network parameters:
For Windows XP example, Please change user computer IP address to the same
network segment with the speed dome camera before landing.Within the same
LAN,IP address can’t be the same, otherwise it will conflict, leading to equipment
can't work normally.
After setting the IP address,click ,open the command prompt, command
format is “ping192.169.0.99”.
User computer is connected to this IP camera successfully as below display.

OPERATION INSTRUCTIONS
- 9 -
If the computer displays as below,
It suggests that the equipment is not installed well, you can check as the following
aspects:
1:Is the firmware connected correctly?
2:Is TCP/IP set up to the same with this IP camera?
3: the network forbid the PING command, please consult the network
administrator.

OPERATION INSTRUCTIONS
- 10 -
WEB browse instructions
3.2.1 Login
In the WEB address bar enter IP address :192.168.0.99,a login page appears as
below
User Name: admin
Password: admin
Port:8000
3.2.2 Download player components
After a successful login, the WEB prompts whether update the new version
plugins, double click and download.
Double click the downloaded Webcompents.exe file and start to install WEB
browse player components, click “NEXT”to confirm and finish. After installment,
get back to WEB page and refresh the page, then you can view the video.
Note:
This player component must be installed to browse video from WEB. At present
this player component support Windows2000/XP/2003/Vista32 operating system
OPERATION INSTRUCTIONS
- 11 -
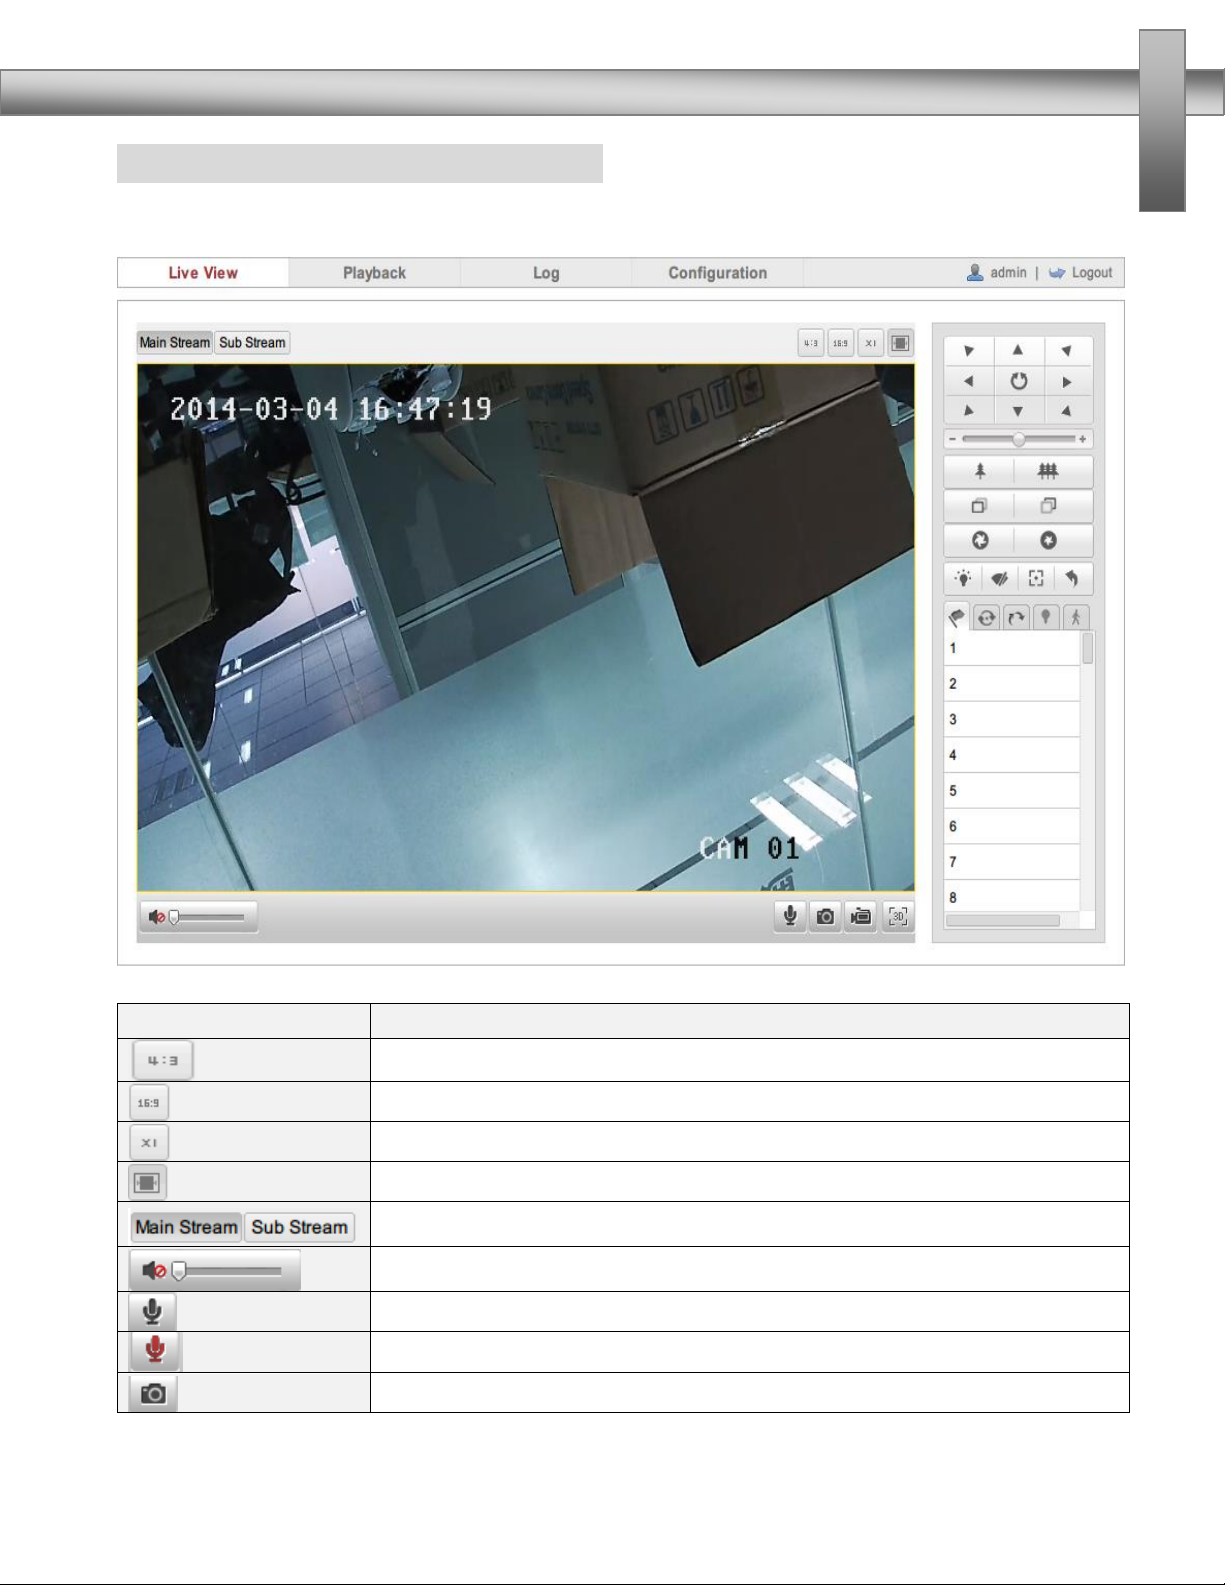
3.2.3 Preview Screen and operations
After player component installment, enter IP address to login page again. With
user name and password, click “Login”to preview screen.
ICON
Instruction
Preview screen 4:3 ratio
Preview screen 16:9ratio
Original preview screen size
Self-adaptive preview screen
Choose main stream or sub stream
volume
Start Two-way Audio
Stop Two-way Audio
Capture

OPERATION INSTRUCTIONS
- 12 -
Record
Start 3D Zoom
Control the Horizontal and vertical motion, open/close auto scan
Zoom
Focus
Iris
PTZ Speed
Light
Wiper
Auxiliary Focus
Patrol
Preset
Pattern
Lens Initialization
IR Setting
Track Setting
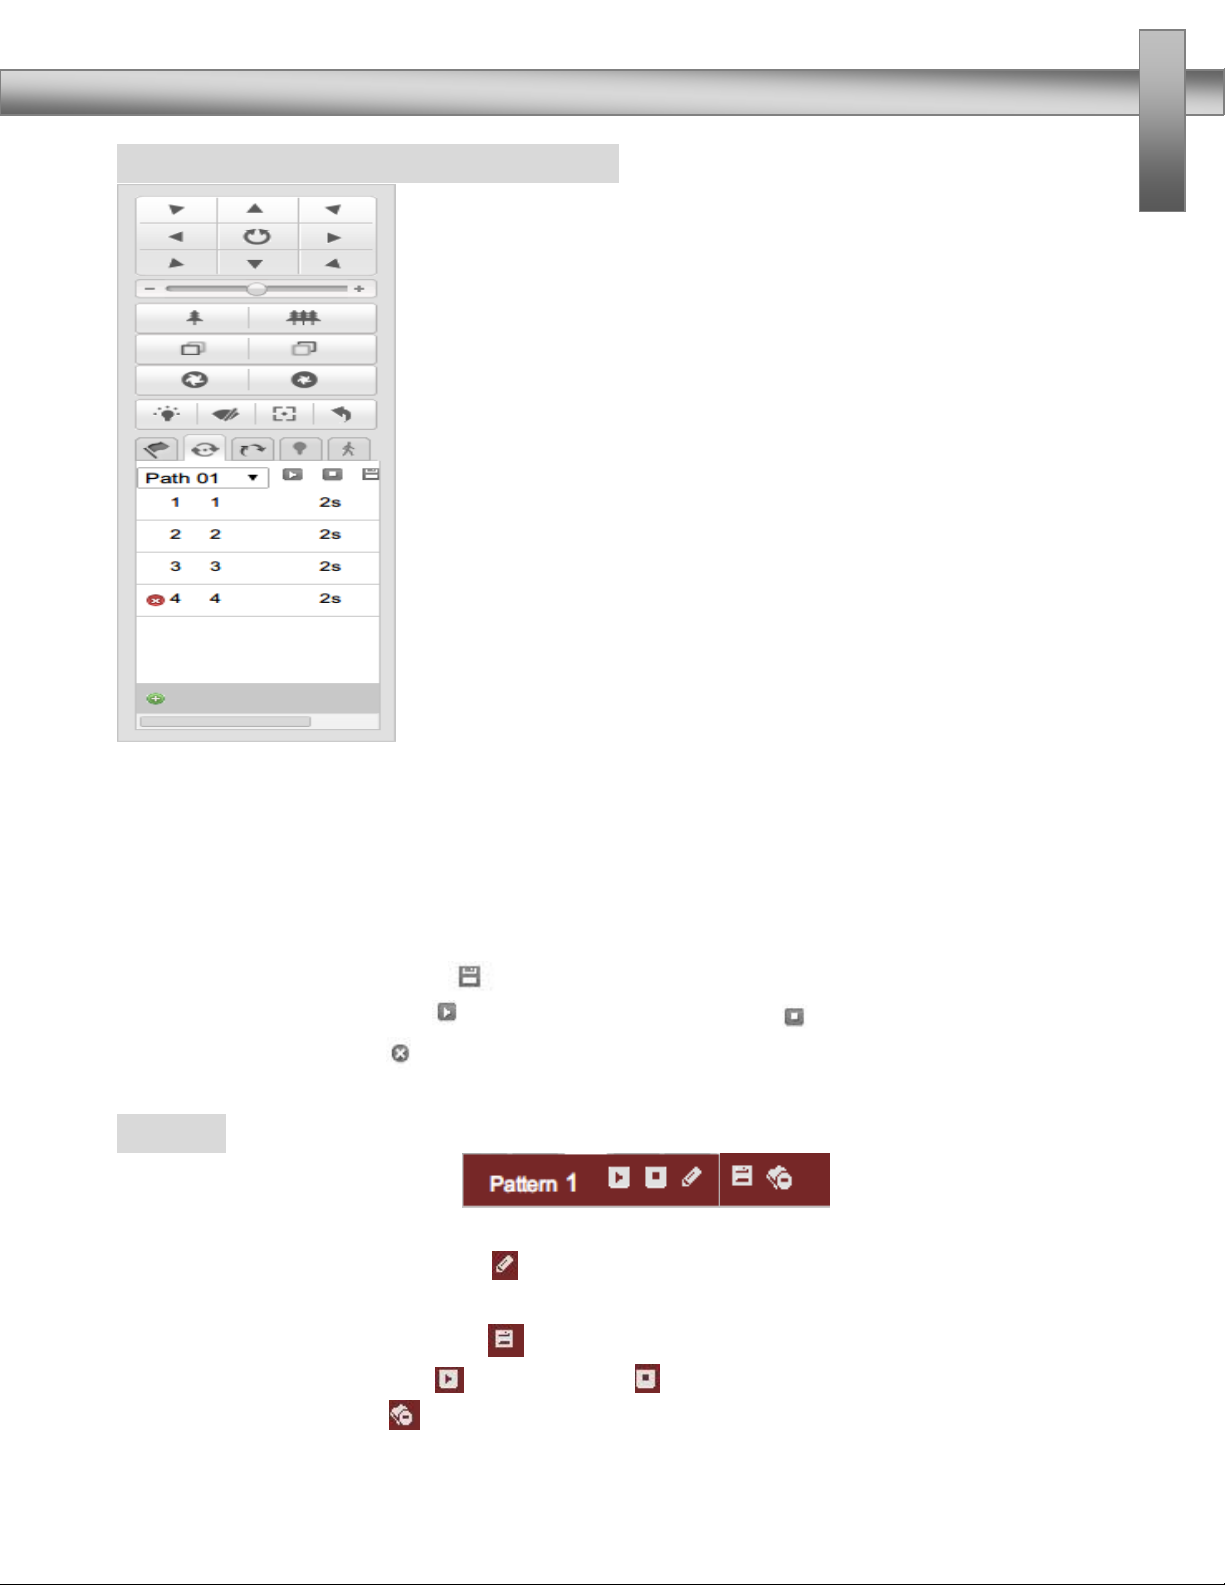
Preset operation instructions
1:In preset setting screen, display the current operating
preset NO.
2:Preset set: Choose the number of the preset, then operate PTZ control panel,
when lens move to the position to be set ,click to save the preset number.
3:Call preset: Click to call preset number that has been set.
4:Clear preset: Click to clear preset number information.
5:Special function preset number: for special function preset, they can be called,
but can’t be altered or deleted.
OPERATION INSTRUCTIONS
- 13 -
Patrol function operation instructions
1:Preset set: Setup the preset number that need to add to patrol route, the steps
please refer to “preset set”in preset operation instructions.
2:Choose patrol routes: Choose the patrol route number that need to be edited,
such as route 1
3:Add preset number: add preset number that has been set to routes, then set the
corresponding time and speed of patrol.
4:Save patrol routes: Click to save patrol routes.
5:Start/Stop patrol: Click to start patrol, and click to stop patrol.
6:Delete patrol: Click to delete patrol route.
Pattern:
1:In pattern setting screen, display the current
operating pattern route.
2:Start recording pattern :Click to start recording pattern, through PTZ panel to
control the movement of speed dome.
3:Stop recording pattern: Click to stop recording pattern and save recording.
4:Start/Stop pattern: Click to start, click to stop.
5:Delete pattern: Click to delete this pattern.
OPERATION INSTRUCTIONS
- 14 -
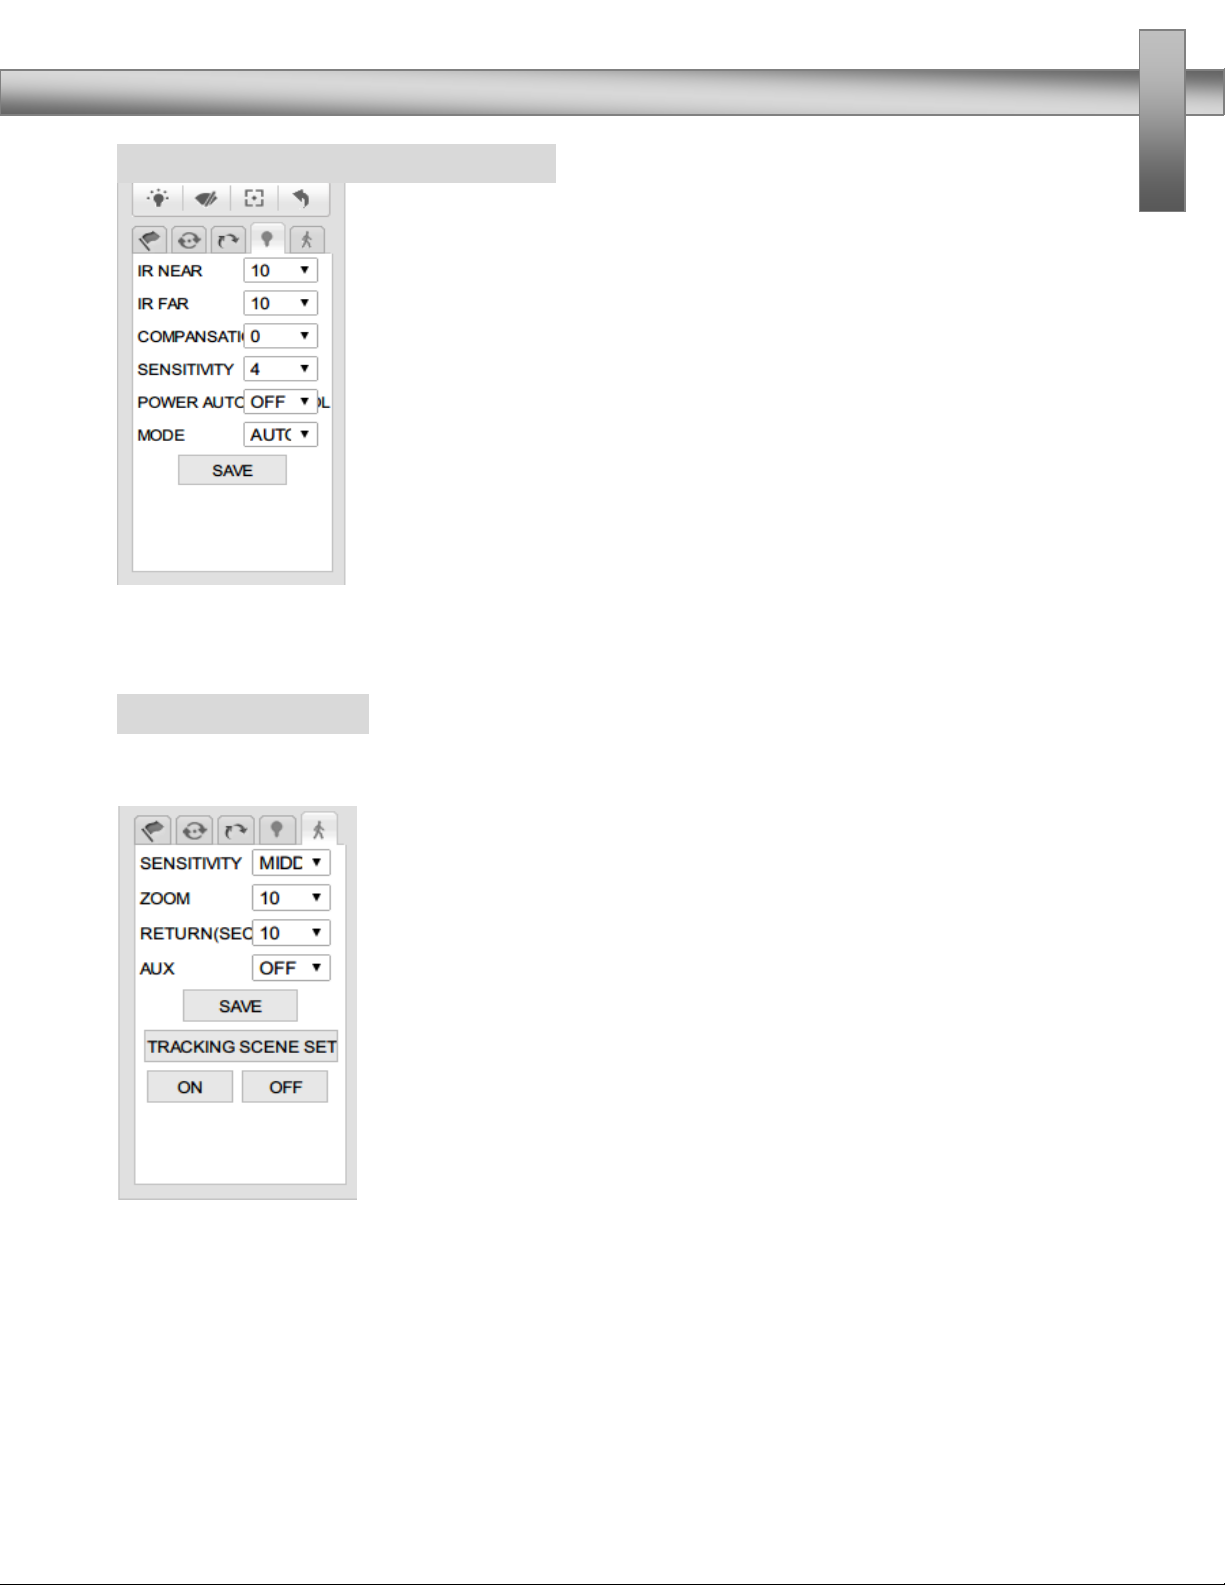
IR Setting operation instructions:
In IR setting screen, users can set IR near consumption1-10,IR far
consumption ,compensation, sensitivity, VAL,IR mode.
Auto-track Setting:
In auto-track setting screen, users can set tracking scene, tracking sensitivity,
return(sec),AUX.
1:Tracking sensitivity can be set to be low, middle, high. To low sensitivity, only
obvious movement can arouse tracking function of the speed dome; To high
sensitivity, little movement can arouse tracking function.
2:Zoom:Upon tracking function, the speed dome adjusts the zoom of camera
according to moving target in the scene, so make sure that moving target can
keep corresponding ratio in the video screen.

OPERATION INSTRUCTIONS
- 15 -
Playback:
Click “Playback ”to get into video search and playback screen. Users can search,
replay and download stored valid video files in SD card or NAS.
Choose a day in the calendar on the right side ,click ,
Eligible video file will be displayed on the timeline. Drag the timeline to the
position you want to play. Click the play button to start playback file.
Log:
OPERATION INSTRUCTIONS
- 16 -
Click “Log”to get into search log. User can search, display and export stored valid
log information in the SD card or NAS.
Choose the type of log and set the query date and the time of starting and ending,
then click ,Eligible log information will be displayed in
the list. Click ,log information is saved in the computer.
Note:
Playback and log function is available under the premise of inserted SD card or
NAS. For the first configuration ,
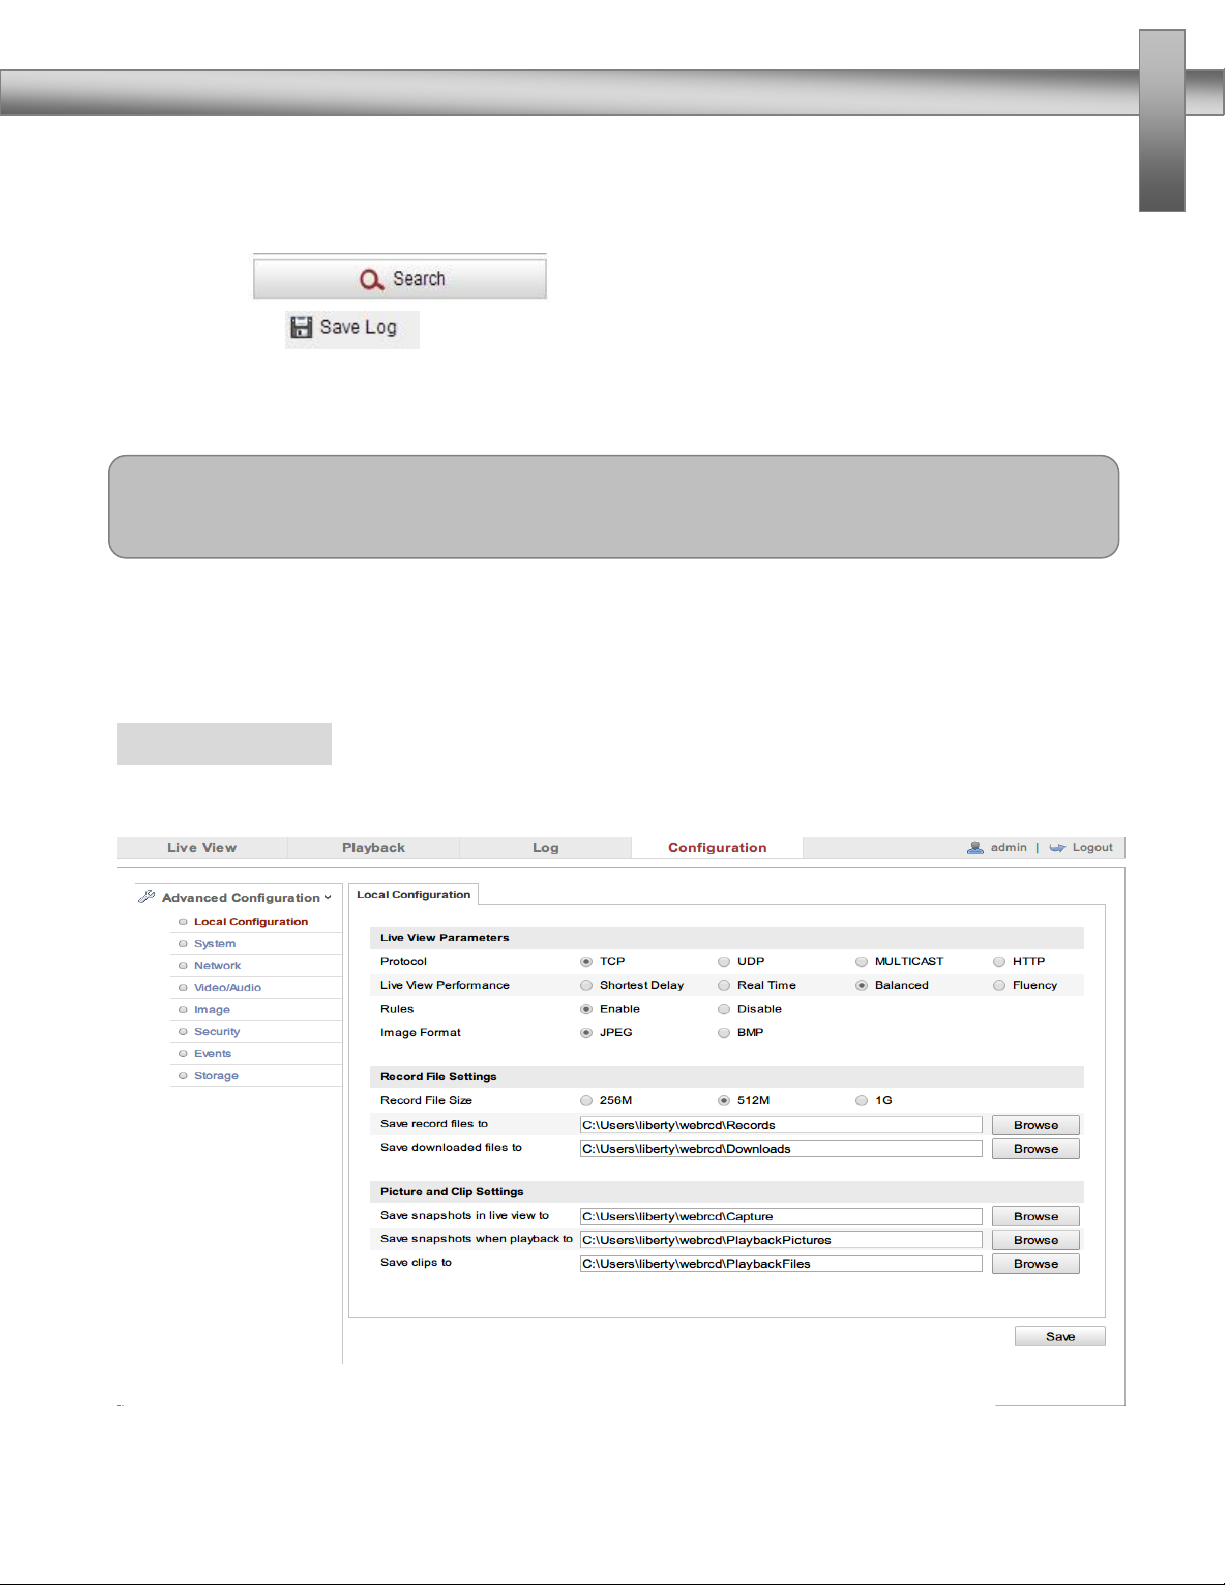
Configuration:
Click “Configuration”to get into the parameters configuration screen.
Advanced Configuration—Local Configuration
OPERATION INSTRUCTIONS
- 17 -
Local Configuration Screen
Parameter
Instruction
Protocol :
TCP、DP、ULTICAST、HTTP(optional)
Live View Performance:
real-time、balanced、fluent (optional)
Record File Sizes:
256M、512M、1G (optional)
Save record files to:
the default system disk:\Documents and
Settings\User\Web\Record Files, according to the actual
situation to change
Save downloaded files
to :
the default system disk:\Documents and
Settings\User\Web\Record Files, according to the actual
situation to change
Save snapshots in live
view to:
the default system disk:\Documents and
Settings\User\Web\Capture Files, according to the actual
situation to change
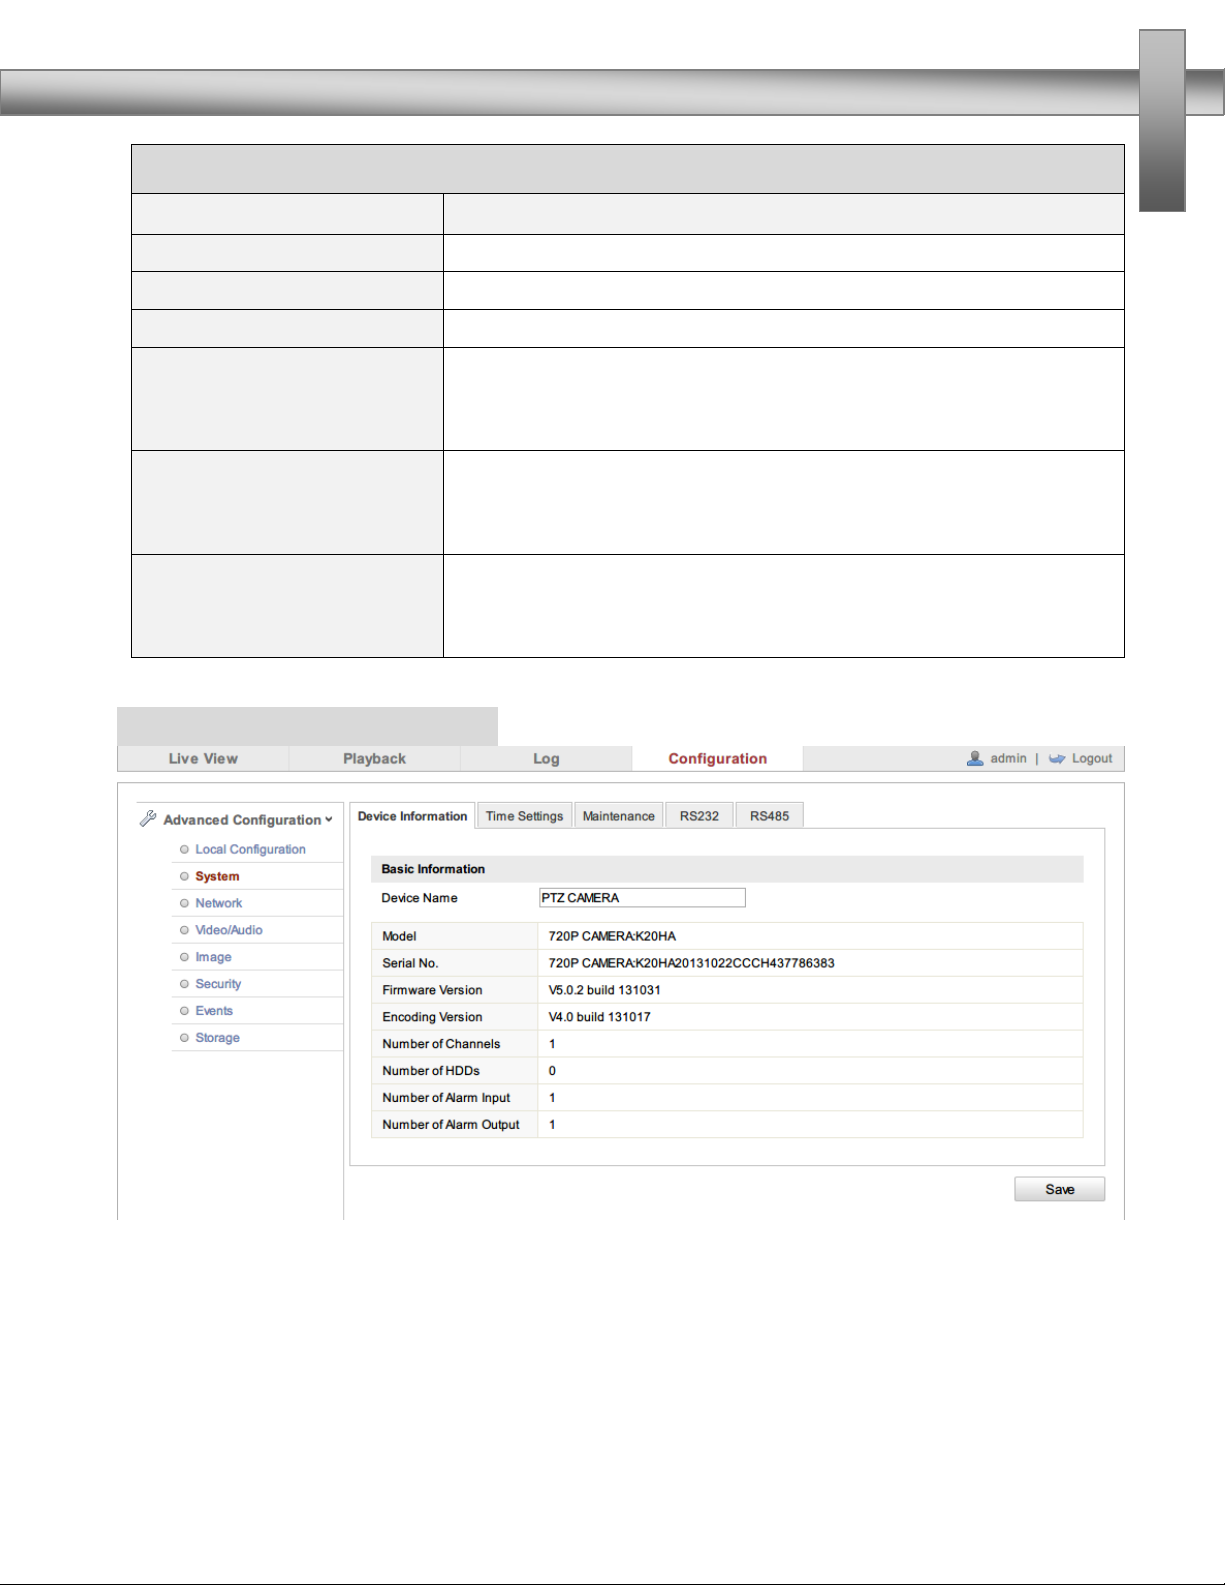
System—Device Information
In Device Information screen, users can set Device Name、Model、Serial No.、
Firmware Version、Encoding Version、Number of Channels、Number of HDDs、
Number of Alarm input and output.
OPERATION INSTRUCTIONS
- 18 -
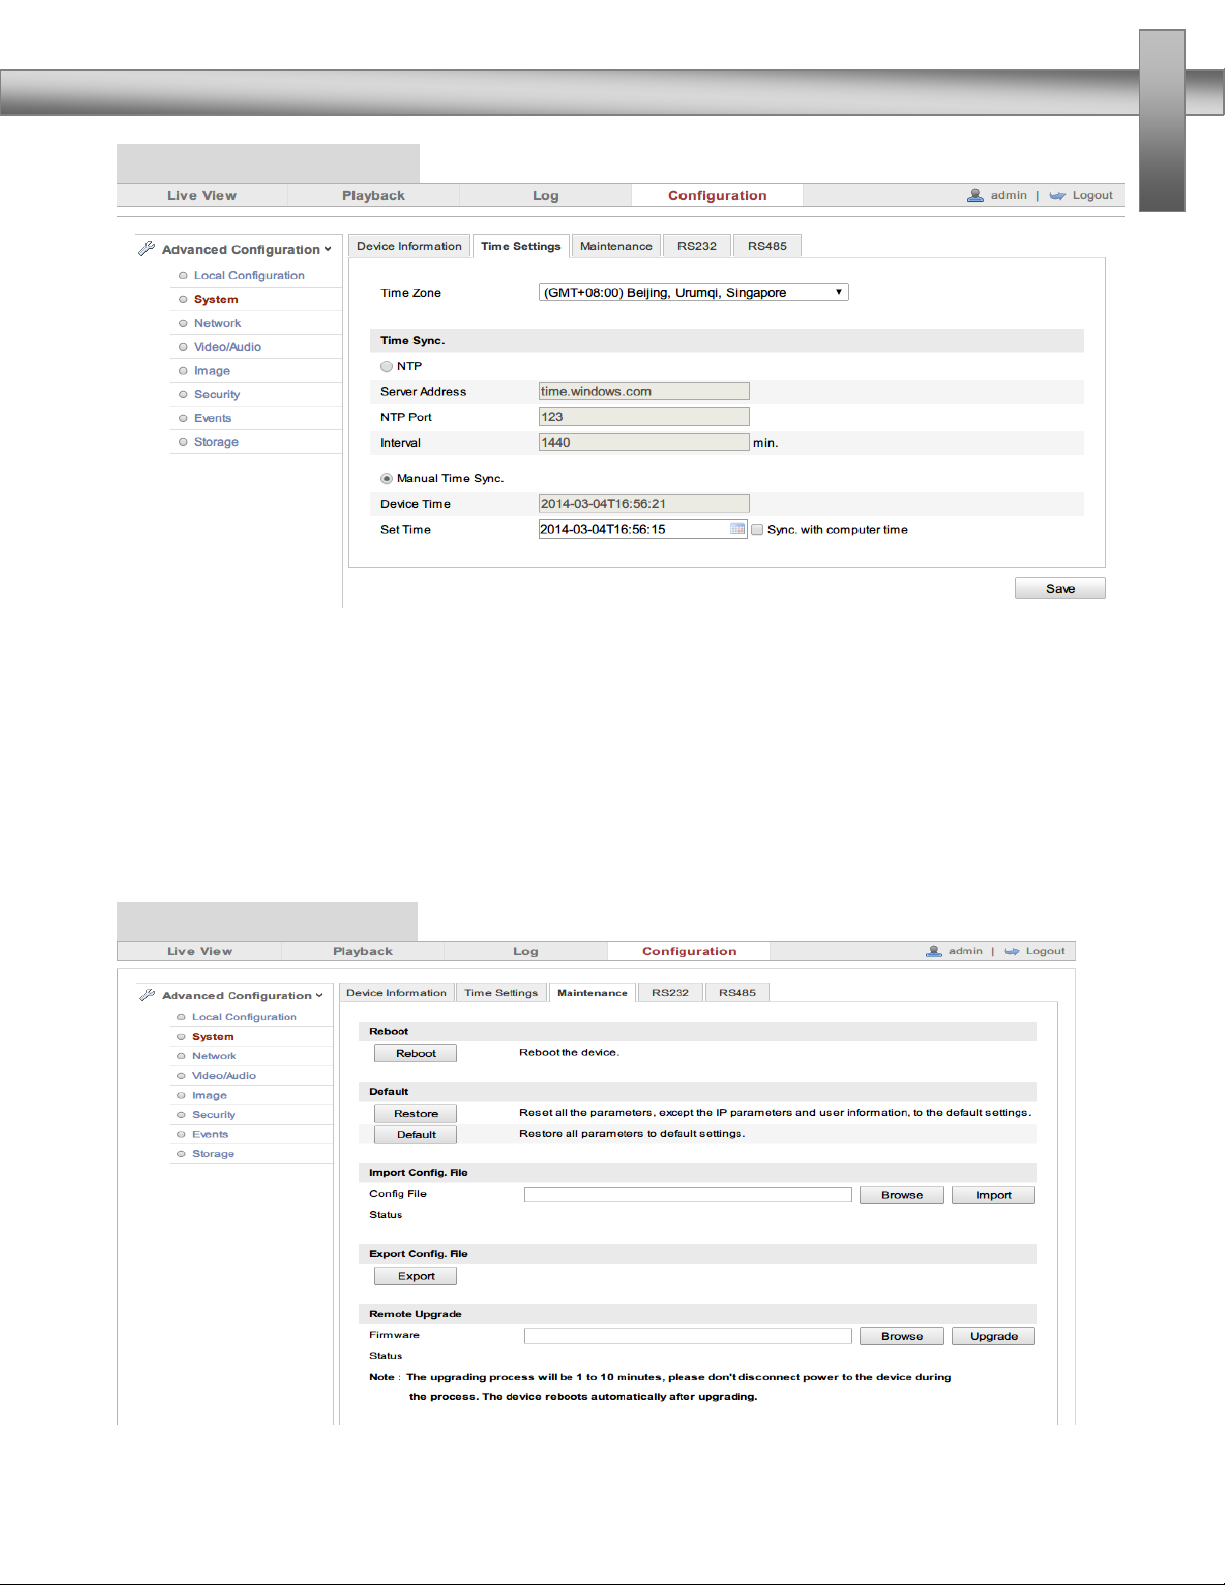
System---Time settings
In the Time Settings screen, time sync is operational. “Time Zone”shows the
current IP camera’s time zone, and that can be set according to the actual
situations. For “Time Sync”, set NTP server address、NTP port、Internal, the device
will be time sync every once in a while according to the setup. For “Manual Time
Sync”, set time and check “Sync with computer time”, and then the time of the
speed dome syncs with the local PC. After changing some parameters and click
“save ”to save the corresponding settings.
System—Maintenance
Table of contents


