Foster AG925BBD User manual
Forno Micro+Grill S1000
cod. 7151 000

17
EN
Microwave Oven
INSTRUCTION MANUAL
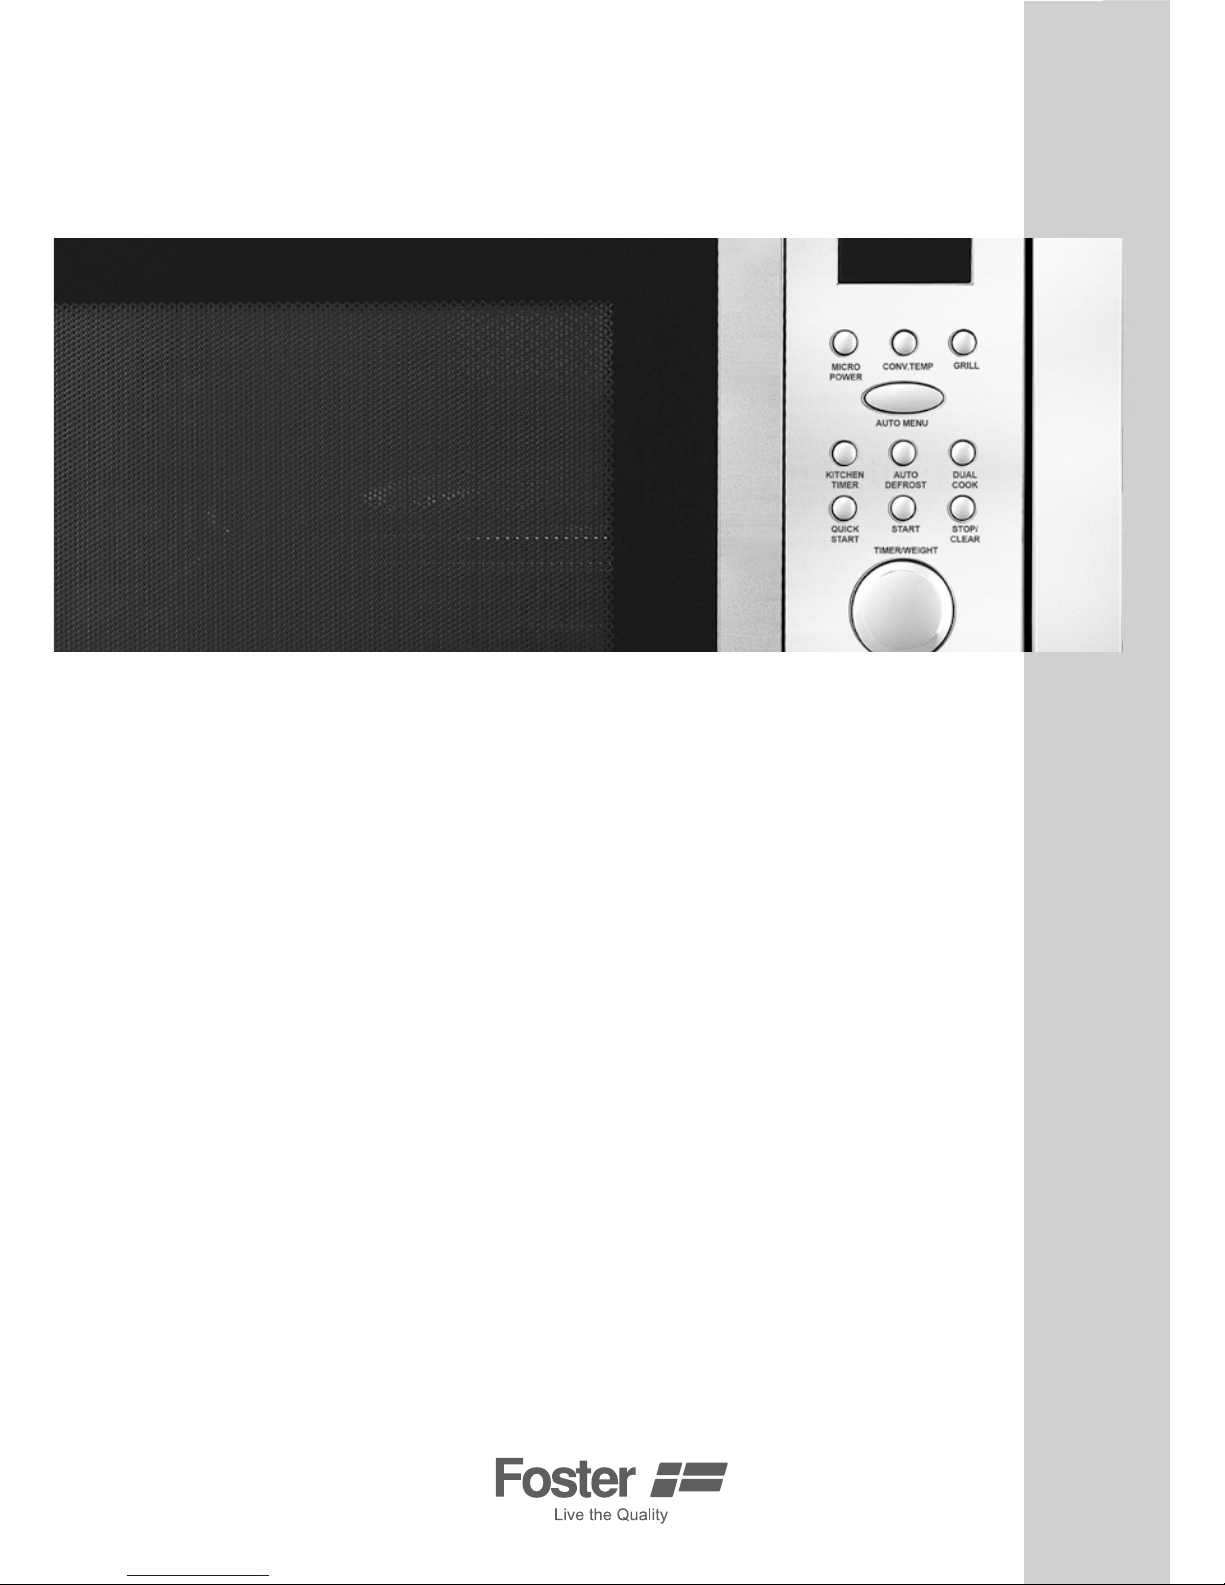
MODEL: AG925BBD
Read these instructions carefully before using your microwave
oven,and keep it carefully.
Ifyoufollowtheinstructions,yourovenwillprovideyouwithmany
yearsofgoodservice.
SAVE THESE INSTRUCTIONS CAREFULLY
PRECAU
TIONS TO AVOID POSSIBLE EXPOSURE TO
EXCESSIVE MICROWAVE ENERGY
(a) Do not attempt to operate this oven with the door open since this can result in
harmfulexposuretomicrowaveenergy.Itisimportantnottobreakortamper
withthesafetyinterlocks.
(b)Donotplaceanyobjectbetweentheovenfrontfaceandthedoororallowsoil
or cleaner residue to accumulate on sealing surfaces.
(c) WARNING:Ifthedoorordoorsealsaredamaged,theovenmustnotbe
operateduntilithasbeenrepairedbyacompetentperson.

18
EN
ADDENDUM
If the apparatus is not maintained in a good state of cleanliness, its surface could be
degraded and affect the lifespan of the apparatus and lead to a dangerous situation.
Specications
Model: AG925BBD
Rated Voltage: 230 V~50 Hz
Rated Input Power (Microwave): 1450 W
Rated Output Power (Microwave): 900 W
Rated Output Power(Grill): 1000 W
Oven Capacity: 25 L
Turntable Diameter: 315 mm
External Dimensions: (LxWxH): 513x380x346 mm
Peso netto: approx. 18.5 kg circa
IMPORTANT SAFETY INSTRUCTIONS
Toreducetheriskofre,electricshock,injurytopersonsorexposuretoexcessivemicrowave
ovenenergywhenusingyourappliance,followbasicprecautions,includingthefollowing:
1 Warning:Liquidsandotherfoodsmustnotbeheatedinsealedcontainerssincetheyare
liable to explode.
2 Warning:Itishazardousforanyoneotherthanacompetentpersontoremoveacover
whichgivesprotectionagainstexposuretomicrowaveenergy.
3 Warning:Onlyallowchildrentousetheovenwithoutsupervisionwhenadequate
instructionshavebeengivensothatthechildisabletousetheoveninasafewayand
understand the hazards of improper use.
4
Warning:Whentheapplianceisoperatedinthecombinationmode,childrenshouldonly
usetheovenunderadultsupervisionduetothetemperaturesgenerated.(onlyforgrillseries)
5 Onlyuseutensilssuitableforuseinmicrowaveovens.
6 Theovenshouldbecleanedregularlyandanyfooddepositsshouldberemoved.
7 Readandfollowthespecic:”PRECAUTIONSTOAVOIDPOSSIBLEEXPOSURETO
EXCESSIVEMICROWAVEENERGY”.
8 Whenheatingfoodinplasticorpapercontainers,keepaneyeontheovenduetothe
possibilityofignition.
9 Ifsmokeisobserved,switchofforunplugtheapplianceandkeepthedoorclosedinorder
tostieanyames.
10 Donotovercookfood.
11 Donotusetheovencavityforstoragepurposes.Donotstoreitems,suchasbread,
cookies,etc.insidetheoven.
12 Removewiretwist-tiesandmetalhandlesfrompaperorplasticcontainers/bagsbefore
placing them in the oven.
13 Installorlocatethisovenonlyinaccordancewiththeinstallationinstructionsprovided.
14 Eggs in the shell and whole hard-boiled eggs should not be heated in microwave ovens
sincetheymayexplode,evenaftermicrowaveheatinghasended.
15 Usethisapplianceonlyforitsintendedusesasdescribedinmanual.Donotusecorrosive
chemicalsorvaporsinthisappliance.Thisovenisespeciallydesignedtoheat.Itisnot

19
EN
designedforindustrialorlaboratoryuse.
16 Ifthesupplycordisdamaged,itmustbereplacedbythemanufacturer,itsserviceagentor
similarlyqualiedpersonsinordertoavoidahazard.
17 Do not store or use this appliance outdoors.
18 Do not use this oven near water, in a wet basement or near a swimming pool.
19 Thetemperatureofaccessiblesurfacesmaybehighwhentheapplianceisoperating.
Keepcordawayfromheatedsurface,anddonotcoveranyeventsontheoven.
20 Do not let cord hang over edge of table or counter.
21 Failure to maintain the oven in a clean condition could lead to deterioration of the surface
thatcouldadverselyaffectthelifeoftheapplianceandpossiblyresultinahazardous
situation.
22 Thecontentsoffeedingbottlesandbabyfoodjarsshallbestirredorshakenandthe
temperaturecheckedbeforeconsumption,inordertoavoidburns.
23 Microwaveheatingofbeveragescanresultindelayederuptiveboiling,thereforetakecare
when handling the container.
24 Steam cleaner is not to be used.
25 Duringusetheappliancebecomeshot.Careshouldbetakentoavoidtouchingheating
elements inside the oven.
26 Accessiblepartsmaybecomehotduringuse.Youngchildrenshouldbekeptaway.
27 Do not use harsh abrasive cleaners or sharp metal scrapers to clean the oven door glass
sincetheycanscratchthesurface,whichmayresultinshattering.
28 Thisapplianceisnotintendedforusebypersons(includingchildren)withreduced
physical,sensory,ormentalcapacities,orlackofexperienceandknowledge,unlessthey
havebeengivensupervisionorinstructionconcerninguseoftheappliancebyaperson
responsiblefortheirsafety.
29 Childrenshouldbesupervisedtoensurethattheydonotplaywiththeappliance.
To reduce the risk of injury to persons
Grounding installation DANGER
ElectricShockHazardTouchingsomeoftheinternalcomponentscancauseseriouspersonal
injuryordeath.Donotdisassemblethisappliance.
WARNING
ElectricShockHazardImproperuseofthegroundingcanresultinelectricshock.Donotplug
intoanoutletuntilapplianceisproperlyinstalledandgrounded.
CLEANING
Besuretounplugtheappliancefromthepowersupply.
1 Cleantheinsideoftheovenafterusingwithaslightlydampcloth.
2 Cleantheaccessoriesintheusualwayinsoapywater.
3 Thedoorframeandsealandneighbouringpartsmustbecleanedcarefullywithadamp
clothùwhentheyaredirty.

20
EN
Two-round-pin plug
This appliance must be grounded. In the event of an electrical short circuit, grounding reduces
theriskofelectricshockbyprovidinganescapewirefortheelectriccurrent.Thisapplianceis
equipped with a cord having a grounding wire with a grounding plug. The plug must be plugged
intoanoutletthatisproperlyinstalledandgrounded.
Consultaqualiedelectricianorservicemanifthegroundinginstructionsarenotcompletely
understoodorifdoubtexistsastowhethertheapplianceisproperlygrounded.Ifitisnecessary
touseanextensioncord,useonlya3-wireextensioncord.
1 Ashortpower-supplycordisprovidedtoreducetherisksresultingfrombecoming
entangled in or tripping over a longer cord.
2 Ifalongcordsetorextensioncordisused:1)Themarkedelectricalratingofthecordset
or extension cord should be at least as great as the electrical rating of the appliance. 2) The
extensioncordmustbeagroundingtype3-wirecord.3)Thelongcordshouldbearrangedso
thatitwillnotdrapeoverthecountertoportabletopwhereitcanbepulledonbychildrenor
trippedoverunintentionally.
UTENSILS
Seetheinstructionson“Materialsyoucanuseinmicrowaveovenortobeavoidedinmicrowave
oven.”
CAUTION
Personal Injury Hazard
Itishazardousforanyoneotherthanacompententpersontocarryoutanyserviceorrepair
operation that involves the removal of a cover which gives protection against exposure to
microwave energy. There may be certain non-metallic utensils that are not safe to use for
microwaving.Ifindoubt,youcantesttheutensilinquestionfollowingtheprocedurebelow.
Utensil Test:
1 Fill a microwave-safe container with 1 cup of cold water (250ml) along with the utensil in
question.
2 Cookonmaximumpowerfor1minute.
3 Carefullyfeeltheutensil.Iftheemptyutensiliswarm,donotuseitformicrowavecooking.
4 Donotexceed1minutecookingtime.
Materials you can use in microwave oven
Utensils Remarks
Aluminumfoil:shieldingonly.
Smallsmoothpiecescanbeusedtocoverthinpartsofmeatorpoultrytopreventovercooking.
Arcingcanoccuriffoilistooclosetoovenwalls.Thefoilshouldbeatleast1inch(2.5cm)away
from oven walls.
Browningdish.
Followmanufacturer’sinstructions.Thebottomofbrowningdishmustbeatleast3/16inch

21
EN
(5mm)abovetheturntable.Incorrectusagemaycausetheturntabletobreak.
DinnerwareMicrowave-safeonly.
Followmanufacturer’sinstructions.Donotusecrackedorchippeddishes.
Glassjars.
Alwaysremovelid.Useonlytoheatfooduntiljustwarm.Mostglassjarsarenotheatresistant
andmaybreak.
GlasswareHeat-resistantovenglasswareonly.
Makesurethereisnometallictrim.Donotusecrackedorchippeddishes.
OvencookingFollowmanufacturer’sinstructions.Donotclosewithmetaltie.Makebagsslits
to allow steam to escape.
Paper plates.
useforshort–termcooking/warmingonly.Donotleaveovenunattendedandcupswhilecooking.
Paper towels.
Usetocoverfoodforreheatingandabsorbingfat.Usewithsupervisionforashort-termcooking
only.
Parchment.
Use as a cover to prevent splattering or a wrap for steaming.
Paper Plastic.
Microwave-safeonly. Follow the manufacturer’s instructions.Shouldbelabeled“Microwave
Safe”.Someplasticcontainerssoften,asthefoodinsidegetshot.“Boilingbags”andtightly
closedplasticbagsshouldbeslit,piercedorventedasdirectedbypackage.
Plasticwrap Microwave-safe only.Use tocover food duringcooking to retain moisture. Do
not allow plastic wrap to touch food.Thermometers Microwave-safe only (meat and candy
thermometers).
Wax paper.
Use as a cover to prevent splattering and retain moisture.
Materials to be avoided in microwave oven
Utensils Remarks
AluminumtrayMaycausearcing.Transferfoodintomicrowave-safedish.
Food cartonwithMaycausearcing.Transferfoodintomicrowave-safedish.
Metal handle.
Metalormetal-Metalshieldsthefoodfrommicrowaveenergy.Metaltrimmaytrimmedutensils
cause arcing.
Metal twist ties.
Maycausearcingandcouldcauseareintheoven.
22
EN
Paper bags.
Maycauseareintheoven.
Plastic foam.
Plasticfoammaymeltorcontaminatetheliquidinsidewhenexposedtohightemperature.
Wood.
Woodwilldryoutwhenusedinthemicrowaveovenandmaysplitorcrack.
SETTING UP YOUR OVEN
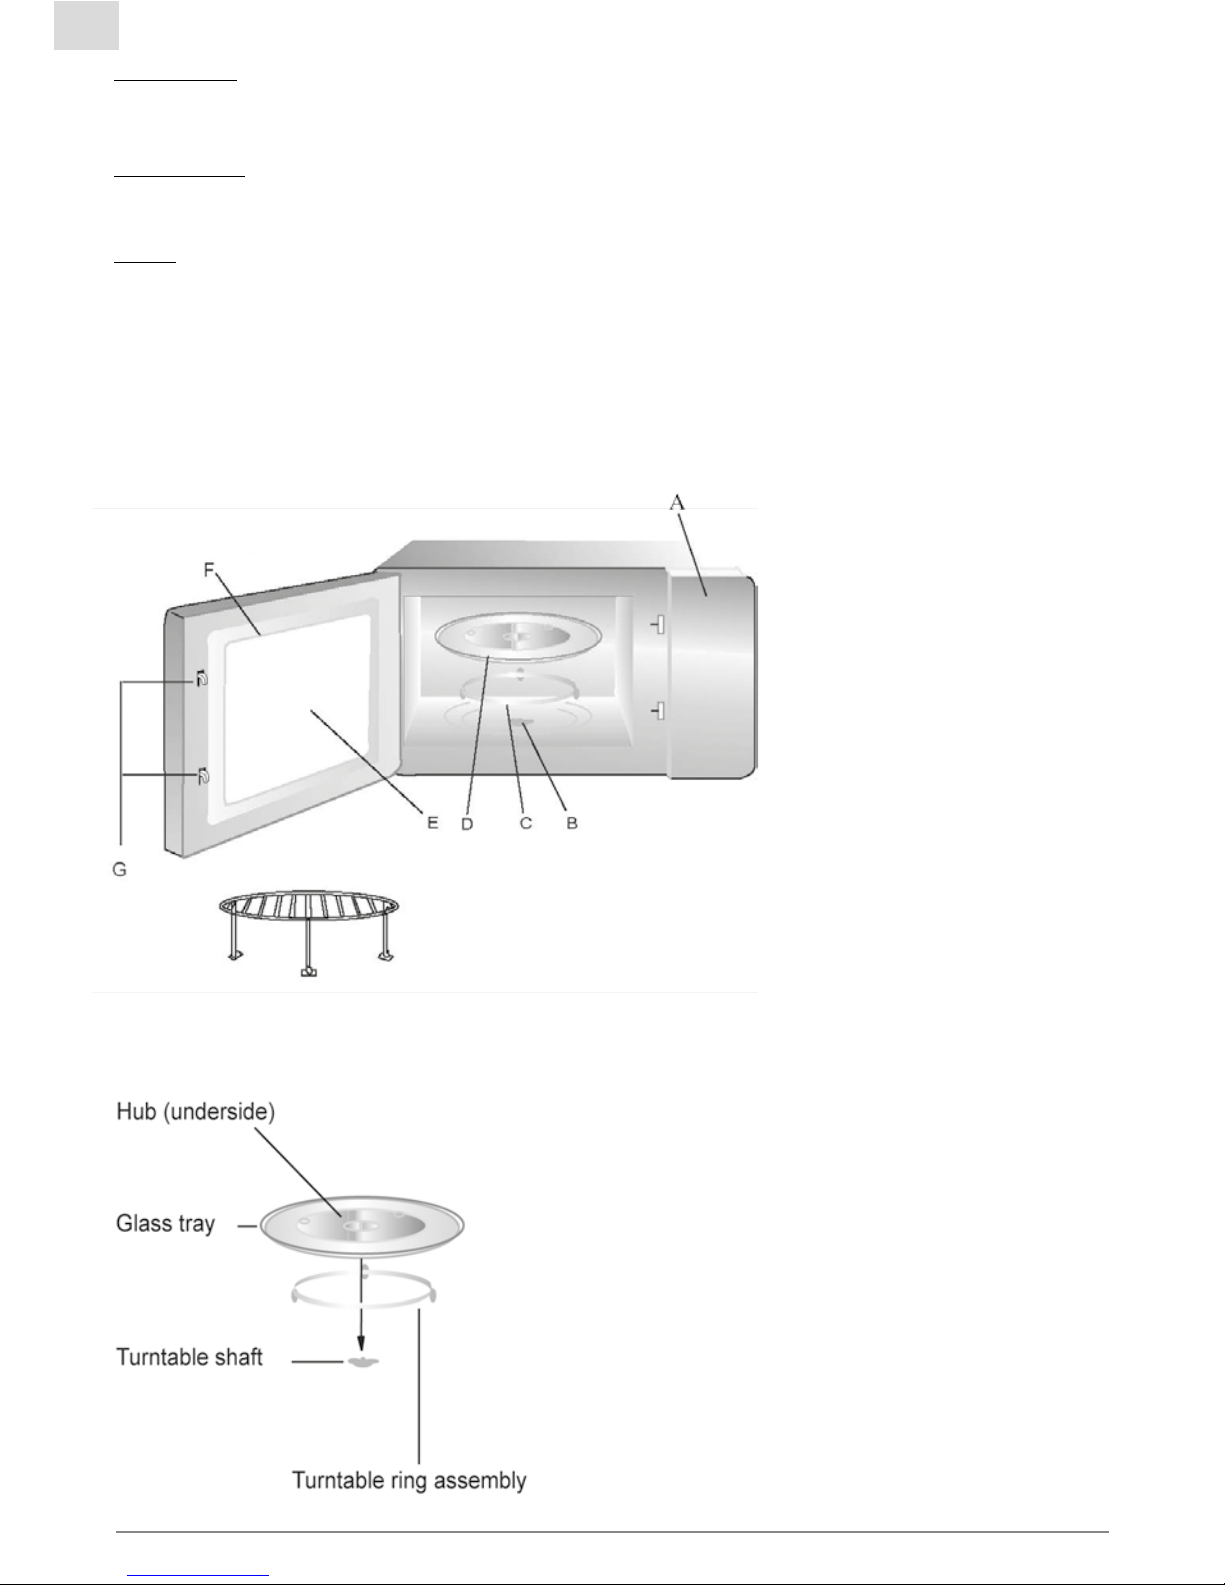
Names of Oven Parts and Accessories
Removetheovenandallmaterialsfromthecartonandovencavity.Yourovencomeswiththe
following accessories:
AControlpanel
B Turntable shaft
CTurntableringassembly
DGlasstray
EObservation window
FDoorassemby
Gsafetyinterlocksystem
1 Instruction manual
1GrillRack
(OnlyforGrillseries)
Turntable Installation
a.Neverplace the glass tray upsidedown.The
glasstrayshouldneverberestricted.
b.Bothglasstrayandturntableringassemblymust
alwaysbeusedduringcooking.
c.Allfoodandcontainersoffoodarealwaysplaced
ontheglasstrayforcooking.
d.Ifglasstrayorturntableringassemblycracksor
Turntableshaftbreaks,contactyour
nearest authorized service center.

23
EN
Installation and connection
1.Thisapplianceisonlyintendedfordomesticuse.
2.Thisovenisintendedforbuilt-inuseonly.Itisnotintendedforcounter-topuseorforuse
inside a cupboard.
3. Please observe the special installation instructions.
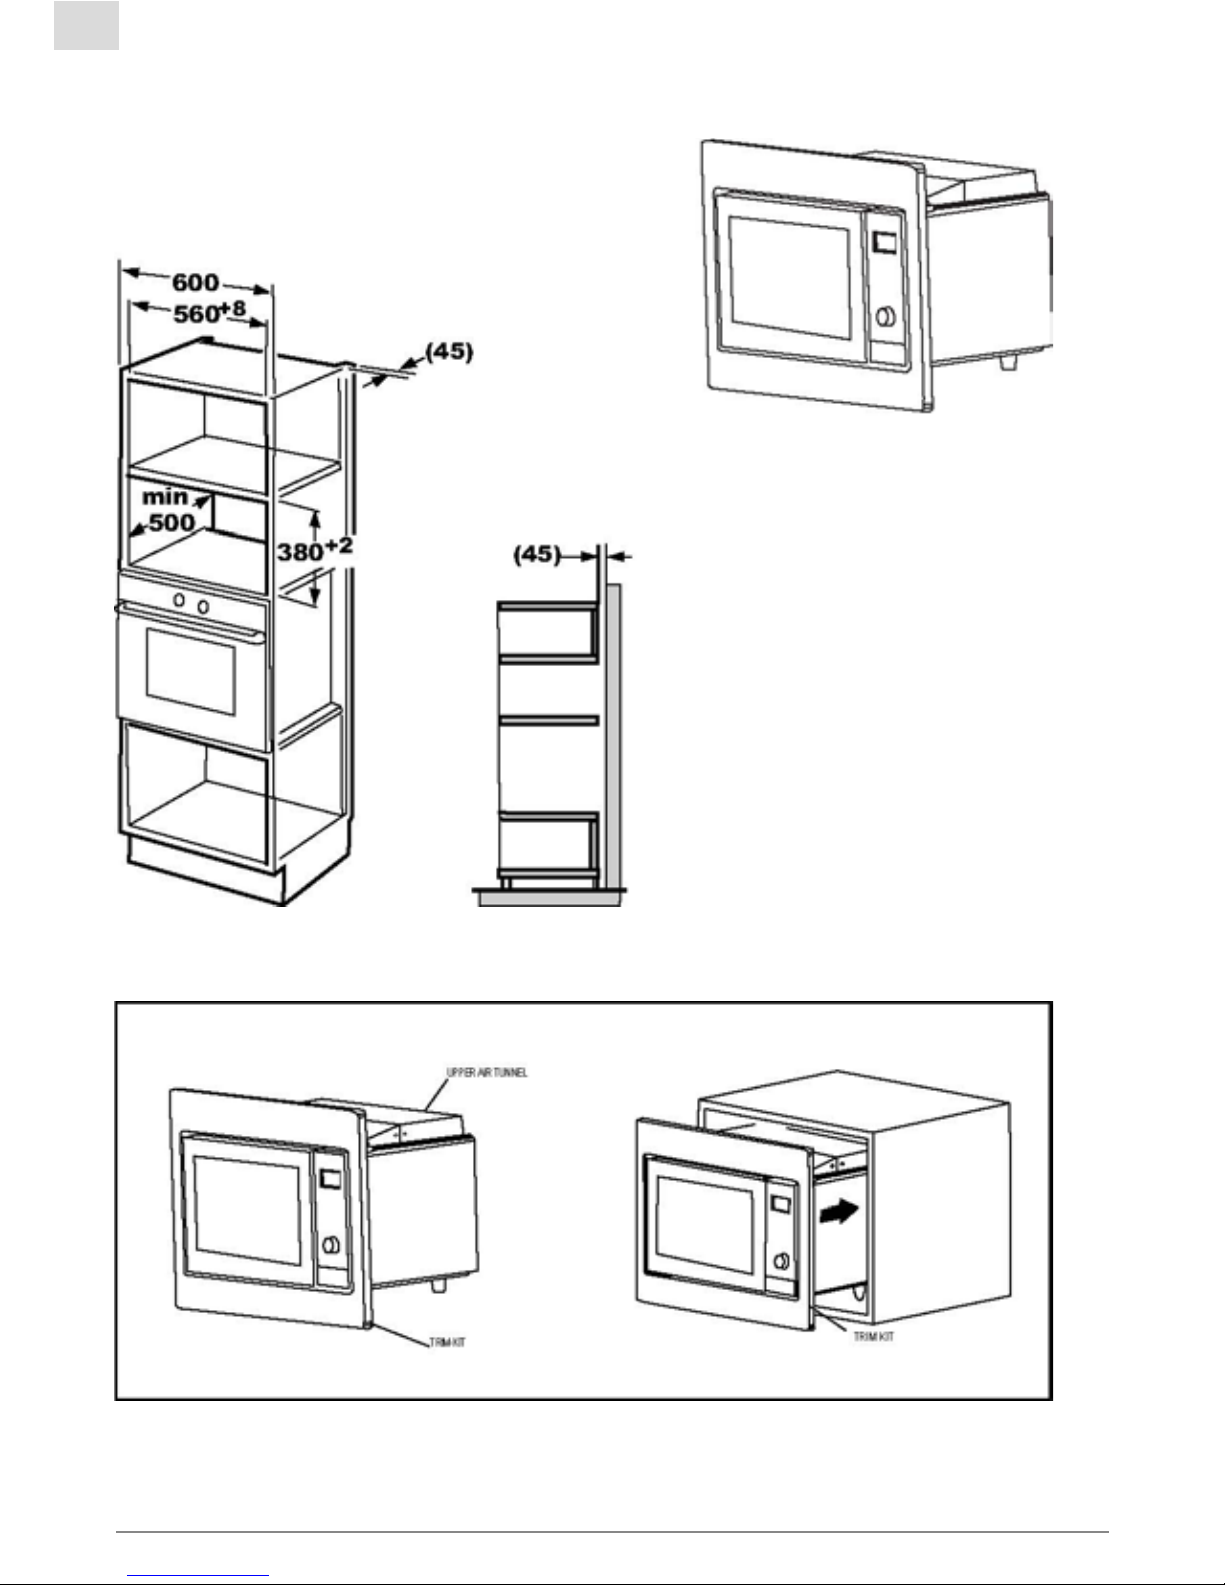
4. The appliance can be installed in a 60cm wide wall-mounted cupboard(at lease 55cm deep
and85cmofftheoor).
5.Theapplianceisttedwithaplugandmustonlybeconnectedtoaproperlyinstalled
earthedsocket.
6.Themainsvoltagemustcorrespondtothevoltagespeciedontheratingplate.
7.Thesocketmustbeinstalledandconnectingcablemustonlybereplacedbyaqualied
electrician.If the plug is no longer to accessible following installation,an all-pole disconnecting
device must be present on the installation side with a contact gap of at lease 3mm.
8.Adapters,multi-waystripsandextensionleadsmustnotbeused.Overloadingcanresultin
ariskofre.
Theaccessiblesurfacemaybehotduringoperation.
Installation Instructions
PleaseReadtheManualCarefullyBeforeInstallation
Please Note Electrical connection
The oven is tted with a plug and must be only connected to a properly installed earthed socket. In
accordancewiththeappropriateregulations,thesocketmustonlybeinstalledandtheconnectingcable
mustonlybereplacedbyaqualiedelectrician.
If the plug is no longer accessible following installation and all-pole isolating switch must be present on the
installation side with a contact gap of at least 3mm.
24
EN
A. Built-in furniture
The built-in cabinet shall not have a rear wall behind the appliance. Minimum installation height is 85cm. Do
notcoverventilationslotsandairintakepoints.
B. Install the Oven
1 •Donottraporkinkthepowercord.
• Makesurethattheovenisinstalledinthecenterofthecabinet.
25
EN
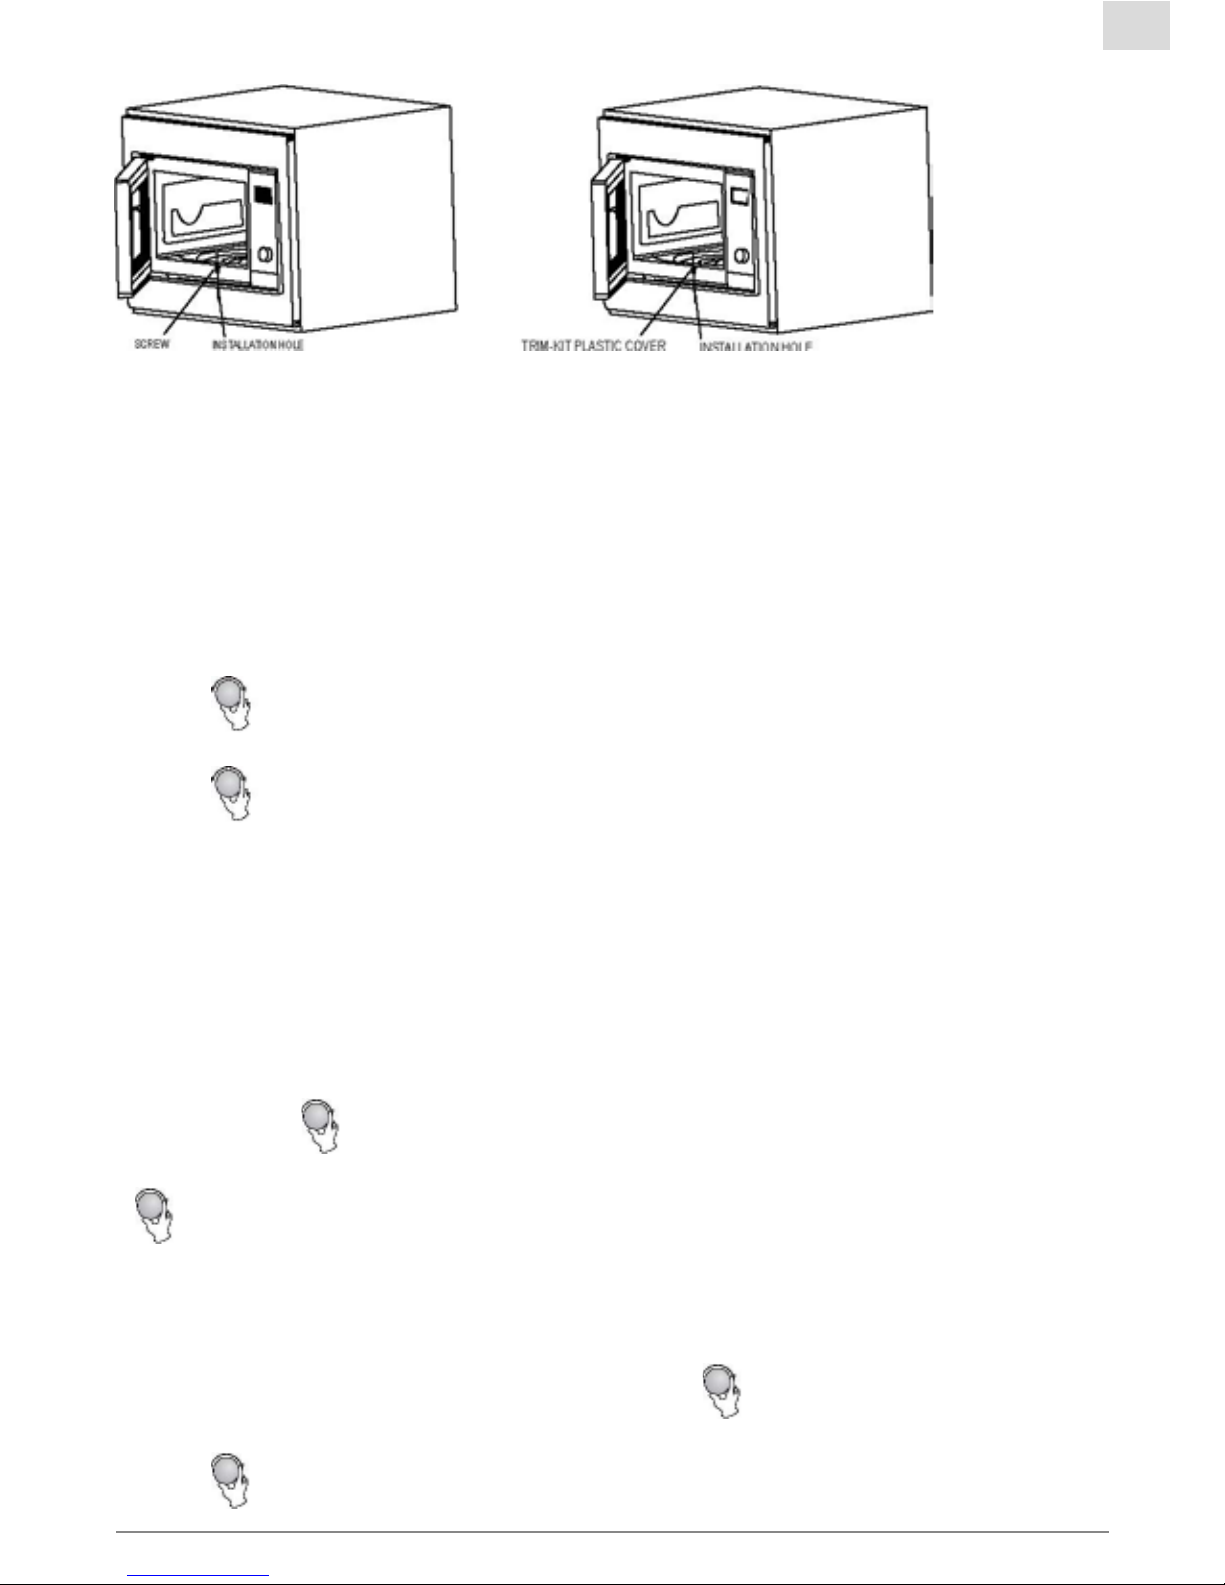
2 Openthedoor;xtheoventothecabinetwithSCREWattheINSTALLATIONHOLE
ofTRIMKIT.ThenxtheTRIM-KITPLASTICCOVERtotheINSTALLATIONHOLE.
Operation Instructions
1. Clock Setting
Whenthemicrowaveoveniselectried,theLEDwilldisplay“0:00”,buzzerwillringonce.
1)Press“CLOCK“,thehourgureswillash.
2)Turn“ “toadjustthehourgures,theinputtimeshouldbewithin0--23.
3)Press“CLOCK“,theminutegureswillash.
4)Turn“ “toadjusttheminutegures,theinputtimeshouldbewithin0--59.
5)Press“CLOCK“tonishclocksetting.“:”willash,andthetimewilllight.
Note:
1)Iftheclockisnotset,itwouldnotfunctionwhenpowered.
2)Duringtheprocessofclocksetting,ifyoupress“STOP/CLEAR“,theovenwillgobackto
thepreviousstatusautomatically.
2. Microwave Cooking.
Press“MICRO./GRILL/COMBI.“theLEDwilldisplay“P100.Press“MICRO./GRILL/COMBI.“
fortimesorturn“ “tochoosethepoweryouwant,and“P100”,“P80”“P50”,“P30”or“P10”
willdisplayforeachaddedpress.Thenpress”START“toconrm,andturn
“ “tosetcookingtimefrom0:05to95:00.Press“START“againtostartcooking.
Example:Ifyouwanttouse80%microwavepowertocookfor20minutes,youcanoperatethe
oven as the following steps.
1)Press“MICRO./GRILL/COMBI.“once,thescreendisplay“P100”.
2)Press“MICRO./GRILL/COMBI.“onceagainorturn“ “tochoose80%microwavepower.
3)Press“START“toconrm,andthescreendisplays“P80”.
4)Turn“ “toadjustthecookingtimeuntiltheovendisplays“20:00”.

26
EN
5)Press“START“tostartcooking.Note:thestepquantitiesfortheadjustmenttimeofthe
coding switch are as follow: 0---1 min: 5 seconds 1---5 min: 10 seconds 5---10 min: 30
seconds 10---30 min: 1 minute 30---95 min: 5 minutes
Order Display “MICRO./GRILL/COMBI.”
Pad instructions
Microwave
Power
Grill
Power
1 P100 100%
2 P80 80%
3 P50 50%
4 P30 30%
5 P10 10%
6 G 0% 100%
7 C-1 55% 45%
8C-2 36% 64%
3. Grill or Combi.
CookingPress“MICRO./GRILL/COMBI.“once,theLEDwilldisplay“P100”,andpress
“MICRO./GRILL/COMBI.“fortimesorturnthe“ “tochoosethepoweryouwant,and
“G”,”C-1”or“C-2”willdisplayforeachaddedpress.Thenpress“START“toconrm,andturn
“ “tosetcookingtimefrom0:05to95:00.Press“START“againtostartcooking.
Example:Ifyouwanttouse55%microwavepowerand45%grillpower(C-1)tocookfor10
minutes,youcanoperatetheovenasthefollowingsteps.
1)Press“MICRO./GRILL/COMBI.“once,thescreendisplay“P100”.
2)Press“MICRO./GRILL/COMBI.“onceagainorturn“ “tochoosecombi.1mode.
3)Press“START“toconrm,andthescreendisplays“C-1”.
4)Turn“ “toadjustthecookingtimeuntiltheovendisplays“10:00”.
5)Press“START“tostartcooking.
Note: If half the grill time passes, the oven sounds twice, and this is normal. In order to have
abettereffectofgrillingfood,youshouldturnthefoodover,closethedoor,andthenifno
operationtheovenwillcontinuecooking.
4. Kitchen Timer
1)Press“KITCHENTIMER“,LEDwilldisplay0:00,clockindicatorwillbelighted.
2)Turn“ “toenterthetimertime.(themaximumcookingtimeis95minutes).
3)Press“START“toconrmsetting.
4)Whenthekitchentimeisreached,clockindicatorwillgoout.Thebuzzerwillring5
times.Iftheclockbeset(12-hoursystem),LEDwilldisplaythecurrenttime.

27
EN
Note:ThekitchenTimeisdifferfrom12-hoursystem,KitchenTimerisatimer.
5. Speedy Cooking
1)Inwaitingstate,Press“START“tostartcookingwith100%powerfor30seconds,each
addedpresswillincrease30secondscookingtimeupto95minutes.
2)Inmicrowavecookingortimedefroststate,eachpressof“START“canincrease30
secondscookingtime.
3)Underthestateofautomenuandweightdefrost,cookingtimecannotbeincreasedby
pressing“START”.
6. Defrost By Weight
1)Press“WEIGHTDEFROST“once,andtheovenwilldisplay“dEF1”.
2)Turn“ “toselecttheweightoffoodfrom100to2000g.
3)Press“START“tostartdefrosting.
7. Defrost By Time
1)Press“TIMEDEFROST“once,andtheovenwilldisplay“dEF2”.
2)Turn“ “toselectthedefrosttime.TheMAX.timeis95minutes.
3)Press“START“tostartdefrosting.ThedefrostpowerisP30.Itcannotchange.
8. Auto Reheat
1)Press“AUTOREHEAT“once,andtheLEDwilldisplay“200”.
2)Press“AUTOREHEAT“moretimesorturn“ “tochoosetheweightoffood,and“400”
or“600”gwillbeselected.
3)Press“START“tostartcooking.
9. Auto Menu
1)Press“AUTOMENU”severaltimesorturn“ “tochoosethemenu,and“A-1”to“A-8”will
display,whichmeanspizza,chickenpieces,meat,vegetable,sh,pasta,soupandpotato.
2)Press“START“toconrm.
3)Turn“ “tochoosethedefaultweightasthemenuchart.
4)Press“START“tostartcooking.
Example:Ifyouwanttouse“AutoMenu”tocookshfor350g.
1)Press“AUTOMENU”severaltimestill“A-5”display.
2)Press“START“toconrm.
3)Turn“ “toselecttheweightofshtill“350”display.
4)Press“START“tostartcooking.

28
EN
The menu chart:
Menu Weight Display
A-1
Pizza
200 g 200
400 g 400
A-2
Chicken Pieces
200 g 200
400 g 400
600 g 600
800g 800
A-3
Meat
250 g 250
350 g 350
450 g 450
A-4
Vegetable
200 g 200
300 g 300
400 g 400
A-5
Fish
250 g 250
350 g 350
450 g 450
A-6
Pasta
50g(with 450 ml cold water) 50
100g(with 800 ml cold water) 100
A-7
Soup
200 ml 200
400 ml 400
A-8
Potato
200 g 200
400 g 400
600 g 600
10. Program set in Advance
1)Settheclockrst.(Consulttheinstructionofclocksetting.)
2)Inputthecookingprogram.Twostagescanbesetatmost.Defrostshouldnotbesetas
thecookingprogram.
Example:Ifyouwanttocookfoodwith80%microwavepowerfor7minutes.
a.Press“MICRO./GRILL/COMBI.“twice,thescreendisplay“P80”.
b.Press“ START“toconrm.
c.Turn“ “toadjustthecookingtimetilltheovendisplays“7:00”.
d.Pleasedonotpress“START“tostartcooking.Doasfollowing.
3)Press“PRE-SET“,thehourgureswillash.
4)Turn“ “toadjustthehourgures,theinputtimeshouldbewithin0--23.
5)Press“PRE-SET“,theminutegureswillash.
6)Turn“ “toadjusttheminutegures,theinputtimeshouldbewithin0--59.
7)Press“START“tonishsetting.Ifthedoorisclosed,buzzerwillringtwicewhenthetime
arrives,thencookingwillstartautomatically.

29
EN
11. Multi-section cooking
Atmost2sectionscanbesetforcooking.Inmulti-sectioncooking,ifonesectionisdefrosting,
thendefrostingshallbeplacedintherstsection.Example:Ifyouwanttodefrostfoodfor5
minutesandthencookwith80%microwavepowerfor7minutes,operateitasthefollowing:
1)Press“TIMEDEFROST”once,andtheovenwilldisplay“dEF2”.
2)Turn“ “toselectthedefrosttimetill“5:00”display.
3)Press“MICRO./GRILL/COMBI.“once,thescreendisplay“P100”.
4)Press“MICRO./GRILL/COMBI.“onceagainorturn“ “tochoose80%microwavepower.
5)Press“START“toconrm,andthescreendisplays“P80”.
6)Turn“ “toadjustthecookingtimetilltheovendisplays“7:00”.
7)Press“START“tostartcooking,andbuzzerwillsoundoncefortherstsection,defrosting
timecountsdown;buzzerwillsoundonceagainenteringthesecondcooking.when
cookingnish,buzzersoundsvetimes.
12. Inquiring Function
1)Instatesofmicrowave,grillorcombinationcooking,press“MICRO./GRILL/COMBI.“,
thecurrentpowerwillbedisplayedfor3seconds.After3seconds,theovenwillturn
backtotheformerstate.
2)Incookingstate,press“CLOCK“toinquirethetimeandthetimewilldisplayfor3seconds.
3)Inpresetstate,press“PRE-SET“toinquirethepresettime,andthepresettimewill
displayfor3seconds.
13. Lock-out Function for Children Lock:
Inwaiting state, press “ STOP/CLEAR“ for 3 seconds, there will be a long beep denoting
enteringthechildren-lockstateandthelockedindicatorwilldisplay.Thecurrenttimewilldisplay
ifthetimehasbeenset,otherwise,theLEDwilldisplay“
Lockquitting:Inlockedstate,press“STOP/CLEAR“for3seconds,therewillbealong“beep”
denotingthatthelockisreleased.

30
EN
Trouble shooting

31
EN
Itisforbiddentoruntheunitwithoutanyfoodinside.Itisverydangerous.
According to Waste of Electrical and Electronic Equipment (WEEE)
directive,WEEEshouldbeseparatelycollectedandtreated.Ifatany
timeinfutureyouneedtodisposeofthisproductpleasedoNOTdispose
of this product with household waste. Please send this product to WEEE
collecting points where available.

Foster S.p.A.
via M.S. Ottone, 18/20 – 42041 Brescello (RE) – Italy
Servizio ricambi: tel. + 39 0522-684300, fax + 39 0522-684300
This manual suits for next models
2
Table of contents
Other Foster Microwave Oven manuals


Popular Microwave Oven manuals by other brands


Whirlpool
Whirlpool MWP 253 Instructions for use

Panasonic
Panasonic NNS244WL - MICROWAVE 2.0 C/OTR Service manual

Electrolux
Electrolux EI30MO45GS - 30" Microwave installation instructions

Clatronic
Clatronic MWG 788 H instruction manual

Smith & Noble
Smith & Noble SNAMW30 instruction manual

Stirling
Stirling D80D20EL-Y4 instruction manual