Foxpro Scorpion X1A User manual


2
Important Information
FOXPRO
®
’s goal is to provide our customers with the highest quality products in the
industry. We take great pride in manu acturing our products in the USA. Please do not
hesitate to contact us or assistance, comments or questions.
FOXPRO
®
Inc.
14 Fox Hollow Drive
Lewistown, PA 17044
(717) 248-2507
Fax: (717) 247-3594
Hours of Operation
Monday – Friday
8AM – 5PM EST
Contact Us
Customer Service: (717) 248-2507
Toll Free Orders Only: 866-463-6977
eneral Inquiry E-mail: sales@go oxpro.com
Stay up to date with the latest sounds by visiting our online sound library. Watch or
new products and upgrades rom FOXPRO
®
. Visit us online:
www.gofoxpro.com
This manual, the animal sounds stored in your caller, and animal sounds purchased from
FOXPRO® Inc. for installation in your caller is protected by copyright.
Publication Date: April 11, 2014
Copyright ©℗ 2014 by FOXPRO® Inc.
REV2

3
Table of Contents
1. Introduction ................................................................................................ 5
1-1 What’s in the Box? .............................................................................. 5
1-2 Scorpion X1A: First Glance .................................................................. 5
1-3 Scorpion X1A: Requirements .............................................................. 6
1-4 TX200 Remote: First Glance ................................................................ 7
1-5 TX200 Remote: Requirements ............................................................ 7
1-6 TX200 Remote: Understanding the Display ........................................ 8
2. Quick Start Guide ........................................................................................ 8
2-1 Playing Sounds .................................................................................... 8
2-2 Using Presets ....................................................................................... 9
3. Auxiliary Jack Function ................................................................................ 9
4. Using External Speakers ............................................................................ 10
4-1 Connecting an External Speaker ....................................................... 10
4-2 Connecting two External Speakers .................................................... 11
4-3 External Speaker Control ................................................................... 11
5. Scorpion X1A Con igurations .................................................................... 12
5-1 Mono/Stereo Selector............................................................................. 12
5-2 Normal (Repeat)/Jukebox Mode ............................................................. 13
5-3 Internal Speaker Selector ........................................................................ 14
5-4 Radio Channel ......................................................................................... 14
5-5 About the Internal Memory .................................................................... 15
6. Batteries & Recharging ............................................................................. 15
6-1 Installing Batteries .................................................................................. 15
6-2 Using Rechargeable Batteries ................................................................. 16
7. TX200 Detailed In ormation ...................................................................... 17

4
7-1 Recall ....................................................................................................... 17
7-2 AUX .......................................................................................................... 18
7-3 Mute ........................................................................................................ 18
7-4 Volume Up and Down ............................................................................. 18
7-5 Large Text Mode ..................................................................................... 18
7-7 Timer ....................................................................................................... 19
7-8 Battery Monitor ...................................................................................... 19
7-9 Inverted Display / Night Mode ................................................................ 19
7-10 Presets ................................................................................................... 19
8. Programming the Scorpion X1A ................................................................ 19
8-1 Getting New Sounds .......................................................................... 20
8-2 Programming the Scorpion X1A (Windows PC’s) .............................. 20
8-3 Trans erring a New Playlist to the TX200 .......................................... 21
9. Product Care & Maintenance.................................................................... 22
10. Troubleshooting ........................................................................................ 23
11. Maximizing Remote Range ....................................................................... 24
12. FCC & IC In ormation................................................................................. 25
13. Warranty Statement ................................................................................. 26

5
1. Introduction
Congratulations on the purchase o the FOXPRO Scorpion X1A digital wildli e caller! Please take
time to read and understand the in ormation in this instruction manual. This will ensure that
you receive the maximum bene it rom your new FOXPRO
Scorpion X1A.
WARNIN : To avoid personal injury and product damage, read all operating
instructions and sa ety precautions in this guide be ore using the FOXPRO
Scorpion X1A digital game call system. A digital copy o this ile can be
downloaded rom:
http://www.go oxpro.com/resources/manuals/FOXPRO_Scorpion X1A.pd
1-1 What’s in the Box?
Included in the box, you should ind the ollowing items:
1. Scorpion X1A digital game call
2. TX200 transmitter
3. Operators manual
4. Warranty registration
1-2 Scorpion X1A: First lance
The graphic on the next page depicts the Scorpion X1A. Certain aspects o the Scorpion X1A are
marked with a number that corresponds to the chart below de ining that particular element.
Number Description
1 Rugged injection molded ABS housing
2 Pilot lamp / low battery indicator
3 Charge jack
4 External speaker jacks
5 Auxiliary device jack

6
1-3 Scorpion X1A: Requirements
The Scorpion X1A digital game call is shipped without batteries. It requires 8 ‘AA’ batteries.
FOXPRO recommends the use o high capacity rechargeable NiMH batteries or the best
per ormance.
Installing Batteries in the Scorpion X1A
1. Access the battery holder by unlocking the latches on the ront o the Scorpion X1A.
2. With the latches unlocked, li t the top o the housing to ully open. Locate the black
plastic battery holder.
3. Li t the battery holder out rom its current position and disconnect the red and black
power wire.
4. The battery holder eatures cavities or the 8 ‘AA’ batteries ( our on each side).
5. Place the batteries into each battery cavity while observing polarity as indicated.
6. Place the battery tray back to its original position and secure the red and black power
wire.
7. Close the Scorpion and secure the latches.
Scorpion X1A Overview. See corresponding chart on previous page.

7
1-4 TX200 Remote: First lance
The ollowing chart corresponds to the graphic on the right that depicts the TX200 transmitter.
Number Description
1 Power switch
2 Battery door
3 Selector knob
4 Display screen
5 4 Preset Buttons
6 Lanyard loop
1-5 TX200 Remote: Requirements
The TX200 transmitter operates on a single 9V battery. It is recommended that you use a high
quality alkaline battery.
Installing the Battery in the TX200 Remote
1. Access the battery compartment by removing the door rom the back o the remote.
The door slides down and o o the remote.
2. Attach the 9V battery to the power wire in the back o the remote.
3. Slide the battery compartment door back on the remote.

8
1-6 TX200 Remote: Understanding the Display
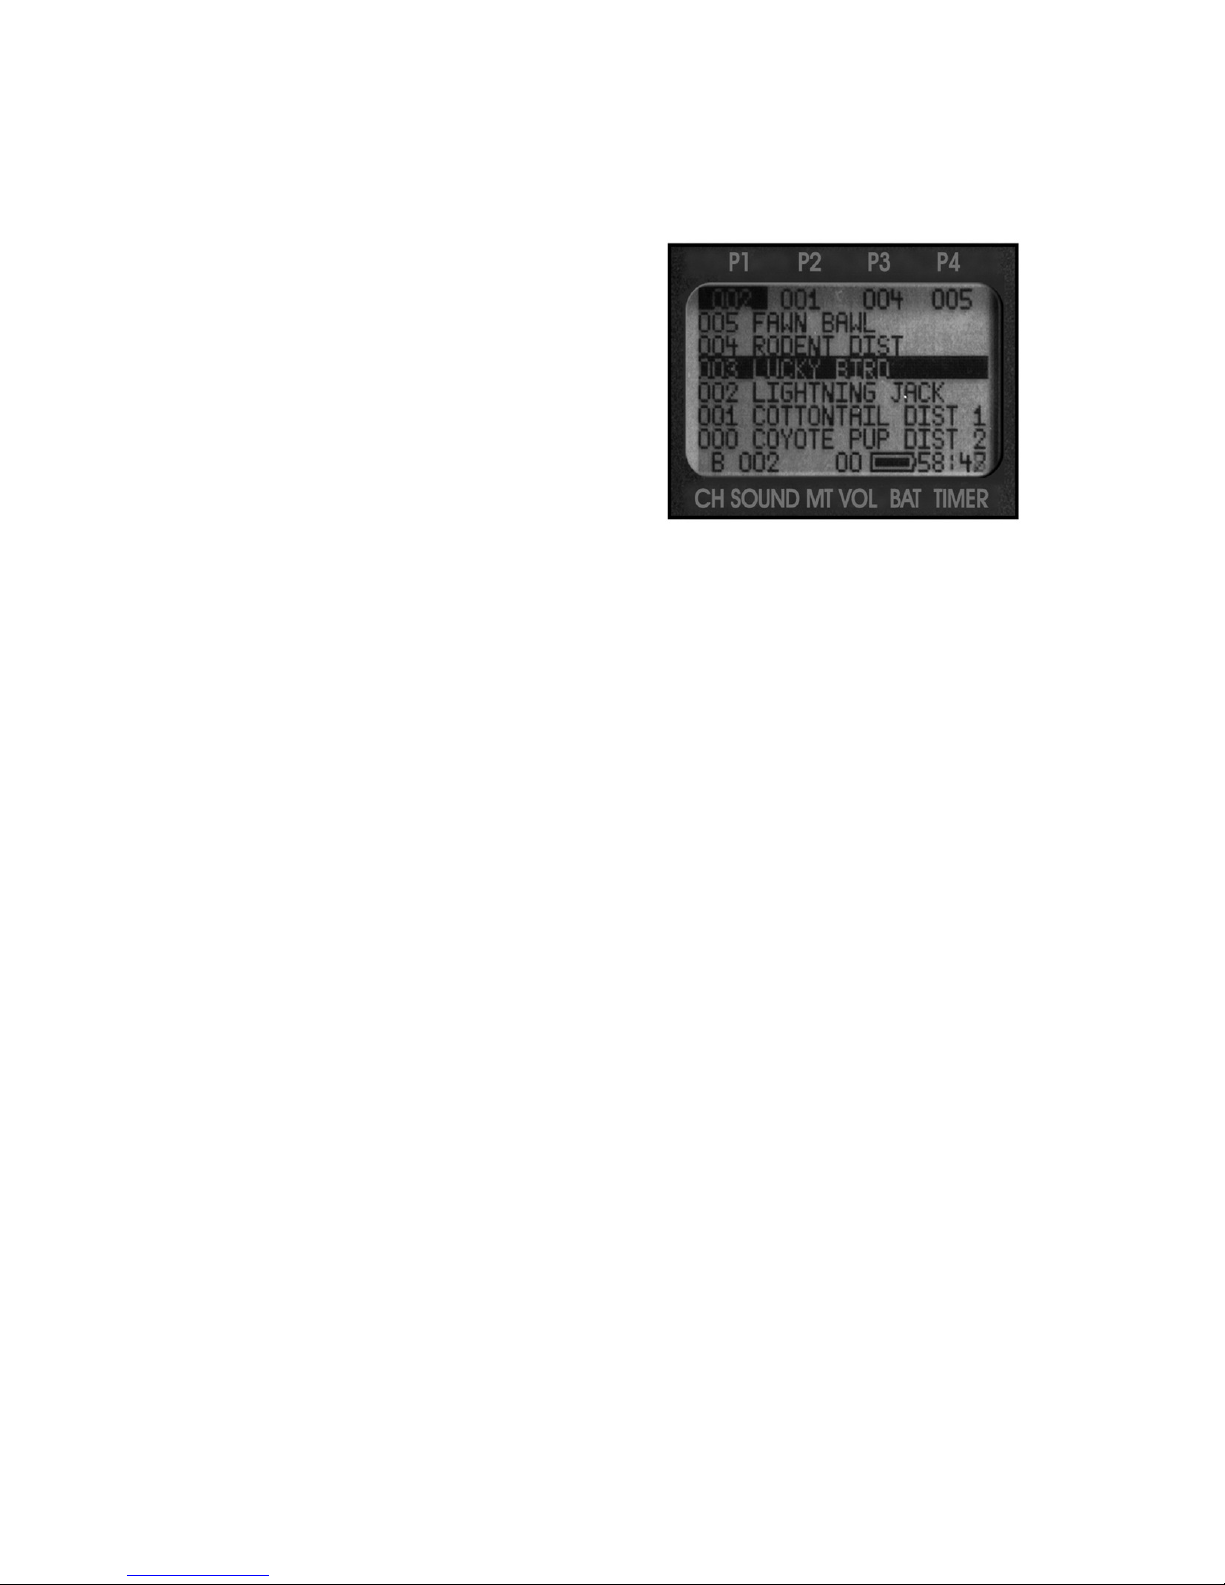
A ter you have turned on the TX200 transmitter, the display illuminates, showing the playlist
(six sounds at a time) along with other details (see the image to the right). The screen layout is
described rom top to bottom: the top status line contains the preset indicators (P1, P2, P3, and
P4) that indicate what sounds are set to the
corresponding presets. I no preset is set, they will
show all zeros. The 6 middle lines show the 6
sounds listed on that particular page. The bottom
line shows the channel o operation (A, B, or C),
current sound selection, mute status (M when
muted), volume level (00 – 40), battery meter, and
elapsed timer.
2. Quick Start uide
We realize that some o you may wish to jump directly into basic operations, such as playing
sounds and using presets. This is a very brie overview and it is strongly recommended that you
read this manual in its entirety to ully understand all capabilities o the system.
2-1Playing Sounds
1. Turn on the TX200 transmitter by placing the power switch into the “ON” position.
2. The Scorpion X1A is turned on by the TX200 transmitter. To do this, hold down the
AUX button on the TX200 or about 3-4 seconds. Observe the green LED on the
Scorpion illuminate, indicating that the power is on.
3. Use the selector knob on the TX200 to cycle through the sound list. Observe the black
horizontal bar moving up and down the screen as you turn the selector knob. When
scrolling through the sounds, the playlist will change by the page.
4. A ter highlighting a sound you wish to play, press down on the selector knob a single
time. This action transmits a radio signal to the Scorpion X1A telling it to begin
playback o the selected sound.
5. Raise your volume level by pressing the volume up button. To rapidly ramp your
volume, press and hold the volume up button. There are a total o 40 volume steps to
choose rom.
6. I you wish to mute or pause the sound, simply push the mute button a single time. To
make the sound play again, push the mute button once more. When the mute
unction is active, the letter “M” will appear on the bottom status line o the TX200.
7. To switch sounds, ollow the instructions rom steps 3 and 4.
8. To turn o the Scorpion, press and hold the mute button or 4-5 seconds. A message
will appear displaying “O command sent.” As soon you as see the message, release
the mute button and the Scorpion will turn o .
9. To turn o the TX200, move the power switch into the “o ” position.

9
IMPORTANT NOTE
I you do not plan to use the Scorpion X1A or a period o time, make sure that you
disconnect and remove the battery holder. If batteries are left inside the Scorpion
for a period of time, they can leak and cause damage that is not covered by the
warranty!
2-2 Using Presets
Four preset buttons are provided so that you can program requently used sounds along with a
volume level or immediate recall. The stored sound number o these presets is shown on the
top status line o the TX200 display—the associated volume is not displayed. To switch instantly
to any o these presets, simply press and release the appropriate button (P1, P2, P3, or P4)
during regular operation. I mute is active (the mute status indicator will display an “M”), the
preset sound will not play until the mute is deactivated.
To Program the Presets:
1. Press and hold the P1 button or 3-4 seconds until the stop status line displays, “SEL
SND/VOL PRESS P1.”
2. Use the selector knob to highlight the sound you want set as the preset P1.
3. Use the volume adjustment knobs to set the desired volume level.
4. Press and release the P1 button. This will store the selected sound and volume level in
the P1 position and the sound number will appear in the P1 position indicator on the
top status line.
5. Repeat steps 1-4 or the remaining presets.
IMPORTANT NOTES
The presets must be reprogrammed each time a new playlist is downloaded into
the TX200. Any selected preset will be highlighted on the top status line. Presets
are not available in channel “A” operation. Preset buttons can be changed as o ten
as you like.
3. Auxiliary Jack Function
The Scorpion X1A is equipped with an auxiliary jack labeled “AUX”. The purpose o this jack is to
allow or the connection o certain external devices, such as the FOXPRO® Black Jack or Jack-
Attack decoy and to be able to turn these on and o with the TX200 transmitter. However,
there are some strict electrical limits involved with this jack. I these limits are exceeded,
damage to your Scorpion X1A will result. This damage is not covered by the warranty.
The electrically inclined will want to know that the jack is connected to the drain o an internal
Field E ect Transistor with a maximum current rating o 100mA. The “tip” polarity o the 3.5mm
jack is positive, while the sleeve is negative. I the external device is connected with the polarity

10
reversed, an internal protection diode within the FET will conduct, causing the device to stay on
constantly. The maximum voltage applied to this jack must never exceed 15 volts. Typical uses
or this jack would be to control the FOXPRO Black Jack or Jack-Attack Decoy, or to start and
stop a video recorder. Instructions on connecting various devices to the “AUX” jack are beyond
the scope o this manual. You are urged to seek help rom a knowledgeable pro essional be ore
connecting any unapproved device to this jack. Remember that damage to your Scorpion X1A
caused by improper use o the “AUX” jack is not covered by the warranty, nor will FOXPRO be
liable or damage to any device connected to this jack.
4. Using External Speakers
The Scorpion X1A is equipped with two External Speaker Jacks, which allows you to connect up
to two additional speakers. The internal Mylar cone speaker per orms admirably; however, you
may encounter situations that require higher sound levels. By connecting a larger external
speaker(s) to the Scorpion X1A, the volume level can be increased signi icantly. The external
speaker jacks on your Scorpion X1A accept a standard 3.5mm plug. When choosing an external
speaker it is recommended to use one with an impedance rating o 8Ω.
4-1Connecting an External Speaker
Make sure that the Scorpion X1A is turned o be ore connecting an external speaker. Plug the
connector o the external speaker into one o the two external speaker jacks (see image below).
Connecting an external speaker to the Scorpion X1A does not automatically disconnect the
internal speaker. You may want to let it play, although battery li e will be better i you disable
the internal speaker. I you wish to have only the external speaker(s) produce sound, per orm
the ollowing steps.

11
Disabling the Internal Speaker
1. Locate the internal speaker selector jumper on the PC board (see image below).
2. Move the jumper to the “OFF” position.
Internal Speaker Selector jumper configurations.
4-2Connecting two External Speakers
To connect 2 external speakers, plug the connectors o the external speakers into the provided
external speaker jacks “A” and “B.” With 2 speakers connected and the internal speaker
selector set to “ON”, the internal and both external speakers will play simultaneously. The
internal speaker and external speaker “A” are connected to the same channel. When you turn
o speaker “A” with the TX200, they are both turned o . By setting the internal speaker
selector to “OFF”, you will have the ability to turn the external speakers “ON” and “OFF” as you
wish.
4-3External Speaker Control
The Scorpion X1A has the ability to control the external speakers with the TX200 transmitter.
With the remote, you are able to turn the speakers o and on. This can give you a huge
advantage when you are playing a stereo audio ile where you can turn o one o the speakers
there ore turning o one o the channels o the audio ile.
Turning off External Speaker Jacks:
1. Enter the Speaker Control Mode by
simultaneously pressing the AUX and
P2 buttons on the TX200 transmitter.
The screen will look like the image to
the right.
2. The image to the right shows that
both speaker A and B are turned on.
To turn o A, push the P2 button. To
turn on speaker A, push the P1
button.
3. To turn o speaker B, push the P4 button. To turn on speaker B, push the P3 button.
4. To exit the external speaker control screen, push the AUX button a single time.

12
5. Scorpion X1A Configurations
The ollowing image shows the inside o the Scorpion X1A. There are several con iguration
settings that you can modi y by repositioning the jumper associated with each con igurable
element.
5-1 Mono/Stereo Selector
The actory de ault mono mode is best or most situations. This mode combines both right (A)
and le t (B) audio channels and delivers the combined sounds to the internal speaker and both
external speakers. Mono mode should be selected i no external speakers are connected. I you
are using an external speaker(s) and intend to silence the speaker separately, then stereo mode
must be used.

13
Configuring Stereo/Mono Modes
1. Make sure the Scorpion X1A is turned o .
2. Locate the mono/stereo selector jumper. Take note that the jumper has two available
positions. By de ault, the jumper will be in the mono position.
3. To set it to stereo, move the jumper down one pin. To set it to mono, place the
jumper across the top two pins. Re er to the image above or re erence.
Although most calling sounds are recorded in mono, some interesting scenarios are possible i
you have the means to record your own stereo sounds. For instance, you could record a lost
sheep on the right channel and a snarling coyote on the le t channel. By connecting an external
speaker to the Scorpion you could have the sheep sound coming rom the internal speaker and
the coyote sound coming rom the external speaker. This would give the impression that two
physically separate animals were involved. In addition, your Scorpion will allow you to silence
either o the speakers, that is, the sheep or the coyote, independently (see External Speaker
Control in chapter 4).
5-2 Normal (Repeat)/Jukebox Mode
In actory de ault operation, the Scorpion X1A is con igured to repeat mode, where the selected
sound plays in a continuous sound loop. There is a second mode called jukebox mode that will
enable the Scorpion X1A to play sounds sequentially. Jukebox mode is ideal or those who elect
to download and play conventional MP3 music iles.

14
Configuring Play Modes:
1. Make sure that the Scorpion is turned o .
2. Unlock the two latches on the ront and li t up the lid to ully open the Scorpion.
3. Locate the mode selection con iguration pins inside the Scorpion. Re er to the image
above to set the con iguration. Pins 2 and 3 set the con iguration or the actory
de ault repeat mode. Pins 3 and 4 set the con iguration or jukebox mode.
4. Close the lid and proceed with operation.
5-3 Internal Speaker Selector
Please re er to Section 4-1 or more in ormation on con iguring the internal speaker.
5-4 Radio Channel
The de ault radio channel or the Scorpion is “B.” Channel “C” is also available or operation o
the Scorpion i both the Scorpion and TX200 transmitter are con igured to that channel.
Changing the Radio Channel:
1. Make sure that the Scorpion is turned o .
2. Unlock the two latches on the ront and li t up the lid to ully open the Scorpion.
3. Locate the channel selection con iguration pins. Re er to the image above to set the
con iguration. Pins 1 and 2 set operation or channel “B” and pins 2 and 3 set
operation or channel “C”.
4. Turn on the TX200 transmitter.
5. Simultaneously depress the P3 and P4 buttons. This allows you to toggle between
radio channels “A”, “B”, and “C”. The TX200 will not operate the Scorpion on channel
“A”.

15
5-5 About the Internal Memory
The micro SD memory storage card was chosen or use in your Scorpion because o the severe
size constraints we had to work with in developing a high per ormance caller contained in such
a small package. Although this card has enormous memory depth and has a proven track record
o reliability, it’s somewhat more vulnerable to mishandling than the physically larger Compact
Flash cards. The vast majority o users will never have any need to change or replace this
device. Since the Trans-Flash card and its holder are very small and delicate, please be certain
that you have a legitimate reason to do so be ore you attempt to remove this card. Not only is
the holder easily broken by large ingers un amiliar with these cards, the card itsel is vulnerable
to irreparable damage rom static electricity while not secured in its holder. Damage to the card
holder and static damage to the Trans-Flash card are not covered by the product warranty. For
these precautions, FOXPRO does not recommend routine change-outs o the memory card by
users who are not amiliar with these cards and the anti-static precautions required in order to
prevent damage to the card. It takes only a ew moments to change the entire playlist by using
the provided USB port, and this procedure is totally sa e and oolproo . I you eel that you have
a real reason to change the card, please contact FOXPRO customer service or advice.
6. Batteries & Recharging
For optimal per ormance and run times, we recommend high capacity 2300 mAh NiMH (Nickel
Metal Hydride) rechargeable cells rather than alkaline types. When you ask your Scorpion caller
to play at extremely loud volume levels, the current demand on the batteries is much more
than alkaline cells can deliver. Consequently, the run time o these batteries can be very short.
The Zinc Carbon so-called “Heavy Duty” cells are expressly NOT recommended at all. The
per ormance o your Scorpion will be much better with high capacity NiMH batteries.
6-1 Installing Batteries
Unlatch the door (latches are located on the side o the caller.) The battery holder is located
beneath this door. Be care ul to observe battery polarity! Install batteries and replace the
holder into its original location. (Be sure that the battery holder and the power wire are plugged
together.)
IMPORTANT NOTES
The cell polarity alternates. Batteries may be damaged i installed backwards.
Double-check polarity be ore closing the door. NiMH batteries should be charged
be ore irst use.

16
6-2 Using Rechargeable Batteries
Your Scorpion X1A operates on 8 ‘AA’ batteries. For optimal per ormance and run times, we
recommend the use o high-capacity 2300 mAh or greater NiMH (Nickel Metal Hydride)
rechargeable batteries rather than alkaline types. You can ind a compatible charging system or
your Scorpion X1A online at: http://www.go oxpro.com
When you ask the Scorpion X1A to play at extremely loud volume levels, the current demand on
the batteries is much more than alkaline cells can deliver. Consequently, the run time o these
batteries can be very short. The Zinc Carbon so-called “Heavy Duty” cells are expressly not
recommended. The per ormance o your Scorpion X1A will be much better with high-capacity
NiMH batteries.
On the ront o your Scorpion X1A, locate the green LED. This is your low power indicator. When
this light begins to blink during operation, it is alerting you that the batteries need replaced or
recharged. I the batteries drop too low to power the Scorpion X1A, it will shut itsel o . Battery
run time is directly related to how loud you operate the Scorpion X1A. Remember that very
loud volumes are rarely needed, as animals hear much better than we do.
WARNIN
Never attempt to charge batteries that are not intended to be recharged! This
includes both Zinc Carbon and alkaline cells. The resulting damage can be serious and
will not be covered by the warranty. For maximum charge e iciency, we recommend
charging your Scorpion X1A in temperatures ranging rom 40°F to 85°F (5°C to 30°C).
WARNIN
Do not mix battery types! For example: never use NiMH rechargeable batteries in
conjunction with non-rechargeable alkaline batteries.
WARNIN
Never connect your Scorpion X1A to an unregulated 12V system (i.e. automotive
systems, high current power supplies, etc.) Serious damage will occur which is not
covered by the warranty. The charge jack is intended only or FOXPRO® chargers.

17
WARNIN
Never attach an unapproved or a non-FOXPRO® charger to your Scorpion X1A!
Damages caused by plugging unapproved charging devices into your Scorpion X1A will
not be covered by warranty.
ENERAL PRECAUTIONS FOR CHAR IN
Disconnect any/all accessory devices that may be attached to the Scorpion X1A prior
to charging. This includes external speakers, auxiliary devices, and USB cables.
Make sure that the rechargeable battery pack is installed in the Scorpion X1A
properly.
Connect the approved FOXPRO charger to the charger jack on the Scorpion X1A and
attach the trans ormer to the appropriate outlet.
Follow the included instructions or the particular FOXPRO charger that you are using.
CHAR IN RECOMMENDATIONS
Remember that NiMH batteries sel -discharge about 1% per day.
Do not leave charging batteries unattended.
Remove batteries rom battery holder when caller will not be used or prolonged
periods to help prevent deep discharge.
Recharge your batteries periodically—even when not in use—to prevent deep
discharge.
WARNIN
While charging your Scorpion X1A, the green LED will illuminate. This LED is NOT an
indicator or a ull charge status. This LED will remain turned-on during the entire
charging cycle.
7. TX200 Detailed Information
This chapter covers the TX200 transmitter in great detail to help you understand all o the
eatures.
7-1 Recall
The recall button allows the previous sound and volume setting to be recalled and played. For
example, let’s say you just switched rom a rabbit distress at volume 18 to a coyote pup distress
at volume 28. By pressing the recall button, the sound will switch rom the coyote pup distress
at volume 28 to the rabbit distress at volume 18. The recall button also works with presets.

18
7-2 AUX
The AUX button is used to operate an external device that is connected to the auxiliary device
jack o the Scorpion X1A. It is also used to turn on the Scorpion X1A rom the TX200 transmitter.
7-3 Mute
The mute button enables you to mute or un-mute the sound being played. When mute is
activated, the letter “M” appears in the mute status indicator. Mute is an alternating unction.
The irst button press activates mute and the second press deactivates mute. Mute also serves
as a pause unction. When you mute the current sound being played and then un-mute, the
sound will begin playing at the point it was muted. I you pre er to restart the sound rom the
beginning, simply push down on the selector knob be ore you un-mute. While muted, you can
also change your sound so that when you un-mute, the new sound will play.
7-4 Volume Up and Down
These buttons provide you with the ability to make volume level adjustments. When the TX200
is initially turned on, the volume level will always be 00. To increase the volume, simply push
and hold the volume up button. To decrease the volume level, push and hold the volume down
button.
7-5 Large Text Mode
Another eature o the TX-200 is that the user has the ability to change the screen to an
enlarged display. This screen was designed
or any person that may have some
di iculty reading the normal text screen.
This display changes rom the text display to
a numeric display with a larger ont, making
it easier to read. The sound number is
displayed on the le t portion o the screen.
The number on the right indicates the
volume level.
To Use Large Text Mode:
1. Make sure the TX200 is turned on.
2. Simultaneously depress the mute and volume up buttons.
3. Turn the sound selector knob to your desired sound number.
4. When the desired sound number is visible, push down the sound selector knob to
have it transmitted to the Scorpion X1A.
5. Adjust the volume to the desired level using the volume buttons.
6. To quit large text mode, depress the mute and volume up buttons simultaneously.
The screen will return to its normal state.

19
When using large text mode, i you are scrolling through the sound numbers and orget what
sound number is currently playing, you can depress the volume down and volume up buttons
simultaneously. A ter doing this, the sound indicator (on the le t) will change to the sound that
is currently being played.
7-7 Timer
The TX-200 transmitter eatures a timer displayed on the bottom status line. This makes it
convenient or determining length o stands and respond times o incoming animals. When your
TX-200 is turned on, the timer begins counting. The timer displays minutes and seconds up to
99:59. Once this time is reached, the timer rolls over to 00:00 and commences counting. The
timer can be reset at any time by simply pressing the recall and P3 buttons simultaneously.
Once you turn your TX-200 transmitter o , the timer stops counting.
7-8 Battery Monitor
The TX-200 transmitter also eatures a very e ective battery monitor on the bottom status line.
The TX-200 transmitter operates on a standard 9-volt battery. Please use a high quality alkaline
battery. Battery li e can approach 175 hours. Watch the battery monitor and replace the
battery be ore it becomes completely depleted.
7-9 Inverted Display / Night Mode
The TX-200 remote allows you to invert the graphics on the display. This eature is re erred to
as night-mode, which prevents the amount o illumination rom the screen. To invert the
display, simultaneously depress the recall and P4 buttons. To return to the normal display
mode, depress the recall and P4 buttons.
7-10 Presets
Please review the quick start guide or using the presets.
8. Programming the Scorpion X1A
Programming your Scorpion X1A can be done rom home with the use o a PC or Mac computer,
or by sending the Scorpion X1A to the actory. In order to program the Scorpion X1A rom
home, you will need the ollowing items:
1. USB A/B printer-style cable
2. Windows based PC running Windows XP, Windows Vista, Windows 7, or Windows 8. I
using a Mac, make sure you are running Mac OS 10 or higher.
For detailed programming guides, please visit the FOXPRO website. Mac users can ind a very
detailed instruction set at the ollowing address:

20
http://www.go oxpro.com/site/resources/mac-programming
All other programming guides can be ound at the ollowing address:
http://www.go oxpro.com/site/resources/programming-support
8-1 etting New Sounds
You can access the FOXPRO website at any time to purchase new sounds to program in your
Scorpion X1A. The website is located at: http://www.go oxpro.com
A ter you are at the site, access the “FOXPRO Sounds” option rom the main menu and click on
one o the sound pack options. You can purchase 4 sounds o your choice, 8 sounds o your
choice, or 16 sounds o your choice. Consult the programming link listed at the beginning o this
section or more details on purchasing, downloading, and installing new sounds rom the
website.
In addition to FOXPRO FXP iles, the Scorpion X1A is also capable o playing MP3, and
uncompressed WAV iles obtained rom other sources. The maximum number o sounds that
your Scorpion X1A can hold at one time is 200.
8-2 Programming the Scorpion X1A (Windows PC’s)
The irst step is to download and install the FOXPRO Sound Programming Utility. The installer
or the FOXPRO Sound Programming Utility can be downloaded directly rom our website at any
time by visiting the ollowing web address:
http://www.go oxpro.com/programmer
When the page is loaded, locate the "Product In ormation" box. This box displays current
version number, publication date, and MD5 and SHA1 in ormation or validating the installation
ile as being genuine. The last item in the box contains the o icial download link. To begin the
download, click on the "Download" button.
I you are upgrading rom a previous version o the FOXPRO Programming Utility, there is no
need to uninstall the original version be ore launching the new installer as it will automatically
upgrade or you. Your original sound library storage older will remain unchanged.
Depending upon what internet browser you are using, you may be prompted to "Open", "Run",
or "Save" the ile that is being requested. Some browsers may not prompt you or action and
just save the ile to your de ault Download older. I you are presented the option, we
recommend selecting either “Open” or “Run”—in doing this, the installer will automatically
launch when the ile has been downloaded. Otherwise, you will need to browse your Download
older or the install ile which is titled: “ oxpro-programming-utility-installer.exe”. You will then
need to open the ile to launch the installer. The installation is very brie and straight orward.
When the installation is complete, a message o success will display on the screen.
Table of contents