Franke TF944E1S User manual

You’re about to begin a very happy and delicious
relationship. Let’s get started.
This is no ordinary microwave.
Welcome to your new
Franke microwave
TF944E1S - MICROWAVE

2
AN IMPORTANT NOTE
Please read this document and the safety information carefully before you first use
your microwave.
SUPPORT
Speak to our customer service representatives.
New Zealand: 09 964 0400 | info@prks.co.nz
WARRANTY
Your Franke product is protected by a 2-year warranty. Should you ever need to make a
warranty enquiry, simply contact our service department.
GET SOCIAL
Keep up to date on all things Franke by following us on Facebook and Instagram.
@FrankeAUS
#makeitwonderful
“Let’s let everyone else be ordinary,
while we make it wonderful”

Contents 3
Chapter 1: Ready, set up, go
5 Introducing your new Franke microwave
6 What’s in the box?
6 First time use
6 Warnings and safety
7 Installation instructions
9 Setting the time
9 Child lock function
9 Environmental information
9 Disposal
Chapter 2: Life with your Franke Microwave
11 Functions
12 Operating your microwave
12 Timer function
12 Auto cooking menu
12 Defrost function
13 Combining oven and microwave functions
13 Memory function
13 Quick start function
13 Microwave power settings
13 Rapid heat function
14 Expert cooking guide
Chapter 3: Getting the most out of your Franke Microwave
16 Cleaning and care
16 Interior lighting
16 Notes regarding ovenware
Chapter 4: Problem, meet solution
18 Trouble shooting
Chapter 5: Last, but not least
20 Warnings, hazards, risks and legal
Looking for something?
22 Glossary and index
CONTENTS

Chapter 1 Ready, set up, go
4
READY, SET UP, GO
CHAPTER 1
Your Franke microwave is designed to be set up
quickly and easily - so you can start creating delicious
masterpieces even sooner.

5Introducing: Your new Franke Microwave Oven
INTRODUCING: YOUR NEW FRANKE MICROWAVE
CONTROL PANEL
Symbol Function
Microwave
3D Hot air
Grill with fan
Grill
Pizza setting
Memory
Parameter adjustment
Temperature/Weight
Auto-programmes
Defrost
Touch and hold: Childprood Lock Touch
briefly: Rapid preheating
Clock
Start
Touch briefly: Stop
Touch twice: Cancel
Parameter Function
Auto menu Select 13 automatic programmes.
From P 01 to P 13.
Temperature
Select the temperature of cooking( ).
:
°C
50,100,105,110...230
:100,105,110...160
:50,100,105,110...230
:100, 105,110... 16
:100,105,110...230
:100,105,110...230
+
+
+
Weight Set the weight of cooking.
Time Set the time of cooking.
Microwave Select microwave power. 100W, 300W,
450W, 700W and 900W.
Function Use
Microwave+Pizza
+
Use this function to roast meals
quickly. And at the same time use
the function of Pizza setting.
Microwave+Grill
+Use this function to cook meals
quickly and at the same time five
the meal a brown crust.
Defrost
2 defrosting programmes.
Auto-programs
13 cooking programmes
The type of heating and cooking
time are set by weight.
Microwave
Defrost, reheat and cooking.
Symbol Function
For baking sponge cakes in baking tins,
flans and cheesecakes as well as cakes,
pizza and small baked items on the baking
tray. 50°C can maintain the taste of food
after heat preservation of 1-2 hours.
Poultry goes brown and crispy. Baked
casseroles and grilled dishes work out best
using this setting.
For frozen convenience products
and dishes which require a lot of heat from
underneath.
Select between the levels high, medium or
low. This is ideal if you wish to grill several
steaks, sausages, pieces of fish or slices
of bread.
Use this function to roast meals quickly.
And at the same time use the function of
3D Hot air.
Poultry goes brown and crispy. Baked
casseroles and grilled dishes work out best
using this setting. And use the function to
roast meals evenly.
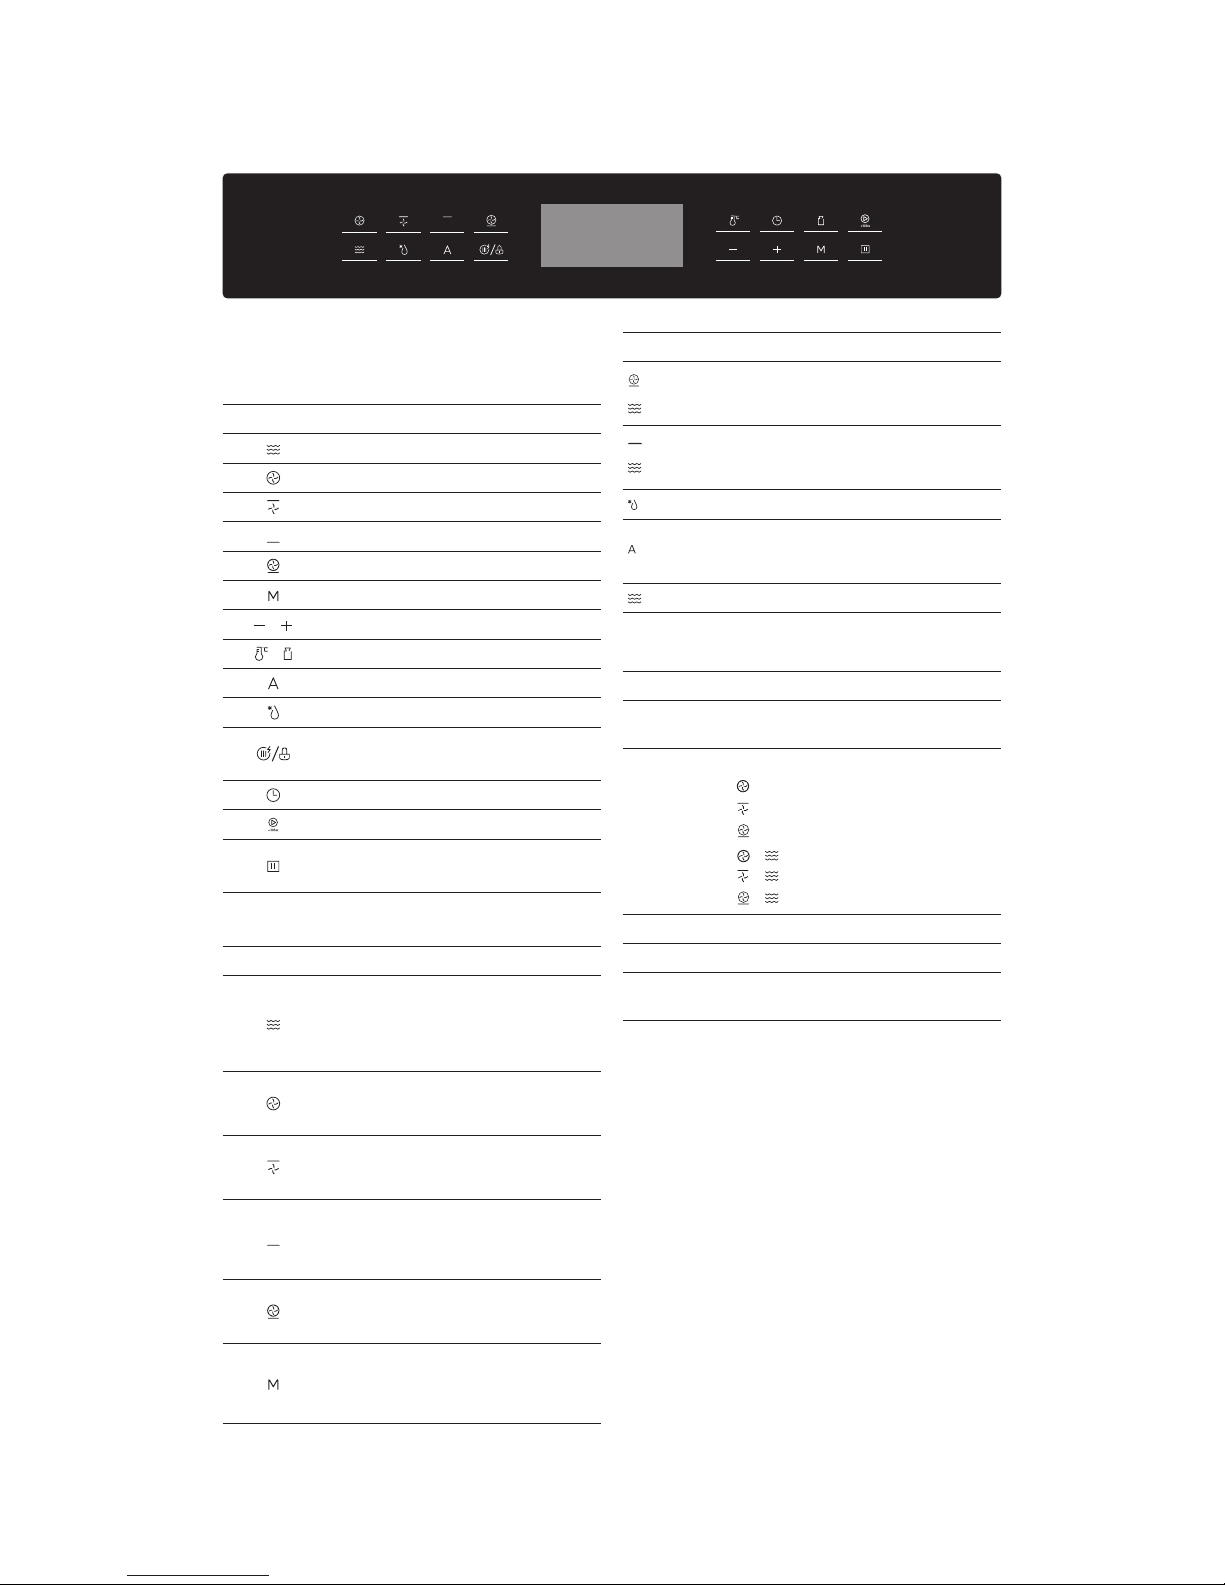
Touch keys and display
The touch keys are used to set the various additional
functions. On the display, you can read the values that
you have set.
Parameter adjustment
Use the adjusting keys to set the parameters.
Cooling fan
Your appliance has a cooling fan. The cooling fan switches
on during operation. The hot air escapes above the door. The
cooling fan continues to run for a certain time after operation.
Caution!
Do not cover the ventilation slots. Otherwise, the appliance
will overheat.
Notes
• The appliance remains cool during microwave operation.
The cooling fan will still switch on. The fan may run on
even when microwave operation has ended.
• Condensation may appear on the door window,
interior walls and floor. This is normal and does not
adversely affect microwave operation. Wipe away the
condensation after cooking.
Function and screen display
Use the function keys to set the type of heating.

Chapter 1 Ready, set up, go
6
WHAT’S IN THE BOX?
1 x Franke Microwave
1 x Turntable
1 x Lower wire rack
1 x Higher wire rack
1 x Glass baking tray
1 x Power cable
FIRST TIME USE
When the microwave is first switched on, it may give off an unpleasant smell. This is due to the
bonding agent used for the insulation panels within the microwave.
Heating up the oven
To remove the new cooker smell, heat up the oven when it is empty and closed. One hour with Hot
air at 230°C is ideal. Ensure that no packaging remnants have been left in the cooking compartment.
1. Touch the key to set hot air function.
2. Touch " " key to set the temperature to 230°C.
3. Touch the key. Touch " " key to set the cooking time to 60 minutes.
4. Touch the key. The oven begins to heat up.
WARNINGS & SAFETY
• The appliance will become hot during use and directly after use, care should be taken to avoid
touching heating elements.
• This appliance is not intended for use by persons (including children) with reduced physical,
sensory or mental capabilities, or lack of experience and knowledge, unless they have been given
supervision or instruction concerning use of the appliance by a person responsible for their safety.
• Children should be supervised to ensure that they do not play with the appliance.
• CAUTION: Accessible parts may become hot when used with cooking appliances.
• If any parts become damaged, they must be replaced by the manufacturer only.
• Do not use abrasive cleaners or sharp metal scrapers during cleaning.
Lower wire rack Glass baking tray
Higher wire rack Wire rack
Turntable

Chapter 1 Ready, set up, go
7
INSTALLATION INSTRUCTIONS
Fitted units
• This appliance is only intended to be fully fitted in a kitchen.
• This appliance is not designed to be used as a tabletop appliance or inside a cupboard.
• The fitted cabinet must not have a back wall behind the appliance.
• A gap of at least 100mm must be maintained between the wall and the base or back panel of the
unit above.
• The fitted cabinet must have a ventilation opening of 250cm2 on the front. To achieve this, cut
back the base panel or fit a ventilation grille.
• Ventilation slots and intakes must not be covered.
• The safe operation of this appliance can only be guaranteed if it has been installed in accordance
with these installation instructions.
• The filter is liable for any damage resulting from incorrect installation.
• The units into which the appliance is fitted must be heat-resistant up 90°C
• Minimum installation heigh: 850mm
min 45
Cupboard feet
Ventilation grid
min 45
min 850

Chapter 1 Ready, set up, go
8
10
8
Building in
• Do not hold or carry the appliance by the door handle. The door handle cannot hold the weight of
the appliance and may break off.
1. Carefully push the oven into the box, making sure that it is in the centre.
2. Open the door and fasten the oven with the screws that were supplied.
• Fully insert the appliance and centre it.
• Do not kink the connecting cable.
• Screw the appliance into place.
• The gap between the worktop and the appliance must not be closed by additional battens.
Important information
A means for full disconnection in all-poles under overvoltage category III conditions must be
incorporated in the fixed wiring in accordance with the wiring rules.
The appliance is designed to be permanently installed with a three-pin power cord and may only be
connected by a licensed expert in accordance with the connection diagram.
If the supply cord is damaged, it must be replaced by the manufacturer, its service agent or similarly
qualified persons in order to avoid a hazard.
Do not use multiple plugs, power strips or extensions. Overloading causes a risk of fire.
If the connection is no longer accessible following installation, an all-pin isolating switch with a contact
gap of at least 3mm must be provided in accordance with the wiring rules.
Connect the wires of the mains power cord in accordance with the following colour coding:
Green and yellow Earth wire (E)
Blue Neutral wire (N)
Brown Live (L)
Great Britain and Australia:
Do not connect the appliance using a 13 A plug or protect it with a 13 A fuse. The appliance must
be protected using a fuse that is rated 16 A or higher. The appliance must be disconnected from the
power supply during all installation work. When the appliance is installed, protection must be provided
against accidental contact in the future.

Chapter 1 Ready, set up, go
9
SETTING THE TIME
After connecting the unit to power, the symbols 0:00 will be shown on the display.
1. Press the ‘clock’ button until the hour figure flashes.
2. Press the ‘plus and minus’ to adjust the hour figure.
3. Press the ‘clock’ button so the minute figures flash.
4. Press the ‘plus and minus’ to adjust the minute figure.
5. Press the ‘clock’ button to confirm the new time settings.
CHILD LOCK FUNCTION
This microwave comes fitted with a child lock feature for the protection of young children.
To activate hold: ‘child lock’ button for 3 seconds. This will illuminate the ‘lock’ icon.
To deactivate hold: ‘child lock’ button for 3 seconds. This will release the child lock.
ENVIRONMENTAL INFORMATION
This Franke appliance is particularly energy efficient, however to make the most out of it, and to save
even more energy make sure you adhere to the following steps:
6. Open the appliance door as infrequently as possible during operation.
7. It is best to bake several items on after the other, as the cooking compartment is still warm.
8. Only preheat the appliance if necessary for the recipe
9. For longer cooking times, you can switch the appliance off 10 minutes prior to the end cooking
time, and use the residual heat.
DISPOSAL
Dispose of all packaging in an environmentally friendly manner. Franke practises environmentally
conscious behaviour, and this appliance is labelled in accordance with the used electrical and
electronic appliances waste guidelines.
If you have any questions on disposals, please call the Franke customer service
team on 03 9700 9100.

10Chapter 2 Life with your Franke Oven
life with your franke oven
CHAPTER 2
We designed this microwave with one thing in mind.
How do we create a wonderfully simple user experience
for you, our customer?

11Chapter 2 Life with your Franke Microwave
3D Hot Air
For baking items in backing tins, as well as reheating pizzas. Can
maintain great taste after reheat.
Grill with Fan
For poultry, grilled dishes and casseroles. Lets food go brown
and crispy.
Pizza Setting
For frozen foods and dishes which require heat from the bottom.
Grill
This is ideal for grilling meat or slices of bread. For example, a
steak, sausage, fish or slices are idea for this setting.
Microwave
For defrosting, reheating or cooking suitable microwave meals
(e.g. popcorn).
Defrost
For thawing frozen food and either taking it to room temperature or
cooking it.
Microwave + Hot Air
This function is for roasting meals quickly and evenly.
Microwave + Grill with Fan
This function os for roasting meals that you need brown and crispy,
e.g. poultry, or grilled dishes that need to be cooking evenly.
Microwave + Pizza
This function is for roasting meals and at the same time using the
bottom heat element.
Microwave + Grill
This function is for roasting meals and giving them a brown crust
on top or melting cheese.
MICROWAVE FUNCTIONS

12Chapter 2 Life with your Franke Oven
OPERATING YOUR MICROWAVE
To select a cooking function and choose your desired temperature:
1. Press the required appliance function start. The symbol chosen will be shown (e.g. microwave).
2. Press the ‘plus and minus’ buttons to adjust the temperature to your desired pre-set.
3. Press the ‘clock’ button to adjust the time of your desired pre-set using the ‘plus and minus’
buttons.
4. Press the ‘start’ button to begin cooking function.
5. Press the ‘stop/pause’ button twice to switch the microwave off.
TIMER FUNCTION
The timer allows you to keep and eye over the amount of cooking time that has elapsed. To set a timer:
6. Press the ‘clock’ button to select the hour figure.
7. Press the ‘plus and minus’ buttons to set the hour figure of the timer.
8. Press the ‘timer’ button to select the minute figure.
9. Press the ‘plus and minus’ to set the minute figure of the timer.
10. Press the ‘start/on’ button to confirm. The time left until the buzzer sounds
is now shown.
AUTO COOKING MENU
This function allows you to use a pre-set cooking function for particular food groups. The
corresponding programme number and item is listed below:
P01 - Fresh vegetables
P02 - Peeled potatoes (cooked)
P03 - Roasted potatoes (when you hear the beep, turn the food)
P04 - Chicken or fish pieces (when you hear the beep, turn the food)
P05 - Cakes
P06 - Apple pie
P07 - Quiche
P08 - Reheating a drink or soup
P09 - Reheating a plated meal (left overs)
P10 - Reheating a sauce, stew or stir-fry
P11 - Cooking frozen pizza
P12 - Cooking frozen chips
P13 - Cooking frozen pasta or lasagne
DEFROST FUNCTION
11. Touch the ‘defrost’ function
12. Press the ‘weight’ button to adjust the weight of food. Then use the ‘plus and minus’ button to
adjust the weight or food.
13. Press the ‘start’ button to begin cooking function.

13
COMBINING OVEN AND MICROWAVE FUNCTIONS
To combine an oven function and microwave power:
1. Press the required appliance function to start. The symbol chosen will be show (e.g. pizza).
2. Press the ‘plus and minus’ buttons to adjust the temperature.
3. Press the ‘clock’ button to adjust the time of your desired pre-set using the ‘plus and minus’
buttons.
4. Press the ‘microwave’ button to combine microwave power for more even roasting.
5. Press the ‘start’ button to begin cooking function.
6. Press the ‘stop/pause’ button twice to switch the appliance off.
MEMORY FUNCTION
To save a cooking setting (time, temp, weight, function) for later use, this is possible through the
memory function below:
1. After entering the desired input, instead of pressing ‘on/start’, press the ‘memory’ button.
2. Continue pressing the ‘memory’ button to choose stored data profile (N1, N2, N3).
3. Press the ‘start’ button to confirm and save.
QUICK START FUNCTION
To instantly start a microwave function of 30s at 900w:
1. Press the ‘start’ button once
2. Each additional press of the ‘start’ button adds an additional 30 seconds to the
cooking time.
MICROWAVE POWER SETTINGS
This Franke appliance can be set to 5 different power settings, with the following:
100W - Defrosting sensitive and delicate foods or softening ice cream.
300W - Melting foods.
450W - Cooking rice, soup or noodles.
700W - Reheating foods, cooking dishes containing eggs, cheese or mushrooms.
900W - Boiling water, cooking chicken, fish or vegetables.
RAPID REHEAT FUNCTION
1. Select the type of cooking function desired.
2. Click the 'rapid heat' button to heat up the cooking compartment quicker
3. Click the 'start' button to confirm
Chapter 2 Life with your Franke Oven

14
EXPERT COOKING GUIDE
Here you will find a selection of recipes and the ideal settings for them. We will show you which type
of heating and which temperature or microwave power setting is best for your meal. You can find
information about suitable accessories and the height at which they should be inserted. There are also
tips about ovenware and preparation methods.
The values in the table always apply to food placed into the cooking compartment when it is cold
and empty. Only preheat the appliance if the table specifies that you should do so. Before using the
appliance, remove all accessories from the cooking compartment that you will not be using.
NOTES
• Do not line the accessories with greaseproof paper until after they have been preheated.
• The times specified in the tables are only guidelines. They will depend on the quality and
composition of the food.
• Use the accessories supplied. Additional accessories may be obtained from specialist retailers
or from the after-sales service.
• Always use an oven cloth or oven gloves when taking accessories or ovenware out of the
cooking compartment.
Chapter 2 Life with your Franke Oven

15
getting the most out of
your franke microwave
CHAPTER 3
Getting the most out of your Franke microwave.
Your Franke microwave turns work into play,
and inspires creativity every single day.
Chapter 3 Getting the most out of your Franke microwave

16Chapter 3 Getting the most out of your Franke microwave
CLEANING AND CARE
We want your Franke Appliance to be looking this good for a long time to come. To ensure that the
various surfaces are not damaged through cleaning, please observe the following:
Glass: Glass cleaner and with a microfiber cloth.
Plastic: Hot soapy water with a soft cloth.
Control panel: Clean with a dish cloth and then dry with a soft cloth.
Interior enamelled surfaces: A mix of hot soapy water, vinegar and lemon juice. Wash with a dish
cloth, and then allow the cooking compartment to dry.
Accessories: Hot soapy water and if there are stubborn food deposits, use a stainless steel
scouring pad.
Rails: Hot soapy water and a dish cloth.
Stainless steel handle: Hot soapy water and a mild stainless steel cleaning product with a soft cloth.
INTERIOR LIGHTING
If the interior lighting bulb or cover is defective for any reason or the light no longer operates, please
call our service team for support.
NOTES REGARDING OVENWARE
Suitable ovenware
Suitable dishes are heat-resistant ovenware made of glass, glass ceramic, porcelain, ceramic or heat-
resistant plastic. These materials allow microwaves to pass through.
You can also use serving dishes. This saves you having to transfer food from one dish to another. You
should only use ovenware with decorative gold or silver trim if the manufacturer guarantees that they
are suitable for use in microwaves.
Unsuitable ovenware
Metal ovenware is unsuitable. Metal does not allow microwaves to pass through. Food in covered
metal containers will remain cold.
Caution!
Creation of sparks: metal – e.g. a spoon in a glass – must be kept at least 2 cm from the oven walls
and the inside of the door. Sparks could destroy the glass on the inside of the door.

17Chapter 4 Problem, meet solution
problem, meet solution
CHAPTER 4
We don’t expect your experience with your new Franke
microwave to be anything but wonderful, but here’s
some trouble shooting remedies just in case.

18Chapter 4 Problem, meet solution
TROUBLE SHOOTING
You shouldn’t have any issues with your Franke appliance, however there are some problems which
can easily be fixed by trouble shooting the table below. If you can’t find your problem, or the remedy
has not fixed the issue, then give our friendly customer service team a call on 03 9700 9100, email
Problem Possible cause Remedy/Information
The appliance does not work.
Faulty circuit breaker.
Look in the fuse box and check
that the circuit breaker for the
appliance is in working order.
Plug not plugged in. Plug in the plug.
Power cut. Check whether the kitchen light
works.
The appliance does not work.
appears in the display panel. Childproof lock is active. Deactivate the childproof lock
(see section: Childproof lock).
0:00 is in the display panel. Power cut. Reset the clock.
The microwave does not
switch on. Door not fully closed. Check whether food residue or
debris is trapped in the door.
It takes longer than before
for the food to heat up in
the microwave.
The selected microwave power level
is too low. Select a higher power level.
A larger amount than usual has bee
placed in the appliance.
Double the amount = almost
double the cooking time.
The food was colder than usual. Stir or turn the food during
cooking.
Turntable grates or grinds. Dirt or debris in the area around the
turntable drive.
Clean the rollers under the
turntable and the recess in the
oven floor thoroughly.
A particular operating mode or
power level cannot be set.
The temperature, power level or
combined setting is not possible for
this operating mode.
Choose permitted settings.
E1 appears in the display panel. The thermal safety switch-off function
has been activated. Call the after-sales service.
E4 appears in the display panel. The thermal safety switch-off function
has been activated. Call the after-sales service.
E11 appears in the display panel. Moisture in the control panel. Allow the control panel to dry.
E17 appears in the display panel. Rapid heating has failed. Call the after-sales service.

19Chapter 5 Last but not least
last but not least
CHAPTER 5
This section contains the warnings, precautions and
legal notices to make sure everything runs smoothly.

20Chapter 5 Last but not least
MICROWAVE DOOR PRECAUTIONS
Never apply pressure on the microwave door when it is closed or open. Never use the microwave door
as a seat or bench or apply any pressure to it while it is open. Do not place cookware or accessories
on the microwave door.
Glass that has become scratched poses a risk of cracking and ultimately shattering which is a serious
risk to injury. Ensure that glass scraper or any sharp objects are kept away from the oven at all times.
The hinges on the microwave door pose a threat for you hands to be trapped. Keep hands clear of the
opening with operating the oven door.
ELECTRIC SHOCK HAZARD
Never carry out an repairs yourself, always get an authorized technician to do any repairs or
maintenance on your oven. If any electrical components become damaged or there is exposed wiring,
there is a risk of electrical shock.
Ensure whenever the oven is in operation and you come into contact with it, that appropriate
footwear is worn.
Table of contents
Other Franke Microwave Oven manuals

Franke
Franke FSM 25 MW XS User manual

Franke
Franke FMWO 32 NH I User manual

Franke
Franke Crystal User manual

Franke
Franke FSM 25 MW XS User manual

Franke
Franke FMW 380 User manual

Franke
Franke TG925BVY User manual

Franke
Franke FMW 20 SMP G XS User manual

Franke
Franke FCMWS25B1 User manual

Franke
Franke FMW 250 CR G Installation and operation manual

Franke
Franke TECH 17 G User manual