FRC 2495 Hive Mind 2018 User manual

1
FRC 2495 Hive Mind 2018 Robot Manual
Version 2.0 (07-MAR-2018)
Introduction
Scope
This manual explains how to control the FRC 2495 Hive Mind 2018 Robot.
Requirements
To control the robot, you need at the minimum a Windows PC running the latest FRC Driver Station
software, the Shuffleboard app, 2 joysticks and a gamepad.
To be able to use the camera for target tracking you also need GRIP (Graphically-Represented Image
Processing) running on the Windows PC.
If you want to be able to modify the code running on the robot, you must further install a Java SE
Development Kit 8.xxx, Eclipse, and the WPI plugins for Eclipse.
Finally you need to install the CTRE Phoenix framework.
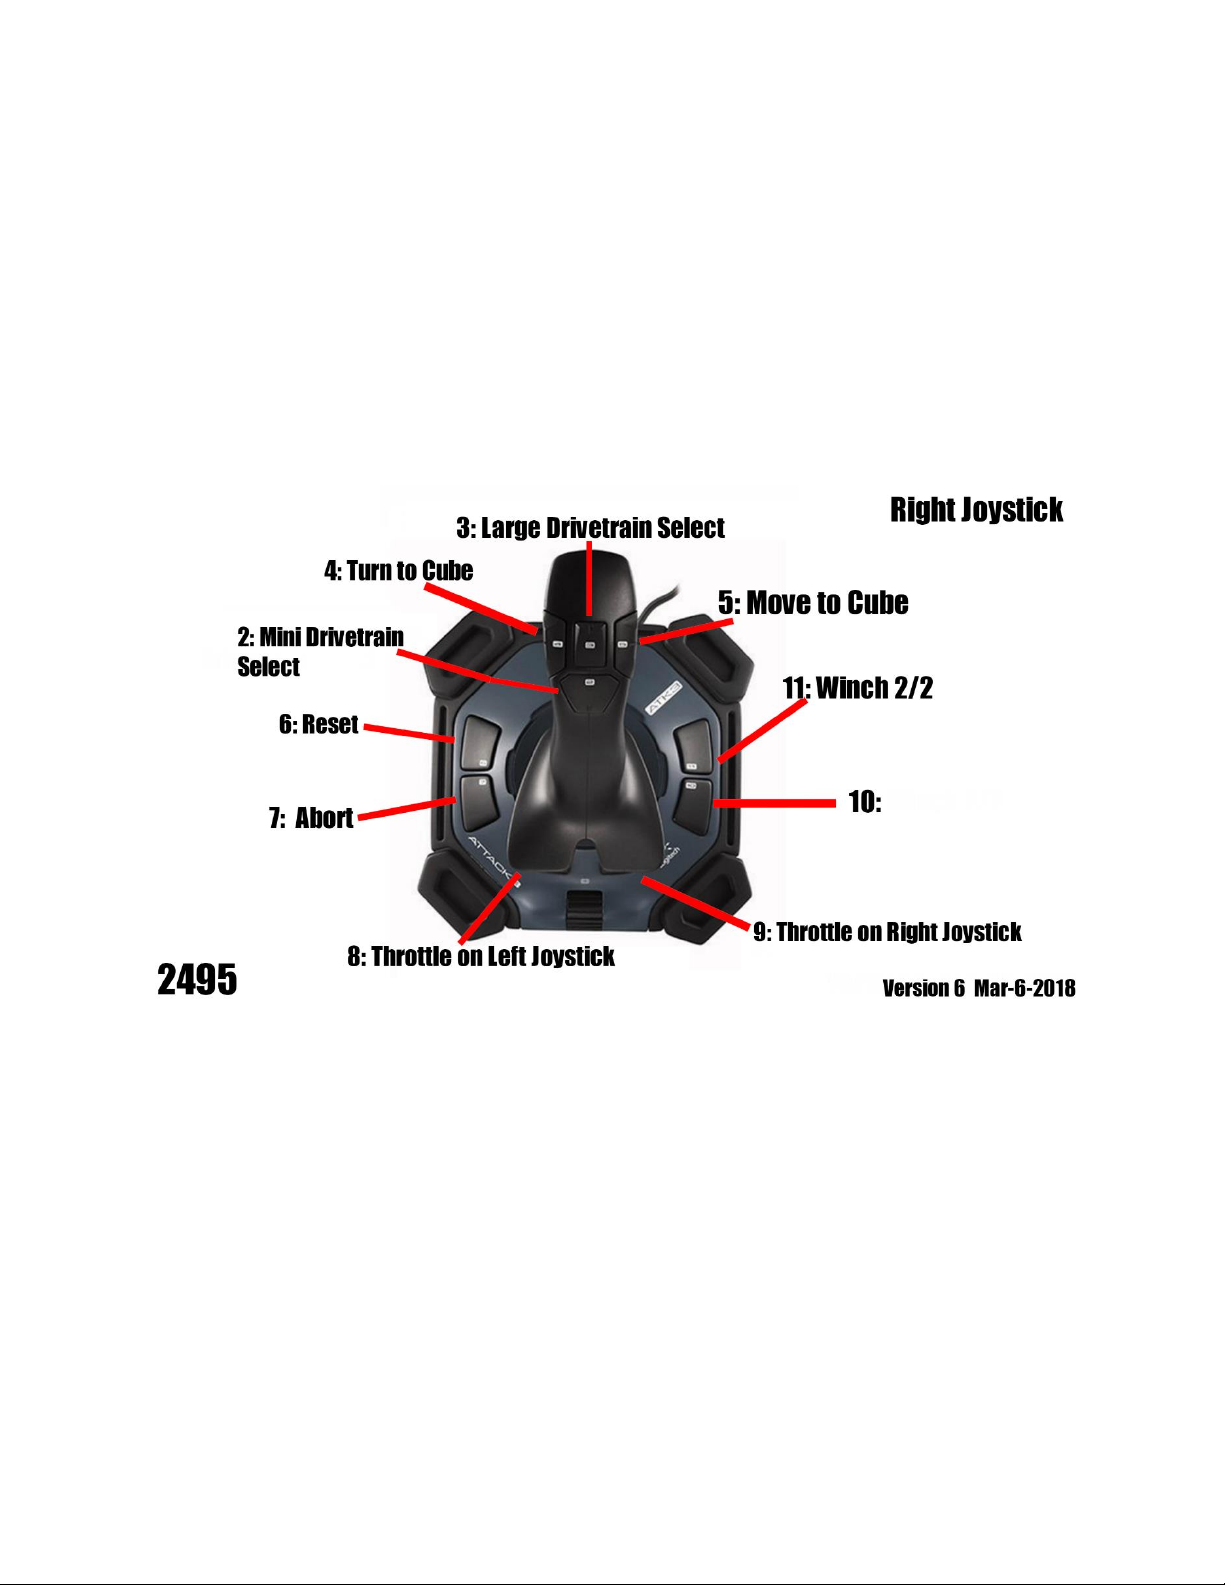
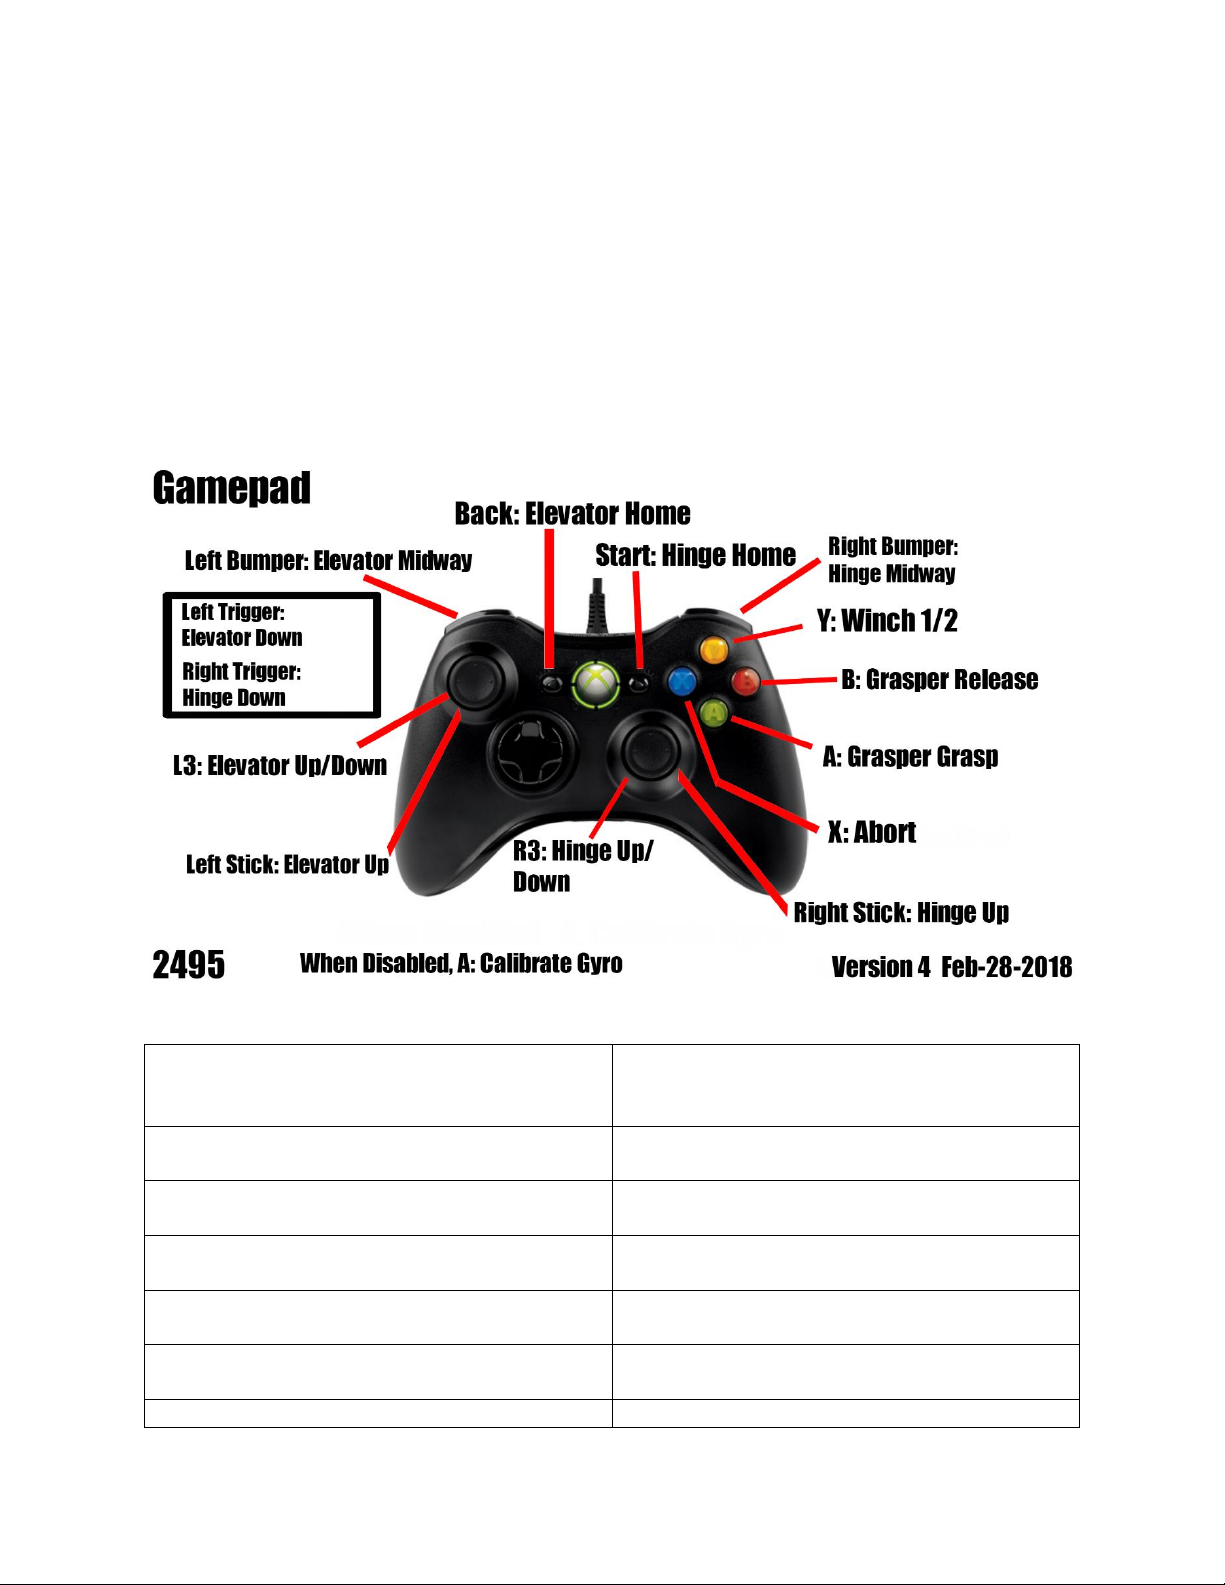
Subsystems
The robot is composed of multiple subsystems which may be controlled independently:
•Compressor to provide power to the Jack
•Drivetrain to drive
•Elevator to raise a cube to a given height
•Grasper to grasp or release a cube
•Hinge to link the grasper to the elevator
•Jack to switch between the large and mini drivetrains
•Mini Drivetrain to move athwart
•Winch to climb
The robot may use the following sensors:
•Accelerometer to measure tilt
•Camera to locate cubes
•Gyroscope to turn precisely
•Sonar to help grasping or releasing a cube

2
Controls
Left Joystick
The left joystick (see Figure 1 Left Joystick below) provides access to features useful in the pit. It
provides for example manual control of the elevator, hinge, grasper and winch by holding a button and
pulling or pushing the stick at the same time. This makes it convenient to rewind the winch after a
match. Convention is “Pull Up, Push Down.”Note that no protection is enforced. You may damage the
robot by improperly using those controls.
By default, the stick also serves to control the throttle of the large drivetrain.
Finally, it offers buttons to move by a set distance or perform hard-turns. Those operations can be
aborted at any time by pressing the Abort button.
Figure 1 Left Joystick
3: Move 50 Inches. Press to move by set distance forward or athwart right depending on drivetrain.
4 & 5: Turn -/+90 Degrees. Press 4 to turn left, 5 to turn right. Only applies to large drivetrain.
6: Reset. Press to reset the encoders on both drivetrains.
7: Abort. Press to abort a long running operation such as a move or a rotation.
8 Elevator Joystick Control. Hold and pull stick to go up (or push to go down). Do not go too high!
9: Hinge Joystick Control. Hold and pull stick to go up (or push to go down). Do not go too low!
10: Grasper Joystick Control. Hold and pull stick to grasp (or push to release)
11: Winch Joystick Control. Hold and push stick to release. Remove physical lock first!

3
Right Joystick
The right joystick (see Figure 2 Right Joystick below) is the main control for the driver. It allows to
control both drivetrains and switch between them by raising or lowering the jack.
By default, the stick offers control for rotation of the large drivetrain or athwart moves using the mini
drivetrain. It may also be used to control the throttle of the large drivetrain by activating that option.
If GRIP is running on the Windows PC it offers buttons to turn towards a cube or move within its reach.
Those operations can be aborted at any time by pressing the Abort button.
Finally, it provides a button that needs to be kept pressed so that the operator can raise the winch
(“nuclear launch two-man rule”).
Figure 2 Right Joystick
2: Mini Drivetrain Select. Press to switch to the mini-drivetrain.
3: Large Drivetrain Select. Press to switch to the large drivetrain.
4: Turn to Cube. Press to use the camera to turn towards the largest cube within its field of view.
5: Move to Cube. Press to move forward by a distance equal to the distance between the camera and
the largest cube within its field of view. Turn towards cube first if you want to reach the cube!
6: Reset. Press to reset the encoders on both drivetrains.
7: Abort. Press to abort a long running operation such as a move or a rotation.
8 & 9: Throttle on Left or Right Joystick. Press to select one-joystick drive or two-joystick drive mode.
11: Winch 2/2: Hold so that the operator can winch up. Keep holding until end of match!

4
Gamepad
The gamepad (see Figure 3 Gamepad below) is reserved for the operator. It provides automatic control
for the hinge, elevator, grasper and winch. It provides a way to recalibrate the gyroscope when the
robot is disabled. It provides forward control of the winch if activated by the driver.
Note that the hinge and elevator need to be homed (i.e. set to the “zero” position using a limit sensor)
before they can be used, and the hinge needs to be down so that the elevator can be homed, so a
typical homing sequence would be: home hinge, lower hinge, home elevator, raise hinge.
All operations started from the gamepad can be aborted at any time by pressing the Abort button. Note
that this will cut the power to the elevator which will naturally go down if not already resting.
Figure 3 Gamepad
Back: Home Elevator. Press to home the elevator.
Hinge must be down. Prerequisite for all elevator
moves hereunder.
Start: Home Hinge. Press to home the hinge.
Prerequisite for all hinge moves hereunder.
Left Trigger: Elevator Down. Press to take
elevator down. Hinge must be down.
Right trigger: Hinge Down. Press to lower hinge
all the way down.
Left Bumper: Elevator Midway. Press to take
elevator to switch level. Hinge must be down.
Right Bumper: Hinge Midway. Press to set hinge
at 45 degrees.
Left Stick: Elevator Up. Pull to take elevator to
scale level. Hinge must be down.
Right Stick: Hinge Up. Pull to raise hinge all the
way up.
L3: Elevator Up/Down: Press to toggle between
up and down positions. Goes down if midway.
R3: Hinge Up/Down. Press to toggle between up
and down positions. Goes down if midway.
X: Abort. Press to abort moves or grasper actions
Y: Winch 1/2: Hold to winch up. Driver must also
hold his button. Gamepad will rumble to confirm.
A: Grasper Grasp. Press to turn on wheels.
B: Grasper Release. Press to release cube.

5
Playing a Match
Start Software Applications
You need to have the FRC Driver Station and the Shuffleboard running at all time. The Shuffleboard
layout to pick is “2495shuffleboard”under C:\Users\FRC2495\git\FRC-2495-2018\misc\Shuffleboard,
and the suggested tab to use is “Competition”.
To use the camera, you also need to run GRIP. The processing pipeline to pick is “yellow” under
C:\Users\FRC2495\git\FRC-2495-2018\misc\GRIP.
Do NOT use the SmartDash.
Get Robot Ready
A few minutes prior to a match, while the robot can be enabled, ensure that the compressor is filled up.
Use the Shuffleboard to verify.
As explained before, also ensure that both the hinge and elevator are homed. The typical sequence is
home the hinge, lower the hinge, home the elevator, raise the hinge. Use the Shuffleboard to verify.
If conditions permit, ensure that GRIP is properly tuned to see cubes by placing one in front of the
camera and checking that the contour reported by GRIP makes sense.
Once the robot is set in place disabled on the field (and when nobody is around it) recalibrate the
gyroscope by pressing the A button. Keep in mind that the calibration requires about five seconds, so do
not wait until the match is about to start…

6
Autonomous options
You need to choose four options for the autonomous mode (on in each of the four categories). Verify
that the options you choose are properly registered in the Shuffleboard. If not pick another option, and
then pick your option again.
1. Auton selection
•Do Nothing. Robot will stay idle in auton. Only use if required to.
•My Auto. Auton will be enabled. Path taken will depend on starting position.
2. Start position
•Left. Starting from the left of the field.
•Center. Starting from the center of the field.
•Right. Starting from the right of the field.
3. Camera option
•Always. Camera will always be used. Do NOT pick as never tested
•Open Loop Only. Camera will be used to rotate and move toward the second cube.
Suggested choice.
•Closed Loop Only. Camera will be used to center on the second cube. Do NOT pick as never
tested.
•Never. Camera will not be used. Use if camera proves unreliable.
4. Sonar option
•Always. Sonar will be used to determine if a cube has been grasped or released. Suggested
choice.
•Release Only. Sonar will only be used to determine if a cube has been released.
•Grasp Only. Sonar will only be used to determine if a cube has been grasped.
•Never. Sonar will not be used. Robot will assume that cube has been released of grasped
after a set time elapses.
After a Match
Once the one-way bearing has been unlocked, you may slowly release the winch using the left joystick.
Table of contents