Freddy Superminor User manual

Superminor
Coolant Management
Vacuum
User Manual

2 FPQ41 Superminor Issue 1
IMPORTANT INFORMATION
This equipment works safely and reliably if qualified, experienced and trained operators follow the
installation, operating and maintenance procedures described in this manual.
If you do not follow the manual instructions and information, you will be responsible for the
consequences and may invalidate the warranty.
Freddy Products Ltd accepts no liability for unauthorised modifications to Freddy supplied equipment.
This manual pays particular attention to Health and Safety. Appropriate safety icons are used and
warning messages are given where you need to take special precautions because of the nature of the
equipment or product. Special attention should be made to Section 2 – Safety, where all such messages
are summarised.
In line with our continuous policy of research and development, we reserve the right to amend models
and specifications without prior notice.
This manual is accurate at the date of printing, but will be superseded and should be disregarded if
specifications or appearance are changed.
Freddy is a registered trademark of Freddy Products Limited. The use of all trademarks in this document
is acknowledged.
Freddy Products Ltd.
Kempton Road
Pershore
Worcestershire
WR10 2TA
United Kingdom
Tel: +44 (0) 1386 561113
Fax: +44 (0) 1386 556401
Email: sales@freddy-products.co.uk
www.freddy-products.co.uk
Twitter: @freddyproducts
© 2013. Freddy Products Ltd. All rights reserved
Original instructions.

FPQ41 Superminor Issue 1 3
Contents
1Introduction.................................................................................................................. 4
1.1 About this manual......................................................................................................... 4
1.2 EC Declaration of Conformity........................................................................................ 5
2Safety............................................................................................................................ 6
2.1 Warnings ....................................................................................................................... 6
2.2 Residual risks................................................................................................................. 7
3Description ................................................................................................................... 8
3.1 Operational overview.................................................................................................... 8
4Operation ..................................................................................................................... 9
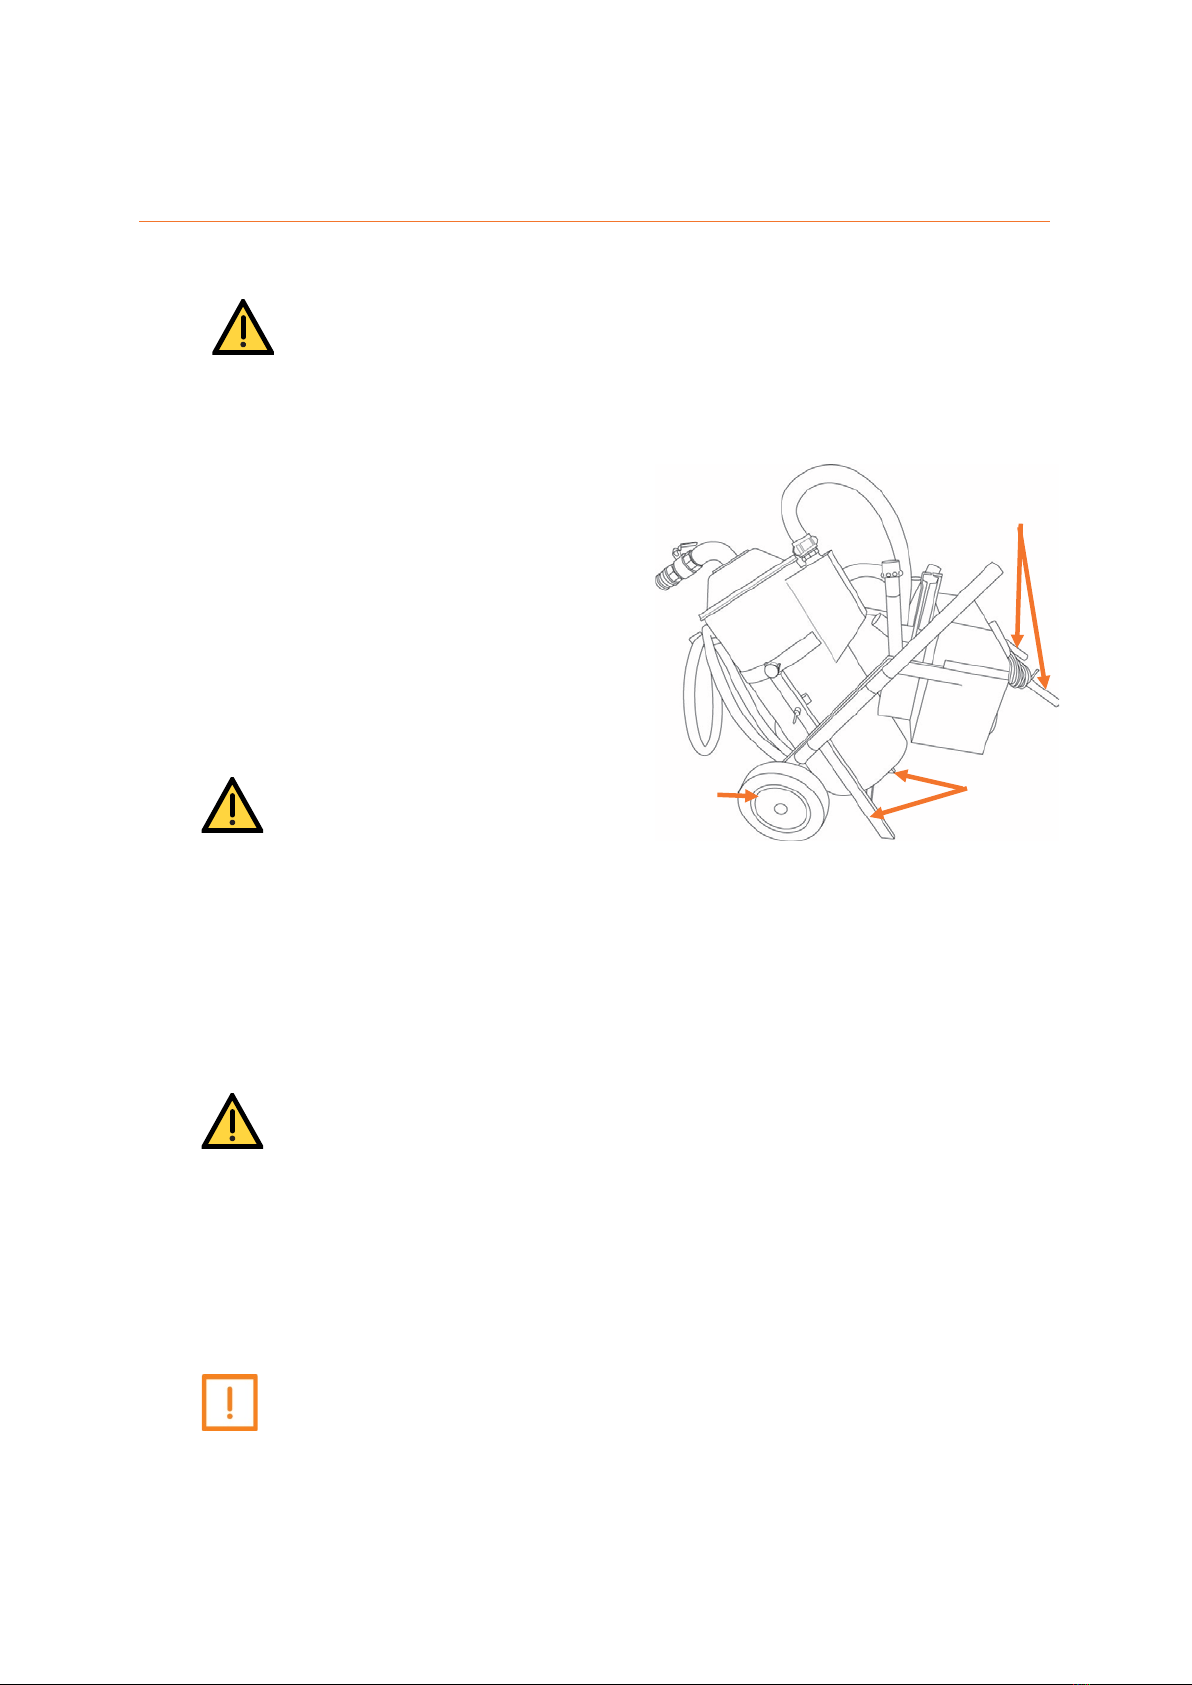
4.1 Moving the Superminor ................................................................................................ 9
4.2 Changing the filter......................................................................................................... 9
4.3 Fit the suction hose ..................................................................................................... 12
4.4 Fit the tools ................................................................................................................. 13
4.5 Switching on and off.................................................................................................... 15
4.6 Selecting suction or discharge..................................................................................... 16
4.7 Tank operations .......................................................................................................... 17
4.8 Vacuum ....................................................................................................................... 18
4.9 Discharge..................................................................................................................... 20
4.10 Changing the tank ....................................................................................................... 23
4.11 Storage ........................................................................................................................ 24
5Technical specification .................................................................................................25
5.1 Superminor +............................................................................................................... 25
5.2 Superminor + compact................................................................................................ 26
5.3 Operating conditions................................................................................................... 27
5.4 Storage conditions ...................................................................................................... 27
6Cleaning and maintenance ...........................................................................................28
6.1 Regular checks............................................................................................................. 28
6.2 Cleaning....................................................................................................................... 29
7Troubleshooting...........................................................................................................31
8Spares list ....................................................................................................................33
9Circuit diagrams ...........................................................................................................34
10 Warranty .....................................................................................................................37
11 End of life.....................................................................................................................37
12 Index............................................................................................................................38

4 FPQ41 Superminor Issue 1
1Introduction
For over 50 years, Freddy has helped
reduce health and safety problems in
machine workshops. Coolant is a vital part
of the machining process, but unless it is
treated correctly, it can cause health
problems for operators and reduce the
efficiency of the machining operation.
The Freddy Superminor is an easy-to-use
machine, designed to:
remove coolant, swarf and hydraulic
and lubricating oils.
separate the particulates.
recover the filtered coolant either for
re-use or disposal.
The Superminor is delivered with a
removable 100 litre tank. This feature
allows the Superminor to deal efficiently
with different fluids without cross-
contamination.
The modular motor pod is available in a
range of voltages and power ratings and
the Superminor can be built to your own
specification.
1.1 About this manual
The following icons are used throughout
this manual:
This symbol appears whenever
there is a potential hazard to the
user or equipment.
This symbol appears whenever
there is a potential biological
hazard. Be aware of the
substances used in the equipment
and the potential hazards they
pose to the user.
This symbol appears whenever
there is a potential chemical
hazard. Be aware of the
substances used in the
Superminor.
This symbol highlights where you
must take special care to ensure
the Superminor operates
efficiently.
Note:
Notes give extra information
about the Superminor.
Hint:
Hints give helpful tips.

FPQ41 Superminor Issue 1 5
1.2 EC Declaration of Conformity

6 FPQ41 Superminor Issue 1
2Safety
Always take care when using the Superminor and be aware of your surroundings.
Always follow the instructions in this manual and any warnings.
In the event of a fire, use fire-fighting equipment suitable for electrical use.
2.1 Warnings
Do not lift the Superminor. Move the Superminor as described in section 4.1.
Keep sumps free of all debris, including swarf and fines. These metal particulates will
lead to increased tool wear and reduce the finish quality on the machined product.
Do not use the Superminor to vacuum the following:
Acids
Alkalis
Hot liquids over 40°C
Liquids with a low flashpoint
Liquids that foam easily or contain detergent
If you have any doubts, contact Freddy Products Ltd.
Do not use the Superminor in areas where there is:
A danger of fire or explosion
A corrosive atmosphere
A high concentration of dust
Create a schedule for regular housekeeping and cleaning to make sure that it is
carried out within a specified time. This should include:
Dealing with spillages immediately
Cleaning sumps regularly and fully
Disposing of fluid safely and correctly
Any other points you want to cover
Operators should be trained in:
The correct use of the Superminor
The relevant local operating procedures
COSHH requirements.
Wear the correct personal protective equipment (PPE) for all applications, including
protective gloves and eye protection to the relevant safety standards.
The sound levels of the Superminor in use are 85dB.
We recommend that ear protection is worn during extensive use of the Superminor.

FPQ41 Superminor Issue 1 7
Misuse of the equipment can cause injury. DO NOT use it for any purpose other than
that described in this manual.
2.2 Residual risks
As with all machinery, the Freddy Superminor presents a number of residual risks to the user,
maintenance engineer and other personnel. These are listed below:
Bacteria that have been filtered from the coolant could pose a bio-hazard. Wear the
correct PPE including protective gloves and eye protection and take care when
dealing with the used filter bags and all coolant.
Toxic substances such as coolant can cause skin and eye irritation. Wear the
appropriate PPE and follow company procedures at all times.
Sharp pieces of metal will be filtered from the coolant. Take care when emptying
and cleaning the filters.

8 FPQ41 Superminor Issue 1
3Description
The Freddy Superminor is designed to
allow you to vacuum out, filter and return
coolant. The tank holds 100 litres of
coolant.
A filter bag is located in a perforated steel
basket and is used to filter swarf, chips,
sludge and smaller particulates from the
coolant. Filter bags are available in gauges
from 5 to 1000 μm (5 to 1000 micron).
The Superminor also includes a float
assembly within the main tank to prevent
overfilling. When the tank is filled to a
certain level, suction is lost.
3.1 Operational overview
Figure 3-1: Simple operational diagram
The Superminor is supplied with different
tools to make tasks easier for you (section
4.4).
Once a filter is fitted and the appropriate
tool is attached to the suction hose, the
Superminor is ready to vacuum spills,
sumps and machine tools.
After vacuuming, the filtered coolant can
be returned to the machine tool sump. The
clear return hose allows you to see the
cleaned coolant being returned.
Suction hose
Tank containing
filter basket
Return hose
Handles
Suction tools

FPQ41 Superminor Issue 1 9
4Operation
This section describes how to set up and use the
Superminor.
The Superminor must be earthed.
4.1 Moving the Superminor
The Superminor has 2 handles and fixed wheels
to allow you to move it to wherever it is needed
(Figure 4-1).
To move the Superminor, lift the handles, and
push the Superminor (in a similar manner to
pushing a wheelbarrow) to where you need to
use it.
When the Superminor is in location, lower the
handles so that the stand is on the floor.
Figure 4-1: Freddy Superminor
Take care when moving the
Superminor. It can weigh up to
210 kg when full. Make sure you
are able to move the Superminor
and get help if necessary.
Note The quoted weight of the
3 kW Superminor is with the
tank full of water – liquids
with different viscosities can
alter the maximum weight.
Before using the Superminor, make
sure the stand is on the floor and is
stable. The tank should be in the
upright position to vacuum and in
the tilted position, as shown in
Figure 4-1, to discharge.
4.2 Changing the filter
You must fit a filter to the Superminor
every time it is used. If one is not fitted,
the machine may be damaged or will
not work efficiently and the warranty
will be void.
Handles
Stand
Fixed
wheels

10 FPQ41 Superminor Issue 1
Bacteria that have been filtered from
the coolant could pose a bio-hazard.
Wear the correct PPE including
protective gloves and eye protection
and take care when dealing with the
used filter bags and all coolant.
Toxic substances such as coolant can
cause skin and eye irritation. Wear the
appropriate PPE and follow company
procedures at all times.
Sharp pieces of metal will be filtered
from the coolant. Take care when
emptying and cleaning the filters.
The grade of filter that should be used depends
on the material being vacuumed. Filters are
available in a variety of grades from
1000 micron to 5 micron:
A coarser filter (larger number) is used for
larger particulates. These are made from
nylon and are reusable. When they have
been used, empty the filter and clean and
rinse it before using it again.
Finer filters (smaller number) are used for
smaller particulates. Finer grade filters are
made from needle-felt and are disposable.
They should only be used once before being
carefully disposed of according to relevant
procedures.
Figure 4-2: Reusable filter bag
In normal use, we advise that you start
with a large or medium grade filter to
filter out the larger debris, and then
repeat the operation with a finer filter.
1. Remove the filter hood:
Make sure that the Superminor stand is
firmly on the ground and that the tank
is upright.

FPQ41 Superminor Issue 1 11
Four clips hold the filter hood (3) in place
(marked * on the diagram). Work on one clip
at a time.
Pull up the lower part of the clip (1) to
release the top part of the clip that secures
the filter hood to the Superminor turret.
Pull down the top of the clip (2).
Repeat this for each clip until the filter hood
can be removed.
Remove the filter hood from the
Superminor.
Figure 4-3: Remove the filter hood
2. Remove the filter:
Note A 200 micron filter is fitted to the
Superminor when it is first supplied.
Carefully remove the used filter from the
Superminor and dispose of the waste
products in accordance with your company
procedures.
Note Nylon filters (sizes 100 to 1000 micron)
can be cleaned and rinsed and then
reused. See section 6.2.1.
Figure 4-4: Remove the filter
Do not re-use disposable filters
(needle-felt filters with mesh sizes of
5 to 75 micron).
3. Fit the filter:
Select the correct grade of filter for the
cleaning operation you will be carrying out.
Place the filter into the filter basket in the
Superminor turret.
Make sure that the body of the filter is
smoothed out into the Superminor and that
the rim of the filter fits into the recess in the
edge of the Superminor turret next to the
seal (1).
Figure 4-5: Fit the filter
The rim of the filter should be level
with the seal in the filter basket in
the Superminor turret.

12 FPQ41 Superminor Issue 1
4. Replace the filter hood:
Fit the filter hood on the Superminor turret
so that the four clips line up.
Work on one clip at a time.
Raise the lower part of the clip to allow you
to place the top part of the clip over the
edge of the filter hood (1).
Push down the lower part of the clip (2) to
secure the filter hood to the Superminor.
Repeat this for each clip.
Figure 4-6: Replace the filter hood
4.3 Fit the suction hose
Before you use the Superminor, you must first
connect the suction hose to the pipe on top of
the Superminor filter hood.
One end of the hose has a 51 mm CAM lock
fitting which has two clamps. This is the end to
attach to the Superminor.
Make sure the clamps on the hose are raised
away from the end of the hose.
Push the end of the hose onto the pipe on top
of the Superminor filter hood.
Figure 4-7: Fit the suction hose
Pull each clamp in turn towards the hose to
secure it in place.
Figure 4-8: Secure the suction hose
To remove the suction hose from the
Superminor, pull the hose clamps away from
the hose towards the Superminor.
Pull the hose away from the Superminor.

FPQ41 Superminor Issue 1 13
4.4 Fit the tools
The Superminor is supplied with the following
tools and tool accessories:
Tool
Use
Probe tool
Dark grey rigid PVC
tool used to clear
sumps.
Crevice tool
Pale grey rigid PVC
tool used to clean
slideways on machine
beds or narrow gaps.
Flexible bench
tool
An orange, soft
polyurethane tool
used to clean the
inside of machines.
Floor tool
Used for floor cleaning
and spillages.
Extension tube
Metal tube usually
used with the floor
tool, but can also be
used to extend the
reach of the flexible
bench and crevice
tools
51 to 38 mm
adaptor
Metal adaptor used to
fit the crevice tool,
flexible bench tool and
extension tube to the
suction hose.
The tools are pushed into the free end of the
suction hose.
To remove the tools, just pull them out of the
end of the suction hose.
Figure 4-9: Fitting tools

14 FPQ41 Superminor Issue 1
4.4.1 Probe tool
Push the non-chamfered end of the probe tool
into the free end of the suction hose.
Note The probe tool does not need the
adaptor.
Figure 4-10: Fit the probe tool
Hint The chamfered end of the probe tool can
be rotated to act as a scoop if necessary.
4.4.2 Crevice tool
Fit the adaptor into the free end of the suction
hose.
Push the crevice tool onto the adaptor.
Figure 4-11: Fit the crevice tool
4.4.3 Flexible bench tool
Fit the adaptor into the free end of the suction
hose.
Push the non-chamfered end of the flexible
bench tool onto the adaptor.
Figure 4-12: Fit the flexible bench tool
Hint You can cut the end soft polyurethane
tool once it has started to wear down or
to give a different angle at the end of the
tool.
4.4.4 Floor tool
Fit the adaptor into the free end of the suction
hose.
Push the extension tube onto the adaptor.
Figure 4-13: Fit the adaptor and extension
tube
Push the extension tube into the floor tool.
Figure 4-14: Fit the floor tool

FPQ41 Superminor Issue 1 15
4.5 Switching on and off
The power cable (1) and power switch (2) are
located at the handle end of the Superminor on
the motor pod.
The power cable can be wound around the
handles for storage.
Connect the power lead (1) to the power socket
on the wall.
Figure 4-15: Power switch location
Check the voltage rating of the
Superminor by looking at the rating
label. Make sure that you connect
the power lead to the correct supply.
To switch on, press the green Ibutton.
To switch off, press the red Obutton.
Figure 4-16: Power switch
3kW Superminor only
The 3kW Superminor has a boost button next to
the power switch (Figure 4-17)which switches on
the third motor to bring the power up to 3kW.
To switch on the 3kW Superminor, press the
green I button as described above. This powers
the Superminor to 2kW. Press the Boost button
to reach full power of 3kW.
To switch off the 3kW Superminor, press the red
Obutton.
Figure 4-17: 3kW Superminor power
switch with boost button

16 FPQ41 Superminor Issue 1
4.6 Selecting suction or discharge
The Suck/Blow valve is located on the motor pod
(Figure 4-18).
The Suck/Blow valve (2) changes the operation of
the Superminor to either suction (SUCK) or
discharge (BLOW).
To prevent the valve being accidentally moved
during operation, a spring-loaded safety lever
locks the valve into the required position (1) (see
section 4.6.1).
Figure 4-18: Suck/Blow valve location
4.6.1 Safety lever operation
To loosen the locking-bolt to allow you to move
the Suck/Blow valve, turn the safety lever anti-
clockwise (looking from the tank side of the
motor pod) until the Suck/Blow valve knob can
be moved.
Figure 4-19: Loosen the Suck/Blow valve
safety lever

FPQ41 Superminor Issue 1 17
To tighten the locking-bolt to lock the Suck/Blow
valve into position, turn the safety lever
clockwise (looking from the tank side of the
motor pod) until the Suck/Blow valve knob can
no longer be moved.
Figure 4-20: Tighten the Suck/Blow valve
safety lever
If the safety lever movement is restricted
before the locking-bolt is tight, pull the
lever away from the Suck/Blow valve
against the resistance of the spring until
you feel the lever move freely (1).
Rotate the lever by just over a quarter-
turn away from the obstruction (2).
Allow the lever to return to the
Suck/Blow valve and continue to loosen
or tighten the locking-bolt.
Figure 4-21: Changing the position of the
safety lever
4.7 Tank operations
4.7.1 Tank free in frame
When the tank is free in the frame, it sits
vertically and it is able to move on the frame
pivot. This is the normal operating position.
To free the tank in the frame, pull out the
spring-loaded location pin on the side of the
Superminor frame (1) until it frees the tank so
you can move it.
Figure 4-22: Tank location pin

18 FPQ41 Superminor Issue 1
Turn the location pin 180° so that the tank
remains free to move.
The tank slowly swings to a vertical position.
Figure 4-23: Tank location pin - disengaged
4.7.2 Tank fixed in frame
Fix the tank in the frame when you need to
discharge or empty the tank.
Turn the spring-loaded location pin on the side
of the Superminor frame (2) by 180° so it is free
to engage.
Figure 4-24: Tank location pin
Tilt the top of the tank away from the frame
until the pin engages with the tank and clicks
into place.
The tank will be secured at an angle of
approximately 32°.
Figure 4-25: Tilt the tank and secure
4.8 Vacuum
Check:
The filter is correctly fitted (section 4.2).
The suction hose is securely attached to the
Superminor (section 4.3).
The correct tool is attached to the suction
hose (section 4.4).

FPQ41 Superminor Issue 1 19
Before using the Superminor, make
sure the stand is on the floor and is
stable. It should be able to move freely
in the frame (section 4.7.1).
Figure 4-26: Select SUCK
Select SUCK on the Suck/Blow valve.
Make sure that the discharge valve on the return
hose is closed.
Figure 4-27: Discharge valve closed
Open the suction valve on top of the tank turret.
Press the green Ibutton of the power switch to
start the Superminor.
The Superminor suction will start straight away.
Use the tool to vacuum the coolant and debris.
Figure 4-28: Suction valve open
When the tank is full:
the tone of the motor changes.
the Superminor stops suction
because the float ball in the tank
acts as a safety mechanism. You
must empty the tank to restart
vacuuming.
When you have finished, press the red Obutton
of the power switch controls to stop the
Superminor.
Remove the used filter and replace it with a clean
one (section 4.2).
Dispose of the waste products in accordance with
your company procedures.
Figure 4-29: Power switch

20 FPQ41 Superminor Issue 1
4.9 Discharge
Discharge the Superminor each time it
is used so the tank is completely empty.
This will prevent sediment build-up.
Figure 4-30: Superminor in tilted position
Before using the Superminor, make sure
the stand is on the floor and is stable.
The tank should be fixed in the tilted
position in the frame (section 4.7.2).
1. Before discharge
The return hose is stored on the tank of the
Superminor, with the discharge nozzle
supported in a holder on the bottom edge of
the tank.
Remove the discharge nozzle from its holder
and unwind the return hose.
Figure 4-31: Discharge pipe and nozzle in
their stored position
Make sure that the discharge valve is closed.
Figure 4-32: Discharge valve closed
Table of contents