Freeflow Spas Excursion User manual

x Page x x
Pre-Delivery Instructions
Please take the time to read this booklet carefully, as it will provide you with the information you will need to ensure
the safe, secure, and timely installation of your new spa. The following sections are guidelines on how to prepare for
delivery and set-up of your new spa. Specifically covered are site selection, delivery access, ground preparation, and
electrical requirements.
Remember to carefully review the Owner’s Manual that accompanies your spa, and to register the spa's warranty
within 10 days of delivery at freeflowspas.com/warranty.php The Owner's Manual can be found in the Owner’s
Package which has been attached to the filter ring of your spa.
Watkins Manufacturing Corporation reserves the right to change features, specifications and design without
notification and without incurring any obligation.
DATE PURCHASED: _________________________________________________________________
DATE INSTALLED: ___________________________________________________________________
DEALER: ___________________________________________________________________________
ADDRESS:__________________________________________________________________________
TELEPHONE: _______________________________________________________________________
In most cities and counties, permits will be required for the installation of electrical circuits or the construction of
exterior surfaces (decks and gazebos). In addition, some communities have adopted residential barrier codes which
may require fencing and/or self-closing gates on the property to prevent unsupervised access to a pool (or spa) by
children under 5 years of age. Your spa is equipped with a locking cover that meets the ASTM F1346-91 Standard
for Safety Covers and as a result, is usually exempt from most barrier requirements. As a general practice, your local
Building Department will inform you of any applicable barrier requirements at the time a permit is obtained for the
installation of an electrical circuit. Your dealer can provide information on which permits may be required.
Freeflow Spa Pre-Delivery Instructions
Congratulations on your decision to purchase a Freeflow spa.
Welcome to the growing family of Freeflow spa owners.

Site Selection and Preparation
IMPORTANT: Site selection and preparation are your responsibility. Carefully read these instructions and consult
your authorized dealer if you have any questions.
You probably have a spot picked out for your new spa, whether it’s indoors or outdoors, on a patio or on a deck.
Just make sure you check the following:
• Alwaysputyourspaonastructurallysound,level(within½"per10')surface.Afilledspacanweigha
great deal. Make certain that the location you choose can support the weight of your filled spa.
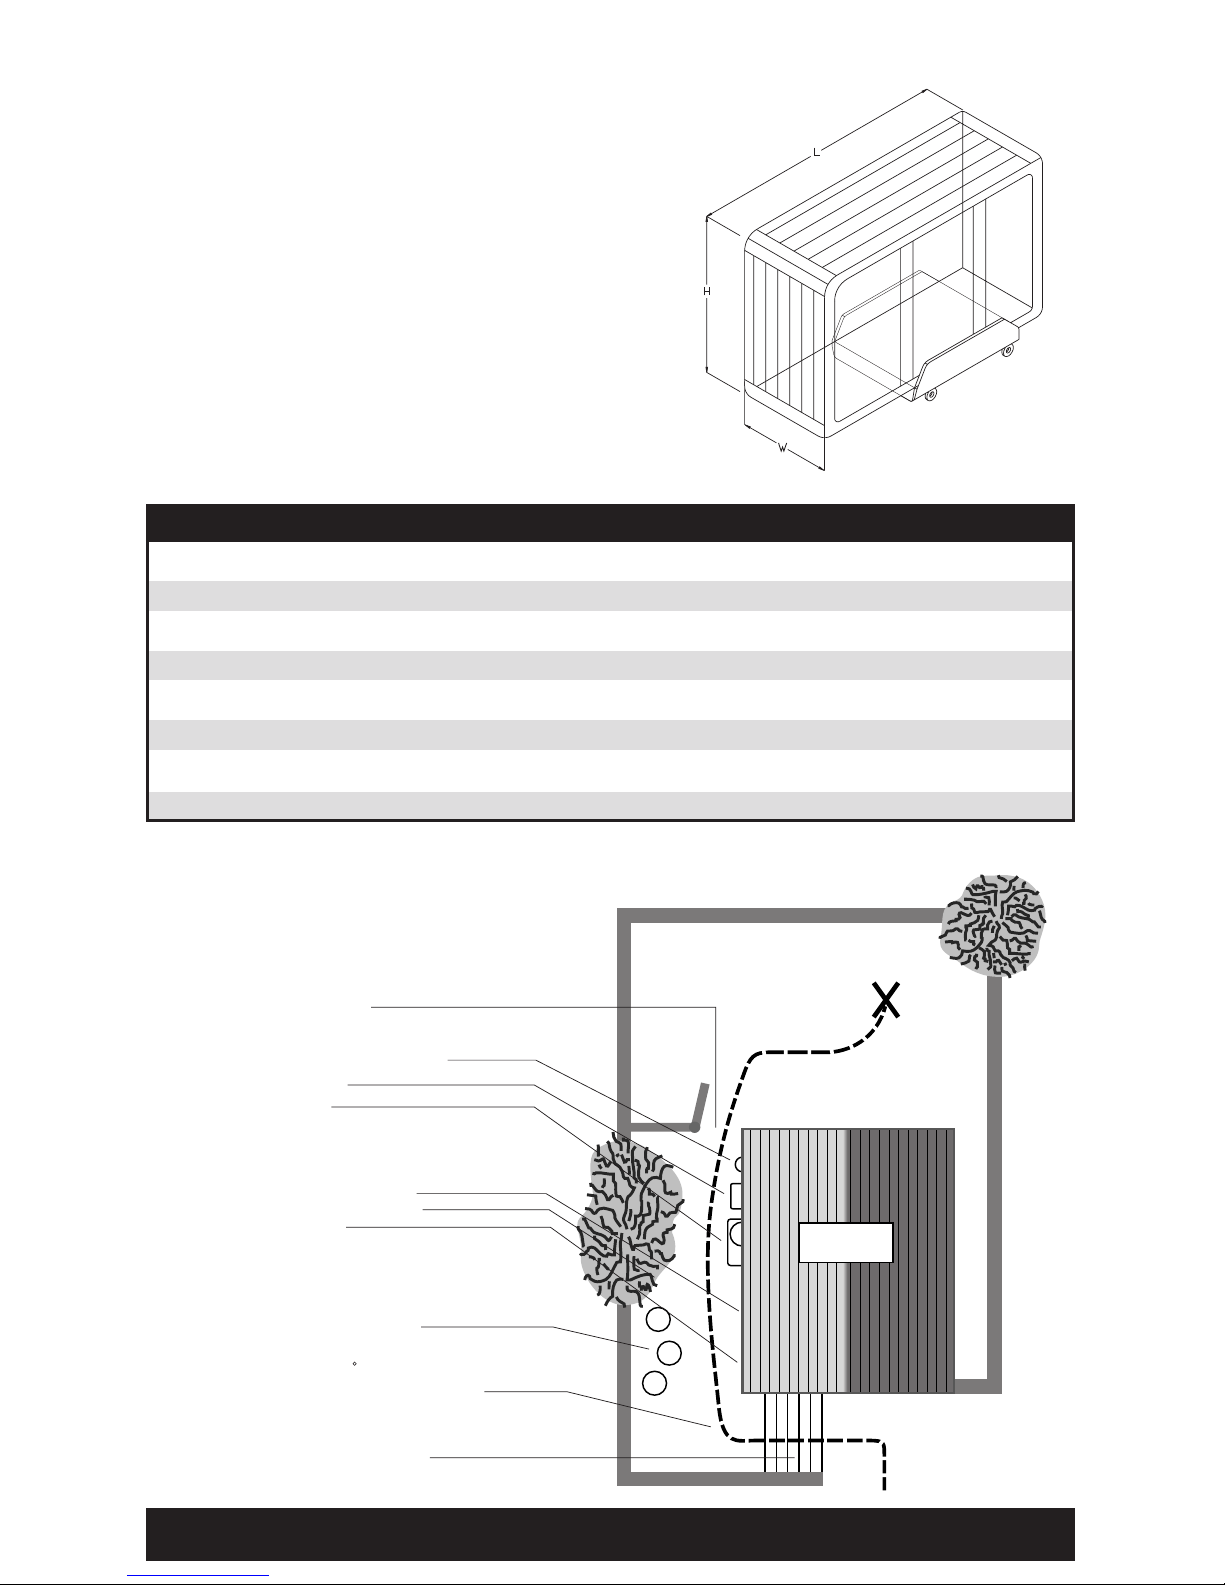
• Locateyourequipmentcompartment,whichhousesalloftheelectricalcomponents,inaplace
where water will drain away from it. Allowing water into the equipment compartment can damage the
electronics, or may result in tripping your house’s circuit breaker.
• Leaveyourselfeasyaccesstothecircuitbreakersinthesubpanel(230voltconvertedmodels),ortothe
GFCI on the end of the power cord (110 volt models).
• Neverletwatergetintothesubpanel(230voltconvertedmodels),orintotheGFCI(110voltmodels),or
into the electrical outlet that your spa is plugged into.
• Leaveaccesstotheequipmentcompartmentforperiodicspacareandmaintenance.
OUTDOOR AND PATIO INSTALLATION
No matter where you install your new spa, it’s important that you have a solid foundation to support it. Structural
damage to the spa resulting from incorrect installation or placement on an inadequate foundation is not covered
under the spa’s limited warranty.
If you install the spa outdoors, a reinforced concrete pad at least four inches thick is suggested. The reinforcing
rod or mesh in the pad should be attached to a bond wire. All spas may be installed onto a deck, provided that
the load capacity of the deck is greater than the dead weight of the spa.
DECK INSTALLATION
To be certain your deck can support your spa, you must know the deck’s maximum load capacity. Consult a
qualified building contractor or structural engineer before you place the spa on an elevated deck or
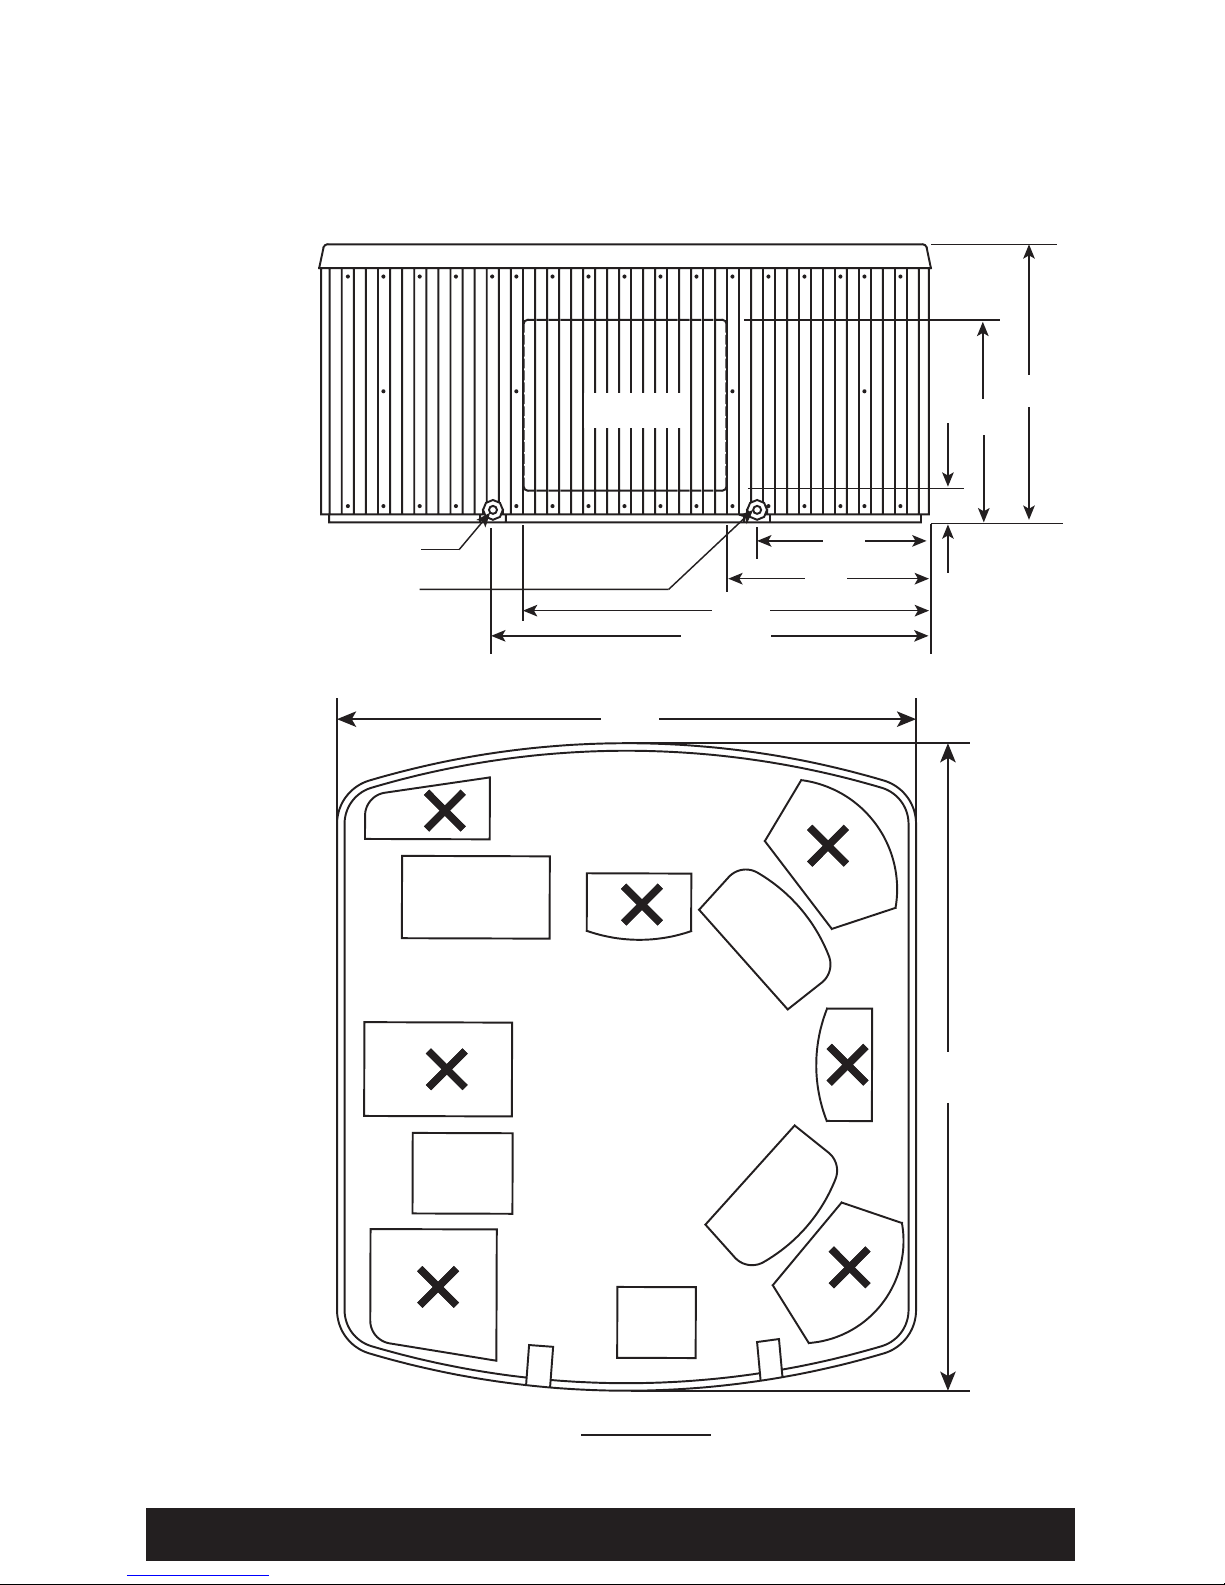
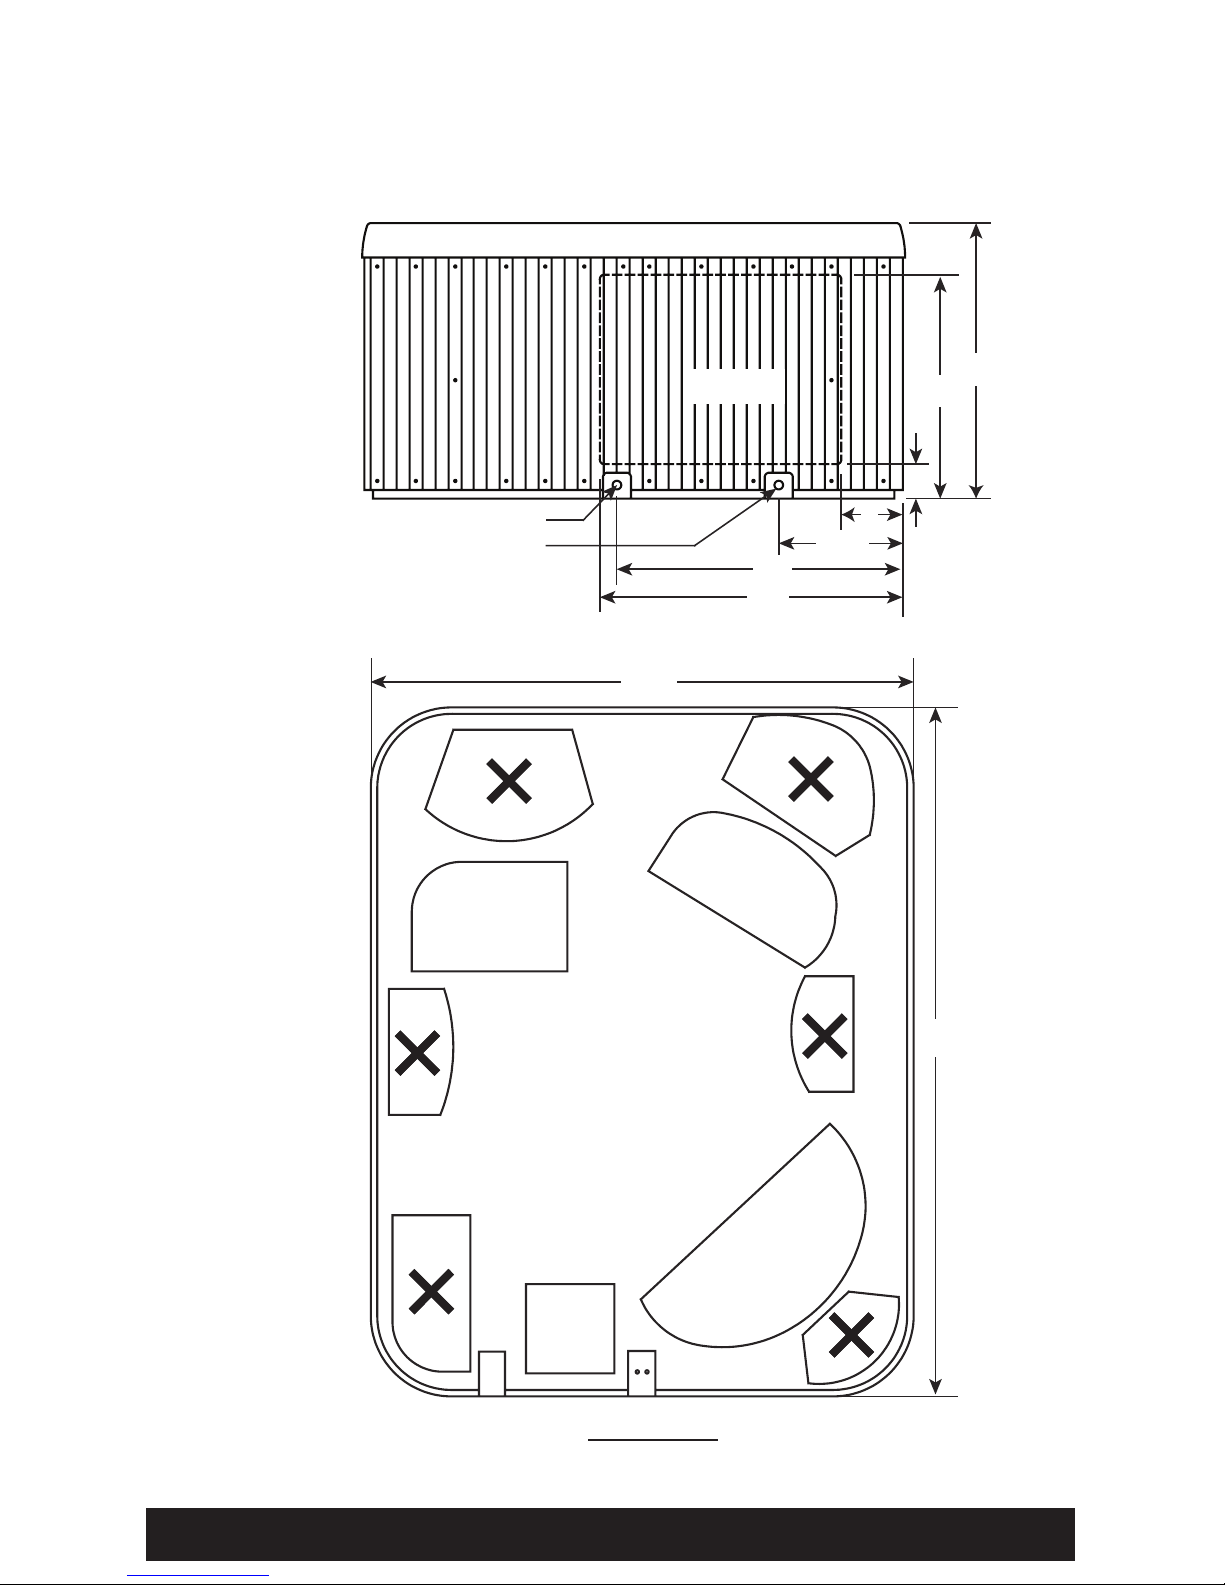
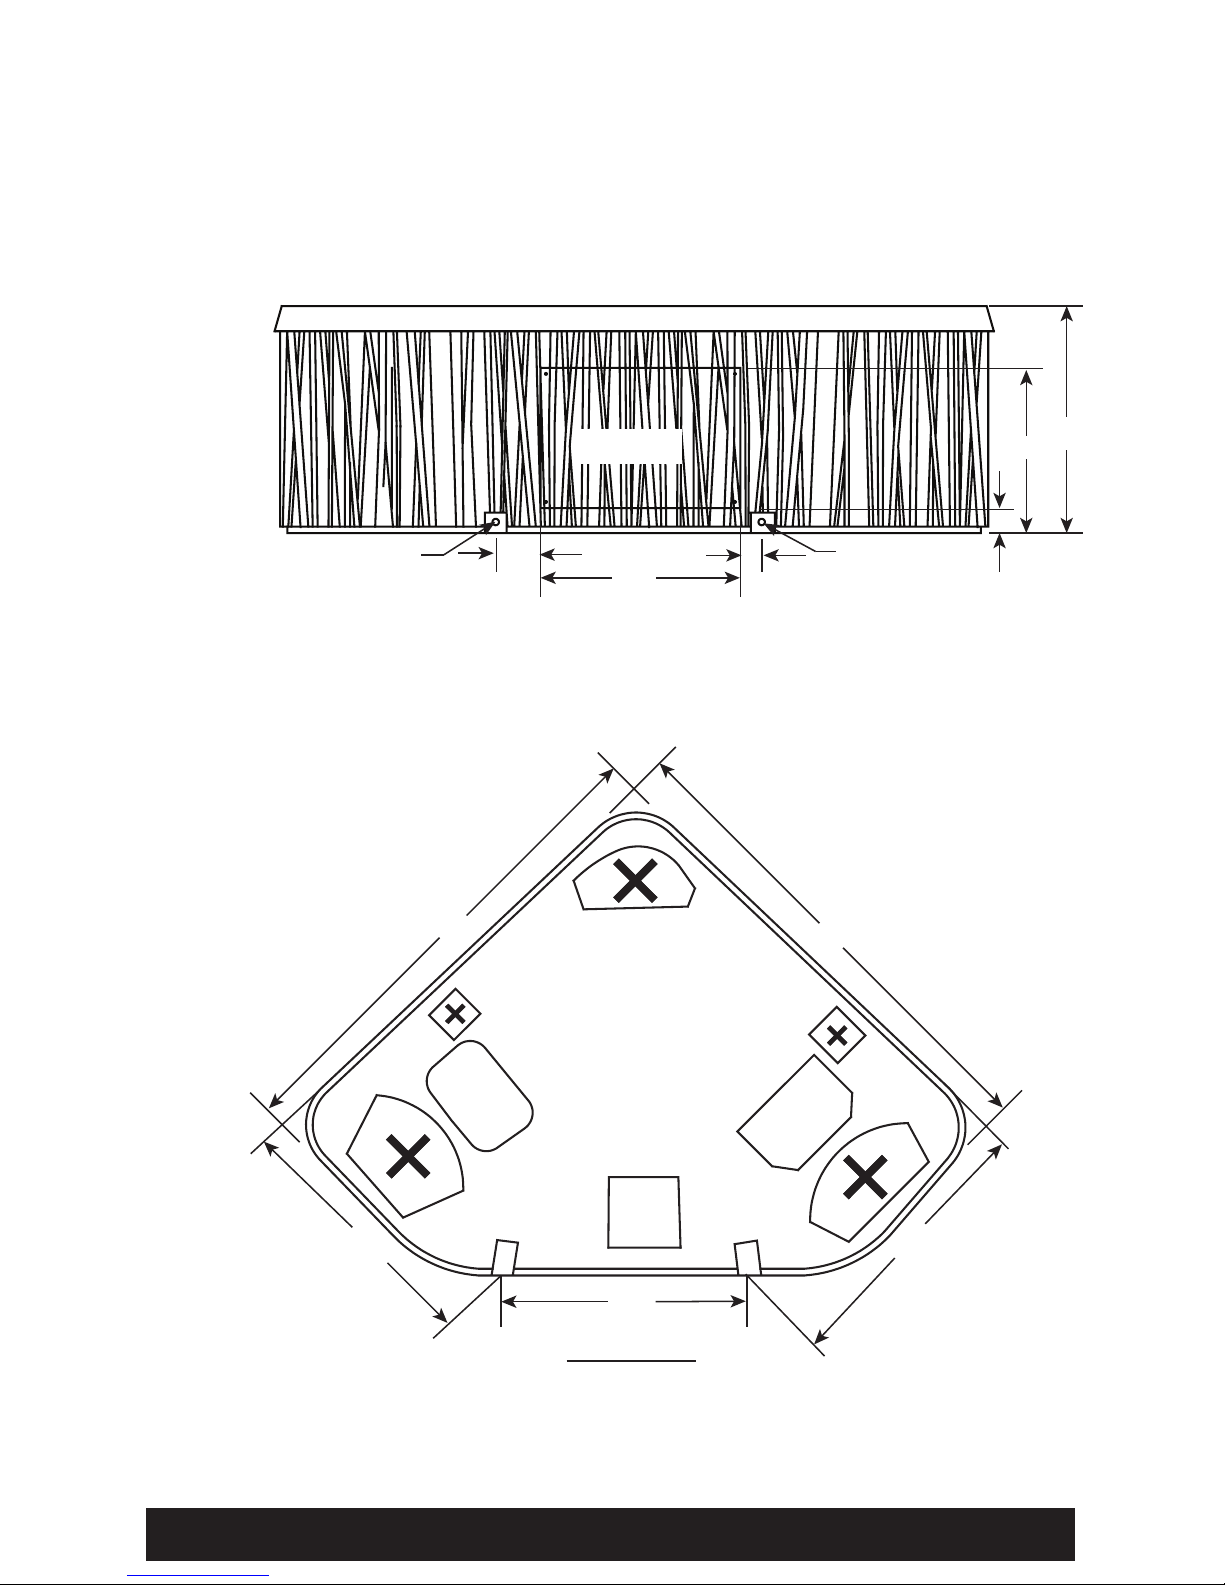
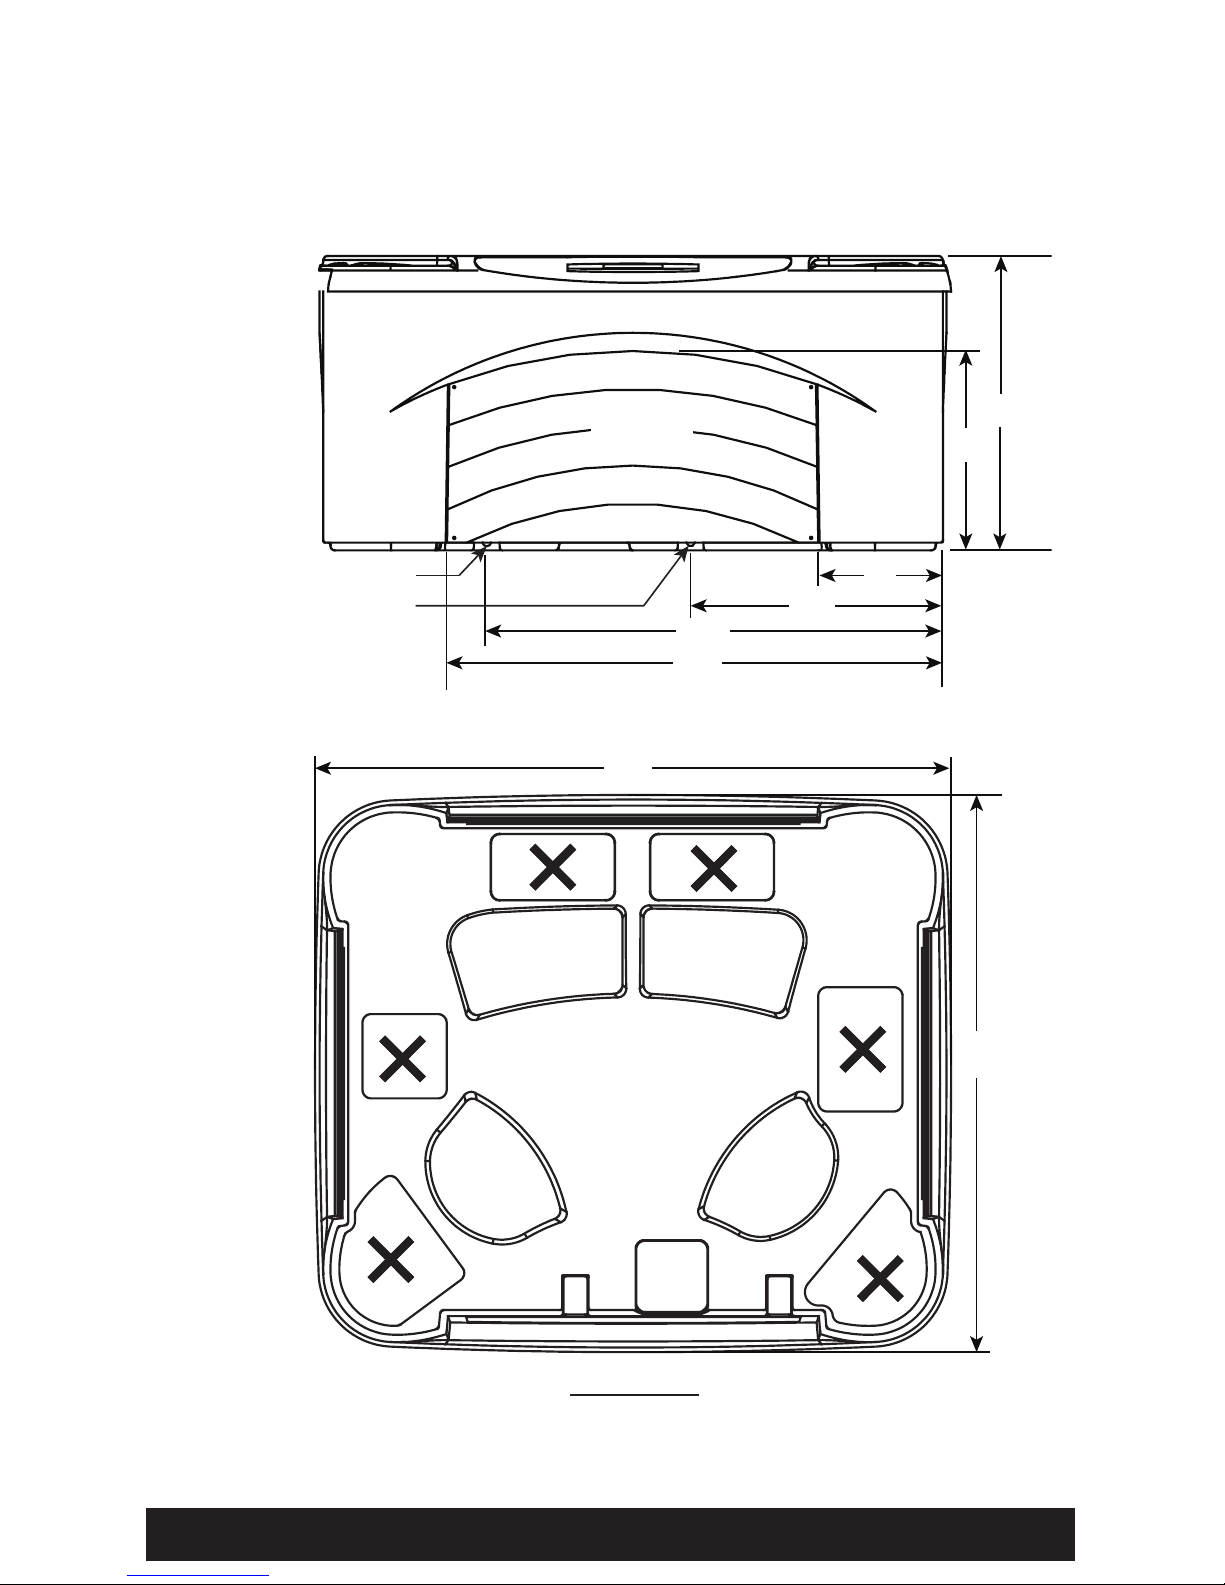
indoors. To find the weight of your spa, its contents and occupants, refer to the Spa Specification chart on back
of this guide. This weight per square foot must not exceed the structure’s rated capacity, or serious structural
damage could result.
INDOOR INSTALLATION
Be aware of some special requirements if you place your spa indoors. Water will accumulate around the spa, so
flooring materials must provide a good grip when wet. Proper drainage is essential to prevent a build-up of water
around the spa. When building a new room for the spa, it is recommended that a floor drain be installed. The
humidity will naturally increase with the spa installed. Water may get into woodwork and produce dry rot, mildew,
or other problems. Check for airborne moisture’s effects on exposed wood, paper, etc. in the room. To minimize
these effects, it is best to provide plenty of ventilation to the spa area. An architect can help to determine if more
ventilation must be installed.
Your dealer can help you with local information such as zoning regulations and building codes.
x Page x xPre-Delivery Instructions Page2

DELIVERY ACCESS
First, locate the dimensions of your spa on the following chart. The
dimensions shown are the measurements of the spa in the vertical
position, laid on its side.
Next, contact your dealer to find the height and width added by
the delivery cart which the dealer will use to deliver your new
spa. Use the height of the cart plus the dimension shown as H to
determine the vertical clearance required to pass the spa and cart.
Use the width of the cart, or dimension W, whichever is greater, to
determine the maximum width of clearance necessary.
NOTE: It may be necessary to allow for additional over-head
clearance if the spa will be rolled up or down an incline or moved
up or down a short flight of stairs.
Use the information below to determine the requirements for
access to your desired location.
x Page x x
How is your width clearance?
Protruding electric meters
A/C units
Do you have sufficient
overhead clearance?
Check low roof eaves,
overhanging branches,
rain gutters
Is the path clear?
Move away branches, dog
houses, firewood, etc.
If there is a 90 turn, can we
clear it? (The spa will not bend)
No more than 6 consecutive
stairs without a landing
Gas meters
Check all gates
HOUSE
BACK YARD
STREET
Page 3 Pre-Delivery Instructions
Model Width W Length L Height H
Excursion 34” 6'5” 7'3”
Solstice 34” 6'5” 7'3”
Accent 33” 5'3” 6'9”
Calistoga™34¼” 6'6” 6'6”
Azure 33” 5'3” 6'9”
Tristar 31” 6' 6'
Cascina™ 31¾” 5'2” 5'10”
Monterey 34" 6'5" 7'3"

x Page x x
It may be necessary to remove a gate, part of a fence, or other movable obstructions in order to roll the spa to its
installation site. About ten percent of the time, a crane is the only way to install the spa by lifting it to its final destination.
If the spa has to be taken off of the cart to go over a wall (either because the entry area is too narrow, the eaves are
too low, the corner is too tight, or the stairway is too steep), a crane will be required. Don’t be alarmed!
The crane has a truck-mounted boom which can fit right in your driveway. It is run by a licensed and insured
operator. For a charge, the crane operator will lift your spa over walls, buildings, or any other obstruction and place it
as close to the installation site as possible. Crane delivery typically takes an average of 30 minutes to complete.
NOTE: If your spa delivery requires the use of a crane, you may be required to pay for its services at the completion
of the delivery.
GROUND PREPARATION
Your spa has been engineered to perform on all kinds of common yard surfaces. While a concrete slab is best
for long-term use*, other foundations are acceptable so long as a level base is prepared prior to delivery. Three
foundation base pictures, shown at right, represent examples of alternatives to a concrete slab for spas installed
without gazebos or other accessories.
*NOTE: A reinforced concrete pad at least four inches thick or a deck that is able to withstand more than 115 lbs. per
square foot is required.
INSTALLATION NOTES:
As a homeowner, it is your responsibility to provide a suitable, level
foundation for your spa. Keep in mind that most delivery crews are not
equipped to level and prepare spa sites.
If you are interested in having a concrete slab, brick surface, or wood
deck installed, your dealer should be able to suggest a qualified,
licensed contractor.
NOTE: In order for the spa to operate properly and the internal
plumbing to drain completely, you must ensure that the spa is leveled
(within½"per10')afterithasbeeninstalled.Donotshimyouspain
any manner, as this could cause the cabinet to warp, thereby voiding
the warranty.
Pre-Delivery Instructions Page 4
CONCRETE PADS
BRICK SURFACES
WOOD DECKING
FOUNDATIONS FOR SPAS
WITH ACCESSORIES

7’3”
Excursion
34”
24”
2”
21”
25”
50.5”
54.5”
6’5”
x Page x xPage 5 Pre-Delivery Instructions
Excursion, Solstice & Monterey
Dimensions
NOTE: All dimensions are approximate; measure your spa
before making critical design or pathway decisions.
(Bottom view)
(Front view)
DOOR
DRAIN
ELECTRICAL
DOOR SIDE
UPSIDE DOWN VIEW OF SPA

Accent
33”
25”
3”
10”
15.5”
33”
36”
5’3”
6’9”
Accent & Azure
Dimensions
NOTE: All dimensions are approximate; measure your spa
before making critical design or pathway decisions.
(Front view)
(Bottom view)
x Page x xPre-Delivery Instructions Page 6
DRAIN
ELECTRICAL
DOOR SIDE
UPSIDE DOWN VIEW OF SPA
DOOR

Calilstoga
34 1/4”
25”
2”
4”
4”
25.5”
6’6”
x Page x xPage 7 Pre-Delivery Instructions
CALISTOGA
Dimensions
NOTE: All dimensions are approximate; measure your spa
before making critical design or pathway decisions.
(Front view)
(Bottom view)
DOOR
DRAIN
ELECTRICAL
DOOR SIDE
UPSIDE DOWN VIEW OF SPA

Tristar
4”
4.5”
25.5”
3”
25”
31”
6’
6
’
3
’
5
”
2’10”
x Page x x
Tristar
Dimensions
NOTE: All dimensions are approximate; measure your spa
before making critical design or pathway decisions.
(Front view)
(Bottom view)
Pre-Delivery Instructions Page 8
DOOR
DOOR SIDE
UPSIDE DOWN VIEW OF SPA
DRAIN
ELECTRICAL

x Page x x
Cascina
22”
31¾”
13”
28”
49”
54”
5’10”
5’2”
x Page x xPage 9 Pre-Delivery Instructions
CASCINA
Dimensions
NOTE: All dimensions are approximate; measure your spa
before making critical design or pathway decisions.
(Front view)
(Bottom view)
DOOR
DOOR SIDE
UPSIDE DOWN VIEW OF SPA
DRAIN
ELECTRICAL

x Page x x
ELECTRICAL REQUIREMENTS
To ensure you will have an opportunity to use your spa soon after delivery, it is very important that the required
electrical service has been installed. Unless otherwise stipulated by your dealer, THIS IS YOUR RESPONSIBILITY.
IMPORTANT: All electrical circuits must be installed by a qualified, licensed electrician.
Freeflowspas‚areavailableas110/230voltconvertibleheatingsystems.Thesemodelscomestandardfromthe
factory with 110 volt heating systems; however, with the addition of a subpanel and a control box wiring change,
theycanbeconvertedto230voltoperation.Seethefollowingsectionsfortheelectricalrequirementsfor110volt
operation,and230voltconvertedoperation.
110 VOLT OPERATION REQUIREMENTS
It is highly recommended that the 110 volt spa be on a dedicated 15 amp, 110 volt circuit.
Each 110 volt model comes equipped with approximately 13 feet of usable power cord. (This is the maximum
length allowed by ETL.) When the spa is installed, the power cord will come out of the bottom of the equipment
compartment.
In addition to the dedicated 15 amp, 110 volt GFCI protected circuit, your spa requires a 15 amp single receptacle.
This receptacle should contain an outdoor-rated, weather-resistant receptacle cover plate. The single receptacle and
cover plate should be installed by your electrician prior to the delivery of your spa.
For your safety, when your electrician is installing the electrical outlet, it should be no closer than five (5) feet and no
farther than ten (10) feet from the spa. (Reference National Electric Code 680-6a(1) and 680-41a.)
WARNINGS: Do not connect your spa to an extension cord!
The 110 volt GFCI switch and the receptacle must be protected from weather and landscape sprinklers–they should
never get wet.
NOTE: If you require the services of a licensed electrician, your dealer should be able to suggest one for you.
Your spa has been carefully engineered to provide maximum safety against electric shock. Remember, connecting
the spa to an improperly wired circuit will negate many of its safety features.
230 VOLT OPERATION REQUIREMENTS
Allmodelsrequirea40amp,singlephase,230voltcircuitbreakerinthemainelectricalservicepanel.
All230voltspasmustbewiredinaccordancewithapplicablelocalandnationalelectricalcodes,allelectricalwork
must be done by a licensed electrician.
NOTE: Watkins Manufacturing Corporation REQUIRES THE USE OF A SUBPANEL TO SUPPLY POWER
AND PROTECT THE SPA. The subpanel containing a GFCI breaker must be purchased separately and can be
purchased from your dealer.
Pre-Delivery Instructions Page 10
RECOMMENDED
110 V 15 AMP
RECOMMENDED
110 V 15 AMP

x Page x x
A licensed electrician should install a four-wire electrical service (two line voltages, one neutral, one ground) from
the main electrical service panel to the subpanel, and from the sub-panel to the spa per the appropriate wiring
diagram as illustrated below.
Your electrician should mount the subpanel in the vicinity of the spa but it should not be closer than five (5) feet
from the spa water edge (NEC 680-38 to 41-A-3).
INSTALLATION NOTE: After the spa has been installed by the dealer’s delivery crew, your electrician can connect
the conduit from the subpanel to the spa’s control box and then complete the wiring connections in the control box.
NOTE: Completestep-by-stepInstallationandWiringInstructionsfor230voltconfigurationareincludedinthe
Owner’s Manual and with each sub-panel, which can be obtained from your dealer.
WARNING: Removing or bypassing the GFCI breakers in the subpanel at any time will result in an unsafe spa and
will void the warranty.
WIRE SPECIFICATION NOTE: Long electrical runs may require a larger gauge feed wire than stated. All wiring
must be copper to ensure adequate connections. Do not use aluminum wire.
RefertotheWiringDiagramsbelowfortheelectricalrequirementsofthe230voltmodels.
Page 11 Pre-Delivery Instructions
White Neutral Wire that is connected to Spa Neutral goes HERE.
From the House
Breaker Box To the Spa
230VWiringInstructions:
4 wires/Minimum 40 amp GFCI Breaker #8 AWG
75°C Copper Wire Minimum (less than 100’ length)
Special Note:
If the GFCI breaker trips immediately after attempting
to turn on, please check the White Neutral Wire that is
connected to the spa. See figure below.
Red
White
Black
Green

x Page x xx Page x xPre-Delivery Instructions Page12
SERVICES AVAILABLE FROM YOUR SPA DEALER
Service Cost
Pre-Delivery site inspection _____________
Deliver spa to installation site _____________
Unwrap spa and haul away packaging material _____________
Set up _____________
Fill the spa with water _____________
Connect the spa to its power source (110 volt models) _____________
Explain and test the spa’s operation
•
Jet system
•
Set temperature control
•
Control panel functions
Explain the safety features
•
GFCI
•
Heater high limit
•
Heater thermal cut-off
General spa operation & maintenance orientation _____________
Water quality and maintenance orientation _____________
Adjust the water’s Total Alkalinity, Calcium Hardness and pH _____________
Sanitize the water _____________
Inspect the spa cover, place on spa _____________
Review winterizing instructions _____________
Review Owner’s Manual _____________
Follow-up call _____________
In-store spa water analysis _____________
TOTAL COST _____________
ADDITIONAL PRODUCTS AVAILABLE FROM YOUR
SPA DEALER
• OzoneSystem
• CoverLifter
• SpaStep
• Filter

x Page x xx Page x xPage 13 Pre-Delivery Instructions
CONTRACTOR SUGGESTIONS
Electrician
Name: ______________________________________________________________________________
Telephone: ______________________________________________________________________________
Name: ______________________________________________________________________________
Telephone: ______________________________________________________________________________
Masonry
Name: ______________________________________________________________________________
Telephone: ______________________________________________________________________________
Name: ______________________________________________________________________________
Telephone: ______________________________________________________________________________
General
Name: ______________________________________________________________________________
Telephone: _____________________________________________________________________________
Name: _____________________________________________________________________________
Telephone: _____________________________________________________________________________

x Page x xx Page x xPre-Delivery Instructions Page 14
THIS PAGE LEFT INTENTIONALLY BLANK

x Page x x
Spa Specifications
CAUTION: Watkins Manufacturing Corporation suggests a structural engineer or contractor be
consulted before the spa is placed on an elevated deck.
* NOTE: The “Filled weight” and “Dead weight” of the spa includes the weight of the occupants
(assuming an average occupant weight of 175 lbs).
Page 15 Pre-Delivery Instructions
Spa Model Footprint
Dimension
Height Effective
Filter
Area
Heater
(Watts)
Water
Capacity
Dry
Weight
Filled
Weight*
Dead
Weight*
Electrical
Requirements
Excursion 7'3"x6'5" 34" 50
square
feet
1,000
or
4,000
315
gallons
452lbs. 4,129
lbs.
100 lbs
per sq.
foot
110 volt, 15 amp
Recommended-
GFCI protected
circuit
Solstice 7'3"x6'5" 34" 50
square
feet
1,000
or
4,000
315
gallons
452lbs. 4,304
lbs.
105 lbs
per sq.
foot
110 volt, 15 amp
Recommended-
GFCI protected
circuit
Accent 6'9"x5'3" 33" 50
square
feet
1,000
or
4,000
250
gallons
382lbs. 3,167
lbs.
105 lbs
per sq.
foot
110 volt, 15 amp
Recommended-
GFCI protected
circuit
CALISTOGA 6'6"x6'6"
Round
34¼" 50
square
feet
1,000
or
4,000
260
gallons
388 lbs. 3,431
lbs.
90 lbs
per sq.
foot
110 volt, 15 amp
Recommended-
GFCI protected
circuit
Azure 6'9"x5'3" 33" 50
square
feet
1,000
or
4,000
250
gallons
334 lbs. 3,119
lbs.
100 lbs
per sq.
foot
110 volt, 15 amp
Recommended-
GFCI protected
circuit
Tristar 6' x 6' 31" 50
square
feet
1,000
or
4,000
205
gallons
302lbs. 2,537
lbs.
80 lbs
per sq.
foot
110 volt, 15 amp
Recommended-
GFCI protected
circuit
CASCINA 5'2"x5'10" 31¾" 50
square
feet
1,000
or
4,000
190
gallons
276lbs. 2,561
lbs.
95 lbs
per sq.
foot
110 volt, 15 amp
Recommended-
GFCI protected
circuit
Monterey 7'3"x6'5" 34" 50
square
feet
1,000
or
4,000
328
gallons
376 lbs. 4,337
lbs.
115 lbs
per sq.
foot
110 volt, 15 amp
Recommended-
GFCI protected
circuit

x Page x x
WATKINS MANUFACTURING CORPORATION
1280ParkCenterDrive
Vista,California92081
(888)961-7727
©
2014WatkinsManufacturingCorporation.
Part#62914.14Rev.A(1/14)
®
This manual suits for next models
7
Table of contents
Other Freeflow Spas Hot Tub manuals
Popular Hot Tub manuals by other brands

Clas Ohlson
Clas Ohlson CM2803 manual

Elecro Engineering
Elecro Engineering Nano SPA Heater Installation & operating manual

SpaDealers
SpaDealers TopSpa XS user guide

Pacific Spas
Pacific Spas ICON Oceana owner's manual

Watkins
Watkins SOLANA TX Pre-delivery instructions

Viking
Viking Mystic installation guide