FTE Maximal MAX T220 HD User manual
MAX T220 HD
MANUAL DE INSTALACIÓN RÁPIDA
QUICK INSTALLATION GUIDE
GUIDE D’INSTALLATION RAPIDE
GUIDA RAPIDA
INSTALAÇÃO RÁPIDA
KURZINSTALLATIONSANLEITUNG

MAX T220 HD
espAñol
MANUAL DE INSTALACIÓN RÁPIDA

PAG. 1
rev 1.0
Español
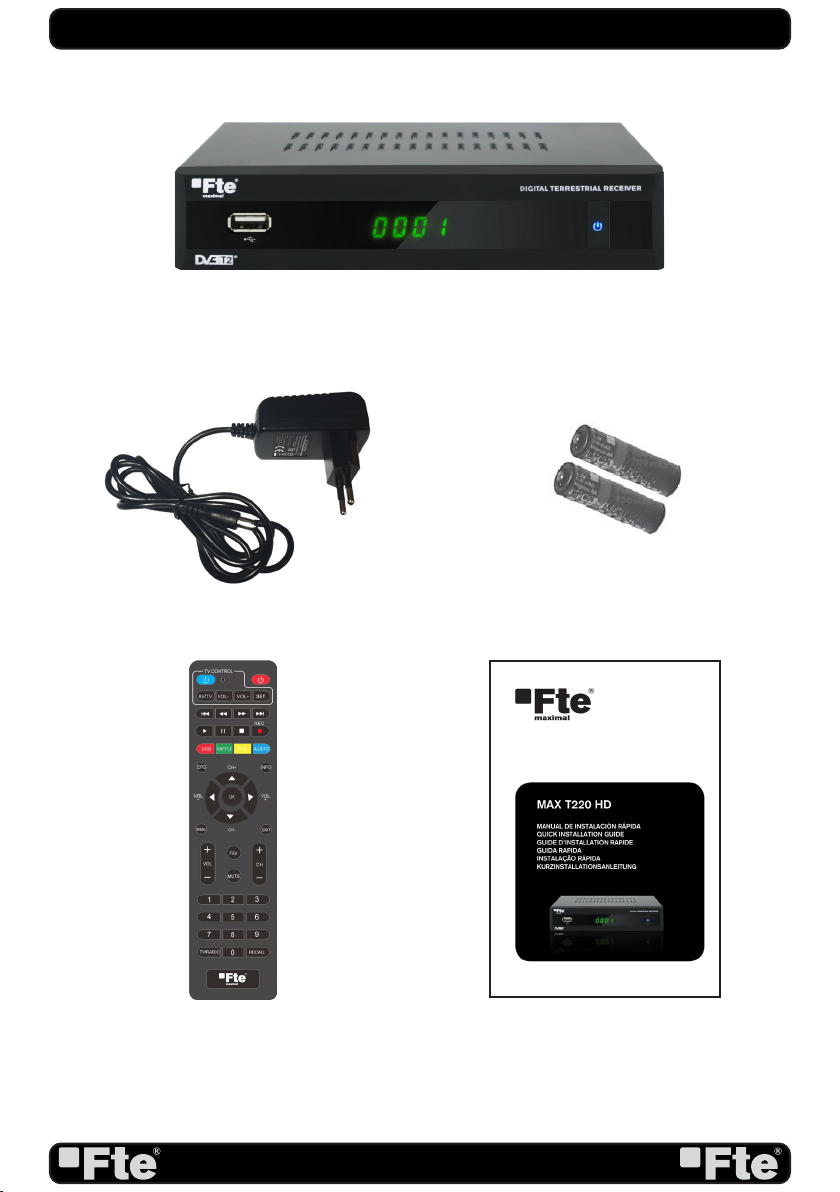
contenido
recePtor
mAndo A distAnciA
PilAs x 2
GuíA ráPidA
Fuente de AlimentAción

PAG.2
rev 1.0
Español
mAnuAl de instAlAción ráPidA
La imagen del rayo dentro del
triangulo equilátero alerta al
usuario de “voltaje peligroso” e
intenta prevenir de un riesgo de
descarga eléctrica.
Advertencia:
Para reducir el riesgo de descarga eléctrica,
nunca abra el receptor usted mismo. La
manipulación debe darse solamente por
personal cualificado.
El signo de admiración
dentro de un triángulo
equilátero alerta al usuario
de una acción importante.
Advertencia:
- El aparato no debe ser expuesto a gotas o salpicaduras ni deben colocarse sobre éste objetos que contengan
líquidos, tales como vasos.
- No exponga el aparato a fuentes de llama viva, tales como velas encendidas. De lo contrario, existe peligro de
incendio.
- El equipo debe de estar conectado a una fuente de alimentación con las características descritas en el manual de
usuario o como esta indicado en el equipo. Si usted no está seguro del tipo de características de la red eléctrica de
su hogar (por ejemplo 120 o 230 V), consulte con su distribuidor local o con su compañía eléctrica.
- No abra el equipo o toque las partes internas del mismo. Consulte con su distribuidor local para recibir asistencia
técnica si es necesaria la apertura del equipo.
- El enchufe se utiliza como elemento de desconexión de la red, este elemento debe ser accesible fácilmente.
- Preste atención a los aspectos medio ambientales derivados de la eliminación de la batería.
- La batería del mando a distancia no debe ser expuesta a calor excesivo, como la luz solar, fuego o similares.
- El encargado de mantenimiento tiene que utilizar el tornillo indicado en la placa posterior.
- Asegúrese que el equipo dispone de una distancia mínima de 5 cm a su alrededor para garantizar la suficiente
ventilación del mismo.
- Asegúrese que no se impide la correcta ventilación del equipo cubriéndolo con objetos tales como periódicos,
manteles, cortinas, etc.
- Use el equipo en climas moderados (no en climas tropicales).
-No abra el equipo para evitar la exposición del mismo a la radiación.
Limpieza del equipo: Una vez el equipo esté desconectado de la red eléctrica, usted puede limpiar el chasis, el
panel frontal y el mando a distancia con un paño suave humedecido ligeramente con una solución de detergente.
Accesorios: No inserte ningún accesorio o equipo sin el consentimiento del fabricante. Tal acción puede ser riesgo
de incendio, electrocución u otros daños personales.
Ubicación: Las ranuras y aberturas del chasis están diseñadas para garantizar una correcta ventilación y para evitar
un recalentamiento del equipo. No bloquee estas aberturas ni permita que sean bloqueadas por situar el equipo
en ubicaciones tales como una cama, un sofá u otras superficies similares, tampoco debe estar situado sobre un
radiador o sobre una fuente de calor.
Protección del cable de alimentación: Sitúe el cable de alimentación fuera del paso, donde no pueda ser pisado.
Por favor, preste especial atención a las clavijas, contactos y al punto donde el cable sale del equipo.
Entrada de líquidos y objetos: Nunca coloque objetos de ningún tipo en las aberturas del equipo, ya que podrían
tocar puntos peligrosos de tensión o cortocircuitar diferentes componentes que podrían provocar un incendio o una
descarga eléctrica. No derrame ningún liquido en el equipo.
Nota: Se puede formar humedad dentro del equipo en las siguientes condiciones:
Cuando el equipo pasa repentinamente de un ambiente frío o una habitación con aire acondicionado a un ambiente
cálido.
Inmediatamente después que una fuente de calor o estufa haya sido encendida.
En una entorno con mucho vapor o muy húmedo.
Si se produce algún tipo de humedad dentro de la unidad, es posible que no funcione correctamente. Para solucionar
este problema, conecte la alimentación y espere dos horas para que la humedad se evapore.
Recambios: Cuando alguna de las partes del equipo necesite ser reemplazada, el usuario debe asegurarse que el
servicio técnico utiliza las piezas de recambio especificadas por el fabricante o con las mismas características que
la pieza original. El reemplazo desautorizado de alguna de las piezas puede suponer riesgo de incendio, descarga
eléctrica u otros peligros.
Comprobaciones de seguridad: Después del mantenimiento y reparaciones realizadas, el usuario debe solicitar
al servicio técnico una comprobación general de seguridad para garantizar que la máquina está en las condiciones
apropiadas.
En caso de que el receptor esté sometido a cambios bruscos de temperatura, es posible que se produzca una
condensación de agua en su interior. Si esto ocurre, deje apagado el receptor durante, al menos, dos horas.
Existe peligro de explosión si la batería no se reemplaza correctamente. Cambiela solo por la misma batería o una
equivalente.

PAG. 3
rev 1.0
Español
mAnuAl de instAlAción ráPidA
Realice los pasos siguientes para la correcta instalación de su receptor.
PAso 1: conexiones
Conecte la entrada “ RF IN” del receptor a la salida de la toma de antena de su vivienda (TV), y la salida
del receptor indicada como “RF OUT”, a la entrada de antena de su televisor al y como se muestra en
la imagen.
Este modelo no incorpora modulador, así que deberá conectar el receptor a su TV mediante un cable
HDMI o euroconector (Scart).
mAnuAl de instAlAción ráPidA
ejemPlo 1
ejemPlo 2
ejemPlo 3
PAG.4
rev 1.0
Español
PAso 2: conFiGurAción tv
La salida HDMI del receptor se iniciará por defecto una
resolución de 720p, que debería ser soportado por la entrada
HDMI de su televisor. Verifique en el manual de su televisor
que su entrada HDMI soporte esta resolución de video. Este
receptor además soporta los siguiente modos de video (De
origen / Nativo TV / 480i / 480p / 576i / 576p / 720p_50 /
720p_60 / 1080i_25 / 1080i_30 / 1080p_50 / 1080p_60).
Usando la salida scart solo está disponible los modos 576i y
480i.
PAso 3: conFiGurAciones básicAs del
recePtor
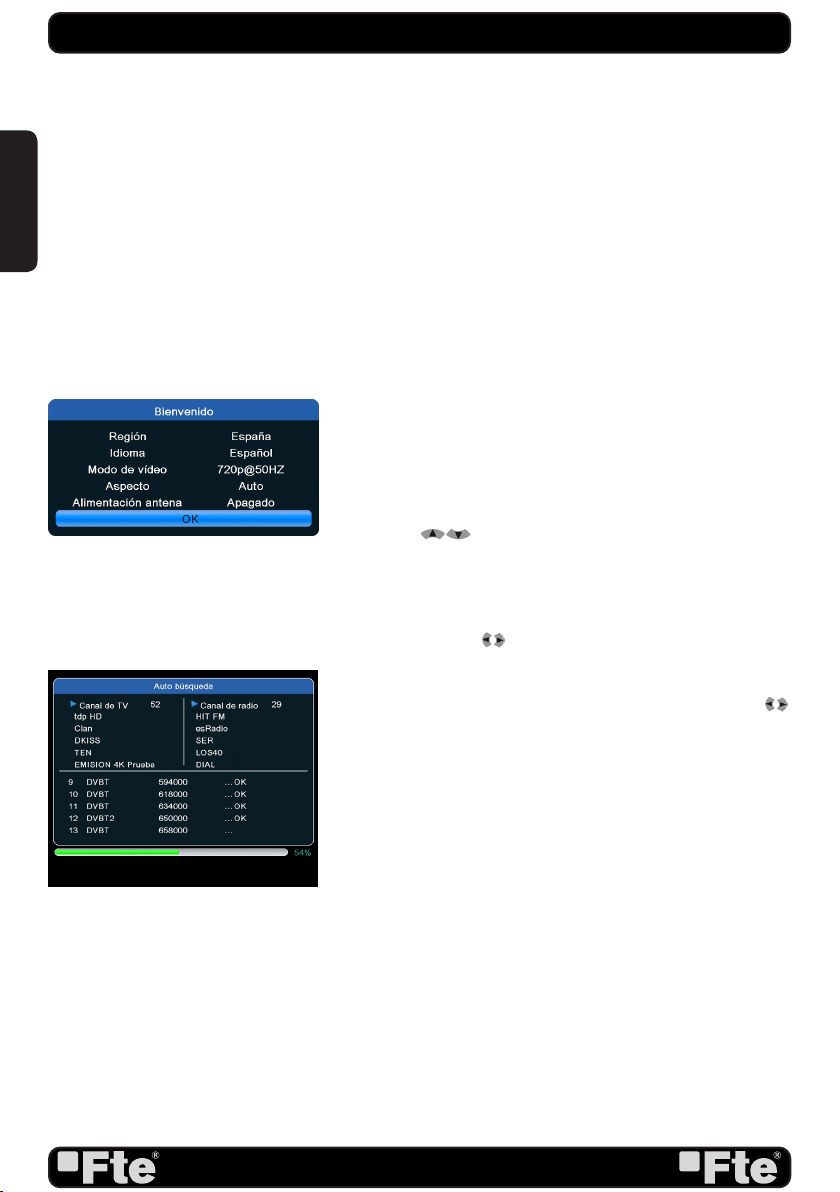
El receptor incluye un asistente de instalación que le ayudará
a configurar los diferentes parámetros del mismo.
Al encender el receptor por primera vez (utilizando el botón de
encendido que se encuentra en el panel trasero del receptor)
se muestra el siguiente menú :
Para desplazarse por las diferentes opciones del menú utilice
las teclas .
- Región: seleccione utilizando las teclas el país en el que
encuentre.
- Idioma: seleccione el idioma en que desee que aparezcan los
menús y otra información del receptor. Para seleccionarlo
utilize las teclas del mando.
- Modo de video: Le permitirá elegir el formato de emisión
de video.
- Aspecto: le permitirá seccionar mediante las teclas
los diferentes formatos de imágenes que los televisores
actuales poseen, AUTO/ 4:3 PS/ 4:3 LB / 16:9.
- Alimentación antena: Seleccione encendido si la antena
conectada al receptor es activa y necesita alimentación de
+5V, sinó deje esta opción en apagado.
- Antes de realizar la búsqueda automática (Presionando la
tecla [OK]) asegúrese que los datos de la opción Región
(Imagen 1) son correctos, sino la búsqueda de canales
se realizará incorrectamente. Una vez confirmado este
parámetro confirme con la tecla [OK]. No realice ninguna
acción con su receptor hasta que la búsqueda de canales
haya finalizado (Imagen 2).
imAGen 1
imAGen 2
mAnuAl de instAlAción ráPidA

PAG. 5
rev 1.0
Español
mAnuAl de instAlAción ráPidA
Idioma: Le permite elegir el idioma en el que aparecen los menús de y otra información
del receptor.
Sistema de TV: Para ajustar el estándar de emisión de vídeo y otros parámetros para la
visualización en pantalla.
Ajustes de la pantalla: Configura el brillo, contraste, saturación, Hue y la nitidez.
Ajuste de la hora: En este menú puede configurar la hora del receptor y modificar el país
en el que se encuentra.
Ajuste del temporizador: Menú para la configuración de temporizadores.
Bloqueado con contraseña: Para bloquear menús y modificar la contraseña de bloqueo
de nuestro receptor.
Configuración de OSD: En este menú podrá configurar los ajustes del OSD.
Favorito: Se puede editar el nombre de los grupos de favoritos.
Otro: En este menú podrá configurar las opciones de “Alimentación de antena”, “Canales
de inicio”, “Beep”, Servicio de AD, Estado tras el corte de energia.
conFiGurAción del sistemA
Lista Canales TV: Le muestra la lista de canales de televisión sintonizados.
Lista Canales de Radio: Le muestra la lista de canales de radio sintonizados
Borrar todo: Borra todos los canales de televisión y radio sintonizados
cAnAl
Información: Le proporciona la información de la versión de software del receptor.
Configuración por defecto: Si selecciona esta opción el decodificador realizará un reset y
volverá a sus valores de fábrica.
Actualizar por USB: Usando esta opción puede actualizar el software mediante USB.
Desconectar el disco USB de forma segura: Permite retirar de forma segura el dispositivo
USB.
Auto Standby: Configuración del standby automático.
Red: Accede a la configuración de la red y dentro de aplicicación de red a los contenidos
de la previsión metereológica.
HerrAmientAs
PAG.6
rev 1.0
Español
mAnuAl de instAlAción ráPidA
PVR: Permite reproducir grabaciones
Video: Reproduce video desde un disco USB
Música: Use esta opción para escuchar archivos de audio desde un disco usb
Imagen: Permite reproducir imagenes desde un disco usb.
Información HDD: Muestra la información del disco duro.
Configuración PVR: Permite configurar la activación del Timeshift.
Extraer el disco USB de forma segura: Permite desconectar de forma segura el disco
USB conectado al receptor.
reProductor multimediA
Búsqueda automática de canales: Le permite realizar una búsqueda completa de los
canales
Busqueda manual de canales: Si lo desea puede realizar la búsqueda de servícios de
televisión y radio en un canal concreto
LCN: si activa esta opción los canales se ordenaran según defina el operador.
instAlAción
PAG. 7
rev 1.0
Español
descriPción del PAnel Y mAndo A distAnciA
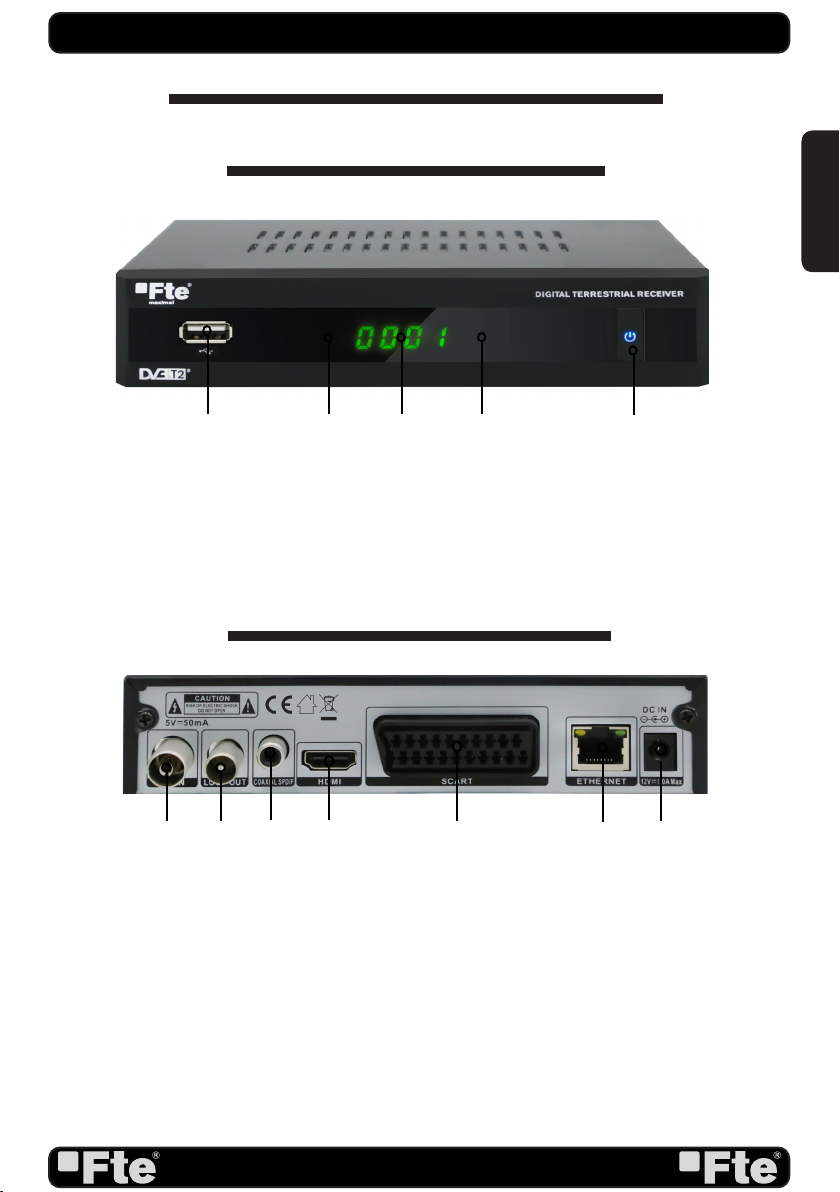
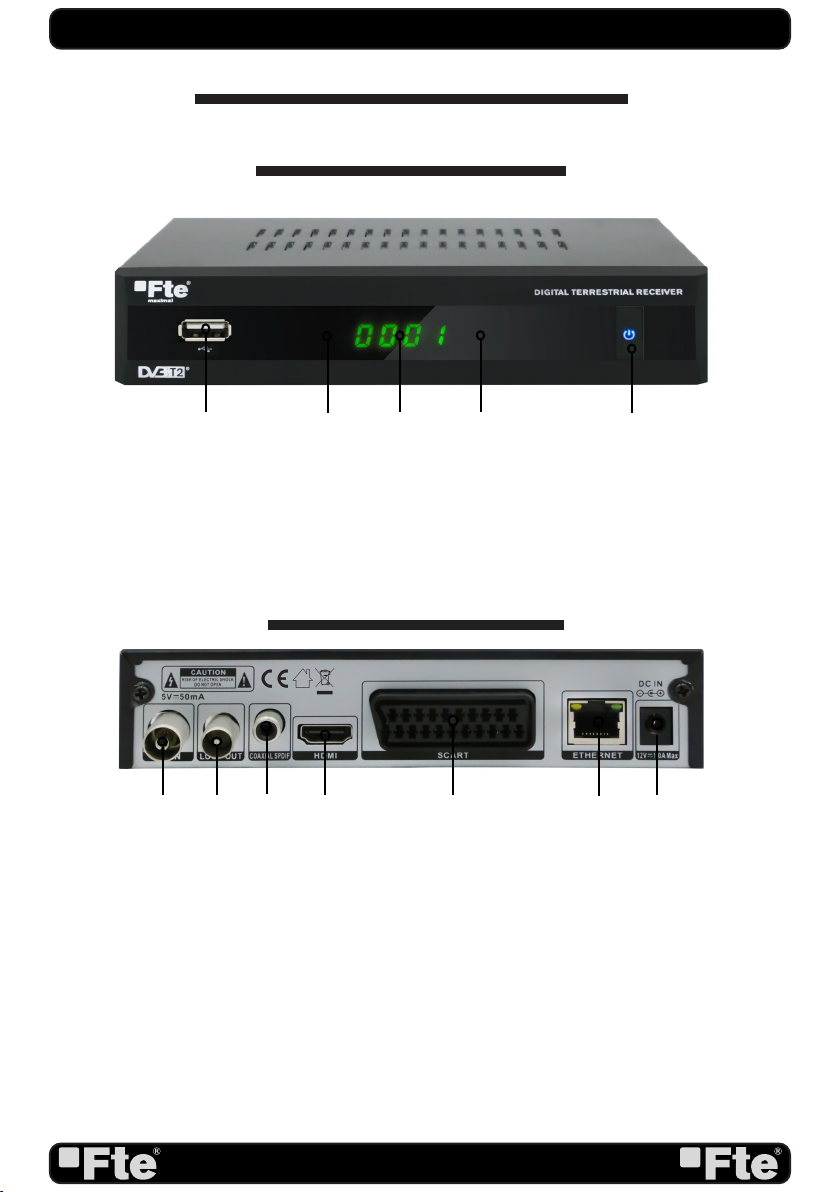
1. RF IN: Entrada de señal terrestre.
2. RF OUT: Salida de la señal de antena terrestre para conectar con otros dispositivos.
3. COAXIAL S/PDIF: Salida coaxial de audio digital (AC3).
4. HDMI: Salida HDMI para conectar al televisor.
5. TV SCART: Salida SCART para conexión a un equipo de TV.
6. ETHERNET: Conexión de red del receptor
7. DC IN: Entrada para conectar una fuente de alimentación de12 Vdc.
1.2. descriPción del PAnel trAsero
1. descriPción del PAnel Y mAndo A distAnciA
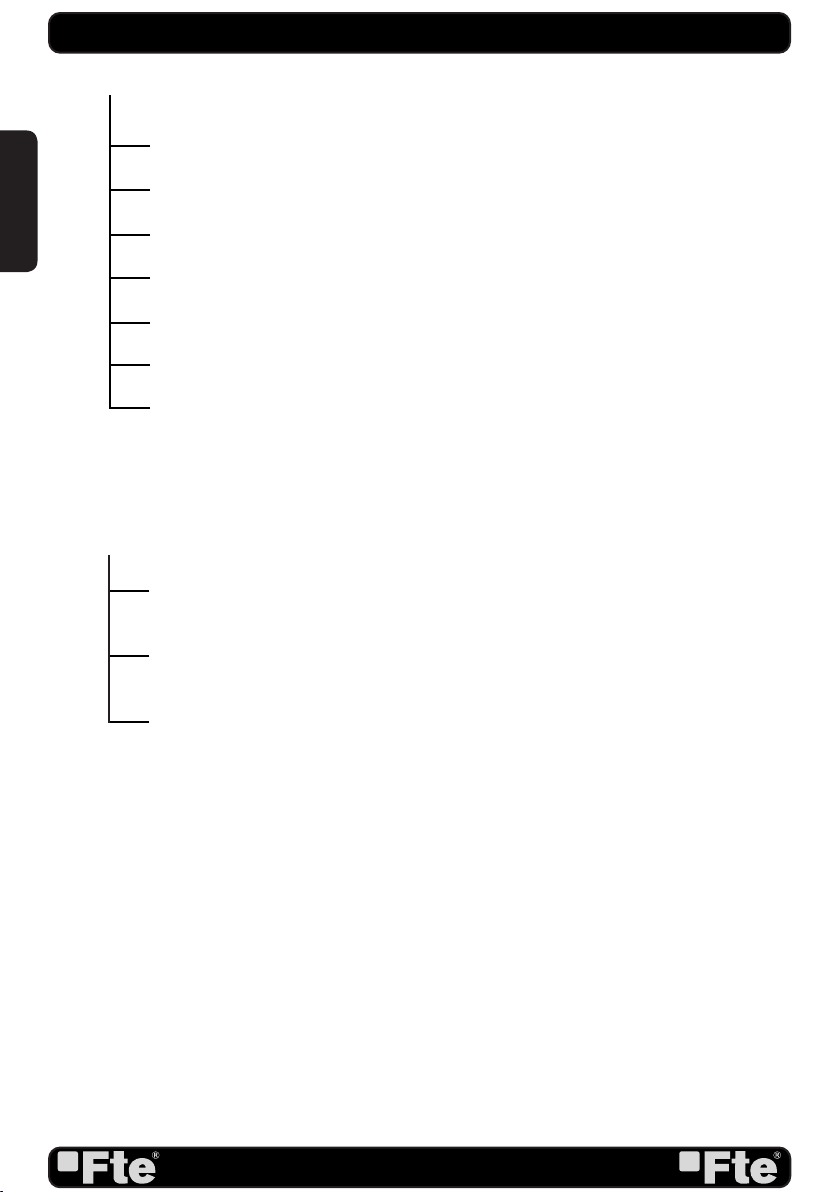
1.1. descriPción del PAnel FrontAl
1. USB: Conector USB 2.0
2 STAND BY LED: Una luz roja indica el estado on/off.
3. DISPLAY: Cuatro dígitos para indicar los números del programa.
4. IR-SENSOR: Receptor de las señales del mando a distancia.
5. BOTON STAND BY:Apaga o enciende el receptor. El led parpadea en standby.
1 52 3 4
61 3742 5

PAG.8
rev 1.0
Español
1- STANDBY: Enciende o pone el receptor en modo reposo.
2- PREV |<<: Salto hacia atrás.
3- REV <<: Retrocede las grabaciones.
4- FWD >>: Avanza las grabaciones.
5- NEXT >>|: Salto hacia adelante.
6- PLAY: Reproduce las grabaciones.
7- PAUSE ||: Pausa las grabaciones.
8- STOP: Detiene las grabaciones.
9- REC: Inicio rápido de la grabación.
10- USB: Accede a la lista de reproducción videos.
11-SUBTITLE: Activa o desactiva los subtítulos.
12-TTX: Abre o cierra el teletexto.
13- AUDIO: Abre el menú de audio.
14- EPG: Muestra las informaciones de la EPG.
15-Botones de color: Botones para las opciones de los menús.
16- INFO: Muestra la información del canal y el nivel de señal.
17- : Cambio de canal o controlan el cursor en el menú.
18- OK: Confirman las selecciones o abre la lista de canales.
19- : Ajusta el volumen de sonido o controlan el cursor en el
menú.
20- MENU: Abre el menú principal.
21- EXIT: Sale de un menú o detiene las operaciones actuales.
22- FAV: Abre la lista de canales favoritos.
23- VOL+/-: Suben o bajan el nivel de sonido.
24- MUTE: Enciende o apaga el sonido.
25- CH+/-: Cambia un canal arriba o abajo.
26- TV/RADIO: Cambia entre los canales de Tv y radio.
27- Números:Teclado para entrada directa de números.
28- RECALL: Ver el último canal visionado.
29- TV control: El mando a distancia tiene 4 botones programables.
TV POWER, Vol+, Vol-, TV/AV.
Mantenga el botón SET 3 segundos hasta que el led rojo (30) sea
mas brillante.
Coloque los mandos del receptor y TV enfrente uno del otro a una
distancia 3-5 cm.
Presione y suelte un de los botones programable del mando a
distancia. El led rojo (30) debe empezar a parpadear.
Pulse el botón del mando a distancia TV. El LED rojo (30) parpadeará
2 veces y se quedará encendido fijo.
Cuando complete el aprendizaje del mando pulse SET y el LED rojo
(30) se apagará.
30.- LED: Se enciende o parpadea una luz roja al pulsar una tecla
del mando o durante la programación.
Nota: Los botones programables podrían no copiar la funcionalidad
de los botones mando de su televisor, porque pueden no ser
compatible.
descriPción del PAnel Y mAndo A distAnciA
1.3 descriPción mAndo A distAnciA
1
29
2 3 4 5
6 7 8 9
10
14
17
16
18
19
20 21
23
22
24 25
27
26 28
11 12 13
15
30

MAX T220 HD
eNGlIsH
QUICK INSTALLATION GUIDE
PAG. 1
rev 1.0
Quick instAllAtion Guide
content
receiVer
BAtteries x 2PoWer suPPlY
reMote control unit

ENGLISH
PAG.2
rev 1.0
Quick instAllAtion Guide
Warning:
-The apparatus shall not be exposed to dripping or splashing and that no objects filled with liquids, such as vases,
shall be placed on the apparatus.
- Do not place naked flame sources, such as lighted candles on the apparatus; otherwise, there is the danger of
fire.
- The unit should be connected to a power supply only of the type described in the operating instructions or as
marked on the unit. If you are not sure of the type of power supply (for example: 120 or 230V) to your home,
consult your local dealer or local power company.
- Do not open the cabinet or touch any parts in the inner mechanism. Consult your local dealer for technical service
if the opening is required.
- The mains plug is used as the disconnect device, the disconnect device shall remain readily operable.
- Take attention to the environmental aspects of battery disposal. The battery of remote control should not be
exposed excessive heat such as sunshine, fire or the like.
- Maintenance man must use the appointed screw in the rear plate.
- Ensure a minimum distance of 5 cm around the apparatus for sufficient ventilation.
- Ensure that the ventilation is not impeded by covering the ventilation openings with items such as newspapers,
table-cloths, curtains, etc.
- Use the apparatus only in moderate climates (not in tropical climates).
- Do not open the cabinet to avoid the unit direct exposure to radiation.
Unit Cleaning: After the unit power is turned off, you can clean the cabinet, panel and remote control with a soft
cloth lightly moistened with a mild detergent solution.
Attachments: Never add any attachments and/or equipment without the manufacturer consent; as such additions
may result in the risk of fire, electric shock or other personal injury.
Locating: Slots and openings in the cabinet are provided for ventilation to protect it from overheating. Do not block
these openings or allow them to be blocked by placing the STB on a bed, sofa or other similar surface, nor should
it be placed over a radiator or heat register.
Power-Cord Protection: Place the power-supply cord out of the way, where it will not be walked on. Please take
special attentions to cords at plugs, convenience receptacles and the point where they exit from the unit.
Object and Liquid Entry: Never put objects of any kind into this STB through openings, as they may touch
dangerous voltage points or short-out parts that could result in a fire or electric shock. Never spill any liquid on the
STB.
Note: Moisture may be formed inside the unit in the following conditions:
When the unit is suddenly moved from a cold environment or an air-condition room to a warm place.
Immediately after a heater has been turned on.
In a steamy or very humid room.
If the moisture forms inside the unit, it may not operate properly. To correct this problem, turn on the power and
wait about two hours for the moisture to evaporate.
Parts Replacement: When the unit parts need to be replaced, user should make sure the service technician
use the replacement parts specified by the manufacturer or having the same characteristics as the original part.
Unauthorized replacement may put the unit in the risk of fire, electric shock or other hazards.
Safety Check: After all the maintenances and repairs are done, user is required to request the service technician
to conduct the overall safety check to ensure the machine is in the proper condition.
The lightning flash with
arrowhead symbol, within an
equilateral triangle, is intended
to alert the user to “dangerous
voltage” and to prevent
from a risk of electric shock
Warning: To reduce the risk of electric
shock, don’t open the cabinet. Refer
servicing to qualified personnel only.
The exclamation point
within an equilateral triangle
is intended to alert the user
to important operating and
maintenance (servicing).
Danger of explosion if battery is incorrectly replaced. Replace only with the same or equivalent type.

PAG. 3
rev 1.0
Quick instAllAtion Guide
Follow next steps for the correct installation of this receiver.
steP 1: connections
Connect a coaxial cable from the output socket to the “RF IN” connector. Connect a coaxial cable from
the “RF OUT” connector at the receiver to your TV input connector as it is shown in Scheme1.
This receiver has not built in modulator so it has to be connected to the TV through a HDMI or SCART
cable.
Quick instAllAtion Guide
exAMPle 2
exAMPle 3
exAMPle 1

ENGLISH
PAG.4
rev 1.0
steP 2:
outPut Video conFiGurAtion
The HDMI output of receiver will start in 720p mode by
default, This mode should be supported by your TV HDMI
input. Please verify in your TV manual that the HDMI input
supports this video mode. This receiver also supports the
following video modes (By origin / Native TV / 480i / 480p /
576i / 576p / 720p_50 / 720p_60 / 1080i_25 / 1080i_30
/ 1080p_50 / 1080p_60). The scart output only support the
video mode 480i and 576i.
steP 3: BAsic conFiGurAtion oF the
receiVer
The receiver includes an installation assistant that will help
you to setup the different parameters.
When the receiver is turned on at first time (using the button
at the rear panel of the receiver), the next menu is shown
on the TV:
In order to move through the different options of this menu,
please use the keysof the remote control. - Region: select
your country using keys.
- Region: select the language of the menu and other
information of the receiver. To choose between the
different languages, use keys of the remote control.
- Video Resolution: is used to switch the video resolution.
You can press [ ] key to select mode output video.
- Aspect Mode is used for switching the screen aspect ratio
mode. Now we provide below options: 4:3 PS (Pan and
Scan) / 4:3 LB (Letter box)/ 16:9 / AUTO. You can press [
] key to select each mode circularly.
- Antenna Power: Turn off/on +5V power for active
antenna
- Auto Scan: before making an auto scan (press [OK]
button) be sure that the data of the Region option (Image
1) is correct, in other case the search of channels will
be made wrongly. Once the Region option is confirmed,
please press [OK]. ( image 2)
Don’t make any action with the receiver until the Auto scan
has finished.
iMAGe 1
iMAGe 2
Quick instAllAtion Guide
PAG. 5
rev 1.0
TV Channel List: This option shows the list of TV stored channels.
Radio Channel List: This option shows the list of Radio stored channels.
Delete All: This option deletes all TV and Radio stored channels.
Quick instAllAtion Guide
edit chAnnel
Language: This option allows selecting menu and options languages.
TV System: This option allows choosing the video Standard and other parameters of
the screen.
Display Setting: Allow set the brightness, Contrast, saturation, Hue and Sharpness.
Local Time Setting: In this option, the time of the receiver and user region or country
can be configured.
Timer Setting: Timer setting menu.
Parental Lock: In this option, user can lock the access to the menu and change the
password of the receiver.
OSD Setting: In this option, the OSD settings can be configured.
Favorite: It allows changing the name of the favourite groups.
Other: In this menu you can configure the “Antenna power”, “Channel play Type”,
“Beeper” , AD Service settigns, and After power stop mode..
sYsteM setuP
Information: This option shows the software information of the receiver
Factory Settings: If this option is selected, a reset of the receiver will be done and it will
load the factory default values.
Upgrade by USB: To update the receiver by USB
Auto Standby: Allow set the auto standby options.
Network: Network: This menu allows you to set the network options, watch the weather
forecast.
tools

ENGLISH
PAG.6
rev 1.0
Quick instAllAtion Guide
PVR: It allow play recordings from the usb disk.
Video: This menu permit play video from the usb disk.
Music: It allows play music from the usb disk.
Image: this menu allow show image from the usb disk.
PVR Storage Information: You can see the capacity of the hard disk.
PVR Setting: It allows configuring the Timeshift
Remove USB device safely: Allows remove USB device of safety way.
MediA PlAYer
Auto Channel Scan: This option make a full scan of all TV and Radio channels
received.
Manual Channel Scan: This option make a compete scan of only one Multiplex.
LCN: This option can control the channel whether sort by the information in the
streams.
instAllAtion
PAG. 7
rev 1.0
1. PAnel & reMote control descriPtion
1.1. Front PAnel descriPtion
reMote control & PAnel descriPtion
1. RF IN: Input of the digital tuner.
2. RF OUT: Ouput for cascading to others devices.
3. COAXIAL S/PDIF: Coaxial output for digital audio (AC3)
4. HDMI: HDMI output for connecting to a TV
5. TV SCART: Output SCART for the connection to a TV set.
6. ETHERNET: Network connection of the receiver.
7. DC IN: 12 VDC connection (power supply)
1.2. reAr PAnel descriPtion
1. USB: USB Connector 2.0
2. STAND BY LED: Shows the state of the receiver
3. DISPLAY: 4 Digits to display the program numbers.
4. REMOTE SENSOR: Detects the infrared signals from the remote control unit.
5. STANDBY BUTTON. Turn on or set to standby mode the receiver.
1 52 3 4
61 3742 5

ENGLISH
PAG.8
rev 1.0
1. STANDBY: Switches receiver ON or in stand-by-mode.
2 PREV |<<: Back
3. REV <<: Backward button for recording and TimeShift.
4. FWD >>: Forward button for recording and TimeShift.
5. NEXT >>|: Next
6. PLAY: Start button for recording and TimeShift.
7. PAUSE II: Pause button for recording and TimeShift.
8. STOP: Stop button for recording and TimeShift.
9. RECORD: Quick start for recording.
10. USB: Opens the multimedia video menu
11. SUBTITLE: Switches subtitle on and off.
12. TTX: Opens and closes teletext.
13. AUDIO: Opens audio menu.
14. EPG: Shows the EPG information.
15. Colour Keys: Controls menu options.
16. INFO: Shows channel information with signal bar.
17. [ ]: Changes channels or controls the cursor in
menus.
18. [ ]: Adjusts audio volume or controls the cursor in
menus.
19. OK: Confirms selections or opens channel list.
20. MENU: Opens the main menu.
21. EXIT: Exit menus or stop operations.
22. FAV: Opens favourite channel list.
23. VOL+/-: Adjusts audio volume up and down.
24. MUTE: Switches audio on and off.
25. CH+/-: Changes channel up and down.
26. TV/RADIO: Switches between TV and Radio channels.
27. Numeric keys: For direct typing values and names.
28. RECALL: Watch the last viewed channel.
29. TV BUTTONS: The remote control has 4 programmable
buttons for controlling the TV: TV Power, Vol +, Vol-, TV/AV.
Long press the SET button for 3 seconds, the red LED (30) will
be from low light to brighter light,release the SET button.
Place the learning and the original remote control from the TV
opposite to each other at a distance of 3-5 cm.
Press and release the learning remote control button you want to
program,the red LED will light blinking.
Press the button of the original remote control, the LED should
blink 2 times and light constantly, release the button.
When learning is completed, press the SET button, the LED will
turn off.
30. LED. The LED turn on or blinking when press any key in
the RCU.
Remark: The programmable buttons could be not copy the
functionality of the button of the TV remote control, because
could be not compatible.
reMote control & PAnel descriPtion
1.3 reMote control unit descriPtion
1
29
2 3 4 5
6 7 8 9
10
14
17
16
18
19
20 21
23
22
24 25
27
26 28
11 12 13
15
30

MAX T220 HD
frANçAIs
GUIDE D’INSTALLATION RAPIDE
Table of contents
Languages:
Other FTE Maximal Receiver manuals

FTE Maximal
FTE Maximal MAX S101 HDMI User manual

FTE Maximal
FTE Maximal MAX T115+ User manual

FTE Maximal
FTE Maximal MAX S302CI User manual

FTE Maximal
FTE Maximal eXtreme HD mini User manual

FTE Maximal
FTE Maximal MULTILINK R LT User manual

FTE Maximal
FTE Maximal PVR T150 User manual

FTE Maximal
FTE Maximal MAX T200 HD User manual

FTE Maximal
FTE Maximal MAX S93 User manual

FTE Maximal
FTE Maximal MAX S222E User manual

FTE Maximal
FTE Maximal MAX S123 HD User manual


