FujiFilm ApeosPort-VII C7773 User manual

Prepared by Customer Training Team
© FUJIFILM Business Innovation Hong Kong Limited
ApeosPort®-VII C7773 / C6673 / C5573 / C4473 / C3373 / C3372 / C2273
DocuCentre-VII C7773 / C6673 / C5573 / C4473 / C3373 / C3372 / C2273
Quick Reference Notes - FAX
簡易操作 - 傳真

CONTENTS
目錄
1Fax Procedure ....................................................................................................................................................1
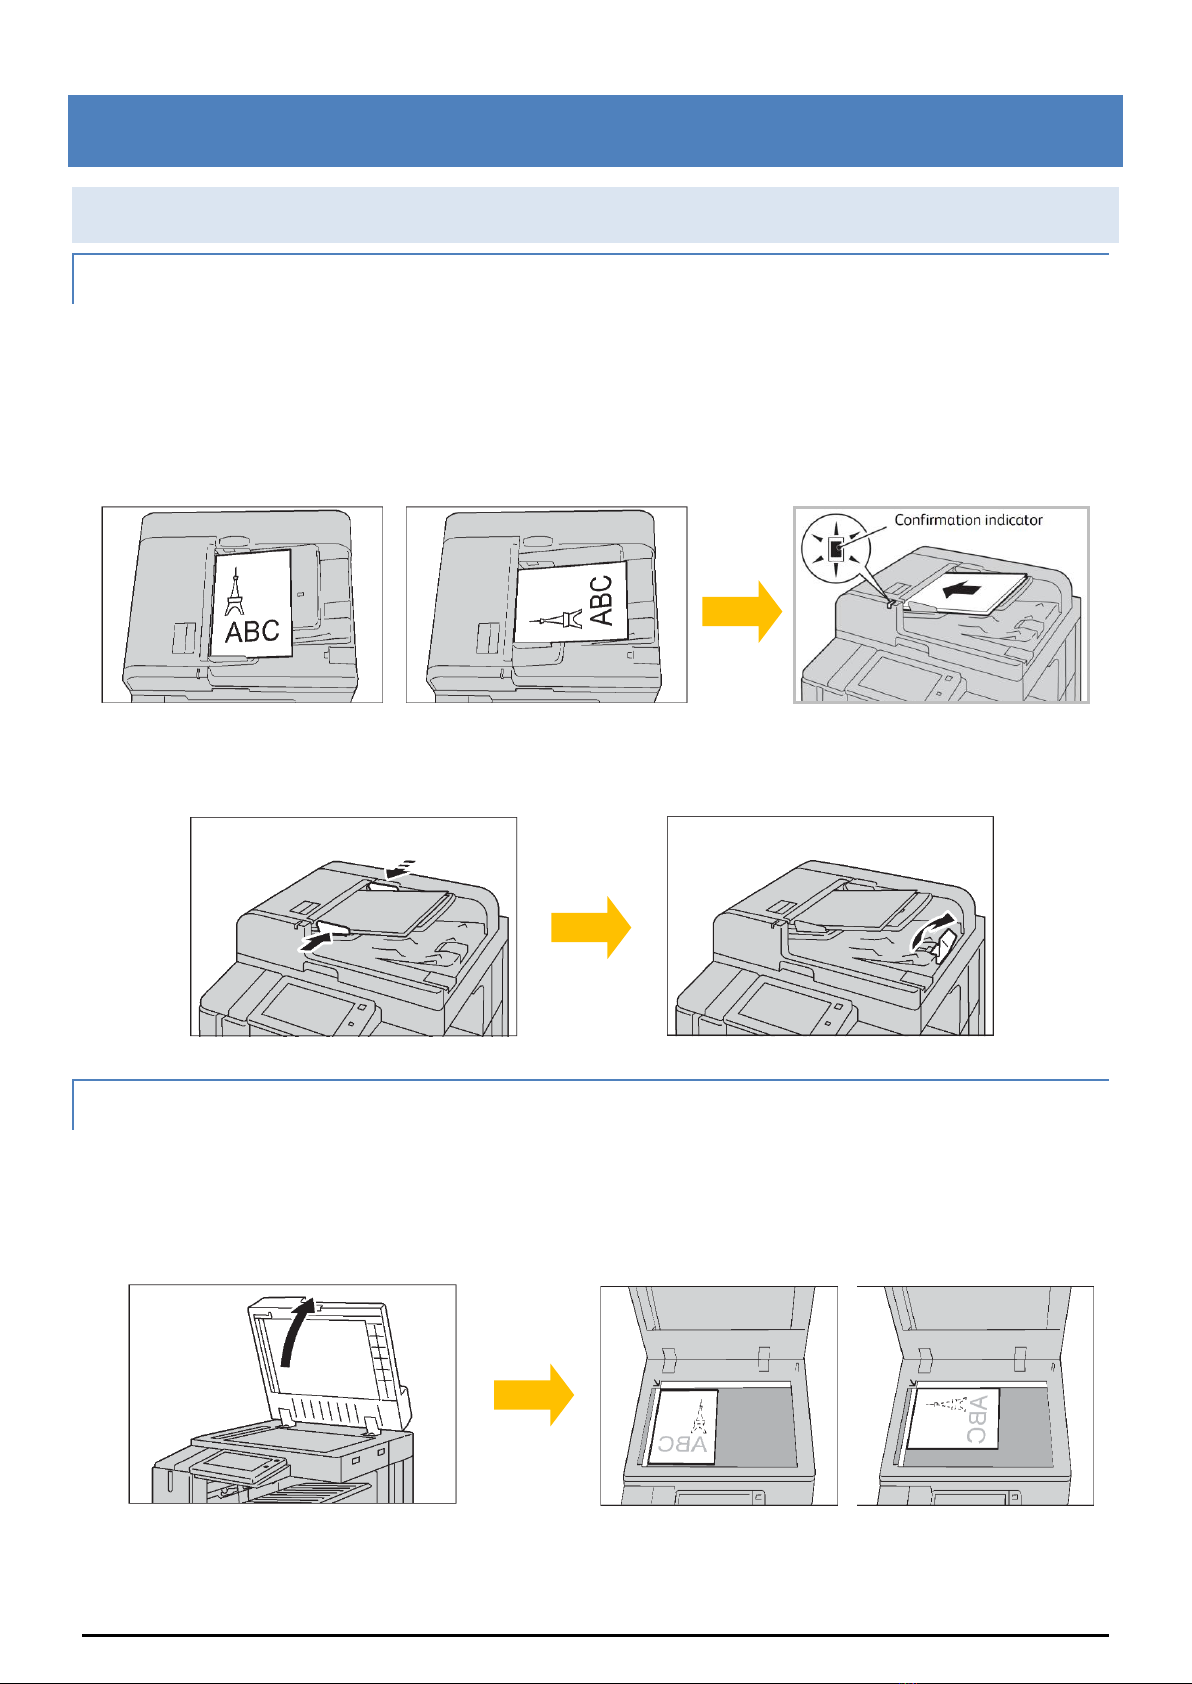
1.1 Loading Document ................................................................................................................................1
1.1.1 Document Feeder ...................................................................................................................1
1.1.2 Document Glass .................................................................................................................................1
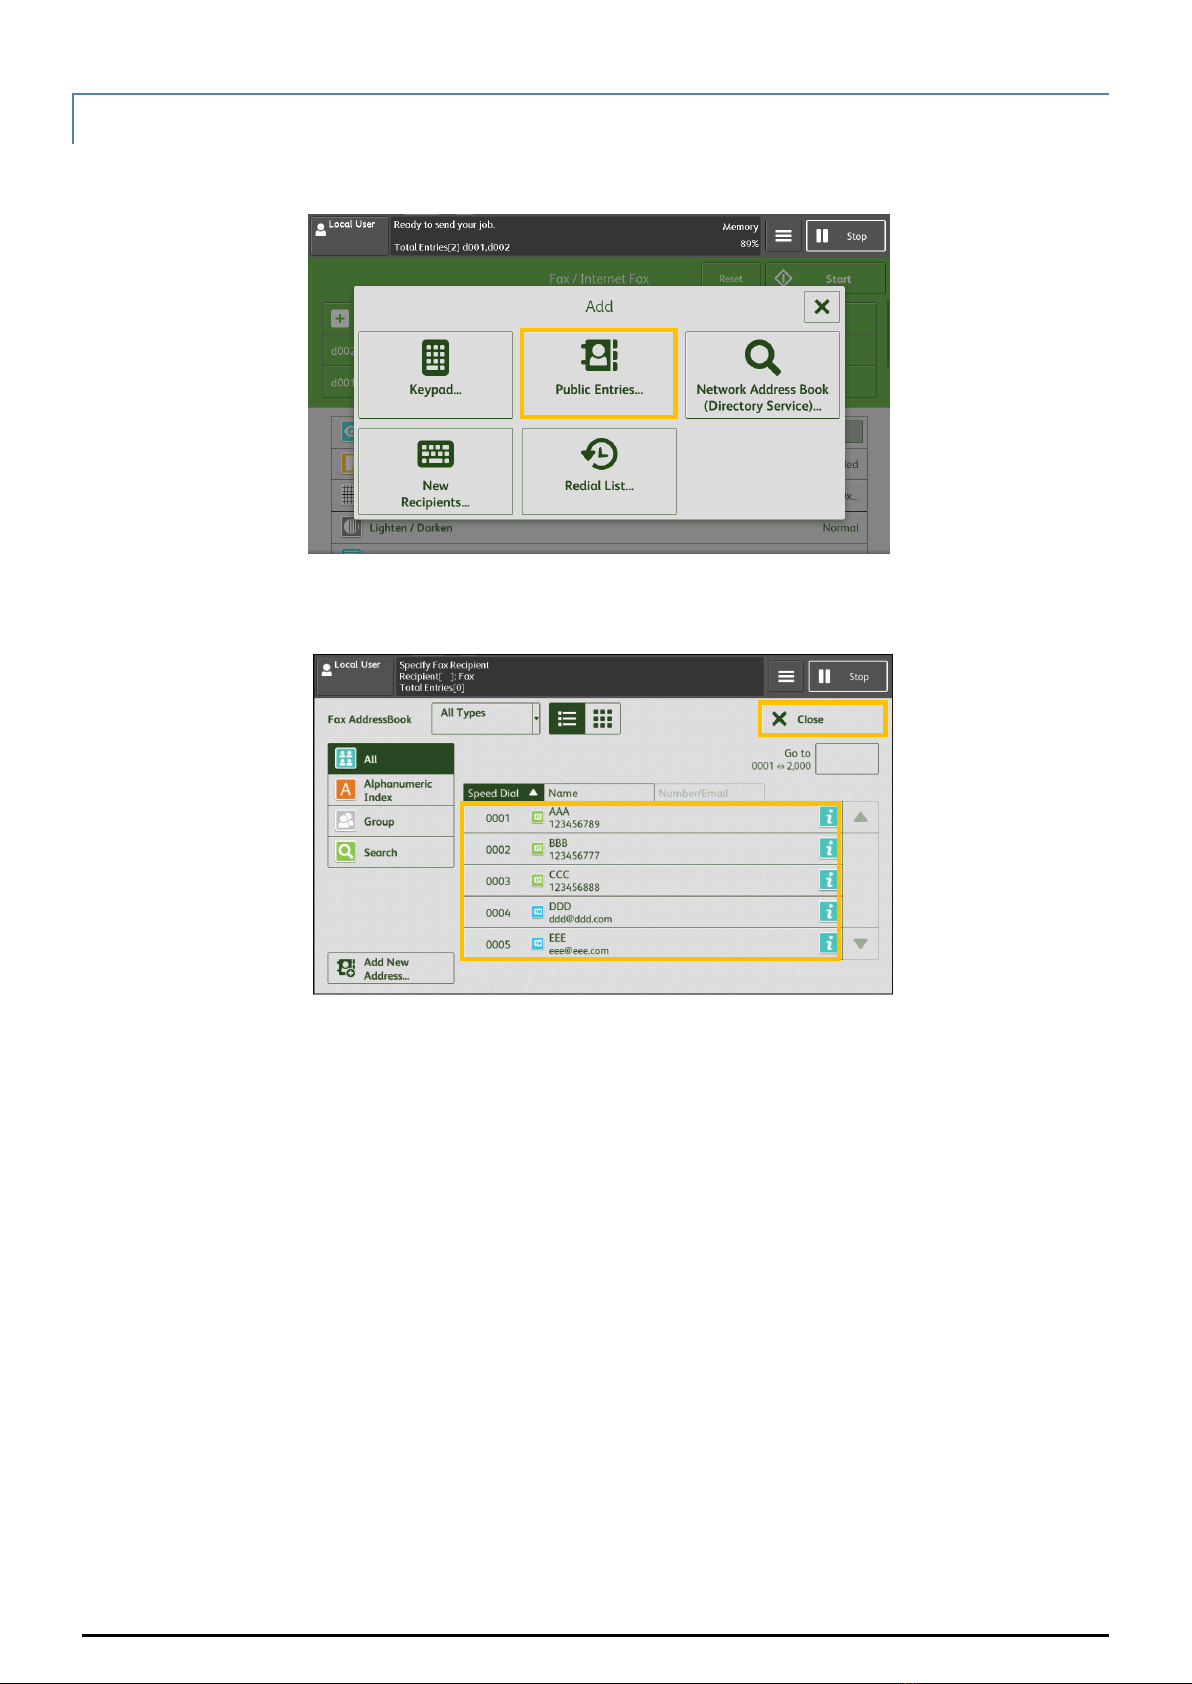
1.2 Specifying Destinations .............................................................................................2
1.2.1 Using the Numeric Keypad ......................................................................................................3
1.2.2 Using the Address Book ............................................................................................................4
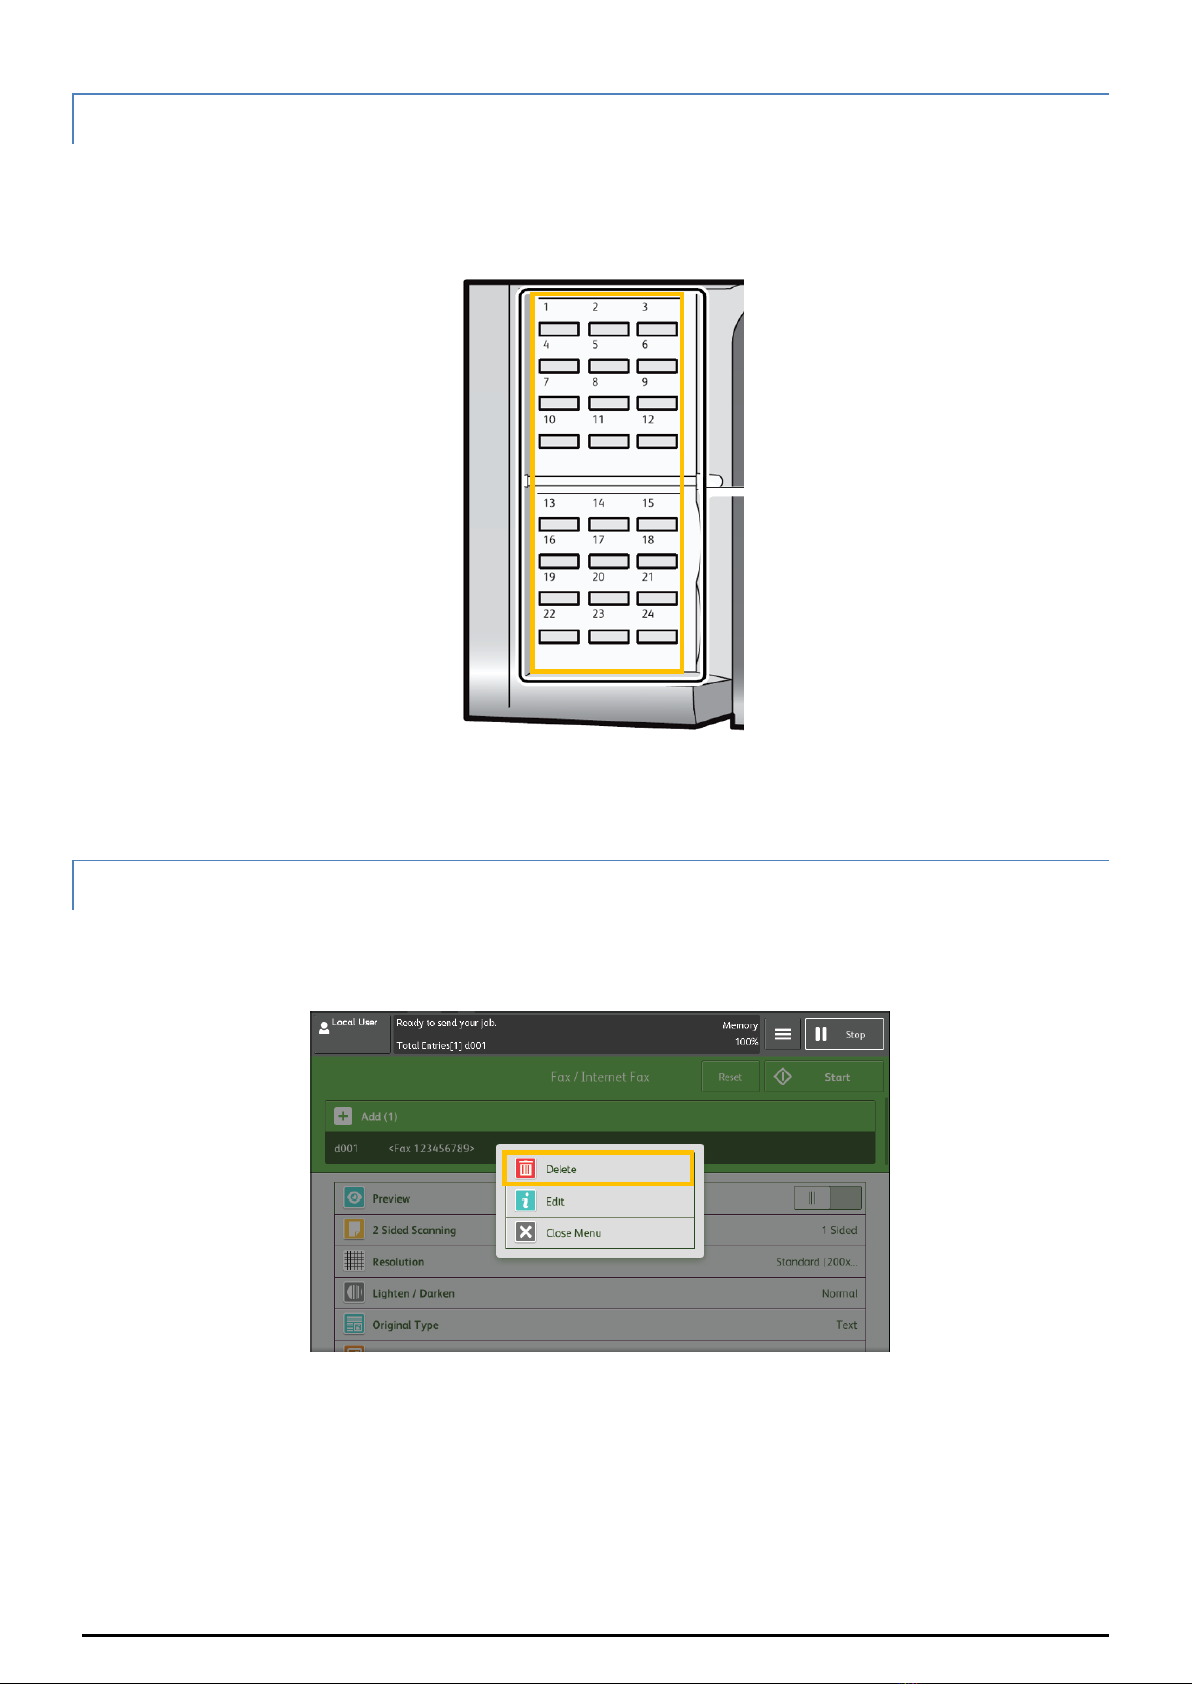
1.2.3 Using the One Touch Button ........................................................................................5
1.2.4 Removing Specified Recipient .................................................................................5
1.3 Confirming the Fax Job in Job Status .................................................................................6
2General Settings ...............................................................................................................................................7
2.1 Lighten/Darken .......................................................................................................................................7
2.2 2 Sided Scanning ..........................................................................................................................8
2.3 Original Type ............................................................................................................................................9
2.4 Resolution ..................................................................................................................................................9
2.5 Acknowledgement Report ..................................................................................................... 10
2.6 Transmission Header Text 録......................................................................................................... 10
2.7 On-hook ................................................................................................................................................... 11
3Operations During Faxing .......................................................................................................... 12
3.1 Stopping the Fax Job ........................................................................................................................ 12
3.2 Previewing the Read Images during a Fax Job ....................................... 14
4Load the Next Document ........................................................................................................... 16

Page 1 of 17
1 FAX PROCEDURE 傳真步驟
1.1 LOADING DOCUMENT 放置原稿
1.1.1 Document Feeder 自動送稿裝置
Remove any paper clips and staples before
loading a document.
放置文件前,請取下萬字夾和清走打釘。
1. Load the document face up (when the
document is 2- sided, place the front side up)
in the center of the document feeder.
1. 將文件正面朝上 (若是雙面文件, 將正面朝
上)放置在送稿裝置的中央。
2. Adjust the document guides to match the size
of the document loaded. Raise the document
stopper.
2. 調整原稿調整桿至符合紙張尺寸, 抬起擋紙
器。
1.1.2 Document Glass 玻璃面板
1. Open the document cover.
1. 開啟原稿外蓋。
2. Load the document face down, and align it
against the top left corner of the document
glass. Close the document cover.
2. 將文件的正面朝下, 對準玻璃面板的左上角放
置並關閉原稿外蓋。

Page 2 of 17
1.2 SPECIFYING DESTINATIONS 選擇指定通訊目的地
1. Press the Home button.
1. 按一下首頁按鈕。
2. Select [Fax / Internet Fax].
2. 選擇【傳真】。

Page 3 of 17
1.2.1 Using the Numeric Keypad 使用數字鍵
1. Select [Keypad].
1. 選擇【鍵盤】。
2. Enter a fax number using the numeric
keypad.
2. 用數字鍵輸入傳真號碼。
3. If you enter an incorrect number, press the
button and re-enter the correct value.
3. 如果輸入數值錯誤,按 鍵並輸入正確數
值。
4. To specify multiple recipients, select [+Add]
on the touch screen after each entry.
4. 若要輸入多個傳真號碼,請在顯示幕上選
擇【下一通信對象】。
5. Press [Save] and then [Start] to start
the fax job.
5. 按【儲存】,然後按【啓動】開始傳真工
作。

Page 4 of 17
1.2.2 Using the Address Book 使用電話簿
1. Select [Public Entries].
1. 選擇【裝置本體電話簿】。
2. Select the recipient numbers. Press [Close].
2. 選擇需要的傳真號碼,然後按【確認】。
Note: You can select multiple numbers at Step 2.
注意:您可以在步驟 2指定多個通信對象。

Page 5 of 17
1.2.3 Using the One Touch Button 使用單鍵撥號鍵
You can use the One Touch Buttons to specify
recipients. One touch buttons correspond to the
numbers registered for the address numbers
from 0001 to 0070.
可使用單鍵撥號鍵指定受信方。單鍵撥號鍵與短
縮號碼中登記的 0001-0070 號碼對應。
Note:
To specify multiple recipients,
press the one touch buttons
continuously.
Turn the one touch panel over
to press the one touch buttons
25 and above.
注意:
若要指定多個通信對象,請連續
按所需的單鍵撥號鍵。
將單鍵撥號面板翻面後,可按
25 以後的鍵。
1.2.4 Removing Specified Recipient 刪除指定的受信方
Select the recipient to be removed then click
[Delete].
從【短縮號碼/受信方】中選擇要刪除的傳真號
碼,然後按【刪除】。

Page 6 of 17
1.3 CONFIRMING THE FAX JOB IN JOB STATUS 確認傳真工作
1. Press the [Job Status] button.
1. 按【工作確認】鍵。
2. Confirm the job status.
2. 確認工作狀態。

Page 7 of 17
2 GENERAL SETTINGS 基本傳真
2.1 LIGHTEN/DARKEN 送信濃度
You can select one out of seven density levels.
傳真濃度有七種等級選擇。

Page 8 of 17
2.2 2 SIDED SCANNING 雙面原稿輸送
1 Sided
單面
Select to transmit 1-sided documents.
傳輸單面原稿時選擇。
2 Sided (Head to Head)
雙面(左右)
Select to transmit 2-sided documents (head to
head).
傳輸雙面原稿(左右)時選擇。
2 Sided (Head to Toe)
雙面(上下)
Select to transmit 2-sided documents (head to
toe).
傳輸雙面原稿(上下)時選擇。
→More…
→詳細設定
2 Sided (First Page 1 Sided)
雙面(僅封面為單面)
Select this option to scan the front side of the first
page and both sides of the remaining pages.
Use this item when the back side of the first page
is blank.
要傳送第一張的正面及其餘張數的兩面時選擇。
若第一張的背面空白時,請用這個選項。
2 Sided (Skip Blank Pages)
雙面(跳過空白頁)
Select this option to to scan only the document
pages that are not blank.
選擇此選項即可只掃描非空白頁的原稿頁面。

Page 9 of 17
2.3 ORIGINAL TYPE 原稿畫質
Text
文字
Transmitting a document that contains only text.
傳輸僅帶有文字的原稿時選擇。
Photo & Text
照片/ 文字
Transmitting a document that contains both text
and photos.
傳輸帶有文字及照片的原稿時選擇。
Photo
照片
Transmitting a document that contains only
photos.
傳輸僅帶有照片的原稿時選擇。
2.4 RESOLUTION 送信畫質
Standard (200 x 100 dpi)
標準
Transmitting standard documents
傳輸文字清晰的普通原稿時選擇。
Fine (200dpi)
高畫質
Transmitting documents with small text or
detailed images.
傳輸小字及/或細緻影像原稿時選擇。
Superfine (400dpi)
超高畫質(400 dpi)
Transmitting documents with fine images
傳輸極小字體及/或極細緻影像原稿時選擇。
Superfine (600dpi)
超高畫質(600 dpi)
Transmitting documents with extremely fine
images
傳輸極小字體及/或極細緻影像原稿時選擇。

Page 10 of 17
2.5 ACKNOWLEDGEMENT REPORT 送信確認報表
Off
不印出
No Transmission Report is printed.
不列印送信確認報表。
On
印出
A Transmission Report is automatically
printed.
傳輸完成時,自動列印送信確認報表。
2.6 TRANSMISSION HEADER TEXT 發信方記録
Off
無
No header information is attached.
不附加發信方資訊。
Fax
有
Header information is attached.
附加發信方資訊。

Page 11 of 17
2.7 ON-HOOK 免持聽筒
Use this feature when using Manual Send.
使用手動送信時,請使用此功能月已。
Entering a destination
輸入收件人
Use alphanumeric characters to specify a
destination. Then, Press the [Start] to start the
fax job.
使用英數字元指定收件人。按【啓動】開始傳真
工作。
Line Cut
線路中斷
Cuts the line connected.
切斷連線。

Page 12 of 17
3 OPERATIONS DURING FAXING 傳真期間的操作
3.1 STOPPING THE FAX JOB 停止傳真
1. Press [Pause] on the touch screen.
1. 按操作面板上的【暫停】鍵。
2. Select [Delete].
2. 按【中止】。
3. If the screen in step 1 or 2 does not appear,
press the [Job Status] button.
3. 若未顯示步驟 1 或2 中的畫面,按
【工作確認】鍵。

Page 13 of 17
4. Select the job to cancel.
4. 選擇要取消的工作。
5. Select [Pause].
5. 選擇【暫停】。
6. Select [Delete].
6. 選擇【中止】。

Page 14 of 17
3.2 PREVIEWING THE READ IMAGES DURING A FAX JOB 傳真時預覽讀取的影像
You can preview the read images while reading
the next document.
讀取下一個文件時,您可預覽之前讀取的影像。
1. When a document starts to be read with
[Preview] is turned on the [Simple Fax] or
[Fax/Internet Fax] screen, the screen on the
below No.2 picture is displayed.
1. 在【簡易傳真】或【傳真/網路傳真】畫面選擇
【預覽】的狀態下開始掃描,顯示下方圖 2的
畫面。
2. After the document is read, select [Preview].
2. 讀取文件之後,選擇【預覽】 。
3. An entire preview image is displayed.
3. 整體顯示預覽影像。

Page 15 of 17
4. Select [Thumbnail view].
4. 選擇【略圖顯示】。
5. Select [Enlarged view].
5. 選擇【擴大顯示】。
6. When all documents have been scanned,
select [Send (Last Original)].
6. 已掃描所有文件後,選擇
【儲存(無下一張)】。

Page 16 of 17
4 LOAD THE NEXT DOCUMENT 放置下一份原稿
If you have another document, select [Next
Original] on the touch screen while the current
document is being scanned.
如果還有其他原稿,請在掃描原稿時,在顯示幕
上選擇【有下一張原稿】。
1. Select [Next Original] while scanning is in
progress.
1. 請在掃描進行期間選擇【有下一張原稿】。
2. Load the next document.
2. 放入下一份原稿。
3. Press the [Start] button.
3. 按【啟動】鍵。

Page 17 of 17
4. When all documents have been scanned,
select [Send (Last Original)].
4. 所有原稿掃描之後,請選擇
【送信(無下一張) 】。

Customer Support Center
2513-2513
This document includes Fuji Xerox product(s), licensed from Xerox Corporation. The distributor of the product(s) is FUJIFILM Business Innovation Corp.
Xerox, Xerox and Design, as well as Fuji Xerox and Design are registered trademarks or trademarks of Xerox Corporation in Japan and/or other countries.
FUJIFILM and FUJIFILM logo are registered trademarks or trademarks of FUJIFILM Corporation.
ApeosPort and DocuWorks are registered trademarks or trademarks of FUJIFILM Business Innovation Corp.
This manual suits for next models
13
Table of contents
Other FujiFilm Fax Machine manuals