PREPARING FOR OPIRATION
1. Remove the lid from the carlying case.
Removethe AC cord, mlcrophone, and earphone
f romthe storage compartment onth€ right side.
Plug the AC cord into a convenient outlet of the
proper specilications.
Thread the tape (see "Threading the Tape").
3.
4.
off -Volu me
Turning thekllob clockwise until a click isheard
turns t}le power o! to the unit, Further rotation in-
creases the volume.
Safety Button
The SaJety Button, marked with an R on the
escutcheon, must be depressed belore the urilt can be
placed in Record, This prevents accidental erasure
of a prerecorded tape.
FUNCTION OF CONTROLS
OPERATING INSTRUCTIONS
Qu ick Stop
To stop the tape momentarily in play or Recor.d,
pu.ll the lever in tlle direction ol the arrov, When the
lever is releaaed, t}le tape $rill stalt moving again.
Control Knob
The center is the stop position. Turning the
knob to the left places the recorder i.n reverse to
rewind the tape onto the supply ree1. Turning the knob
to the right places the recorderin Ptay and in Record
when the SaJety button i6 depreseed.
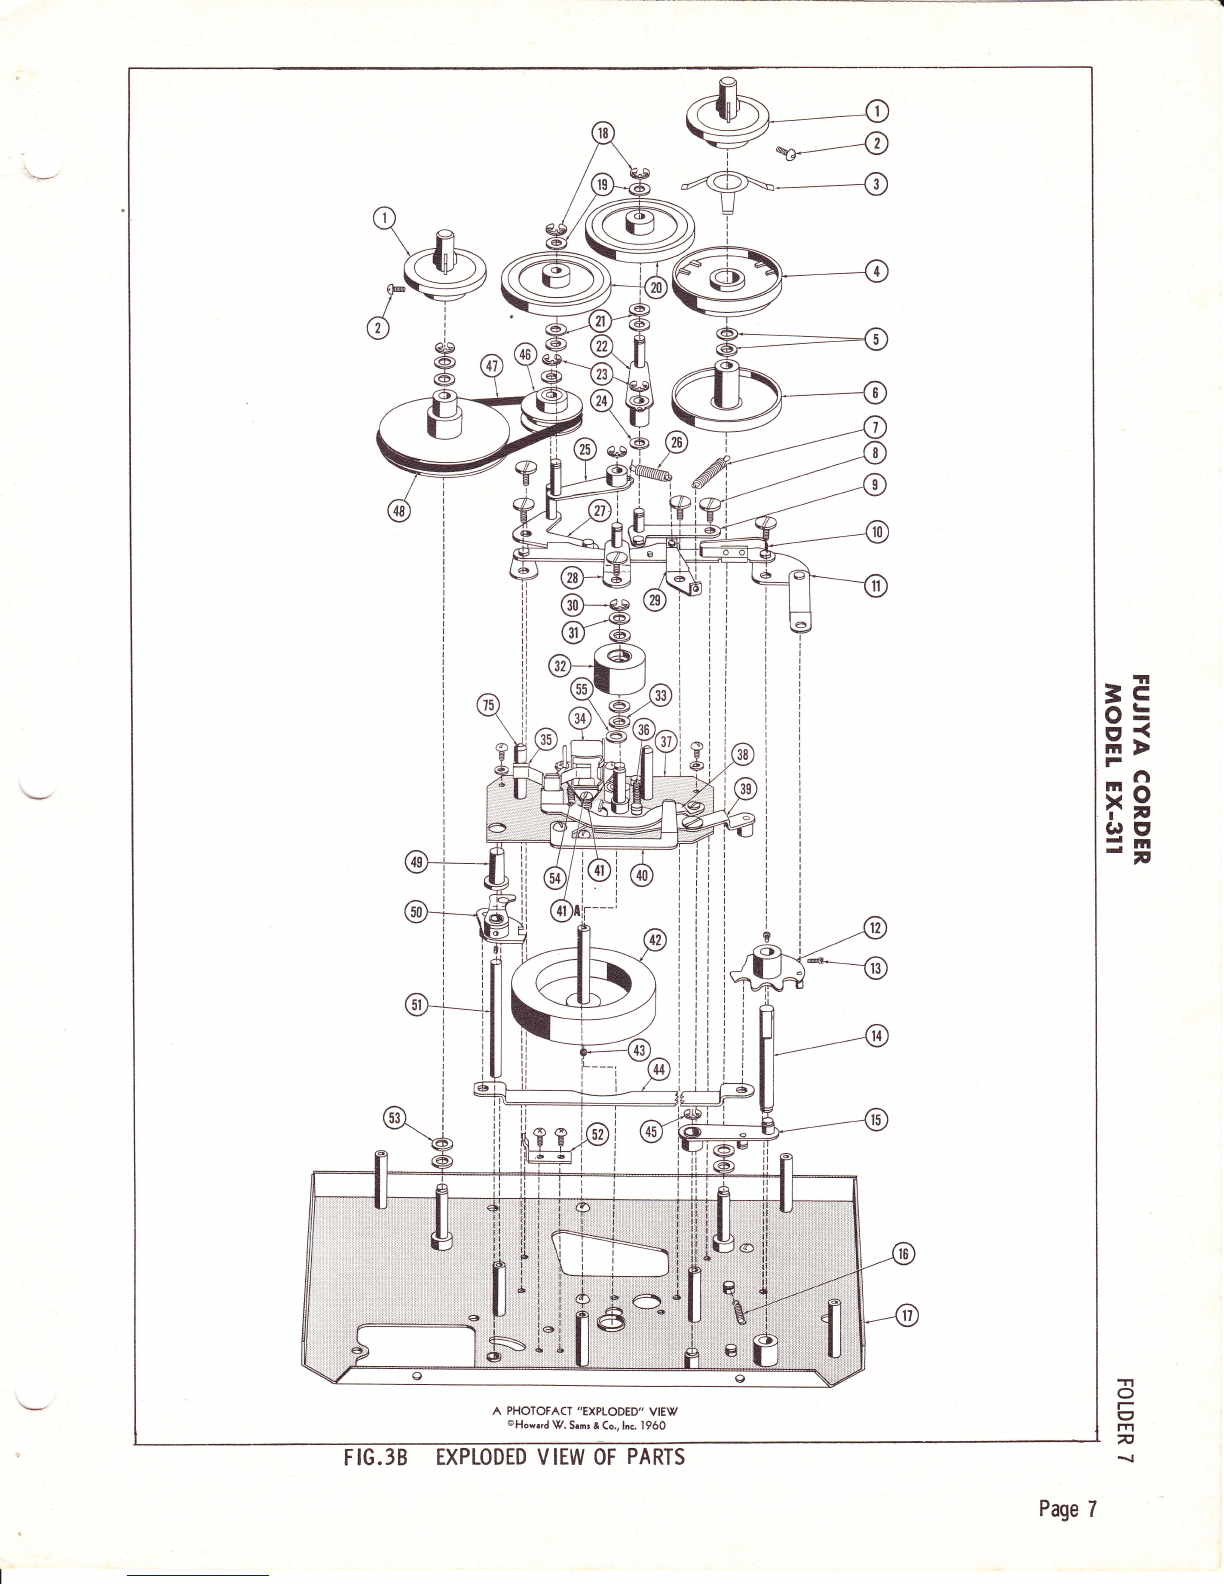
Th reading ihe Tape
l. Place a reel of tape on Left reel cup (I) and an
empty leel on right reel cup (l).
2. Unwind about l0 inches of tape. Hold a section
taut and insert it into t}le tape slotr making cer-
tain the dul.I-aoated side faces the rear of the
recorder.
3. Insert thefree end into one ofthe radiat slots in
thehubofthe take-up reel. Turn the reel Eeveral
turlls counterclockwise to secure the tapeto the
reel and to tal<e up the slack between reels.
To Record From a Microphone
l. Thread the tape (see "Threading the Tape").
2. Plug the microphone into the Mic jack,
3. Turn the Off-Volume control clockvise, and
allow about 30 seconds forthe tubes tovarm up.
4. Depress the SaJety Button and turn t}Ie Control
Knob to Play-Record.
5. Hold the mj.crophone 6 to 12 inches from your
mouth and spea.li in a normal voice. Adjust the
OIf-VoIume control until the record ]evel indi-
cator flashes oll the loudest sound.
NOTE: Correct volume level is very important
durlng a recording. Too veak a signal
(record level itrdicator does not ilash) witl
result in weak playback and high background
nolse. Too strong a signal (indicator
flashea continuously) witl reEult in distor-
tion during playback.
Page 2
To Record From a Radio
Recordings can be made llom a radio by one of
three methods:
l. Through a microphone, by pickup from a ladio
spea]{er:
Place the rnictophone 6 to 12 j.nches in frolt of
the radio speaker. Turn the radio volume control.
to anormal level. (Setting it too high will cause
distortion. ) Turnthe radiotone control totreble
or high. Set the recordj.ng level, and lecord as
described under "T:o Record From a Micro-
phone".
2. Through a direct connectiontothe radio speaker:
Make up a shielded cable with a two-conduetor
phone plug on one end and two al.ligator clips on
the other end. Connectthe alllgator clip6 across
the voice-coil terminals of the tadio speaker,
and insert the phone plug into the Mic jack. Set
the radio volume and tone controls ae in Step l.
Setthe recording level, and proceed as described
under "To Record From a Microphone".
3. Through a direct connection to the radio volume
control:
Make up a shielded cable with a two-couductor
phone plug on one end. Connect the other end
across the radio volume control. Insert the
phone plug into the Mic jack. Set the recording
level, and proceed as deacribed underi,To Re-
cord From a Micfophone,'. The radio volume
and tone controls do not affect this setup; so
they may be left in any position.