Fust Gastro Novamatic GS G400 Installation and operating instructions

GB UNDERCOUNTER DISHWASHER G400
INSTALLATION, OPERATION AND MAINTENANCE
Page 3
DE UNTERBAUGESCHIRRSPÜLER G400
INSTALLATION, BEDIENUNG UND WARTUNG
Seite 15
NL TAFELMODEL VAATWASMACHINE G400
INSTALLATIE, GEBRUIK EN ONDERHOUD
Pag. 27
SE GOLVDISKMASKIN G400
INSTALLATION, HANDHAVANDE OCH UNDERHÅLL
Sid 41
DK INDBYGNINGSOPVASKEMASKINE G400
INSTALLATION, DRIFT OG VEDLIGEHOLDELSE
Side 53
FI ASTIANPESUKONE G400
ASENNUS, KÄYTTÖ JA HUOLTO
Sivu 65
NO INNEBYGD OPPVASKMASKIN G400
MONTERING, BRUK OG VEDLIKEHOLD
Side 77
FR LAVE-VAISSELLE G400
INSTALLATION, EMPLOI ET ENTRETIEN
Page 89
IT LAVASTOVIGLIE SOTTOTAVOLO G400
INSTALLAZIONE, USO E MANUTENZIONE
Pag. 101
ES LAVAVAJILLAS EMPOTRABLE G400
INSTALACION, USO Y MANTENIMIENTO
Pág. 113
PT MÁQUINA DE LAVAR LOIÇA DE ENCASTRAR G400
INSTALAÇÃO, UTILIZAÇÃO E MANUTENÇÃO
Pág. 125
DOC. NO. 5956.431.02
EDITION: 1 12.2007
NOVAMATIC GS G400


ENGLISH
3
A GENERAL RECOMMENDATIONS ......................................................... Page 4
A1 HANDLING ......................................................................................................................Page 4
A2 UNPACKING ................................................................................................................... Page 4
A3 DISPOSAL....................................................................................................................... Page 4
A4 TECHNICAL DATA.......................................................................................................... Page 5
B INSTRUCTIONS FOR THE INSTALLER/MAINTENANCE PERSON..... Page 7
B1 WATER CONNECTION................................................................................................... Page 7
B2 ELECTRICAL CONNECTION ......................................................................................... Page 7
B3 DETERGENT/RINSE-AID DISPENSERS AND SETTINGS............................................ Page 8
B4 SETTING THE DISPENSERS......................................................................................... Page 9
B5 MAINTENANCE............................................................................................................... Page10
C INSTRUCTIONS FOR THE USER........................................................... Page 11
C1 STARTING....................................................................................................................... Page 11
C2 WASH CYCLES............................................................................................................... Page12
C3 OPERATION.................................................................................................................... Page 12
C4 END OF WORK AND DAILY CLEANING........................................................................ Page 13
D TROUBLESHOOTING............................................................................. Page 14
EN CONTENTS

4
WARNING
CAREFULLY READ THE INSTALLATION,
OPERATING AND MAINTENANCE INSTRUCTIONS
BEFORE INSTALLING THIS APPLIANCE.
INCORRECT INSTALLATION, ADAPTATIONS OR
ALTERNATIONS COULD CAUSE DAMAGE TO
PROPERTY OR INJURY TO PERSONS. MALICIOUS
DAMAGE, DAMAGE DUE TO NEGLIGENCE, OR TO
FAILURE TO COMPLY WITH INSTRUCTIONS AND
REGULATIONS, OR TO INCORRECT CON-
NECTIONS OR UNAUTHORISED TAMPERING
INVALIDATE ANY WARRANTY AND RELIEVE THE
MANUFACTURER OF ALL LIABILITY.
1. Carefully read this instructions booklet, as it
contains important advice for safe installation,
operation and maintenance. Keep this booklet to
hand in a safe place for future reference by other
operators.
2. Installation should be carried out by qualified
engineers, in accordance with current regula-
tions and with the manufacturer’s instructions.
3. The appliance should only be used by persons
specifically trained in this operation.
4. Switch off the appliance in the event of failure or
malfunctioning.
Only have the appliance repaired by a service centre
authorised by the manufacturer and ask for original
spare parts.
A1 HANDLING
Use suitable means to move the appliance: a lift truck
or fork pallet trucks (the forks should reach more than
halfway beneath the appliance).
A2 UNPACKING
Fig. 1
Wear protective gloves to unpack.
Lift the appliance using a lift truck, remove the base
and position the appliance
Fig. 2
where it is to be installed.
Fig. 3
Remove the protective film and ensure that the
packaging material is disposed of correctly in
compliance with the regulations in force in the country
where the product is to be used.
A3 DISPOSAL
All the packaging materials are environment friendly.
They may be kept without danger, recycled or burned
in a special waste incineration plant. Recyclable plastic
components are marked as follows:
Wood and cardboard components may be disposed of
according to local regulations in force. Appliances that
have reached the end of their service life should be
suitably disposed of. The appliance should be
dismantled according to regulations in force. All metal
parts are in stainless steel (AISI 304) and are
removable. Plastic parts are marked with the symbol of
the material.
A GENERAL RECOMMENDATIONS
polyethylene: external wrapping film,
instruction bag.
polypropylene: top packaging panels,
straps.
polystyrene
foam:
protective surround
elements.
PE
PP
PS

5
ENGLISH
A4 TECHNICAL DATA
Standard cycle time may vary should the inlet water temperature be different from that indicated above.
MODELLS 5/1-WT4 G 400
Supply voltage: V 220...240 1N~ 400...415- 3N~
- convertible to V - 220...240- 3~
- convertible to V - 220...240- 1N~
Frequency Hz 50 o 60 50 o 60
Max. power input kW 3,65 3,85/5,35
Boiler heating elements kW 2,80 3,00/4,50
Tank heating elements kW 2,00 2,00
Water supply press. kPa [bar] 200...300 [2...3] 200...300 [2...3]
Water supply temp. °C 50 50
Water supply hardness °fH [°dH ] 14 [8] max 14 [8] max
Rinse cycle water consumption l 3,2...3,5 3,2...3,5
Boiler capacity l 5,5 5,5
Tank capacity l 33 33
Standard cycle time with water supply at 50°C sec. 120 - 180 120 - 180
Legal noise level Leq dB(A) <70 <70
Protection rating IPX4 IPX4
Net weight Kg 54 54
Power supply cable H07RN-F H07RN-F
Table 1
400..415 V 3N 400…440V 3 220…240V 3 220…240V 1N
CSCSCSCS
3,65 kW - - - - - - 3x2,5 20A 1P+N
3,85 kW 5X1,5 16A 3P+N - - 4X1,5 16A 3P+N 3x2,5 20A 1P+N
5,35 kW 5X1,5 16A 3P+N - - 4X1,5 16A 3P+N 3x4 32A 1P+N
C = Power supply cable
S = On/Off switch
Table 2

6
Fig. 4
Legend Fig. 4
A- Water inlet pipe with ø 3/4” G fittings
C- Outlet pipe øi 40 mm (^) – øi 18mm (*).
I- Power supply
S- Pipe inlet for detergents
Q- Unipotential screw
(^) - Only for model with free-fall drainage
(*) - Only for model with drain pump
C
A
I
I
Q
30
162
255
202
62
4650846
32
37
S
C
A
Q
635
MAX
20
970
5943159
51
38
35
820
600
600

7
ENGLISH
Install a disconnecting switch with a capacity at
least equal to that given in the technical data table,
a 30mA residual current circuit breaker and an
overcurrent device (magnetothermal cut-out with
manual reset or fuse) between the appliance and
the mains power outlet.
RATING PLATE
The rating plate contains identification and technical
data and is located on the right-hand side panel of the
appliance (Fig. 5).
Fig. 5
B1 WATER CONNECTION
• Position the dishwasher and level the appliance by
turning the relative height-adjustable feet (Fig. 5).
• Connect the appliance water supply pipe “A”
(Fig. 4) to the mains, fitting a cut-off cock, the filter
provided and a pressure gauge between the
appliance and the mains (Fig. 6).
Fig. 6
•Check that the dynamic water supply pressure,
measured between the appliance and the main, is
between 200 and 300 kPa (test while dishwasher
tank or boiler is filling with water).
If the pressure is too high, fit a suitable pres-
sure reducer on the inlet pipe.
- On the model with free-fall drainage:
connect the waste outlet pipe “C” (Fig. 4) to the main
drain pipe, fitting a trap, or place the outlet pipe over
an S trap set into the floor.
- On the model with drain pump:
position the outlet pipe at a height anywhere between
750 and 1000 mm from the floor.
Check that about 4 litres of water flow out of the outlet
pipe during the rinse cycle.
B2 ELECTRICAL CONNECTION
Fig. 7
• Before carrying out the electrical connection, check
that the voltage and frequency on the appliance
rating plate correspond to those of the mains
electricity supply.
• The earth wire at the terminal end must be longer
(max. 20 mm) than the phase wires.
• Connect the earth wire of the power supply cable to
an efficient earth clamp. The appliance must also
be included in a unipotential system, the
connection being made through the screw “Q”
(Fig. 4) marked with the symbol “ ”. The
unipotential wire must have a cross section of 10
mm2.
Power supply 220…230V 1N
Fig. 8
Open the power supply terminal board.
Using a suitable power cable (see technical data table),
connect the phase wire to terminal L, the neutral wire to
terminal N and the earth wire to the terminal .
BINSTRUCTIONS FOR THE INSTALLER/MAINTENANCE PERSON
Model LS5
PNC 9CGX 400100 05 Ser.N .123000001
AC 400V 3N 50Hz
Power Boiler 16500w
Power Tank 7500w
Power Max 26800w
Made in EEC
Model RT10 ED
PNC 9CGX400100 05
Ser.N .123000001
!
CAUTION:
THE EARTH AND ELECTRICAL CON-
NECTIONS SHOULD BE IN COMPLI-
ANCE WITH NATIONAL REGULATIONS.
AC400....
1
11
10
9
8
7
6
5
4
3
2
12
!

8
Three-phase version:
Power supply 400…415V 3N
Fig. 9
Open the power supply terminal board and insert the
jumpers provided as follows: one jumper between
terminals 2 and 4 and another between terminals 4 and
6. Using a suitable power supply cable (see technical
data table), connect the three phases to terminals 1, 3
and 5, the neutral to terminal 4 and the earth wire to the
terminal .
Power supply 220...230V 3
Fig. 10
Open the power supply terminal board and insert the
jumpers provided as follows: one jumper between
terminals 1 and 2, one between terminals 3 and 4 and
another between terminals 5 and 6. Using a suitable
power supply cable (see technical data table), connect
the three phases to terminals 1, 3 and 5 and the earth
wire to the terminal .
Power supply 220…230V 1N
Fig. 11
Open the power supply terminal board and insert the
jumpers provided as follows: two jumpers between
terminals 1, 3, 5 and another two between terminals 2, 4
and 6.
Using a suitable power supply cable (see technical data
table), connect the phase and neutral to terminals 5 and
6 respectively and the earth wire to the terminal .
Connections provided for energy control.
This appliance is designed for an external energy
consumption control.
Fig. 12
Connect the energy peak controller across terminals 11
and 12.
Safety devices
• An automatic reset thermoamperometric protective
device incorporated in the windings of the electric
pump cuts off the electricity supply in the case of
malfunctioning.
• In the event of water mains failure, a device
prevents water in the boiler from returning into the
mains.
• An overflow pipe, connected to the drainage outlet,
maintains the water in the tank at a constant level.
• On models with a drain pump, a supplementary
level control device activates if the main level
control device is faulty.
Failure to comply with safety rules and regulations
relieves the manufacturer of all liability.
B3 DETERGENT/RINSE-AIDDISPENSERSAND
SETTINGS
If the appliance is connected to a water softener or
osmotic device, contact the detergent supplier for a
specific product.
Dishwashers with incorporated rinse-aid dia-
phragm dispenser pump (Fig. 13).
To change the dispensed amount, turn on screw “D”
accordingly (Fig. 13).
The diaphragm dispenser may be activated manually
by pressing screw “D” (Fig. 13).
L1
L2
L3
L1
L2
L3
CAUTION
A normally open (n.o.) contact of the
controller must be connected across
terminals 11 and 12. When this contact
closes the boiler heating elements are
disconnected. Using the dishwasher in
these conditions may increase the cycle
time.
11
12
!

9
ENGLISH
Connections for automatic detergent dispenser
(Fig. 13)
Fig. 13
There is a ready-made impression “N” to be perforated
(Ø 8 mm) for positioning the detergent concentration
measuring sensor.
In the front area of the tank there is a hole “P” (Ø 10 mm)
closed with a plug that is designed for fitting a liquid
detergent injector.
Electrical connections for automatic detergent and
rinse-aid dispensers.
Single-phase version:
The appliance has a terminal board for the power
supply of dispensers operating at 230 V, max. power
30VA.
Connect to the terminal board “L” (Fig. 13) to terminals
1 and 2 for dispensing during the rinse cycle or to
terminals 3 and 4 for dispensing during the wash cycle.
Three-phase versions:
Terminals are available on the power supply terminal
board for the electrical connection of external
dispensers working at 220…240 V. Max. power 30 VA.
Fig. 14
• Connect the detergent dispenser between
terminals 7 and 9. These connection points are live
during filling of the tank for 165” (average filling
time at 200 kp) and during the rinse cycle.
Fig. 15
• Connect the rinse-aid dispenser between
terminals 8 and 9. These connection points are live
during the rinse cycle.
MANUAL ACTIVATION
Whenever the detergent containers are replaced, it
may be necessary to activate the dispensers manually
in order to fill the hoses and eliminate any air.
Simultaneously press the buttons, as shown in the
figures below. If necessary, repeat this operation
several times.
In the appliances with pressure boiler, the diaphragm
dispenser pump may be manually activated by pres-
sing screw “D” (Fig. 13).
B4 SETTING THE DISPENSERS
All operations should be carried out with the appliance
switched on, the door open and no cycle selected.
SEQUENTIAL START
Press the indicated buttons simultaneously for 5
seconds:
Display of programming mode:
N
P
T
D
L
L1
L2
L3
DETERGENT DISPENSER DISPENSER RINSE-AID
LEGEND
Increase
Decrease
Confirm or select next parameter
12
12
1
12
GEn

10
Initial amount of detergent:
Setting the activation time:
Initial amount of rinse-aid:
Setting the activation time:
Amount of detergent during the cycle:
Setting the activation time:
Amount of rinse-aid during the cycle:
Setting the activation time:
Exit from programming mode:
Notes for external dispensers:
-if
dEt=181 the detergent dispenser only ope-
rates during wash pump operation; terminals 7-9
of the main terminal board are powered at the
same time.
-if
dEt=182 the detergent dispenser only ope-
rates during filling electrovalve operation for res-
toring the boiler level; terminals 7-9 of the main
terminal board are powered at the same time.
-if
rAi=61 the rinse-aid dispenser only opera-
tes during filling electrovalve operation for resto-
ring the boiler level; terminals 8-9 of the main
terminal board are powered at the same time.
-if
rAi=62 the rinse-aid dispenser only opera-
tes during wash pump operation; terminals 8-9 of
the main terminal board are powered at the same
time.
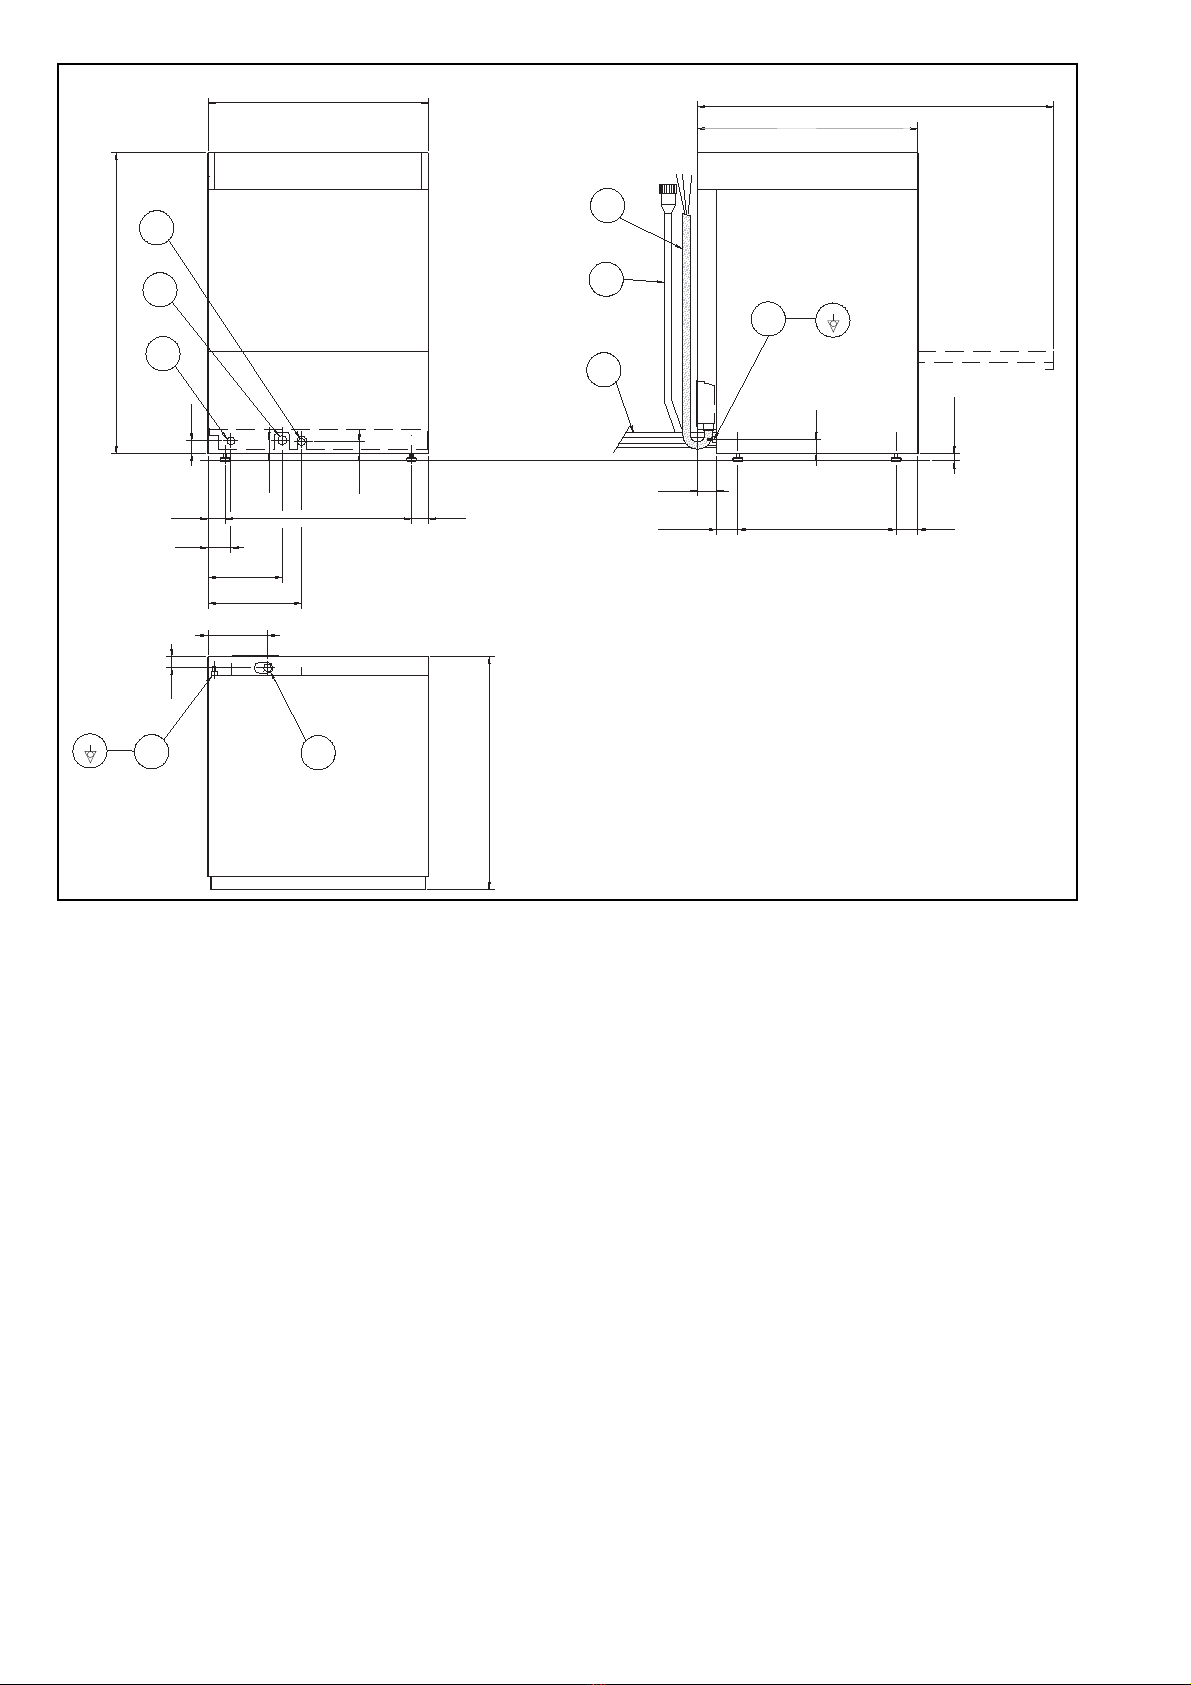
For connections, see the wiring diagram.
Example:
Supposing that an external detergent dispenser has
been connected with a tank concentration measuring
sensor, a standard setting could be as follows:
dIn=0 the dispenser is not activated during filling of
the tank.
dEt=181 the dispenser is activated during wash
pump operation and, thanks to the concentration
measured by the conduction sensor, the correct
amount of detergent is dispensed.
Suggestion: to check the effectiveness of the rinse-
aid, look at freshly washed glasses against the light.
Drops of water remaining on the glass indicate an
insufficient amount while streaks indicate an excess.
Changing the detergent/rinse-aid type.
If changing to a different detergent/rinse-aid type
(even one by the same manufacturer), you must rinse
the suction and pressure hoses with fresh water before
connecting the new detergent/rinse-aid container.
Otherwise, the mixing of different types of detergent/
rinse-aid will cause crystallisation, which may result in
a breakdown of the dosing pump. Failure to observe
this condition will invalidate the guarantee and product
liability.
B5 MAINTENANCE
• Descale the boiler, the internal surfaces of the tank
and the appliance water piping once or twice a
year.
• Descale the rinse and wash jets every month using
vinegar or a descaling agent.
Prolonged period of inactivity
If the dishwasher is not to be used for a long time,
proceed as follows:
• Close the water supply cock.
• Completely drain the tank.
• Remove and carefully clean the filters.
• Completely drain the boiler.
• Spread a thin film of Vaseline oil over all the
stainless steel surfaces.
dln
45 12
45
rln
12
10
dEt
12
8
rAl
12
4
GEn

11
ENGLISH
Our appliances have been studied and optimised to give high performance. This appliance must be used exclusively
for the purpose for which it has been designed, i.e. for washing dishes with water and specific detergents. Any other
use is to be considered improper.
This appliance does not carry out the rinse cycle should there be no supply water; it stops all functions with an error
message “A1” (also see “Warning messages”).
TIPS
• Carry out a couple of cycles without dishes to flush out any industrial grease which has remained in the
tank and piping.
• Avoid washing decorated dishes.
• Do not allow silverware to come into contact with other metals.
• Do not allow food to dry on the dishes.
• Remove large food scraps from the dishes to prevent clogging the filters.
• Pre-wash the dishes by spraying them with cold or lukewarm water, without using any detergent.
• Use automatic dispensers for the detergent.
• If there is no automatic dispenser, pour a non-foaming detergent into the tank when the water has reached
the washing temperature.
CONTROL PANEL
Fig. 16
The temperature shown on the display is that of the boiler if the indicator light “E” is on or of the tank if the light “D” is
on. The tank temperature is displayed during the wash cycle and the boiler temperature during the rinse cycle.
C1 STARTING
• Open the water supply cock.
• Switch on at the mains.
• Open the door and check that all the components
are in their correct position.
• Close the door and press button “A”.
The indicator light of button “A” (Fig. 16) comes on,
indicating that the dishwasher is powered and that
water is being introduced and heated.
The word “FILL” is shown on the display during the
entire filling and heating stage:
If the door is opened during this stage the message
"CLOSE" will appear on the display:
The filling and heating stage has finished when the dis-
play shows the tank temperature:
To display the boiler temperature during heating of the
tank, open the door and press the button “F” (Fig. 16).
C INSTRUCTIONS FOR THE USER
21
AB
KDEFG
LEGEND:
A= on/off
B= drain/self-cleaning cycle
D= “tank temperature” indicator light
E= “boiler temperature” indicator light
F= wash cycle 1
G= wash cycle 2
K=display
FILL
CLO
55˚C
1

12
C2 WASH CYCLES
The wash cycle includes one wash with hot water and
detergent (min 55 °C) and one rinse with hot water and
rinse-aid (min 82 °C).
Table of times
Standard cycle time with supply water at 50 °C.
A device lengthens the cycle time if the water in the
boiler has not reached the minimum temperature for
correct rinsing.
The cycle times and the temperature may be
personalised (e.g. increase of the rinse time and
temperature).
The cycle times should only be set by a specialised
technician.
C3 OPERATION
The wash cycle includes one wash with hot water and
detergent and one rinse with hot water and rinse-aid:
The appliance is then ready for use:
• Open the door.
• Pour the required amount of detergent into the
tank.
• Insert the rack containing the dirty dishes.
• Close the door and select the suitable wash cycle;
the corresponding indicator light comes on and the
wash cycle starts.
Wash cycles:
- CYcle I
For not very dirty dishes or glasses: press button “F”
(Fig. 16), (see table of times).
- Ciclo II (recommended)
For very dirty dishes: press button “G” (Fig. 16), (see
table of times).
• To stop the wash cycle, just press the cycle button
or open the door.
• To continue the wash cycle, press the cycle button
again or close the door. The cycle starts from
where it was interrupted.
• At the end of the wash, the dishwasher emits a
series of beeps and “END” blinks on the display:
Open the door and remove the rack containing the
clean dishes.
CAUTION
The appliance will not remove burnt food deposits
from dishes. Dishes with burnt-on food deposits
should be cleaned mechanically/chemically (for
example, pre-wash under running water) before
putting them in the dishwasher.
Change the water in the tank three times a day.
Type of racks and loading
Fig. 17
• YELLOW rack: for 18 plates with maximum
diameter of 240 mm.
Fig. 18
• GREEN rack: for 12 bowls with maximum diameter
of 240 mm.
Fig. 19
• BLUE rack for glasses: the glasses should be
placed upside down.
Fig. 20
• YELLOW container for cutlery: insert items, with
the handles pointing downwards, in each container.
• Available as accessories: dividers for glasses and
rack for dishes with maximum diameter of 320 mm.
Note: if only one type of dish rack is to be used, it is
advisable to choose the GREEN rack.
G 400 120
II
180
II
12
55˚C
12
12
END
(OPTIONAL)

13
ENGLISH
C4 END OF WORK AND DAILY CLEANING
The appliance is designed to carry out an automatic
cleaning cycle to help flush out any residues and to
guarantee greater health and hygiene:
• Open the door and take out the rack containing the
clean dishes.
• Remove the tank filters and the overflow “W”.
Fig. 21
• Close the door.
• Select the drain cycle by pressing button “B”
(Fig. 16).
• The message "CLE" ("CLEAN") will be displayed
throughout the drain cycle:
• After a few minutes, 3 beeps indicate the end of the
cleaning cycle and “END” blinks on the display:
• Switch off the dishwasher by pressing button “A”
(Fig. 16).
• Switch off at the mains.
• Close the water supply cock.
• Replace the filters and the overflow.
• Unscrew the ring nuts “H” and remove the header
units “C”.
Fig. 22
• Release the arms “F”, “I” and “O” from the hub,
remove the threaded plugs “L” and “Q” and clean
all the parts with a water jet. Do not use tools or
sharp implements to clean the nozzles, which could
otherwise be damaged.
• Remove the filter “Z” and clean away any remained
food in order to avoid blocking the draining system.
Fig. 23
CAUTION
THE RINSE ARMS “I” and “O” ARE NOT SYMME-
TRICAL; the rinse arm with raised ring (O) should
be fitted onto hub socket.
Fig. 24
• Upon completion of cleaning operations, replace
the parts removed previously.
Cleaning the exterior surfaces
Before carrying out any cleaning operations, turn off
the power at the mains.
Clean the stainless steel surfaces using warm soapy
water; never use detergents containing abrasive
substances nor steel scrapers, common wire wool,
brushes or scrapers; rinse thoroughly using a wet cloth
and carefully wipe dry.
Clean the control panel using a soft damp cloth and a
neutral detergent if necessary.
Do not wash the appliance using direct or high-
pressure water jets.
To reduce the emission of pollutants into the
environment, clean the appliance (externally and
where necessary internally) with products having a
biodegradability of over 90%.
W
CLE
END
H
C
O
I
Q
L
F
Z
1
2
OI

14
D TROUBLESHOOTING
DISHWASHER DOES NOT WASH
WELL
1. Check if the suction filter is dirty and clean it thoroughly.
2. Check if the wash jets are clogged by solid food remains.
3. Check that the initial amount of detergent or subsequent additions are
correct.
4. The selected wash cycle is too short. Repeat the cycle.
5. Check that the dishes are stacked correctly in the racks.
GLASSES AND DISHES ARE
NOT DRIED PROPERLY
1. Check the instructions for the amount of rinse-aid.
2. Check that there is rinse-aid in the container and if necessary top up.
3. Check the set amount of rinse-aid.
CONDENSATION ON GLASSES 1. Check that there is rinse-aid in the container and if necessary top up.
2. Check the set amount of rinse-aid.
3. Remove the rack of glasses immediately the cycle has ended.
STAINS ON THE GLASSES 1. Only use “non-foaming” products for professional dishwashers.
EXCESSIVE FOAM IN THE TANK 1. Check if the amount of product dispensed by the detergent dispenser is
excessive.
2. Ensure that the tank has not been cleaned with unsuitable cleaners.
Drain the tank and rinse thoroughly before new wash cycles.
3. If a foaming detergent has been used, drain and refill the tank with
water until the foam disappears.
SMEARS OR SPOTS ON THE
GLASSES
1. Reduce the amount of rinse-aid.
THE WASH OR RINSE ARMS
TURN SLOWLY
1. Remove and thoroughly clean the arms.
2. Clean the wash pump suction filter.

15
DEUTSCH
A ALLGEMEINE HINWEISE ....................................................................... Seite 16
A1 TRANSPORT................................................................................................................... Seite 16
A2 ENTFERNUNG DER VERPACKUNG............................................................................. Seite 16
A3 ENTSORGUNG ............................................................................................................... Seite16
A4 TECHNISCHE DATEN .................................................................................................... Seite 17
B ANWEISUNGEN FÜR DEN INSTALLATEUR/WARTUNGSWART........ Seite 19
B1 WASSERANSCHLUSS ................................................................................................... Seite 19
B2 ELEKTROANSCHLUSS .................................................................................................. Seite 19
B3 VORBEREITUNGEN UND DOSIERER FÜR SPÜLMITTEL/KLARSPÜLMITTEL .......... Seite 20
B4 REGULIERUNG DER DOSIERER.................................................................................. Seite 21
B5 WARTUNG ...................................................................................................................... Seite 22
C ANWEISUNGEN FÜR DEN BENUTZER................................................. Seite 23
C1 BETRIEBSBEGINN ......................................................................................................... Seite 23
C2 SPÜLGÄNGE .................................................................................................................. Seite 24
C3 BETRIEB .........................................................................................................................Seite 24
C4 BETRIEBSENDE UND TÄGLICHE REINIGUNG............................................................ Seite 25
D FEHLERSUCHE....................................................................................... Seite 26
DE INHALTSVERZEICHNIS

16
HEWISE
DIE INSTALLATIONS-, BETRIEBS- UND WAR-
TUNGSANWEISUNGEN VOR DER INSTALLATION
DIESES GERÄTES SORGFÄLTIG DURCHLESEN.
UNSACHGEMÄSSE INSTALLATION, ANPASSUN-
GEN ODER VERÄNDERUNGEN KÖNNEN SCHÄ-
DEN AN GEGENSTÄNDEN UND PERSONEN VER-
URSACHEN. ABSICHTLICHE BESCHÄDIGUNGEN
BZW. DURCH NACHLÄSSIGKEIT UND NICHTBE-
ACHTUNG DER ANWEISUNGEN UND NORMEN
HERVORGERUFENE, BWZ. AUFGRUND FEHLER-
HAFTER ANSCHLÜSSE ODER NICHT ZUGELAS-
SENER MANIPULATIONEN ENTSTANDENE BE-
SCHÄDIGUNGEN ANNULLIEREN JEGLICHE GA-
RANTIE BZW. VERANTWORTUNG VON SEITEN
DES HERSTELLERS.
1. Das vorliegende Handbuch aufmerksam durchle-
sen, da es wichtige Hinweise zu Betriebssicherheit,
Gebrauch und Wartung enthält. Dieses Handbuch
für eventuelles späteres Nachschlagen durch an-
dere Bedienungspersonen aufbewahren.
2. Die Installation muß von qualifiziertem Fachper-
sonal gemäß den Herstellerangaben entspre-
chend den geltenden Richtlinien ausgeführt
werden.
3. Das Gerät darf nur von Personen bedient werden,
die mit dem Betrieb des Gerätes vertraut sind.
4. Das Gerät im Falle eines Defektes oder einer Be-
triebsstörung ausschalten.
Notwendige Reparaturen nur von einem Technischen
Kundendienst durchführen lassen, der vom Hersteller
hierzu bevollmächtigt ist und nur Originalersatzteile
verwenden.
A1 TRANSPORT
Jegliche Versetzung des Gerätes muß mit Hilfe eines
geeigneten Hilfsmittels erfolgen, d.h.: mit einem Hub-
wagen oder Gabelstapler (diese müssen breiter sein
als die Hälfte der Abmessungen des Produktes).
A2 ENTFERNUNG DER VERPACKUNG
Abb. 1
Unter Verwendung von Arbeitshandschuhen die Ver-
packung entfernen.
Abb. 2
Das Gerät mit einem Hubwagen anheben, die Unter-
lage entfernen und an dem Bestimmungsort aufstel-
len.
Abb. 3
Den Schutzfilm entfernen und sicherstellen, daß das
Verpackungsmaterial nicht in der Umwelt abgeladen
wird, sondern unter Beachtung der in dem Land gel-
tenden Richtlinien entsorgt wird, in dem das Produkt
benutzt wird.
A3 ENTSORGUNG
Alle für die Verpackung verwendeten Materialien sind
umweltfreundlich. Sie können gefahrlos aufbewahrt,
wiederverwertet oder in einer geeignetenMüllverbren-
nungsanlage verbrannt werden. Die Kunststoffteile,
welche einer eventuellen Entsorgung durch Recycling
unterliegen, sind wie folgt gekennzeichnet:
Holzteile und Karton können unter Beachtung der lo-
kalen Richtlinien entsorgt werden. Am Ende der Le-
bensdauer des Produktes ist zu vermeiden, das Gerät
in der Umwelt abzuladen. Die Entsorgung des Gerätes
hat unter Beachtung der geltenden Richtlinien zu erfol-
gen. Alle Metallteile bestehen aus Chromnickelstahl
(AISI 304) und sind demontierbar. Die Kunststoffteile
sind mit dem Materialsiegel gekennzeichnet.
Die Dauer der Standardzyklen kann sich verändern,
falls die Wassertemperatur bei der Zufuhr unterschied-
lich zu der o.g. sein sollte.
A ALLGEMEINE HINWEISE
Polyäthylen: äußerer Verpackungsfilm,
Beutel mit Instruktionen.
Polypropylen: Verpackungsdeckel,
Bandeisen.
Polystyrol-
schaum:
Schutzecken.
PE
PP
PS

17
DEUTSCH
A4 TECHNISCHE DATEN
Die Dauer der Standardzyklen kann sich verändern, falls die Wassertemperatur bei der Zufuhr unterschiedlich zu
der o.g. sein sollte.
MODELLLS 5/1-WT4 G400
Versorgungsspannung: V 220...240 1N~ 400...415- 3N~
- umstellbar auf V - 220...240- 3~
- umstellbar auf V - 220...240- 1N~
Frequenz Hz 50 o 60 50 o 60
Max. Leistungsaufnahme kW 3,65 3,85/5,35
Leistung Boilerwiderstände kW 2,80 3,00/4,50
Leistung Spültankwiderstände kW 2,00 2,00
Wasserzufuhrdruck für Ausführungen kPa [bar] 200...300 [2...3] 200...300 [2...3]
Wassertemperatur Zulauf °C 50 50
Wasserhärte Zufuhr °fH [°dH ] 14 [8] max 14 [8] max
Wasserverbrauch pro Klarspülgang l 3,2...3,5 3,2...3,5
Fassungsvermögen Boiler l 5,5 5,5
Fassungsvermögen Spültank l 33 33
Dauer Standardzyklus mit Wasserzulauf 50°C sec. 120 - 180 120 - 180
Schallpegel dB(A) <70 <70
Schutzart IPIPX4X4 IPX4
Nettogewicht Kg 54 54
Art des Versorgungskabels H07RN-F H07RN-F
Tabelle 1
400..415 V 3N 400…440V 3 220…240V 3 220…240V 1N
CSCSCSCS
3,65 kW - - - - - - 3x2,5 20A 1P+N
3,85 kW 5X1,5 16A 3P+N - - 4X1,5 16A 3P+N 3x2,5 20A 1P+N
5,35 kW 5X1,5 16A 3P+N - - 4X1,5 16A 3P+N 3x4 32A 1P+N
C = Versorgungskabel
S = Hauptschalterù
Tabelle 2

18
Abb. 4
Zeichenerklärung zu Abb. 4
A- Wasseranschlussrohr ¾ “ G
C- Abwasseranschlußrohr Innendurchmesser 40 mm (^) int. –18 mm (*)
I- Stromversorgung
S- Eingang Spülmittelschläuche
Q- Potentialausgleichsschraube
(^) - Nur bei Modell mit Fallrohr
(*) - Nur bei Modell mit Ablaufpumpe
C
A
I
I
Q
30
162
255
202
62
4650846
32
37
S
C
A
Q
635
MAX
20
970
5943159
51
38
35
820
600
600

19
DEUTSCH
Vor dem Gerät einen Trennschalter mit einer Lei-
stung installieren, die nicht geringer als die in der
Tabelle der technischen Daten aufgeführten ist, ei-
nen Differentialschalter von 30mA und eine Über-
stromvorrichtung (magnetothermisch mit manuel-
ler Rückstellung oder Schütz).
Typenschild
Das Typenschild enthält die Angaben und technischen
Daten; es befindet sich auf der rechten Seite des Ge-
rätes (Abb. 5).
Abb. 5
B1 WASSERANSCHLUSS
• Den Geschirrspüler aufstellen und die wasserge-
rade Ausrichtung des Gerätes durch Drehen der je-
weiligen höhenverstellbaren Füße vornehmen
(Abb.5).
• Die Wasserzufuhrleitung „A“ des Gerätes (Abb. 4)
an das Wasserversorgungsnetz anschließen, wo-
bei ein Absperrhahn, der mitgelieferte Filter sowie
ein Manometer zwischen zu schalten ist (Abb. 6).
Abb. 6
•Überprüfen Sie, ob der Fließdruck der Wasserver-
sorgung vor dem Gerät zwischen 200 und 300
kPa (die Messung ist vorzunehmen, während der
Geschirrspüler Wasser in den Tank und/oder in den
Boiler füllt).
Sollte der Druck höher sein, ist dem Gerät ein
geeigneter Druckminderer vorzuschalten.
- Bei dem Modell mit Fallrohr:
Das Ablaufrohr „C“ (Abb.4) unter Verwendung eines
Siphons an die Abflussleitung anschließen, oder das
Rohr über ein im Fußboden eingelassenes Siphonsieb
positionieren.
- Bei dem Modell mit Ablaufpumpe:
Das Ablaufrohr in einer Höhe von 750 bis 1000 mm
vom Boden positionieren.
Anschließend überprüfen, ob aus dem Ablaufrohr wäh-
rend des Klarspülgangs ca. 4 l Wasser ausfließen.
B2 ELEKTROANSCHLUSS
Abb. 7
• Vor Anschluß des Gerätes ist sicherzustellen, daß
die auf dem Typenschild angegebene Spannung
und Frequenz mit der des Versorgungsnetzes über-
einstimmen.
• Der Erdungsleiter auf der Seite der Klemmeleiste
muß länger sein (max. 20 mm) als die Phasenleiter.
• Den Erdungsleiter der Stromversorgung an einen
geeigneten Erdungsanschluss anschließen. Das
Gerät ist außerdem in ein Potentialausgleichssy-
stem einzubinden, dessen Anschluß mit Hilfe der
mit dem Symbol “ “ gekennzeichneten Schraube
„Q“ (Abb.4) vorzunehmen ist. Der Potentialaus-
gleichsleiter muß über einen Querschnitt von 10
mm² verfügen.
Stromversorgung 220...230V 1N
Abb. 8
Die Klemmenleiste der Versorgung öffnen.
Mit einem geeigneten Stromkabel (siehe Tabelle Tech-
nische Daten) die Phase an der Klemme L, den Nullei-
ter an der Klemme N und den Erdungsdraht an der
Klemme .anschließen.
B ANWEISUNGEN FÜR DEN INSTALLATEUR/WARTUNGSWART
Model LS5
PNC 9CGX 400100 05 Ser.N .123000001
AC 400V 3N 50Hz
Power Boiler 16500w
Power Tank 7500w
Power Max 26800w
Made in EEC
Model RT10 ED
PNC 9CGX400100 05
Ser.N .123000001
!
ACHTUNG:
DIE ERDUNGS- UND ELEKTROAN-
SCHLÜSSE MÜSSEN DEN NATIONA-
LEN RICHTLINIEN ENTSPRECHEN.
AC400....
1
11
10
9
8
7
6
5
4
3
2
12
!

20
Dreiphasen-Ausführung:
Stromversorgung 400...415V 3N
Abb. 9
Die Klemmenleiste der Versorgung öffnen und die mit-
gelieferten Überbrückungen wie folgt einsetzen: eine
Überbrückung zwischen der Klemme Nr. 2 und 4 und
eine andere zwischen der Klemme Nr. 4 und 6. Mit ei-
nem geeigneten Stromversorgungskabel (siehe Tabelle
Technische Daten) die drei Phasen an den Klemmen 1,
3 und 5 anschließen, den Nulleiter an die Klemme 4 und
den Erdungsdraht an die Klemme .
Stromversorgung 220...230V 3
Abb. 10
Die Klemmenleiste der Versorgung öffnen und die mit-
gelieferten Überbrückungen wie folgt einsetzen: eine
Überbrückung zwischen der Klemme Nr. 1 und 2, eine
zwischen der Klemme Nr. 3 und 4 und eine andere zwi-
schen der Klemme Nr. 5 und 6. Mit einem geeigneten
Stromversorgungskabel (siehe Tabelle Technische Da-
ten) die drei Phasen an den Klemmen 1, 3 und 5 an-
schließen und den Erdungsdraht an die Klemme .
Stromversorgung 220...230V 1N
Abb. 11
Die Klemmenleiste der Versorgung öffnen und die mit-
gelieferten Überbrückungen wie folgt einsetzen: zwei
Überbrückungen zwischen den Klemmen Nr. 1, 3 und 5
und zwei weitere zwischen den Klemmen Nr. 2, 4 und 6.
Mit einem geeigneten Stromversorgungskabel (siehe
Tabelle Technische Daten) jeweils die Phase an die
Klemme Nr. 5, den Nulleiter an die Klemme Nr. 6 und
den Erdungsdraht an die Klemme anschließen.
Vorbereitung der Energiekontrolle
Dieses Gerät ist für die externe Kontrolle des Energie-
verbrauchs vorbereitet.
Abb. 12
Die Spitzenstrom-Steuereinheit zwischen den Klemmen
Nr. 11 und 12 anschließen.
Sicherheitsvorrichtungen
• Ein in die Wicklungen der Elektropumpe eingebau-
ter thermo-Schutzschalter mit automatischer Rück-
stellung unterbricht die Stromversorgung der
Pumpe bei Betriebsstörungen.
• Eine Vorrichtung verhindert im Falle eines Defektes
der Wasserleitung, daß das Wasser des Boilers in
das Wasserversorgungsnetz zurückläuft.
• Ein mit dem Abfluß verbundenes Überlaufrohr er-
möglicht, daß der Wasserstand im Inneren des
Tanks immer konstant bleibt.
• Bei dem Modell mit Ablaufpumpe ist ein zusätzli-
cher Pressostat einegebaut.
Der Hersteller lehnt jede Verantwortung bei
Nichtbeachtung der Unfallverhütungsvorschriften
ab.
B3 VORBEREITUNGEN UND DOSIERER FÜR
SPÜLMITTEL/KLARSPÜLMITTEL
Wenn die Maschine an einen Wasserenthärter und/oder
Osmotisator angeschlossen ist, den Reinigungsmittel-
lieferanten für ein spezifisches Produkt kontaktieren.
Geschirrspüler mit integrierter Klarspülerdosier
pumpe (Abb. 13).
Um die Dosierung zu verändern, die Schraube “D”
entsprechend betätigen. (Abb. 13).
Der Membranendosierer kann manuell durch Betäti-
gung der Schraube “D” manuell aktiviert werden
(Abb. 13).
L1
L2
L3
L1
L2
L3
ACHTUNG:
Zwischen den Klemmen Nr. 11 und 12
muss ein Relais-Öffnungskontakt der
Steuereinheit vorgesehen sein. Wenn
sich dieser Kontakt schließt, werden die
Widerstände des Boilers deaktiviert.
Wird der Geschirrspüler in dieser Phase
gebraucht, kann sich die Zykluszeit ver-
längern.
11
12
!
Table of contents
Languages: