FXA PLUS SMC46BRS User manual

501741209
Instruction manual GB pg 2 - 24
Käyttöohje FI pg 25 - 47
Bruksanvisning SE pg 48 - 70

- 2 -
Gasoline Lawn Mower
ORIGINAL INSTRUCTION MANUAL
Model: 501741209 / PLUS SMC46BRS
CAUTION: Read and follow all Safety Rules and Instructions before operating this equipment.
2016
Kesko Corporation Group Companies,
Address: Satamakatu 3, Fl-00160, Helsinki, Finland
Telefon: +358-10 53032 Fax: +358-9 857 4783

- 3 -
ORIGINAL INSTRUCTION MANUAL 501741209 / G46SHL-E
Dear Customer.
Thank you for choosing our Gasoline Lawn mower. To ensure that you get the best results from your
Gasoline Lawn mower please read all of these safety and operating instructions carefully before using
this product.
Spend a few moments to familiarize yourself with your mower before each use. Keep this manual in a
safe place, so that the information is available at all times. If you give the equipment to any other person,
hand over these operating instructions and safety regulations as well.
Intended use
The equipment may only be used for the tasks it is designed to handle. Any other use is deemed to be a
case of misuse. The user/operator and not the manufacturer will be liable for any damage or injuries of
any kind caused as a result of this.
The petrol lawn mower is intended for private use i.e. for use in home and gardening environments.
Private use of the lawn mower refers an annual operating time generally not exceeding that of 50hours,
during which time the machine is primarily used to maintain small-scale, residential lawns and
home/hobby gardens. Public facilities, sporting halls, and agricultural/forestry applications are excluded.
Please note that our equipment has not been designed for use in commercial, trade or industrial
applications. Our warranty will be voided if the machine is used in commercial, trade or industrial
businesses or for equivalent purposes.
The operating instructions as supplied by the manufacturer must be kept and referred to in order to
ensure that the lawn mower is properly used and maintained. The instructions contain valuable
information on operating, maintenance and servicing conditions.
Important! Due to the high risk of bodily injury to the user, the lawn mower may not be used to trim
bushes, hedges or shrubs, to cut scaling vegetation, planted roofs, or balcony-grown grass, to clean (suck
up) dirt and debris off walkways, or to chop up tree or hedge clippings. Moreover, the lawn mower may not
be used as a power cultivator to level out high areas such as molehills.
For safety reasons, the lawn mower may not be used as a drive unit for other work tools or toolkits of any
kind.

- 4 -
TABLE OF CONTENTS
1. SAFETY MESSAGES
2. ASSEMBLY
3. TECHNICAL DATA
4. BEFORE OPERATION
5. OPERATION
6. MAINTENANCE
7. STORAGE
8. ENVIRONMENT
9. EXPLODE DRAWING
10. PART LIST
11. EU DECLARATION OF CONFORMITY
1. SAFETY MESSAGES
Your safety and the safety of others are very important. We have provided important safety messages in
this manual and on the mower. This information alerts you to potential hazards that could hurt you or
others. Please read these messages carefully.
Of course, it is not practical or possible to warn you about all the hazards associated with operating or
maintaining a lawn mower. You must use your own good judgment.
You will find important safety information in a variety of forms:
Safety Labels –on the lawn mower.
Instructions –how to use this mower correctly and safely.
Important: Read the instruction manual before using the machine.
Danger of thrown objects. Keep other people at a safe distance while working
Warning: Remove the spark plug cable from the spark plug and read instructions before
carrying out any repair or maintenance.
Danger of cutting yourself. Blades in movement. Do not put hands or feet near or
under the opening of the cutting plate.
Safety Messages –preceded by a safety alert Symbol and one of three signal words:

- 5 -
DANGER WARNING or CAUTION.
DANGER: You will be killed or seriously hurt if you don't follow instructions
WARNING: You will be killed or seriously hurt if you don't follow instructions.
CAUTION: You can be hurt if you don't follow instructions.
Each message tells you what the hazard is, what can happen, and what you can do to avoid or reduce
injury.
GENERAL CONDITION OF USE
This machine is to be used exclusively for cutting natural grass. Never use the mower for other
purposes. Any other utilization can involve danger for your safety and can involve damage to the
mower.
Persons under 16 years of age and persons who are not familiar with the user instructions must not
use the mower.
The user is responsible of the safety of other people in the working area. Keep children and domestic
animals at a safe distance while the mower is in use.
Before mowing, remove all foreign objects from the lawn which may be thrown by the machine, stay
alert for any foreign objects which may have been missed.
Using Instructions
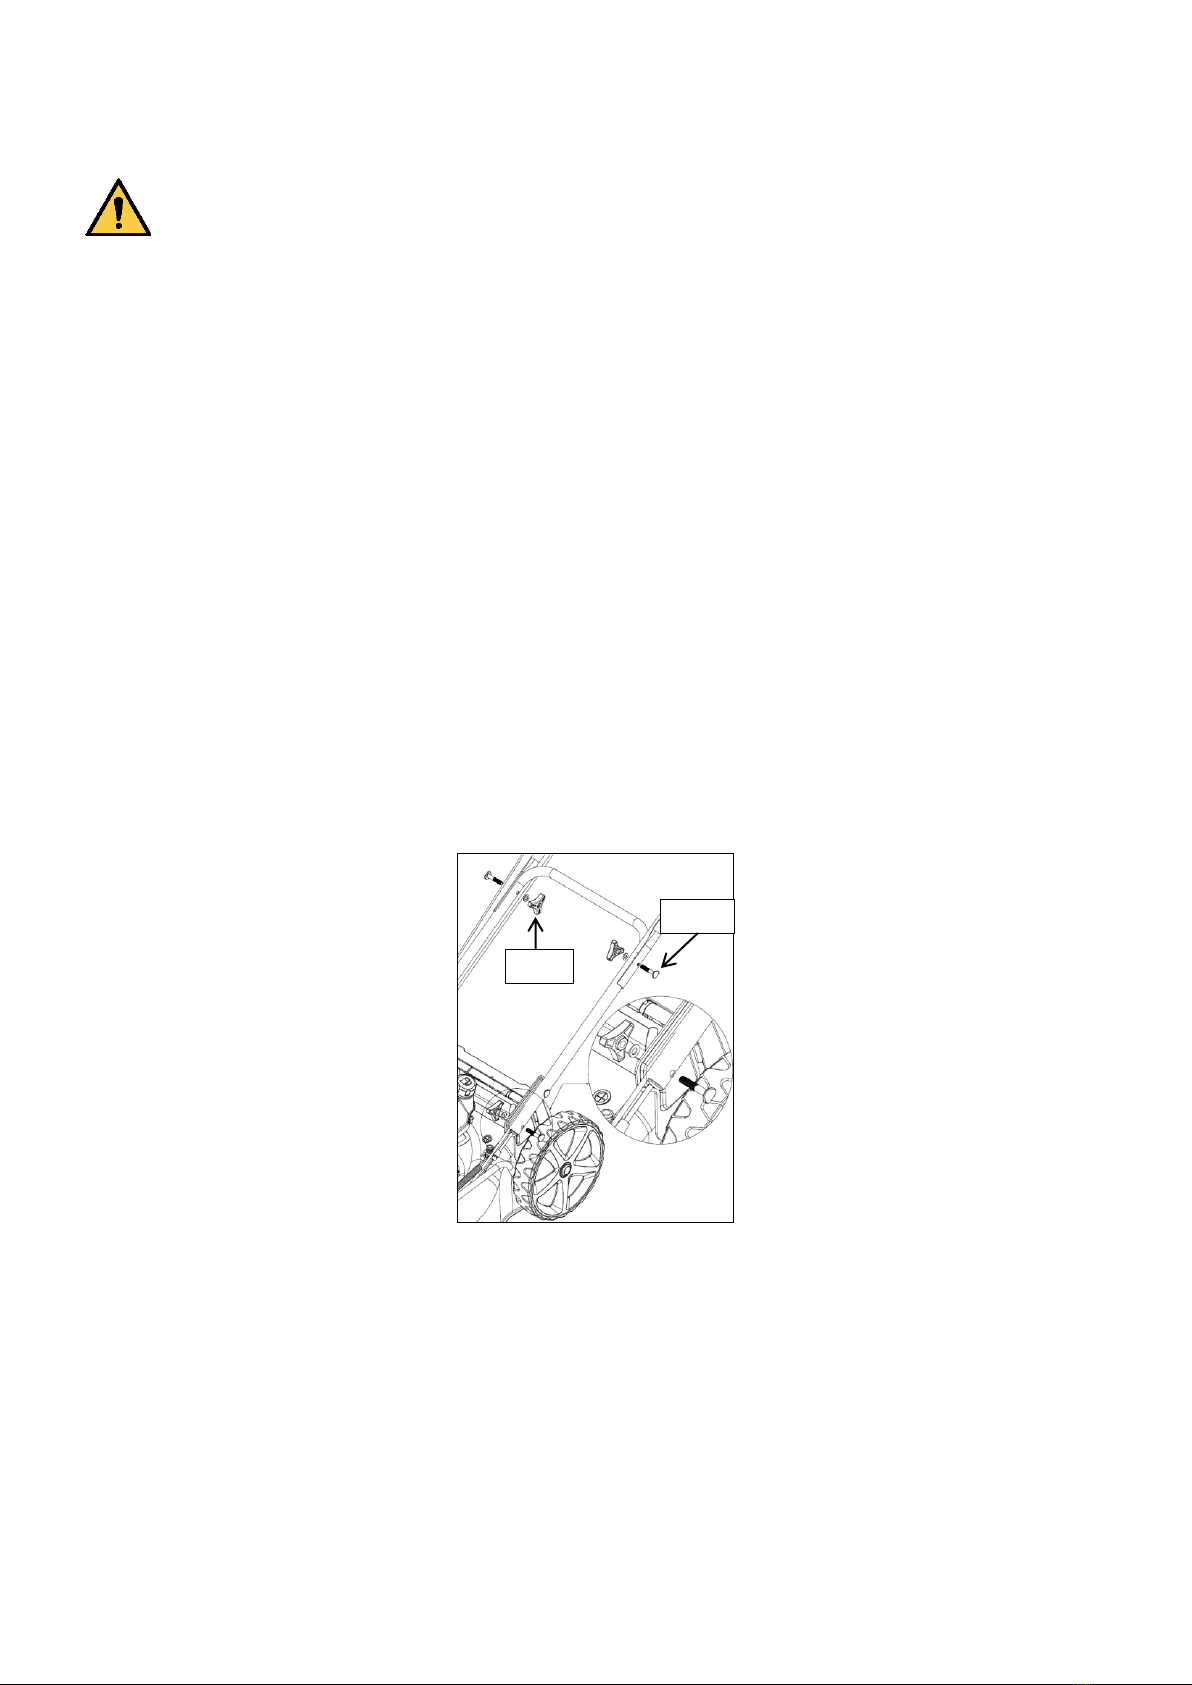
Check that all nuts, bolts and screws are well tightened.
Before mowing place the grass catcher in its position.
Before mowing make sure that the blade and the blade fixing screw are securely fastened. When
cutting edges require re-sharpening, this must be done evenly on both sides so as to prevent any
imbalance. If the blade is damaged, it must be replaced.
When mowing always wear a long trousers and strong footwear.
Do not run the engine in an enclosed and/or poorly ventilated area, where gas of the engine contains
carbon monoxide, which are dangerous for your health.
Work only when there is sufficient light.
Do not use the lawn mower when it is raining or when the grass is wet.
Particular precautions must be taken while mowing on slopes or downing stretches. Mow across the
face of slopes, never down or up.
Turn off the engine if you must leave the lawn mower unattended, displace the lawnmower or incline
it.
Never lift the rear of the mower while starting the engine and never place your hands and feet
underneath the deck or into the rear discharge chute while the engine is running.
Never change in any way the rated speed of the engine.
On the self-propelled mowers, disconnect the self-propelled system before starting the engine.
Never lift or carry the mower while the engine is running.
Stop the engine and remove the spark plug cover in these cases:
-Before any operation under the deck or the grass rear discharge chute.
-Before any maintenance, repairing or checking operations.
-Before carrying, lifting or removing the mower.
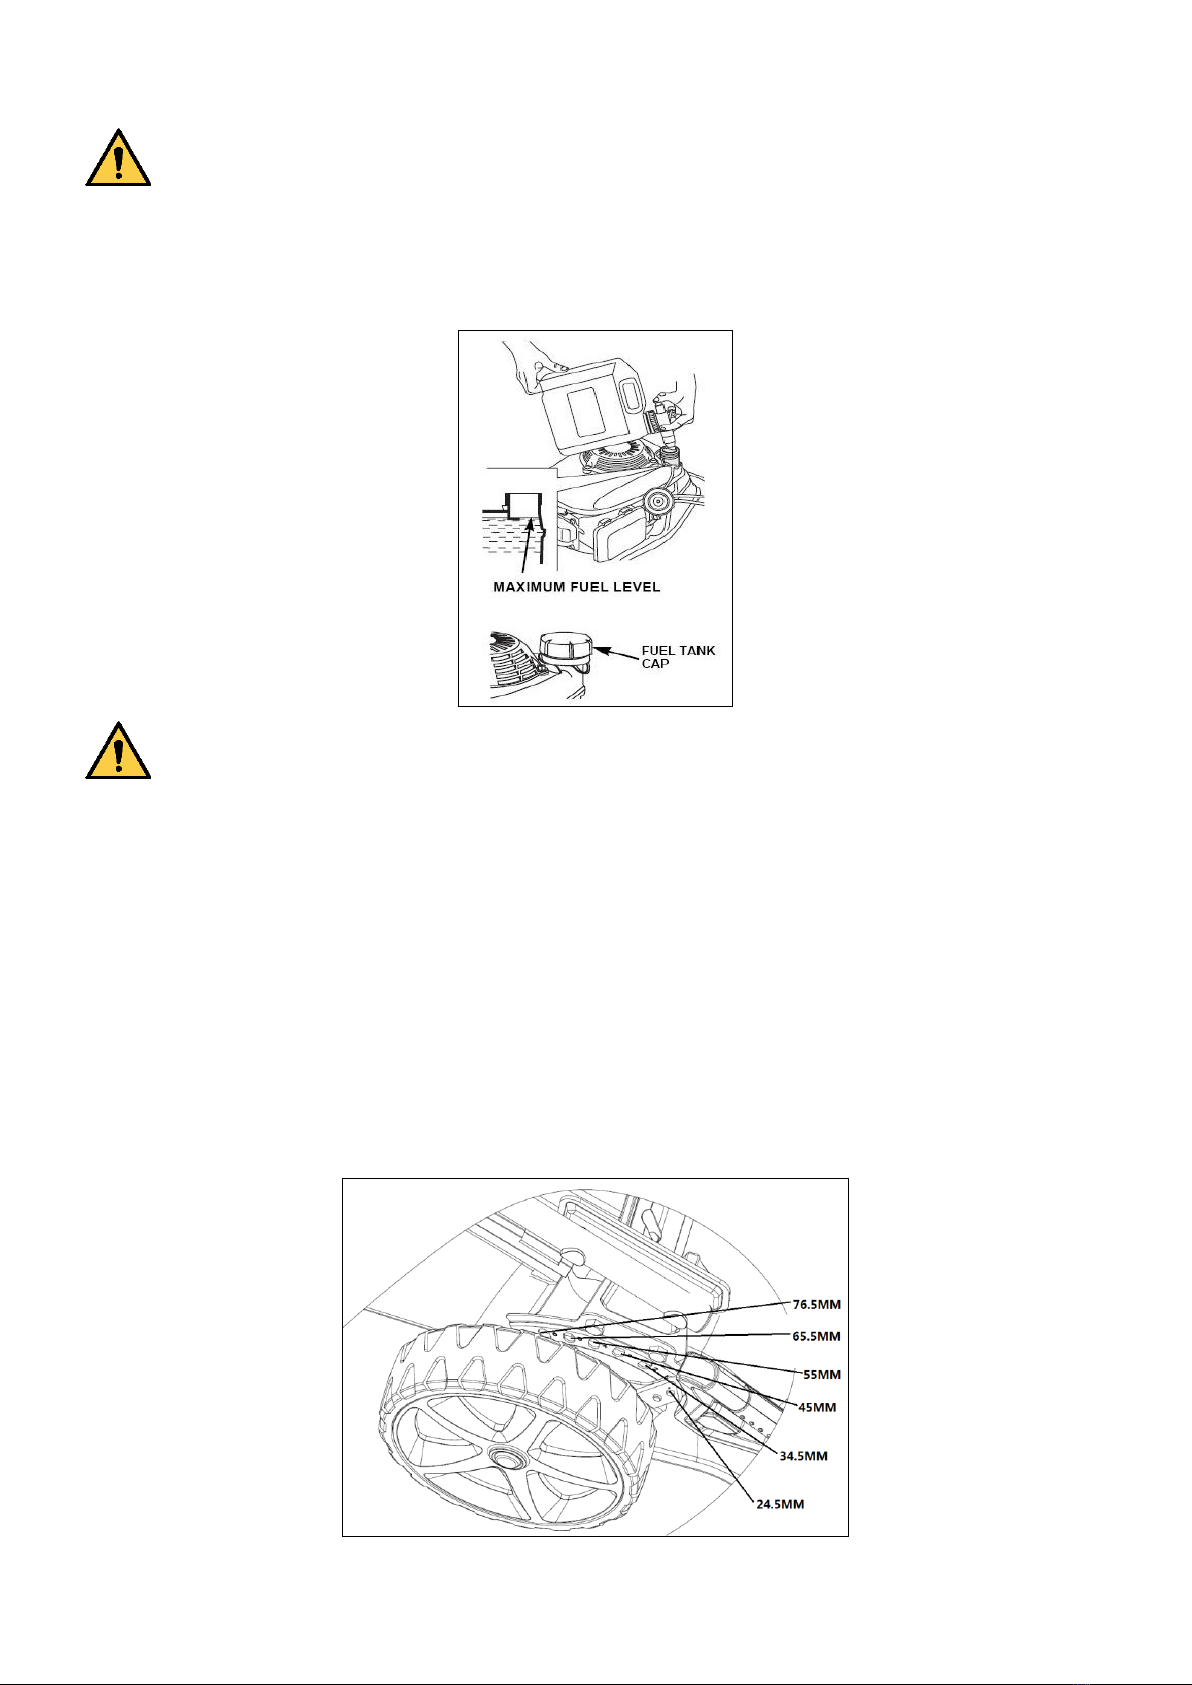
-If you leave the mower unattended or changing the cutting height.

- 6 -
-To remove and emptying the grass catcher.
-After hitting a foreign object, stop the engine and check thoroughly the mower in order to see if it
is damage. Bring the mower in an agreed service station to do the repairing if necessary.
WARNING: After you stopped the engine the blade is still in motion during a few seconds.
-If the mower vibrates in an abnormal way, find the reasons why, and take your mower to an
agreed service station.
-Check regularly that bolts, nuts and screw are secularly tightening for a safe use of the mower.
GASOLINE IS HIGHLY INFLAMMABLE
-Keep gasoline in a jerry can specially made for this purpose.
-Fill up the tank with a funnel, do the operation outside. Do not smoke. Do not use mobile phone.
-Fill up with gasoline and oil before starting the engine. Never open the cap of the fuel tank to add
gasoline while the engine is running or still hot.
-Do not start the engine if there is some gasoline spread around, take the mower away from the
one where gasoline have been split and avoid any contact from a hot source as long as the split
gasoline is completely evaporated.
-Tighten the fuel tank cap and close tightly the jerry can cap.
2. ASSEMBLY
Unpacking
Remove the lawn mower from carton and check thoroughly for additional loose parts.
Handle setup and height adjustment
Take out the handle and screw the handle parts with the four screws and knobs. Put the recoil starter on
the right of the handle and fix the cable with the plastic collar.
Introduce the rope of the recoil starter handle on its support guide rope.
If you want to adjust the height of the handle bar, you can choose “L” or “H” two holes in left-right bracket
to fix the handle bar with screws and knobs.
The “H” hole is high position of the handle bar, and the “L” hole is low position of the handle bar.
KNOB
SCREW

- 7 -
Brake cable setup
Put the brake cable and clutch cable to the hole of brake lever and clutch lever. (see the arrow mark)
Panel Setup
Take out the panel and two bolts in a bag from carton and fix the panel with the bolts.
Grass Bag Assembly
Slide the grass bag frame into the grass bag and attach the clips as shown.
Lift the rear discharge guard, remove the mulching plug, and install the grass bag.
CLUTCH CABLE
BRAKE CABLE
BOLT
CONTROL PANEL

- 8 -
Mulching plug
The mulching plug helps to curve the inside of the mower deck for more efficient mulching. Install and
remove the mulching plug by raising the rear discharge guard as shown. The mulching plug only fits one
way. Remove the mulching plug when using a grass bag.
Rear discharge guard props
Take out the two supports in a bag from carton, and lift the rear discharge guard, install the two supports
which can hold the rear discharge guard, and this can make the grass out more efficiently from the deck.
Side discharge cover assembly
Lift the side discharge guard, install the side discharge cover.
Only Mulching: Please remove the side discharge cover.
SUPPORT

- 9 -
3. TECHNICAL DATA
Model
501741209 / G46SHL-E
Engine type
BS450E OHV
Self-Propelled
Yes
Engine Displacement
125 cm3
Nominal Power
1.7 kW
Blade Width
457 mm
Rated Speed
2800/min
Gasoline Tank Capacity
0.80 L
Grass catcher capacity
65 L
Net Weight
31.70 kg
Height adjustment
25-75 mm, 6 adjustment
GuaranteedSoundpressurelevelattheoperator’s
position
(According to EN ISO 5395-1
Annex F & EN ISO 5395-2, EN ISO 4871)
83.10 dB (A)
K=2.50 dB
Measured sound power level
Guaranteed Sound Power level
(According to 2000/14/EC)
94.36 dB(A) –K=1.23 dB
96 dB(A)
Vibration
(According to EN ISO 5395-1
Annex G & EN ISO 5395-2)
6.360 m/s²
K=1.5 m/s²
4. BEFORE OPERATION
Engine Oil
The lawn mower is shipped without oil in the engine.
All engines are run at the factory prior to packaging. Most of the oil is removed prior to shipment; however,
some oil remains in the engine. The amount of oil left in the engine varies.
Add enough oil to bring the oil level between the upper and lower limit marks on the dipstick as shown. Do
not overfill engine with oil.
A: Oil filler cap/dipstick
B: Upper limit / Lower limit
C: Oil tank inlet

- 10 -
FUEL
NOTICE: Engine delivered without gasoline, refuel 0.8 liter of before starting the engine.
Remove the filler cap.
Add fuel to the bottom of the fuel level limit in the neck of the fuel tank. Do not overfill. Wipe up spilled
fuel before starting the engine.
Tighten the fuel tank cap
WARNING: Gasoline is extremely flammable, and gasoline vapor can explode, causing serious
injury or death. Use extreme care when handling gasoline. Keep out of reach of children.
Refuel in a well-ventilated area with the engine stopped. Do not smoke or allow flames or sparks in the
area where the engine is refueled or where gasoline is stored. Avoid repeated or prolonged contact with
skin or breathing of vapor.
After refueling, tighten the fuel tank cap securely. If any fuel was spilled, make sure the area is dry before
starting the engine
Cutting Height Adjustment
Check the cutting height settings, and make any necessary adjustments.
-All wheels of the mower can be adjusted at the same time with one lever.
-The cutting heights listed are approximate. The actual height of cut grass will vary with lawn and soil
conditions.
-Move the adjustment lever forward to lower and back to raise the cutter housing.

- 11 -
WARNING: The blade can cause serious injury. Stop the engine before adjusting cutting height
5. OPERATION
Starting the engine
Primer Button
Incoldcondition,it’snecessarytopushtheprimerbuttonontheairfilter before pulling the starter handle.
Primer only for cool engine use.
You also should put more fuel to mix air for easy start. When you push the primer button, it will pump the
fuel direct from carburetor to burning house.
* Note: Not all models have this PRIMER.
Pull back on the brake lever and hold it against the handle.
Release the clutch lever. This will prevent the lawn mower from moving forward when you operate the
starter.
With the starter handle in its support, take the starter handle with your right hand and pull slowly as far
as to have a resistance, and then pull energetically on the starter handle with starter rope through the
support. (If the cold start is not sufficient enough, repeat this operation 2 or 3 times)
Temperature
Push time
<0℃
3~4
0℃~10℃
2~3
10℃~20℃
1~2
>20℃
1
CLUTCH LEVER
BRAKE LEVER
PRIMER
BUTTON

- 12 -
Operation the controls for mowing
The blade is in action as soon as engine started. While the machine is working maintain the security
handle in working position. The engine will stop as soon as you release the engine control bar.
Release the lever to stop the engine whenever you need to leave the mower.
Clutch Lever
Push the clutch lever forward and hold it against the handlebar to propel the mower forward.
Releasetheclutchlevertostopthemower’sforwardmovement.
Always release the clutch lever before starting the engine. If the clutch is engaged, the mower will move
forward.
Operate the clutch lever with a quick and complete motion, so the clutch is either fully engaged or fully
released. Hold the clutch lever against the handlebar during self-propelled mowing. This will help to
extend the service life of the clutch mechanism.
Stop engine
Release the clutch lever.
CLUTCH LEVER
CLUTCH LEVER

- 13 -
Release the brake lever.
WARNING: The blade will continue to rotate for a few seconds after the engine has stopped.
Disconnect the spark plug cap if the lawn mower is to be left unattended.
6. MAINTENANCE
IMPORTANT: Regular, careful maintenance is essential for keeping the safety level and original
performance of the machine unchanged in time.
Keep all nuts, bolts and screws tight to be sure the equipment is in safe working condition. Regular
maintenance is essential for safety and performance.
Never store the equipment with fuel in the tank inside a building where vapor may reach a flame or a
spark or a source of extreme heat.
Allow the engine to cool before storing in an enclosed space.
To reduce the fire hazard, keep the engine, exhaust silencer, battery compartment and fuel storage
area free of grass, leaves, or excessive grease. Do not leave containers with grass cuttings in rooms.
For reasons of safety, do not use the equipment with worn or damaged parts. Parts are to be replaced
and not repaired. Use genuine spare parts (blades should always bear the symbol). Parts that are not
of the same quality can damage the equipment and be dangerous for your safety.
If the fuel tank has to be drained, this should be done outdoors and when the engine is cool.
Wear strong work gloves when removing and reassembling the blade.
Checktheblade’sbalanceaftersharpening.
Check the self-closing guard and grass-catcher frequently for wear and deterioration.
Whenever the machine is to be handled, transported or tilted you must:
-Wear strong working gloves.
-Grasp the machine at the points that offer a safe grip, taking account of the weight and its
distribution.
Blade Inspection
Tilt the lawn mower to the right, so the air cleaner side is up. This will help to prevent fuel leakage and
hard starting.
Inspect the blade for damage, cracks and excessive rust or corrosion.
A dull blade can be sharpened, but a blade that is excessively worn, bent, cracked, or otherwise
damaged must be replaced.
A torque wrench must always be used when installing the blade.
Check that the blade bolts are tight.
Removal and installation
If you remove the blade for sharpening or replacement, you will need a torque wrench for installation.
BRAKE LEVER

- 14 -
Wear heavy gloves to protect your hands.
Remove the bolt with a socket wrench. Use a wooden block to prevent the blade from turning when
removing the bolt. Then remove the blade.
Install the blade using the blade bolt and special washers. Be sure to install the special washers with
the concave side toward the blade and the convex side toward the bolt.
Tighten the blade bolt with a torque wrench. Use a wooden block to prevent the blade from turning
when tightening the bolt.
Grass catcher cleaning and replacement
-Cleaning
Wash the bag with a garden hose, and allow it to dry completely before use; a wet bag will clog quickly.
-Replacement
Unclip the plastic edges of the bag from the frame; remove the frame from the bag.
Insert the frame into the bag; clip the plastic edges of the bag onto the frame.
Engine Maintenance
-Check Engine Oil Level
Check the engine oil level with the engine stopped and the mower.
Remove the oil filler cap, and wipe the dipstick clean.
Insert the dipstick into the oil filler neck, but do not screw it in.
BLADE ADAPTOR
BLADE
BOLD
WASHER

- 15 -
Check the oil level shown on the dipstick. If near the lower, fill to the upper level with the oil. Do not
overfill.
Screw in the filler cap securely.
NOTICE: Running the engine with a low oil level will cause engine damage.
-Change Engine Oil
Drain the used oil while the engine is warm. Warm oil drains quickly and completely.
Wipe the oil filler area clean, and then remove the oil filler cap/dipstick.
Place a suitable container next to the mower to catch the used oil, then tilt the mower on its right side.
The used oil will drain through the filler neck. Allow the oil to drain completely.
Please dispose of used motor oil and the containers in a manner that is compatible with the environment.
We suggest you take it in a sealed container to your local recycling center or service station for
reclamation. Do not throw it in the trash, pour it on the ground, or pour it down a drain.
Fill with the recommended oil. Do not overfill. Allow a couple of minutes for the oil to settle in the
engine, then measure the oil level.
-Air Cleaner Service
NOTICE: Operating the engine without an air cleaner, or with a damaged air cleaner, will allow
dirt to enter the engine, causing rapid engine wear.
The air cleaner system uses a pleated filter with an optional pre-cleaner. The pre-cleaner can be washed
and reused.
Loosen the fastener (A) that holds the cover (B).
Open the cover and remove the pre-cleaner (C) and the filter (D).
To loosen debris, gently tap the filter on a hard surface. If the filter is excessively dirty, replace with a
new filter.
Wash the pre-cleaner in liquid detergent and water. Then allow it to thoroughly air dry. Do not oil the
pre-cleaner.
Assemble the dry pre-cleaner to the filter with the lip (E) of the pre-cleaner on the bottom of the filter
pleats.
Install the filter.
Install the cover tabs (F) into the slots (G).
Close the cover (B) and secure with the fastener (A).
A: Oil filler cap/dipstick
B: Upper limit / Lower limit
C: Oil tank inlet

- 16 -
-Spark Plug Service
For good performance, the spark plug must be properly gapped and free of deposits.
Disconnect the spark plug cap and remove any dirt from around the spark plug area.
Remove the spark plug with a spark plug wrench
Inspect the spark plug. Replace it if the electrodes are worn, or if the insulator is cracked or chipped.
Measure the spark plug electrode gap with a suitable gauge. The gap should be 0.028 ~ 0.031 inches
(0.7 ~ 0.8mm). Correct the gap, if necessary, by carefully bending the side electrode with a suitable
tool.
Install the spark plug carefully, by hand, to avoid cross-threading.
Install the spark plug cap on the spark plug.

- 17 -
NOTICE: A loose spark plug can overheat and damage the engine. Over tightening the
spark plug can damage the threads in the cylinder head.
Clutch lever cable and brake lever cable adjustment
If the clutch lever were loose, you should turn the clutch cable adjustment to tighten. (please see the
picture)
If the brake lever were loose, you should turn the brake cable adjustment to tighten. (please see the
picture)
Maintenance Schedule
REGULAR SERVICE
PERIOD
Before
each
use
First
month
or 5 hrs.
Every 3
months
or 25 hrs.
Every 6
months
or 50 hrs.
Every
year
or 100 hrs.
Every
two
years
or 250 hrs.
ITEM
Perform at every indicated
month or operating hour
interval, whichever comes
first (1)
Engine oil
Check
O
Replace
O
O(2)
Air cleaner
Check
O
Replace
O(3)
Spark plug
Check-adjust
O
Replace
O
Clutch
Cable
adjustment

- 18 -
Flywheel
brake pad (A
types)
Check
O
Fuel tank
and filter
Clean
O
Fuel tube
Check
Every 2 years (Replace if necessary)
Valve
clearance
Check-adjust
O
Combustion
chamber
Clean
After every 200 hours
(1) For commercial use, log hours of operation to determine proper maintenance intervals.
(2) Change engine oil every 25 hours when used under heavy load or in high ambient temperatures.
(3) Service more frequently when used in dusty areas.
Trouble Shooting
ENGINE WILL NOT START
Possible Cause
Correction
1. Check fuel
Out of fuel.
Refuel
Bad fuel; engine stored without
treating or draining gasoline, of
refueled with bad gasoline
Drain the fuel tank and
carburetor. Refuel with fresh
gasoline
2. Remove and inspect spark plug
Spark plug faulty, fouled, or
improperly gapped.
Replace the spark plug
Spark plug wet with fuel (flooded
engine).
Dry and reinstall spark plug
3. Take engine to an authorized our
servicing dealer, or refer to shop
manual
Fuel filter clogged, carburetor
malfunction, ignition
malfunction, valves stuck, etc.
Replace or repair faulty
components as necessary
4. Push the prime button
In cold condition
Push the primer button
ENGINE LACKS POWER
Possible Cause
Correction
1.Check air cleaner
Air cleaner elements clogged
Clean or replace air cleaner
elements
2. Check fuel
Bad fuel; engine stored without
treating or draining gasoline, of
refueled with bad gasoline
Drain the fuel tank and
carburetor. Refuel with fresh
gasoline
3. Take engine to an authorized our
servicing dealer, or refer to shop
manual
Fuel filter clogged, carburetor
malfunction, ignition
malfunction, valves stuck, etc.
Replace or repair faulty
components as necessary

- 19 -
7. Storage
The same petrol must not remain in the tank for more than one month.
Thoroughly clean the mower and store it indoors in a dry place.
Never store the lawnmower with fuel in the tank inside a building where can reach an open flame or
spark.
To reduce fire hazard, keep the engine, muffler, battery compartment and fuel storage area free of
grass, leaves or excessive grease.
If the fuel tank has to be drained, this should be done outdoors.
Be careful during adjustment of the machine to prevent entrapment of the fingers between moving
blade and fixed parts of the machine.
Allow the product to cool for at least 30 minutes before storing.
8. ENVIRONMENT
Should your machine need replacement after extended use, do not put it in the domestic waste but
dispose of it in an environmentally safe way.

- 20 -
9. EXPLODE DRAWING
This manual suits for next models
1
Table of contents
Languages:
Other FXA Lawn Mower manuals
Popular Lawn Mower manuals by other brands

Worx
Worx WG708E Original instructions

Progressive Turf Equipment
Progressive Turf Equipment Pro-Flex 120 Operators manual and parts lists

MTD
MTD Procut 700 series Operator's manual

MTD
MTD 135-440A Owner's operating service instruction manual

Sears
Sears Craftsman 917.252561 owner's manual

Black & Decker
Black & Decker LM175 instruction manual