Fzone FZ-ATO User manual

USER MANUAL
Aquarium Water Auto Top Off System
F Z - A T O
Web: www.fzaqua.com
Email: service@fzaqua.com
Facebook: www.facebook.com/Fzoneaqua
Messenger: @Fzoneaqua

▪Key Words Definition
▪Chapter I : Safety Instructions
▪Chapter II: IInstallation Requests
▪Chapter III: Working Flow Chart
▪Chapter IV: Precautions
▪Chapter V: How to Install the ATO
4.1 Check before Install
4.2 Installation Diagram
4.3 Installation Steps
▪Chapter VI: Advanced Settings
▪Chapter VII: Buzzer Modes and Settings
▪Chapter VII: Alarm Situations
CONTENTS
Page 3
Page 4
Page 4
Page 5
Page 6
Page 7
Page 9
Page 10
Page 11
2

ATO or A.T.O.: The Auto Top Off device
Initialization:
Press the three buttons("A.T.O.", "Pause", "LOCK") simultaneously for 5 seconds, hear a
"beep", the device starts the initialization.
SPT:
When the device is initialized, it will calculate the SPT (single pumping time) according to
the size of the tank.
LOW: LOW light or LOW light level
MID: MID light or MID light level
HIG: HIG light or HIG light level
Key Words Definition
3

Please read the following safety instructions thoroughly before using this device.
No read or no follow safety instructions will lead to severe damages or accidents.
▪ The power adapter and controller is not waterproof, please keep it dry, do not put it in water.
▪ Remove dust, dirt, oils or grease with a dry, clean cloth.
▪ Do not move forward or attach the device, if oil, grease, or damage is present!
▪ Do not disassemble the device.
▪ Reset the device when change to different sizes' tanks, it will calculate the SPT for new tank.
▪ Only suitable for TRANSPARENT glass or acrylic RIMLESS tanks.
Non-TRANSPARENT tanks will block the sensors that will lead to overpump accidents.
Chapter II: Installation Requests
▪ It is recommended to install on a rimless tank. If a rimed tank is used, the tank frame limits
the installation position of the device, or the water level cannot be monitored exactly. Then
the water level is about 2cm away from the upper edge, which may not meet the user's
expectation.
▪ Suitable for calm water surface or water surface with small fluctuation.
▪ The thickness of the tank should less than 12mm.
Chapter I : Safety Instructions
4

Chapter III: Working Flow Chart
The device ensures the water level to be maintained between MID and LOW through three
sensors and an intelligent algorithm of SPT (single pumping time).
The working flow chart as follow:
▪ When the water level is lower than LOW level, the LOW light will turn off and the water
pump will start the 1st pumping for a SPT period.
▪ If the water level reaches the MID or HIG level, the pump will stop pumping water.
▪ If the 1st SPT period pumping is completed and the water level has not reached the LOW
level, the device will check the LOW light or start the 2nd pumping.
▪ If the water level fails to reach the LOW level after two pumping, the alarm will be triggered.
5
▪The water-outlet should be higher than the water surface to prevent siphoning. (Users
can prepare their own anti-siphon valve according to their needs).
▪The installation location of the controller must be clean.
▪The internal magnetic module must be clean to avoid optical sensor malfunction of the
external controller module.
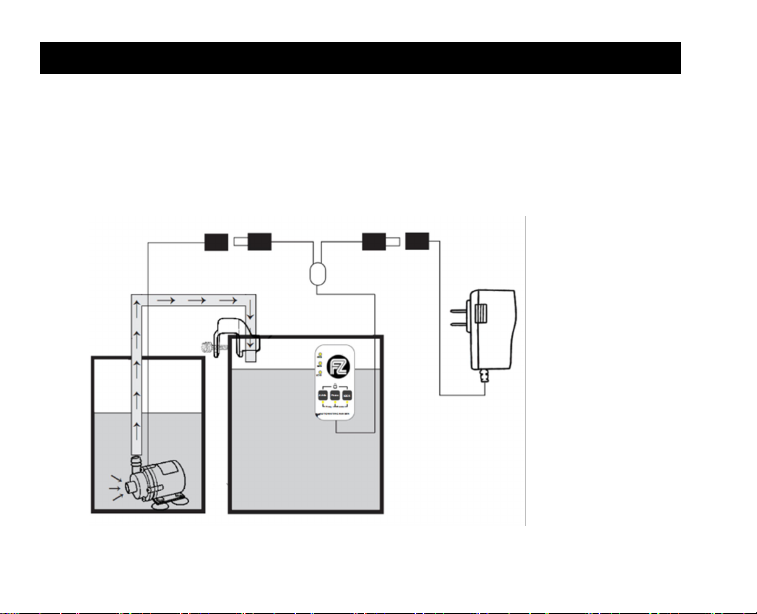
① Power adapter
② ATO controller
③ Pump
④ Clamp
⑤ Tube
①
②
③
④
⑤
Chapter IV: Precautions
6

Installation steps:
Chapter V: How to Install the ATO
Target water level
Step 1:
Install the ATO controller on the tank wall
and align the target water level between
"LOW" and "MID".
Step 2:
Manually fill the water close to the “Low”.
Neither exceed the middle line of the “LOW”
and “MID”, nor lower more than 1cm of the
LOW light.
Note:
The initial water level will affect the calculation
of the SPT period.
Not exceed the middle line of
the “LOW” and “MID”
Not lower more than 1cm of
the low light
7

Step 3:
Connect the pump tube with the water inlet
tube, and insert power adapter with socket,
according to above installation steps.
Step 4:
Press the three buttons("A.T.O.", "Pause", "LOCK")
simultaneously for 5 seconds, hear a "beep", the
device starts the initialization, drive the water pump to
do the initial pumping, till the water level reaches
“MID” and calculate the SPT period.
The algorithm of SPT period works as follow:
• If the initial water level is lower than the "LOW" level,
the STP period is equal to the 50% period from the
start of pumping until the water level reaches the
"MID" level.
• If the initial water level is between "LOW" and "MID",
the SPT period is equal to the period from the start of
pumping until the water level reaches the "MID" level.
After completing the above initialization, the device can automatically monitor the
water level. When the water level is lower than "LOW", the water pump will be started.
According to the SPT algorithm, the water level will be maintained between "LOW" and
"MID" automatically.
8

Chapter VI: Advanced Settings
One-key manual water pumping:
Press the "ATO" button, the pump can be started to pump water in a SPT period (When the
water reaches the MID level, it will automatically stop).
One-key manual pause:
Press the "Pause" button, the ATO automatical pumping function will be temporarily
stopped, the pump will not be started when the water is lower than the "LOW" level.
It is usually used when changing water or cleaning tanks.
High water level monitor:
If the water reaches the "HIG" level and keeps the water level above "HIG" for more than 20
minutes, the buzzer alarm will be triggered.(No alarm in less than 20 minutes is to prevent
from triggering the "HIG" level when feeding the fish)
Note:
This function can be turned off. After it is turned off, there will be no buzzer alarm when the
water reaches the "HIG" level, but the pump will stop pumping according to the SPT
algorithm.
Please refer to the Chapter VII: Buzzer Modes and Settings
Child lock function:
Press the "ATO" and "LOCK" buttons simultaneously for 5 seconds, the device will turn
on/off the child lock function after the sound "beep". When the child lock function is turned
on, the below 3 button lights (“LOW”, “MID”,“HIG”)will turn off, the One-key manual water
pumping and the One-key manual pause functions will turn off.
9

Buzzer modes:
▪ Mode A: The buzzer turns on, after the "di" sound.
▪ Mode B: The buzzer turns off, after the "di di" sound.
▪ Mode C: The buzzer turns on, but the HIG level monitoring alarm turn off (See the
Chapter VI: Advanced Settings -High water level monitor), after the “dididi” sound.
Settings:
▪ Start setting: press "Pause" and "LOCK" simultaneously for 3 seconds, you will hear a
"beep", and then you hear three sound periods: "di", "didi" and "dididi".
▪ Select mode: after the "di" sound, press the "Pause" key to select mode A; after the "di
di" sound, press the "Pause" key to select mode B; after the "di di di" sound, press "Pause"
"Button to select mode C.
DO NOT RECOMMEND NEW USERS TO TURN OFF THE BUZZER!
OR THERE IS NO BUZZER ALARM FOR FOLLOWING ALARM SITUATIONS!
Chapter VII: Buzzer Modes and Settings
10
Table of contents


