G.I.KRAFT GI35114 User manual

Owner’s Manual
GI35114
The equipment is approved by following car manufacturers
G.I.KRAFT

Contents
1 、 Introduction
2 、 Specifications
3 、 Installation
4 、 Precautions
5 、 Controls
6 、 Operation
7 、 Repair and Maintenance
7-1 、 xploded View
7-2 、 Troubshooting
8、
9 、 Accessories and Spareparts List
10 、 Packing List
lectrical Diagram
1
2
3
4
5
6-7
9
10
11
8

Introduction
Introduction
Page.1
These models battery charger/booster are intended for charging
and starting batteries,GI35114
usually used in cars,trucks,motorcycles,boats,etc.
with jump-start function, that are

Specifications
Page.2
Input voltage
(v)
Parameters
Power(KVA)
Charge voltage
( V )
ffective charge
current(6gears)
Chrging direction
(N degree)
Instant current(A)
Reference Capacitance
Dimensions(mm)
Weight(kg)
Input cord length(mm)
Work cable length
(mm)
Model
GI35114
380
2.5/20
12/24
20.25.35.45.
55.72
10
1800
20/1500
410*350*795
60
3000
3000+3000

Installation
1 、 Open package and find out Owner’s Manual.
2 、 Check the supplied of accessories according to packing list that
attached with Owner’s Manual.
3 、 Properly install this equipment as following diagram. Inspect
the unit for any damage. If so, contact your local distributor
or service agency.
Page.3

Precautions
1 、 Select a correct location to place the unit
2 、 Do not move or operate unit where it could tip
3 、 Use cart or unit handle to move unit
4 、 Charging produces explosive gases,Never smoke or allow a spark or
flame in vicinity of battery or engine.
5 、 Operate charger indoor with good ventilation .Do not operate cha-
rger to rain or snow or use when wet.
6 、 Disconnect input power before using charging clips.
7 、 lectricity arc and spark exist in some electrical component parts
of charger such as power switch and relay during normal charging
batteries. Keep charger away from inflammables and explosives
8 、 Do not stop charging suddenly before battery fully charged.Also,
never allow clips touch each other.
9 、 Do not operate charger with damaged cord or plug—replace the cord
or plug immediately
10 、 Never charge a frozen battery.
11 、 Use only qualified fuse.
12 、 Clean the battery which will be charged before charging. And
check the initial voltage of the battery.
13 、 Never set Mode switch to “0”position for charging batteries.
14 、 Do not charge damaged battery ,otherwise it will damage the bui-
ld-in protection
15 、 Do not switch charging current while battery is being charged.
Page.4

Controls
0
1
2
3
4
5
6
0
15
30
45
60
1 、 Handle
2 、 12V/24V Selection
3 、 12V indicator
4 、 24V indicator
5 、 Power indicator
6 、 Timer
7 、 Current
8 、 Voltmeter
9 、 Ammeter
1
2 3 456
1
789
AV
Page.5

Operation
Page.6
12V
(1) (2) (3)
12V
12V 12V
12V
24V 24V
24V
24V
+
+
+
_
_
_
+
+
_
_
_
_
+
+
+_+_
12-
12+
24+
24-
24V charging connection 12V charging connection
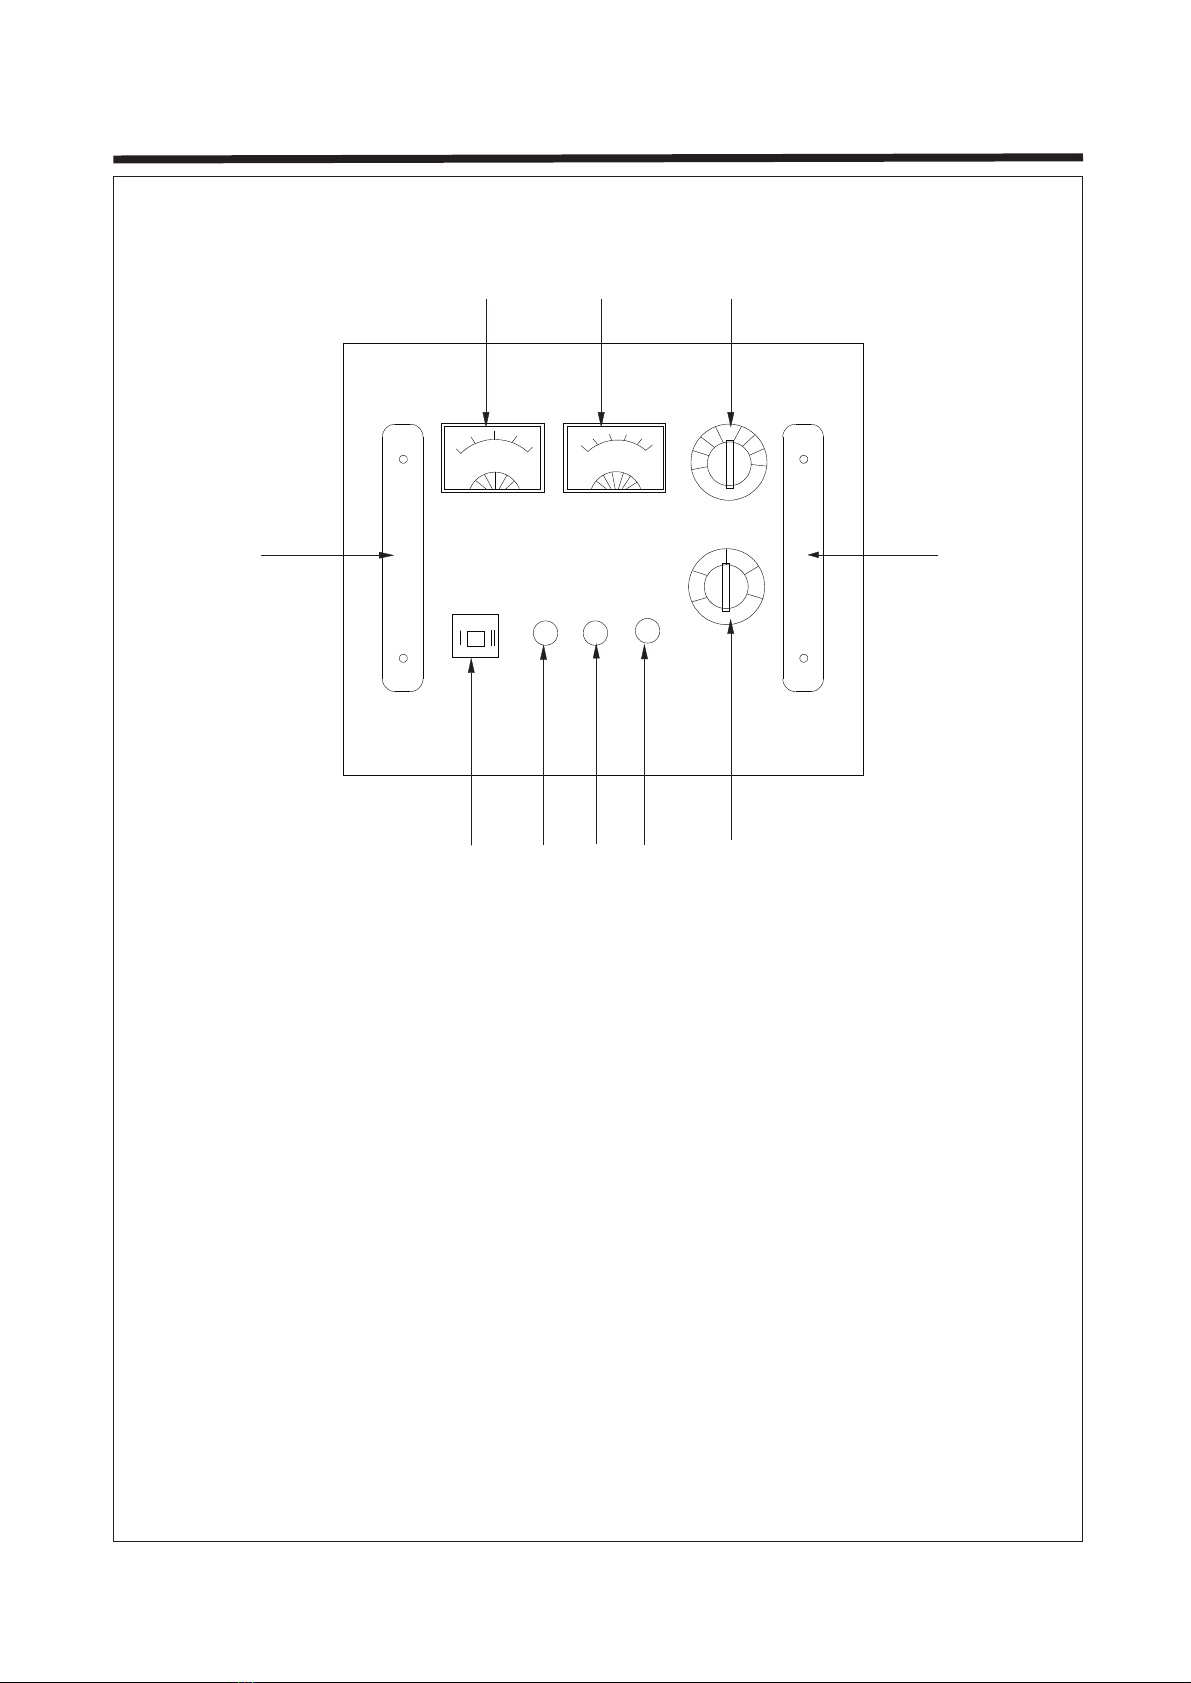
1 、 Charging
1) 、 Select 12V or 24V
2) 、 Connect work cables to battery charger terminals as above diagram,and then
connect clips from battery charger to the terminals of battery
3) 、 Select charging time and current. The position 1,2,3 of current adjustment
knob are slow charge ,and 4,5,6 are fast charge.usually,time for fast charge
is 60 mins.
4) 、 Connect input power, charging time can be set within 60 mins by timer ,The
charger stops automatically when it reaches pre-set time.
5) 、 The charger can be charge more than one battery at the same time ,but the char-
ging time will be extended
GI35114 Charing Connections:
12+
24+
24V Charing Connection 12V Charing Connection
Charging :
1 ) Select 12Vor 24V 。
2 ) Connect work cables to battery terminals.
The work cable from front of machine is a 12V and 24V cathode
cable, connect this cable to the negative terminal of battery.
And then,connect another work cable from 12V or 24V Positive
terminal of charger to the positive terminal of battery.
3) 、 Select charging time and current. The position 1,2,3 of current adjustment
knob are slow charge ,and 4,5,6 are fast charge.usually,time for fast charge
is 60 mins.
4) 、 Connect input power, charging time can be set within 60 mins by timer ,The
charger stops automatically when it reaches pre-set time.
Charing Connections:

12-
24-
12+
24+ 12V jump-start connection
24Vjump-start connection
2 、 Jump-starting
1) 、 Select 12V or 24V
2) 、 Connect work cables to battery charger terminals as above diagram,and then
connect clips from battery charger to the terminals of battery
3) 、 Connect input power.
4) 、 For high power engines, fast charge the battery for 15mins before jump-start-
ing to get the best result .For diesel engines,pre-heat spark plug before jum-
p starting. For cables connections,connect negative post(-)first,and then pos-
itive post(-).
5) 、 Connect work cables to battery charger terminals while current adjustment knob
in”0”position,and then turn current adjustment knob to max.position to jump-
start the engine. If car engine cannot start after 3-4 times jump-start operat-
ions. Please speedy charge the battery for 15 mins before jump-start again.
Note:
1 、 The positive clip from battery charger must connect to positive post (+) of
battery,and connect negative clip to negative post(-)
2 、 Do not use the connections of charging to jump-start engine,otherwise it will
damage ammeter and fuse
3 、 If charger can not jump start engines check input power cord to meet mannfac-
turer’s requirements.or the connections of work cables.
Page.7
GI35114 :
jump-start connection

Repair and Maintenance
1 、 xploded view
Front view
Rear view
Rectifier
Main transformer
A/C contactor
Page.8
12V positive
post
24V positive
post
Jump-start
negative
post
Charging
negative
post
12V
positive
post
24V
positive
post
GI35114

2 、 Troubleshooting
Trouble Probable cause Remedy
No input power
(1)incorrect input power
connection
(2)Power switch in”off”
position
(
1
)
Check input power connection
(
2
)
Turn power switch to “on”
position
Timer does not work
(
1
)
Charging time has not adjusted
(
2
)
Timer damaged
(
1
)
Adjust charging time
(
2
)
Replace timer
Not enough electricity
power of charged Batt-
ery
(1)Improperly c
o
nnect work cables
or clamps
(2) Not enough charging current
(3) Not enough charging time
(4)
x cess charge rate of battery capacity
(1)Check cables connections
and tighten clamps
(2)increase charging current
(3)increase charging time
(4)Check correct charge rate
for the battery being charged
Charger stops working
while operating
(1)Timer reaches preset time
(2)Charger over heat
(1)A
djust timer
(2)Wait for charger temper-
ature cool down
Voltmeter does not
work
(1)Switches in “off”
position
(2)12V/24Vswitch in
neutral
(1)Turn on power,adjust timer
and current
(2)S
elect
12Vor24V
Ammeter does not work
(1)No out put current (1)A
mmeter works while
under loading only
Cannot charging battery (1)I
ncorrect cables connec
-
tions
(2)
Switches in “off”position
(3)B
attery had been damaged
(1)
Check cables connections
(2)Adjust switches to correct
position
(3)Check battery
Page.9

Page.10

Accessories and spareparts list
R marks:
1)Optional orders for above accessories and spareparts are
available.
2)Model and parts number required when ordering parts from
your local distributor or service agency.
e
Accessories and spareparts list
Handle
Front stand
Rectifier
Amperage switch
Timer
Power switch
Wheel
Voltmeter
Ammeter
Ground clamp
Output cord
Page.11
Table of contents
Other G.I.KRAFT Welding System manuals
Popular Welding System manuals by other brands

Clarke
Clarke Weld MIG 130 TE Turbo Operating and maintenance instructions

widos
widos PSM 10 XHS Working Instructions Translation

Miller Electric
Miller Electric SSW-2020 ATT user manual

ESAB
ESAB Warrior 500i CV instruction manual

Cebora
Cebora Power Rod 180 M instruction manual

Leister
Leister Uniroof E operating instructions

Red-D-Arc
Red-D-Arc EXTREME 360 MAP Auto-Line owner's manual

EWM
EWM Tetrix 300 Comfort TM operating instructions

Lincoln Electric
Lincoln Electric POWER MIG 140 Operator's manual

Everlast
Everlast PowerTig Series Operator's manual

REHM
REHM BOOSTER2 130 Short guide

Lincoln Electric
Lincoln Electric POWER FEED 84 SINGLE Operator's manual