Gaggenau VP414115 User manual

en Safety
2
Table of contents
INFORMATION FOR USE
1 Safety....................................................................2
2 Preventing material damage ...............................3
3 Environmental protection and saving en-
ergy .......................................................................3
4 Familiarising yourself with your appliance ........5
5 Before using for the first time .............................5
6 Basic operation ....................................................6
7 How it works.........................................................6
8 Cleaning and servicing........................................8
9 Troubleshooting...................................................9
10 Customer Service...............................................10
11 Disposal..............................................................11
12 INSTALLATION INSTRUCTIONS .......................11
12.3 General information ...........................................11
1 Safety
Observe the following safety instructions.
1.1 General information
¡Read this instruction manual carefully.
¡Do not connect the appliance if it has been
damaged in transit.
1.2 Intended use
Only use this appliance:
¡To prepare meals and drinks.
¡Under supervision. Never leave the appli-
ance unattended when cooking for short
periods.
¡In private households and in enclosed
spaces in a domestic environment.
¡Up to an altitude of max. 2000m above
sea level.
Do not use the appliance:
¡On boats or in vehicles.
¡as a room heater.
¡With an external timer.
1.3 Restriction on user group
This appliance may be used by children aged
8 or over and by people who have reduced
physical, sensory or mental abilities or inad-
equate experience and/or knowledge,
provided that they are supervised or have
been instructed on how to use the appliance
safely and have understood the resulting
dangers.
Do not let children play with the appliance.
Children must not perform cleaning or user
maintenance unless they are at least 15 years
old and are being supervised.
Keep children under the age of 8 years away
from the appliance and power cable.
1.4 Safe use
WARNING‒Risk of fire!
Hot oil and fat ignites quickly.
▶Never leave hot oil or fat unattended.
▶Never attempt to extinguish a fire using wa-
ter; instead, switch off the appliance and
then cover the flames with a lid or a fire
blanket, for example.
The appliance gets very hot and may cause
flammable materials to ignite.
▶Never store or use combustible materials
(e.g. spray cans or cleaning agents) under
the appliance or in its immediate vicinity.
▶Never place flammable objects on or in the
appliance.
WARNING‒Risk of burns!
Hob protective grilles may cause accidents.
▶Never use hob protective grilles.
WARNING‒Risk of scalding!
The accessible parts of the appliance become
hot during operation.
▶Never touch these hot parts.
▶Keep children at a safe distance.
WARNING‒Risk of burns!
The appliance remains hot for a long time
after it is switched off.
▶Do not touch the appliance while the resid-
ual heat indicator is lit.

Preventing material damage en
3
If the appliance cover is closed, this causes a
build-up of heat.
▶Only operate or switch on the appliance
when the appliance cover is open.
▶Do not use the appliance cover for keeping
warm or setting down.
▶Only close the appliance cover once the
appliance has cooled down.
WARNING‒Risk of electric shock!
The insulation on cables of electrical appli-
ances may melt if it touches hot parts of the
appliance.
▶Never bring electrical appliance cables into
contact with hot parts of the appliance.
An ingress of moisture may cause an electric
shock.
▶Do not use any steam cleaners or high-
pressure cleaners to clean the appliance.
A defective appliance may cause an electric
shock.
▶Never switch on a defective appliance.
▶Unplug the appliance from the mains or
switch off the circuit breaker in the fuse
box.
▶Call customer service. →Page10
Incorrect repairs are dangerous.
▶Repairs to the appliance should only be
carried out by trained specialist staff.
▶Only use genuine spare parts when repair-
ing the appliance.
▶If the power cord of this appliance is dam-
aged, it must be replaced with a special
connection cable, which is available from
the manufacturer or his Customer Service.
WARNING‒Risk of injury!
Heat accumulation occurs when the device
cover is closed.
▶Only close the appliance cover when the
appliance has cooled down.
▶Never switch the appliance on with the ap-
pliance cover closed.
▶Do not rest food on the appliance cover or
use it to keep food warm.
▶Remove spilled liquids before opening the
appliance cover.
2 Preventing material damage
ATTENTION!
Hard or pointed objects may cause scratches or
notches to form on the frying surface.
▶Do not allow any hard or pointed objects to fall onto
the frying surface.
▶Never cut on the frying surface with a knife.
▶Use the spatula supplied to turn the food.
▶Never hit the frying surface with the spatula.
Non heat-resistant materials will melt on heated hot-
plates.
▶Do not use oven protective foil.
▶Do not use aluminium foil or plastic containers.
Liquids may damage theappliance.
▶Remove spilled liquids before opening the appli-
ance cover.
3 Environmental protection and saving energy
3.1 Saving energy
If you follow these instructions, your appliance will use
less energy.
Stop preheating the appliance once it reaches the re-
quired temperature.
¡An extended preheating time increases the energy
consumption.
Use the edge of the frying surface to keep food that is
already cooked warm, whilst continuing to cook food
in the middle.
¡This enables you to use the heat distribution of the
frying surface efficiently.
Switch back to a lower temperature early on.
¡Using a temperature that is too high wastes energy.
Select an appropriate temperature.
¡Using a temperature that is too high wastes energy.
Use the residual heat of the Teppan Yaki. If the cook-
ing time is relatively long, you can switch the appli-
ance off 5 to 10minutes before the cooking time
ends.
¡Failing to make the most of any residual heat leads
to increased energy consumption.
Product Information according (EU) 66/2014 can be
found on the attached appliance pass and online on
the product page for your appliance.

en Environmental protection and saving energy
4
3.2 Disposing of packaging
The packaging materials are environmentally compat-
ible and can be recycled.
▶Sort the individual components by type and dispose
of them separately.

Familiarising yourself with your appliance en
5
4 Familiarising yourself with your appliance
4.1 Appliance
You can find an overview of the parts of your appliance
here.
1
2
3
4
1
Spatula, 2 pcs, for turning the food
2
Frying surface
3
Temperature setting
4
Selecting the cooking zone
4.2 Control knob
You can use the controls to configure all functions of
your appliance and to obtain information about the op-
erating status.
The markings on the left-hand control knob show the
assignment to the cooking zones. The markings on the
right-hand control knob show the assignment to the
temperature settings, the keep warm function and the
cleaning setting.
0
240
220
200
160
120
180
Both cooking zones are operating
Only the front cooking zone is operating
Only the rear cooking zone is operating
Keep warm function
Cleaning setting
4.3 Indicator on the illuminated ring
Each control knob is encircled by an illuminated ring
with various display functions.
Indicator Name
Off Appliance OFF
Lights up: Orange Appliance ON
Flashing: Orange Appliance OFF
Residual heat indicator
Flashing alternately: Or-
ange and white
Safety switch-off function,
power failure
Flashing alternately: Yel-
low and magenta
Appliance fault.
Call customer service.
Lights up: Green for a few
seconds, then turns yel-
low
The appliance is initial-
ising during initial connec-
tion or following a power
failure
4.4 Function
Teppan Yaki means frying and cooking food according
to an old, Japanese tradition. You can cook the food
directly on the frying surface without using pots and
pans. Use the spatula supplied to turn the food or re-
move food residues if necessary.
4.5 Residual heat indicator
After switching off the appliance, the illuminated ring on
the control knob slowly flashes until the appliance has
cooled enough for it to be safe to touch.
4.6 Automatic switch-off
For your safety, the appliance has a safety shut-off
function. Any heating process is switched off after
4hours if the appliance controls are not used during
this time. The heating element also remains switched
off after a power cut. The illuminated ring on the right-
hand control knob flashes white and orange alternately.
5 Before using for the first time

en Basic operation
6
Clean the appliance and accessories.
5.1 Heating up the appliance
▶To eliminate the new-appliance smell, heat up the
empty appliance at 200°C for a few minutes.
Smoke development and odour development are
normal.
Ventilate the installation room well.
6 Basic operation
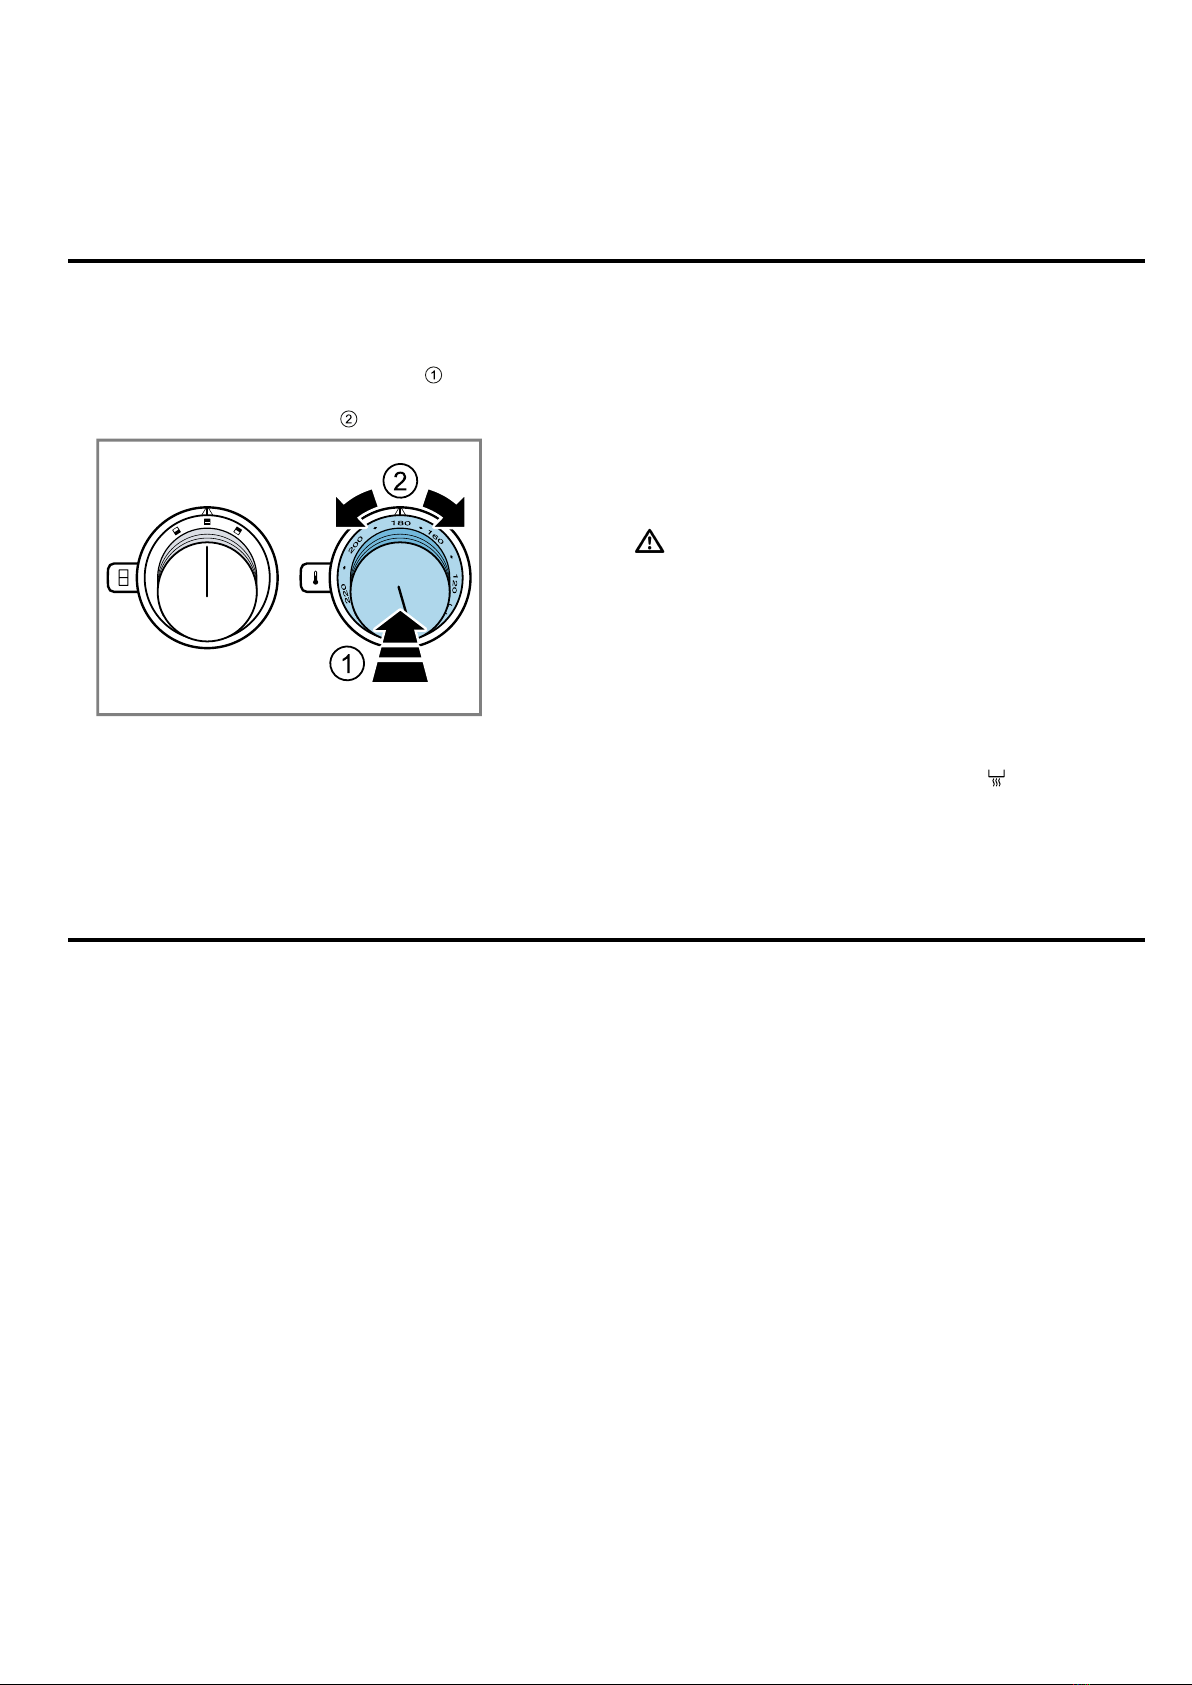
6.1 Switching on the appliance
1. Push in the right-hand control knob and turn it
clockwise or anti-clockwise to the required temperat-
ure between 120–240°C .
aThe illuminated ring on the control knob flashes
while the appliance is heating up.
2. Push in the left-hand control knob and select the re-
quired cooking zone to heat up only the front or rear
cooking zone or the entire frying surface.
3. Wait until the set temperature has been reached.
aThe illuminated ring on the control knob lights up
continuously.
4. Use the spatula or a heat-resistant brush (e.g. silic-
one brush) to spread a little oil or fat evenly over the
frying surface.
5. Place the food directly onto the frying surface.
‒Do not use pots or pans.
6. Use the spatula supplied to turn the food.
6.2 Switching off the appliance
WARNING‒Risk of burns!
The appliance remains hot for a long time after it is
switched off.
▶Do not touch the appliance while the residual heat
indicator is lit.
▶Turn the control knob to 0.
6.3 Switching on the keep warm function
You can keep food warm on the keep warm function.
1. Turn the right-hand control knob to .
2. Use the left-hand control knob to select the entire
frying surface, only the front or the rear cooking
zone.
7 How it works
You can find the right settings for different food here as
well as helpful comments. We have perfectly tailored
these recommendations to your appliance.
7.1 Tips for boiling and frying
¡Do not place the food on the appliance until the
heating display has gone out. When increasing the
temperature between two preparations, do not place
the food until the heating display has gone out.
¡Use the spatula to press the meat, poultry and fish
pieces flat on the frying surface. In order not to des-
troy fibres, do not turn the food until it is easily de-
tached from the plate. Otherwise, liquid may leak
out, causing the food to dry out.
¡When roasting, ensure that the pieces of meat,
poultry and fish do not touch each other. Otherwise,
the food may draw out liquid.
¡Do not pierce or cut the meat while cooking it, oth-
erwise meat juice may escape.
¡To prevent water and soluble nutrients from escap-
ing, do not add salt to meat, poultry or fish until it
has been fried.
¡Before frying, you can roll fish fillets in flour so that
the fish fillet sticks less firmly.
¡Fry fish fillets on the skin side first. If possible, only
turn the fish fillet once.
¡Only use oils and fats that can be heated to a high
temperature and are suitable for frying, e.g. refined
plant oils or clarified butter.
¡The frying surface is hotter in the centre than in the
edge area. If you are cooking food with different
cooking times and temperature requirements at the
same time, you can arrange the food optimally on
the plate.
Also take note of the different temperatures for the
frying surface when selecting the quantity of food.
The thinner the food, the higher the temperature and
the shorter the cooking time.
¡When working with only one heating zone, select the
highest setting in each case for the temperature
range specified in the cooking table. Alternatively,
you can set 10°C more than you are used to from
preparing using both heating zones. Use approx.
half of the specified quantity.

How it works en
7
7.2 Recommended settings
The setting values are only intended as a guideline because more or less heat will be required depending on the
type and condition of the food.
Meat and poultry
Food Temperature in °C Cooking time in mins Comments
Beef steak, medium, 2.5-3cm 1. Sear at
230-240°C
2. Continue cooking
at 180°C
1. Fry for 2mins
each side
2. Continue frying for
6-11mins
E.g. entrecôte, fillet steak, rump
steak. The steak is medium when
meat juice can be seen on the
surface.
Pork neck steak, 2cm 210-220 15-18
Veal escalope, 1.5cm 190-200 16-20
Strips of beef or pork, 800-900g 230-240 6-8 Distribute the pieces of meat
evenly; they should not be touch-
ing.
Strips of poultry, 800-900g 180-190 10-12 Distribute the pieces of meat
evenly; they should not be touch-
ing.
Minced meat, 600g 230-240 7-8
Saddle of lamb, medium, 1.5–
2.5cm
1. Sear at 200°C
2. Continue cooking
at 160°C
1. Fry for 2mins
each side
2. Continue frying for
4-6mins
Turkey steak, 1.5cm 200-210 12-16
Poultry liver, 1cm 200-210 3-5
Fish and seafood
Food Temperature in °C Cooking time in mins Comments
Fish fillet, 1cm
Fish fillet, 2cm
Fish fillet, 2.5cm
210-220
190-200
180-190
5-7
7-10
15-17
E.g. perch, cod, basa, haddock,
plaice, monkfish, sole, pikeperch
Salmon steak, 2.5cm
Salmon steak, 3cm
180-190
160-170
15-17
18-20
Tuna steak, 2.5-3cm 180-190 17-20
Prawns, 30g each 190-200 6-7
Scallops, 30g each 190-200 8-12
Vegetables
Food Temperature in °C Cooking time in mins Comments
Aubergines, sliced, 600g 180-190 6-8 Salt the aubergines and leave to
stand for approx. 30minutes be-
fore frying. Then dry.
Mushrooms, sliced, 600g 230-240 10-12
Carrots, julienne, 600g 180-190 12-16
Potatoes, boiled, sliced, 600g 200-220 7-10
Peppers, cut into strips, 600g 200-210 8-12
Courgettes, sliced, 600g 180-190 8-10
Onions or leeks, cut into rings,
600g
170-190 5-7
Egg-based dishes and desserts
Food Temperature in °C Cooking time in mins Comments
Fried eggs, scrambled eggs,
4-6eggs
180-190 3-5

en Cleaning and servicing
8
Food Temperature in °C Cooking time in mins Comments
Crêpes, 2-6 pcs 180-190 1-2mins each side
Fruit, sliced, 300-400g 180-190 5-7 E.g. pineapple, apple, mango.
Use clarified butter for frying.
Sweeten with sugar or honey if
desired.
Banana in coconut, 4halves 180-190 6-9
Side dishes and miscellaneous
Food Temperature in °C Cooking time in mins Comments
Rice, boiled, 500g 190-200 5-7
Pine nuts, 300g 160 5-7 Turn frequently
Rice noodles, boiled, 400g 200-220 4-5
Tofu, 300g 200-220 3-5 Turn frequently
White bread cubes or croutons,
100g
170 10-12 Turn frequently to begin with
7.3 Using the with Teppan Yaki with
cookware
You can also use the Teppan Yaki to cook with cook-
ware.
¡Cooking methods that require little heat supply are
suitable for using the cookware with Teppan Yaki.
You can heat food quickly on the hob first, if re-
quired, before continuing cooking on the Teppan
Yaki.
¡For melting, defrosting and keeping warm, approx.
140°C sufficient.
160–200°C is sufficient for soaking rice and cer-
eals, and for heating small quantities of food.
¡Use heat-resistant cookware with a lid.
To prevent damage to the stainless steel frame,
carefully place the cookware on the heating surface.
¡Note that using the Teppan Yaki with cookware is
not energy-saving if the cookware is smaller than
the heated surface.
¡If you do not require the entire frying surface, you
can use the left-hand control knob to select only the
front or rear area. You can find the ideal temperat-
ure for your application by moving the cookware.
8 Cleaning and servicing
To keep your appliance working efficiently for a long
time, it is important to clean and maintain it carefully.
8.1 Cleaning products
You can obtain suitable cleaning products from after-
sales service or the online shop.
WARNING‒Risk of electric shock!
An ingress of moisture can cause an electric shock.
▶Do not use steam- or high-pressure cleaners to
clean the appliance.
WARNING‒Risk of burns!
The appliance becomes hot during operation.
▶Allow the appliance to cool down before cleaning.
ATTENTION!
Unsuitable cleaning products may damage the sur-
faces of the appliance.
▶Do not use harsh or abrasive detergents.
▶Do not use cleaning products with a high alcohol
content.
▶Do not use hard scouring pads or cleaning
sponges.
▶Only use glass cleaners, glass scrapers or stainless
steel care products if recommended in the cleaning
instructions for the relevant part.
▶Wash sponge cloths thoroughly before use.
8.2 Cleaning the cooled frying surface
1. Use the spatula to remove the worst of the residue.
2. Pour a little water (maximum 250ml) and add a
drop of washing-up liquid on the frying surface so
that it is just covered.
3. Turn the right-hand control knob to .
4. Leave the dirt to soak for approx. 5 to 10minutes.
5. Use a washing-up brush to clean the frying surface.
6. Mop up and remove the liquid with a soft sponge.
7. Clean stubborn or greasy dirt with the powder deter-
gent or the cleaning gel.
‒→"Clean greasy dirt on the frying surface with
the "Wiener Kalk" cleaning powder", Page9
‒→"Cleaning burnt-on dirt on the frying surface
using the cleaning gel", Page8
8. Carefully remove any detergent residue.
9. Dry the frying surface with a soft cloth.
Cleaning burnt-on dirt on the frying surface
using the cleaning gel
1. Allow the appliance to cool down.

Troubleshooting en
9
2. Follow the instructions on the packaging for the
cleaning gel.
3. Apply the cleaning gel to the dirt and leave it to
work for at least 2hours.
‒Leave heavy soiling overnight.
4. Rinse the cleaning gel thoroughly from the frying
surface.
Clean greasy dirt on the frying surface with the
"Wiener Kalk" cleaning powder
1. Follow the instructions on the packaging for the
powder detergent.
2. Make a paste from the cleaning powder and water.
3. Wipe with the paste in the brush direction of the sur-
face and clean the frying surface.
8.3 Cleaning the frying surface between two
roasting processes
Ice cubes are better suited than water for cleaning the
appliance when hot as they cause less splashing and
steam.
WARNING‒Risk of burns!
Splashing and steam occur when water or ice cubes
are poured onto the hot frying surface.
▶Do not lean over the appliance.
▶Maintain a safe distance.
1. Switch off the appliance.
2. Use the spatula to push approx. 4 or 5 ice cubes
over the hot frying surface.
3. Use the spatula to remove dirt that has begun to
soften.
4. Switch on the appliance.
5. Wait until the set temperature has been reached.
aThe illuminated ring on the control knob lights up
continuously.
6. Place the food on the frying surface.
8.4 Cleaning the stainless steel frame
1. Clean the stainless steam frame using hot soapy
water and a dish cloth.
‒Use only a small amount of water for cleaning.
‒Do not allow water to get into the appliance.
2. Soak burnt-on remains with a small amount of
soapy water.
Do not scour burnt-on remains.
3. Remove heavy soiling or yellow discolouration
caused by heat using the stainless steel cleaner.
4. Dry with a soft cloth.
8.5 Cleaning the control knob
Notes
¡Do not use a glass scraper.
¡You cannot remove the knob for cleaning.
¡Lemon and vinegar are not suitable for cleaning and
may create dull patches.
1. Clean the control knob with warm soapy water and
a soft cloth.
2. Do not use too much water when cleaning.
8.6 Cleaning the spatula
1. Clean the spatula using soapy water and a dish
cloth.
2. Clean the spatula in the dishwasher as necessary.
9 Troubleshooting
You can rectify minor faults on your appliance yourself.
Read the troubleshooting information before contacting
after-sales service. This will avoid unnecessary costs.
WARNING‒Risk of injury!
Improper repairs are dangerous.
▶Repairs to the appliance should only be carried out
by trained specialist staff.
▶If the appliance is defective, call Customer Service.
WARNING‒Risk of electric shock!
Incorrect repairs are dangerous.
▶Repairs to the appliance should only be carried out
by trained specialist staff.
▶Only use genuine spare parts when repairing the
appliance.
▶If the power cord of this appliance is damaged, it
must be replaced with a special connection cable,
which is available from the manufacturer or his Cus-
tomer Service.
9.1 Malfunctions
Fault Cause and troubleshooting
The appliance is not
working.
The mains plug of the power cord is not plugged in.
▶Connect the appliance to the power supply.
The circuit breaker in the fuse box has tripped.
▶Check the circuit breaker in the fuse box.
There has been a power cut.
▶Check whether the lighting in your kitchen or other appliances are working.

en Customer Service
10
Fault Cause and troubleshooting
The appliance does
not work. The illumin-
ated ring on the con-
trol knob is flashing
orange and white al-
ternately.
There has been a power cut.
▶Check whether the lighting in your kitchen or other appliances are working.
The appliance does
not heat up when it is
switched on. All of
the illuminated rings
around the control
knobs light up white
for 10seconds after
switch-on. The illumin-
ated ring around the
active control knob
then lights up orange.
Demo mode is activated.
▶Deactivate the demo mode. →Page10
The appliance does
not heat up when it is
switched on. The illu-
minated ring on the
control knob is flash-
ing yellow and
magenta alternately.
Electronics fault
▶Call the after-sales service.
→"Customer Service", Page10
The appliance
switches off while op-
erating. The illumin-
ated ring on the con-
trol knob is flashing
orange and white al-
ternately.
The automatic switch-off →Page5 has switched off the heating process.
1. Turn the right-hand control knob to 0.
2. Switch the appliance back on.
Power failure in the household: Following a power failure, the appliance remains switched
off for safety reasons.
1. Turn the right-hand control knob to 0.
2. Switch the appliance back on.
9.2 Deactivating demo mode
The appliance does not heat up in demo mode. If all of
the illuminated rings on the control knobs light up white
for 10seconds after switch-on, demo mode is activ-
ated. If you turn the right-hand control knob to another
position, the illuminated ring lights up orange on the
control knob.
1. Turn the right-hand control knob to 0.
2. Disconnect the appliance from the mains power
supply.
3. Wait at least 30seconds.
4. Re-connect the appliance.
aThe illuminated rings on the control knobs light up
green for a few seconds and then turn yellow.
5. Wait until the illuminated rings no longer light up.
6. Within the next 3minutes, turn the right-hand control
knob to 240°C, clockwise to and anti-clockwise
to 0.
7. Wait until the illuminated ring on the control knob
lights up yellow.
8. Turn the control knob clockwise to .
aThe illuminated ring on the control knob lights up
green.
9. Wait for 5seconds.
aThe illuminated ring on the control knob lights up
yellow.
aDemo mode is deactivated.
10. To save the setting and exit the menu, turn the con-
trol knob to 0, anti-clockwise to 240°C, clockwise
to and anti-clockwise to 0.
11. Wait until the illuminated ring on the control knob no
longer lights up.
10 Customer Service
Function-relevant genuine spare parts according to the
corresponding Ecodesign Order can be obtained from
Customer Service for a period of at least 10 years from
the date on which your appliance was placed on the
market within the European Economic Area.
Note:Under the terms of the manufacturer's warranty
the use of Customer Service is free of charge.
Detailed information on the warranty period and terms
of warranty in your country is available from our after-
sales service, your retailer or on our website.
If you contact Customer Service, you will require the
product number (E-Nr.) and the production number
(FD) of your appliance.
The contact details for Customer Service can be found
in the enclosed Customer Service directory or on our
website.

Disposal en
11
10.1 Product number (E-Nr.) and production
number (FD)
You can find the product number (E-Nr.) and the pro-
duction number (FD) on the appliance's rating plate.
The rating plate is located on the underside of the ap-
pliance.
Make a note of your appliance's details and the Cus-
tomer Service telephone number to find them again
quickly.
11 Disposal
11.1 Disposing of old appliance
Valuable raw materials can be reused by recycling.
1. Unplug the appliance from the mains.
2. Cut through the power cord.
3. Dispose of the appliance in an environmentally
friendly manner.
Information about current disposal methods are
available from your specialist dealer or local author-
ity.
This appliance is labelled in accord-
ance with European Directive
2012/19/EU concerning used elec-
trical and electronic appliances
(waste electrical and electronic equip-
ment - WEEE).
The guideline determines the frame-
work for the return and recycling of
used appliances as applicable
throughout the EU.
12 Installation instructions
Observe this information when installing the appliance.
12.1 Scope of delivery
After unpacking all parts, check for any damage in
transit and completeness of the delivery.
Order the appropriate control knob in black or stainless
steel.
12.2 Appliance dimensions
You will find the dimensions of the appliance here
12.3 General information
¡Read this instruction manual carefully.
¡Only a licensed expert may connect the ap-
pliance.

en Installation instructions
12
¡Switch off the power supply before carrying
out any work.
¡Never use this appliance in boats or in
vehicles.
¡Follow the worktop manufacturer's recom-
mendations.
12.4 Instructions for the electrical
connection
In order to safely connect the appliance electrically, ob-
serve this information.
¡Check the household wiring before connecting the
appliance. Ensure that there is sufficient fuse protec-
tion for the household wiring. The voltage and fre-
quency of the appliance must match the electrical
installation (see rating plate).
¡Ensure that the power supply is properly earthed,
that the fuse protection is sufficient and the cable
and wiring system in the building is sufficiently di-
mensioned for the electrical power of the appliance.
¡Route the connection cable in such a way that it
does not touch the hot casing.
¡Use only the connection cable that is supplied with
the appliance or is provided by technical customer
service.
¡This appliance complies with the EC interference
suppression regulations.
¡The appliance corresponds to protection class 1.
You should therefore only use the appliance with a
protective earth connection.
¡Ensure that the protection against contact is guaran-
teed during installation.
¡Only a qualified electrician may connect appliances
without a plug. They are subject to the requirements
of the local electricity provider. We recommend in-
stalling a residual-current-operated circuit-breaker
(RCCB) in the appliance's power supply circuit.
¡Carry out the electrical connection in accordance
with the installation instructions. The appliance may
be damaged if it is not connected correctly.
¡The manufacturer shall assume no liability for mal-
functions or damage resulting from incorrect elec-
trical wiring.
¡We recommend installing a socket equipped with
protective-earth contacts behind the appliance, ap-
proximately 70cm above the floor, in accordance
with regulations. Only a qualified electrician may in-
stall a protective contact socket in accordance with
the relevant regulations.
12.5 Safe installation
Follow these safety instructions when installing the ap-
pliance.
WARNING‒Risk of electric shock!
Incorrect repairs are dangerous.
▶Repairs to the appliance should only be carried out
by trained specialist staff.
▶Only use genuine spare parts when repairing the
appliance.
▶If the power cord of this appliance is damaged, it
must be replaced with a special connection cable,
which is available from the manufacturer or his Cus-
tomer Service.
It must always be possible to disconnect the appliance
from the electricity supply. The appliance must only be
connected to a protective contact socket that has been
correctly installed.
▶The mains plug of the mains power cable must be
easily accessible after installation of the appliance.
▶If this is not possible, an all-pole isolating switch
must be integrated into the permanent electrical in-
stallation according to the conditions of overvoltage
category III and according to the installation regula-
tions.
▶The permanent electrical installation must only be
wired by a professional electrician. We recommend
installing a residual-current circuit breaker (RCCB)
in the appliance's power supply circuit.
WARNING‒Risk of injury!
Components inside the appliance may have sharp
edges.
▶Wear protective gloves.
WARNING‒Risk of electric shock!
Incorrect installation is dangerous.
▶Connect and operate the appliance only in accord-
ance with the specifications on the rating plate.
▶Connect the appliance to a power supply with al-
ternating current only via a properly installed socket
with earthing.
▶The protective conductor system of the domestic
electrical installation must be properly installed.
▶Never equip the appliance with an external switch-
ing device, e.g. a timer or remote control.
▶When the appliance is installed, the mains plug of
the power cord must be freely accessible. If free ac-
cess is not possible, an isolating switch must be in-
tegrated into the permanent electrical installation ac-
cording to the installation regulations.
▶When installing the appliance, check that the power
cable is not trapped or damaged.
12.6 Information about the installation room
For safe operation, observe the following information
regarding the installation area.
¡Install the appliance in accordance with the installa-
tion diagram.
¡Observe the minimum clearance from the side
walls, parts of the cupboard, and to the rear.

Installation instructions en
13
12.7 Information about flush installation
With the flush installation, the appliance and worktop
are on one level. There is no unattractive stepping
between the appliance and the worktop.
You can install the appliance in the following
temperature-resistant and waterproof worktops:
¡Stone worktops
¡Plastic worktops, e.g. Corian®
¡Solid wood worktops
Coordinate with the worktop manufacturer when using
other materials.
Installation in compressed-wood worktops is not pos-
sible.
Have all cut-out work on the worktops carried out in a
specialist workshop in compliance with the installation
diagram. The cut-out must be neat and precise since
the cut edge is visible on the surface.
Clean and degrease the cut-out edges with a suitable
cleaning agent. When doing so, observe the usage in-
structions from the silicone manufacturer.
12.8 Installation accessories
Here, you can find an overview of the installation ac-
cessories.
Use the accessories only as specified. The manufac-
turer shall accept no liability if you use the accessories
incorrectly.
Accessories Order number
Connection strip for sur-
face-mounted installation
VA420010
Connection strip for flush
installation
VA420004
Appliance cover, stainless
steel
VA440010
12.9 Combining multiple appliances
Requirement:You need a suitable connection strip to
combine several Vario appliances. You can obtain the
connection strip as an optional accessory.
1. When making the unit cut-out, allow extra space for
the connecting strip between the appliances.
‒Observe the installation instructions for the con-
nection strip.
2. If required, install the appliances in individual cut-
outs.
‒Maintain a bar width of at least 50mm between
the individual cut-outs.
12.10 Installing the appliance flush with the
frameless induction hobs
1. For flush installation in combination with frameless
induction hobs, cut out the support edge with
6.5mm.
2. Make the unit cut-out in the worktop for one or more
Vario appliances in accordance with the installation
drawing.
‒Observe the installation instructions for the con-
nection strip VA420004.
12.11 Installing the appliance cover
You can obtain a suitable appliance cover as an op-
tional accessory.
1. Secure the appliance cover to the appliance before
installing it.
‒Follow the installation instructions for the appli-
ance cover.

en Installation instructions
14
2. When making the cut-out, take the additional space
required for the appliance cover into consideration.
12.12 Preparing the unit
Requirements
¡The fitted units are heat-resistant up to 90°C.
¡The worktop is level, horizontal and stable.
1. Follow the instructions on combining several appli-
ances.
→"Combining multiple appliances", Page13
2. Ensure that the stability of the fitted unit is guaran-
teed after the cut-outs have been made.
3. Ensure that the thickness of the worktop corres-
ponds to the required minimum thickness.

Installation instructions en
15
4. Make the unit cut-out in the worktop for one or more
Vario appliances in accordance with the installation
drawing.
5. Ensure that the angle of the cut surface to the work-
top is 90°.
6. The cut-out edges at the sides must be flat to en-
sure that the retaining springs sit correctly on the
appliance.
7. For multi-layer worktops, affix appropriate strips to
the side in the unit cut-out, if required.
8. Remove dust and residues from the cut-out work.
Seal the cut surfaces so that they are heat-resistant
and waterproof.
9. Ensure that the minimum clearance from the bottom
of the appliance to furniture parts is 10mm.
10. Use suitable substructures to ensure the load-bear-
ing capacity and stability of the unit, particularly in
the case of thin worktops.
‒Take the appliance weight, including additional
load, into consideration.
‒Use heat-resistant and moisture-resistant rein-
forcement material.
Note:Only check that the appliance is level once it has
been installed in the installation opening.
Making the cut-out for the control knob
1. Create the holes for the control knob in accordance
with the enclosed instructions.
2. If the panel is more than 23 mm thick, cut out the
rear of the front panel for the retaining plate.
3. Note the clearances between the control knobs.
4. After making the cut-outs, remove any shavings.
5. Seal the cut surfaces so that they are heat-resistant
and waterproof.
12.13 Installing the control knob
1. If required, and depending on the distance between
the control knobs, break off the retaining plate at the
perforation.
2. Hold the retaining plate in place against the rear of
the control panel.

en Installation instructions
16
3. When fitting an individual control knob, use 2
screws to hold the retaining plate in place and pre-
vent it from rotating.
‒In the case of stone worktops, stick the retaining
plate using heat-resistant, two-component adhes-
ive.
4. Remove the protective film from the rear of the illu-
minated ring.
5. Install the control knob in the correct sequence.
0
2
4
0
2
2
0
2
0
0
1
6
0
1
2
0
1
8
0
6. Push the control knob into the hole.
‒Always position the side marking on the control
knob on the left.
7. Ensure that the retaining lug on the retaining plate is
located on the upper side and the control knob is in
the zero setting.
8. On the rear of the control knob, tighten the retaining
nut using the installation tool provided.
9. Align the control knob precisely in the zero setting.
12.14 Connecting the control knob to the
connection cables
1. Connect all of the control knobs to the enclosed
shorter connection cables.
The two connectors on the control knob are
identical.
2. Ensure that the plugs snap into place in the con-
nectors.
3. Attach the longer connection cable to one of the
control knobs to connect it to the appliance.
You can connect the appliance to any control knob.
4. Ensure that the plug engages in the socket.
5. After installation, check that all of the plug connec-
tions are seated correctly.
6. To fix all connection cable in place after installation,
bend the lugs on the retaining plates.

Installation instructions en
17
12.15 Connecting connection cables to the
appliance
1. Connect the connection cable for any of the control
knobs to the appliance's socket.
2. Ensure that the plug engages in the socket.
12.16 Installing the appliance
WARNING‒Risk of electric shock!
If the insulation of the power cord is damaged, this is
dangerous.
▶Never let the power cord come into contact with hot
appliance parts or heat sources.
▶Never let the power cord come into contact with
sharp points or edges.
▶Never kink, crush or modify the power cord.
1. Keeping the appliance level, insert it into the unit
cut-out.
2. Push the appliance firmly into the unit cut-out from
above.
‒Ensure that the appliance is firmly positioned in
the unit cut-out and does not move.
‒If the width of the cut-out is at the upper toler-
ance limit, secure a bar at the sides of the cut-
out in each case, if necessary.
3. Connect the appliance to the power supply.
4. Check the functionality of the appliance.

en Installation instructions
18
12.17 Sealing the joints
For flush installation, seal the joints with silicone.
Requirement:You must carry out a function test before
sealing any joints.
1. Seal all around the gap using suitable, heat-resistant
silicone, e.g. Novasil® S70 or Ottoseal® S70.
Unsuitable silicone adhesive causes permanent dis-
coloration to natural stone worktops.
2. Use the smoothing agent recommended by the
manufacturer to smooth the joint.
3. Observe the usage instructions for the silicone ad-
hesive.
4. Leave the silicone adhesive to dry for at least 24
hours.
The drying time depends on the ambient temperat-
ure.
5. Do not operate the appliance until the silicone has
dried completely.
12.18 Removing the appliance
ATTENTION!
Tools may damage the appliance frame.
▶Do not prise out the appliance from above.
1. Disconnect the appliance from the power supply.
2. If the appliance is flush-mounted with the surround-
ing surfaces, remove the silicone seal.
3. Push out the appliance from below.


BSH Hausgeräte GmbH
Carl-Wery-Straße 34
81739 München, GERMANY
www.gaggenau.com
*9001798024*
9001798024 en (021027)
Valid within Great Britain:
Imported to Great Britain by
BSH Home Appliances Ltd.
Grand Union House
Old Wolverton Road
Wolverton, Milton Keynes
MK12 5PT
United Kingdom
Table of contents
Other Gaggenau Griddle manuals
Popular Griddle manuals by other brands

Salvis
Salvis Smartline AGH2 Operating instruction

Impecca
Impecca COURANT CGE-6102 user manual

Keating Of Chicago
Keating Of Chicago Miraclean 3624 361 Specification sheet

Cuisinart
Cuisinart CSG-100 user manual

Cadco
Cadco GLASS-CERAMIC FRY TOP GRIDDLE FTCG-200 Use & care manual

Kamado Joe
Kamado Joe KJ15094522 quick start guide