Galmet Easy Air Basic 2 GT User manual

- 1 -
OPERATION MANUAL AND WARRANTY CARD
"Galmet Sp. z o.o.” Sp.K.
Operation & Installation Manual
WARRANTY CARD
EASY AIR BASIC 2 GT
Air-To-Water Heat Pump
In operating mode the heat pump generates domestic hot water at a maximum
temperature of 50ºC

- 2 -
OPERATION MANUAL AND WARRANTY CARD
"Galmet Sp. z o.o.”
Table of contents
1. Use and operation...................................................................................................................3
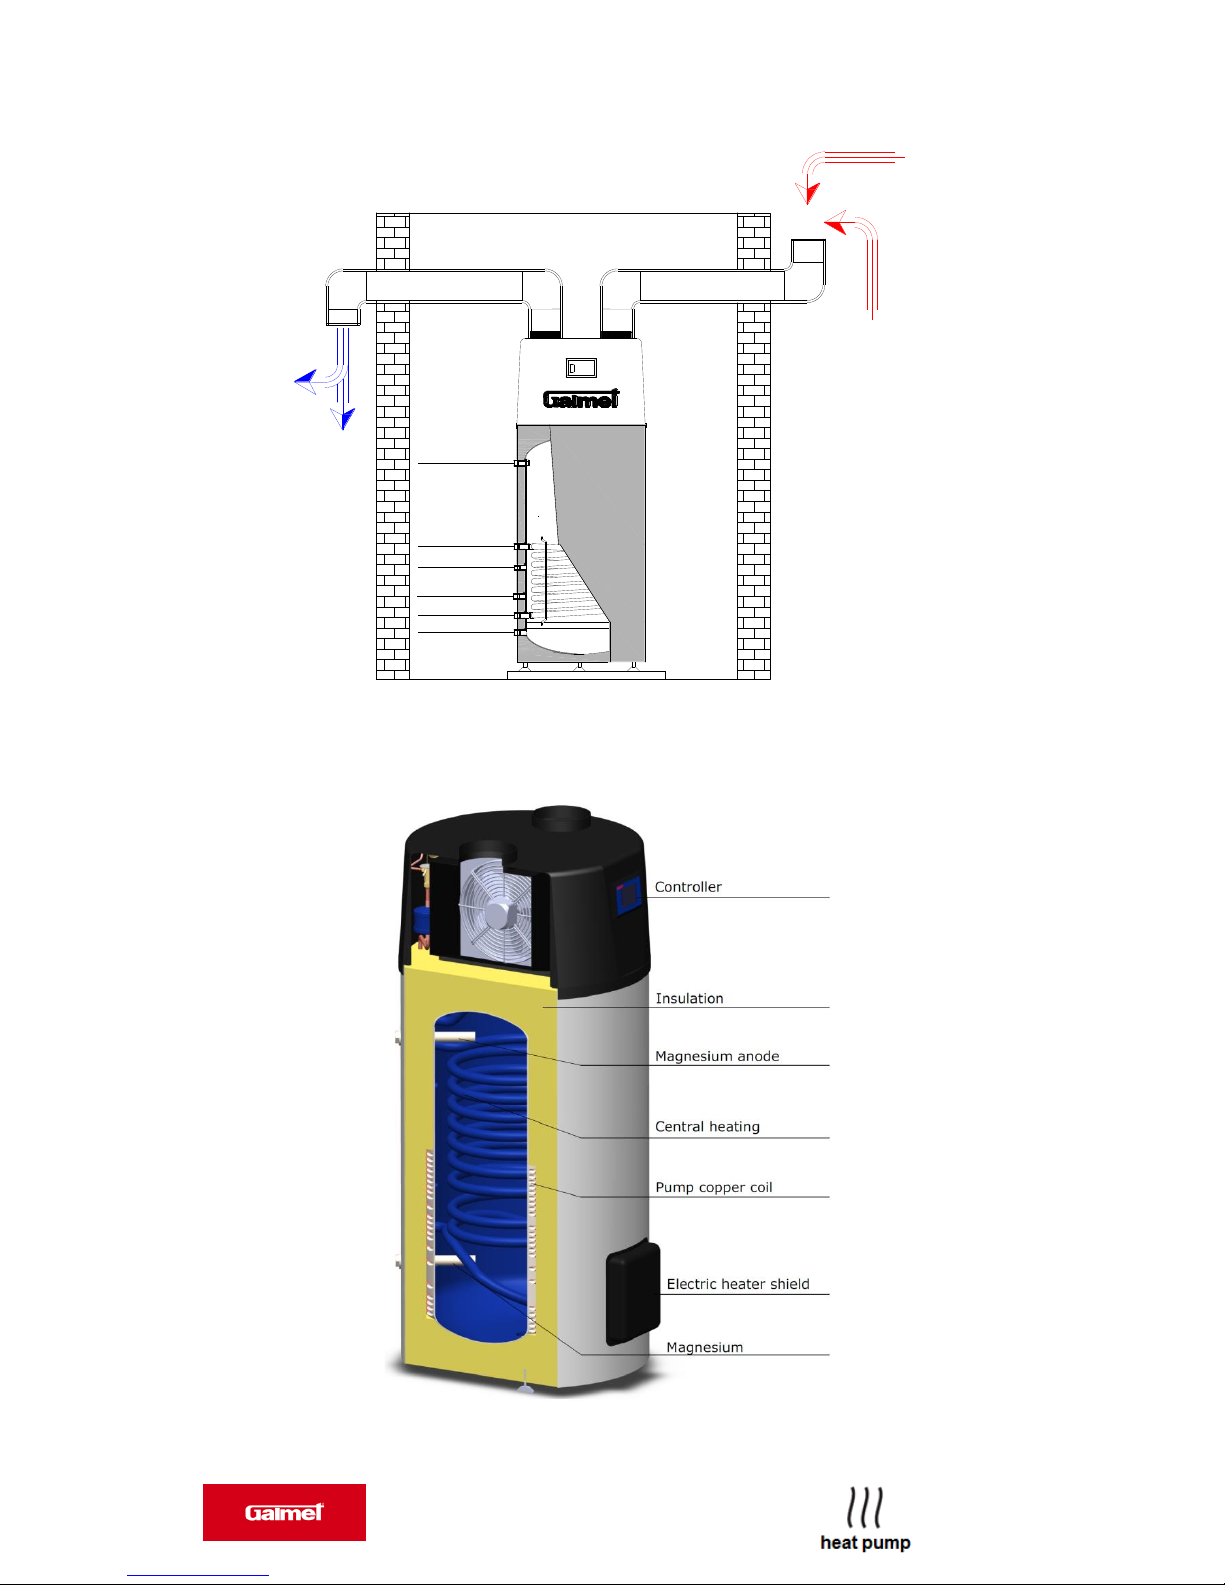
2. Device description..................................................................................................................3
3. Proper operation.....................................................................................................................4
4. Improper operation.................................................................................................................4
5. Operating principle.................................................................................................................4
6. Heat pump specifications.......................................................................................................5
7. Maintenance:..........................................................................................................................5
8. Checking and moving the device...........................................................................................5
9. Schematic diagrams of the heat pump....................................................................................6
9.1. General dimensions........................................................................................................... 6
9.2. Transport method..............................................................................................................7
10. Connection diagram for heat pump air duct.........................................................................7
10.1. Installing the heat pump indoors.....................................................................................8
10.2. Heat pump positioning inside the boiler room................................................................8
10.3. Heat pump air supply from the outside and air discharge into another room.................9
10.4. Air pump supply from the boiler room and air discharge outdoors................................9
10.5. Supplying and discharging air from the heat pump outdoors.......................................10
11. Description of heat pump connections...............................................................................10
12. Schematic diagram of the heat pump hydraulic system.....................................................11
13. Connections........................................................................................................................11
14. Schematic diagram of the device hydraulic system...........................................................12
15. Schematic diagram of the device electrical wiring ............................................................13
16. Troubleshooting guide........................................................................................................15
17. Device inspection card .......................................................................................................15
18. Declaration of Conformity.................................................................................................15
19. Notes...................................................................................................................................17
20. Warranty Terms and Conditions........................................................................................18
21. Warranty card.....................................................................................................................19

- 3 -
OPERATION MANUAL AND WARRANTY CARD
"Galmet Sp. z o.o.”
The pump installation and start-up can be carried out only by
manufacturer's service team or a fitter duly authorized after
attending a manufacturer's training. Otherwise the warranty
covering the device will not be granted.
Please read and understand this operation manual. Failure to follow the
instructions provided in this manual can result in voiding the warranty or in permanent
damage to the device.
This equipment is not intended for use by persons (including children) with
limited physical, sensual or mental abilities and persons inexperienced or not knowing
the equipment. It is allowed only when it is carried out under supervision or by
following the equipment operating instructions provided by persons responsible for
their safety.
The device should be installed by following good construction practices and in
accordance with locally valid regulations and standards. The device is intended for
indoor installation.
1. Use and operation
The EASY AIR BASIC 2 GT heat pump is an air-to-water heat pump making it
possible to provide domestic hot water maximum for a 6-person family. The maximum
temperature of the domestic hot water generated by the heat pump is 50°C. However,
for energy-saving reasons it is recommended not to set the temperature of domestic hot
water above 45 °C, as it will result in raising the costs of using the heat pump and will
cause premature wear of the heat pump unit components.
Water temperature exceeding 50ºC can cause serious burns. Special
attention should be paid to avoid burns in children, the disabled or elderly
people.
2. Device description
The Easy Air Basic 2 GT heat pump contains one heat generator and an electric
heater used to collect heat in the accumulator tank and heat it to a preset temperature.
The pump incorporates a coil providing an opportunity to connect an external heat
source, e.g. a central heating boiler. The heat pump receives heat from the air
surrounding it and uses it to heat up the water in the accumulator tank. The heat pump
can be also connected to air ducts, but their diameter cannot be lower than 160 mm and
their overall length cannot exceed 10 m. During operation the heat pump absorbs
moisture from the room air and therefore the condensate generation is a normal
phenomenon; the condensate drain pipe is located under the device and it should be
directed to the sewage system.

- 4 -
OPERATION MANUAL AND WARRANTY CARD
"Galmet Sp. z o.o.”
3. Proper operation
The heat pump is designed for absorbing energy from the air in the room, or
from the area the ducts are connected to, and it transfers the energy to the domestic hot
water accumulator tank.
4. Improper operation
It is prohibited to:
use fat-containing air;
use the device to heat other liquids than domestic hot water.
Install the device:
- outdoors;
- in rooms exposed to freezing;
- in rooms exposed to dust, gases or flammable vapors;
Operate the device:
- with its accumulator tank empty;
- with its coil unfilled;
- at a temperature below +7ºC.
5. Operating principle
Using as a heat pump
During normal use the pump heats 200 liters of water collected in a accumulator tank
up to 45 °C within the following periods.
Air temperature
Cold water temperature
Heating time
+ 20ºC
15ºC
4.5 h
+ 10ºC
15ºC
5.5 h
+ 7ºC
15ºC
6.0 h
Coil
Each heat pump is equipped with one coil used to connect additional heat sources.

- 5 -
OPERATION MANUAL AND WARRANTY CARD
"Galmet Sp. z o.o.”
6. Heat pump specifications
TYPE
EasyAir Basic 2GT
Catalog number
09-353100
Pump operation range
+7 +35ºC
Domestic hot water temperature
50ºC
Accumulator tank volume
200 L
Refrigerant
R 134 a / 700 g
Dimensions: height x diameter
1500 x 670
Weight
125 kg
Power supply voltage
230V
Connection fittings
1” Internal Thread
Condensate connection
12 mm
Rated power consumption
600 W
Working pressure
6 bar
Average thermal power of the heat
pump
1.92 kW
Electric heater power
2 kW
Electrical protection
B16
Air flow rate
300 m³/h
Compressor
Embraco/Aspera
7. Maintenance:
a) check the connection between the plug, socket and earthing wire on a regular basis;
b) in colder regions (below 0º) while the system is to be shut off for a longer period, drain the
water to protect the internal tank against freezing and avoid damage to the heater;
c) to provide proper device operation it is recommended to clean the internal tank and heater on
a regular basis;
d) check the magnesium anode every year. If it is worn, replace it. For additional information
contact the supplier or a service centre;
e) if water parameters at outlet are sufficient, it is recommended to set a lower temperature to
reduce heat emission, prevent lime scale build-up and to save energy;
f) clean the air filter every month, while the evaporator should be cleaned once a year;
g) before you shut off the device for a longer period disconnect the power supply, drain water
from the tank and pipes and close all valves. Check all internal components on a regular basis.
8. Checking and moving the device
After the device delivery, check its packaging for any damage. If any damage is found, notify the
carrier of this fact immediately.
When carrying the device, take into account the following tips:
1. Fragile, handle with special care.
Hold the device upright to avoid damage to the compressor.
2. Before you carry the device check whether the route to the installation site is free from any
obstacles.
3. The device should be carried in its original packaging.
4. When lifting the device always use protectors to avoid damage to tapes and ensure the device
weight is properly balanced.

- 6 -
OPERATION MANUAL AND WARRANTY CARD
"Galmet Sp. z o.o.”
9. Schematic diagrams of the heat pump
General view Heat pump components
Fig. 1 Heat pump view
9.1. General dimensions
45°
Fig. 2 Heat pump dimensions

- 7 -
OPERATION MANUAL AND WARRANTY CARD
"Galmet Sp. z o.o.”
Air inlet - rated air flow
300 m3/h
Max. duct length 5 m
GALMET
160mm
160mm
Air outlet - rated air flow
300 m3/h
9.2. Transport method
Fig. 3 Heat pump transport method
10. Connection diagram for heat pump air duct
Fig. 4 Air duct connection
Front view
Transport method
It is not allowed to carry the device in a horizontal position. A deviation from
vertical position of up to 40 degrees is allowed, as shown in this figure above.
45°
Side view

- 8 -
OPERATION MANUAL AND WARRANTY CARD
"Galmet Sp. z o.o.”
10.1. Installing the heat pump indoors
The heat pump must be installed in a way allowing a service technician to maintain the
compressor unit and should provide access to at least to one wall of the device. A minimum
distance from the wall should be 40 cm. A minimum floor area needed to install the heat
pump is 2 x 2 m (4 square meters), while the room height should exceed 2.2 m. When
installing the device without ducts carrying the air to the outside of the building provide a
minimum room ventilation at a level of 350 m³/h.
C
D
A B
A+B <10m
C >800mm
D > 400mm
HEAT PUMP
45°
Cold water
Coil return
Coil supply
Circulation
Domestic hot water
Sensor
Fig. 5 Heat pump installation
10.2. Heat pump positioning inside the boiler room
Air ducts
Utility room,
e.g. laundry
room, garage
HEAT PUMP
45°
Cold water
Coil return
Coil supply
Circulation
Domestic hot water
Sensor
Fig. 6 Heat pump positioning inside the boiler room
The minimum length between the suction duct and cold air outlet should be
1.5 m !!

- 9 -
OPERATION MANUAL AND WARRANTY CARD
"Galmet Sp. z o.o.”
HEAT PUMP
Air ducts
+15°C
+10°C
Utility room,
e.g. laundry
room, garage
External
supply for the
heat pump
45°
Cold water
Coil return
Coil supply
Circulation
Domestic hot water
Sensor
Air ducts
+10°C
Air discharge
outdoors
Utility room,
e.g. laundry
room, garage
+15°C
HEAT PUMP
45°
Cold water
Coil return
Coil supply
Circulation
Domestic hot water
Sensor
10.3. Heat pump air supply from the outside and air discharge into another
room
Fig. 7 Air supply duct outdoors and air discharge into another room
10.4. Air pump supply from the boiler room and air discharge outdoors
Fig. 8 Air supply from the boiler room and discharge into another room

- 10 -
OPERATION MANUAL AND WARRANTY CARD
"Galmet Sp. z o.o.”
10.5. Supplying and discharging air from the heat pump outdoors
Air ducts
+15°C
+10°C
External
supply for the
heat pump
HEAT PUMP
45°
Cold water
Coil return
Coil supply
Circulation
Domestic hot water
Sensor
Fig. 9 Air supply and discharge outdoors
11. Description of heat pump connections
Fig. 10 Dimensions of connection fitting layout

- 11 -
OPERATION MANUAL AND WARRANTY CARD
"Galmet Sp. z o.o.”
12. Schematic diagram of the heat pump hydraulic system
Fig. 11 Schematic diagram of the heat pump hydraulic system
13. Connections
Fig. 12 Heat pump connections

- 12 -
OPERATION MANUAL AND WARRANTY CARD
"Galmet Sp. z o.o.”
14. Schematic diagram of the device hydraulic system
Fig. 13 Schematic diagram of the heat pump
R134a
refrigerant

- 13 -
OPERATION MANUAL AND WARRANTY CARD
"Galmet Sp. z o.o.”
7 8
15. Schematic diagram of the device electrical wiring
Fig. 14 Schematic diagram of the heat pump electrical wiring
Electrical wiring connections should be carried out by a qualified electrician with valid
license. This fact should be recorded in the catalog and warranty card provided on the
last page of this manual.
The heat pump should be provided with a current-differential and overcurrent
protections (fuses); the rate of overcurrent protections depending on the device
electrical power is presented in the table below.
Protection Type
Heat Pump Type
B16
EasyAir Basic 2GT

- 14 -
OPERATION MANUAL AND WARRANTY CARD
"Galmet Sp. z o.o.”
The device should be connected to the mains with its power cord.
The wall socket should be earthed (fitted with a PE terminal).
If any malfunction of the device occurs, shut off the system, disconnect it
from the power supply source and contact a service centre.
WARNING!!!!!
If the power cord is damaged, it should be replaced immediately with a special cord or a
set available from the manufacturer or at a specialty repair shop.
Recycling
The symbol presented below signifies that it is prohibited to dispose of worn electrical
and electronic devices together with other waste. These products should be delivered to
assigned waste collection points for waste processing. A proper recycling of electrical and
electronic devices helps to protect the natural environment and prevents negative impact on
human health.

- 15 -
OPERATION MANUAL AND WARRANTY CARD
"Galmet Sp. z o.o.”
16. Troubleshooting guide
Trouble
Cause
Solution
The outlet water is cold.
The display is off.
Improper connection between
the plug and socket;
outlet water temperature
setting too low;
outlet water temperature
controller failure
;
printed circuit board (PCB)
track damaged.
Reinsert the plug;
increase the outlet water
temperature;
contact a technical service.
No hot water at outlet.
Running water supply has
been cut off;
water pressure too low;
the water inlet valve is closed.
After providing water supply
all will return to normal
condition
;
operate at a higher pressure;
open the valve at water inlet.
Water leakage.
Pipe connections are not
sealed/tightened properly.
Check and seal the
connection.
17. Device inspection card
Item
Gas pressure
Pressure in
heating circuit
Servicing
operations
Stamp and
signature of
fitter
First start-up
Inspection after
12 months
Inspection after
24 months
Inspection after
36 months
18. Declaration of Conformity

- 16 -
OPERATION MANUAL AND WARRANTY CARD
"Galmet Sp. z o.o.”
DECLARATION OF CONFORMITY
"Galmet Sp. z o.o.” Sp. K.
(Company name)
UL. RACIBORSKA 36
48-100 GŁUBCZYCE
declares that the following product:
EasyAir Basic 2GT Air-To-Water Heat Pump
this declaration applies to is compliant with the following Directives:
-Pressure Equipment Directive (PED): 97/23/EC
-Low Voltage Directive (LVD): 2006/95/EC
-Electromagnetic Compatibility Directive (EMC): 2004/108/EC
and standards:
-PN-EN 50366:2004+A1:2006 Electromagnetic Field Measurement
-PN-EN 60335-2-40:2004+A12:2005+A11:2005+A1:2006+A2:2009
PN-EN 60335-1:2004+A1:2005+A2:2008+A12:2008+A13:2009
+A14:2010 Operation Safety
Głubczyce, November 18th, 2010
Place and date
………..……………………………….
Authorized person signature

- 17 -
OPERATION MANUAL AND WARRANTY CARD
"Galmet Sp. z o.o.”
19. Notes

- 18 -
OPERATION MANUAL AND WARRANTY CARD
"Galmet Sp. z o.o.”
20. Warranty Terms and Conditions
1. The heat pump warranty is granted for a period of 24 months from its first start-up, however not longer than
27 months from the date of manufacture.
2. The warranty period for the enamel-coated tank is 48 months, however no longer than for the warranty period
plus 12 months from the product date of manufacture.
3. During the warranty period any device defects resulting from the manufacturer's fault will be rectified free of
charge within 14 working days from the date of reporting.
4. The method of rectification is at the manufacturer's discretion.
5. It is mandatory to replace the tank magnesium anode at least every 18 months
(the anode should be inspected for wear every 12 months) - the replacement is not covered by the warranty
(keep the purchase invoice and the record testifying its replacement). A regular magnesium anode replacement is
required to maintain the tank warranty.
6. It is not allowed to install the heater without an operational safety valve (keep the safety valve purchase
document and its warranty card). The safety valve should be installed directly upstream the heater at the cold
water supply pipe. It is prohibited to install the heater in rooms where temperature can drop below 0°C.
7. The company or fitter carrying out: the installation, start-up, repair and maintenance inspections shall carry
out all works in accordance with good construction practices and must be a specialty company.
8. During the warranty period the warrantor provides a free of charge repair or rectification of a physical defect
of the contract subject, within the following periods:
a) 14 days from the date of making a claim, if the defect rectification does not require replacing structural
components of the contract subject;
b) 30 days from the date of making a claim, if the defect rectification requires replacing structural components
of the contract subject;
9. The warranty does not cover:
a) damage resulting from failure to use the device in compliance with generally accepted rules for such devices,
failure to follow the intended use recommendations and instructions provided by the manufacturer;
b) damage caused by the user;
c) products, where unauthorized interference has been found, including modifications, repairs carried out on
one’s own, construction changes;
d) damage resulting from improper installation and assembly;
e) improper device operation resulting from incorrectly chosen installation parameters
, controller settings, improper system venting, etc.
10. The device service covers the damage and defects resulting from the manufacturer's fault.
11. Assembly, electrical and hydraulic connections and device maintenance can only be carried out by an
authorized fitter.
The manufacturer shall not be held responsible for any damage to the device resulting from its improper
installation or failure to use the device following the instructions contained in this operation and installation
manual.
12. The method of warranty repair is at the device manufacturer's discretion. Except from its own service center
network, the warrantor allows for carrying out warranty repairs by other fitters authorized by him (to be
consulted beforehand).
13. No operating manual or no warranty card stamped by the shop and the fitter results in voiding the warranty
immediately. No entry documenting the first start-up date in the device inspection card of this manual results in
voiding the warranty immediately.
14. When the Buyer makes it impossible to carry out a warranty repair twice, despite the warrantor’s readiness to
carry it out, it is considered that the Buyer gives up the warranty claim.
"Galmet Sp. z o.o.” Sp. K., reserves the right to introduce changes in the specifications or models to improve
devices without prior notice. The manufacturer shall not bear any costs resulting from the above mentioned changes.
.


Table of contents
Other Galmet Heat Pump manuals
Popular Heat Pump manuals by other brands

Calorex
Calorex VPT 12 Owners & installation manual

Bryant
Bryant Evolution 284ANV Series manual

Nordic
Nordic R-Series Installation and service manual

Nibe
Nibe ClimateMaster Tranquility TC L Series Installation operation & maintenance

American Standard
American Standard 4A7A6018-061 Installation and operation manual

Mitsubishi Electric
Mitsubishi Electric PUH-P200MYA Technical & service manual