Galvo Shed GVO 3030 User manual

GVO 3030
GABLE ROOF SHED
3030mm wide x 3030mm deep x 1830-2090mm high
ASSEM BLY
INSTRUCTIONS
YOU SHOULD HAVE TWO PACKAGES:
• 1 cardboard package
• 1 channel pack
TOOLS REQUIRED:
• Battery or electric drill
• 3.3mm (1/8th inch) drill bit
• Screwdriver or riveter
• Tape measure
• Ladder
• Non-slip gloves, good
shoes and goggles
• A set of helping hands
CALL 0508 454 873
for an installer near you
Some parts have sharp edges and should
be handled very carefully. We recommend
the use of protective gloves and footwear
when assembling.
DO NOT attempt to erect this shed in windy
weather. All dimensions are approximate.
PACKED BY:
Please quote this code for any
correspondence back to the supplier

If you choose to vary from these instructions your warranty will be impaired
2
IMPORTANT!
• Remove the swarf (drill filings) from the panels as you assemble them.
• All components are cut to length. Do not cut any parts unless instructed.
• Fixings through the inside of the channels into the sheeting are just as important as
fixings from the outside.
RIBS AND PANS
• Generally most fixings are spaced at 300mm apart.
• Keep the fixings in the pans as close to the ribs as possible for added strength.
• Ribs will always protrude to the outside of the shed.
• Extra internal fixings are strongly recommended in high wind areas. PAN
RIB
COMPONENTS CHECKLIST
Please check all components carefully and advise your supplier immediately if any discrepancies.
Remember to quote the code on the front page.
2 x 1770 x 780mm door sheets 2 x narrow 1830 x 715mm sheets
(beside door)
4 x 1960mm angle cut sheets &
2 x 2025mm gable cut sheets
(end walls)
2 x 2290mm 'U' channels for end
walls (top)
4 x 1600mm 'L' flashings
(roof to side flashings)
4 x door bracing
8 x 1600mm x 780mm sheets (roof)
4 x 1830 x 780mm (back wall)
4 x 3000mm 'U' channels with
ends cut for front and back walls
4 x 1770mm 'U' channels
(door sides)
2 x 1830mm & 1 x 1770mm 'Z'
door jambs (front)
1 x 3000mm long ridge beam (roof)
2 x 2 gable plates for gable ends
4 x 3000mm 'U' channels for roof 2 x 2255mm 'U' channels for end
walls (bottom)
2 x 1586mm 'U' channels
(door spacers)
2 x 310mm door plate
4 x 780mm 'U' channels (door top
and bottom)
1 x pack screws with padbolts
1 x pack of rivets and hinges
A
E
I
H
M
Q
B
F
J
N
R S
C
G
K
O
D
L
P
1
DIAGRAM 1 DIAGRAM 2 DIAGRAM 3
BUILDING YOUR SHED
• The basic task is to join the sheets together to
form your panels, and fix channels to the top
and bottom of these panels. They will then join
together to form your shed (diagram 1, 2, and 3).

If you choose to vary from these instructions your warranty will be impaired 3
NARROW PAN
30MM
4MM
GAP
HINGES
The hinges should protrude
over the top of the channel
YOU WILL NEED
2 x 1770mm x 780mm door sheets
4 x 1770mm 'U' channels
4 x 780mm 'U' channels
2 x 310mm door plate
Hinges
4 x door bracing
1 x 1770mm 'Z' door jamb
YOU WILL NEED
2 x 1830mm x 715mm sheet
2 x 1830mm 'Z' door jambs
STEP 1 DOOR ASSEMBLY
Attach the 780mm 'U' channels Lto the top and bottom of the door sheet Aat the
centre ribs only. Attach the 1770mm 'U' channels Jto the door sheet Athrough the
top and bottom channels Lat the four corners.
Attach the door plate Oin the centre of the door sheet, slipping it under the two side
'U' channels and fixing it to the sheet ribs and the side 'U' channels.
Attach the hinges Papprox 150mm from the top and bottom of the door through the
'U' channels. The fixings should be centred on the side 'U' channels.
Turn the door over and fix the four corners through all the 'U' channels and fit the door
bracing from the bottom corner to the opposite centre to the top corner (step 2 below).
Perform the same (but mirror image) for 2nd door. Attach 1770mm 'Z' door jamb
to 2nd door.
STEP 2 HANGING THE DOOR
Attach the first 'Z' door jamb Nto the 715mm sheet Bon the rib with the narrow pan.
Attach the other 'Z' door jamb to the 715mm sheet. Lay the premade door face down on
the 715mm sheet Bapprox 30mm up from the bottom and down from the top.
Check the door is centralised on the sheet (top and bottom). Fix the hinges through the
side of the 'Z' door jamb Nraising the door about 4mm off the 'Z' door jamb.
Repeat the procedure for the second door.
150MM
A
J
L
O
P
Q
N
J
L
P
L
O
A
J
B
N
B
N

If you choose to vary from these instructions your warranty will be impaired
4
STEP 3 FRONT WALL
Lay down the doors with the sheets attached. Cap the sheets with the 3000mm
channels F. Use the door spacers Kto make sure the door fits the gap (they sit
on top of the 'Z' door jambs Nsee diagram 1).
Drill and fix (rivet or screw) the channels at every second rib down through the top.
Attach the door spacers at each end through the 'Z' door jambs and channels.
Put three fixings underneath through the channels into the sheeting pan and the
top and bottom of the door spacers and 'Z' door jambs (see diagram 1).
Fit the padbolt Pto the door strap on the outside of the door using wide
flange rivets or screws.
Channels will come short
of the ends of the sheeting by
10-15mm on all panels.
PADLOCK KEEPER
ASS E M BLY
KEEPER
WASHER
RIVET
P
F
F
K
K
YOU WILL NEED
2 x 3000mm 'U' channels with ends cut
2 x 1586mm door spacers
3 x padbolts
F
K
P
GALVO TIP
To hinge the door of your shed on
the opposite side, simply put the
top channel on the bottom and
the bottom channel on the top.
Put the padbolt on the door
before erecting the panels.
It will stop your garage door
swinging around!
Fix through the top and bottom of the channels into the door
jamb and spacer. The door jamb goes on inside of the channel.
SPACERCHANNEL
3
CHANNELS
The higher side of the channel goes
to the inside of the shed. It is very
important to include the fixings on the
underside of all the channels as they
are structural (except roof channels).
OUTSIDE
INSIDE
FCHANNELS WITH
CUTOUTS
The cutouts go to the inside
of the panel to allow easy
fitment of the end walls on
assembly (page 5).
TOP
BOTTOM
IMPORTANT ADDITIONAL INFORMATION

If you choose to vary from these instructions your warranty will be impaired 5
DIAGRAM 1
STEP 4 BACK WALL
Join the 4 sheets Ctogether with 2 fixings through the overlapping ribs, making
sure the ends of the sheets are flush. Cap the sheeting with the 3000mm
'U' channels F.
Fix the channels through the end ribs and every second rib in between. Make sure
you put at least one fixing per sheet up through the underside of the channel into
the pan of the sheet.
STEP 5 ROOF
Join the sheets Dtogether, same as the back. Cap the sheeting with the 3000mm
'U' channels F. Fix the channels at every second rib but not the corners at this stage.
Place the short flange of the first 'L' flashing Mon top of the rib at one end.
Make sure the ends are flush with the sheeting (diagram 1) and put one
fixing in the centre to hold the 'L' flashing. Fix the corners through
the channels and one more between the corner and the centre
fixing. Perform the same at the other end.
Fit the ridge beam Rto 1 roof panel only.
Fix through the ends and up through the
internal flange on the underside.
GALVO TIP
Put extra fixings in for
high wind areas, particularly
on the underside.
YOU WILL NEED
8 x 1600mm x 780mm sheets
4 x 3000mm 'U' channels
4 x 1600mm 'L' flashings
1 x 3000mm long ridge beam
D
F
M
R
YOU WILL NEED
4 x 1830mm x 780mm sheets
2 x 3000mm 'U' channels with ends cut
C
F
F
F
C
R
M
MF
F
D

If you choose to vary from these instructions your warranty will be impaired
6
CHANNELS
Channels will end 15-20mm
short at tops of end walls
and 10-15mm at bottoms.
STEP 6 END WALLS
Join 3 Esheets together to create a gable end wall as shown. Make a cut in the
centre (1145mm) of the 2290mm top channel Iand cap the three Esheets. Cap
the bottom of the sheets with an H2255mm channel. Rivet at corners only for
now. Slip Rgable plate under channel at the top and rivet to sheeting at the *.
Rivet the channels at every 2nd rib and thru gable plate into sheeting ribs.
Place 3 rivets up underneath through channel into pan of sheet.
Perform the same again for the other end.
I
R
H
E
YOU WILL NEED
4 x 1960mm angle cut sheets & 2 x
2025mm gable cut sheets (end walls)
2 x 2255mm 'U' channels (bottom)
2 x 2290mm 'U' channels (top)
2 x gable plates
E
H
I
R
STEP 7 DOOR BRACES
The door braces can be fitted now or after you have assembled your shed.
Tuck one end of the 'Z' between the bottom channel of the inside of the
door and the sheet. Do the same at the top, overlapping in the centre
behind the padbolt.
If you have a locking 'T' handle you will have to run the 'Z's the opposite
way to the diagram.
Rivet the 'Z's at the ends, and in the centre of the channel it is tucked
under, and through the overlap in the centre. Two or three more fixings will
be required through the door sheeting into the 'Z', but they will need to be
riveted through from the outside of the door for a neater appearance.
You may need to cut or bend the flange at the bottom and the top of the
'Z' if it catches on the door jamb when opening or closing (diagram 1).
5
AFTER
DIAGRAM 1
BEFORE
YOU WILL NEED
2 x 'Z' Door braces
Fixings
O
N
ABOVE
Z door braces in position on
the inside of door sheet

If you choose to vary from these instructions your warranty will be impaired 7
STEP 8 INSTALLATION
SIDE WALL ASSEMBLY
• Stand up the back wall and as your helping hand is holding it up, bring the left end wall
in to meet it at the left corner (diagram 1) overlapping the corners (diagram 2). Drill and fix
at approximately 100mm down from the top and up from the bottom, drilling and fixing
from the outside.
• Bring the right end wall into the right back corner and perform the same again
checking to make sure the walls are sitting flat at the bottom.
• Bring the front wall into place and join the front corners to the end walls, same as
the back (diagram 3).
• Finish joining the corners by fixing at approximately 200-300mm apart. You will find it
easier to drill these corners if they are supported on the inside (see tip).
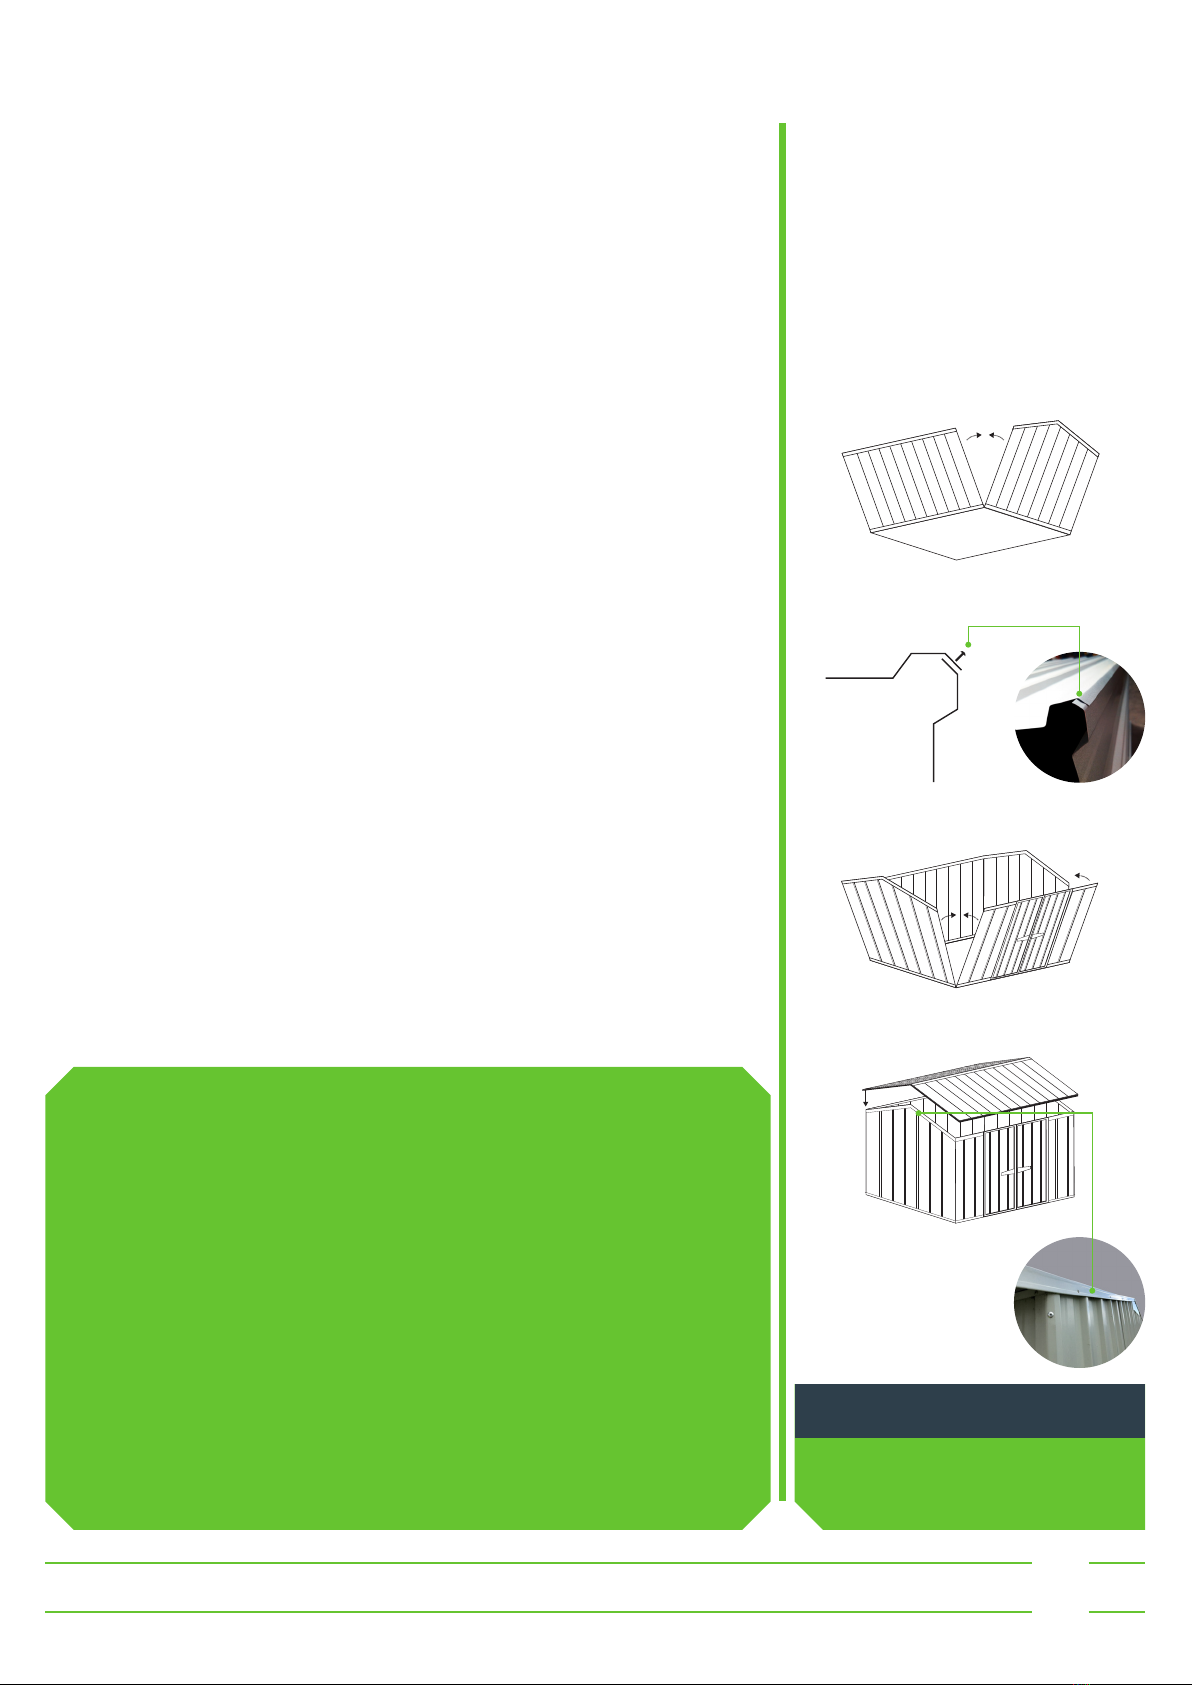
FIXING THE ROOF
• With a person at each end of the roof, lift it over the top of your upright walls and
lower down on top with an overhang that looks best to you (diagram 4). At the left end fix
through the 'L' flashing into the top channel of the left end wall. Measure the overhang at
the back and fix the right end 'L' to the right end wall with the same overhang as the left
end. If it is difficult to get the same overhang at each end, this
will be caused by an unlevel site or walls that are not square. Adjust accordingly.
Fix the 'L's at 300mm apart.
• Using the ladder and the tape measure, fix down through the top of the roof,
through the pan into the top channel of the front and the back walls (10mm more
than the overhang). Fix beside every second rib. You will not need to worry about
these fixings leaking as any water seeping through these fixings will end up on the outside
of the walls.
FIT THE DOOR BRACES AND INSTALL SHED
• Fit the door braces, if not already done so. Check that all filings/swarf is removed.
• Important: Fix your shed down to its foundations. If your foundations are unlevel or bowed,
you will have problems with your padbolt and door levels. This can be fixed by slipping
a spade under either door jamb and lifting. You will soon get a feel for which side needs
propping up.
DIAGRAM 2
IMPORTANT
• Do not attempt to assemble panels in rain or windy conditions.
• Make sure your foundations are squared and level before erecting panels.
• It is easier to remove all swarf (filings) before you stand your walls up.
• Complete all panels before erecting your shed.
• Keep a firm grip on panels when handling. If they slip they will cause damage.
• Always wear non-slip gloves, protective footwear and eyewear.
YOUR SHED'S FLOOR
• It is essential that every shed has a floor, but the only way to make sure
your shed is there to stay on windy sites is with a recessed concrete floor.
BUILDING YOUR SHED
The basic task is to join the sheets
together to form your panels, and fix
channels to the top and bottom of
these panels.
They will then join together to form
your shed (diagram 1, 2, 3 and 4).
GALVO TIP
Use the handle end of a hammer in the inside of
the corner, but beware of drilling holes on the
end of your hammer!
DIAGRAM 4
DIAGRAM 1
DIAGRAM 3
L FLASHING
Rivet through the side of the 'L'
flashing to secure the roof to the
side of the shed.

If you choose to vary from these instructions your warranty will be impaired
8
KITSET WOODEN FLOORS
Every shed must have a floor. These are available from your local reseller or contact info@storetech.nz
FLAT FLOOR CLAMPS
For existing concrete only. Water can
seep underneath.
INTERNAL DIMENSIONS
GVO 3023
2985MM X 2985MM
SHED
PEG THE FLOOR TO THE GROUND IN A WINDY AREA
RUNNER
FLOOR BOARD
WARRANTY
Thank you for purchasing a GALVO shed. We offer you a 15 Year warranty for Classic range and 18 Year warranty on the GALVO Premium range. The warranty is very simple - “if any part or component of your shed fails, we will send you a new part or component”. Your GALVO shed
will require very little maintenance unless it is situated near the sea/ocean or any other harsh environments e.g. sulphur, etc* If your GALVO shed is situated near the sea or harsh environments we suggest you wash the shed regularly (every 3 months or less) to prolong the life of
your shed. However the warranty that we offer will be overridden by the warranty/guarantee offered by the original manufacturer of the steel.
The conditions listed below apply and are applicable to the 15 and 18 year warranties:
(a) the warranty shall not cover any defect or damage which may be caused or partly caused by or arise through: (i) failure on the part of the Customer to properly maintain any Goods; or (ii) failure on the part of the Customer to follow any instructions or guidelines provided by
the Supplier; or (iii) any use of any Goods otherwise than for any application specified on a quote or order form; or (iv) the continued use of any Goods after any defect becomes apparent or would have become apparent to a reasonably prudent operator or user; or (v) the storage
of caustic materials (including but not limited to acids, fertilisers or hazardous chemicals); or (vi) Fair wear and tear, any accident or act of God. (including weather) (b) The warranty shall cease and the Supplier shall thereafter in no circumstances be liable under the terms of
the warranty if the workmanship is repaired, altered or overhauled without the Supplier’s consent. (c) in respect of all claims the Supplier shall not be liable to compensate the Customer for any delay in either replacing or remedying the workmanship or in properly assessing the
Customer’s claim. (d) Your shed must be raised above ground level (of natural earth substrate) by at least 70mm.
For Goods not manufactured by the Supplier, the warranty shall be the current warranty provided by the manufacturer of the Goods. The Supplier shall not be bound by nor be responsible for any term, condition, representation or warranty other than that which is given by the
manufacturer of the Goods. Where the Supplier is required to perform labour associated with the replacement or repair of defective Goods under manufacturer’s warranty, the labour performed shall be charged at the Supplier’s hourly rate. We wish you many years of trouble free
storage of your valuable assets and we would be only too happy to assist with any questions you may have. Email to [email protected]
The team at Storetech Industries Ltd, suppliers of GALVO sheds.
*The GALVO Classic range is not covered by warranty within 2 kms of the sea or if it’s situated in thermal regions, but is priced accordingly.
RECESSED FLOOR
CLAMPS
For poured floors with a recess
around the perimeter.
BOXING DIAGRAM 20MM - 25MM
(1 ' X 1 ')
INTERNAL DIMENSIONS
SHED
RECESS
20MM - 25MM
8MM BOLT SET INTO CONCRETE
100MM
25MM
25MM
APPROX
APPROX 25MM RECESS
AROUND THE OUTSIDE
25MM
2985MM
INTERNAL
MEASUREMENT
2985MM
STEP 9 COMPLETE YOUR SHED
RECESSED CONCRETE FLOOR PLAN FOR SPECIALLY
POURED CONCRETE FLOORS: SPECIFICATIONS
Every shed must have some type of foundation between it and the ground. You can pour a concrete floor and use recessed floor
clamps, use an existing concrete base with flat floor clamps or purchase a kitset wooden floor from your nearest reseller.
Table of contents
Other Galvo Shed Outdoor Storage manuals

Galvo Shed
Galvo Shed GVO 1515 User manual

Galvo Shed
Galvo Shed GVO 3023 User manual

Galvo Shed
Galvo Shed GVO1508 User manual

Galvo Shed
Galvo Shed GVO2315 User manual

Galvo Shed
Galvo Shed GVO3030 User manual

Galvo Shed
Galvo Shed GVO 2315 User manual

Galvo Shed
Galvo Shed GVO 1508 User manual

Galvo Shed
Galvo Shed GVO3023 User manual
Popular Outdoor Storage manuals by other brands

LIVING AND HOME
LIVING AND HOME 0735940285711 user guide

USP
USP DURAMAX 10 Ft x 8 Ft StoreMax Plus owner's manual

rollaway container
rollaway container ARPCA24 manual

Duratuf
Duratuf GL105 Assembly instructions

Viking
Viking SD5300SS Use & installation guide

USP
USP DURAMAX Apex Pro 10.5 Ft x 8 Ft 40116 owner's manual