Gammill The Charm User manual

Quick Start Guide

©GAMMILL QUILTING SYSTEMS 2013
ALL RIGHTS RESERVED
8/16/2013

OVERVIEW
Needle-End
Hand Wheel Motor-End
Hand Wheel
Needle
On/Off
Switches
Motor
Detail
Light
Intermittent
Tension
Thread Break
Sensor
Rotary
Tension Light Switch
Gammill, Inc.
1 | Page

ACCESSORIES
The following accessories are included with The Charm:
Item
What you can do with it
Adjustable Laser Light
Use the Adjustable Laser Light to guide your quilting
path or follow patterns.
2 Cone Thread Holders
Use the front Cone Thread Holder to hold the top
thread used for quilting; use the back Cone Thread
Holder to wind bobbins.
2 Cone Guards
Use the Cone Guard to protect your thread from
getting caught on your quilt.
Foot Control
Use the Foot Control for real-time speed control to run
the quilting machine or activate various functions.
Horizontal Small Spool Holder
Use the Horizontal Small Spool Holder to hold small
thread spools.
Gam Slide
Use the Gam Slide on the bed of your quilting machine
to create a smooth surface to quilt on.
Tablet
Use the Tablet to run The Charm Android application
to access features and maintenance functions.
Gam-Guide Jr
Use the Gam-Guide Jr to help with straight line
quilting.
Gammill, Inc.
2 | Page

PAMPERING THE CHARM - OILING
8-12 drops
every 6-8 hours
*2-4 for the
18-8
1-2 drops every
6-8 hours
1-2 drops every
6-8 hours
1-2 drops every
6-8 hours
*not on
18-8
Extra oiling
location on the
18-8
1-2 drops every
6-8 hours
Gammill, Inc.
3 | Page

OIL THE HOOK ASSEMBLY EACH TIME YOU CHANGE THE BOBBIN. PLACE THE OIL IN THE
TOP OF THE THREE HOLES ALONG THE INSIDE OF THE HOOK ASSEMBLY. LET IT RUN DOWN
INTO THE OTHER TWO HOLES. ROTATE THE HAND WHEEL THREE TURNS TO DISTRIBUTE
THE OIL EVENLY.
Learn how to oil your Charm with this great video!
Gammill, Inc.
4 | Page

THREAD GUIDE
Watch this helpful video to see how to thread your machine!
Threading Order
Threading Instructions
Cone Guard
Be sure the Cone Guard is in place, insert the thread
cone onto the cone holder. Pull the thread up from
the cone.
Thread Lead Off
Take the thread from the cone, up through the hole in
the end of the Thread Lead Off guide and then
through the middle hole from right to left.
Small Guide
Take the thread through the back of the small thread
guide, continuing toward the needle end of the
machine.
Intermittent Tension Thread Guide
Push a loop of thread through the Intermittent
Tension thread guide.
Intermittent Tension
Open the loop and put it around the Intermittent
Tension between the discs.
Gammill, Inc.
5 | Page

Thread Break Sensor Wheel
Wrap the thread two to three times counter clockwise
around the Thread Break Sensor Wheel. Wrap as
many times as it takes to turn the wheel while
stitching.
3-hole Thread Guide
Pass the thread up through the first hole and back
down through the third hole.
L-Guide
Bring the thread over the L-Guide.
Rotary Tension
Wrap the thread clockwise 1 ¾ times around the
Rotary Tension in the wheel.
Check Spring
Catch the thread on the Check Spring.
Gooseneck Guide
Pull the thread up, catching the Gooseneck Guide.
Thread Guide
Snap the thread into the thread guide leading to the
Take-up Lever.
Take-up Lever
Take the thread through the right side of the eye of
the Take-up Lever toward the needle end of the
machine.
Thread Guides
Snap the thread into the remaining thread guides
leading to the needle.
Needle
Pass the thread through the eye of the need from the
left to the right.
Gammill, Inc.
6 | Page

BOBBIN WINDING
Click here to watch a helpful video on winding a bobbin!
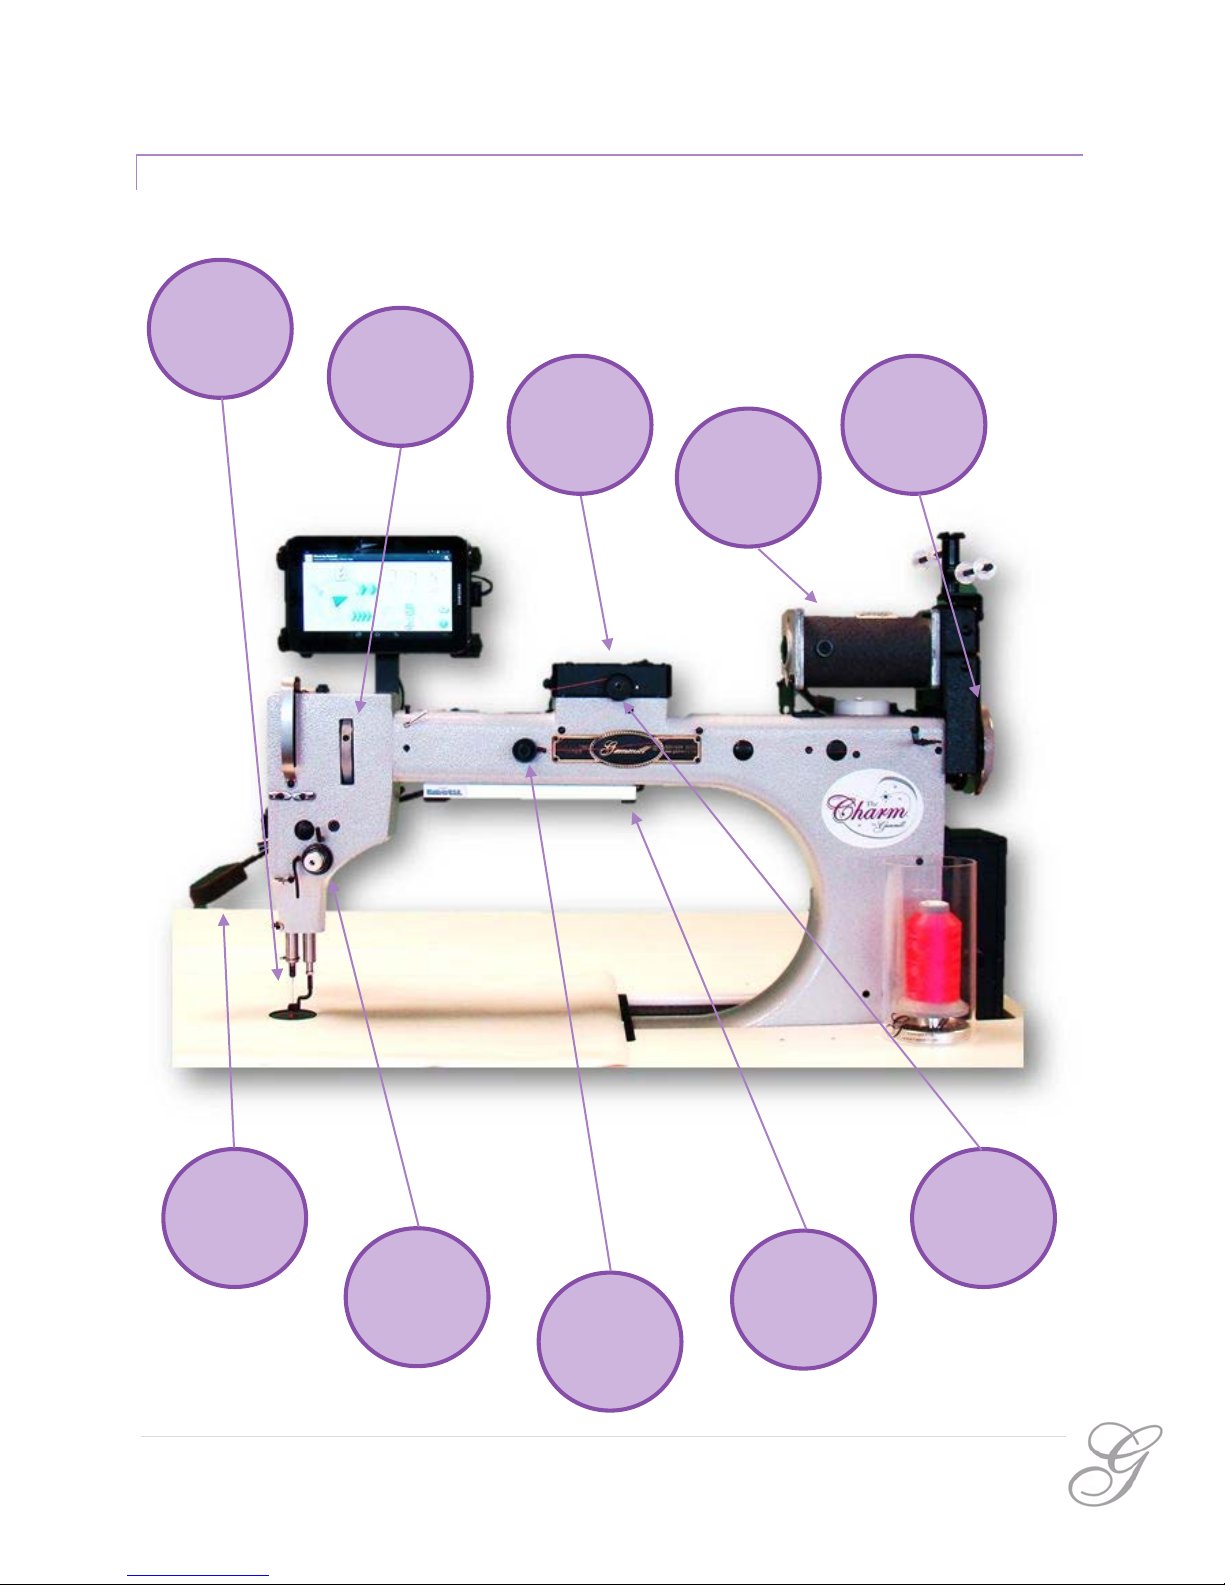
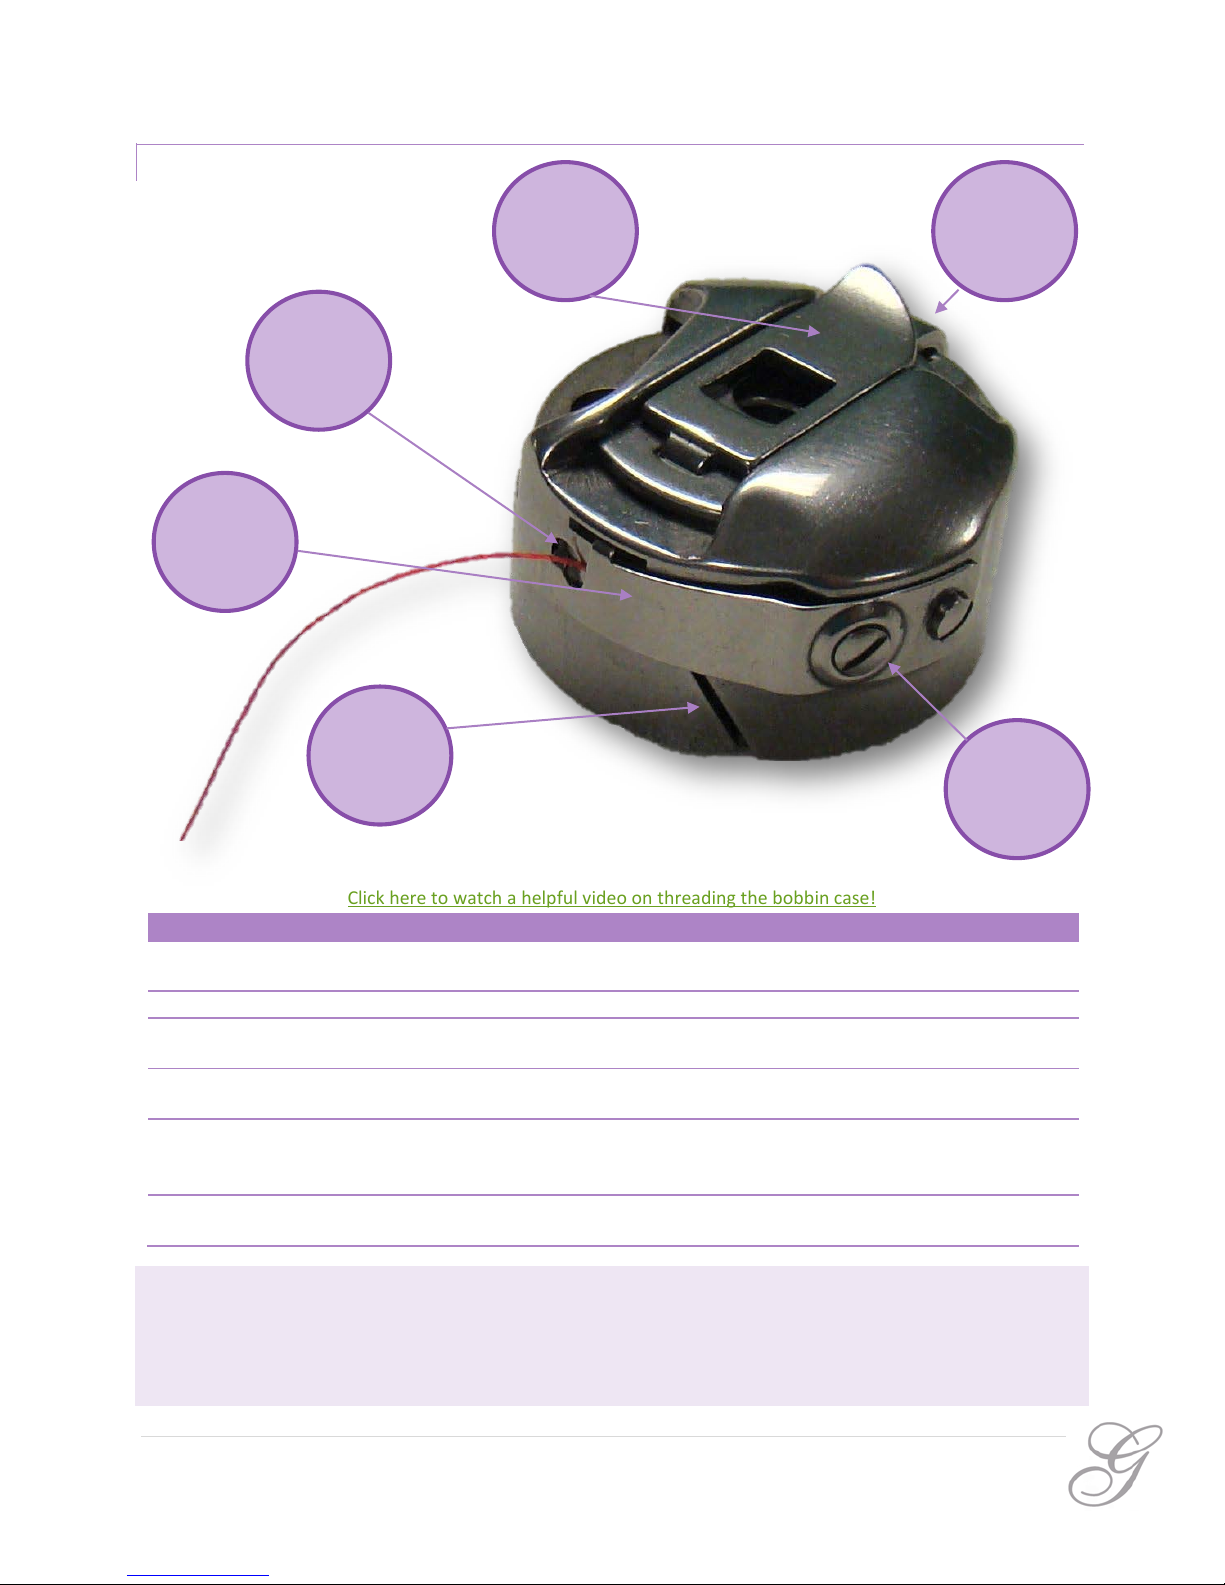
Bobbin Winder Threading Order
Threading Instructions
Cone Guard
Be sure the Cone Guard is in place, insert the thread
cone onto the cone holder. Pull the thread up from
the cone.
Thread Lead Off
Take the thread from the cone, up through the hole in
the end of the Thread Lead Off guide and then
through the middle hole.
Pre-Bobbin Winder Tension Thread Guide
Take the thread through the Pre-Bobbin Winder
Tension Thread Guide.
Post-Bobbin Winder Tension Thread Guide
Take the thread through the Post-Bobbin Winder
Tension Thread Guide.
Thread Guide Bobbin Winder Tensioner
Pull the thread between the Pre-Bobbin Winder
Tension Thread Guide and the Post-Bobbin Winder
Tension Thread Guide slipping it between the metal
tension discs of the Tensioner.
Thread Guide
Take the thread through the back of the small thread
guide, continuing toward the needle end of the
machine.
Bobbin
Wrap the thread several times around the bobbin
clockwise and slip the thread through a hole facing
you. Push the bobbin onto the bobbin spindle rotating
until it clicks. Push the lever arm against the bobbin.
Gammill, Inc.
7 | Page

THE BOBBIN CASE
Click here to watch a helpful video on threading the bobbin case!
Bobbin Threading Order
Threading Instructions
Bobbin Case
Insert the wound bobbin into the Bobbin Case with
the thread unwinding clockwise.
Slot
Slide the thread into the slot in the bobbin case.
Tension Spring & Thread Guide
Slip the thread behind the Tension Spring and out the
thread guide.
Latch
Open the latch to secure the bobbin while inserting it
into the hook assembly.
Hook Assembly
Place the bobbin case into the hook assembly, release
the latch and rotate to fit the hook latch tab into the
notch in the hook.
Click it!
Push the bobbin case into the hook assembly until it
clicks.
TO CHECK YOUR BOBBIN TENSION, LAY THE BOBBIN CASE IN YOUR HAND, BOBBIN SIDE UP.
PULL THE THREAD UP. THE BOBBIN SHOULD STAND UP IN YOUR HAND, BUT NOT LIFT OFF.
IF THE BOBBIN LIFTS OFF LOOSEN THE BOBBIN TENSION SCREW. IF IT DOES NOT STAND
UP, TIGHTEN THE BOBBIN TENSION SCREW.
Thread
Guide
Tension
Spring
Slot
Tension
Screw
Latch
Hook Latch
Tab
Gammill, Inc.
8 | Page

POWER RECOMMENDATIONS:
120 V AC
15 AMP CIRCUIT
50 OR 60 HERTZ
LOAD PEAK 1500 VA
POWERING UP THE SYSTEM
CLICK HERE TO WATCH A HELPFUL VIDEO ON STARTING UP THE CHARM SYSTEM!
Powering Up Order
Powering Up Instructions
Plug In
Be sure the power cable is plugged into the electrical
socket in the wall and connected to the machine.
Power Switch (Circle with line)
Toggle the Power Switch to the On position (l).
Motor Switch (M with circle)
Toggle the Motor Switch to the On position (l).
TO TURN OFF THE SYSTEM DO EACH OF THESE STEPS IN REVERSE.
SURGE PROTECTOR
STRONGLY
RECOMMENDED
Gammill, Inc.
9 | Page

THE TABLET
SEE THE SAMSUNG GALAXY QUICK START GUIDE FOUND IN THE TABLET BOX FOR BASIC TABLET
INFORMATION:
BASIC TABLET NAVIGATION:
Finger Gesture
What it does
Tap
Tap items to select them.
Touch and Hold
Touch an item and remain touching to change the
selection at a faster rate.
Swipe
Slide your finger on the screen a few inches to unlock
the screen or scroll through screens and menus.
Pinch
Use two fingers in a pinching motion on the screen to
zoom in or spread them to zoom out.
FIND THE CHARM APPLICATION ICON ON THE TABLET HOME
SCREEN AND TAP TO LAUNCH IT.
IT CAN ALSO BE FOUND IN THE APPS SCREEN.
Gammill, Inc.
10 | Page

CONNECTING BLUETOOTH
Icon
What you can do with it
Scan Gammill Devices
The system will automatically scan for the Charm. A cycling circle
lets you know it’s looking.
Longarm Icon
All eligible Gammill devices will show up under the Detected
Gammill Components heading. Tap on your Charm longarm icon.
Accept Configuration
The longarm icon selected will appear under the Selected
Configuration heading as shown on the screen shot below. Tap the
green Accept Configuration icon to establish the Bluetooth
connection.
Cancel
Tap the red Cancel icon to stop the Bluetooth connection process.
This will leave the screen returning to the Charm main screen and
will leave the application disconnected from the machine.
ONCE CONNECTED, YOU ARE RETURNED TO THE
MAIN SCREEN OF THE CHARM APPLICATION.
IN THE TOP RIGHT CORNER, CLICK ON THE THREE
LINES TO ACCESS THE DROP DOWN MENU. SELECT
THE BLUETOOTH SYSTEM CONNECTION TO
ESTABLISH COMMUNICATION BETWEEN THE
CHARM AND THE TABLET.
Gammill, Inc.
11 | Page

THE CHARM APPLICATION
THIS IS THE MAIN SCREEN:
Icon
What you can do with it
Setting Icon Tap the Setting Icon to access the Setting Options.
Variable Stitch Icon Tap the Variable Stitch Icon to select the Variable Stitch mode.
Constant Stitch Icon Tap the Constant Stitch Icon to select the Constant Stitch mode.
Basting Stitch Icon Tap the Basting Stitch Icon to select the Basting Stitch mode.
Diagnostic Icon Tap the Diagnostic Icon to access the Diagnostic Tools.
Single Stitch Icon Tap the Single Stitch Icon to take a single stitch.
Needle Up Icon Tap the Needle Up Icon to move the needle to the up position.
Needle Down Icon Tap the Needle Down Icon to move the needle to the down position.
Stitch Count Icon Tap the Stitch Count Icon to reset the stitch count.
Gammill, Inc.
12 | Page

Stitch Time Icon Tap the Stitch Time Icon to reset the stitch time.
Manual Icon Tap the Manual Icon to access any instructions you need.
Help Icon Tap the Help Icon to activate labels for the function icons.
Voice Activation Icon Tap the Voice Activation Icon to give a verbal command.
Indicator Arrow This arrow points to the function selected indicating the active
function.
DIAGNOSTICS SCREEN:
Diagnostic Test
What it tells you
Needle Position Test
Rotate the needle manually through the up and down
positions using the hand wheel. The red circles will
turn green as the needle rotates through the up and
down positions.
Foot Pedal Position
As you push down on the foot pedal the Foot Pedal
Position indicator will show the pedal is connected
and responds.
Gammill, Inc.
13 | Page

SETTINGS SCREEN:
Icon
What you can do with it
Needle Stop Up Icon
Tap the Needle Stop Up Icon to change to the Needle Stop Down
Icon making the needle stop in the down position when you stop
stitching.
Needle Stop Down Icon
Tap the Needle Stop Down Icon to change to the Needle Up Icon
making the needle stop in the up position when you stop stitching.
Variable Speed Response
Tap the Variable Speed Response to set the maximum stitch speed
allowed in the Variable Stitch Mode. Touch and told to make faster
adjustments.
Constant Speed
Tap the Constant Speed adjustment arrows to set the constant
speed. Touch and hold to make faster adjustments.
Baste Speed
Tap the Baste Speed adjustment arrows to set the basting speed.
Touch and hold to make faster adjustment.
Voice Feedback Icon
Tap the Voice Feedback Icon to turn the sound off.
Voice Feedback Disabled
Tap the Voice Feedback Disabled to turn the sound on.
Voice Commands Icon
Tap the Voice Commands Icon to turn the microphone off.
Voice Commands Disabled
Tap the Voice Commands Disabled to turn the microphone on.
Thread Break Detection
Tap the Thread Break Detection to turn off the Thread Break Alarm
feature.
Thread Break Detection
Disabled
Tap the Thread Break Detection Disabled to turn on the Thread
Break Alarm feature.
Gammill, Inc.
14 | Page

THE QUILTING MODES
The Charm stitches in three different modes: variable stitch mode, constant stitch mode and basting stitch mode.
VARIABLE STITCH MODE
BASIC FUNCTION: THE VARIABLE STITCH MODE ALLOWS YOU TO VARY YOUR STITCHING
SPEED AS YOU QUILT. WHILE THIS GIVES THE MOST CONTROL OVER ALL OF THE SPEED
VARIABLES (RATE OF MOVING FABRIC AND SPEED OF NEEDLE), IT IS THE MORE
CHALLENGING MODE TO REGULATE YOUR STITCH LENGTH IN.
PEDAL FEATURE: INCREASE THE SPEED OF THE NEEDLE BY PUSHING DOWN ON THE PEDAL;
DECREASE THE SPEED OF THE NEEDLE BY RELEASING THE PEDAL. THE PEDAL FUNCTIONS
MUCH LIKE A GAS PEDAL ON A CAR, THE HARDER YOU PUSH THE FASTER YOU GO.
OPTIONS: ADJUST THE FASTEST POSSIBLE SPEED THE PEDAL CAN MAKE IT STITCH BY
CHANGING THE VARIABLE SPEED RESPONSE ON THE SETTINGS SCREEN.
Gammill, Inc.
15 | Page

CONSTANT STITCH MODE
BASIC FUNCTION: THE CONSTANT STITCH MODE ALLOWS YOU TO STITCH AT A CONSTANT
SPEED. THIS SIMPLIFIES REGULATING THE STITCH LENGTH SINCE YOU ONLYH HAVE TO
FOCUS ON ADJUSTING THE RATE AT WHICH YOU MOVE THE FABRIC WHILE QUILTING.
PEDAL FEATURE: THE STITCHING SPEED REMAINS CONSTANT REGARDLESS OF HOW FAR
YOU PUSH THE PEDAL.
OPTIONS: ADJUST THE SPEED THE PEDAL CAN MAKE IT STITCH BY CHANGING THE
CONSTANT STITCH SPEED ON THE SETTINGS SCREEN.
Gammill, Inc.
16 | Page

BASTING STITCH MODE
BASIC FUNCTION: THE BASTING STITCH MODE OFFERS A PULSING STITCH THAT ALLOWS
YOU TO MOVE THE FABRIC AT A RATE TO CREATE BASTING STITCHES OF ANY DESIRED
LENGTH.
PEDAL FEATURE: THE STITCHING SPEED REMAINS CONSTANT REGARDLESS OF HOW FAR
YOU PUSH THE PEDAL.
OPTIONS: ADJUST THE SPEED THE PEDAL CAN MAKE IT STITCH BY CHANGING THE STITCH
SPEED ON THE SETTINGS SCREEN.
Gammill, Inc.
17 | Page

ENABLED
DISABLED
VOICE COMMAND & VOICE FEEDBACK
IMPORTANT: THE CHARM MUST BE CONNECTED TO THE INTERNET FOR THE VOICE
COMMANDS FUNCTION TO WORK. THE STITCHER VOICE FEEDBACK WORKS WITH OR
WITHOUT INTERNET ACCESS.
VOICE COMMAND:THE VOICE COMMAND FUNCTION ALLOWS YOU TO TELL THE CHARM
WHAT YOU WANT IT TO DO. TAP THE HELP BUTTON TO SEE THE NAMES OF THE
FUNCTIONS THE CHARM UNDERSTANDS. TO ACTIVATE THE VOICE PROMPT, EITHER TAP
THE GREEN ICON IN THE TOP LEFT CORNER OR TAP THE FOOT PEDAL. THE CHARM ONLY
REPONDS TO COMMANDS WHEN PROMPTED AND RESPONDS BY ASKING, “SAY COMMAND
PLEASE.”
VOICE FEEDBACK:ANYTIME THE STITCHER VOICE FEEDBACK IS ON, THE CHARM WILL TELL YOU
WHAT MODE YOU ARE SELECTING OR ALERT YOU TO OTHER CHANGES YOU MAKE. THIS MODE
IS NOT INTERACTIVE.
PEDAL FEATURE: WITH THE STITCHER VOICE COMMANDS TURNED ON THE PEDAL TAP
FEATURE CHANGES FROM THE NEEDLE UP/DOWN OPTION TO THE VOICE COMMAND
OPTION. TAP THE PEDAL AND YOU WILL BE ASKED FOR A COMMAND.
OPTIONS: TO ACTIVATE THE STITCHER VOICE FEEDBACK AND VOICE COMMANDS, BOTH OF
THESE ICONS ON THE SETTINGS SCREEN NEED TO BE VISIBLE. TO TURN OFF THE VOICE
COMMAND SYSTEM, TAP THE VOICE COMMANDS ICON SO THE RED X APPEARS. TO TURN
OFF THE STITCHER VOICE FEEDBACK, TAP THE STITCHER VOICE FEEDBACK ICON SO THE
RED X APPEARS.
Gammill, Inc.
18 | Page
Table of contents
Other Gammill Sewing Machine manuals