manuals.online logo
Brands
  1. Home
  2. •
  3. Brands
  4. •
  5. Garden Treasures
  6. •
  7. Tent
  8. •
  9. Garden Treasures TSF1010-PY User manual

Garden Treasures TSF1010-PY User manual

ITEM#0402007
MODEL #TSF1010-PY
10X10 CANOPY
Français p. 05
Español p. 09
1
Questions, problems, missing parts? Before returning to your retailer, call our customer
service department at 1-800-643-0067, 8 a.m. - 8 p.m., EST, Monday - Friday.
ATTACH YOUR RECEIPT HERE
Serial Number Purchase Date
2
SAFETY INFORMATION
Please read and understand this manual before attempting to assemble, operate or install the product.
• Do not use the shelter in lightning storm.
• Use caution when handling the frame. Avoid pinching hands or fingers as the frame opens or closes.
• Do not build fire under the shelter.
CAUTION
• Always stake or weigh down your shelter. Do not use it in any potentially windy or rainy weather.
• Wind and rain can damage your shelter and may also result in injury to you or others. Therefore, do not rely on shelter for protec-
tion in heavy or prolonged rain storms.
• Do not leave your shelter unattended.
• The shelter is designed as a temporary sun shelter. Do not leave up for extended periods.
PREPARATION
Before beginning installation of product, make sure all parts are present. Compare parts with package contents list. If any part is
missing or damaged, do not attempt to assemble, install or operate the product.
Estimated Assembly Time: 10 minutes.
CARE AND MAINTENANCE
• Use a mild soap (not detergent), and plenty of water for cleaning the top.
• Let the top and frame of the shelter dry completely before closing or storing to avoid mildew.
• Frame will operate and look better if occasionally wiped with silicone spray, especially before and after use in damp conditions.
Remove excess silicone residue before attaching the top.
• Use a seam sealer if top leaks or drips water.
• Slightly tighten the bolts if the frame becomes loose.
This warranty is extended to the original purchaser and applies to defects in materials and workmanship of your patio furniture,
provided your furniture is maintained with care and used only for personal, residential purposes. The shelter frames are warranted to be
free from defects in material or workmanship for a period of two (2) years.
If within the stated warranty period a product is found to be defective in materials or workmanship, the purchaser must contact the
manufacturer’s Customer Service Department at 1-800-643-0067. The manufacturer, at its option, will repair or replace the defective
parts. The manufacturer's obligation and liability under this warranty is limited to the repair or replacement (at its option) of the product,
after its own review and examination.
Warranty to the original purchaser is non-transferable. All warranty claims require a dated sales receipt. Any replacement of warranted
items will be in the original style and color, or a similar style and color if the original is unavailable or has been discontinued. As some
states do not allow exclusions or limitations on an implied warranty, the above exclusions and limitations may not apply. This warranty
gives you specific rights. You may also have other rights which vary from state to state.
2 YEAR LIMITED WARRANTY
WARNING
Keep all heat sources away from the top fabrics. This fabric meets the flammability requirements of CPAI-84. The fabric may burn if left
in continuous contact with any flame source. The application of any foreign substance to the fabric may render the flame-resistant
properties ineffective.
PART DESCRIPTION QUANTITY
A CANOPY TOP 1
B FRAME 1
C ROLLER BAG 1
D STAKE KIT 4
PACKAGE CONTENTS
No tools required for assembly.
3
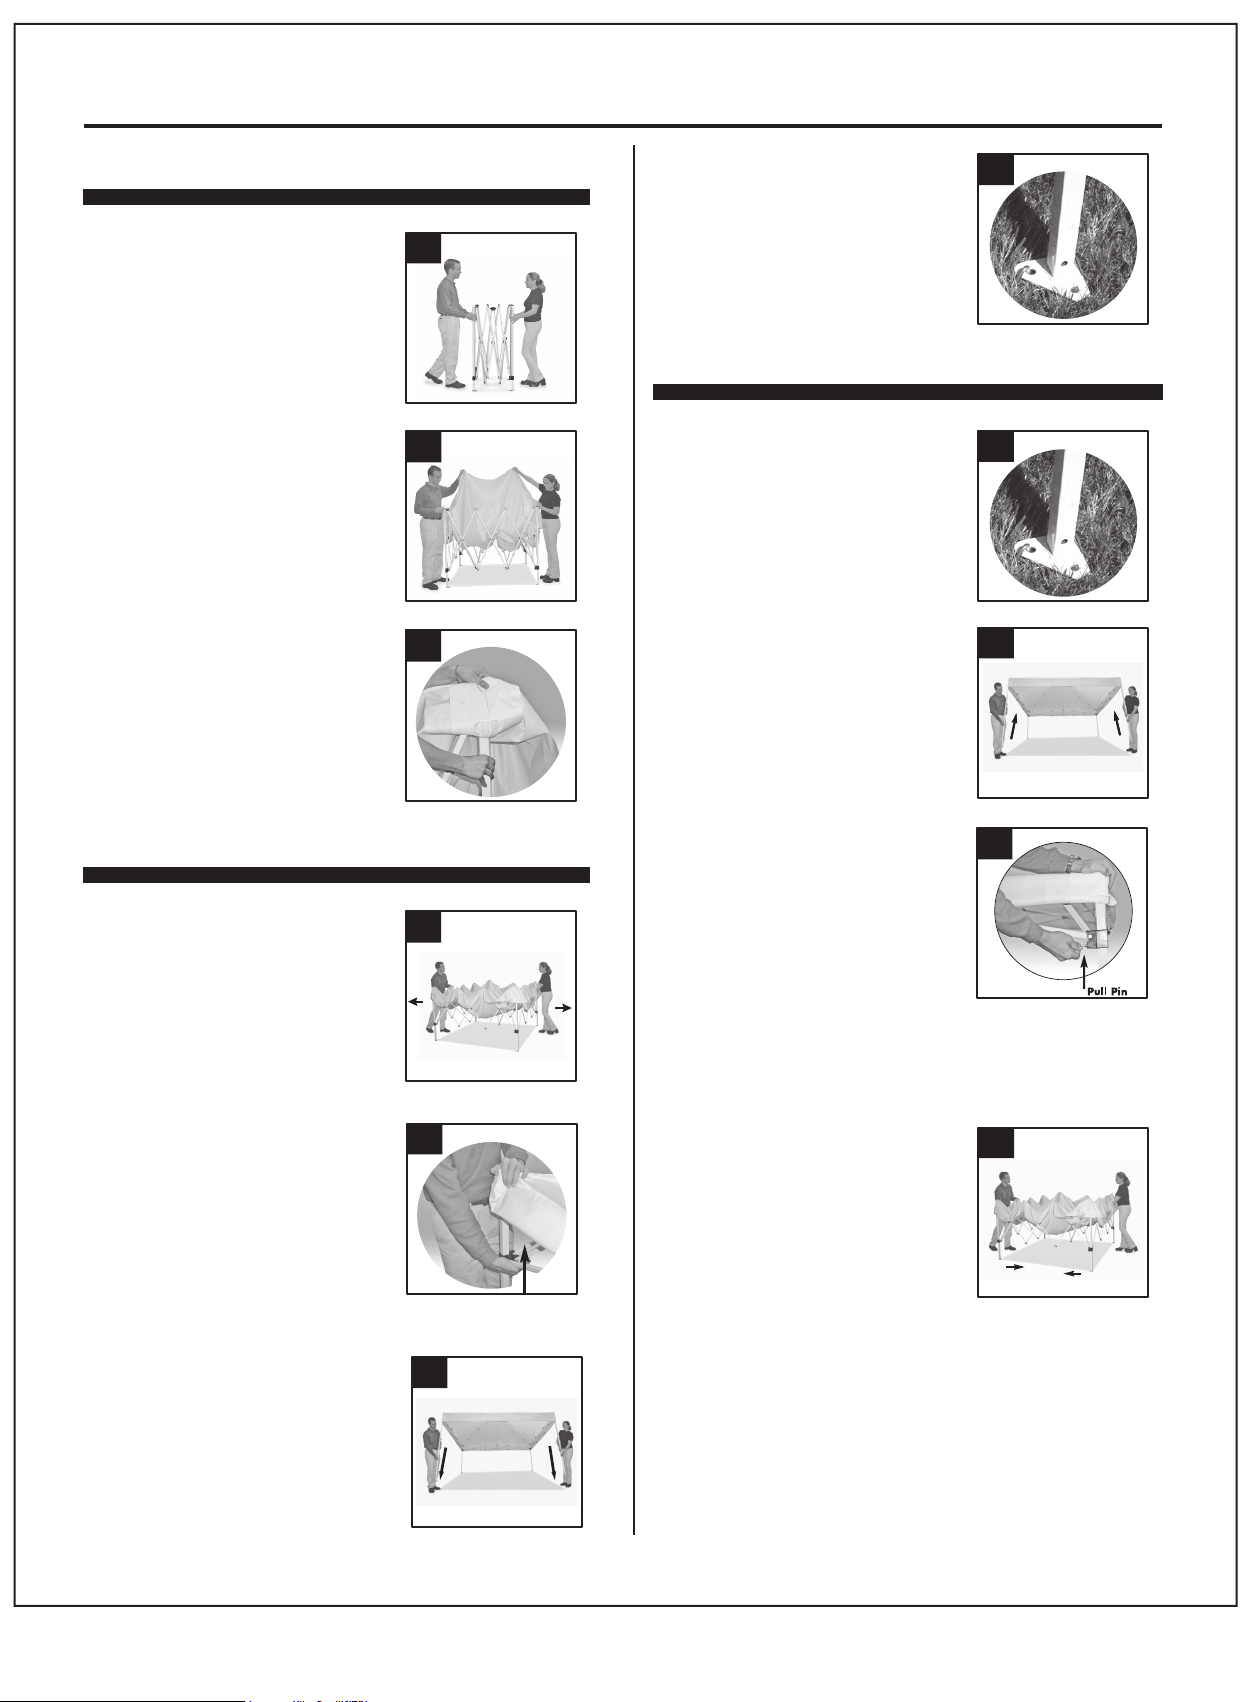
ASSEMBLY INSTRUCTIONS
1. Place your frame in the center of
the area to be shaded. With
your partner on the opposite
side, grasp two outer legs,
slightly lift the frame off the
ground, and step backwards,
stopping at full arm’s length.
1
3. Attach the fabric top to the
frame by matching hook and
loop attachment straps on top of
hook and loop strips on the
frame. Push firmly together at
each corner.
3
1. With your partner on the
opposite side of the shelter,
grasp the top and bottom of the
diamond shaped area of the
truss on opposite sides. Lift up
and step backward until the
shelter is 3/4 opened, being
careful not to pinch your fingers.
First Time Top Attachment
How to Set Up
2
2. Gently unfold the fabric top and
place it over the open frame.
1
2. To engage the Pull Pin Slider at
each corner, first lift the fabric off
the slider, then with one hand
hold the top of the leg while
pushing up on the slider with the
other hand. The Pull Pin will
engage the hole. Pull down the
valance fabric over the slider.
Repeat on all four corners.
2
2. With your partner, slightly lift up
two adjacent outer legs,
depress the snap button and
telescope inner legs into the
outer legs. Repeat on the
opposite legs.
4. Grasp the top and bottom of
diamond shaped truss by the
close labels. Lift the shelter up
slightly and shake it while
stepping towards your partner
until the unit is 3/4 closed. With
each partner grasping two
outer legs, push the frame
together to fully close it.
Be careful not to pinch
fingers! Store the shelter in the
carry bag.
4
How to Take Down
3
3. Release Pull Pin at each corner
by first lifting valance fabric
away from slider. With one
hand push up on the truss near
the Pull Pin. Pull the pin out to
release.
Note: It is much easier to
release the Pull Pin when the
shelter weight has been
removed from the Pull Pin.
3. Lift the outer legs up and slide
out the inner legs until the snap
button locks in the outer legs.
Repeat on the opposite legs.
3
4. Insert the stake through the
hole in each footplate. Push in
with either your foot or a
hammer on harder surfaces
until fully engaged.
2
1. Pull each stake out of the
ground.
4
1
4
1
2. Open the roller bag by
unzipping the end by the
wheels.
3. Place the open end of the
roller bag over the top of the
shelter and slide the roller bag
down until the shelter is
completely covered.
3
6. Roller bag is designed to be
pulled by the handle.
5. Close the roller bag.
6
1. Close your shelter completely
as shown in the picture.
ROLLER BAG INSTRUCTIONS
5
2
Printed in China
4. Turn the shelter upside-down
by carefully placing it on its
side. With knees bent, place
your hands underneath the
shelter. Lift and walk forward
until it is upright.
Note: Make sure to bend your
knees slightly so that back
strain does not occur.
4

This manual suits for next models

1

Other Garden Treasures Tent manuals

Garden Treasures S-J-110 User manual

Garden Treasures

Garden Treasures S-J-110 User manual

Garden Treasures TSF1212-RE User manual

Garden Treasures

Garden Treasures TSF1212-RE User manual

Garden Treasures GSS00132AE User manual

Garden Treasures

Garden Treasures GSS00132AE User manual

Garden Treasures GSS00133AC User manual

Garden Treasures

Garden Treasures GSS00133AC User manual

Garden Treasures URM81903A User manual

Garden Treasures

Garden Treasures URM81903A User manual

Garden Treasures 159081 User manual

Garden Treasures

Garden Treasures 159081 User manual

Garden Treasures GSS00133AC Use and care manual

Garden Treasures

Garden Treasures GSS00133AC Use and care manual

Garden Treasures 159083 User manual

Garden Treasures

Garden Treasures 159083 User manual

Garden Treasures C-909E-1N User manual

Garden Treasures

Garden Treasures C-909E-1N User manual

Garden Treasures 0149646 User manual

Garden Treasures

Garden Treasures 0149646 User manual

Popular Tent manuals by other brands

Dancover STORAGE TENT PVC 4 quick start guide

Dancover

Dancover STORAGE TENT PVC 4 quick start guide

The No Bake Tent The No Bake Tent instruction manual

The No Bake Tent

The No Bake Tent The No Bake Tent instruction manual

Trakker TEMPEST BROLLY V2 Assembly instructions

Trakker

Trakker TEMPEST BROLLY V2 Assembly instructions

Snugpak JOURNEY SOLO Assembly instructions

Snugpak

Snugpak JOURNEY SOLO Assembly instructions

Eureka Tundraline Assembling instructions

Eureka

Eureka Tundraline Assembling instructions

Gutta 7310209 Assembly instructions

Gutta

Gutta 7310209 Assembly instructions

Coleman KVIKA TENT 8'X8' user manual

Coleman

Coleman KVIKA TENT 8'X8' user manual

Kiwi Camping Kingfisher 2 Pitching instructions

Kiwi Camping

Kiwi Camping Kingfisher 2 Pitching instructions

BigTop 92721 Assembly instructions

BigTop

BigTop 92721 Assembly instructions

James Baroud Vision 150 user guide

James Baroud

James Baroud Vision 150 user guide

SMRT TENT SKY LOFT owner's manual

SMRT TENT

SMRT TENT SKY LOFT owner's manual

23zero DUKE SWAG user manual

23zero

23zero DUKE SWAG user manual

Coopers of Stortford 11006 Instructions for use

Coopers of Stortford

Coopers of Stortford 11006 Instructions for use

Cabanon BORA BORA Instructions for setup

Cabanon

Cabanon BORA BORA Instructions for setup

ShelterLogic Shed-in-a-Box RoundTop Assembly instructions

ShelterLogic

ShelterLogic Shed-in-a-Box RoundTop Assembly instructions

Sealey CPS01 instructions

Sealey

Sealey CPS01 instructions

Just Kampers J39631 manual

Just Kampers

Just Kampers J39631 manual

Carefree ASCENT Service manual

Carefree

Carefree ASCENT Service manual

manuals.online logo
manuals.online logoBrands
  • About & Mission
  • Contact us
  • Privacy Policy
  • Terms and Conditions

Copyright 2025 Manuals.Online. All Rights Reserved.