GARDENTEC GTT4002 User manual

GTT4002
USER’S MANUAL
GASOLINE TILLER
Please read and save this user’s manual.Read carefully before
attempting to assemble,install,operate or maintain the product described.

2

3

4

5

6
Dear customer,
Thank you for placing your trust in our product!
Before using the product for the fist time, please make sure you read these operating
instructions! Here you will find information about how to use the product safely and
ensure its long service life. You should pay attention to all of the safety instructions in
this document!
__________________________
Table of contents
Before you begin ............................................................................................. 7
Intended use ....................................................................................................... 7
What are the meanings of the symbols used? .................................................... 8
For your safety ................................................................................................ 8
General safety instructions .................................................................................. 8
Risks caused by vibrations .................................................................................... 10
Concerning the use of fuels ................................................................................. 10
Maintenance ....................................................................................................... 11
Device-specific safety instructions ...................................................................... 11
Personal protective clothing ............................................................................... 13
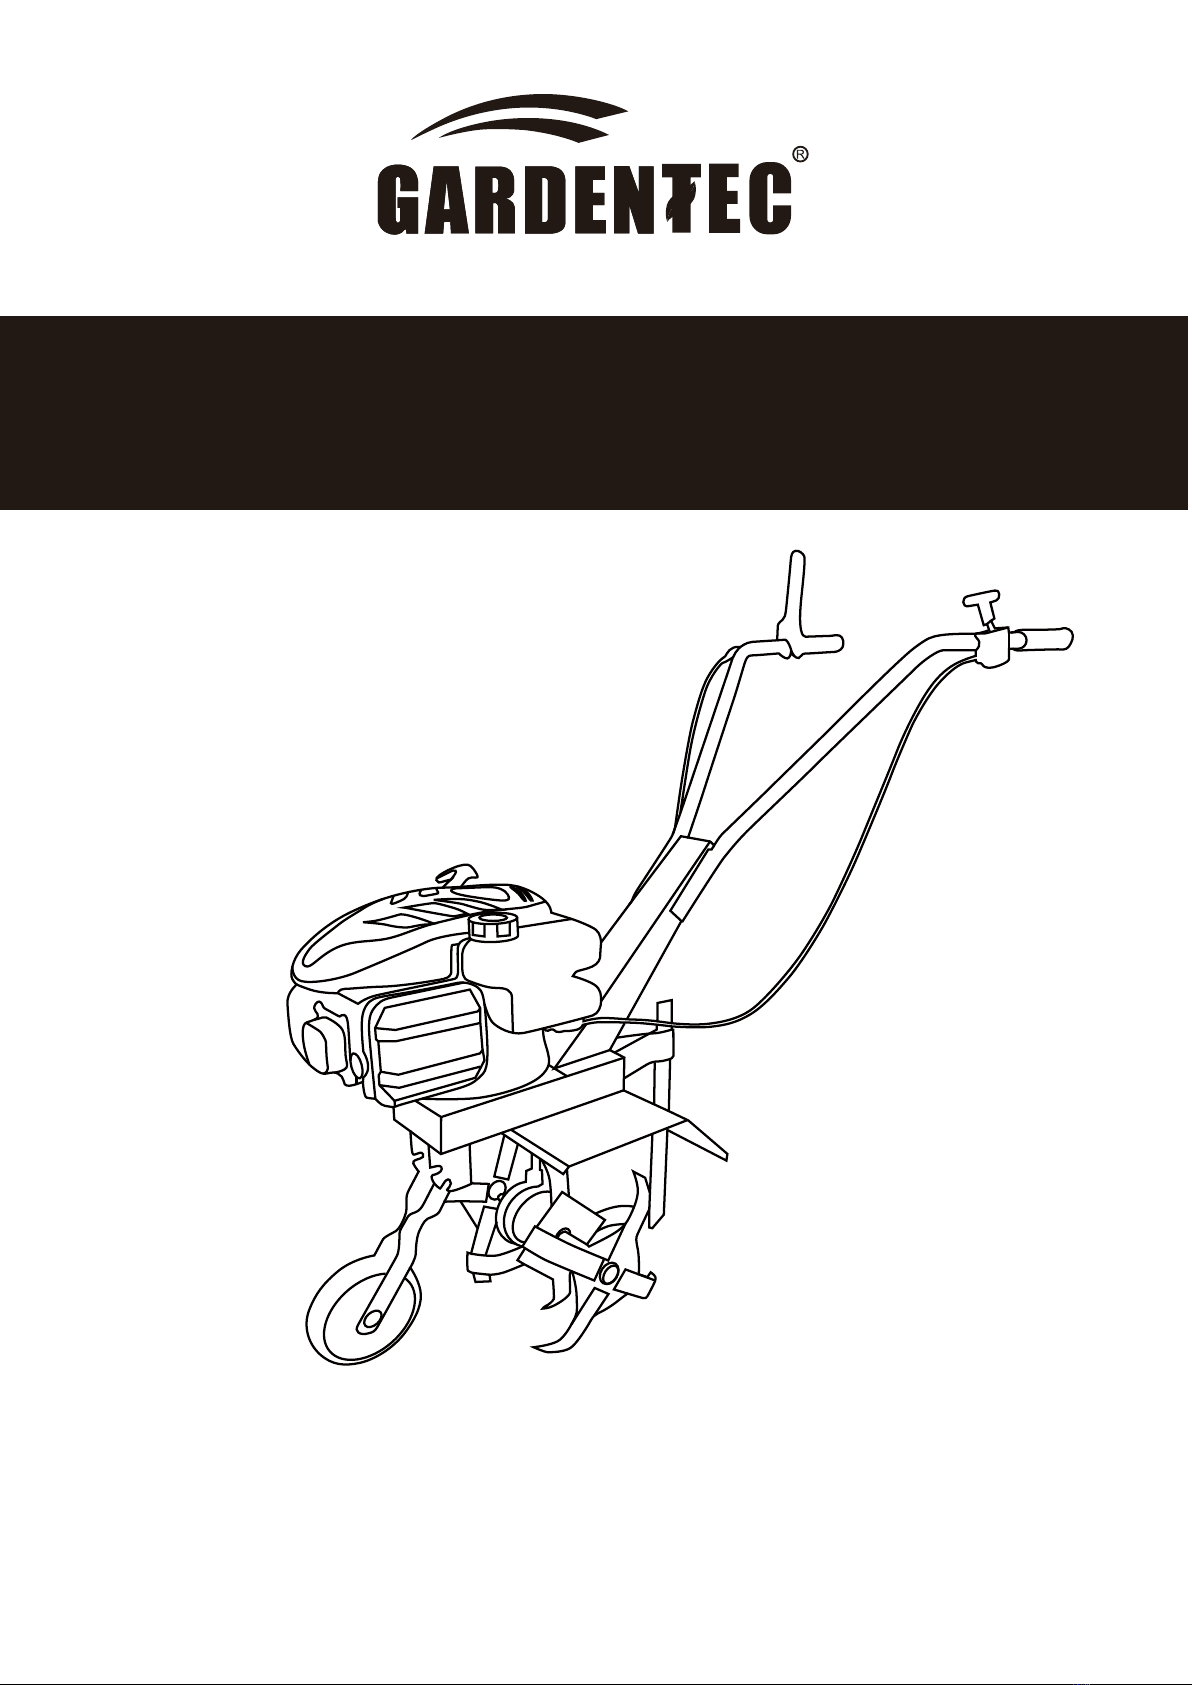
Your device at a glance .........................................................................................13
Motorised hoe ................................................................................................... 13
Motor ................................................................................................................ 14
Scope of delivery ............................................................................................... 14
Assembly ............................................................................................................. 14
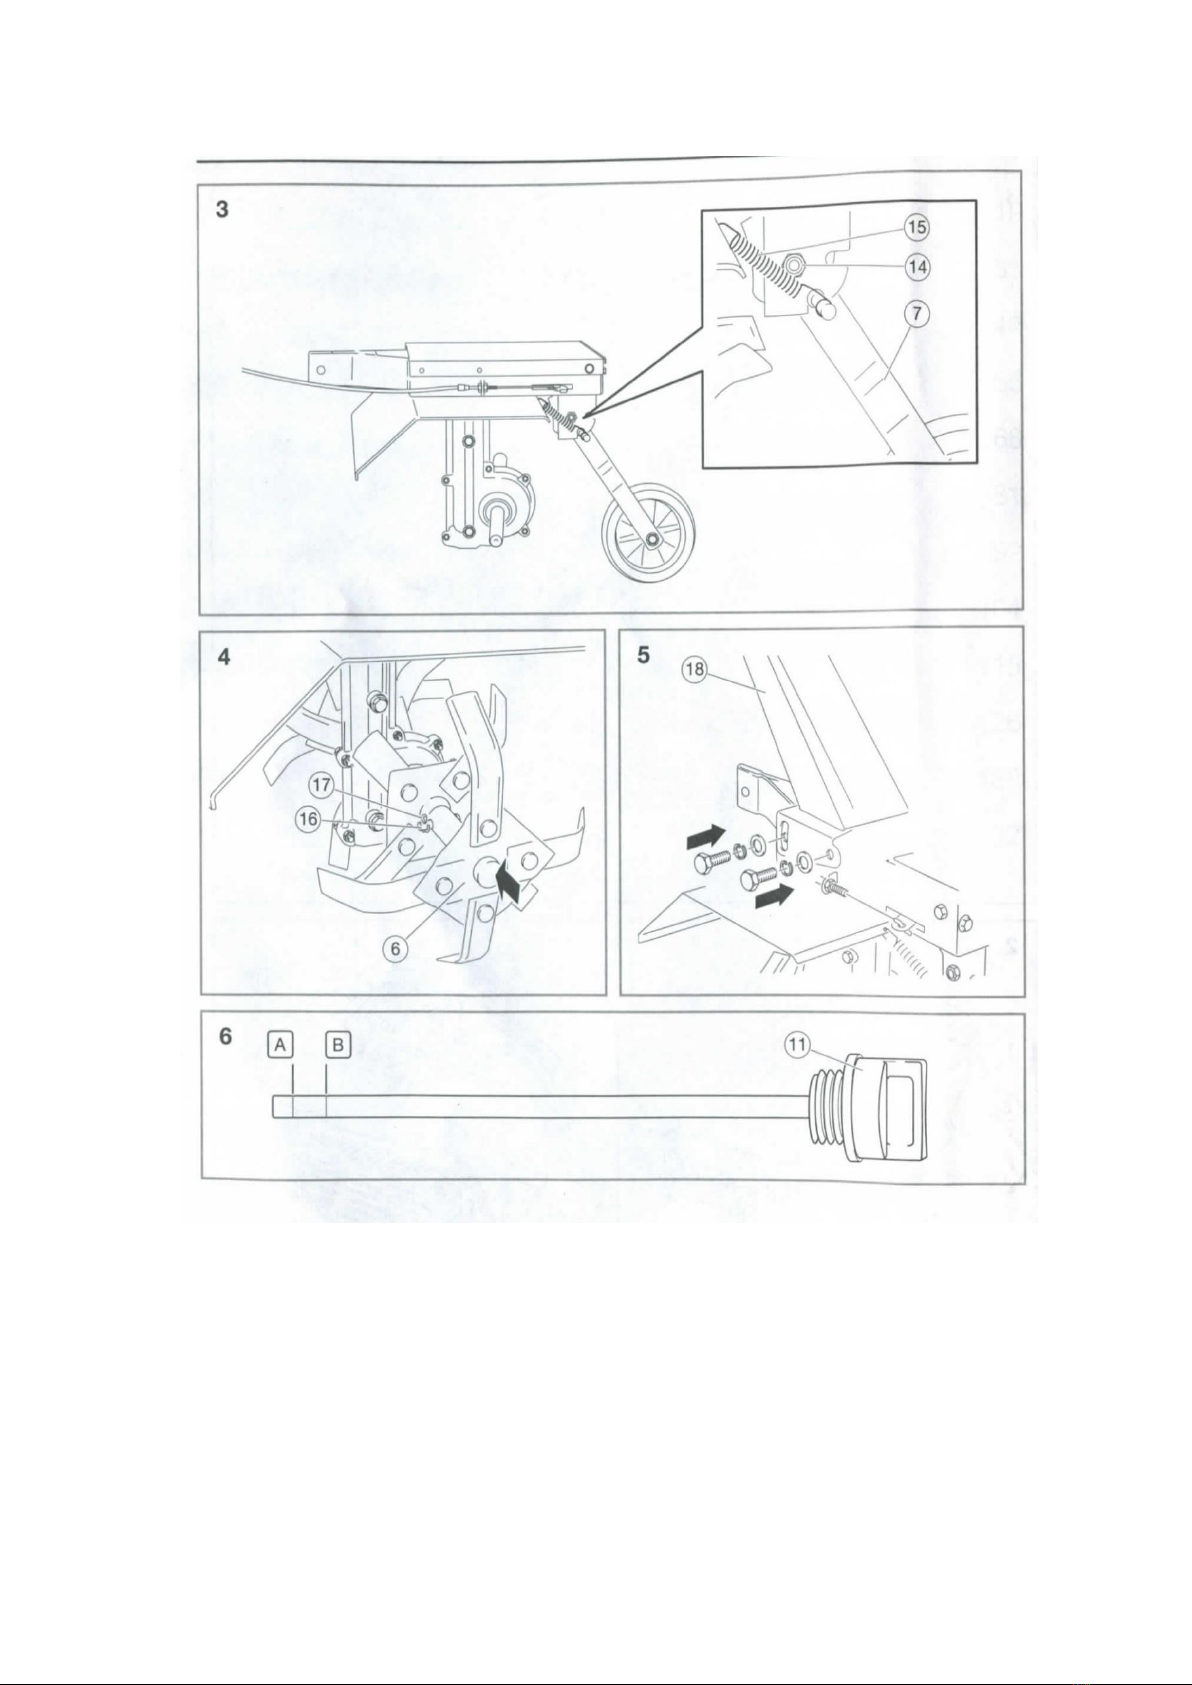
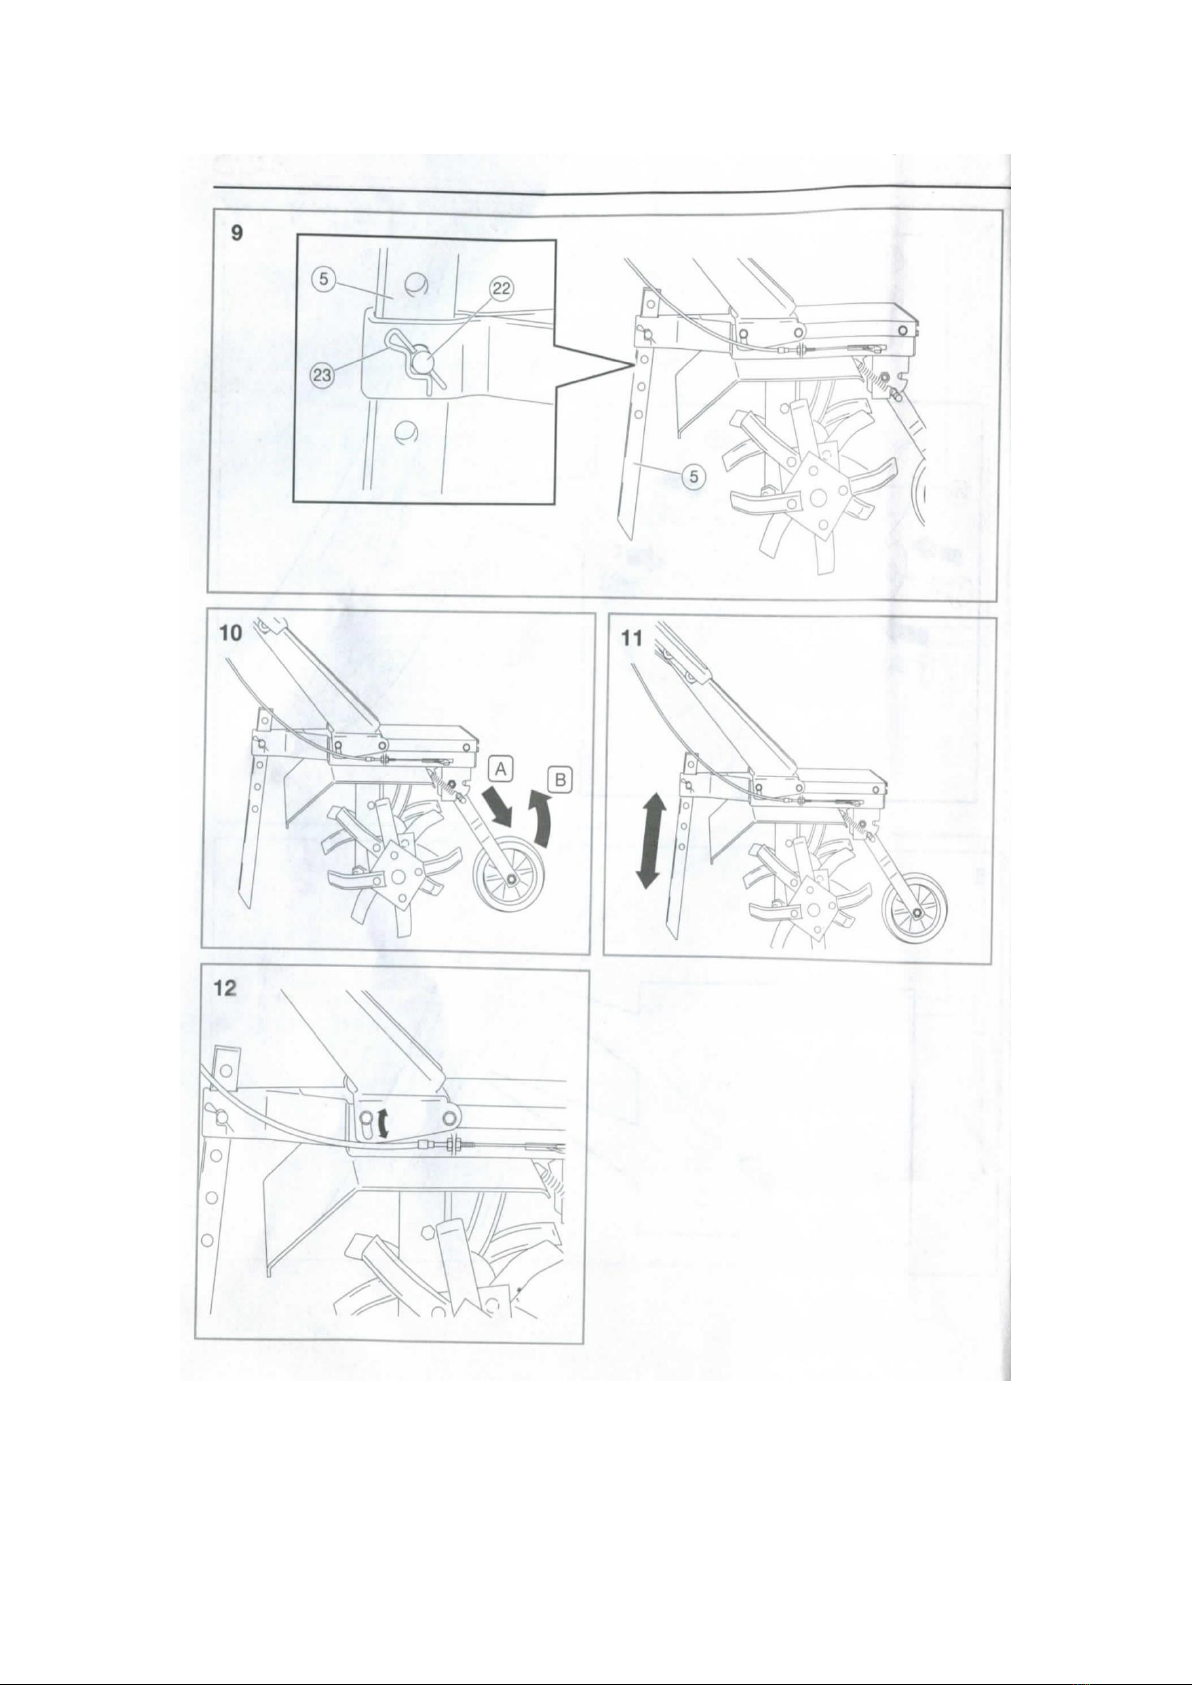
Mounting the front wheel................................................................................. 14
Mounting the chopping tool ............................................................................. 14
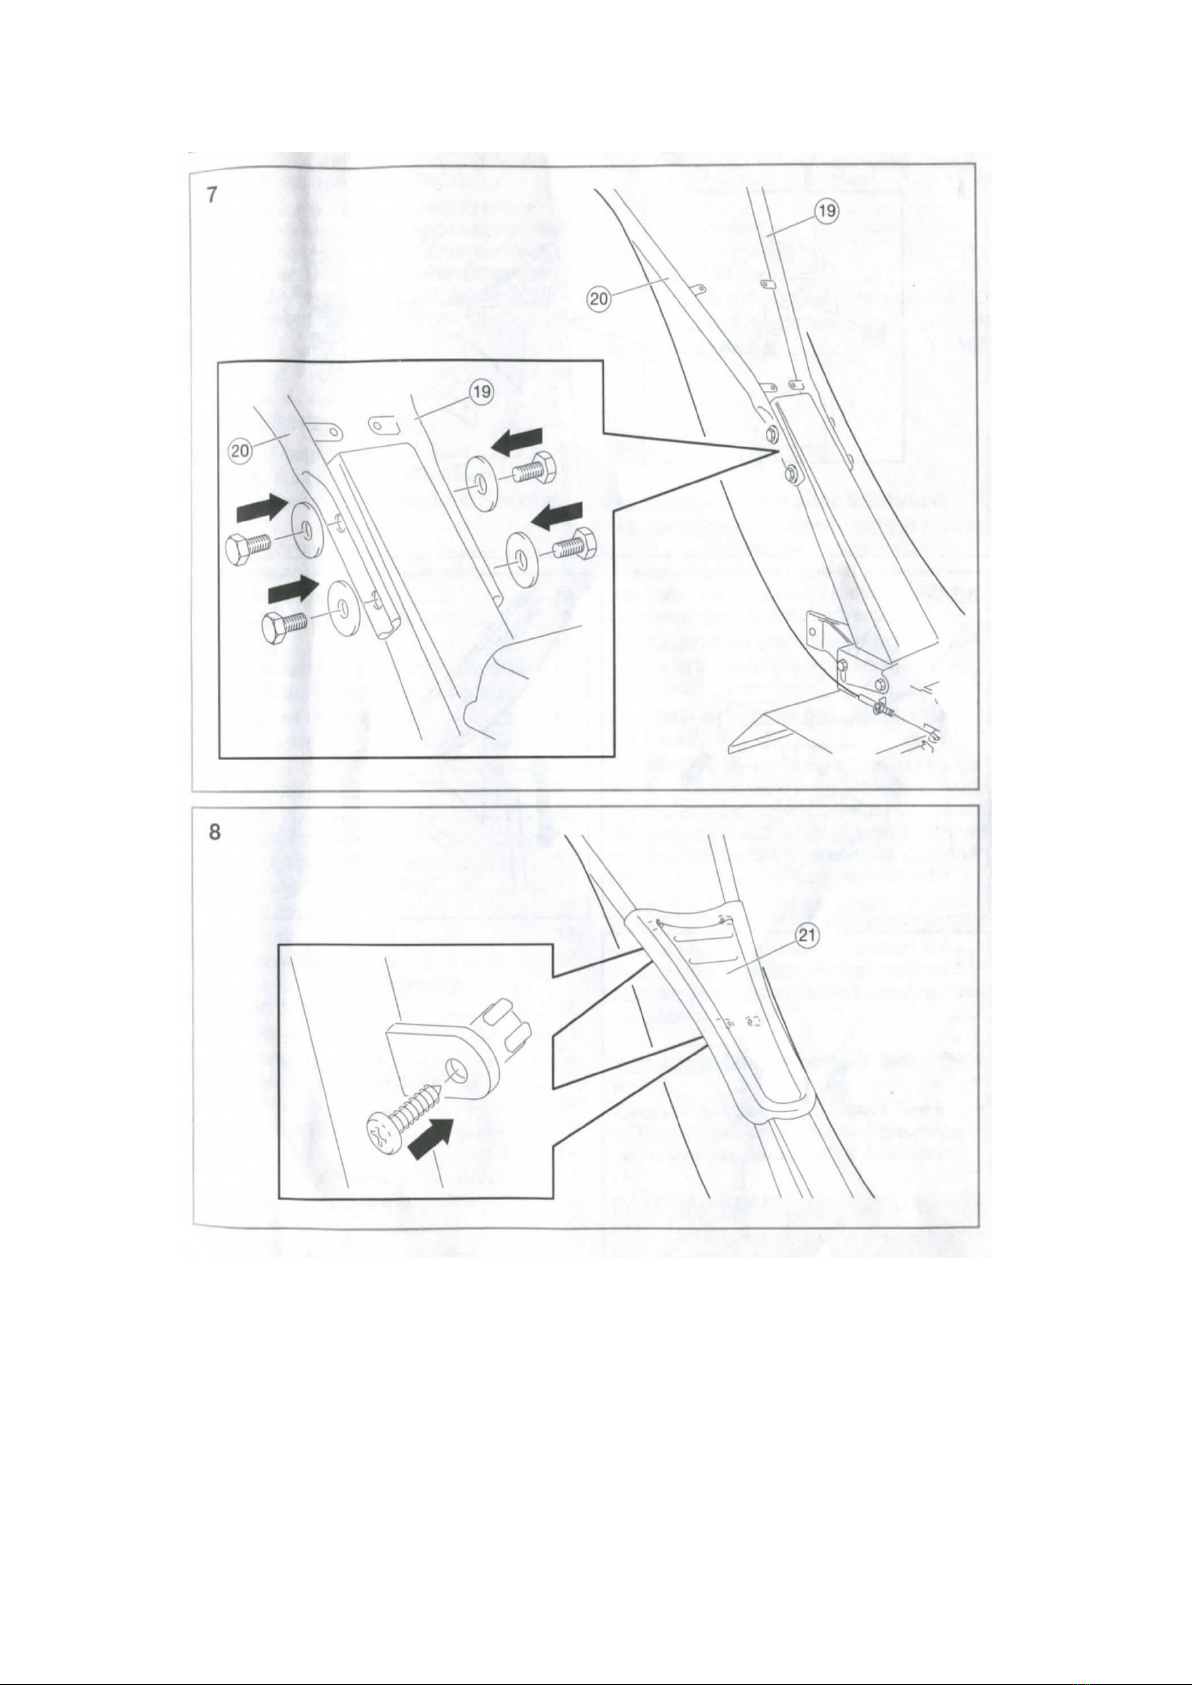
Mounting the steering connector ..................................................................... 15
Mounting the steering ...................................................................................... 15
Mounting the chopping spur ............................................................................. 15
Initial start up ................................................................................................... 15
Unit and operating elements ........................................................................... 15
Filling with fuel ................................................................................................ 16
Filling with motor oil ....................................................................................... 17
Operation ................................................................................................... 17
Check before starting the device! .................................................................. 17
Starting the engine ........................................................................................ 18
Switching off the motor ................................................................................ 19

7
Chopping ....................................................................................................... 19
Cleaning and maintenance ........................................................................ 20
Cleaning and maintenance overview ........................................................... 21
Cleaning the device ...................................................................................... 21
Cleaning the air filter .................................................................................... 21
Checking the level of motor oil ..................................................................... 22
Cleaning/replacing spark plugs ....................................................................... 22
Storage, transportation ...................................................................................... 23
Storage .............................................................................................................. 23
When taken out of operation ........................................................................... 23
Troubleshooting .......................................................................................... 23
What to do when something doesn’t work ..................................................... 23
Disposal ............................................................................................................. 25
Disposal of the appliance ................................................................................ 25
Disposal of the packaging ............................................................................... 25
Technical data .............................................................................................. 25
Fuel and lubricants to be used ....................................................................... 26
Instructions for fuels ...................................................................................... 26
_____________________
Before you begin...
Intended use
When used the its intended purpose, this device corresponds to the state of the
art,as well as to the current safety requirements at the time of its introduction.
The unit is designed to loosen and prepare the soil for garden and landscaping.
The device is not suitable for commercial or industrial use.
Any other type of use is inappropriate.
Improper use or modifications to the device or the use of components that are not
tested and approved by the manufacturer may result in unforeseen damage!
Any use that deviates from its intended use and is not included in these instructions
is considered unauthorised use and relieves the manufacturer from his or her legal
liability.
What are the meanings of the symbols used?
Danger notices and information are clearly marked throughout these instructions for
use. The following symbols are used:

8
DANGER!
Direct danger to life and risk of injury!
Directly dangerous situation that may lead to death or severe injurise.
WARNING!
Probable danger to life and risk of injury!
Generally dangerous situation that may lead to death or
severe injuries.
CAUTION!
Possible risk of injury!
Dangerous situation that may lead to injuries.
NOTICE!
Risk of damage to the device!
Situation that may lead to property damage.
Note:
Information to help you reach a better understanding of the processes
involved.
These symbols identify the required personal protection equipment:
_______________________
For your safety
General safety instructions
To operate this device safety, the user must have read and understood these
instruction for use before using the device for the time.
Observe all safety instructions! Failure to do so may cause harm to you and
others.

9
Retain all instructions for use, and safety instructions for future reference.
If you sell or pass the device on, you must also hand over these operating
instructions.
The device must only be used when it functions properly. If the device or part of
the device is defective, have it repaired by a specialist.
Never use the device in a room where there is a danger of explosion or in the
vicinity of flammable liquids or gases.
Danger of suffocation caused by exhaust fumes! Starting the motor and using
the device inside closed rooms is prohibited.
The motor should be switched off:
- whenever you leave the machine unattended
- before you refill it
When the motor is switched off, close the throttle. If the machine has a petrol
feed tap, this should be closed when you finish working.
Never store the unit with fuel in the tank inside a building in which furl vapours
may come into contact with naked flames or sparks or may inflame.
Always allow the motor to cool down before putting the unit into a close space.
To prevent risks of fire, ensure that both the motor and the exhaust are free of
plant materials or leaking oil.
Always ensure that a device which has been switched off cannot be restarted
unintentionally.
Do you use devices with an on/off switch that does not function correctly.
Keep children away from the device!
Keep the device out of the way of children and other unauthorised persons.
Do not overload the device. Do not use the device for purposes for which it is
not intended.
Make sure to always wear the required personal protective equipment.
Exercise caution and only work when in good condition: If you are tired, ill, if you
have ingested alcohol, medication or illegal drugs, do not in a condition to use it
safely.
This product is not intended to be used by persons(including children) or who
are limited in their physical, sensory or mental capacities or who lack experience
and/or knowledge of the product unless they are supervised, or have been
instructed on how to use the product, by a person responsible for their safety.
Ensure that children are not able to play with the device.
Always comply with all applicable domestic and international safety, health, and
working regulations.
Risks caused by vibrations

10
CAUTION!
Risk of injury due to vibrations!
Vibrations may, in particular for persons with circulation problems,
cause damage to blood vessels and/or nerves.
If you notice any of the following symptoms, stop working immediately
and consult a doctor. Numbness of body parts, loss of sense of feeling, itching, pins
and needles, pain, changes in skin colour.
The vibration values specified in the technical data represent the main uses of the
device. The actual existing vibrations during use may deviate from these as a result of
the following factors:
Incorrect use of the products;
Unsuitable tools inserted;
Unsuitable material;
Insufficient maintenance.
You can reduce the risks considerably by following the tips below:
- Maintain the device in accordance with the instructions in the operating
instructions.
- Avoid working at low temperatures.
- When it is cold, make sure your body and you hands, in particular, are kept worm.
- Take regular breaks and move your hands at the same time to promote circulation.
Concerning the use of fuels
Fuels are inflammable and explosive.
Reduce the risk of explosion and fire as follows:
Turn off and cool the motor down before filling the tank with fuel.
Refrain from smoking and starting open fires when handling fuels.
Store and mix fuels in approved and correspondingly labelled canisters.
Store fuels in closed containers. Keep in mind that fuels may also evaporate at
room temperature and collect on the floor of closed rooms(risk of explosion).
Do not open the tank lid or refill with petrol when the motor is running or even
when it is not.
If petrol is spilled, do not attempt to start the motor.
Start the machine at least nine meters away from the fuelling location.
If you need to empty the tank, do so out in the open.
Fuels are toxic! They contain substances that have an immediate toxic
effect and may also cause permanent damage to your health. Take all
precautionary measures to prevent your body from absorbing any of
these substances:

11
Tank and siphon fuels only outdoors or in well-ventilated rooms.
Do not inhale fuel fumes.
Avoid contact with eyes and skin. If contact occurs, thoroughly rinse with water.
If contact with eyes occurs, seek immediate medical attention.
Wear gloves when transferring fuel.
When fuel has come into contact with your clothes, change them immediately.
Clean your clothes before putting them back on.
Store fuel out of the reach of children.
When handled inappropriately, fuels may cause damage to the
environment:
Use caution when siphoning fuels. Fuel must never seep into the ground or the
sewage system.
Dispose of any remaining fuel in an appropriate manner. Never dispose of fuel
with regular household waste.
Fuels may be stored only for a limited time. Never buy more fuel that you plan
on consuming within the next few months.
Maintenance
Before conducting an maintenance on the device, always set the ignition switch
to [0] and pull the ignition cable plug.
Check the fuel system regularly for leaks or defective parts.
Only those maintenance and fault elimination tasks described here may be
carried out. Any other tasks must be completed by a specialist.
Only use original replacement parts. Only these replacement parts are designed
and suitable for the device. Other replacement parts will not only lead to an
invalidation of the warranty, they may also endanger you and your environment.
Device-specific safety instructions
Make sure that flammable materials or materials that may explode are kept out
of the vicinity.
The unit may not be operated without the protective mechanism fitted.
Take care when using rotating tools - keep a safe distance.
Start the motor carefully in accordance with the instructions from the
manufacturer and ensure that there is plenty of space between your feet and
the tool(s).
Ensure that all nuts, bolts and screws are tightened and the unit is in a safe
operating state.
All components of the device must be assembled correctly in order to ensure
trouble-free operation.
Before using, carry out a visual check to make sure that the tools are not worn or
damaged. In order to avoid imbalance, worn or damaged parts and fixing bolts
may only be replace in sets.

12
Take care when tools are slowing down after being stopped. Before doing any
work on these tools, wait until they have come to a complete standstill.
Never leave the unit unattended when the motor is running.
When working, always wear study shoes and long trousers. Never operate the
machine with bare feet or in light-weight sandals.
Never allow children or other people who are not familiar with operating
instructions to operate the machine. Regional legislation may specify the
minimum permitted age of the user.
Never work when other people, particularly children , or animals are in the
vicinity.
Check the site you wish to process with the machine, before you do so, and
remove all objects that may be thrown up by the machine.
Only work in a daylight or with good lighting.
Ensure that you are standing firmly when operating on slopes.
Only operate the unit at walking speed.
Work across the slope, never up or down slope.
Be particularly careful when changing direction on a slope.
Do not work on very steep slopes.
Be particularly careful when turning the machine or pulling it towards you.
Never put hands or feet onto or under rotating parts.
Never left or carry the machine with the motor running.
Symbols affixed to your tools may not be removed or covered. Information on
the device that is no longer legible must be replaced immediately.
Before putting the unit into operation, read the instructions for use.
Risk of injury due to flying parts!
Always maintain a sufficient safety distance.
Risk of injury caused by rotating machine parts!
Before carrying out maintenance work, remove the ignition cable and
read the operating instructions.
Be careful when handing lubricants and fuels!

13
Personal protective clothing
Wear hearing protection when using the device.
Wear robust footwear when using the device.
Wear closely fitting clothes when using the device.
Wear eye protection when using the device.
Wear protective gloves when using the device.
________________________
Your device at a glance
Motorised hoe
▶P.2, item 1
1. Coupling handle
2. Gas handle
3. Steering
4. Motor
5. Choppong spur
6. Chopping tool
7. Front support wheel
Motor
▶P.2, Item 2
8. Fuel filter nozzle
9. Starter cord

14
10. Air filter cover
11. Motor oil filling screw
12. Exhaust
13. Ignition cable connector
Scope of delivery
Motorised hoe
Front wheel unit
Steering bars(2 X)
Steering cover
Spark plug wrench
Steering connector
Dual key
Operating manual
Note:
If any of the parts is missing or damaged, contact the retailer.
________________________
Assembly
Mounting the front wheel
▶P.3 , item 3
- Screw the front support wheel (7) using the hexagonal screw and nut(14) to the unit
as shown.
- Fit the tension spring(15).
Mounting the chopping tool
▶P.3 item 4
- Slide the chopping tool(6) onto the axle.
- Slide bolts(16) through the opening in the chopping tool(6) and axle.
- Fix the bolts(16) into place using the securing pin(17).
Mounting the steering connector
▶P.3 , item 5

15
- Fit the steering connector(18), as shown, to the motor hoe.
- Use hexagonal screws, spring washers and washers to mount on both sides.
Mounting the steering
▶P.4, item 7
- Hold the left steering bar(19) up against the side of the unit and secure with
hexagonal screw and washers.
- Do the same for the steering bar on the right (20).
▶P.4, item 8
- Fit the steering cover (21) and screw into place from behind using 4 screws.
Mounting the chopping spur
▶P.5, item 9
- Fit the chopping spur(5).
- Put the bolts (22) through holder and spur at the required height.
- Use a pin(23) to fix the bolt into place.
___________________________________
Initial start up
Unit and operating elements
Steering
Set the steering height:
▶P.5, item 12
- Loosen the screws.
- Set the required steering height.
- Tighten the screws.
Gas handle
Gas handle at position[ STOP ] = Motor off;
Gas handle at position[ ] =Minimum motor revolution;
Gas handle at position[ ] =Maximum motor revolutions;
Coupling handle

16
When the coupling handle is released, the cable pull must be completely relaxed;
When the coupling handle is pulled, the cable pull must be tensioned in such a way
that the spring on the coupling handle starts to extend.
Coupling handle pulled =Chopping tool turns;
Coupling handle released (position [stop ] ) =Unit is running in idle.
Front support wheel
▶P.5, item 10
The front support wheel makes it easier to push the unit. When chopping, it must be
folded upwards.
- Loosen the screw.
- Pull the front support wheel from the fixed position[A].
- Fold the front support wheel upwards [B] and click into place.
- Tighten the screw up again.
Chopping spur
▶P.5, item 11
The forwards movement of the unit is braked by the chopping spur. The required
chopping depth is achieved by digging the spur into the ground at different depths.
(▶Mounting the chopping spur - p.15)
Filling with fuel
DANGER!
Risk of injury!
Petrol is extremely flammable!
- Switch off the motor and allow to cool down before refilling.
- Observe all of the safety notes for handling fuels.
Notice!
Risk of damage to the device!
The unit is delivered without motor oil.
Motor oil must be filled before starting the machine.

17
Note:
Only use suitable fuels (▶Fuel and lubricants to be used - p. 26).
- Unscrew the tank lid (8) and remove.
- Carefully pour fuel into the tank (max. 800ml). Do not spill!
- Check the seal in the tank lid for damages, and clean if necessary. Immediately
replace damaged seals!
- Tighten the tank lid (8) by hand.
Filling with motor oil
- Unscrew the motor oil filling screw (11) and remove.
- Fill with motor oil carefully (approx. 600ml). Do not spill!
- Tighten the motor oil filling screw (11) up again by hand.
Operation
Check before starting the device!
NOTICE!
Risk of damage to the device!
The unit is delivered without motor oil.
Motor oil must be filled before starting the machine.
Operating the motor with insufficient oil will damage the motor.
Direct oil and oil designed for two-stroke motors will shorten the lifetime of
the motor.
Use the prescribed motor oil(▶Fuel and lubricants to be used - P.26).
DANGER!
Risk of inquiry!
The device may only be put into operation if there are no defects. If a
part is defective, it must be replaced before the device is used again.

18
Check to make sure the device is in safe operating condition:
- Check that no leaks have developed.
- Check to make sure there are no visible defects.
- Check to make sure all device components are correctly mounted.
- Check to make sure the safety mechanisms are functioning properly.
Starting the engine
Danger!
Danger of fire!
Any spilled fuel may cause the device to catch fire.
Before starting, make sure you have wiped away any spilt fuel carefully.
Start the device at least nine metres from the place you filled it.
Notice!
Risk of damage to the device!
The lifetime and the operating safety of the motor are closely linked to
The starting time. Allow a cold motor to warm up for a few minutes and
do not insist upon full performance immediately.
During the first 20 hours of operation(starting time) do not push the
Motor to the limits of its performance capabilities.
- Set the gas handle to [ ].
- Slowly pull the starter cord (9) out until the starter catches, then pull with force.
- If the motor does not start, set the gas handle to [ || ] , and repeat the start
process.
After starting the motor, set the required revolutions on the gas handle.
Switching off the motor
- Set the gas handle to [ STOP ].
DANGER!
Risk of injury!
Always switch the unit off, even if you only intend to stop using it for a

19
short period of time.
Chopping
Danger!
Risk of injury!
Before starting work check the area and remove all objects which may be
kicked up by he unit.
Danger!
Risk of injury!
When working, never let go of the steering.
Danger!
Risk of injury!
If use on a slope where there is a risk of slipping, the unit must be
secured by a second person with a bar or a rope. The second person must
be positioned above the unit and at a safe distance from the chopping
tool.
Always work at right angles to be slope, never work up and down. Be
particularly careful when changing direction.
DANGER!
Risk of injury!
Never clean the chopping tool when the motor is running. Switch off the
Motor and remove the spark plug connector. Remove trapped objects
only with the help of another object e.g.a wooden stick.

20
NOTICE!
Risk of damage to the device!
Do not move the unit with a rotating chopping tool over cement or asphalt
surfaces etc. Instead use the built-in front support wheel and make sure the
motor is switched off.
- Fold the front support wheel up (▶Front support wheel - p.16).
- Set the required chopping depth by adjusting the chopping spur(▶Chopping spur
- p.16).
- Starting the motor(▶Starting the engine - p.18).
- Pull the coupling handled and hold(▶Coupling handle - p.16).
- Set the require revolutions of the chopping tool on the gas handle.(▶Gas handle -
p.15).
____________________________
Cleaning and maintenance
Danger!
Risk of injury!
Prior to conducting maintenance or cleaning:
- Switch off the motor
- Allow the unit to cool down
- Removing the ignition cable
Danger!
Risk of injury!
Carry out the maintenance work described here in person.
All other work , in particular motor maintenance and repair, must be
carried out by a trained specialist.
Improper maintenance work can damage the device and lead to
injuries.
Table of contents
Other GARDENTEC Tiller manuals
Popular Tiller manuals by other brands

Brinly-Hardy
Brinly-Hardy AS-30 BH owner's manual

bannerman
bannerman BA-4 AIR-JECT Operator's manual and parts list

Swisher
Swisher E4-U3006 Owner's/operator's manual

Brinly-Hardy
Brinly-Hardy Thatcher 1690819 Operator's manual

Ivation
Ivation IVA1208TLR user guide

Craftsman
Craftsman 486.24003 owner's manual