GARDENTEC GTT6505 User manual

GTT6505
GASOLINE TILLER
USER’S MANUAL
Please read and save this user’s manual.Read carefully before
attempting to assemble,install,operate or maintain the product described.Protect yourself and others by observing all safety information.

This entire book is filled with important safety information--please
read it carefully.
INTRODUCTION
SAFETY MESSAGES
Safety Labels
Safety Messages
Safety Headings
Safety Section
Instructions --how to use this tiller correctly and safely.
Your safety and the safety of others are very important.And using this
tiller safely is an important responsibility.
To help you make informed decisions about safety,we have provided
operating procedures and other information on labels and in this
manual.This information alerts you to potential hazards that could
hurt you or others.
Of course,it is not practical or possible to warn you about all the
hazards associated with operating or maintaining a tiller.You must
use your own good judgment.
You will find important safety information in a variety of forms,
including:
-- preceded by a safety alert symbol and one
of three signal words: DANGER,WARNING,or CAUTION.
These signal words mean:
You WILL be KILLED or SERIOUSLY HURT if
you follow instructions.don't
You CAN be KILLED or SERIOUSLY HURT if
you don't follow instructions.
You CAN be HURT if you don’t follow
instructions.
--such as
IMPORTANT SAFETY INFORMATION.
--such as
TILLER SAFETY.
STORAGE
STORAGE PREPARATION..........................................................................31
STORAGE PRECAUTIONS..........................................................................35
TAKING CARE OF UNEXPECTED PROBLEMS............................................................36
CONTENTS
TILLER SAFETY .................................................................................................1
CONTROLS ........................................................................................................4
IMPORTANT SAFETY INFORMATION .... .......2.................................................
SAFETY LABEL LOCATIONS..........................................................................3
COMPONENT &CONTROL LOCATIONS.......................................................4
CONTROLS ....................................................................................................5
SETTING UP YOUR NEW TILLER ...................................................................7
WHEEL ASSEMBLY.......................................................................................8
BUMPER ASSEMBLY....................................................................................8
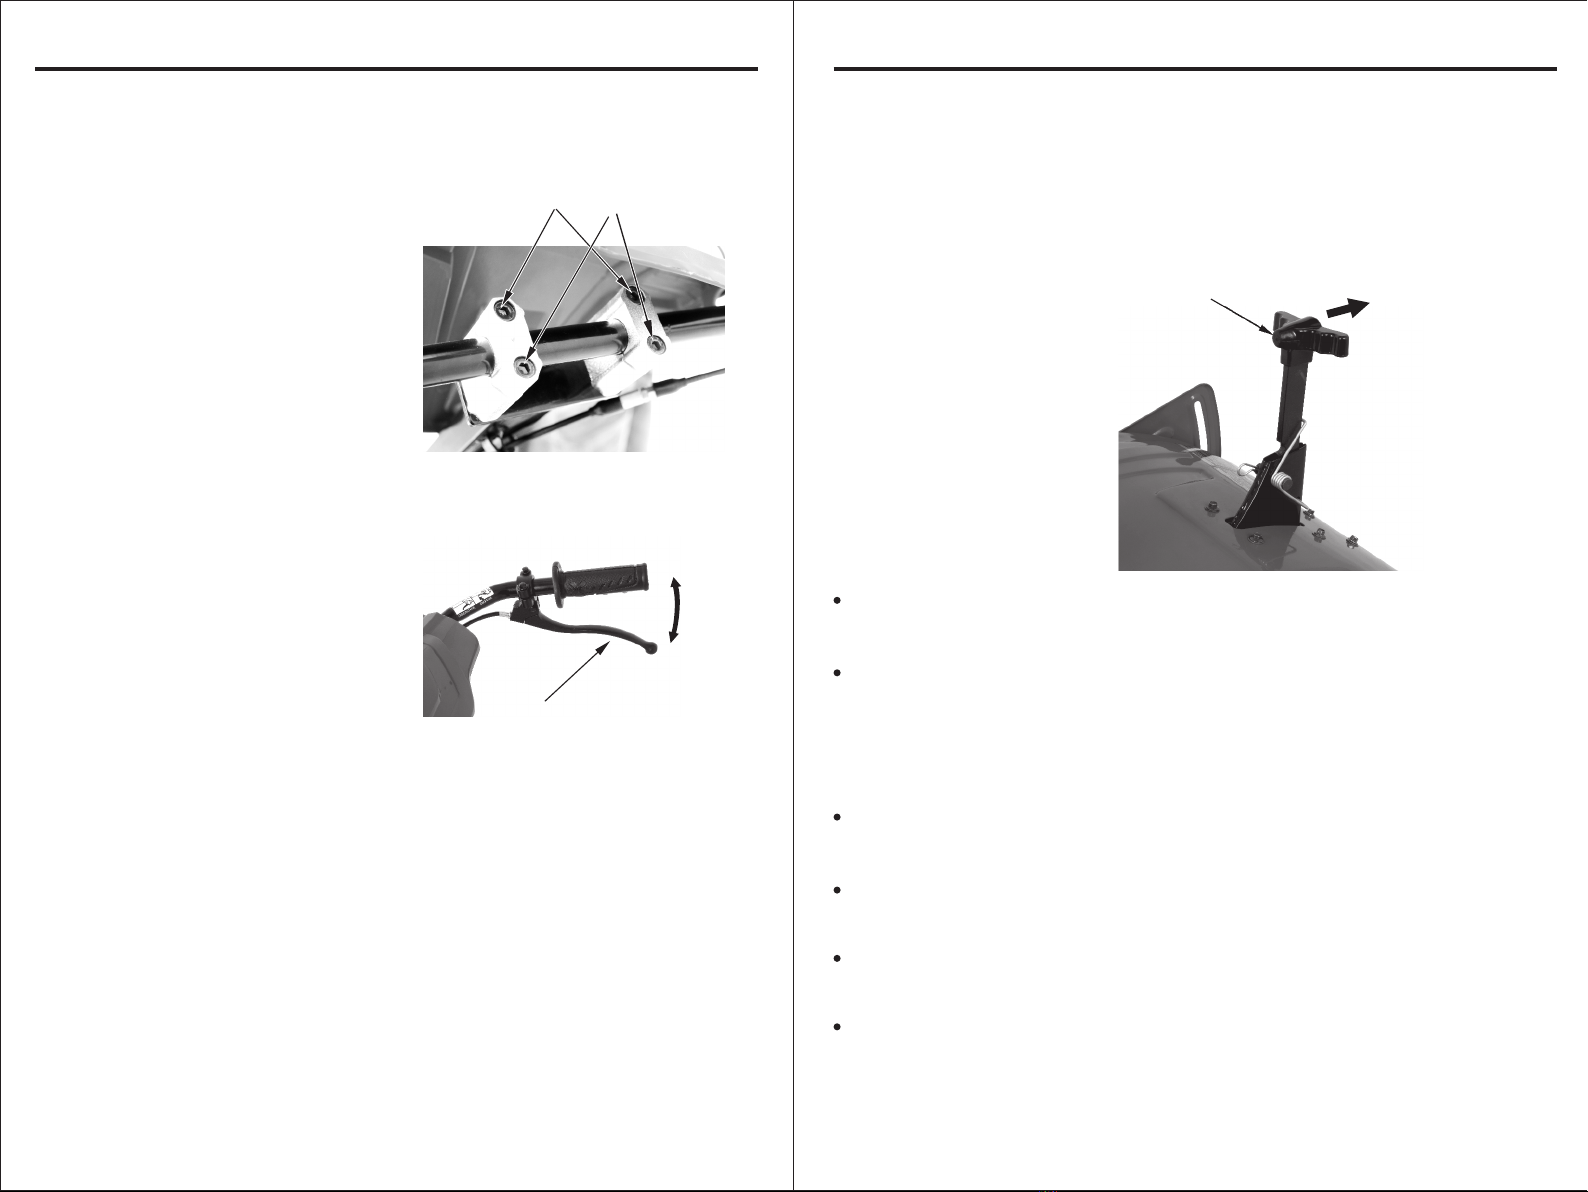
HANDLE BAR BRACKET ASSEMBLY ..........................................................7
REVERSE CA ASSEMBLY......................................................................7BLE
CLUTCH CA ASSEMBLY.........................................................................7BLE
BEFORE OPERATION.......................................................................................9
OPERATION.....................................................................................................10
ARE YOU READY TO GET STARTED...........................................................9
IS YOUR TILLER READY TO GO...................................................................9
SAFE OPERATING PRECAUTIONS............................................................10
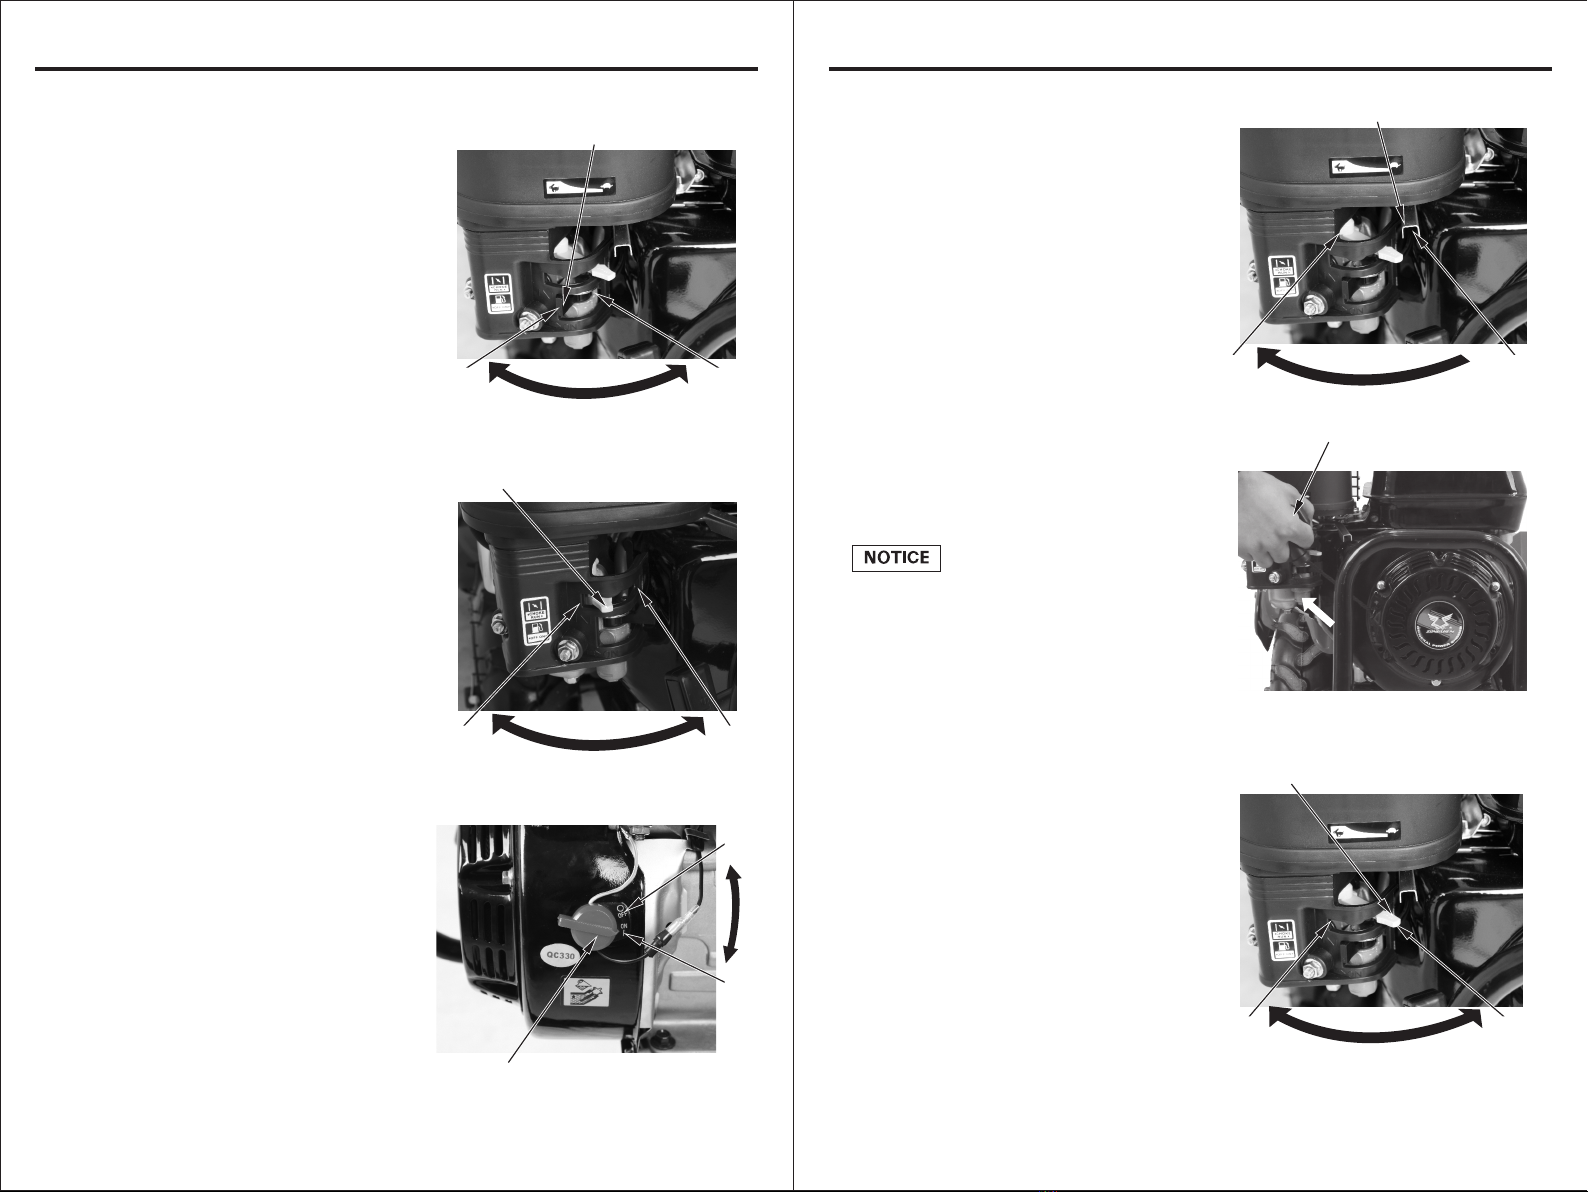
STARTING THE ENGINE..............................................................................10
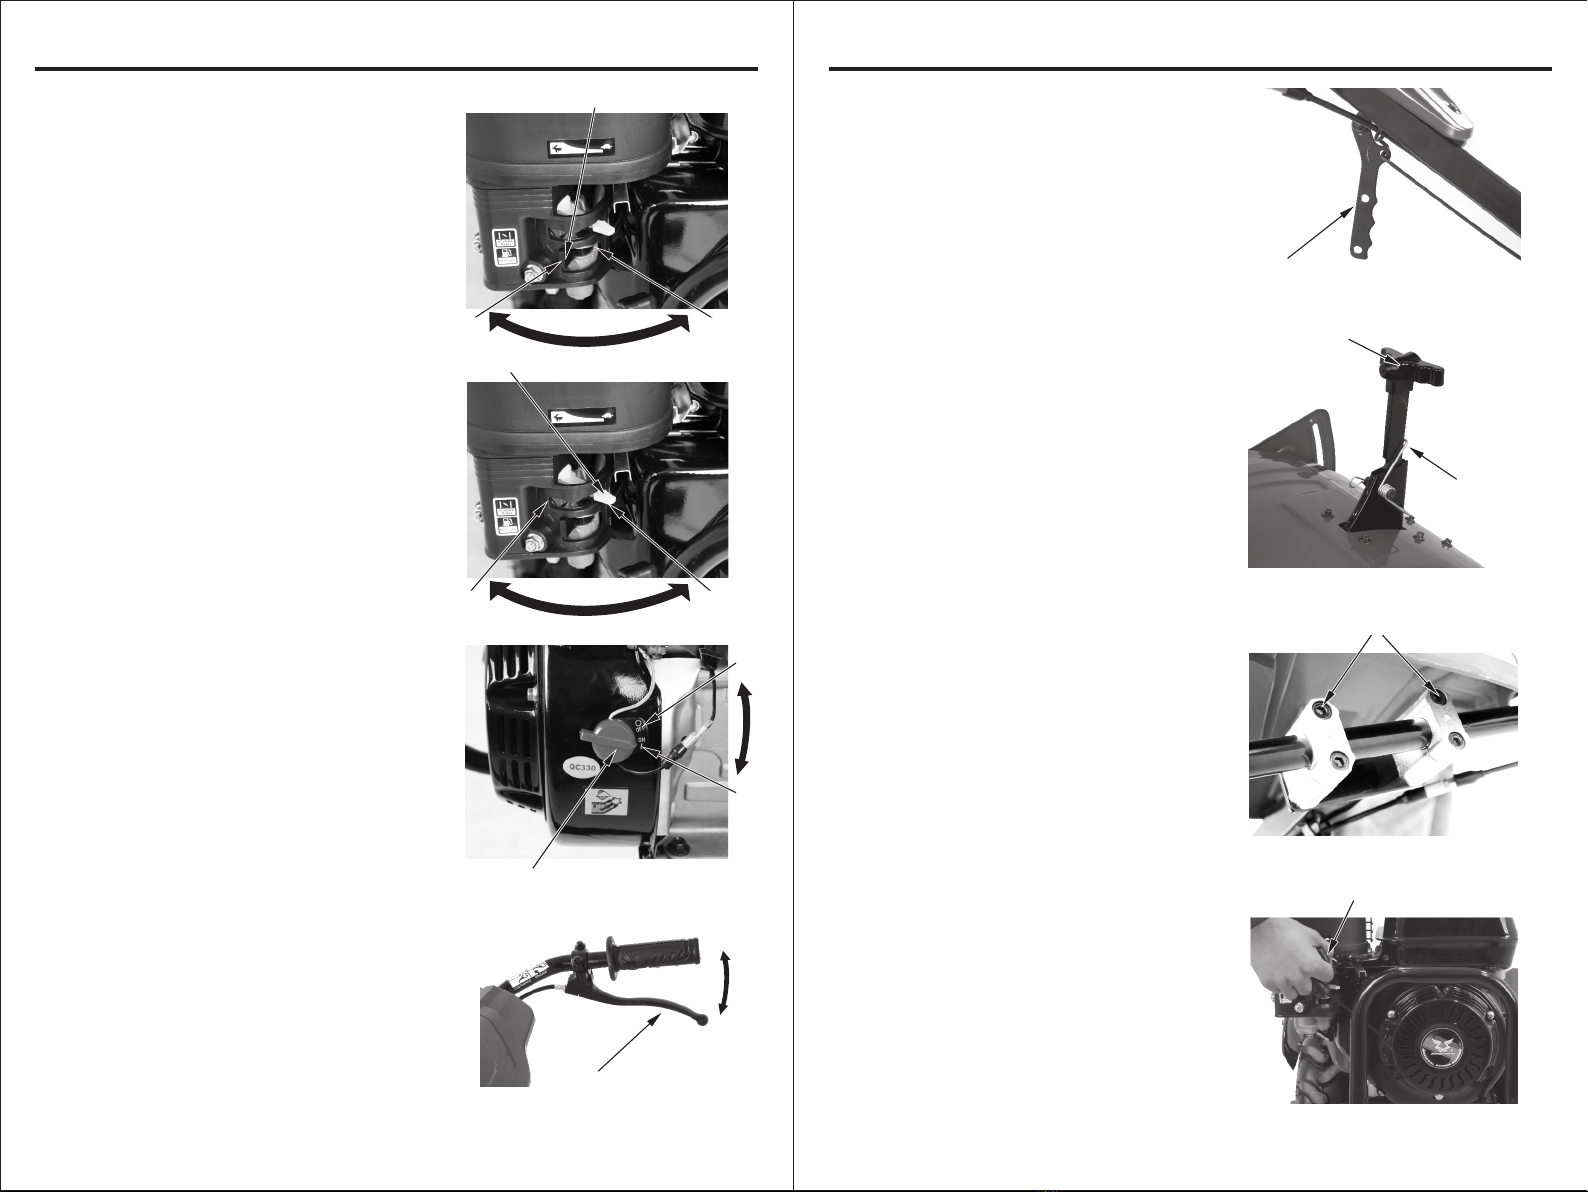
OPERATING THE CONTROLS FOR TILLING.............................................13
HANDLING TIPS...........................................................................................14
STOPPING THE ENGINE.............................................................................15
CLUTCH CABLE ADJUSTMENT...................................................................24
REVERSE CABLE ADJUSTMENT................................................................24
SERVICING YOUR TILLER.............................................................................16
THE IMPORTANCE OF MAINTENANCE.....................................................16
MAINTENANCE SAFETY.............................................................................17
MAINTENANCE SCHEDULE........................................................................18
REFUELING..................................................................................................19
FUEL RECOMMENDATIONS.......................................................................20
ENGINE OIL LEVEL CHECK........................................................................20
ENGINE OIL CHANGE..................................................................................21
ENGINE OIL RECOMMENDATIONS............................................................22
TRANSMISSION OIL RECOMMENDATIONS...............................................22
AIR FILTER INSPECTION.............................................................................23
AIR FILTER CLEANING................................................................................23
DRIVE BELT CHANGE.................................................................................26
TINE REPLACEMENT..................................................................................29
SPARK ARRESTER SERVICE (optional equipment ) ..................................29
TIRE PRESSURE CHECK............................................................................30
SPARK PLUG SERVICE...............................................................................24

1
IMPORTANT SAFETY INFORMATION
Operator Responsibility
TILLER SAFETY
Know how to stop the tiller quickly in case of emergency.
Understand the use of all tiller controls.
Be very cautious when operating the tiller in REVERSE,especially if
attachments are being used.
Keep a firm hold on the handlebars.They may tend to lift during
clutch engagement.
Be sure the drag bar is in place and properly adjusted.
Be sure that anyone who operates the tiller receives proper instruction.
Do not let children operate the tiller.Keep children and
pets away from the area of operation.
Tillers are designed to cultivate earth outdoors.Other uses can result in
injury to the operator or damage to the tiller and other property.
Most accidents can be prevented if you follow all instructions in this
manual and on the tiller.The most common hazards are discussed
below,along with the best way to protect yourself and others.
Avoid Rotating Tines
Rotating tines can cause serious cuts and even amputate body parts.
Keep away from the tine area whenever the engine is running.If you
need to work around the tines to clear an object accumulation or for
any other reason,always shut off the engine.Disconnect the spark
plug cap,and wear heavy gloves when you need to clean the tine area
or handle the tines.
TILLER SAFETY
Clear Tilling Area
A tine can throw rocks and other objects with enough force to cause
serious injury.Before tilling,carefully inspect the area and remove all
stones,sticks,bones,nails,pieces of wire,and other loose objects.Be
aware if children are in the area,stop the tiller.Never operate
over gravel.
Keep Shields in Place
Wear Protective Clothing
Turn Engine Off When Not Operating the Tiller
Slope Operation
Guards and shields are designed to protect you from being hit by
thrown objects and to keep you from touching hot engine parts and
moving components.For your safety and the safety of others,keep all
shields in place when the engine is running.
Wearing protective clothing will reduce your risk of injury.Long pants
and eye protection reduce the risk of injures from thrown objects.
Sturdy shoes with aggressive soles provide better traction.
If you need to leave the tiller for any reason,even just to inspect the
area ahead,always turn the engine off.
When tilling on slopes,keep the fuel tank less than half full to
minimize fuel spillage.
Till across the slope (at equally spaced intervals)rather than up and
down it.
Be very careful when changing the direction of the tiller on a slope.
Do not use the tiller on a slope of more than 10.Before starting the
engine,check that the tiller is not damaged and is in good condition.
For your safety and the safety of others,exercise extreme care when
using the tiller on a slope.
2
the tines

TILLER SAFETY
SAFETY LABEL LOCATIONS
These labels warn you of potential hazards that can cause serious injury.
Read them carefully.If a label comes off or becomes hard to read, contact
your dealer for a replacement.
3
COMPONENT &CONTROL LOCATIONS
CONTROLS
MUD GUARD
MUFFLER
DRAG BAR
TRANSMISSION
OIL FILLER CAP
ENGINE SWITCH
REVERSE LEVER
HANDLE HEIGHT ADJUSTER
4
ENGINE OIL FILLERENGINE OIL FILLER
CAP/DIPSTICKCAP/DIPSTICK
CHOKE LEVER
ROTARY TINES
MAIN CLUTCH LEVER
STARTER GRIP
FUEL TANK CAP
HANDLEBAR
THROTTLE LEVER
AIR FILTER
FUEL VALVE LEVER
MUFFLER
HANDLE BAR BRACKET

CONTROLS
Drag Bar
REVERSE LEVER
The drag bar controls tilling depth
and should always be used when
tilling.It enables you to compensate
for the hardness of the soil.Ideal
drag bar height will depend on the
type of soil being tilled and soil
conditions at the time of tilling.In
general,the drag bar should be
adjusted so that the tiller is tilted
slightly backward.
Reverse Lever
The transmission offers a choice of
one forward speed,neutral,and
one reverse speed.Reverse lever
engages and disengages the trasmission
backward.
DRAG BAR
LOCKING
SPRING
STARTER GRIP
Handlebar Height Adjuster
Handlebar height can be adjusted to
match operator height.
For normal tilling,the most
comfortable operator position is
with the handlebars at waist height.
Starter Grip
Pulling the starter grip operates the
recoil starter to crank the engine.
HEIGHT ADJUSTING BOLT
6
Main Clutch Lever
The main clutch lever engages and
disengages the transmission that
drives the tines.
CONTROLS
Fuel Valve
Choke Lever
Engine Switch
The fuel valve opens and closes the
connection between the fuel tank
and the carburetor.
The choke lever opens and closes
the choke valve in the carburetor.
The CLOSED position enriches the
fuel mixture for starting a cold
engine.
The OPEN position provides the
correct fuel mixture for operation
after starting and for restarting a
warm engine.
The engine switch controls the
ignition system.
OFF--Stops the engine.
ON--Running position.
The fuel valve lever must be in the
ON position for the engine to run.
After stopping the engine,turn the
fuel valve lever to the OFF position.
ON
OFF
ENGINE SWITCH
MAIN CLUTCH LEVER
DISENGAGED
ENGAGED
ON
OFF
FUEL VALVE LEVER
CLOSED OPEN
CHOKE LEVER
5

SETTING UP YOUR NEW TILLER
ASSEMBLY INSTRUCTION
1.Carefully remove the tiller from package.
2.Fix handle bar bracket as shown and
tighten bolts and nuts.
locking
HANDLE BAR
BRACKET
HANDLE BAR BRACKET ASSEMBLE
FIXING HOLE
REVERSE CA BLE ASSEMBLY
1.Go through the fixing holes.
2.Fix the cable by the locking nuts.
3.Lock the reverse lever to handle bar
bracket.
7
LOCKING NUTS
CLUTCH CABLE HEAD
CLUTCH CA ASSEMBLEBLE
1.Go through the fixing holes.
2.Fix clutch cable head into clutch lever.
Put the cable right the way.
LOCKING
NUTS
LOCKING NUTS
BOLTS
SETTING UP YOUR NEW TILLER
ASSEMBLY INSTRUCTION
8
CLEVIS PIN
LOCKING RING
FREE WHEEL POSITION
TILLING POSITION
LOCKING SCREWS
CLEVIS PIN
LOCKING RING
1. Install the wheels, two positions for
different purposes.
Free wheel position for transportation,
Tilling position for working.
When the tiller is ready to go, you
should change the wheels from free
wheel position to tilling position by
adjusting the locking hole.
WHEEL ASSEMBLY
1. Install the bumper by the locking screws.
BUMPER ASSEMBLY

IS YOUR TILLER READY TO GO?
BEFORE OPERATION
ARE YOU READY TO GET STARTED?
Your safety is your responsibility.A little time spent in preparation will
sig.nificantly reduce your risk of injury. Read and understand this manual.
Know what the controls do and how to operate them. Know how to quickly
shut off the tiller in case of an emergency.
Improperly maintaining this tiller,or
failing to correct a problem before
operation,could cause a
malfunction in which you could be
seriously injured.
Always perform a pre-operation
inspection before each operation,
and correct any problem.
For your safety,and to maximize the service life of your equipment,it
is very important to take a few moments before you operate the tiller
to check its condition.Be sure to take care of any problem you find,or
have your servicing dealer correct it,before you operate the tiller.
You must be alert and in good physical condition to operate the tiller. Do not
operate the tiller if you are tired, ill, or under the influence of alcohol,medica-
tion, or any substance that might impair your vision, dexterity, or judgment.
Wearing protective clothing will reduce your risk of injury. Do not wear loose
clothing, jewelry, short pants, sandals, or go barefoot. Secure hair so it is
above shoulder level. Wear gloves, a long-sleeved shirt, and long pants made
of heavy meterial. Clothing should fit closely but allow freedom of movement,
and should have no strings, straps, etc. that could catch on brush or the tiller.
Keep clothing fastened. Wear sturdy work boots with good toe protection and
nonslip sloes.
9
OPERATION
SAFE OPERATING PRECAUTIONS
Before operating the tiller for the first time,please review both the
TILLER SAFETY
chapter and the chapter titled
BEFORE OPERATION
.
For your safety,avoid starting or operating the tiller in an enclosed
area such as a garage.Your tiller’s exhaust contains poisonous carbon
monoxide gas that can collect rapidly in an enclosed area and cause
illness or death.
Carbon monoxide gas is toxic.
Breathing it can cause
unconsciousness and even kill you.
Avoid any enclosed areas or
activities that expose you to carbon
monoxide.
STARTING THE ENGINE
Tines are sharp and spin fast.
Spinning tines can cut you severely
and can amputate body parts.
Wear protective footwear.
Keep your hands and feet away
from the tines while the engine is
running.
Stop the engine before
performing any adjustment,
inspection,or maintenance.
10

OPERATION
Turn the fuel valve lever to the ON
position.Check that the fuel drain
screw is tightened securely.
1.
Leave the choke lever in the OPEN
position to restart a warm engine.
Move the choke lever to the
CLOSED position to start a cold
engine.
2.
Turn the engine switch to the ON
position.
3.
11
ON
OFF
ENGINE SWITCH
ON
OFF
FUEL VALVE LEVER
CLOSED OPEN
CHOKE LEVER
OPERATION
SLOW
FAST
Move the throttle lever away from
the SLOW position,about 1/3 of
the way toward the FAST position.
Pull the starter grip lightly until
you feel resistance,then pull
briskly in the direction of the
arrow as shown.
Do not allow the starter grip to
snap back against the engine.
Return it gently to prevent
damage to the starter.
4.
5.
THROTTLE LEVER
If the choke lever was moved to
the CLOSED position to start the
engine,gradually move it to the
OPEN position as the engine
warms up.
6.
STARTER GRIP
Direction to pullDirection to pull
12
CLOSED OPEN
CHOKE LEVER

OPERATION
Tilling Depth Adjustment
DDRRAAGGBBAARR
The drag bar is used to control the tilling depth,which can be adjusted
by holding the drag bar backward to release it and sliding the drag bar
up and down as necessary.
During operation, if the machine jerks forward while tilling,press
down on the handlebars. This will cause the drag bar to dig more
deeply into the soil.
HANDLING TIPS
Adjust the handlebar height to a comfortable position (waist height
for normal tilling).
The drag bar should always be used when tilling. It enables you to
compensate for the hardness of the soil. The ideal height of the drag
bar will depend on the type of soil being tilled and soil conditions at the
time of tilling. In general, however, the drag bar should be adjusted
so that the tiller is tilted slightly backward.
If the machine jerks forward while tilling,press down on the handlebars.
This will cause the drag bar to dig more deeply into the soil.
If tines dig in but the machine will not move forward,move the
handlebars from side to side.
Stop the tines before crossing gravel drives,walks,or roads.Stay
alert for hidden hazards or traffic.
Stop the engine immediately if the tiller vibrates abnormally.Check
the tiller for damage or loose parts,and repair or replace them
before using the tiller again.Vibration is usually a sign of trouble.
1413
OPERATION
OPERATING THE CONTROLS FOR TILLING
Clutch
If the tines dig in but the machine will not move forward,move the
handlebars from side-to-side.
When the lever is released,the
clutch is disengaged,and power is
not transmitted.
When the main clutch lever is
squeezed,the clutch is engaged,
and power is transmitted to the
transmission.
Stop the engine before adjusting
the handlebar height.
Loosen the height adjusting bolts,
adjust the handlebar height and tighten
the bolts. For normal tilling, the most
Reverse Lever Operation
Use the reverse lever only when it is necessary to move the tiller away
from an obstacle.
Check the area behind you and make sure it is clear of any obstacles.
Move the throttle to the SLOW position.
Make sure the main clutch lever is released.
Raise the handlebar slightly and engage the reverse lever.
Carefully walk the tiller backwards.
Release the reverse lever,lower the handlebar when done.
1.
2.
3.
4.
5.
Handlebar Height Adjustment
comfortable operator position is
with the handlebars at waist height.
HEIGHT ADJUSTING BOLT
MAIN CLUTCH LEVER
DISENGAGED
ENGAGED

16
SERVICING YOUR TILLER
THE IMPORTANCE OF MAINTENANCE
Maintenance,replacement,or repair of the emission control devices
and systems may be performed by any engine repair establishment or
individual.
Good maintenance is essential for safe,economical,and trouble-free
operation.It will also help reduce air pollution.
To help you properly care for your tiller,the following pages include a
maintenance schedule,routine inspection procedures,and simple
maintenance procedures using basic hand tools.Other service tasks
that are more difficult or require special tools are best handled by
professionals and are normally performed by a qualified mechanic.
The maintenance schedule applies to normal operating conditions.If
you operate your tiller under unusual conditions,such as sustained
high-load or high-temperature operation or use in dusty conditions
consult your servicing dealer for recommendations applicable to your
individual needs and use.
Remember that your servicing dealer knows your tiller best and is fully
equipped to maintain and repair it.
Improper maintenance,or failure to
correct a problem before operation,
can cause a malfunction in which
you can be seriously hurt or killed.
Always follow the inspection and
maintenance recommendations and
schedules in this owner’s manual.
To ensure the best quality and reliability, contact your dealer for parts.
15
OPERATION
STOPPING THE ENGINE
To stop the engine in an emergency,simply turn the engine switch to
the OFF position.Under normal conditions,use the following
procedure.
Release the main clutch lever to
the DISENGAGED position.
1.
Turn the engine switch to the OFF
position.
2.
Turn the fuel valve lever to the
OFF position.
3.
ON
OFF
FUEL VALVE LEVER
ON
OFF
ENGINE SWITCH
MAIN CLUTCH LEVER
DISENGAGED
ENGAGED

17
SERVICING YOUR TILLER
MAINTENANCE SAFETY
Injury from moving parts.
Burns from hot parts.
Carbon monoxide poisoning from engine exhaust.
Safety precautions
Some of the most important safety precautions follow.However,we
cannot warn you of every conceivable hazard that can arise in
performing maintenance.Only you can decide whether or not you
should perform a given task.
Disconnect the spark plug cap and wear heavy gloves when working
near the belts or tine blades.
To reduce the possibility of fire or explosion,be careful when
working around gasoline.Use only a non-flammable solvent,not
gasoline,to clean parts.Keep cigarettes,sparks,and flames away
from all fuel-related parts.
Read the instructions before you begin,and make sure you have the
tools and skills required.
Do not run the engine unless instructed to do so.
Let the engine and exhaust system cool before touching.
Be sure there is adequate ventilation whenever you operate the
engine.
Make sure the engine is off before you begin any maintenance or
repairs.This will eliminate several potential hazards:
Failure to properly follow
maintenance instructions and
precautions can cause you to be
seriously hurt or killed.
Always follow the procedures and
precautions in the owner't manual.
ˎ
ˎ
18
SERVICING YOUR TILLER
MAINTENANCE SCHEDULE
ITEM
Perform at every indicated
month or operating hour
interval,whichever comes
first.
Each
use
REGULAR SERVICE PERIOD(2)
Every 2 years (Replace if necessary)
Initial 10 hrs.
Check level
Change
Check level
Check
Clean
Replace
Adjust
Adjust
Check-adjust
Replace
Clean
Clean
Adjust
Check-adjust
Check-adjust
Clean
Clean
Check
Every
year
or
300 hrs.
Every
3 months
or
50 hrs.
(1)
First
month
or
20 hrs.
(3)
Every
6 months
or
100 hrs.
(3)
Service more frequently when used in dusty areas.
Engine oil
Transmission oil
Air filter
Clutch cable
Belt tension
Spark plug
Sediment cup
Reverse cable
Idle speed
Valve clearance
Combustion chamber
Fuel tank &filter
All fasteners
(for tightness)
Fuel tube
For commercial use,log hours of operation to determine proper maintenance intervals.
After every 1000 hrs.
(1)
(2)
(3)
Check-tighten
Replace the belt if it is cracked or shows abnormal wear.
Spark arrester (applicable types)

20
SERVICING YOUR TILLER
FUEL RECOMMENDATIONS
Fuel can damage paint and plastic.Be careful not to spill fuel when
filling your fuel tank.
This engine is certified to operate on unleaded gasoline with a pump
octane rating of 86 or higher.
You may use regular unleaded gasoline containing no more than 10%
ethanol (E10)or 5%methanol by volume.In addition,methanol must
contain cosolvents and corrosion inhibitors.
Use of fuels with content of ethanol or methanol greater than shown
above may cause starting and/or performance problems.It may also
damage metal,rubber,and plastic parts of the fuel system.
Engine damage or performance problems that result from using a fuel
with percentages of ethanol or methanol greater than shown above
are not covered under warranty.
Never use stale or contaminated gasoline or an oil/gasoline mixture.
Avoid getting dirt or water in the fuel tank.
If your equipment will be used on an infrequent or intermittent basis,
please refer to the fuel section of the STORAGE chapter
for additional information regarding fuel deterioration.
ENGINE OIL LEVEL CHECK
Check the engine oil level with the tiller on a level surface and the
engine stopped.
Remove the engine oil filler cap/dipstick and wipe it clean.
Insert and remove the engine oil filler cap/dipstick without screwing
it into the oil filler neck.Check the oil level shown on the engine oil
filler cap/dipstick.
If the oil level is low,fill with the recommended oil to the top of the
oil filler neck.
1.
2.
3.
19
SERVICING YOUR TILLER
REFUELING
Refuel in a well-ventilated area before starting the engine.If the engine
has been running,allow it to cool.Refuel carefully to avoid spilling fuel.
Do not fill the fuel tank above the fuel level mark.After refueling,
tighten the fuel tank cap securely.
Never refuel the engine inside a building where gasoline fumes may
reach flames or sparks.Keep gasoline away from appliance pilot lights,
barbecues,electric appliances,power tools,etc.
Spilled fuel is not only a fire hazard,it causes environmental damage.
Wipe up spills immediately.
LEVEL MARK
FUEL FILLER CAP
With the engine stopped,remove the fuel tank cap and check the fuel
level.Refill the tank if the fuel level is low.Do not fill above the fuel
level mark.
Gasoline is highly flammable and
explosive.
You can be burned or seriously
injured when handling fuel.
Stop the engine and keep heat,
sparks,and flame away.
Refuel only outdoors.
Wipe up spills immediately.

21
SERVICING YOUR TILLER
ENGINE OIL
FILLER CAP/DIPSTICK
OIL FILLER NECK
LOWER LIMIT
UPPER LIMIT
Screw in the engine oil filler cap/dipstick securely.
4.
ENGINE OIL CHANGE
Drain the oil while the engine is warm to assure rapid and complete
draining.
Improper disposal of engine oil can be harmful to the environment.
If you change your own oil,please dispose of the used oil properly.
Place a suitable container below the engine to catch the used oil,
and then remove the engine oil filler cap/dipstick,drain plug,and
sealing washer.
1.
Allow the used oil to drain completely,and then reinstall the drain
plug and sealing washer.Tighten the plug securely.
2.
22
SERVICING YOUR TILLER
With the tiller in a level position,fill with the recommended oil to the
outer edge of the oil filter hole.
Running the engine with a low oil level is misuse and can cause
engine damage.
Screw in the engine oil filler cap/dipstick securely.
3.
4.
ENGINE OIL RECOMMENDATIONS
AMBIENT TEMPERATURE
Oil is a major factor affecting performance and service life.Use a 4-
stroke automotive detergent oil.
SAE 10W-30 is recommended for general use.Other viscosities shown
in the chart may be used when the average temperature in your area is
within the recommended range.
TRANSMISSION OIL RECOMMENDATIONS
TRANSMISSION OIL FILLER CAP
The tiller is shipped WITHOUT TRANSMISSION OIL. Fill in oil before use.
Remove the transmission oil filler cap.1.
Screw in the oil filler cap.3.
Recommended oil is 80W-902.
Recommended capacity is 500ml
-600ml.

23
SERVICING YOUR TILLER
AIR FILTER INSPECTION
Unscrew the wing nut,and
remove the air filter cover.
Check the foam element to be
sure they are clean and in good
condition.
1.
If the foam element are dirty,
clean them as described below.
Replace the foam element
if they are damaged.
2.
Reinstall the air filter cover,
and tighten the wing nut securely.
3.
WING NUT
AIR FILTER COVER
FOAM
ELEMENT
AIR FILTER CLEANING
1. Remove the wing nut and air filter cover.
2. Remove the foam element and separate them.
3. Carefully check the foam element for holes or tears and
replace if necessary.
4. Clean the foam element if they are to be reused.
A dirty air filter will restrict air flow to the carburetor,reducing engine
performance.If you operate the tiller in very dusty areas,clean the air
filter more frequently than specified in the
Maintenance Schedule.
Foam element:Clean in warm soapy water,rinse and allow to dry
thoroughly,or clean with a high flash point solvent and allow to dry.
5.Dip the element in clean engine oil and squeeze out all the excess oil.
Operating the engine without an air filter,
or with a damaged air filter will allow dirt
to enter the engine, causing rapid engine
wear.
SPARK PLUG SERVICE
Disconnect the spark plug cap,and remove any dirt from around the
spark plug area.
An incorrect spark plug can cause engine damage.
1.
24
SERVICING YOUR TILLER
LOCKING NUT ADJUSTING NUT
Excess oil will restrict air flow through the foam element and may
cause the exhaust to smoke when the engine starts.
Wipe dirt from the inside of the air filter cover using a moist rag.
6.
Reinstall the foam element and grommet.Install the air filter cover,
and tighten the wing nut.
7.
CLUTCH CABLE ADJUSTMENT
If drive belt is loosen or the tiller don’t go when throttle lever is 2/3 engaged,
adjusting nut in or out just enough to eliminate free play.Do not overtighten.
Clutch cable should be adjusted. Loosen the locking nut and turn the
REVERSE CABLE ADJUSTMENT
If drive belt is loosen or the tiller don’t go when reverse lever is 2/3 engaged,
Reverse cable should be adjusted. Same way as CLUCH CABLE ADJUST-
MENT when adjusting reverse cable.

SERVICING YOUR TILLER
DRIVE BELT CHANGE
1.Stop the engine, and remove the spark plug cap.
2.Unscrew the plastic cover by loosening
cross screws both sides and hex screw
on the top.
Unscrew the engine bolts and nuts4.
Release the clutch cable and take out
clutch cable head.
5.
Take out the reverse cable.
6.
26
REVERSE CABLE
CROSS
SCREWS
TRANSMISSION OIL
FILLER CAP
HEX SCREW
ENGINE BOLTS
CLUTCH CABLE HEAD
3.Remove the transmission oil filler cap.
both sides.
25
SERVICING YOUR TILLER
SEALING WASHER
0.028-0.031 in
Remove the spark plug with a 13/16-inch spark plug wrench.
Inspect the spark plug.Replace it
if the electrodes are worn,or if the
insulator is cracked or chipped.
Measure the spark plug electrode
gap with a wire-type feeler gauge.
Correct the gap,if necessary,by
carefully bending the side
electrode.
Install the spark plug carefully,by
hand,to avoid cross-threading.
After the spark plug seats,tighten with a 13/16-inch spark plug wrench to
compress the washer. If reinstalling a used spark plug, tighten 1/8-1/4
turn after the spark plug seats.
2.
3.
4.
5.
6.
(0.7-0.8mm)
SPARK PLUG WRENCH
If installing a new spark plug,tighten 1/2 turn after the spark plug seats.
Attach the spark plug cap.
A loose spark plug can overheat and damage the engine.
Overtightening the spark plug can damage the threads in the
cylinder head.
7.
The gap should be:
0.028 0.031 in(0.7 0.8mm)

SERVICING YOUR TILLER
DRIVE BELT CHANGE
10.Take out the belt protection cover.
12. Install back the engine, put the
new belts on their own way.
Adjust the space between pulley
and housing at 28.5mm.
After adjustment, tighten the engine
screws securely. Then put the
plastic cover back and tighten
securely.
BELT PROTECTION COVER
PULLEY
BELT HOLDER
FORWARD PULLEY
HOUSING
11. Push off the belt holder slightly
and take out the belt needed to
be changed.
Install new belts as original way.
Install back the belt protection
cover.
28
28.5mm
SERVICING YOUR TILLER
DRIVE BELT CHANGE
8. Take out the forward belt and reverse belt
REVERSE SPRING
FORWARD BELT
REVERSE BELT
REVERSE PULLEY
FORWARD PULLEY
BELT PROTECTION COVER
27
9. Unscrew the belt protection cover
underside.
7. Release the spring for reverse cable,
and take out the engine.
from their own pulley.

SERVICING YOUR TILLER
TIRE PRESSURE CHECK
30
LOCKING RING
CLEVIS PIN
Check the tire pressure.Improper inflation can reduce both tire life and
load carrying capacity.
Make sure the clevis pin is securely installed.
Tire size: 3.50-6"
Tire pressure:17.1 psi (1 20 kPa ,1.2 kgf/cm )
SPARK ARRESTER SERVICE (optional equipment )
TINE REPLACEMENT
1. Inspect the tines. Replace
them if the tines are worn out.
2. Take out the locking pin from
the clevis pin.
3. Take out the tines sets.
4. Unscrew the bolts and nuts.
5. Change the worn tines. Notice
the direction of the tines.
6. Install back the tines sets by
tightening the bolts and nuts.
Notice the different direction of
installment way for bolts and
nuts.
7. Lock the sets by clevis pin
and locking pin.
29
M10 NUTS
M10 BOLTS
TINES HOLDING BRACKET
CLEVIS PIN
LOCKING PIN LOCKING PIN
Your engine is not factory-equipped with a spark arrester.In some
areas,it is illegal to operate an engine without a spark arrester.Check
local laws and regulations.
SERVICING YOUR TILLER

STORAGE
STORAGE PREPARATION
Cleaning
Engine
Tiller
Proper storage preparation is essential for keeping your tiller trouble-
free and looking good.The following steps will help to keep rust and
corrosion from impairing your tiller’s function and appearance,and
will make the engine easier to start when you use the tiller again.
Wash the tiller,including the underside.
Wash the engine by hand,and be careful to prevent water from
entering the air cleaner.
Using a garden hose or pressure washing equipment can force
water into the air filter .Water in the air filter will soak the
foam element and can enter the carburetor or engine cylinder,
causing damage.
Water contacting a hot engine can cause damage.If the engine
has been running,allow it to cool for at least half an hour before
washing.
If using a garden hose or pressure washing equipment to clean the
tiller,be careful to avoid getting water on the belts.
Spraying water on hot tine shaft bearings can cause them to be
damaged from cooling too quickly.
1.
31
STORAGE
Fuel
After washing the tiller,wipe dry all accessible surfaces.
Start the engine outdoors,and let it run until it reachs normal
operating temperature to evaporate any water remaining on the
engine.
After the tiller is clean and dry,touch up any damaged paint and
coat other areas with a light film oil.Lubricate the clutch cable core
and reverse cable core with a silicone spray lubricant.
Stop the engine and allow it to cool.
While the engine is running,operate the clutch lever to expel water
from the pulleys,belts,and other moving items.
Depending on the region where you operate your equipment,fuel
formulations may deteriorate and oxidize rapidly.Fuel deterioration
and oxidation can occur in as little as 30 days and may cause damage
to the carburetor and/or fuel system.Please check with your servicing
dealer for local storage recommendations.
Gasoline will oxidize and deteriorate in storage.Old gasoline will
cause hard starting,and it leaves gum deposits that clog the fuel
system.If the gasoline in your tiller deteriorates during storage,you
may need to have the carburetor and other fuel system components
serviced or replaced.
The length of time that gasoline can be left in your fuel tank and
carburetor without causing functional problems will vary with such
factors as gasoline blend,your storage temperatures,and whether the
fuel tank is partially or completely filled.The air in a partially filled fuel
tank promotes fuel deterioration.Very warm storage temperatures
accelerate fuel deterioration.Fuel deterioration problems may occur
within a few months,or even less if the gasoline was not fresh when
you filled the fuel tank.
2.
3.
4.
5.
6.
32

STORAGE
Draining the Fuel Tank and Carburetor
Loosen the carburetor drain screw,and then move the fuel valve to
the ON position.
Gasoline is highly flammable and
explosive.
You can be burned or seriously
injured.
Never use gasoline to clean engine
parts.Use a nonflammable solvent.
Place an approved gasoline container below the carburetor,and use
a funnel to avoid spilling fuel.
After all the fuel has drained into the container,tighten the drain
screw securely.
Remove and empty the sediment cup,and then reinstall the
sediment cup and tighten securely.
2.
3.
4.
1.
DRAIN SCREW
34
STORAGE
Adding a Gasoline Stabilizer to Extend Fuel Storage Life
You can extend fuel storage life by adding a gasoline stabilizer that is
formulated for that purpose,or you can avoid fuel deterioration
problems by draining the fuel tank and carburetor.
When adding a gasoline stabilizer,fill the fuel tank with fresh gasoline.
If only partially filled,air in the tank will promote fuel deterioration
during storage.If you keep a container or gasoline for refueling,be
sure that it contains only fresh gasoline.
Add gasoline stabilizer following manufacturer’s instructions.
After adding a gasoline stabilizer,run the engine outdoors for 10
minutes to be sure that treated gasoline has replaced the untreated
gasoline in the carburetor.
Stop the engine,and turn the fuel valve to the off position.
1.
2.
3.
33

STORAGE
STORAGE PRECAUTIONS
If your tiller will be stored with gasoline in the fuel tank and carburetor,
it is important to reduce the hazard of gasoline vapor ignition.Select a
well-ventilated storage area away from any appliance that operates
with a flame,such as a furnace,water heater,or clothes dryer.Also
avoid any area with a spark-producing electric motor or where power
tools are operated.
If possible,avoid storage areas with high humidity because that
promotes rust and corrosion.
Unless all fuel has been drained from the fuel tank,leave the fuel valve
in the OFF position to reduce the possibility of fuel leakage.
Place the tiller on a level surface.Tilting can cause fuel or oil leakage.
When the engine and exhaust system is cool,cover the tiller to keep
out dust.A hot engine and exhaust system can ignite or melt some
materials.Do not use sheet plastic as a dust cover.A nonporous cover
will trap moisture around the tiller,promoting rust and corrosion.
35 36
TAKING CARE OF UNEXPECTED PROBLEMS
Table of contents
Other GARDENTEC Tiller manuals
Popular Tiller manuals by other brands

Brinly-Hardy
Brinly-Hardy AS-30 BH owner's manual

bannerman
bannerman BA-4 AIR-JECT Operator's manual and parts list

Swisher
Swisher E4-U3006 Owner's/operator's manual

Brinly-Hardy
Brinly-Hardy Thatcher 1690819 Operator's manual

Ivation
Ivation IVA1208TLR user guide

Craftsman
Craftsman 486.24003 owner's manual