Gastrodomus TST3 User manual

TOSTIERE
TOASTER
MANUALE D’USO
USER’S MANUAL
BENUTZERHANDBUCH
Models: TST3, TST6

Attenzione:
Leggere attentamente le istruzioni per l'installazione, il funzionamento e la
manutenzione prima di installare questo apparecchio.
Per la vostra sicurezza
Non conservare benzina o altri liquidi infiammabili nelle vicinanze di questo o di altri
apparecchi.
AVVERTENZA: Pericolo di incendio
L'area in cui è installato l'apparecchio deve essere tenuta sgombra da combustibili e
infiammabili. Ciò include stracci, grasso, carta da imballaggio e cavi elettrici.
Istruzioni per la messa a terra elettrica
Questo apparecchio è dotato di una spina a tre poli (messa a terra) per la protezione
contro il rischio di scosse elettriche e deve essere inserito direttamente in una presa
a tre poli correttamente messa a terra. Non tagliare o rimuovere il polo di messa a
terra da questa spina. Per l'apparecchio la cui potenza d'ingresso è molto più grande
e supera un certo valore, non viene utilizzata alcuna spina. Ma l'apparecchio deve
essere collegato a terra in modo sicuro.
Avviso
Questo apparecchio è progettato per l'uso solo in luoghi non combustibili. Installare
l'apparecchio su una superficie solida, piana e non combustibile.
Per la manutenzione, è necessario mantenere uno spazio libero di 15 cm dalla parte
posteriore dell'apparecchio alla parete.
Grazie per l'acquisto e l'utilizzo del nostro TOASTER. Con il suo design unico, questo
prodotto è realizzato in acciaio inossidabile di alta qualità. Al fine di sfruttare appieno
le funzioni di questo prodotto e ridurre al minimo le perdite e i danni inutili, si prega
di leggere attentamente il manuale e di conservarlo per riferimento futuro.
Attenzione:
Qualsiasi riadattamento e un'errata installazione, regolazione e manutenzione
possono portare a perdite e incidenti. Si prega di contattare il fornitore se è
necessario effettuare la regolazione o la manutenzione e tutte queste operazioni
devono essere effettuate da professionisti autorizzati.
Non mettere alcun liquido infiammabile, gas o altri oggetti infiammabili intorno al
prodotto per la vostra sicurezza.
Se il cavo di alimentazione è danneggiato, deve essere sostituito immediatamente dal
produttore o dal suo agente di assistenza o da una persona qualificata simile per
evitare pericoli.

INDICE DEL CONTENUTO
1. Struttura del prodotto e accessori
1.1 Struttura del prodotto
2. Parametro del prodotto, funzione, scopo
2.1. Parametro e funzione del prodotto
2.2. Scopo
3. Precauzioni
3.1. Precauzioni speciali
3.2. Spegnere dopo l'uso
4. Procedure operative
5. Installazione
5.1. Precauzioni prima dell'installazione
5.2. Installazione
6. Controllo giornaliero e risoluzione dei problemi
7. Schema del circuito
8. Diagramma e pezzi di ricambio
9. Trasporto e stoccaggio
10. Pulizia e manutenzione

1. Struttura del prodotto e accessori
1.1 Struttura del prodotto
2. Parametri del prodotto, funzione, scopo
2.1. Parametri e funzione del prodotto
Modello
TST6
TST3
Dimension
Width
440mm
440mm
Depth
300mm
300mm
Height
400mm
290mm
Power Supply
220~240V 50/60Hz
220~240V 50/60Hz
Power
3kW
1.7kW
Stand
Rubber Stand
Rubber Stand
Weight
9.8kg
7.4kg
2.2. Scopo
Questa attrezzatura può essere utilizzata nei supermercati, nei ristoranti occidentali,
nei bar e nei bar per famiglie, ecc.
3. Precauzioni
3.1. Speciali precauzioni
Attenzione
Non agitare e non appoggiare il prodotto durante l'uso. Non tentare di smontare
o rimontare il prodotto o potrebbero verificarsi gravi incidenti. Spegnere il
prodotto dopo l'uso. Quando si utilizza il vassoio di ricezione degli scarti, l'utente
dovrebbe usare un guanto di isolamento termico per toccare il manico.
Non aprire la camera di questo prodotto. Questo prodotto contiene un circuito ad
alta tensione, per qualsiasi smontaggio può verificarsi una scarica elettrica. Non
spruzzare acqua direttamente sul prodotto durante la pulizia. L'acqua può
condurre l'elettricità e può portare a scosse elettriche per le infiltrazioni. Non
sbattere o appoggiare oggetti pesanti sul prodotto. Qualsiasi operazione deviante
danneggerà la macchina e causerà pericoli.

3.2. Spegnere l'alimentazione dopo l'uso
Quando non si utilizza questo prodotto, ruotare il timer in senso inverso e
l'interruttore in posizione off. Quindi scollegare la spina e togliere la corrente.
4. Procedure operative
4.1. Mettere il forno su un tavolo fisso in piano e regolare il timer e il selettore del
riscaldamento in posizione off.
4.2. Mettere il cibo sul ripiano per la tostatura.
4.3. Collegare il cavo di alimentazione alla presa elettrica specifica di 230V AC. 5.
Impostare il timer sul tempo determinato e regolare il selettore del
riscaldamento per scegliere il riscaldamento del fuoco superiore, inferiore o
entrambi.
5. Installazione
5.1. Precauzioni prima dell’installazione
a. La posizione per l'installazione deve essere piana e fissa.
b. Non mettere oggetti infiammabili vicino alla posizione per l'installazione.
c. La temperatura dell'ambiente dovrebbe essere inferiore a 45C.
d. L'umidità relativa dell'ambiente dovrebbe essere inferiore all'80%.
e. Controllare se tutti gli accessori sono pronti.
f. Controllare se l'aspetto è danneggiato.
5.2. Installazione di potenza
Attenzione
Non utilizzare altri tipi di alimentazione oltre a quella indicata.
Non utilizzare l'interruttore dell'aria e l'interruttore di dispersione che non
soddisfano gli standard di sicurezza.
L'installazione e la manutenzione del circuito devono essere effettuate da
professionisti autorizzati.
(1) L'interruttore dell'aria, l'interruttore di dispersione, il fusibile e la presa di
corrente devono essere installati vicino al prodotto.
(2) Questo prodotto deve essere collegato a terra.
(3) La spina e la presa devono essere ben collegate senza allentarsi.

6. Controllo giornaliero e risoluzione dei problemi
Problema
Controllo
Riscaldamento
Se l'alimentazione è ben collegata?
Se c'è l'alimentazione elettrica per la rete?
Se il tubo di riscaldamento è rotto?
Il contenuto di cui sopra è solo per riferimento. In caso di problemi, smettete di usare
questo prodotto e informate subito i professionisti per un controllo!
7. Schema del circuito

8. Diagramma e pezzi di ricambio
12
1
8
5
2
4
10
9
11
17
18
13
19
14 15 16
5
0
10
15
67
3
5
9
10
11
8
15 5
10
0
17
18
19
14
13
LN
E
12
16
2
4
1
3
67
15

Ricambi:
1
Supporto in gomma
2
Piastra inferiore
3
Connettore
4
Piastra di installazione per piastra di fondo
5
Rottami Piastra di ricezione
6
Interruttore
7
Timer
8
Guscio
9
Ripiano di protezione per il tubo di riscaldamento
10
Scaffale per arrostire
11
Ripiano di protezione per il tubo di riscaldamento
12
Ceramica isolata
13
Guaina del cavo di alimentazione
14
Cavo di alimentazione
15
Piastra di installazione per tubo di riscaldamento elettrico
16
Tubo di riscaldamento al quarzo
17
Piastra superiore
18
Piastra di montaggio per la piastra superiore
19
Pannello superiore e laterale
9. Trasporto e Montaggio
Durante il trasporto, la macchina deve essere maneggiata con cautela ed evitare che
si scuota. La macchina confezionata non deve essere conservata all'aperto. Dovrebbe
essere messa in un magazzino ventilato senza gas corrosivi. Non dovrebbe essere
messa a testa in giù. Se deve essere conservato temporaneamente all'aria aperta, è
necessario effettuare una misurazione contro la pioggia.
10. Pulizia e Manutenzione
1. Togliere la corrente durante la pulizia e la manutenzione dell'apparecchiatura in
caso di incidente.
2. Dopo aver finito di lavorare, usare un asciugamano bagnato con un detergente non
corrosivo per pulire la superficie del forno, la camera e la superficie del cavo di
alimentazione. Si prega di utilizzare un asciugamano asciutto per pulire
l'interruttore di controllo e il timer. Non usare acqua per pulire direttamente la
macchina.
Warning:
Read the installation, operation and maintenance instructions thoroughly before
installing or servicing this appliance.
For your safety
Do not store gasoline or other flammable liquids in the vicinity of this or any
other appliance.
WARNING: FIRE HAZARD
The area where the appliance is installed must be kept clear of combustibles and
flammables. This includes mops, rags, grease, wrapping paper and electrical
cords.
Warning
Electrical Grounding Instructions
This appliance is equipped with a three-prong (grounding) plug for your
protection against shock hazard and should be plugged directly into a properly
grounded three-prong receptacle. Do not cut or remove the grounding prong
from this plug. For the appliance whose power input is much larger exceeding a
certain value , no plug is used. But the appliance should be grounded safely.

Thanks for your purchasing and using our TOASTER. With its unique designing, this
product is made of high quality Stainless Steel. In order to make full use of the
function of this product and minimize unnecessary loss and damage, please read the
manual carefully and keep it for future reference.
WARNING
Any refitting and wrong installation, adjustment and maintenance can lead to
property loss and casualty. Please contact the supplier if you need to adjust or
maintain it and all these should be done by authorized professionals.
Do not put any flammable liquid, gas or other objects around the product for your
safety sake.
If the supply cord is damaged, it must be replaced at once by manufacturer or its
service agent or a similar qualified person in order to avoid hazard.
Notice
This appliance is designed for use in non-combustible locations only. Install the
appliance on a firm, level, non-combustible surface.
For servicing, a clearance of 6 inches (15cm) from rear of the appliance to wall
should be kept.

TABLE OF CONTENT
1. Product structure and Accessories
1.1Product Structure
2. Product Parameter, Function, Purpose
2.1. Product Parameter and Function
2.2. Purpose
3. Precautions
3.1. Special Precautions
3.2. Power off after Using
4. Procedures of Operation
5. Installation
5.1. Precautions before Installation
5.2. Power Installation
6. Daily Check and Trouble Shooting
7. Circuit Diagram
8. Solid Diagram and Name of Spare Parts
9. Transportation and Storage
10. Cleaning and Maintenance
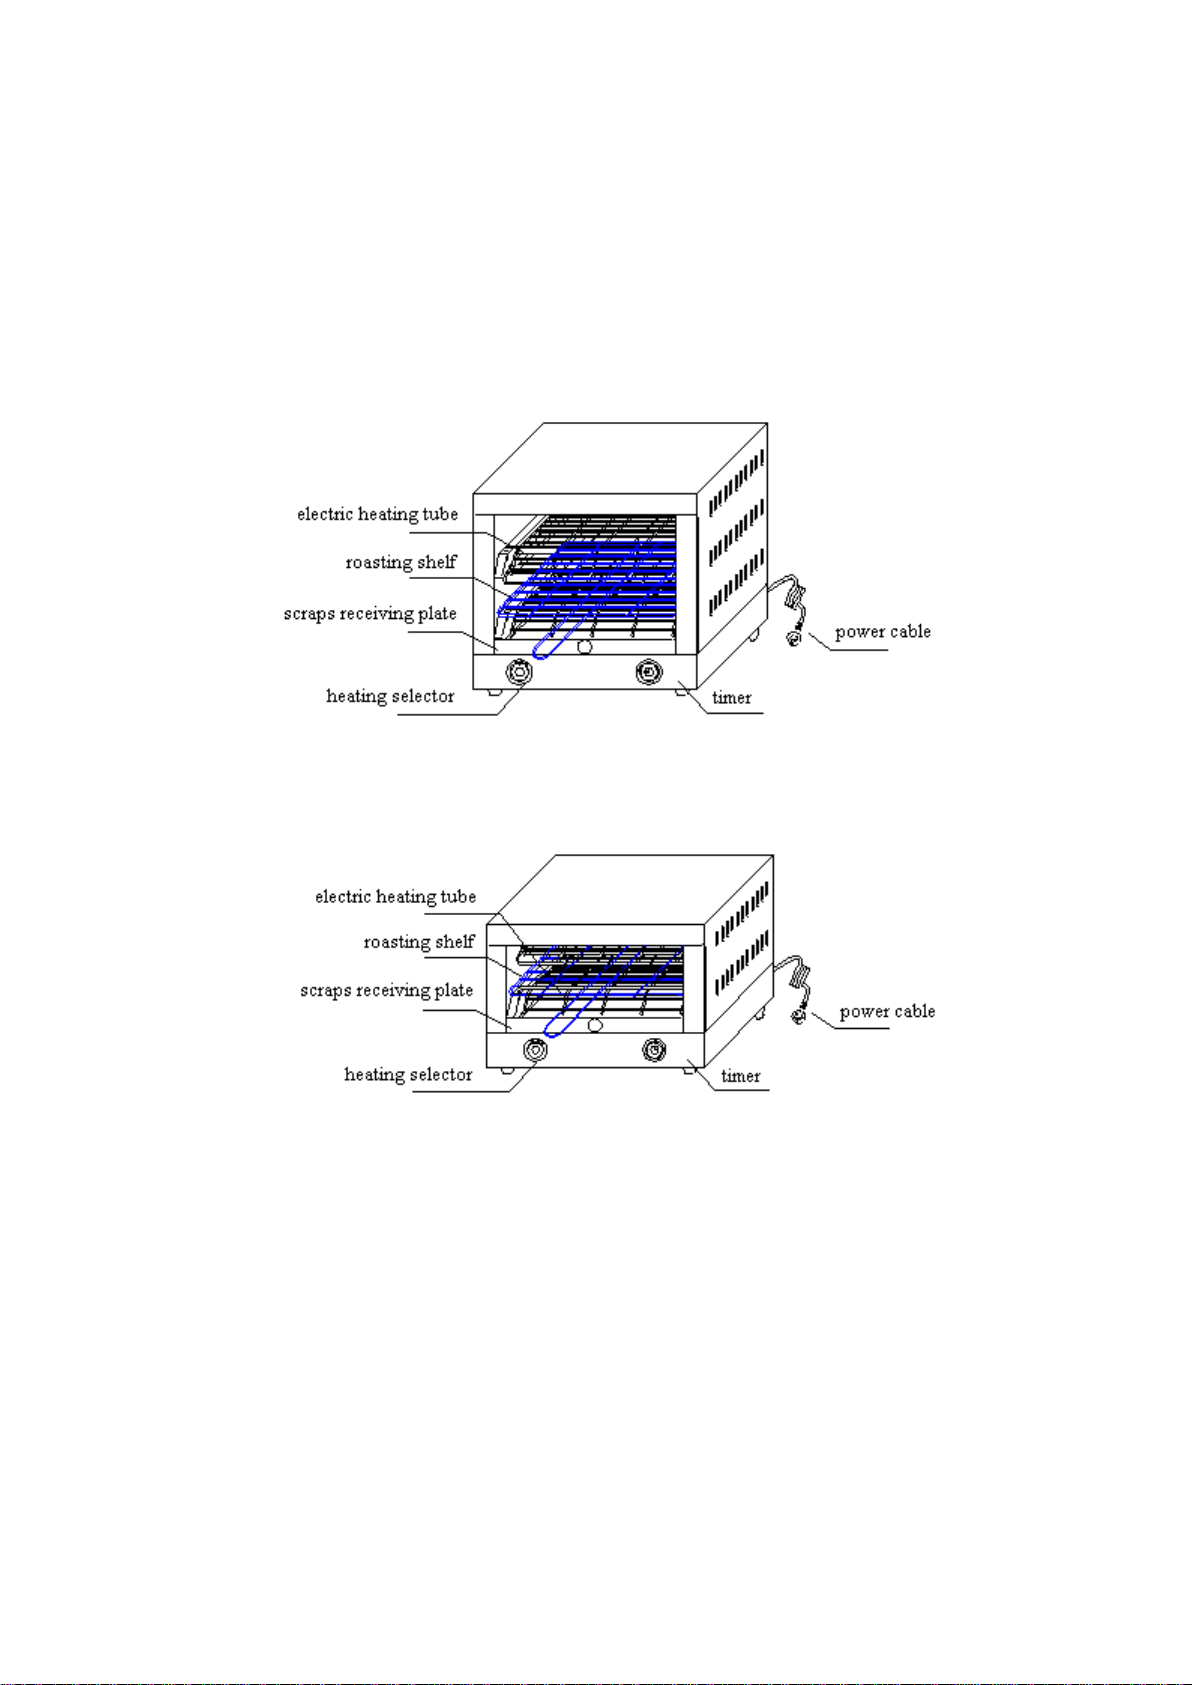
1. Product Structure and Accessories
1.1 Product Structure
2. Parameter, Function and Purpose
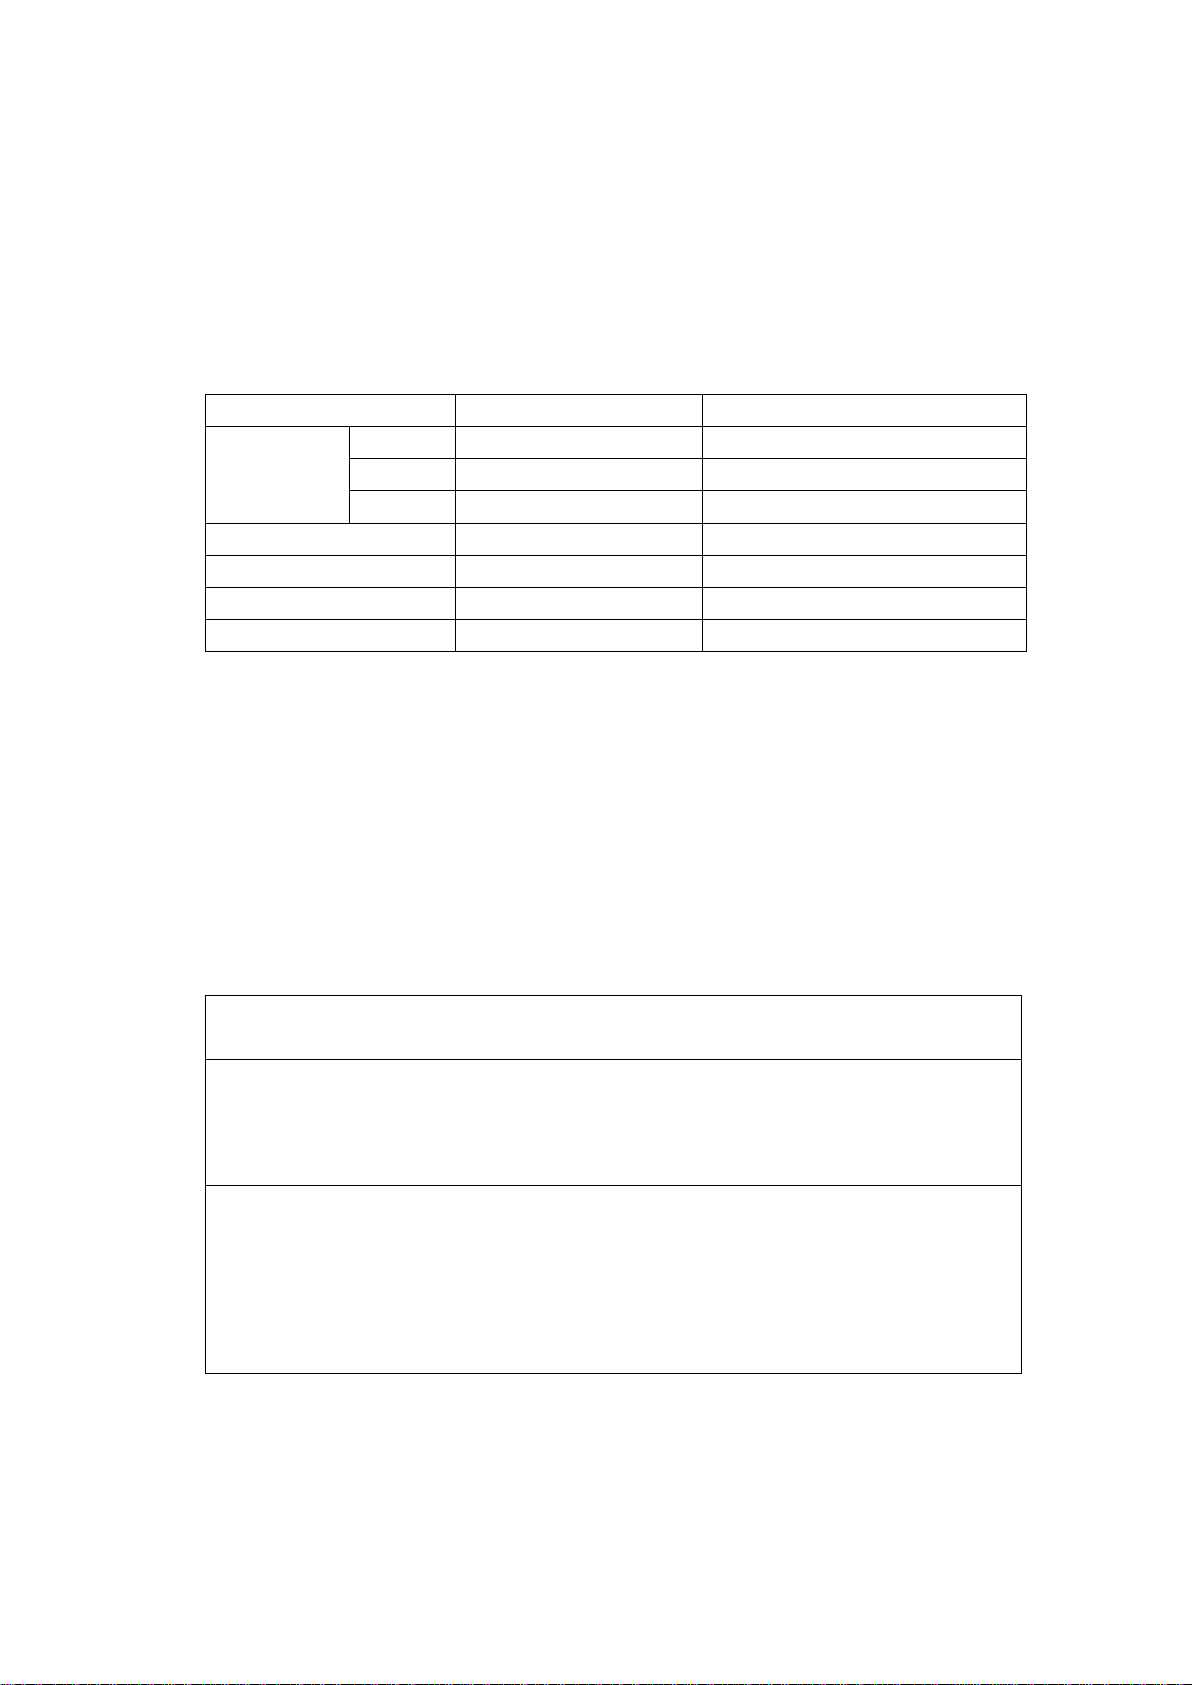
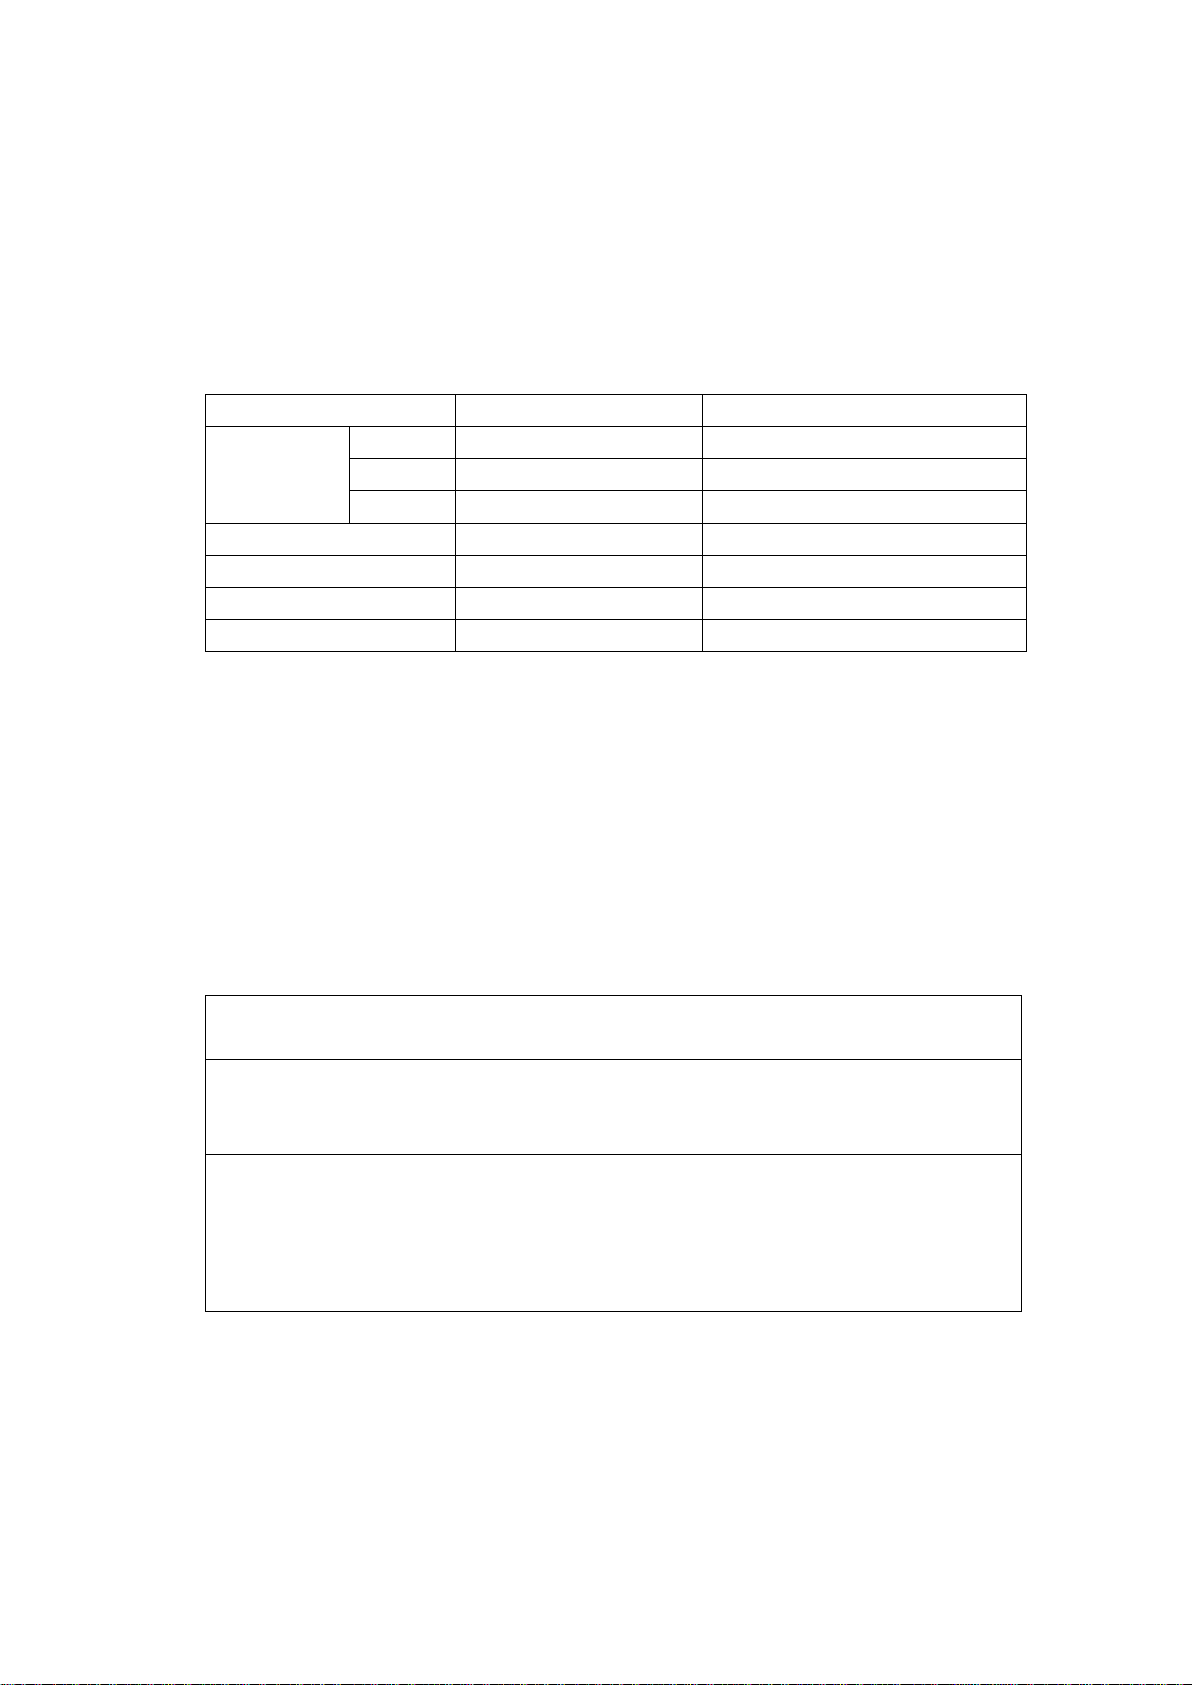
2.1. Product Parameter and Function
Model
TST6
TST3
Dimension
Width
440mm
440mm
Depth
300mm
300mm
Height
400mm
290mm
Power Supply
220~240V 50/60Hz
220~240V 50/60Hz
Power
3kW
1.7kW
Stand
Rubber Stand
Rubber Stand
Weight
9.8kg
7.4kg
2.2. Purpose
This equipment can be used in supermarket, western restaurant, and family and
bar, etc.
3. Precautions
3.1. Special Precautions
Warning
Do not shake and lean the product while using it. Do not try to dismantle or refit
or serious accident may occur. Turn off the power after using. When operating
scraps receiving tray, user should use heat insulation glove to touch handle.
Do not open the chamber of this product. This product contains high voltage
circuit, electric shot may occur for any disassembly. Do not spray water direct on
the product while cleaning. Water can conduct electricity and it will lead to
electric shock for creepage. Do not flap or put any heavy things on the product.
Any deviant operation will damage the machine and cause danger.

3.2. Turn off the Power after Using
When not using this product, turn the timer at reverse direction to the off
position and the switch to off position. Then disconnect the plug and cut off the
power.
4. Procedures of Operation
4.1. Put the oven on a level fixed table and adjust timer and heating selector to off
position.
4.2. Put food on the shelf for toasting.
4.3. Plug the power cable to the specific electrical outlet of AC 230V. Set the timer to
the certain time and adjust heating selector to choice upper fire heating, lower
fire heating or both fire heating.
5. Installation
5.1. Precaution before Installation
6. The position for installation should be level and fixed.
7. Do not put flammable object near the position for installation.
8. The temperature of environment should be under 45℃.
9. The relative humidity of environment should be less than 80%.
10. Check if all the accessories are ready.
11. Check whether the appearance is damaged.
5.2. Power installation
Warning
! Do not use other power beyond the one indicated.
! Do not use the air switch and creepage switch that do not meet the standard of
safety.
! Circuit installation and maintenance must be done by authorized professionals.
(1) Air switch, creepage switch, fuse and power outlet must be installed near the
product.
(2) This product must be grounded.
(3) The plug and outlet should be well connected without getting loose.
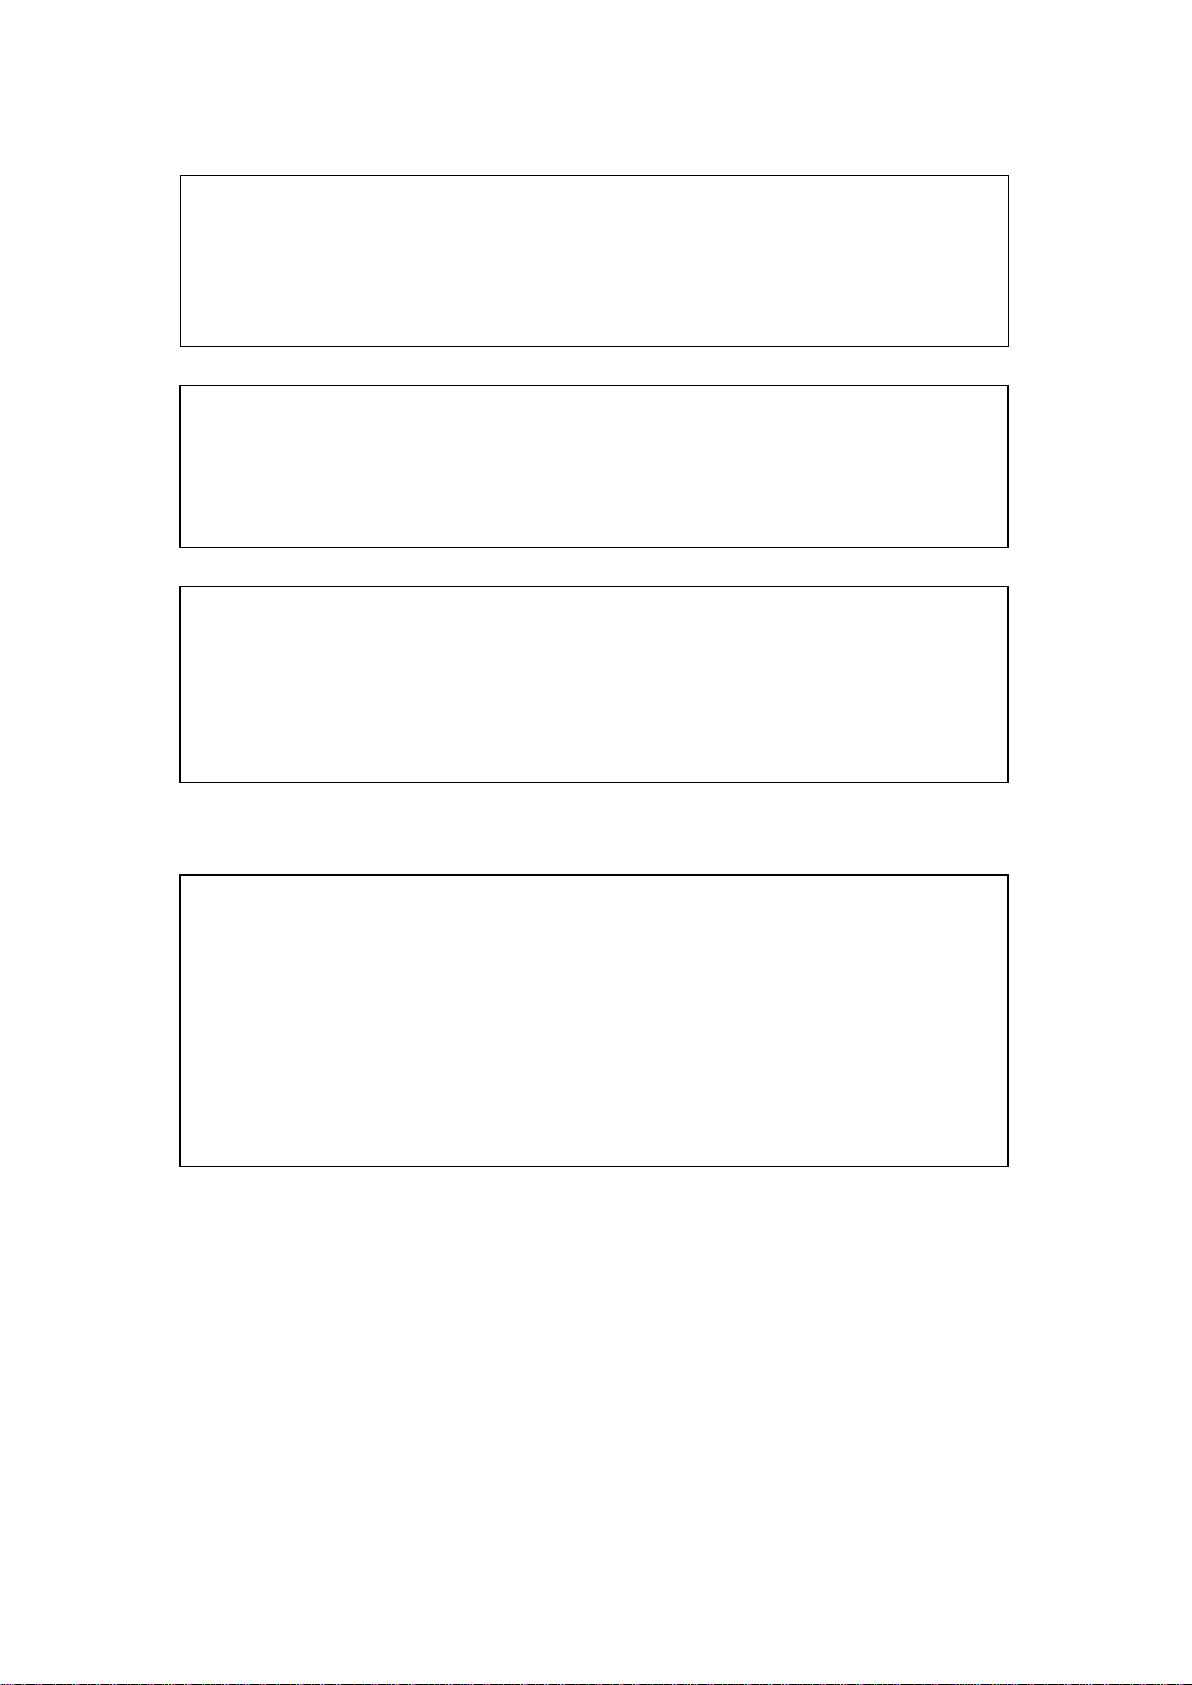
6. Daily check and trouble shooting
Trouble
Check
Heating
If power is well connected?
If there is power supply for the network?
If heating tube is broken?
The above content is just for reference. If any trouble occurs, stop using this product
and inform the professionals for checking at once!
7. Circuit Diagram
8. Solid Diagram and Name of Spare Parts
12
1
8
5
2
4
10
9
11
17
18
13
19
14 15 16
5
0
10
15
67
3
5
9
10
11
8
15 5
10
0
17
18
19
14
13
LN
E
12
16
2
4
1
3
67
15

Spare’s Name List
B
NO
Name of Spares
1
Rubber Stand
2
Bottom Plate
3
Ceramic Amphenol Connector
4
Installation Plate for bottom plate
5
Scraps Receiving Plate
6
Switch
7
Timer
8
Shell
9
Protecting shelf for heating tube (A)
10
Roasting shelf
11
Protecting shelf for heating tube (B)
12
Insulated Ceramic
13
Sheath of power cable
14
Power cable
15
Installation Plate for Electric Heating Tube
16
Quartz heating tube
17
Top plate
18
Installation Plate for top plate
19
Top and side board
9. Transportation and Storage
During transportation, the machine should be careful handled and prevent from
shaking. The packaged machine should not be stored in the open air. It should be put
in a ventilated warehouse without corrosive gas. It should not be put upside down. If
it needs to be stored in open air temporary, measurement against raining in needed.
10. Cleaning and Maintenance
1. Cut off all the power when cleaning and maintaining the equipment in case of
accident.
11. After finishing working, use wet towel with non-corrosive cleanser to clean
the surface of oven, chamber and the surface of power cable. Please use dry
towel to clean the control switch and timer. Do not use water to clean the
machine directly in case of damaging electric function.

Vorsichtig:
Bitte lesen Sie die Installations-, Betriebs- und Wartungsanweisungen sorgfältig durch,
bevor Sie dieses Gerät installieren.
Zu Ihrer Sicherheit
Lagern Sie kein Benzin oder andere entflammbare Flüssigkeiten in der Nähe dieses
oder anderer Geräte.
WARNUNG: Brandgefahr
Der Bereich, in dem das Gerät installiert ist, muss frei von brennbaren und
entflammbaren Materialien gehalten werden. Dazu gehören Lumpen, Fett,
Geschenkpapier und elektrische Kabel.
Anweisungen zur elektrischen Erdung
Dieses Gerät ist zum Schutz vor Stromschlaggefahr mit einem dreipoligen (geerdeten)
Stecker ausgestattet und muss direkt in eine ordnungsgemäß geerdete dreipolige
Steckdose eingesteckt werden. Schneiden oder entfernen Sie den Erdungszapfen
nicht von diesem Stecker. Für Geräte, deren Eingangsleistung viel größer ist und
einen bestimmten Wert überschreitet, wird kein Stecker verwendet. Aber die Einheit
muss sicher geerdet sein.
Hinweis
Dieses Gerät ist nur für die Verwendung an nicht brennbaren Orten vorgesehen.
Installieren Sie das Gerät auf einer festen, flachen, nicht brennbaren Oberfläche.
Für die Wartung müssen Sie einen Freiraum von 15 cm von der Rückseite des Geräts
zur Wand einhalten.
Vielen Dank für den Kauf und die Nutzung unseres TOASTERs. Dieses Produkt mit
seinem einzigartigen Design ist aus hochwertigem Edelstahl gefertigt. Um die
Funktionen dieses Produkts voll auszuschöpfen und unnötige Verluste und Schäden
zu minimieren, lesen Sie bitte das Handbuch sorgfältig durch und bewahren Sie es
zum späteren Nachschlagen auf.

Bitte seien Sie vorsichtig:
Jede Nachjustierung und falsche Installation, Einstellung und Wartung kann zu
Leckagen und Unfällen führen. Bitte setzen Sie sich mit dem Lieferanten in
Verbindung, wenn eine Einstellung oder Wartung erforderlich ist und alle diese
Arbeiten von autorisiertem Fachpersonal durchgeführt werden müssen.
Legen Sie zu Ihrer Sicherheit keine entflammbaren Flüssigkeiten, Gase oder andere
entflammbare Gegenstände um das Produkt herum.
Wenn das Netzkabel beschädigt ist, muss es sofort durch den Hersteller oder seinen
Kundendienst oder eine ähnlich qualifizierte Person ersetzt werden, um Gefahren zu
vermeiden.
This manual suits for next models
1
Table of contents
Languages:


